Installation Manual. TriPac. Auxiliary Heating and Cooling Temperature Management System. TK IM (Rev. 13, 01/12)
|
|
|
- Charlotte Fox
- 6 years ago
- Views:
Transcription
1 Installation Manual TriPac Auxiliary Heating and Cooling Temperature Management System TK IM (Rev. 13, 01/12)
2 Installation Manual TriPac Auxiliary Heating and Cooling Temperature Management System TK IM (Rev. 13, 01/12) Copyright 2005 Thermo King Corp., Minneapolis, MN, U.S.A. Printed in U.S.A.
3 Release History TriPac Installation Manual Released 08/05 Released manual Rev. 1 08/05 Rewrote procedures for bleeding air from APU coolant system. Rev. 2 09/05 Added APU nut retainer, changed heater mounting hole to 4-1/4, added details on 7CLB wire connections, revised coolant hose valve and fittings and added Service Bulletin information on evaporator fan wiring. Text changes to page 3, 6, 14, 16, 22, 24, 26, 46, 52, 66 and 68. Rev. 3 02/06 Added four-step tightening procedures for APU mounting bolts, pages 9, 16-17, changed heater location, page 15, added note to drill a 1/8 hole in exhaust hose for drainage, page 30, 38, added heater return air duct information, pages 32-33, 40-41, added D4 heater information, pages 34-41, changed text and art regarding the routing of the battery harness, pages 58,5 9, added new standby harnesses, pages 62-65, added new fuel tank pickup tube adapter plate, pages 66-67, added note about bleeding air from the system, pages 72, 74, added note on installing the new relocated arctic block temperature sensor, pages 73-75, changed text and art regarding moving the heater s battery negative wire to the control box grounding stud, pages and 83, added new arctic block temperature sensor/fan control switch, pages 76-77, changed text to include position of mounting bolts, page 91, removed wiring diagram, page 92. Rev. 4 06/06 Revised art and text to reflect new cover on APU, new evap drain valve and clamp, new Rev.1.0 Interface board and procedures on Arctic switch installation, Standby harness w/switch and heater electrical connections. Rev. 5 10/06 Revised art and text showing new electrical connectors pages 19, 21, 61, 79, new heater plate pages 27, 29, 35, 37, new A/C duct page 43, new compressor fittings pages 51, 53, 87, 91, new control board mounting hardware pages 55, 63, 81, new fuel pickup tube w/compression fittings pages 67, 69, and 73. Rev. 6 06/07 Revised art and text to show new revision 1.5 interface board. Rev. 7 05/08 Revised art and text to show new evaporator and condenser. Rev. 8 12/08 Added APU, Condenser and Evaporator dimensions pages 13-16, added torque specifications for A/C hose fittings page 54, revised art and text for new wiring harnesses with factory installed connectors on pages 58,59, 64-69, and added multiple battery connection information on pages 84 and 85. Rev. 9 05/09 Revised TriPac Component Diagrams on pages showing APU s equipped with either Tractor Coolant Integration or Closed Loop Cooling. Added new coolant bleeding procedures for the Closed Loop Cooling option on page 94. Rev /10 Added heater fuel pump tank bracket information pages 76-77, and main fuse and holder pages Rev /11 Revised Arctic Switch instructions on page and main fuse installation instructions on pages Rev /11 Updated the Safety section by including Battery Installation and Cable Routing warnings on page 7. Rev /12 Updated manual with new control box assembly, new main harness, new evaporator harness and new heater harness. 2
4 Introduction This manual was written to assist with the installation of the Thermo King TriPac Auxiliary Heating and Cooling System onto a typical semi tractor. While it is not intended to be specific to a particular vehicle, the information in this manual will provide the installer with details to correctly and safely install each of the TriPac components. Before beginning the installation, the installer should confirm with the customer the location for each of the TriPac components by using the TriPac Installation Questionnaire. The customer should also be made aware of any modifications to existing equipment that may be necessary to complete the installation. Modifications may include: OEM components on the chassis may need to be relocated to accommodate the installation of the TriPac APU. Fuel tank may need to be changed to a smaller size. TriPac components will be mounted onto the outside of the sleeper. Existing storage space under the bunk will be utilized by TriPac components. Heating and A/C duct work will be routed and vents will be installed in existing closets or storage compartments. Due to its complexity, you should not attempt this installation unless you: are an experienced mechanic. can safely lift 75 lbs. (34 kilos). are EPA Section 609 certified and trained in the repair and maintenance of diesel powered refrigeration systems. have a basic understanding of electricity and electrical wiring. have the necessary tools and equipment to complete the installation. This manual is published for informational purposes only. Thermo King makes no representations warranties express or implied, with respect to the information recommendations and descriptions contained herein. Information provided should not be regarded as all-inclusive or covering all contingencies. If further information is required, Thermo King Corporation Service Department should be consulted. Thermo King s warranty shall not apply to any equipment which has been so installed, maintained, repaired or altered as, in the manufacturer s judgment, to affect its integrity. Manufacturer shall have no liability to any person or entity for any personal injury, property damage or any other direct, indirect, special, or consequential damages whatsoever, arising out of the use of this manual or any information, recommendations or descriptions contained herein. 3
5 Table of Contents Safety Precautions Heater Safety Precautions Tips for a Successful Installation TriPac APU Dimensions TriPac Condenser Dimensions TriPac Evaporator Dimensions TriPac Control Box Dimensions Required Tools and Additional Supplies Typical Component Locations TriPac Component Diagram TriPac APU Installation A/C Condenser Installation A/C Receiver Drier Installation A/C Evaporator Installation D2 Heater Installation D2 Heater Duct Installation D4 High Output Heater Installation (Option) D4 High Output Heater Duct Installation (Option) A/C Duct Installation Fabricating Refrigeration Hoses A/C Hose Installation A/C System Evacuation and Leak Check Procedures Control Box and Main Harness Installation HMI Controller Installation Heater Wiring Installation A/C Wiring Installation Standby Truck Integration Harness with Switch (Option) Standby Truck Integration Harness without Switch (Option) Fuel Pickup Tube Installation Heater Fuel Pump and Fuel Line Installation TriPac APU Fuel Line Installation Tractor Coolant Hose Installation Arctic Switch (Option) Heater Fuel Pump Connections Fuse Holder and APU Battery Connections Priming the Heater Fuel Pump Heater Start-Up Procedures A/C System Charging and APU Engine Start-up Procedures TriPac System Run-In Procedures System Check List
6 Safety Precautions Caution SEVERE DIESEL ENGINE DAMAGE will result from operating the TriPac APU unit before completing the installation which includes: adding engine oil, installing fuel pump, fuel lines, coolant hoses, adding the correct type antifreeze and bleeding air from coolant lines. SEVERE COMPRESSOR DAMAGE will result from operating the A/C system before completing the installation which includes: installing the condenser, evaporator, receiver drier, connecting the refrigeration lines, leak testing, evacuation, clean-up, and charging the system with the correct type and amount of refrigerant. Recover Refrigerant At Thermo King, we recognize the need to preserve the environment and limit the potential harm to the ozone layer that can result from allowing refrigerant to escape into the atmosphere. We strictly adhere to a policy that promotes the recovery and limits the loss of refrigerant into the atmosphere. 5
7 Safety Precautions The symbol appears next to a point that is particularly important: DANGER: Addresses a circumstance that, if encountered, will lead to death or serious injury WARNING: Addresses a circumstance that, if encountered, might lead to death or serious injury. CAUTION: Addresses a circumstance that, if encountered, may cause damage to equipment or minor injury. DANGER: When the APU is installed behind tractor fairings, skirting, etc., the exhaust outlet must be routed out to an open area to prevent exhaust fumes from entering the passenger compartment which could result in in carbon monoxide poisoning or death by asphyxiation. DANGER: Never apply heat to a sealed refrigeration system or container because it could explode, causing death or serious injury DANGER: Fluorocarbon refrigerants, in the presence of an open flame or electrical short, produce toxic gases that are severe respiratory irritants capable of causing death. DANGER: Be careful when working with a refrigerant or refrigeration system in any enclosed or confined area with a limited air supply (i.e., a trailer, container or the hold of a ship). Refrigerant tends to displace air and can cause oxygen depletion which may result in death by suffocation. WARNING: Always wear goggles or safety glasses. Refrigerant liquid, refrigeration oil, and battery acid can permanently damage the eyes (see First Aid under Refrigeration Oil). WARNING: Keep your hands away from fans and belts when the unit is running. WARNING: Make sure all mounting bolts are tight and are of correct length for their particular application WARNING: Never drill holes into the unit. Holes drilled into the unit may weaken structural components. Holes drilled into electrical wiring can cause fire or explosion. WARNING: When using ladders to install or service refrigeration systems, always observe the ladder manufacturer s safety labels and warnings. A work platform is the recommended method for installations. WARNING: Exposed coil fins are very sharp and can cause painful lacerations. 6
8 Safety Precautions Battery Cable Installation and Routing WARNING: Improperly installed battery cables could result in fire or explosion! Battery cables must be installed, routed and secured properly to prevent them from rubbing, chaffing or making contact with hot, sharp or rotating components. WARNING: Do not attach fuel lines or any additional wiring harnesses to the battery cables as this could cause an electrical fire! CAUTION: Do not connect other manufacturer s equipment or accessories to the Thermo King unit. This could result in severe damage to equipment and void the warranty! CAUTION: Set all unit electrical controls to the OFF position before connecting battery cables to the battery to prevent unit from starting unexpectedly and causing personal injury. CAUTION: Always wear protective clothing, gloves and eye wear when handling and installing batteries. Battery acid can cause serious burns when exposed to eyes or skin. If battery acid contacts skin or clothing, wash immediately with soap and water. If acid enters your eye, immediately flood it with running cold water for at least twenty minutes and get medical attention immediately. Refrigerant First Aid FROST BITE: In the event of frost bite, the objectives of First Aid are to protect the frozen area from further injury, to warm the affected area rapidly and to maintain respiration. EYES: For contact with liquid, immediately flush eyes with large amounts of water and get prompt medical attention. SKIN: Flush area with large amounts of lukewarm water. Do not apply heat. Remove contaminated clothing and shoes. Wrap burns with dry, sterile, bulky dressing to protect from infection/injury. Get medical attention. Wash contaminated clothing before reuse. INHALATION: Move victim to fresh air and use CPR or mouth-to-mouth ventilation, if necessary. Stay with victim until arrival of emergency medical personnel. Refrigeration Oil First Aid WARNING: Although fluorocarbon refrigerants are classified as safe refrigerants, certain precautions must be observed when handling them or servicing a unit in which they are used. When released to the atmosphere in the liquid state, fluorocarbon refrigerants evaporate rapidly, freezing anything they contact. WARNING: Avoid refrigeration oil contact with the eyes. Avoid prolonged or repeated contact of refrigeration oil with skin or clothing. Wash thoroughly after handling refrigeration oil to prevent irritation. NOTE: In case of eye contact, immediately flush with plenty of water for at least 15 minutes. CALL A PHYSICIAN. Wash skin with soap and water. 7
9 Heater Safety Precautions IMPORTANT: Correct installation of this heater is necessary to ensure safe and proper operation. BEFORE installing the heater, thoroughly read and understand this manual and the heater manufacturer s manuals included with the heater. DANGER: EXPLOSION HAZARD or FIRE HAZZARD! Failure to follow these instruction could cause a explosion or fire resulting in serious or fatal injury! Heater must be turned off while re-fueling. Install heater so it will maintain a minimum distance of 2 from any flammable or heat sensitive material. Install the exhaust system so it will maintain a minimum distance of 2 from any flammable or heat sensitive material. Stored items in may shift while vehicle is in operation and should be secured adequately to prevent contact with the heater. Use a protective air intake grille on the air inlet side of the heater to prevent objects from being sucked in. The heater must only be operated when the maintenance flap is closed and the outlet hood is mounted in position. Do not install heater in enclosed areas where combustible fumes may be present. Do not store or transport combustibles (road flares, starting fluids, fuel containers, oil cans, spray cans, gas cartridges, fire extinguishers, cleaning rags, clothing, paper, etc.) in the same compartment as the heater. Ensure that the fuel system is intact and there are no leaks. Do not route electrical wires, harness or battery cables together with fuel lines. DANGER: ASPHYXIATION HAZARD! Failure to follow these instructions could cause oxygen depletion resulting in serious or fatal injury! Route the heater exhaust so that exhaust fumes can not enter into the passenger compartments. Ensure an air tight seal will be maintained between the heater and mounting surface and at any exhaust connection points. Ensure that heating air supply is taken from an area where poisonous gases will not be present. When the heater is installed in a enclosed compartment separate from the evaporator, a inlet for return air must be installed to provide the heater with a fresh air supply. If running exhaust components through an enclosed compartment, ensure that it is vented to the outside. The enclosed compartment must be free of any holes, cracks or rusted out areas to prevent fumes from entering into the passenger compartment. The heater must be installed flush with the floor pan (i.e. sheet metal, fiberglass, etc.) to ensure proper sealing of the mounting plate and gasket. The heater must not be operated in closed areas such as garages, buildings, warehouses, etc. Do not inhale exhaust fumes. CAUTION: Disconnect the heater harness at the battery before welding on the truck chassis to prevent damage to the electronic HMI controller. 8
10 Tips for a Successful Installation BEFORE BEGINNING THE INSTALLATION Read this manual to understand where components are to be located and how they are to be installed. Review the TriPac component drawings for important minimum/maximum dimensions and clearances that must be taken into consideration when installing these components. Verify tools and special equipment required for the installation are available and in good working condition. Open all TriPac kits and inspect contents before beginning installation. Review component location diagram and discuss with the customer where the TriPac components will be installed. It is recommended that one person performs the installation of all the components outside the sleeper while a second person installs all the components inside the sleeper. This will help minimize damage to the sleeper s interior from grease, dirt, etc. APU INSTALLATION DANGER: When the APU is installed behind fairings, skirting, etc., the exhaust outlet must be routed to an open area to prevent exhaust fumes from entering the passenger compartment which could result in carbon monoxide poisoning or death by asphyxiation. DO NOT weld on any part of the tractor s frame or drill holes in the top or bottom flanges. Serious structural damage could occur. Consult your chassis manufacturer for further information. The APU is designed to be mounted only to the existing frame rails. NO OTHER MOUNTING IS ACCEPTABLE! Determine the best location for installing the APU on the existing chassis frame rail. Safely relocate any components on the chassis frame rail that interfere with the installation of the APU. Check clearance around APU before installing. The use of a motorcycle/atv lift or modified floor jack to raise APU into position is recommended. Only the supplied spacer blocks and mounting claws must be used to install the APU to the chassis frame rail. If different mounting bolts are used they must be Grade 5 and of the correct length. DO NOT cut off excessive length bolts. Verify the upper and lower APU mounting bolts are flush with the chassis frame rail before tightening. The mounting hardware securing the APU to the tractor s frame must be correctly positioned and torqued using the four-step tightening sequence described in the TriPac APU Installation on page 22. All APU covers, guards or removable panels must be in place and installed securely while operating the system. A/C CONDENSER COIL INSTALLATION Always keep A/C system fittings capped and sealed until the installation of the refrigeration hoses. Determine the best location to mount the condenser onto the exterior of the sleeper. Verify all measurements before drilling any mounting holes. Verify there is no interference with any OEM electrical wiring, internal supports, etc. before drilling mounting holes. Confirm the condenser location does not interfere with the service or operation of existing tractor components. Provide protection to the tractor s finish to prevent damage during the installation process. Use the stainless steel mounting hardware (supplied in the kit) to mount the condenser coil. Use the large fender washers (supplied in kit) inside the sleeper to provide additional support. All mounting holes must be sealed with silicone caulking to prevent moisture or fumes from entering the sleeper. 9
11 Tips for a Successful Installation A/C EVAPORATOR INSTALLATION Always keep A/C system fittings capped and sealed until the installation of the refrigeration hoses. Determine the best location for the A/C evaporator inside the sleeper, typically under the bunk. Verify there is no interference with any OEM electrical wiring, internal supports, etc. before drilling any mounting holes. The evaporator should be mounted directly onto the floor mat inside the sleeper by using the supplied template to locate the drain and mounting holes. Always install the drain valves (kazoos) onto evaporator drain tubes securely with hose clamps. The A/C vents should be located and installed to provide maximum air circulation in the sleeper such as: LOW (floor level), MEDIUM (above lower bunk level) or HIGH (above upper bunk level). All mounting holes must be sealed with silicone caulk to prevent moisture or exhaust fumes from entering the sleeper. All edges of access holes made in fiberglass and wood composite floors must be sealed correctly with fiberglass cloth and resin. HEATER INSTALLATION Determine the best location of the heater inside the sleeper, typically under the bunk. Allow clearance for dismantling for service. Install heater so it will maintain a minimum distance of 2.00 inches (50.8 mm) from any heat sensitive or flammable material. Heater must be mounted on a flat horizontal surface. Heater must be installed flush with the floor pan (i.e. sheet metal, fiberglass, etc.) to ensure proper sealing of the mounting plate and gasket. All edges of access holes made in fiberglass and wood composite floors must be sealed correctly with fiberglass cloth and resin. Outside air intake and exhaust hoses must be installed correctly for the heater to operate safely. Exhaust hose should be mounted slightly downwards to help drain off condensation. Install exhaust hose so it will maintain a minimum distance of 2.00 inches (50.8 mm) from any heat sensitive or flammable material. Inside air inlet and outlet ducts must be installed correctly for the heater to operate safely: Pulse fuel pump must be installed at a 15 to 35 degree angle from horizontal to operate correctly. Fuel pickup tube must be installed correctly in the fuel tank or the heater will not operate. Fuel line from the pickup tube to the fuel pump to the heater should be routed at a continuous rise. Use a hose cutter or sharp knife to cut plastic fuel lines. Do not use a wire cutter as this will pinch the plastic fuel line closed. Do not route electrical wires, harness or battery cables together with fuel lines. BEFORE operating the heater, the fuel lines must be bled of air using the Heater Priming Harness ( ) or damage to the fuel pump will result. The Diagnostic Code Reader ( ) must be used to setup and operate the heater in the run-in mode. 10
12 Tips for a Successful Installation A/C HOSE CONNECTIONS AND ROUTING Always keep A/C system fittings capped and sealed until the installation of the refrigeration hoses. Only cut refrigerant hoses with the correct hose cutting tool ( ). NEVER USE A SAW! Always use the correct hose fitting tool ( ) when assembling refrigeration hoses. Always lubricate hose fittings with PAG 100 refrigerant oil ( ) when assembling to refrigeration hoses. Always install and lubricate O-rings with PAG 100 refrigerant oil ( ) when connecting refrigeration hose fittings to component connection fittings. Refrigeration hoses should be installed onto components in such a way as to allow for vibration and movement of the cab. THEY SHOULD NEVER BE STRETCHED TIGHT! All refrigeration connections should be tightened securely using two wrenches. Always keep refrigeration hoses from rubbing or chafing against sharp metal objects, rotating components or hot components. Protective covers or sleeving (installer supplied) for the refrigeration hoses may be required depending on the installation. Always install the condenser s receiver drier in the direction indicated by the arrow. Thermo King Evacuation Station ( ) and Evacuation Station Operation and Field Application Instructions (TK-40612) are recommended. The oil in the evacuation station vacuum pump should be changed after each use. The A/C system must be leak free. Check for leaks by using an electronic leak detector. The A/C system will be charged with 1.2 to 2.0 bs. (depending on hose lengths) of R134a. COOLANT HOSE CONNECTIONS AND ROUTING The following steps are for APU s equipped with Tractor Coolant Integration only. Coolant hoses should be routed from the APU to the tractor s engine without any sharp bends or kinks. Coolant hoses should be installed and routed in such a way as to allow for vibration and movement. THEY SHOULD NEVER BE STRETCHED TIGHT! Coolant hoses should be protected with supplied plastic sleeving and adequately secured to the chassis with clamps and band wraps. Always keep coolant hoses from rubbing or chafing against sharp metal objects, rotating components or hot objects. All coolant pipe fittings installed should be of proper material type, (i.e: brass to brass, or copper to copper). All coolant fittings should be assembled using pipe thread sealer to prevent leaks. Ball type shutoff valves (supplied) should be installed to allow the TriPac cooling system to be closed off and isolated from the tractor s engine cooling system. Shutoff valves and fittings must be adequately supported to prevent cracks or leaks from vibration. Closed Loop Cooling Do not start the APU s engine without first adding coolant and bleeding all air from the system. 11
13 Tips for a Successful Installation ELECTRICAL WIRING AND HMI CONTROLLER INSTALLATION Electrical wiring should be installed and routed in such a way as to allow for vibration and movement of the cab. THEY SHOULD NEVER BE STRETCHED TIGHT! Always keep electrical wiring from rubbing or chafing against sharp metal objects, rotating components or hot objects. All electrical wiring should be neatly routed and secured with band wraps or clamps. Do not route electrical wires, harness or battery cables together with fuel lines. Excess length of battery cables should be cut off to reduce voltage drop. Superlube ( ) or equivalent should be applied to all electrical connections. All main power and ground accessory connections must be installed directly on top of the tractor s battery terminal posts and tightened securely. DO NOT INSTALL UNDER OEM BATTERY CABLES! The HMI controller must be grounded to the control box to prevent damage from static discharge. The HMI sensor bulb should be installed in the tractor s sleeper typically 36 above bunk surface, accessible and visible from the drivers bunk. The HMI sensor bulb should be visible and mounted away from windows, air vents, out of direct sunlight and not touching anything to accurately measure air temperature. DO NOT CUT THE SENSOR HARNESS! 12
14 TriPac APU Dimensions NOTE: Dimensions are shown in inches. 13
15 TriPac APU Dimensions NOTE: Dimensions are shown in inches. 14
16 TriPac Condenser Dimensions NOTE: Dimensions are shown in inches. 15
17 TriPac Evaporator Dimensions NOTE: Dimensions are shown in inches. 16
18 TriPac Control Box Dimensions NOTE: Dimensions are shown in inches. 17
19 Required Tools and Additional Supplies Tools 1. Typical Mechanics Tools 2. Floor Jack or Motorcycle/ATV Lift 3. Drill Motor 4. Drill Bit Set 5. 7/8 dia. or 1 Step Reamer (for evaporator drain and controller holes) 6. Hole Saws 1-1/4 dia. (for fuel tank pickup tube) 2-1/2 dia. (for heater outlet louver) 3 dia. (access hole for evaporator hoses and electrical wiring) 4-1/4 dia. (mounting A/C louvers, routing A/C ducts through bulkheads and heater mounting hole) 7. Reciprocating Saw (return air opening) 8. 1/2 Drive Torque Wrench 9. Level 10. Tape Measure 11. Utility Knife 12. Caulk Gun 13. Tubing Cutter (for cutting fuel pickup tubes) 14. Strobe Light/Tachometer ( ) 15. Digital Meter ( ) 16. Leak Detector ( ) 17. Hose Fitting Tool ( ) 18. Hose Cutting Tool ( ) 19. Heater Priming Harness ( ) 20. Heater Diagnostic Tool ( ) 21. Shop Vacuum Supplies (As Required) 1. 1/2 Brass Fittings (for coolant lines) 45 degree elbow, MPT x FPT 90 degree elbow, MPT x FPT Tee, FPT x FPT x FPT Hose Fitting, 1/2 NPT to 3/4 Hose Closed Nipple, 1/2 NPT 2. Teflon Pipe Thread Tape (for coolant fittings) 3. Antifreeze, up to 2 gallons (must be the correct type to match original) 4. RTV Silicone 5. Sealing Putty ( ) 6. PAG Refrigerant Oil ( ) 7. Refrigerant 134A. 8. Return air wall louver aprox. 6 x 10 (when needed) 9. Shrink Tubing 0.51 to 0.16 w/adhesive (for battery cable terminals) 10. Mounting Clamps #24 and #32 (to secure cables and hoses) 11. Band wraps (assorted sizes and lengths) 12. Upholstery Cleaner (aprox. 2 cans) 13. Cardboard or blankets (to protect interior) 14. Fiberglass Repair Kit (only used for fiberglass and wood composite floors) 18
 5. TriPac APU 3. Heater 6.")
20 Typical Component Locations NOTE: Component Locations Will Vary With Sleeper Design TRIPAC COMPONENTS 1. A/C Evaporator 4. Control Box 2. Return Air Grille (Installer Supplied) 5. TriPac APU 3. Heater 6. A/C Condenser 19

21 TriPac Component Diagram APU s Equipped with Tractor Coolant Integration Sleeper 1. APU with Tractor Coolant Integration 5. HMI Controller 9. Heater s Fuel Pump 2. A/C Condenser 6. Heater 10. Fuel Supply and Return Lines 3. A/C Receiver Drier 7. Heater s Exhaust Tube 11. Coolant Supply and Return Hoses 4. A/C Evaporator 8. Heater s Intake Tube 12. Tractor s Heater Core 20

22 TriPac Component Diagram APU s Equipped with Closed Loop Cooling Sleeper Closed Loop Cooling Expansion Tank 1. APU with Closed Loop Cooling 5. HMI Controller 9. Heater s Fuel Pump 2. A/C Condenser 6. Heater 10. Fuel Supply and Return Lines 3. A/C Receiver Drier 7. Heater s Exhaust Tube 4. A/C Evaporator 8. Heater s Intake Tube 21
23 TriPac APU Installation STANDARD INSTALLATION METHOD - MOUNTING CLAWS Installation Special Tools Required Modified Floor Jack or Motorcycle/ATV Lift 1/2 Drive Torque Wrench 1. Remove the top cover of the TriPac APU to access and remove the mounting hardware that secures the APU to the shipping crate. 2. It is recommended that a modified floor jack or motorcycle/atv lift be used to install the APU. Protection such as cardboard, shop rags, etc. should be used under the APU to prevent damage during installation. 3. Raise the APU into position. From outside the APU, insert the 3/4 in. mounting bolts and washers through the mounting claws and spacer blocks (slots go down) and into the APU s frame mounting holes. 4. From inside the APU, loosely install the washers, nut retainers and locking nuts in that order. DO NOT OIL THE BOLT THREADS! WARNING: The following steps are critical and must be followed to ensure the safe installation of the APU to the tractor s frame. 5. With the APU still supported by a lift: Push APU and spacer blocks up tight to the tractor frame. Adjust the height of the APU so the top and bottom mounting claws and bolts are positioned flat on the frame. Review (Detail A). Lightly tighten mounting hardware only enough to remove excess play. 6. Using a torque wrench, torque the mounting bolts in four step increments starting with the top bolts, then the bottom bolts. STEP 1- Torque the top then the bottom mounting bolts to 25 ft-lb. (33.9 N m). IMPORTANT: STOP and verify all mounting claws and bolts remained flat on the frame (Detail A). If they are not, loosen bolts, adjust as necessary and retighten again to 25 ft-lb. (33.9 N m). STEP 2- After the first step is successfully completed, torque the top then the bottom bolts to 50 ft-lb. (67.8 N m). STEP 3- Next, torque the top and then the bottom bolts to 100 ft-lb. (135.6 N m). STEP 4 - Finally, recheck all bolts to confirm they are at 100 ft-lb. (135.6 N m) IMPORTANT: DO NOT OVER-TORQUE MOUNTING BOLTS! 7. Remove the support lift and visually inspect the installation for the following: Mounting claws and bolts are correctly installed. They should be square and flat on the frame (Detail A). If any mounting claws and bolts are improperly installed on the frame (i/e. they resemble Details B & C) - adjust as necessary. Damaged, deformed or cracked components during installation - must be replace immediately. 8. Install the exhaust pipe, clamp and mounting bracket and tighten hardware securely. 22
24 TriPac APU Installation 23
25 A/C Condenser Installation A/C Condenser Location Locate an area on the exterior of the sleeper to install the condenser that does not interfere with the operation of existing truck components. If possible mount the condenser below the bunk level. This allows easier access to four 3/8 bolts with large fender washers inside without disturbing interior panels. IMPORTANT: Before drilling any holes, check for interference with internal wires, supports or interior panels. Avoid drilling into the truck s interior support members as this could void the tractor s OEM warranty. The condenser housing and coil assembly can be also installed with the hose fittings facing towards the roadside (DETAIL A) if needed. When doing so, the actual condenser coil must be removed from the housing and rotated so the #8 fitting is on top by: rotating the complete condenser housing and coil assembly so the hose fittings are facing towards the roadside. removing the condenser coil from the housing, and rotating it so the #8 fitting is positioned at the top, then install it back into the condenser housing and tighten the hardware securely. Installation Tape Measure Level Drill Motor 3/8 Drill Bit Special Tools Required Caulk Gun and RTV Silicone Sealant 1. Measure and mark the exterior center line of the sleeper. 2. Center and level the condenser onto the sleeper with the #8 fitting located on top. Mark the mounting holes; typically one in each corner. Drill four 3/8 mounting holes. 3. Apply a bead of RTV silicone along the entire condenser mounting flanges and around each of the four mounting holes. 4. Install the condenser with 3/8 stainless mounting bolts and large fender washers from the inside, and 3/8 washers and locking nuts on the outside. Tighten hardware securely. 24

26 A/C Condenser Installation 25
27 A/C Receiver Drier Installation A/C Receiver Drier Location Locate an area on the exterior of the tractor to install the receiver drier. It is recommended to mount the receiver drier directly onto the sleeper to reduce hose flexing. Typical Mounting Locations: Side-by-side Mount (DETAIL A). Mid-height Mount (DETAIL B). High Mount (DETAIL C). Installation Drill Motor 3/8 Drill Bit Level Special Tools Required 1. Position and level the receiver drier bracket and mark each of the two mounting holes. Drill two 3/8 holes. 2. Attach two large hose clamps to the bracket with 3/8 stainless mounting bolts, washers and locking nuts (installer supplied) and tighten securely. 3. With the switch facing out, install the receiver drier onto the bracket and tighten the hose clamps securely. 26
28 A/C Receiver Drier Installation 27
29 A/C Evaporator Installation PREFERRED LOCATION - FLUSH WITH FRONT BULKHEAD Installation A/C Evaporator Location A template is supplied to represent the amount of area needed to accommodate the evaporator. It also provides locations for the two 7/8 drain holes and the 3 access hole. IMPORTANT ACCESS HOLE INFORMATION: The location of the 3 access hole will be determined by your particular sleeper construction, including OEM internal floor supports, electrical wiring, etc. It should be located directly behind the evaporator s A/C fittings to allow the refrigerant hoses with 90 degree fittings to be attached and routed down through the floor easily. Floors made from fiberglass covered wood construction require the edges of the 3 access hole be completely sealed with fiberglass and epoxy resin. Before drilling any holes, check for interference with internal wires, supports or interior panels. Avoid drilling into the truck s support members. Drill Motor 1/4 Drill Bit 7/8 Step Reamer 3 dia. Hole Saw Reciprocating Saw Special Tools Required Caulk Gun and RTV Silicone Sealant Sealing Putty ( ) Fiberglass Cloth and Resin Kit (if required) 1. Position the template flush with the bulkhead, mark the location of the 7/8 evaporator drain holes and the 3 access hole. Remove the template. Drill 1/4 pilot hole for the drain holes followed by a 7/8 step reamer. Drill 3 access hole. 2. Cut and install a piece of split loom (or similar) around the inside edge of the 3 access hole to provide protection for the hoses and wiring. 3. Reposition the evaporator mounting brackets attached to sides of the evaporator. 4. Set the evaporator in place and determine where the return air opening needs to be located on the bulkhead. 5. Mark the return air opening (minimum opening size 14'' x 7''). Remove the evaporator and cut the opening. Install the evaporator to the floor with TEK screws. 6. Install a return air grille (installer supplied). 7. From underneath the sleeper: Attach the two water valves (kazoos) onto the evaporator drain tubes and secure with supplied hose clamps. Seal around the drain tube access holes with sealing putty or silicone sealant. Apply silicone sealant around the four evaporator mounting screws. Seal any unused holes, cracks, or visible air gaps that might be found. 28

30 A/C Evaporator Installation PREFERRED LOCATION - FLUSH WITH BULKHEAD 14'' x 7'' minimum bulkhead opening 29
31 A/C Evaporator Installation ALTERNATIVE LOCATION - CENTERED UNDER BUNK A/C Evaporator Location A template is supplied to represent the amount of area needed to accommodate the evaporator. It also provides locations for the two 7/8 drain holes and the 3 access hole. IMPORTANT ACCESS HOLE INFORMATION: The location of the 3 access hole will be determined by your particular sleeper construction, including OEM internal floor supports, electrical wiring, etc. It should be located directly behind the evaporator s A/C fittings to allow the refrigerant hoses with 90 degree fittings to be attached and routed down through the floor easily. Floors made from fiberglass covered wood construction require the edges of the 3 access hole be completely sealed with fiberglass and epoxy resin. Before drilling any holes, check for interference with internal wires, supports or interior panels. Avoid drilling into the truck s support members. Drill Motor 1/4 Drill Bit 7/8 Step Reamer 3 dia. Hole Saw Reciprocating Saw Special Tools Required Caulk Gun and RTV Silicone Sealant Sealing Putty ( ) Fiberglass Cloth and Resin Kit (if required) Installation 1. Position the template under the bunk and mark the location of the 7/8 evaporator drain holes and the 3 access hole. Remove the template. Drill 1/4 pilot hole for the drain holes followed by a 7/8 step reamer. Drill 3 access hole. 2. Cut and install a piece of split loom (or similar) around the inside edge of the 3 access hole to provide protection for the hoses and wiring. 3. Reposition the evaporator mounting brackets attached to the sides of the evaporator. 4. Install the evaporator to the floor with TEK screws. 5. Mark a location for a return air opening (minimum opening size 14'' x 7'') and cut the opening. Install a return air grille (installer supplied). 6. From underneath the sleeper: Attach the two water valves (kazoos) onto the evaporator drain tubes and secure with supplied hose clamps. Seal around the drain tube access holes with sealing putty or silicone sealant. Apply silicone sealant around the four evaporator mounting screws. Seal any unused holes, cracks, or visible air gaps that might be found. 30

32 A/C Evaporator Installation ALTERNATIVE LOCATION - CENTERED UNDER BUNK 14'' x 7'' minimum bulkhead opening 31
33 D2 Heater Installation Heater Location IMPORTANT: Correct installation of this heater is necessary to ensure safe and proper operation. BEFORE installing the heater, thoroughly read and understand Heater Safety Precautions on page 8 of this manual along with the heater manufacturer s manuals included with the heater. The location for mounting the heater will vary depending on the type of tractor. Typically the heater is mounted inside the sleeper, under the bunk in a storage compartment. However, the heater may be mounted anywhere inside the tractor provided you adhere to the following conditions: Install heater so it will maintain a minimum distance of 2.00 inches (50.8 mm) from any heat sensitive or flammable material. Combustion air intake, exhaust and fuel inlet must be located outside the tractor. Install exhaust hose so it will maintain a minimum distance of 2.00 inches (50.8 mm) from any heat sensitive or flammable material. Heater must be mounted on flat horizontal surface providing an air tight seal between heater and tractor. All floor matting, carpet, insulation, etc. must be removed to allow the heater to be mounted directly to the bare floor. Heater harness may be repositioned to either side of the heater. Floors made of fiberglass covered wood construction require the edges of the access hole be sealed with fiberglass and epoxy resin. Drilling Hole In Floor Drill Motor Utility Knife Center Punch 4-1/4 dia. Hole Saw Special Tools Required Fiberglass Cloth and Resin Kit (if required) 1. Position the heater s metal mounting plate onto the floor mat. 2. Use a utility knife to cut the floor mat around the outside edges of the plate. Remove floor mat to access the bare floor. 3. With the mounting plate in position, center punch the four outer holes. Remove the mounting plate and mark an X connecting the four center punched outer holes. 4. Center punch the center of the X and drill a 4-1/4 hole with a hole saw. 32
34 D2 Heater Installation 33
35 D2 Heater Installation Heater Subassembly Turn the heater upside down and attach the following components: 1. Snap the Air Outlet Hood onto the end of the heater. 2. Install the mounting plate with nuts and lock washers and tighten securely. 3. Attach the short rubber hose and clamps onto the fuel inlet connection located at the base of the heater. 4. Insert the plastic fuel line all the way into the rubber hose until it bottoms out to prevent air gaps. Tighten both hose clamps securely. NOTE: The exhaust and intake hose are not interchangeable. They are different in size, type of clamps and end caps. Make sure the correct hose and clamp is installed on the proper heater fitting. All clamps must be turned to the center to allow clearance to go through the 4-1/2 mounting hole. 5. Attach the silver exhaust hose and metal clamp onto the fitting located under the OUTLET end of the heater. Turn metal clamp to the center and tighten securely. 6. Attach the black air intake hose and hose clamp onto the fitting located under the INLET end of the heater. Turn hose clamp to the center and tighten securely. 7. Install gasket to mounting plate. 8. The heater has two service data nameplates. Remove one and reinstall it onto the top of the heater so that it is visible when the heater is installed. Heater Installation 9. Position the heater over the access hole with intake hose, exhaust hose and fuel line exiting the tractor. 10. Attach the heater to the floor with TEK screws and tighten securely. NOTE: Tighten TEK screws sufficiently to ensure a positive seal between mounting plate and mounting surface. Do not over tighten! 11. From underneath the sleeper: Apply silicone sealant around ONLY the four heater mounting screws. DO NOT apply any sealant around the access hole! 34
36 D2 Heater Installation 35
37 D2 Heater Installation Exhaust and Combustion Air Intake Hose Routing IMPORTANT: Correct installation of this heater is necessary to ensure safe and proper operation. BEFORE installing the heater, thoroughly read and understand Heater Safety Precautions on page 8 of this manual along with the heater manufacturer s manuals included with the heater. DANGER: The correct installation of the exhaust and combustion air intake hoses is extremely important to prevent carbon monoxide poisoning or asphyxiation. EXTREME CARE MUST BE TAKEN TO: Route the exhaust and combustion air intake hoses so they cannot be plugged by dirt, water or snow. Ensure the intake and exhaust hose outlets do not face into the tractor s slip stream to prevent ram air effect. Keep exhaust and combustion air intake hoses a minimum of 12 apart. Install exhaust hose so it will maintain a minimum distance of 2.00 inches (50.8 mm) from any heat sensitive or flammable material. The exhaust hose should be mounted slightly downwards to help drain off condensation. Install the protective caps onto the ends of the intake and exhaust hoses. Route the exhaust hose to an open area to the rear or side of the tractor so fumes cannot build up and enter the cab or the combustion air inlet hose to the heater. DO NOT mount the intake or exhaust hoses the tractor s frame. They must be installed to the cab to allow for movement. Installation 1. Route the silver exhaust hose to an open area to the rear or side of the tractor positioned slightly downwards to help drain off condensation and secure with clamps. NOTE: Drill a 1/8 hole in exhaust hose if necessary to allow for water drainage. 2. Attach metal end cap to exhaust hose. DANGER: The exhaust hose outlet must exit at least 3 feet from the A/C evaporator drains located under the tractor to prevent carbon monoxide poisoning or asphyxiation. ALWAYS VERIFY the two water valves (kazoos) are installed onto the evaporator drain tubes and are secured with hose clamps. 3. Route the black air intake hose towards the front underside of the tractor where it can pick up clean, fresh, moisture free air. Form a U bend at the inlet end of the hose and secure with clamps or band wraps. 4. Attach plastic end cap to intake hose. NOTE: Combustion air intake and exhaust lengths can be shortened to a minimum of 8 if required. 36
38 D2 Heater Installation 37
39 D2 Heater Duct Installation Duct Locations CAUTION: USE SUPPLIED HEATER DUCT HOSE ONLY! Do not use existing vehicle ducts or outlets. Ducts and outlets must be capable of withstanding a minimum of 300F (148.9C) operating temperatures. Adjustable air vent must always be installed so it cannot blow hot air directly at living creatures (people, animals) or objects sensitive to temperature. Do not position outlet so that it will blow hot air directly at operator or at thermostat. Position air outlet so that it cannot be obstructed. Use the supplied protective air intake grille on the air inlet side of the heater to prevent objects from being sucked in. Do not overtighten duct clamps. DO NOT lay or bundle the heater ducts with A/C ducts. They should not touch each other. Ensure provisions are made for proper air return ventilation. The heater is equipped with a Return Inlet and Discharge Outlet for attaching the flexible heater duct hoses. IMPORTANT: A return air duct to the heater should be provided for best heating efficiency. Return Inlet must be provided to return air to the heater. It is typically mounted at the base of the bunk directly opposite the discharge outlet vent. Discharge Outlet should be located at floor level to provide maximum heating comfort in the sleeper. It is typically installed at the base of the bunk on one end. Heater ducts should be installed and routed with smooth bends and no kinks to provide maximum airflow. Installation Drill Motor Discharge Air Special Tools Required 2-1/2 Hole Saw (for installing discharge air vent and return air grille) 3 Hole Saw (for routing ducts through compartment walls if required) 1. Find an appropriate location for the floor level discharge air vent and drill a 2-1/2 hole using the correct hole saw. Unsnap rotating outer louver assembly from the mounting base. Install the base into 2-1/2 hole and secure with supplied screws. Reinstall rotating outer louver assembly back into the mounting base ring. Verify that it rotates freely. 2. Attach one end of the heater duct to the discharge outlet hood on the heater and secure with supplied clamp. 3. Route the heater duct to the floor level discharge air vent, cut as needed, attach to the end of the plastic louver vent and secure with supplied hose clamp. Return Air 4. If a return air duct is not used, the protective grille must be installed onto the heater inlet. 5. Find an appropriate location for the floor level return air grille and drill a 2-1/2 hole using the correct hole saw. Install the return air grille into the 2-1/2 hole and secure with supplied screws. 6. Attach one end of the return air duct to the air inlet hood on the heater and secure with supplied clamp. Route the return air duct to the return air grille, cut as needed, attach to the end of the plastic louver vent and secure with supplied hose clamp. 38
40 D2 Heater Duct Installation 39
41 D4 High Output Heater Installation (Option) Heater Location IMPORTANT: Correct installation of this heater is necessary to ensure safe and proper operation. BEFORE installing the heater, thoroughly read and understand Heater Safety Precautions on page 8 of this manual along with the heater manufacturer s manuals included with the heater. The location for mounting the heater will vary depending on the type of tractor. Typically the heater is mounted inside the sleeper, under the bunk in a storage compartment. However, the heater may be mounted anywhere inside the tractor provided you adhere to the following conditions: Install heater so it will maintain a minimum distance of 2.00 inches (50.8 mm) from any heat sensitive or flammable material. Combustion air intake, exhaust and fuel inlet must be located outside the tractor. Install exhaust hose so it will maintain a minimum distance of 2.00 inches (50.8 mm) from any heat sensitive or flammable material. Heater must be mounted on flat horizontal surface providing an air tight seal between heater and tractor. All floor matting, carpet, insulation, etc. must be removed to allow the heater to be mounted directly to the bare floor. Heater harness may be repositioned to either side of the heater. Floors made of fiberglass covered wood construction require the edges of the access hole be sealed with fiberglass and epoxy resin. Drilling Hole In Floor Drill Motor Utility Knife Center Punch 4-1/4 dia. Hole Saw Special Tools Required Fiberglass Cloth and Resin Kit (if required) 1. Position the heater s metal mounting plate onto the floor mat. 2. Use a utility knife to cut the floor mat around the outside edges of the plate. Remove floor mat to access the bare floor. 3. With the mounting plate in position, center punch the four outer holes. Remove the mounting plate and mark an X connecting the four center punched outer holes. 4. Center punch the center of the X and drill a 4-1/4 hole with a hole saw. 40
42 D4 High Output Heater Installation (Option) 41
43 D4 High Output Heater Installation (Option) Heater Subassembly Turn the heater upside down and attach the following components: 1. Snap the Air Outlet Hood onto the end of the heater. 2. Install the mounting plate with nuts and lock washers and tighten securely. 3. Attach the short rubber hose and clamps onto the fuel inlet connection located at the base of the heater. 4. Insert the plastic fuel line all the way into the rubber hose until it bottoms out to prevent air gaps. Tighten both hose clamps securely. NOTE: The exhaust and intake hose are not interchangeable. They are different in size, type of clamps and end caps. Make sure the correct hose and clamp is installed on the proper heater fitting. All clamps must be turned to the center to allow clearance to go through the 4-1/2 mounting hole. 5. Attach the silver exhaust hose and metal clamp onto the fitting located under the OUTLET end of the heater. Turn metal clamp to the center and tighten securely. 6. Attach the black air intake hose and hose clamp onto the fitting located under the INLET end of the heater. Turn hose clamp to the center and tighten securely. 7. Install gasket to mounting plate. 8. The heater has two service data nameplates. Remove one and reinstall it onto the top of the heater so that it is visible when the heater is installed. Heater Installation 9. Position the heater over the access hole with intake hose, exhaust hose and fuel line exiting the tractor. 10. Attach the heater to the floor with TEK screws and tighten securely. NOTE: Tighten TEK screws sufficiently to ensure a positive seal between mounting plate and mounting surface. Do not over tighten! 11. From underneath the sleeper: Apply silicone sealant around ONLY the four heater mounting screws. DO NOT apply any sealant around the access hole! 42
44 D4 High Output Heater Installation (Option) 43
45 D4 High Output Heater Installation (Option) Exhaust and Combustion Air Intake Hose Routing IMPORTANT: Correct installation of this heater is necessary to ensure safe and proper operation. BEFORE installing the heater, thoroughly read and understand Heater Safety Precautions on page 8 of this manual along with the heater manufacturer s manuals included with the heater. DANGER: The correct installation of the exhaust and combustion air intake hoses is extremely important to prevent carbon monoxide poisoning or asphyxiation. EXTREME CARE MUST BE TAKEN TO: Route the exhaust and combustion air intake hoses so they cannot be plugged by dirt, water or snow. Ensure the intake and exhaust hose outlets do not face into the tractor s slip stream to prevent ram air effect. Keep exhaust and combustion air intake a minimum of 12 apart. Install exhaust hose so it will maintain a minimum distance of 2.00 inches (50.8 mm) from any heat sensitive or flammable material. The exhaust tube should be mounted slightly downwards to help drain off condensation. Install the protective caps. onto the ends of the intake and exhaust hoses. Route the exhaust tube to an open area to the rear or side of the tractor so fumes cannot build up and enter the cab or the combustion air inlet hose to the heater. DO NOT mount the intake or exhaust hoses the tractor s frame. They must be installed to the cab to allow for movement. Installation 1. Route the silver exhaust hose to an open area to the rear or side of the tractor positioned slightly downwards to help drain off condensation and secure with clamps. NOTE: Drill a 1/8 hole in exhaust hose if necessary to allow for water drainage. 2. Attach metal end cap to exhaust hose. DANGER: The exhaust hose outlet must exit at least 3 feet from the A/C evaporator drains located under the tractor to prevent carbon monoxide poisoning or asphyxiation. ALWAYS VERIFY the two water valves (kazoos) are installed onto the evaporator drain tubes and are secured with hose clamps. 3. Route the black air intake hose towards the front underside of the tractor where it can pick up clean, fresh, moisture free air. Form a U bend at the inlet end of the hose and secure with clamps or band wraps. 4. Attach plastic end cap to intake hose. NOTE: Combustion air intake and exhaust lengths can be shortened to a minimum of 8 if required. 44
")
46 D4 High Output Heater Installation (Option) 45
47 D4 High Output Heater Duct Installation (Option) Duct Locations CAUTION: USE SUPPLIED HEATER DUCT HOSE ONLY! Do not use existing vehicle ducts or outlets. Ducts and outlets must be capable of withstanding a minimum of 300F (148.9C) operating temperatures. Adjustable air vent must always be installed so it cannot blow hot air directly at living creatures (people, animals) or objects sensitive to temperature. Do not position outlet so that it will blow hot air directly at operator or at thermostat. Position air outlet so that it cannot be obstructed. Use the supplied protective air intake grille on the air inlet side of the heater to prevent objects from being sucked in. Do not overtighten duct clamps. DO NOT lay or bundle the heater ducts with A/C ducts. They should not touch each other. Ensure provisions are made for proper air return ventilation. The heater is equipped with a Return Inlet and Discharge Outlet for attaching the flexible heater duct hoses. IMPORTANT: A return air duct to the heater should be provided for best heating efficiency. Return Inlet must be provided to return air to the heater. It is typically mounted at the base of the bunk directly opposite the discharge outlet vent. Discharge Outlet should be located at floor level to provide maximum heating comfort in the sleeper. It is typically installed at the base of the bunk on one end. Heater ducts should be installed and routed with smooth bends and no kinks to provide maximum airflow. Installation Drill Motor Discharge Air Special Tools Required 4 Hole Saw (for installing discharge air vent, return air grille and for routing ducts through compartment walls if required 1. Find an appropriate location for the floor level discharge air vent and drill a 4 hole using the correct hole saw. Unsnap rotating outer louver assembly from the mounting base. Install the base into 4 hole and secure with supplied screws. Reinstall rotating outer louver assembly back into the mounting base ring. Verify that it rotates freely. 2. Attach one end of the heater duct to the discharge outlet hood on the heater and secure with supplied clamp. 3. Route the heater duct to the floor level discharge air vent, cut as needed, attach to the end of the plastic louver vent and secure with supplied hose clamp. Return Air 4. If a return air duct is not used, the protective grille must be installed onto the heater inlet. 5. Find an appropriate location for the floor level return air grille and drill a 4 hole using the correct hole saw. Install the return air grille into the 4 hole and secure with supplied screws. 6. Attach one end of the return air duct to the air inlet hood on the heater and secure with supplied clamp. 7. Route the return air duct to the return air grille, cut as needed, attach to the end of the plastic louver vent and secure with supplied hose clamp. 46
48 D4 High Output Heater Duct Installation (Option) 47
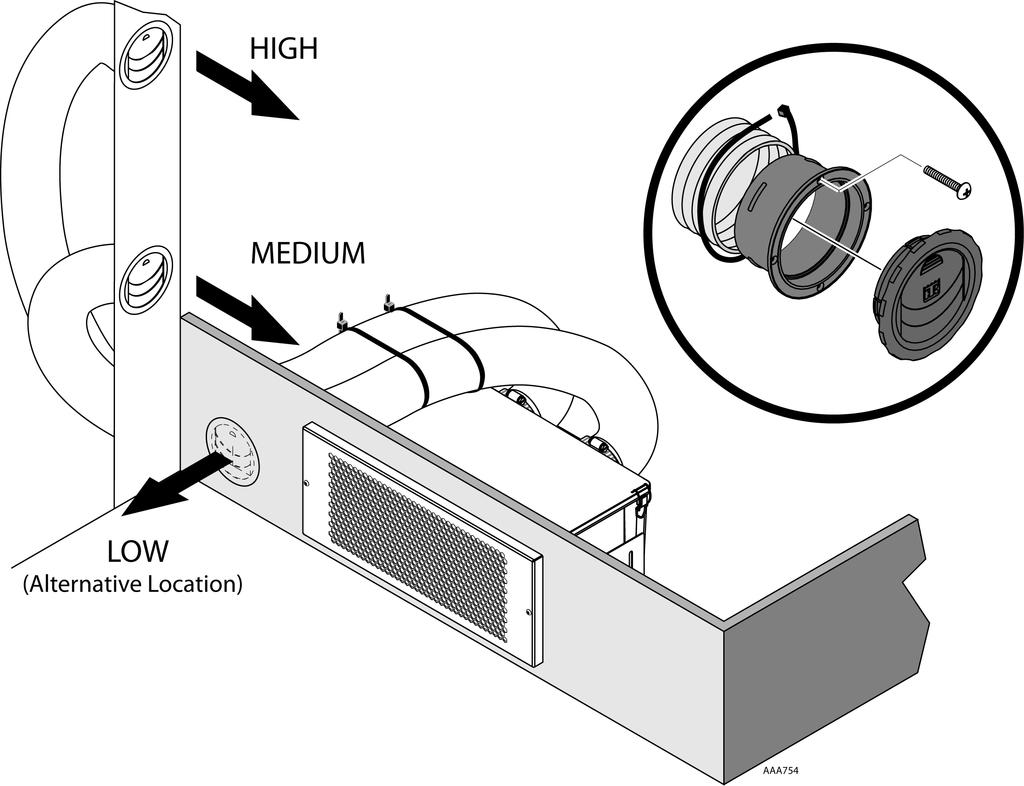
49 A/C Duct Installation A/C Vent Locations The evaporator is equipped with two air discharge outlets to attach the supplied flexible air ducts. The ducts will be attached to plastic air vents that should be located and installed to provide maximum air circulation in the sleeper. Suggested locations of the air vents: MEDIUM (above lower bunk level) HIGH (above upper bunk level) Alternative Location - LOW (floor level) NOTE: A/C air ducts and vents are typically routed and installed through closets or storage compartments. IMPORTANT: Extreme care should always be taken when drilling holes in the various types of material found in sleepers such as plastic, steel, aluminum, and upholstery. Installation Drill Motor Special Tools Required 4-1/4 diameter Hole Saw (for installing plastic A/C louver vents and for routing ducts through compartment walls) 1. Find an appropriate location for the A/C vents and drill 4-1/4 diameter holes. 2. Attach one end of the flexible air duct to one of the air discharge outlets of the evaporator and secure with supplied hose clamps. 3. Route the flexible air duct through the A/C vent hole, cut excess duct as needed. 4. Unsnap rotating outer louver assembly from the mounting base. 5. Attach to flexible air duct to the end of the louver base with band wraps. 6. Push the mounting base back into 4-1/4 mounting hole and secure with supplied screws. 7. Reinstall rotating outer louver assembly back into the mounting base and verify that it rotates freely. 8. Install the second A/C vent in the same manner. 9. Verify flexible ducts are installed and routed with smooth bends and no kinks to provide maximum airflow. 10. Secure flexible ducts with large band wraps to prevent excess movement. 48
50 A/C Duct Installation 49
 Hose Cutting Tools (204-677) TK 2000 Multi-Refrigerant Hose Nipple Assembly Appropriately Sized Clips and Cage PAG Refrigerant Oil (204-544)")
51 Fabricating Refrigeration Hoses TK 2000 Assembly System The TK 2000 System is designed for assembly with Multi-Refrigerant hose only. Assembly Materials Checklist Hose Fitting Tool ( ) Hose Cutting Tools ( ) TK 2000 Multi-Refrigerant Hose Nipple Assembly Appropriately Sized Clips and Cage PAG Refrigerant Oil ( ) NOTE: The two black O-rings on the nipple assembly are of a specific rubber compound and size. They should not be removed or replaced Hose 2. Cage 3. Clips 4. Nipple with internal O-ring 50
 has been specially designed for cutting all non-wire reinforced hose, such as TK 2000")


52 Fabricating Refrigeration Hoses Cut the Hose 1. Cut the hose to proper length with an appropriate cutting tool. Hand-held hose cutter ( ) has been specially designed for cutting all non-wire reinforced hose, such as TK 2000 Multi-Refrigerant hose. Be sure the cut is made square to the hose length. Slip on Two Clamps 2. Install two proper- size clips onto the cut end of the hose. Orientation of the clips does not affect the performance of the connection. However for ease of assembly, both clips should have the same orientation. CAUTION: Failure to slide the clips over the hose at this time will require the clips to be stretched over the hose or fitting later. This may permanently damage the clip. 51


53 Fabricating Refrigeration Hoses Oil the Nipple 3. Lubricate the nipple with a generous amount of the refrigeration or A/C system s compressor lubricating oil. This MUST be done to lower the force of nipple insertion. 4. Insert the nipple into the hose. To ensure that the nipple is fully inserted, check the gap between the cut end of the hose and the shoulder on the nipple. Care should be taken to avoid kinking or other damage to the hose during nipple insertion. NOTE: Be sure to wipe excess oil from the nipple and hose. 52

 to close the clips.")
54 Fabricating Refrigeration Hoses Snap on the Cage. 5. Snap the cage into the groove on the nipple. The arms should extend over the hose length. When the cage has been carefully installed in the cage grove, the cage will be able to rotate in the grove. This step must be performed to ensure: The clips will be located over the O-ring on the nipple. The connection will be compatible with the connection s pressure rating. Slide the Clips 6. Slide the clips over the cage arms and into the channels on each arm. Close the Clips 7. Use the fitting tool ( or ) to close the clips. The pliers should be positioned squarely on the clip connection points and should remain square during the closing of the clip. NOTE: For easiest assembly, the clasp should be closed between the cage arms. 53


55 Fabricating Refrigeration Hoses Correct Nose of the pliers should be firmly seated under the assembly bump and lock latch. If the pliers are not kept square during closing the clip, the clasp may have an offset. Use the piers to correct the clasp alignment. Incorrect 54

56 Fabricating Refrigeration Hoses CAUTION: TK 2000 Speedy Clip System components should not be reused. Failure to follow these instructions and/or the use of TK 2000 Speedy Clip System hose with fittings supplied by other manufactures could result in sudden or unintended escape of refrigerant gases. Personal injury and/or violations of EPA regulations may occur as a consequence. NOTE: Thermo King recommends adherence to all guidelines, including EPA guidelines concerning the service of refrigerant systems. Improperly Installed Clip Properly Installed Clip 55
57 A/C Hose Installation Installation Special Tools Required Hose Fitting Tools ( ) Hose Cutting Tool ( ) PAG Refrigerant Oil ( ) Torque Wrench NOTE: Read and understand Fabricating Refrigeration Hoses on page 50 for proper hose fabrication requirements. Always use two wrenches while tightening refrigeration fittings. Fitting Size Torque Specifications #6 (3/8'') lb-ft (15-17 N m) #8 (1/2'') lb-ft (20-27 N m) #10 (5/8'') lb-ft (28-37 N m) #12 (3/4'') lb-ft (38-45 N m) 1. Fabricate a #10 hose and fitting and attach onto the suction fitting located on the evaporator: Remove the lower cover of the APU to access the compressor fittings. Route the hose down through the 3 access hole in the tractor floor and through the access hole located at the rear of the APU. Cut the hose to the appropriate length, attach a #10, 45 degree fitting with service port and connect to the suction fitting on the APU s compressor. Tighten fitting as specified. Secure hose to support bracket on APU with band wraps. 2. Fabricate a #6 hose and fitting and attach onto the liquid line fitting located on the evaporator: Route the hose down through the 3 access hole in the tractor floor to the receiver drier. Cut the hose to the appropriate length, attach a #6 fitting and connect to the OUTLET end indicated by arrow on the receiver drier. Tighten fitting as specified. 3. Fabricate and attach #8 hose and fitting onto the discharge fitting located near the top of the condenser coil: Route the hose through the access hole located at the rear of the APU. Cut the hose to the appropriate length, attach a #8, 45 degree fitting with service port and connect to the discharge fitting on the APU s compressor. Tighten fitting as specified. Secure hose to support bracket on APU with band wraps. 4. Fabricate a #6 hose and fitting and attach onto the matching fitting located on the condenser coil: Route the hose to the receiver drier. Cut the hose to the appropriate length, attach a #6 fitting and connect to the INLET fitting located on the receiver drier. Tighten fitting as specified. 56
58 A/C Hose Installation 57
59 A/C System Evacuation and Leak Check Procedures System Evacuation Procedures Special Tools Required Thermo King Evacuation Station (P/N ) Recommended Evacuation Station Operation and Field Application Instructions (TK-40612) Electronic Leak Detector ( ) Gauge Set with R134a Adapters NOTE: The oil in the evacuation station vacuum pump should be changed after each use. IMPORTANT: Always use recommended vacuum equipment. Before each use, check that there are no leaks in the vacuum equipment either in the pump itself or in the hoses. 1. Connect the gauge manifold to the suction and discharge service ports of the APU s compressor. 2. Connect the service line of the gauge manifold to the vacuum pump and micron gauge. 3. Open the gauge manifold and vacuum pump valves and gauge manifold hand valves. 4. Start the vacuum pump and evacuate until system reaches 500 microns. 5. Once the system reaches 500 microns, continue evacuation for one additional hour. NOTE: While the system is being evacuated, and to save installation time, continue on to the electrical installation beginning with Control Box and Main Harness Installation on page 60. Return and complete this procedure later. 6. Close the vacuum pump valve, switch off the pump, checking that the gauge reading for the vacuum pump does not exceed 2000 microns in the following five minutes. If vacuum level exceeds 2000 microns before five minutes, and continues to rise, proceed to the Leak Check Procedures section below. 7. If vacuum level remains below 2000 microns for 5 minutes the system is leak free and ready to be filled with refrigerant. 8. Close manifold hand valves and remove evacuation equipment. Leak Check Procedures 1. Add vapor R-134a to the unit until bottle pressure is reached. 2. Thoroughly leak check the system with an electronic leak detector. 3. If leak(s) are found, recover leak check charge. 4. Repair any leaks and re-evacuate system. 58
60 A/C System Evacuation and Leak Check Procedures 59
61 Control Box and Main Harness Installation Control Box Location The box can be mounted horizontally or vertically. Make sure the location chosen allows access for: Installation of wiring Servicing of interface board components Operation of the reset switch. NOTE: DO NOT install the control box at this time. It will be installed AFTER all the TriPac electrical harnesses have been connected. Main Harness Installation IMPORTANT: Before making any electrical connections, confirm the Heater and APU battery cables are not connected to the battery. NOTE: Excessive harnesses lengths should be doubled up and secured with band wraps. DO NOT CUT THE WIRE HARNESSES! NOTE: Always check the male pins for straightness before attempting to mate connectors. If any resistance is felt when mating the connector: recheck the male pin alignment. Exercise care when mating the connection. 1. Position the control box inside the truck and remove the cover. 2. Route the Main Electrical Harness from APU up into the sleeper through the 3 access hole in the floor into the control box. 3. Connect the 20-pin main harness connector to the mating connector (J14) on the interface board. 4. Connect the 6-pin main harness connector to the mating connector (J5) on the interface board. 5. Attach the 2 wire with the terminal ring onto the interface board power stud (J15 2). Torque to 18 lb-in. (2 N m). IMPORTANT: The 2 wire terminal ring must be positioned correctly onto the power stud as shown on the decal on control box cover. 6. Connector 7CLB will be attached to the mating connector on the A/C evaporator harness that will be installed in a later step. 7. Connector SBY and 2A will be attached to the mating connector on the standby harness that will be installed in a later step. 60
62 Control Box and Main Harness Installation 61
63 HMI Controller Installation HMI Controller Location Choose a location inside the tractor s sleeper for the HMI controller. It should be accessible and visible from the drivers bunk. Two separate wire harnesses need to be routed and connect to the HMI: A Control Harness - from the control box to the HMI. A Sensor Bulb Harness- from the HMI to a point in the interior typically 36 above bunk surface. The sensor bulb should be visible and mounted away from windows, air vents, out of direct sunlight and not touching anything to accurately measure air temperature. DO NOT CUT THE SENSOR HARNESS! Installation Level Drill Motor Drill Bits Special Tools Required 1. Route the control harness (with ground wire) into the control box and connect: 4-pin connector to the mating connector (J11) on the interface board. ground wire terminal ring to the grounding stud (J16 CH) on the interface board. Torque to 18 lb-in. (2 N m). 2. From the control box, route the control harness behind the interior walls to the location chosen to install the HMI controller. 3. Remove the rear mounting base from the HMI controller and route the control harness through the rear access hole and connect: 4-pin connector to the mating connector of the HMI. 4. Route the sensor bulb harness through the rear access hole of the HMI controller base and connect the 2-pin connector to the mating 2-pin connector (marked Control Sensor) on the HMI controller. The sensor bulb should be installed in the interior of the sleeper typically 36 above bunk surface. The sensor bulb should be visible and mounted away from windows, air vents, out of direct sunlight and not touching anything to accurately measure air temperature. DO NOT CUT THE SENSOR HARNESS! 5. Position and level the HMI mounting base, install with supplied hardware and reattach the HMI controller to the base. 62
64 HMI Controller Installation 63
65 Heater Wiring Installation Installation Wire Cutters Terminal Crimping Tool Special Tools Required Locate the heater harness supplied in the kit. Remove the two small plastic bags attached to the harness containing the fuel pump electrical connector components and the in-line fuse assembly. Retain these for installation later. 1. Connect the16-pin connector to the heater: use a large bladed screwdriver to pull the locking tab out (to unlock) from the connector body. connect the two 16-pin connectors together. push locking tab back in (to lock) the connector body. 2. Route the heater control harness connectors into the control box, but DO NOT make any connections to the interface board at this time. They will be connected later after the TriPac System Run-In Procedures are completed. 3. The 8-pin connector (with 4 wires) is used for diagnostic purposes only. 4. Route the fuel pump harness out of the sleeper through the 3 access hole. It will be assembled and connected to the fuel pump in a later step. 64
66 Heater Wiring Installation NOTE: DO NOT connect these to the interface board at this time. 65
67 A/C Wiring Installation Installation NOTE: Excessive harnesses lengths should be doubled up and secured with band wraps. DO NOT CUT THE WIRE HARNESSES! 1. Route the A/C harness into the control box and make the following connections to the interface board: A/C EVAP 4-pin connector (CH-07, PWM2, PWM1, 7D) to the mating connector (J1). A/C COND 4-pin connector (CH-08, 7CLA, 7CL, 7CF) to the mating connector (J2). 2. Attach the 2-pin connector (7CLB) to the mating connector located on the main harness installed earlier. 3. Route the A/C wire harnesses (7CF, CH-08) and (7CL, 7CLA) out of the sleeper through the 3 access hole towards the condenser coil. 4. Attach connector (7CF, CH-08) to the condenser fan harness. 5. Attach connector (7CL, 7CLA) to the receiver drier binary switch. 6. Install control box securely with TEK screws in location chosen earlier. 66
68 A/C Wiring Installation 67
69 Standby Truck Integration Harness with Switch (Option) Installation Digital Meter ( ) Drill Motor 1/2 Drill Bit Special Tools Required Access the tractor s ignition switch wires at rear of the switch: a. Turn ignition switch to the ACCESSORY position and use a digital meter to locate a wire connection with NO POWER (0 Vdc). b. Turn ignition switch to the ON position and re-check for voltage at the same wire connection tested earlier. If voltage is present, this is where the IGN wire will be connected. Typically the standby switch is installed in the dashboard in a location that is easily accessible for the driver. 1. Remove dash panel (if required). Mark and drill 1/2 hole. 2. Install the standby switch, nameplate and nut. Confirm the 2A wire on the switch is facing UP and then tighten the nut securely. 3. Connect IGN wire with in-line fuse to: WIRE IGN VEHICLE CONNECTION ON circuit of ignition switch 4. Route the standby switch harness to the control box and connect the 2-pin connector (SBY and 2A) to the mating pigtail connector found on the main harness installed earlier. or ON circuit of fuse panel 68
70 Standby Truck Integration Harness with Switch (Option) 69
71 Standby Truck Integration Harness without Switch (Option) Installation Digital Meter ( ) Special Tools Required Access the tractor s ignition switch wires at rear of the switch: a. Turn ignition switch to the ACCESSORY position and use a digital meter to locate a wire connection with NO POWER (0 Vdc). b. Turn ignition switch to the ON position and re-check for voltage at the same wire connection tested earlier. If voltage is present, this is where the IGN wire will be connected. 1. Connect IGN wire with in-line fuse to: WIRE IGN VEHICLE CONNECTION ON circuit of ignition switch or ON circuit of fuse panel 2. Route the standby harness to the control box and connect the 2-pin connector (SBY and 2A) to the mating pigtail connector found on the main harness installed earlier. 70
72 Standby Truck Integration Harness without Switch (Option) 71
73 Fuel Pickup Tube Installation PREFERRED INSTALLATION WITH ADAPTER PLATE (10-379) For OEM fuel tanks equipped with an auxiliary fuel level sender (FLS) 5 bolt mounting flange Installing the Fuel Pickup Tube & Adapter Plate NOTE: Some OEM s offer a fuel tank option which provides three auxiliary fuel fitting connections. With this option, the fuel pickup tube and adapter plate are not needed. Simply route and connect the APU s fuel supply and return lines and the heater s fuel supply line to these fittings. Always check your fuel tank for these fittings before installing the fuel pickup tube or adapter plate. DANGER: Use caution when working in or around the area of the diesel fuel tank. Diesel fuel vapors are potentially explosive. Do not smoke while working near the diesel fuel tank. Tape Measure Tubing Cutter Torque Wrench Special Tools Required IMPORTANT INSTALLATION TIPS Identify and mark APU FUEL SUPPLY pickup tube for reference later. Remove protective caps from ends of pickup tubes prior to installation. Do not apply any type of sealant material to fuel pickup assembly. Doing so will result in plugged fuel lines. Installation 1. Locate auxiliary FLS mounting flange and block off plate on tractor s fuel tank. Remove block off plate and clean surface area of all dirt, grease, etc. 2. Install adapter plate (counter sunk holes facing up) and the gasket. Secure with the supplied screws and torque to 90 lb-in. (10.2 N m) maximum. 3. The APU diesel engine fuel supply tube is 24 and heater fuel supply tube is 23. Measure and cut APU diesel fuel supply tube 2 shorter than fuel tank diameter. Measure and cut heater fuel supply tube 3 shorter than fuel tank diameter. The heater fuel supply tube is identified by not having a fitting. 4. Loosen and slide the hardware to top of the pickup tube assembly. 5. Spread pickup tubes approximately 12 apart then squeeze pickup tubes back together and insert tubes and bushing into hole of adapter plate. 6. Tip back-up washer and insert into hole of adapter plate. With back-up washer on underside of adapter plate, thread nut onto bushing and hand tighten. OPTION - Install supplied fuel pump bracket for fuel heater. Position pickup tube as needed to facilitate fuel line connections and tighten nut to 16 to 18 ft-lb. (21 to 24 N m). 7. Install supplied warning nameplates onto fuel tanks in a visible area near fuel cap. 72
74 Fuel Pickup Tube Installation PREFERRED INSTALLATION WITH ADAPTER PLATE (10-379) For OEM fuel tanks equipped with an auxiliary fuel level sender (FLS) 5 bolt mounting flange Adapter Plate 73
75 Fuel Pickup Tube Installation ALTERNATIVE INSTALLATION BY DRILLING HOLE IN FUEL TANK Installing the Fuel Pickup Tube NOTE: Some OEM s offer a fuel tank option which provides three auxiliary fuel fitting connections. With this option, the fuel pickup tube and adapter plate are not needed. Simply route and connect the APU s fuel supply and return lines and the heater s fuel supply line to these fittings. Always check your fuel tank for these fittings before installing the fuel pickup tube or adapter plate. DANGER: Use caution when working in or around the area of the diesel fuel tank. Diesel fuel vapors are potentially explosive. Do not smoke while working near the diesel fuel tank. DANGER: Before drilling into a fuel tank, drain all diesel from the tank. Use nitrogen or an inert gas to purge the diesel fuel vapors from the tank. Keep the diesel tank filled with inert gas while drilling. DANGER: Use extreme caution when drilling into a diesel fuel tank. Sparks from an electric drill or drill bit could cause an explosion. Tape Measure Drill Motor Step Reamer Bit 1-1/4 Hole Saw Tubing Cutter Heavy Grease Torque Wrench Special Tools Required IMPORTANT INSTALLATION TIPS Identify and mark APU FUEL SUPPLY pickup tube for reference later. Remove protective caps from ends of pickup tubes prior to installation. Spread pickup tubes approximately 12 apart. Do not apply any type of sealant material to fuel pickup assembly. Doing so will result in plugged fuel lines. Check for internal baffles in fuel tank BEFORE drilling any holes. Installation 1. Tape paper template (supplied with pickup tube) onto tractor s fuel tank and center punch three holes. Remove template from tank. 2. Drill a 1/4 pilot hole then drill: 1/2 diameter outer holes first with step reamer. 1-1/4 diameter inner hole next with hole saw. Thoroughly clean and flush the tank to remove any chips. 3. The APU diesel engine fuel supply tube is 24 and the heater fuel supply tube is 23. Measure and cut APU diesel fuel supply tube 2 shorter than fuel tank diameter. Measure and cut heater fuel supply tube 3 shorter than fuel tank diameter. The heater fuel supply tube is identified by not having a fitting. 4. Loosen and slide hardware to top of pickup tube assembly. 5. Spread pickup tubes approximately 12 apart then squeeze pickup tubes back together and insert tubes and bushing into hole of adapter plate. 6. Tip back-up washer and insert it to fuel tank hole. With back-up washer on underside of fuel tank hole, thread nut onto bushing and hand tighten. OPTION - Install supplied fuel pump bracket for fuel heater. Position pickup tube as needed to facilitate fuel line connections and tighten nut to 16 to 18 ft-lb. (21 to 24 N m). 7. Install supplied warning nameplates onto fuel tanks in a visible area near fuel cap. 74
76 Fuel Pickup Tube Installation ALTERNATIVE INSTALLATION BY DRILLING HOLE IN FUEL TANK 75
77 Heater Fuel Pump and Fuel Line Installation Installation Utility Knife Hose Cutting Tool ( ) Fuel Pump Installation IMPORTANT: Proper mounting angle of the fuel pump is necessary to allow any air or vapor in the fuel lines to pass through the pump rather than cause a blockage (Detail s A and B). The fuel pump can be installed using either the L-bracket or the fuel tank mounting bracket (both supplied). L-Bracket Installation Special Tools Required 1. Choose a protected mounting location close to the fuel pick-up tube and heater. 2. Install the fuel pump into the supplied rubber mounting clamp and attach the L-bracket. 3. Position the fuel pump at a 15 to 35 degree angle with the outlet end facing up (outlet end has connector and smaller barb fitting) and secure the clamp and bracket securely (Detail A). Fuel Tank Bracket Installation 1. Loosen the fuel pickup tube nut and position the supplied fuel pump bracket under the nut then retighten the nut to 16 to 18 ft-lb. (21 to 24 N m). NOTE: The bracket goes under the nut, not under the washer or rubber gasket. 2. Install the fuel pump into the supplied rubber mounting clamp and attach the rubber clamp to the tank mounted bracket securely. Fuel Lines 1. Attach the rubber hose connection to the outlet end of the fuel pump and secure with supplied hose clamp. 2. Route the plastic fuel line (installed earlier on the heater) to the fuel pump and cut to length. Insert the fuel line into the rubber hose connection until it butts up tight with the fuel pump s outlet pipe (Detail B). Secure with supplied hose clamp. The fuel line must be installed correctly to prevent air bubbles (DETAIL B). The fuel line from the pickup tube, to fuel pump, to heater should be routed at a continuous rise. Only use a hose cutter or utility knife to cut plastic fuel lines. Do not use a wire cutter as this will pinch the plastic fuel line closed. 3. Attach fuel line from the fuel pick-up supply to the inlet end of the fuel pump and secure with supplied hose clamp. NOTE: The heater fuel pickup supply tube is identified by not having a fitting. 76
78 Heater Fuel Pump and Fuel Line Installation 77
79 TriPac APU Fuel Line Installation Installation Utility Knife Special Tools Required NOTE: Be sure to connect the APU s fuel supply line to the fuel SUPPLY pickup tube connection identified and mark earlier. 1. Route the APU fuel supply line to the SUPPLY connection of the fuel pickup tube, cut to proper length and attach with compression fittings. 2. Route the APU fuel return line to the RETURN connection of the fuel pickup tube, cut to proper length and attach with compression fittings. 3. Route and secure all fuel lines with adequate clamps. 78
80 TriPac APU Fuel Line Installation 79
81 Coolant Hose Routing and Connections Each coolant hose installation will be different. Carefully review the tractor s engine cooling system to determine the best method for installing the cooling hoses and hand valves. Consult tractor dealer or OEM for assistance in identifying correct coolant hoses or engine fittings required for proper installation. NOTE: All APU coolant hoses should be installed in such a way as to allow the hand valves to isolate the APU cooling system from the tractor s cooling system. This hand valve must be located as close to the tractor s engine as possible. Theory of Operation With the tractor s engine shut off, and the TriPac APU engine operating, warm coolant is circulated from the APU engine up to the tractor s engine and then back to the APU engine. This keeps the tractor s engine warm allowing for easier cold starts. When the TriPac APU engine is running and coolant temperature reaches normal operating temperature of 180 F (82 C), the thermostat will open allowing hot coolant to flow from the APU OUTLET fitting forward to the tractor s engine. Hot coolant enters the tractor s engine block through an INLET fitting typically located near the water pump. Hot coolant circulates through the tractor s engine block and exits an OUTLET fitting typically used for the heater. Warm coolant then returns to the TriPac APU and enters the INLET fitting. Warm coolant circulates through the APU s engine block to absorb heat before being pumped back out to the tractor s engine. Hand valves are installed to allow the APU s cooling system to be isolated from the tractor s cooling system to allow for component servicing. Tractor Coolant Hose Installation PREFERRED INSTALLATION APU Coolant Hoses Tee d Directly Into Tractor s Heater Hoses NOTE: Skip this step if your APU has the Closed Loop Cooling Option. Installation Utility Knife Pipe Thread Sealer Special Tools Required 1. Drain coolant from tractor s radiator and engine. Keep for re-use. 2. Locate HEATER INLET coolant hose on tractor s engine: Cut tractor s heater inlet hose and install pipe fittings, elbow, tee fitting and hand valve. From the hand valve, connect and route a new coolant hose back to the OUTLET fitting located on the APU. CLOSE hand valve. 3. Locate HEATER OUTLET coolant hose on the tractor s engine: Cut tractor s heater outlet hose and install pipe fittings, elbow, tee fitting and hand valve. From shutoff valve, connect and route a new coolant hose back to the INLET fitting located on the APU precooler. OPEN hand valve. 4. Install protective plastic sleeving on all coolant hoses and secure coolant hoses with clamps. 5. Make sure the APU OUTLET hand valve (tractor inlet, next to water pump) is closed. If this valve is left open, coolant will be sitting on top of the TriPac thermostat and not allow the TriPac engine to bleed air. NOTE: The system will be bled of air later by following the A/C System Charging and APU Engine Start-up Procedures on page 94. Add coolant removed earlier back into the tractor s radiator. DO NOT start the tractor s engine at this time. 6. Install supplied coolant nameplate in a visible area near the tractor s coolant fill cap. 80
82 Tractor Coolant Hose Installation PREFERRED INSTALLATION APU Coolant Hoses Tee d Directly Into Tractor s Heater Hoses NOTE: If the Arctic Block Temperature Sensor Option is to be installed, it should be installed at this time also. See page
83 Tractor Coolant Hose Installation ALTERNATIVE INSTALLATION Separate APU Coolant Hoses Attached Directly To Threaded Fittings Located On Tractor s Engine Coolant Hose Routing and Connections Each coolant hose installation will be different. Carefully review the tractor s engine cooling system to determine the best method for installing the TriPac APU cooling hoses and hand valves. Consult the tractor dealer or OEM for assistance in identifying correct coolant hoses or engine fittings required for proper installation. NOTE: All APU coolant hoses should be installed in such a way as to allow the hand valves to isolate the APU cooling system from the tractor s cooling system. This hand valve must be located as close to the tractor engine as possible. Theory of Operation With the tractor s engine shut off, and the TriPac APU engine operating, warm coolant is circulated from the APU engine up to the tractor s engine and then back to the APU engine. This keeps the tractor s engine warm allowing for easier cold starts. When the TriPac APU engine is running and coolant temperature reaches normal operating temperature of 180 F (82 C), the thermostat will open allowing hot coolant to flow from the APU OUTLET fitting forward to the tractor s engine. Hot coolant enters the tractor s engine block through an INLET fitting typically located near the water pump. Hot coolant circulates through the tractor s engine block and exits an OUTLET fitting typically used for the heater. Warm coolant then returns to the TriPac APU and enters the INLET fitting. Warm coolant circulates through the APU s engine block to absorb heat before being pumped back out to the tractor s engine. Shutoff valves are installed to allow the APU s cooling system to be isolated from the tractor s cooling system to allow for component servicing. NOTE: Skip this step if your APU has the Closed Loop Cooling Option. Installation Utility Knife Pipe Thread Sealer Special Tools Required 1. Drain coolant from tractor s radiator and engine. Keep for re-use. 2. Use the tractor s heater hoses as a guide to locate an INLET plug on the engine before the water pump. Remove plug and: Install hose fittings, short section of coolant hose and hand valve. From the hand valve, install a hose fitting and route a new coolant hose back to the OUTLET fitting located on the APU. CLOSE hand valve. 3. Use the tractor s heater hoses as a guide to locate an OUTLET plug on the engine block. Remove plug and: Install hose fittings, short section of coolant hose and hand valve From the hand valve, install a hose fitting and route a new coolant hose back to the INLET fitting located on the APU precooler. OPEN Hand Valve. 4. Install protective plastic sleeving on all coolant hoses and secure hoses with adequate clamps. 5. Make sure the APU OUTLET hand valve (tractor inlet, next to water pump) is closed. If this valve is left open, coolant will be sitting on top of the TriPac thermostat and not allow the TriPac engine to bleed air. NOTE: The system will be bled of air later by following the A/C System Charging and APU Engine Start-up Procedures on page 94. Add coolant removed earlier back into the tractor s radiator. DO NOT start the tractor s engine at this time. 6. Install supplied coolant nameplate in a visible area near the tractor s coolant fill cap. 82
84 Tractor Coolant Hose Installation ALTERNATIVE INSTALLATION Separate APU Coolant Hoses Attached Directly To Threaded Fittings Located On Tractor s Engine NOTE: If the Arctic Block Temperature Sensor Option is to be installed, it should be installed at this time also. See page
85 Arctic Switch (Option) Installation NOTE: When installing the Arctic Switch option, the pre-cooler fan temperature switch mounted on the pre-cooler coil (if present) will not be used. The Arctic Switch should not be mounted on the pre-cooler coil. Both switches should only be mounted in the temperature tube assembly in the coolant line. 1. Locate the INLET coolant hose and measure approximately 6.00 (152.4 mm) out from the APU. Use a hose cutter and remove a 3.00'' (76.2 mm) section of coolant hose. 2. Install the temperature tube assembly with hose clamps into the coolant hose noting the correct position of switches. Tighten the hose clamps securely. IMPORTANT: When the Temperature Tube Assembly is installed horizontally the switches must face down, vertical installations the switches must face towards the APU (Detail A). 3. Insert the BLUE and WHITE wires through the existing main wire harness grommet and into the APU. 4. Route the BLUE wires along the main wire harness towards the Pre-Cooler Fan Temperature Switch (if present) and the WHITE wires to the empty connector plug (7A, 8FET). 5. BLUE Wire Connections Preferred Method - If present, unplug the Pre-Cooler Fan Temperature Switch (CH, LWT) mounted on the Pre-Cooler coil as it will no longer be used. Insert the BLUE pin terminated wires into the supplied shroud connector. The wires are not polarity sensitive and can be inserted in either position. Plug the connector into the mating harness connector (CH, LWT). Alternative Method - If present, unplug the Pre-Cooler Fan Temperature Switch (CH, LWT) mounted on the Pre-Cooler coil as it will no longer be used. Cut the connector off the harness and the terminal pins off the BLUE wires. Strip the wire ends, connect the wires with butt splice connectors, crimp firmly and use a heat gun to shrink the butt splice insulation. The wires are not polarity sensitive and can be connected to either wire. 6. WHITE Wire Connections Preferred Method -Insert the WHITE pin terminated wires into the supplied tower connector. The wires are not polarity sensitive and can be inserted in either position. Plug the connector into the mating harness connector (7A and 8FET). Alternative Method -Locate the existing empty connector plug (7A, 8FET). Cut the connector off the harness and the terminal pins off the WHITE wires. Strip the wire ends, connect the wires with butt splice connectors, crimp firmly and use a heat gun to shrink the butt splice insulation. The wires are not polarity sensitive and can be connected to either wire. 7. Provide a drip loop and secure all wires adequately with supplied band wraps. 84

86 Arctic Switch (Option) 85
87 Heater Fuel Pump Connections Wire Cutters Terminal Crimping Tool Special Tools Required CAUTION: To prevent the APU from starting unexpectedly, set all electrical controls to the OFF position BEFORE connecting wires to battery. 1. Route the heater fuel pump harness down to the fuel pump and cut the wires to the correct length. Strip wire ends, slide on rubber sealing boots, attach pin terminals securely with crimping tool. Insert pin terminals into connector body until they lock in place. NOTE: The pump is not polarity sensitive. The wires can be installed in either location of the connector body. Snap locking cover closed on connector body. DO NOT connect the fuel pump harness to the fuel pump at this time. The fuel pump harness will be attached later after the fuel pump has been primed. Heater Fuel Pump Connections 86
88 Heater Fuel Pump Connections NOTE: DO NOT connect these to the interface board at this time. NOTE: DO NOT connect to fuel pump at this time. 87
89 Fuse Holder and APU Battery Connections Important Battery Cable Installation Information IMPORTANT: See Battery Cable Installation and Routing on page 7 for additional information. NOTE: Do not attach both the positive and the negative cables to a single battery. For best results, attach the positive cable to the first battery and the negative cable to the last battery as shown. 1. FUSE HOLDER Mount fuse holder securely to the battery box structure with (installer supplied) 1/4-20 hardware within 12.0 inches (304.8 mm) of the positive battery terminal. It is not acceptable to leave fuse holder loose or tied to other cabling. DO NOT install fuse at this time. 2. POSITIVE BATTERY CABLE AND VOLTAGE SENSING WIRE Route positive cable with voltage sensing wire from TriPac to fuse holder. Cut battery cable to length and strip 1/2 to 3/4 in. (13 to 19 mm) of insulation from cable end. Slide heat shrink tubing and terminal ring with small hole onto end of cable. Attach terminal ring firmly to cable. Position heat shrink tubing to cover exposed wires on terminal ring and use a heat gun to shrink tubing in place. Install cable onto fuse holder stud and only hand tighten nut. Cut voltage sensing wire to length, strip end, attach in-line fuse with splice connector. Slide heat shrink tubing and terminal ring onto other end of in-line fuse. Attach terminal ring firmly to wire. Position heat shrink tubing to cover exposed wires on terminal ring and use a heat gun to shrink tubing in place. This wire will be attached in the step SHORT POSITIVE BATTERY CABLE Fabricate a short cable (from the excess positive cable) that will reach from the battery positive terminal to fuse holder and strip 1/2 to 3/4 in. (13 to 19 mm) of insulation from cable ends. Slide heat shrink tubing and terminal ring with small hole onto end of cable. Attach terminal ring firmly to cable. Slide heat shrink tubing and terminal ring with large hole onto other end of cable. Attach terminal ring firmly to cable. Position heat shrink tubing to cover exposed wires on terminal rings and use a heat gun to shrink tubing in place. Install battery cable end with small hole terminal ring followed by the voltage sensing wire onto the fuse holder stud and only hand tighten nut. Install battery cable end with large hole terminal ring connector onto the battery s POSITIVE (+) connection and tighten securely. Apply Superlube (PN ) onto the battery s connection. 4. NEGATIVE BATTERY CABLE Route negative cable from TriPac to tractor s negative battery, cut to length and strip 1/2 to 3/4 in. (13 to 19 mm) of insulation from cable end. Slide supplied heat shrink tubing and terminal ring onto end of cable. Attach terminal ring firmly to end of cable. Position heat shrink tubing to cover exposed wires on terminal ring and use a heat gun to shrink tubing in place. Install negative cable terminal lug onto the battery s NEGATIVE (-) connection and tighten securely. Apply Superlube (PN ) onto the battery s connection. 5. FUSE Remove nuts from fuse holder and place fuse onto the studs and on top of sensing wire and battery cables lugs, then reinstall nuts. Tighten the nuts to 120 in-lb (13.5 N m) and close the fuse holder cover securely. 88

90 Fuse Holder and APU Battery Connections CAUTION: Route and secure the TriPac battery cables with cable ties so they do not cross or rub on existing cables! 89
91 Priming the Heater Fuel Pump Priming the Heater Fuel System Special Tools Required Heater Priming Harness ( ) The heater uses a pulse style fuel pump. You must use the heater priming harness to operate the fuel pump to prime the system. Applying continuous power to the pump will not work. NOTE: Verify there is a sufficient amount of fuel in the fuel tank. 1. Attach the Heater Priming Harness connector to the heater fuel pump. 2. Attach the alligator clips to the battery: Wire RED BLACK Battery Connection POSITIVE NEGATIVE 3. Turn the priming harness switch to the ON position. 4. The flasher unit will operate the fuel pump (ON/OFF/ON/OFF) to prime the system. 5. Allow the system to operate for approximately 5 minutes to bleed air from the fuel lines. NOTE: Running the fuel pump longer then 5 minutes will cause the heater to emit excessive white smoke when operated. 6. Check fuel lines and system for leaks. 7. Turn the priming harness switch to the OFF position. Disconnect the positive and then the negative battery connections. 8. Disconnect the priming harness connector from the heater fuel pump. 9. Attach the heater fuel pump harness onto the heater fuel pump. 90
92 Priming the Heater Fuel Pump 91
93 Heater Start-Up Procedures Heater Start-Up Procedures NOTE: See Operating and Diagnostic Manual TK OD for further diagnosis and service procedures if needed.. 1. Connect only the 2-pin connector (Red, Brown) heater power wire (installed earlier in the control box) to mating connector (J9) on the interface board. DO NOT connect the 14-pin connector at this time. It will be connected after the System Run-in Procedures have been completed. 2. Connect the Heater Diagnostic Tool to the 8-pin diagnostic connector located on the heater harness inside the sleeper near the heater. The diagnostic controller will automatically turn on and display will show dia. 3. To operate the heater: Special Tools Required Heater Diagnostic Tool ( ) Press the D keypad. The display will begin flashing After eight seconds, the display will flash AF:00 indicating no error. NOTE: If an error code appears, push both L keypads at the same time. This will clear any stored codes and the display will flash AF:00. The heater will begin a four minute start up procedure and will then be operating in HIGH BOOST mode. 4. With the heater operating check the following: Exhaust and intake hoses are installed and functioning correctly. Heat is flowing out of the heat duct inside the sleeper. 5. To shut the heater off: Press both L keypads at the same time. This will clear any stored codes. Push the D keypad. Leave the Heater Diagnostic Tool connected at this time. 92
94 Heater Start-Up Procedures NOTE: DO NOT connect at this time. 93
95 A/C System Charging and APU Engine Start-up Procedures A/C System Charging and APU Engine Start-up Procedures This is a multi-step procedure consisting of: a. adding a partial refrigerant charge to the system b. verifying APU engine has the proper amount of oil c. bleeding air from the APU cooling system d. bleeding air from the APU fuel lines e. running the APU with the A/C operating and adjusting the engine rpm s f. system fluids leak check g. verifying alternator output voltage h. adding a full refrigerant charge to the system Adding a Partial Refrigerant Charge IMPORTANT: Before starting the APU engine, oil and coolant levels must be checked to prevent damage to the engine and the A/C system must have a partial charge of refrigerant added to prevent damage to the A/C compressor. See Bleeding the Coolant System on page 96 and Bleeding the Fuel Lines on page 98 before adding a partial refrigerant charge. R134a Refrigerant Scale Special Tools Required 1. Connect the refrigerant bottle to the gauge manifold and place it on a scale. 2. Open the refrigerant bottle valve for liquid and purge the charging line. 3. Keep the low pressure side valve of the gauge manifold closed. Open the high pressure side valve. 4. Add refrigerant until reaching approximately 1 lb. 2 oz. of R-134a. 5. Close the refrigerant bottle valve and the high side valve of the gauge manifold. 94
96 A/C System Charging and APU Engine Start-up Procedures 95
97 A/C System Charging and APU Engine Start-up Procedures APU Engine Start-up Procedures CAUTION: DO NOT operate the APU engine before a partial refrigerant charge has been added or damage to the A/C compressor will result. IMPORTANT: BEFORE operating the APU engine check the oil level. Add proper amount and type of oil if needed. Oil Capacity TriPac APU Oil Specifications 4.5 qts.(including filter) Oil Type 10W30 for temperatures at or above -13 F (-25 C) 5W30 for temperatures at or below -13 F (-25 C) CAUTION: Units equipped with the Closed Loop Cooling Option only - Check sight glass on overflow tank to confirm coolant level before starting the APU s engine. Bleeding the Coolant System APU s Equipped with Traditional Tractor Coolant Integration 1. Verify APU OUTLET hand valve is CLOSED (tractor inlet, next to water pump). If this valve is left open, coolant will be sitting on top of the TriPac thermostat and not allow the TriPac engine to bleed air. 2. Open the APU INLET hand valve. 3. Place a clean container under the bleed line to catch coolant that is drained. 4. Open the bleed petcock on the APU engine to allow air to bleed out. 5. When a steady stream of coolant flows from the bleed line, close the petcock. 6. Open the APU OUTLET hand valve. 7. Replace drained coolant from the TriPac back into the tractor s radiator. 8. Bleed TriPac fuel system. See Bleeding the Fuel Lines on page 98. CAUTION: Verify the APU engine has proper amount of oil and the A/C system has a partial refrigerant charge before starting the engine. 9. Start the TriPac engine. 10. The remaining air in the system will be forced to the tractor radiator and the TriPac APU should now be bled of all air. APU s equipped with the Closed Loop Cooling Option CAUTION: Do not start the engine without bleeding the air out of the engine block. NOTE: If an engine runs with air trapped in the block, the engine may be damaged. The high water temperature switch may not protect an engine that has air trapped in the block, because the high water temperature switch is designed to protect an engine from overheating due to failures in the cooling system and the loss of coolant. Often when a TriPac unit cooling system is refilled, air is trapped in the engine block and/or under the thermostat. Use the following procedure to bleed air out of the block and the cooling system: 1. Place a clean container under the TriPac bleed line to catch the coolant that is drained. 2. Open bleed petcock on the TriPac engine to allow air to bleed out. NOTE: Units built prior to September 2006 have the bleed petcock on top of the thermostat housing. On theses units, remove the water pump bleeder bolt and bleed the air until there is a stead stream of coolant. Then reinstall the water pump bleeder bolt. 96

98 A/C System Charging and APU Engine Start-up Procedures 3. Slowly pour coolant into the expansion tank until a steady stream of coolant flows from the bleed line, then close the bleed petcock. 4. Slowly pour coolant to the expansion tank until the coolant level is at the top of the window in the expansion tank. 5. Install the expansion tank cap. 6. Bleed the TriPac fuel system. See Bleeding the Fuel Lines on page 98. CAUTION: Verify the APU engine has proper amount of oil and the A/C system has a partial refrigerant charge before starting the engine 1 7. Start the TriPac engine and use a non-contact thermometer pointed at the water pump bleeder bolt to monitor the coolant temperature. The water pump bleeder bolt located next to the bleed petcock on the water pump (see Figure 1). 8. When the temperature reaches 150 F (66 C) for units with a 160 F (71 C) thermostats, or 170 F (76 C) for units with 180 F (82 C) thermostats, shut off the engine for 2 minutes to allow the thermostat to heat soak and open completely to purge air out of block, head, and water pump After 2 minutes, re-start the engine. 10. Remove the expansion tank cap and slowly pour coolant to the expansion tank until the coolant level is at the top of the window in the expansion tank, then reinstall the expansion tank cap. Repeat steps 8 through 10 until the coolant level stabilizes. The TriPac APU cooling system should now be bled of all air. 1. Water Pump Bleeder Bolt 2. Bleed Petcock Figure 1: Water Pump Bleeder Bolt and Bleed Petcock Locations 97

99 A/C System Charging and APU Engine Start-up Procedures Bleeding the Fuel Lines 1. Locate the On/OFF switch inside the APU and turn the switch ON. 2. Crack open the fuel return line banjo fitting on the APU engine. 3. At the HMI: press MAIN POWER Key ON press APU SYSTEM Key ON press MODE Key to AC press FAN Key to set fan speed press UP or DOWN Keys to set the thermostat to 50 F (10 C) multiple start attempts will be required to start the engine. NOTE: The fuel pump only runs when the engine is turning over. If the engine cranks for 30 seconds and fails to start, a start fault shutdown will be generated. This alarm code will have to be cleared before attempting another start sequence. 4. Close the fuel return line banjo fitting when a steady flow of fuel is observed. 5. Allow engine to start. Verifying Engine Operation 1. Once the APU engine is running: verify with a strobe light tachometer the engine rpm is 1800 RPM loaded (A/C clutch engaged). Adjust as required. check cooling system for leaks check for fuel leaks check for oil leaks check for exhaust leaks verify with a digital meter that the charging voltage at the battery cables is at least 13.6 Vdc. Fuel Return Line Fitting Engine Speed Adjustment Screw 98
V-220 / V-320 Heater Kits Installation Instructions TK IM (Rev. 0, 06/17)
") Installation Manual V-220 / V-320 Heater Kits Installation Instructions TK 56340-18-IM (Rev. 0, 06/17) Installation Manual V-220 / V-320 Heater Kits Installation Instructions TK 56340-18-IM (Rev. 0, 06/17)
Installation Manual V-220 / V-320 Heater Kits Installation Instructions TK 56340-18-IM (Rev. 0, 06/17) Installation Manual V-220 / V-320 Heater Kits Installation Instructions TK 56340-18-IM (Rev. 0, 06/17)
Installation Manual. SB Domestic Refrigerated Container (DRC) Unit Single Temperature System. TK IM (Rev.
 Unit Single Temperature System. TK IM (Rev.") Installation Manual SB-210+ 30 Domestic Refrigerated Container (DRC) Unit Single Temperature System TK 54654-5-IM (Rev. 0, 12/10) Copyright 2010 Thermo King Corp., Minneapolis, MN, U.S.A. Printed in U.S.A.
Installation Manual SB-210+ 30 Domestic Refrigerated Container (DRC) Unit Single Temperature System TK 54654-5-IM (Rev. 0, 12/10) Copyright 2010 Thermo King Corp., Minneapolis, MN, U.S.A. Printed in U.S.A.
SB Domestic Refrigerated Container (DRC) Unit Single Temperature System TK IM (Rev. 2, 02/13)
 Unit Single Temperature System TK IM (Rev. 2, 02/13)") Installation Manual SB-210+ 30 Domestic Refrigerated Container (DRC) Unit Single Temperature System TK 54654-5-IM (Rev. 2, 02/13) Installation Manual SB-210+ 30 Domestic Refrigerated Container (DRC) Unit
Installation Manual SB-210+ 30 Domestic Refrigerated Container (DRC) Unit Single Temperature System TK 54654-5-IM (Rev. 2, 02/13) Installation Manual SB-210+ 30 Domestic Refrigerated Container (DRC) Unit
Installation Manual. Truck Edition V-520 RT Series Model 10, 20, 30 and 50 Single Temperature Systems. TK IM (Rev.
 Installation Manual Truck Edition V-520 RT Series Model 10, 20, 30 and 50 Single Temperature Systems TK 54987-1-IM (Rev. 2, 03/12) Installation Manual Truck Edition V-520 RT Series Models 10, 20, 30 and
Truck Edition V-520 RT Series Models 10, 20, 30 and 50 Single Temperature Systems TK IM (Rev. 8, 1/16)
") Installation Manual Truck Edition V-520 RT Series Models 10, 20, 30 and 50 Single Temperature Systems TK 54987-18-IM (Rev. 8, 1/16) Installation Manual Truck Edition V-520 RT Series Models 10, 20, 30
Installation Manual Truck Edition V-520 RT Series Models 10, 20, 30 and 50 Single Temperature Systems TK 54987-18-IM (Rev. 8, 1/16) Installation Manual Truck Edition V-520 RT Series Models 10, 20, 30
Installation Manual. Truck Edition V-500 Series. TK IM (Rev. 3, 01/05) Copyright 2004 Thermo King Corp., Minneapolis, MN, U.S.A.
 Copyright 2004 Thermo King Corp., Minneapolis, MN, U.S.A.") Installation Manual Truck Edition V-500 Series TK 51857-1-IM (Rev. 3, 01/05) Copyright 2004 Thermo King Corp., Minneapolis, MN, U.S.A. Introduction This manual was written to assist with the installation
Installation Manual Truck Edition V-500 Series TK 51857-1-IM (Rev. 3, 01/05) Copyright 2004 Thermo King Corp., Minneapolis, MN, U.S.A. Introduction This manual was written to assist with the installation
Installation Manual. NAD Truck Edition V-200 and V-300 Series. TK IM (Rev. 7, 02/12)
") Installation Manual NAD Truck Edition V-200 and V-300 Series TK 51856-1-IM (Rev. 7, 02/12) Installation Manual NAD Truck Edition V-200 and V-300 Series TK 51856-1-IM (Rev. 7, 02/12) Copyright 2003 Thermo
Installation Manual NAD Truck Edition V-200 and V-300 Series TK 51856-1-IM (Rev. 7, 02/12) Installation Manual NAD Truck Edition V-200 and V-300 Series TK 51856-1-IM (Rev. 7, 02/12) Copyright 2003 Thermo
Truck Edition V-520 Series Single Temperature and SPECTRUM Multi-Temperature Systems TK IM (Rev. 11, 03/18)
") Installation Manual Truck Edition V-520 Series Single Temperature and SPECTRUM Multi-Temperature Systems TK 54014-18-IM (Rev. 11, 03/18) Installation Manual Truck Edition V-520 Series Single Temperature
Installation Manual Truck Edition V-520 Series Single Temperature and SPECTRUM Multi-Temperature Systems TK 54014-18-IM (Rev. 11, 03/18) Installation Manual Truck Edition V-520 Series Single Temperature
Truck Edition V-520 Series Single Temperature and SPECTRUM Multi-Temperature Systems TK IM (Rev. 4, 01/12)
") Installation Manual Truck Edition V-520 Series Single Temperature and SPECTRUM Multi-Temperature Systems TK 54014-18-IM (Rev. 4, 01/12) Installation Manual Truck Edition V-520 Series Single Temperature
Installation Manual Truck Edition V-520 Series Single Temperature and SPECTRUM Multi-Temperature Systems TK 54014-18-IM (Rev. 4, 01/12) Installation Manual Truck Edition V-520 Series Single Temperature
JOHN DEERE GATOR HPX/XUV 2 PASSENGER HEATER INSTALLATION INSTRUCTIONS (p/n: 9PH20S30)
") P. 1 of 12 JOHN DEERE GATOR HPX/XUV 2 PASSENGER HEATER INSTALLATION INSTRUCTIONS (p/n: 9PH20S30) Item: Qty: Description: 1 2 1 x 1 x 5/8 Tee Fitting 2 2 Plastic Snap-in Hose Grommet 3 4 1-1/2" Hose Clamps
P. 1 of 12 JOHN DEERE GATOR HPX/XUV 2 PASSENGER HEATER INSTALLATION INSTRUCTIONS (p/n: 9PH20S30) Item: Qty: Description: 1 2 1 x 1 x 5/8 Tee Fitting 2 2 Plastic Snap-in Hose Grommet 3 4 1-1/2" Hose Clamps
Trailer Edition Precedent S-600M, C-600M and S-600DE with S-2 and S-3 Remote Evaporator Systems TK IM (Rev. 4, 12/15)
") Installation Manual Trailer Edition Precedent S-600M, C-600M and S-600DE with S-2 and S-3 Remote Evaporator Systems TK 55774-2-IM (Rev. 4, 12/15) Installation Manual - B Trailer Edition Precedent S-600M,
Installation Manual Trailer Edition Precedent S-600M, C-600M and S-600DE with S-2 and S-3 Remote Evaporator Systems TK 55774-2-IM (Rev. 4, 12/15) Installation Manual - B Trailer Edition Precedent S-600M,
Installation Manual. Truck Edition SPECTRUM Multi-Temperature Systems T-800R, T-1000R and T-1200R (ESA ONLY) T-1000 (TSA)
 T-1000 (TSA)") Installation Manual Truck Edition SPECTRUM Multi-Temperature Systems T-800R, T-1000R and T-1200R (ESA ONLY) T-1000 (TSA) TK 54481-1-IM (Rev. 5, 10/11) Copyright 2009 Thermo King Corp., Minneapolis, MN,
Installation Manual Truck Edition SPECTRUM Multi-Temperature Systems T-800R, T-1000R and T-1200R (ESA ONLY) T-1000 (TSA) TK 54481-1-IM (Rev. 5, 10/11) Copyright 2009 Thermo King Corp., Minneapolis, MN,
Truck Edition V-220 / V-320 Series Single Temperature Systems TK IM (Rev. 0, 06/17)
") Installation Manual Truck Edition V-220 / V-320 Series Single Temperature Systems TK 56321-18-IM (Rev. 0, 06/17) Installation Manual Truck Edition V-220 / V-320 Series Single Temperature Systems TK 56321-18-IM
Installation Manual Truck Edition V-220 / V-320 Series Single Temperature Systems TK 56321-18-IM (Rev. 0, 06/17) Installation Manual Truck Edition V-220 / V-320 Series Single Temperature Systems TK 56321-18-IM
INSTALLATION AND COMMISSIONING MANUAL. Neos 100S Integra 20X, 30S, 35X, 40X, 50X
 Installation Truck Refrigeration & Commissioning Manual: INSTALLATION AND COMMISSIONING MANUAL for Neos 100S Integra 20X, 30S, 35X, 40X, 50X Direct Drive Refrigeration Units 2017 Carrier Corporation Printed
BlueHeat AirTop 2000 Heater
 BlueHeat AirTop 000 Heater Air Heater Installation Manual Ford E-Series 6.0L Diesel Beginning Model Year: 006 Special instructions for these models Part locations may differ slightly dependent on the vehicle
specializing in AIR CONDITIONING, PARTS AND SYSTEMS for your classic hi l PERFECT FIT SERIES IN-DASH HEAT/ COOL/ DEFROST FORD TRUCK
 specializing in AIR CONDITIONING, PARTS AND SYSTEMS for your classic hi l PERFECT FIT SERIES IN-DASH HEAT/ COOL/ DEFROST 1967-72 FORD TRUCK CONTROL & OPERATING INSTRUCTIONS The controls on your new Perfect
PERFECT FIT IN-DASH HEAT/ COOL/ DEFROST FORD PICKUP
 specializing in AIR CONDITIONING, PARTS AND SYSTEMS for your classic vehicle PERFECT FIT IN-DASH HEAT/ COOL/ DEFROST 1960-66 FORD PICKUP CONTROL & OPERATING INSTRUCTIONS The controls on your new Perfect
Installation Manual. Truck Edition UT-1280 Undermount Systems. TK IM (Rev 0, 01/17)
") Installation Manual Truck Edition UT-1280 Undermount Systems TK 56374-1-IM (Rev 0, 01/17) Installation Manual Truck Edition UT-1280 Undermount Systems TK 56374-1-IM (Rev. 0, 01/17) Copyright 2017 Thermo
Installation Manual Truck Edition UT-1280 Undermount Systems TK 56374-1-IM (Rev 0, 01/17) Installation Manual Truck Edition UT-1280 Undermount Systems TK 56374-1-IM (Rev. 0, 01/17) Copyright 2017 Thermo
PERFECT FIT IN-DASH HEAT/ COOL/ DEFROST 1968 CHEVROLET IMPALA
 specializing in AIR CONDITIONING, PARTS AND SYSTEMS for your classic vehicle PERFECT FIT IN-DASH HEAT/ COOL/ DEFROST 1968 CHEVROLET IMPALA CONTROL & OPERATING INSTRUCTIONS The controls on your new Perfect
PERFECT FIT IN-DASH HEAT/ COOL/ DEFROST EARLY 1955 CHEVROLET PICKUP
 specializing in AIR CONDITIONING, PARTS AND SYSTEMS for your classic vehicle PERFECT FIT IN-DASH HEAT/ COOL/ DEFROST 1947 - EARLY 1955 CHEVROLET PICKUP CONTROL & OPERATING INSTRUCTIONS The controls on
Sleeper Heater and Air Conditioner, Blend Air System 83.05
 Sleeper Heater and Air Conditioner, Blend Air System 8.0 General Information General Description The sleeper heater and air conditioner assembly is mounted in either the baggage compartment or under the
Installation Instructions Part No , Part No Part No
 Torsion-Flex Motor mount for PSC motors and Rigid-Mount for ECM motors Replacement Kit Cancels: New Installation Instructions Part No. 327752-401, Part No. 327753-401 Part No. 327754-401 IIK-310A-45-11
PERFECT FIT SERIES IN-DASH HEAT/ COOL/ DEFROST CHEVROLET CHEVELLE/ EL CAMINO NOTE: INSTRUCTIONS DEPICT CHEVELLE
 specializing in AIR CONDITIONING, PARTS AND SYSTEMS for your classic vehicle PERFECT FIT SERIES IN-DASH HEAT/ COOL/ DEFROST 1964-65 CHEVROLET CHEVELLE/ EL CAMINO NOTE: INSTRUCTIONS DEPICT CHEVELLE CONTROL
INSTALLATION INSTRUCTIONS
 INSTALLATION INSTRUCTIONS Series Units RETAIN THESE INSTRUCTIONS FOR FUTURE REFERENCE WARNING Improper installation, adjustment, alteration, service or maintenance can cause personal injury, loss of life,
Installation Instructions T 9822 Gas Dryer. en - US, CA. To prevent accidents
 Installation Instructions T 9822 Gas Dryer To prevent accidents en - US, CA and appliance damage read these instructions before installation or use. M.-Nr. 07 431 110 2 WARNING For your safety the information
Heater for BRP Commander. Caution: Before using this product, read this manual and follow all safety instructions. Owner s Manual
 Owner s Manual Model: Can Am Commander Heater for BRP Commander Caution: Before using this product, read this manual and follow all safety instructions. Safety Instructions Kit Contents Tool Requirement
INSTALLATION MANUAL. Split-type Air Conditioner (Cooling and Heating) Indoor Unit AQB18J6WC AQB24J2WC. Outdoor Unit UQB18J6WC UQB24J2WC
 Indoor Unit AQB18J6WC AQB24J2WC. Outdoor Unit UQB18J6WC UQB24J2WC") AQB8J6WC_IM_E_25864 2006.4.4 3:29 PM Page 7 INSTALLATION MANUAL Indoor Unit AQB8J6WC AQB24J2WC Outdoor Unit UQB8J6WC UQB24J2WC ENGLISH FRANÇAIS ESPAÑOL Split-type Air Conditioner (Cooling and Heating)
AQB8J6WC_IM_E_25864 2006.4.4 3:29 PM Page 7 INSTALLATION MANUAL Indoor Unit AQB8J6WC AQB24J2WC Outdoor Unit UQB8J6WC UQB24J2WC ENGLISH FRANÇAIS ESPAÑOL Split-type Air Conditioner (Cooling and Heating)
Installation Manual. Truck Edition SPECTRUM TM TS Multi-Temperature Systems. TK IM (Rev. 11, 05/15)
") Installation Manual Truck Edition SPECTRUM TM TS Multi-Temperature Systems TK 51580-1-IM (Rev. 11, 05/15) Installation Manual Truck Edition SPECTRUM TS Multi-Temperature Systems TK 51580-1-IM (Rev. 11,
Installation Manual Truck Edition SPECTRUM TM TS Multi-Temperature Systems TK 51580-1-IM (Rev. 11, 05/15) Installation Manual Truck Edition SPECTRUM TS Multi-Temperature Systems TK 51580-1-IM (Rev. 11,
PERFECT FIT IN-DASH HEAT/ COOL/ DEFROST PLYMOUTH BELVEDERE
 PERFECT FIT IN-DASH HEAT/ COOL/ DEFROST 1966-67 PLYMOUTH BELVEDERE CONTROL & OPERATING INSTRUCTIONS The controls on your new Perfect Fit system. Offers complete comfort capabilities in virtually every
BC BRONCOS AIR CONDITIONING UNIT
 BC BRONCOS AIR CONDITIONING UNIT CAUTION If you are not familiar with the principals of air conditioning, have an authorized air conditioning technician evacuate and charge the system. Serious damage to
INSTALLATION INSTRUCTIONS
 2008 Lennox Industries Inc. Dallas, Texas, USA INSTALLATION INSTRUCTIONS CH33 Series Units EVAPORATOR COILS 505,264M (65484504) 05/08 Supersedes 10/07 Litho U.S.A. RETAIN THESE INSTRUCTIONS FOR FUTURE
PERFECT FIT SERIES IN-DASH HEAT/ COOL/ DEFROST CHEVROLET NOVA
 specializing in AIR CONDITIONING, PARTS AND SYSTEMS for your classic PERFECT FIT SERIES IN-DASH HEAT/ COOL/ DEFROST 1966-67 CHEVROLET NOVA CONTROL & OPERATING INSTRUCTIONS The controls on your new Perfect
PL Series Premier Indoor Plenum Coils
 IM-PLC-0667392-04 April 2016 PL Series Premier Indoor Plenum Coils Installation Instructions GENERAL ADP evaporator coils are designed for use with condensing units or heat pump units. These instructions
INSTALLATION MANUAL. Split-type Air Conditioner (Cooling and Heating) Outdoor Unit UQB09JJWC UQB12JJWC. Indoor Unit AQB09JJWC AQB12JJWC
 Outdoor Unit UQB09JJWC UQB12JJWC. Indoor Unit AQB09JJWC AQB12JJWC") AQB09JJ6WC_IM_E_2585 2006.4.17 4:26 PM Page 17 INSTALLATION MANUAL Indoor Unit AQB09JJWC AQB12JJWC Outdoor Unit UQB09JJWC UQB12JJWC ENGLISH FRANÇAIS ESPAÑOL Split-type Air Conditioner (Cooling and Heating)
AQB09JJ6WC_IM_E_2585 2006.4.17 4:26 PM Page 17 INSTALLATION MANUAL Indoor Unit AQB09JJWC AQB12JJWC Outdoor Unit UQB09JJWC UQB12JJWC ENGLISH FRANÇAIS ESPAÑOL Split-type Air Conditioner (Cooling and Heating)
TABLE OF CONTENTS. NOTE: Read the entire instruction manual before starting the installation. TROUBLESHOOTING... 13
 R 410A Duct Free Split System Air Conditioner and Heat Pump Product Family: DFS4(A/H) System, DFC4(A/H)3 Outdoor, DFF4(A/H)H Indoor NOTE: Read the entire instruction manual before starting the installation.
Camaro A/C Install Instructions
 1967-1968 Camaro A/C Install Instructions This kit is designed for the 1967-1968 non A/C equipped Camaro. This kit can be used with or without Astro vents Step One Remove the following factory components:
1998 Expedition/Navigator Workshop Manual
 Page 1 of 8 SECTION 412-00: Climate Control System - General Information 1998 Expedition/Navigator Workshop Manual DESCRIPTION AND OPERATION Procedure revision date: 02/11/2000 Climate Control System WARNING:
Installation Instructions
 PAGE 1 Installation Instructions Important information about your new a/c system. Please read the following directions prior to installing this a/c system. PN: CK6772-1CHPU 1967-1972 Chevy PU A/C Kit Contact
PRELIMINARY INSTALLATION. Operation & Service Manual. Carrier Transicold Europe 03/09/07 Viento - Installation/Rev- #1/56
 INSTALLATION Carrier Transicold Europe 03/09/07 Viento - Installation/Rev- #1/56 INSTALLATION Table of content Introduction...4 Preparation before installation...5 Vehicle partition... 6 Box preparation...7
Heating and ventilation system,
 Page 1 of 24 87-151 Heating and ventilation system, servicing Instrument panel air outlets and air guide ducts CAUTION! Before working on the electrical system: Obtain security code for anti-theft radio.
an ISO 9001:2015 Registered Company
 an ISO 9001:2015 Registered Company Mark IV (672001-VHY) 18865 Goll St. San Antonio, TX 78266 Phone: 800-862-6658 Sales: sales@vintageair.com Tech Support: tech@vintageair.com www.vintageair.com 902001-VHY
PERFECT FIT SERIES IN-DASH HEAT/ COOL/ DEFROST MUSTANG
 specializing in AIR CONDITIONING, PARTS AND SYSTEMS for your classic vehicle PERFECT FIT SERIES IN-DASH HEAT/ COOL/ DEFROST 1965-66 MUSTANG CONTROL & OPERATING INSTRUCTIONS The controls on your new Perfect
an ISO 9001:2008 Registered Company ShortPac HEAT/COOL (05000-QUX-A/05000-VUX-A)
") an ISO 9001:2008 Registered Company ShortPac (05000-QUX-A/05000-VUX-A) 18865 GOLL ST. - SAN ANTONIO, TX. - 78266 - ph.210-654-7171 - fax 210-654-3113 900499 REV C 3/7/14, ShortPac EVAPORATOR KIT PG 1 OF
an ISO 9001:2008 Registered Company ShortPac (05000-QUX-A/05000-VUX-A) 18865 GOLL ST. - SAN ANTONIO, TX. - 78266 - ph.210-654-7171 - fax 210-654-3113 900499 REV C 3/7/14, ShortPac EVAPORATOR KIT PG 1 OF
TOYOTA FJ-40 DIRECTIONS
 PAGE 1 TOYOTA FJ-40 DIRECTIONS Please read the following directions prior to installing this a/c system. Contact us by email or phone if you need any assistance or information regarding this a/c system.
Product Support Bulletin
 MODEL: SUBJECT: CONVENTIONAL, W/ C7 CAT ENGINE WEBASTO TSL-17 HEATER Body DATE: APRIL 13, 2004 INDEX: 6 PAGE: 1 OF 16 Before you start this procedure, perform Freightliner Service Bulletin #20-7 first.
Climate Control System
 Page 1 of 13 SECTION 412-00: Climate Control System General Information DESCRIPTION AND OPERATION 1998 Mark VIII Workshop Manual Climate Control System Cautions and Warnings WARNING: To avoid accidental
INSTALLATION INSTRUCTIONS TXV Coils for Manufactured Housing EMA
 TXV Coils for Manufactured Housing EMA NOTE: Read the entire instruction manual before starting the installation. SAFETY CONSIDERATIONS Improper installation, adjustment, alteration, service, maintenance,
BUILT-IN DISHWASHER INSTALLATION INSTRUCTIONS
 BUILT-IN DISHWASHER INSTALLATION INSTRUCTIONS PLEASE READ COMPLETE INSTRUCTIONS BEFORE YOU BEGIN LEAVE INSTALLATION INSTRUCTIONS AND USER'S GUIDE WITH OWNER ALL ELECTRIC WIRING AND PLUMBING MUST BE DONE
Models: GW/R-T GW/R-2-T GW/R-3-T
 Part# GW/R-T-OM 1/12/04 TN Models: GW/R-T GW/R-2-T GW/R-3-T This manual contains important information concerning the installation and operation of the gun washers listed above. Read manual thoroughly
Installation Instructions
 40MBFQ Floor Console Ductless System Sizes 09 to 12 Installation Instructions TABLE OF CONTENTS PAGE SAFETY CONSIDERATIONS... 2 PARTS LIST... 3 SYSTEM REQUIREMENTS... 4 DIMENSIONS... 5 CLEARANCES... 5
BlueHeat Coolant Heater
 BlueHeat Coolant Heater Dodge Ram 500 / 3500 003 / 004-5. Liter Gasoline 003 / 006-5.9 Liter Diesel 00 6. Liter Diesel Installation Instructions DOC P/N 500068B KIT P/N 5000498C PRELIMINARY INFORMATION
INSTALLATION INSTRUCTIONS FOR 6532 SERIES PACKAGE HEAT PUMP
 INSTALLATION INSTRUCTIONS FOR 6532 SERIES PACKAGE HEAT PUMP RV Products A Division of Airxcel, Inc. P.O. Box 4020 Wichita, KS 67204 1976-360 (1-02) PP TABLE OF CONTENTS 1. Warnings......................................................
INTRODUCTION. NOTE: Read the entire instruction manual before starting the installation. FIRE, EXPLOSION, ELECTRICAL SHOCK HAZARD
 Installation Instructions NOTE: Read the entire instruction manual before starting the installation. SAFETY CONSIDERATIONS Improper installation, adjustment, alteration, service, maintenance, or use can
INSTALLATION MANUAL SPLIT TYPE ROOM AIR CONDITIONER (PART NO )
") SPLIT TYPE ROOM AIR CONDITIONER INSTALLATION MANUAL (PART NO. 9312791019-01) This air conditioner uses new refrigerant HFC (R410A). The basic installation work procedures are the same as conventional refrigerant
SPLIT TYPE ROOM AIR CONDITIONER INSTALLATION MANUAL (PART NO. 9312791019-01) This air conditioner uses new refrigerant HFC (R410A). The basic installation work procedures are the same as conventional refrigerant
ModulAir Air Dryer with External Purge Tank - Changeover from Bendix AD-IS for Peterbilt Installation. Air Dryer Mounting Bracket (Item 1)
") Instruction Guide L31259 11/10 ModulAir Air Dryer with External Purge Tank - Changeover from Bendix AD-IS for Peterbilt Installation Air Dryer Mounting Bracket (Item 1) Tank Mounting Bracket (Item 19)
Instruction Guide L31259 11/10 ModulAir Air Dryer with External Purge Tank - Changeover from Bendix AD-IS for Peterbilt Installation Air Dryer Mounting Bracket (Item 1) Tank Mounting Bracket (Item 19)
Ductless Split Air Conditioner
 Ductless Split Air Conditioner Installation Manual Indoor HSU09VHG(DB)-W HSU12VHG(DB)-W HSU18VHH(DB)-W HSU24VHG(DB)-W Outdoor HSU09VHG(DB)-G HSU12VHG(DB)-G HSU18VHH(DB)-G HSU24VHG(DB)-G Table of Contents
Installation instructions for the T 9820 Gas Dryer
 Installation instructions for the T 9820 Gas Dryer The T 9820 gas dryer is only approved for use in the USA and Canada. It is not approved for use in Mexico. To prevent accidents en - US, CA and machine
INSTALLATION INSTRUCTIONS
 INSTALLATION INSTRUCTIONS - Wall-mount indoor unit - OPERATING LIMITS Cooling Maximum conditions Heating Maximum conditions Outdoor temperature : 122 F (50 C) D.B. Outdoor temperature : 75 F (24 C) D.B.
Heater with Air Conditioning. E-Series Ford Aeromaster
 Service Guide Heater with Air Conditioning E-Series Ford Aeromaster Contents Blower Motor...2 Plenum Removal...3 Control Module...6 Servo Motors...8 Coolant Valve and Servo Motor...8 Evaporator Recirculation
Installation Instructions. For the 18 Built-In Dishwasher and Front Color Panels
 Installation Instructions For the 18 Built-In Dishwasher and Front Color Panels Printed in USA 154232102 Before You Begin DO NOT INSTALL DISHWASHER UNTIL YOU HAVE READ ALL INSTRUCTIONS. FOR YOUR SAFETY,
Service Bulletin Trucks Date Number Page
 Mack Trucks, Inc. Allentown, PA USA (Does not apply to Mack Trucks Australia) (Supersedes SB215025 dated 03/27/07) Service Bulletin Trucks Date Number Page 11/04/08 SB215025 1(25) Cooling System Revisions
Service Manual For model N260 - a 2.4 cu. ft., 2-way refrigerator. For model N a 2.4 cu. ft., 3-way refrigerator.
 Service Manual For model N260 - a 2.4 cu. ft., 2-way refrigerator. For model N260.3 - a 2.4 cu. ft., 3-way refrigerator. NORCOLD, Inc. P.O. Box 4248 Sidney, OH 45365-4248 Part No. 619260A (4-98) Table
INSTALLATION INSTRUCTIONS
 ,t_2007 Lennox Industries Inc. Dallas, Texas, USA INSTALLATION INSTRUCTIONS CH33 Series Units EVAPORATOR 505,264M (65484504) 10/07 Supersedes 09/06 COILS n _putech blications ical Litho U.S.A. RETAIN THESE
an ISO 9001:2008 Registered Company GOLL ST. - SAN ANTONIO, TX ph fax MINI SPACE SAVER HEAT /COOL
 an ISO 9001:2008 Registered Company 18865 GOLL ST. - SAN ANTONIO, TX. - 78266 - ph.210-654-7171 - fax 210-654-3113 MINI SPACE SAVER HEAT /COOL 01000-QUX-A 01000-VUX-A 900101-VUX-A REV C 3/5/14, MINI SPACE
Installation Instructions
 40MAQ High Wall Ductless Split System Sizes 09 to 36 Installation Instructions NOTE: Read the entire instruction manual before starting the installation TABLE OF CONTENTS PAGE SAFETY CONSIDERATIONS 2 PARTS
DLCLRA. INSTALLATION INSTRUCTIONS Outdoor Unit Single Zone Ductless System Sizes 36 to 58 TABLE OF CONTENTS
 DLCLRA INSTALLATION INSTRUCTIONS Outdoor Unit Single Zone Ductless System Sizes 36 to 58 Fig. 1 - Size 36 TABLE OF CONTENTS PAGE SAFETY CONSIDERATIONS... 2 PARTS LIST... 3 SYSTEM REQUIREMENTS... 4 WIRING...
Installation Instructions
 40MBFQ Floor Console Ductless System Sizes 09 to 58 Installation Instructions TABLE OF CONTENTS PAGE SAFETY CONSIDERATIONS... 2 PARTS LIST... 3 SYSTEM REQUIREMENTS... 4 WIRING... 4 DIMENSIONS... 5 CLEARANCES...
Page 1 of 18. Part# /5/2013
 Part# 1002655-06 8/5/2013 This manual contains important information concerning the installation and operation of the gun washers listed above. Read manual thoroughly and keep for future reference INSTRUCTIONS
Installer's Guide. WARNING: HAZARDOUS VOLTAGE - DISCONNECT POWER and DISCHARGE YCC-IG EB23D1-12
 Installer's Guide YCC-IG-12 18-EB23D1-12 Single Packaged Gas/Electric 13 SEER Convertible, 1½ - 5 Ton, 40-120 MBTU R-410A ALL phases of this installation must comply with NATIONAL, STATE AND LOCAL CODES
1956 FORD F-100 TRUCK
 an ISO 9001:2008 Registered Company INSTALLATION INSTRUCTIONS FOR 1956 FORD F-100 TRUCK HEAT/COOL/DEFROST 75456-LFZ-A 18865 GOLL ST. - SAN ANTONIO, TX. - 78266 - ph.210-654-7171 - fax 210-654-3113 905456-LFZ-A
AOYG18LFC OUTDOOR UNIT INSTALLATION MANUAL INSTALLATION MANUAL. For authorized service personnel only. PART NO
 AOYG8LFC OUTDOOR UNIT INSTALLATION MANUAL INSTALLATION MANUAL For authorized service personnel only. English PART NO. 93778639 93778639_IM.indb /20/20 6:07:25 PM AIR CONDITIONER OUTDOOR UNIT INSTALLATION
Garage Ventilation Installation Instructions
 Garage Ventilation Installation Instructions Parts List * Quantity Exterior Louver & Frame Kit 4 in. x 4 in. w/ Fasteners (Fastener shown as a) () Louver 4 in. x 8 in. w/ Fasteners (Fastener shown as a)
HEATING AND AIR CONDITIONING
 XJ HEATING AND AIR CONDITIONING 24-1 HEATING AND AIR CONDITIONING TABLE OF CONTENTS page DESCRIPTION AND OPERATION SERVICE WARNINGS AND PRECAUTIONS...1 COMPRESSOR - 2.5L VM DIESEL....3 COMPRESSOR CLUTCH
Installation Instructions Part No
 Heat Exchanger Cell Kit Cancels: New Installation Instructions Part No. 326600-751 IIK-310A-45-6 6-02 NOTE: Read the entire instruction manual before starting the installation. SAFETY CONSIDERATIONS Installing
INSTALLATION MANUAL PROHEAT A2/A4
 INSTALLATION MANUAL PROHEAT A2/A4 Rev. B CONTENTS A. SAFETY... A-1 SAFETY CONSIDERATIONS... A-2 B. INTRODUCTION... B-1 1.0 TECHNICAL SPECIFICATIONS... 1-1 1.1 PACKAGE CONTENTS... 1-1 1.2 PHYSICAL A2...
Chevrolet Pickup Condenser Kit with Drier with Condenser Mounted Forward From Stock Position (021553)
") an ISO 900:2008 Registered Company 97-55 Chevrolet Pickup Condenser Kit with Drier with Condenser Mounted 3 8 Forward From Stock Position (02553) 8865 Goll St. San Antonio, TX 78266 Phone: 20-65-77 Fax:
an ISO 900:2008 Registered Company 97-55 Chevrolet Pickup Condenser Kit with Drier with Condenser Mounted 3 8 Forward From Stock Position (02553) 8865 Goll St. San Antonio, TX 78266 Phone: 20-65-77 Fax:
1. General Description
 1. General Description A: SPECIFICATIONS 1. HEATER SYSTEM Heating capacity 2. A/C SYSTEM AUTO A/C MODEL Item Specifications Condition 5.0 kw (4,300 kcal/h, 17,062 BTU/h) or more AC-2 Mode selector switch:
Installation Instructions
 38MHR Outdoor Unit Single Zone Ductless System Sizes 09 to 24 Installation Instructions NOTE: Read the entire instruction manual before starting the installation. NOTE: Images are for illustration purposes
CIRRUS AIRPLANE MAINTENANCE MANUAL
 COOLING 1. DESCRIPTION On aircraft serials 183 and subsequent, an optional air condition system is available. This section contains the maintenance practices pertinent to this system. Cabin ventilation
OWNER S MANUAL. Models: Herkules Equipment Corporation 2760 Ridgeway Court Walled Lake, MI USA Fax
 Part# 1000692 7/12/99 tn INSTRUCTIONS This manual contains important information concerning the installation and operation of the gun washers listed at the right. Read manual thoroughly and keep for future
569, 570, 571, 572 Series
 Please read and save this Repair Parts Manual. Read this manual and the General Operating Instructions carefully before attempting to assemble, install, operate or maintain the product described. Protect
INSTALLATION INSTRUCTIONS PT-A HEAT/AC STANDARD KIT FORD E-SERIES VANS
 INSTALLATION INSTRUCTIONS PT-A-402 - HEAT/AC STANDARD KIT 2007-2014 FORD E-SERIES VANS with Gas engine (To be used with 2007 and newer Prisoner Transport Inserts ONLY) Warning do not attempt to install
HEAT/ COOL/ DEFROST FORD THUNDERBIRD
 specializing in AIR CONDITIONING, PARTS AND SYSTEMS for your classic vehicle PERFECT FIT IN-DASH HEAT/ COOL/ DEFROST 1964-66 FORD THUNDERBIRD CONTROL & OPERATING INSTRUCTIONS The controls on your new Perfect
DUAL VOLTAGE ICE BOX CONVERSION SYSTEM 120 VOLTS A.C. & 12/24 VOLTS D.C. MODELS: SCQT-4408F-U1-L SCQT-4408F-U1-I OWNER'S GUIDE
 DUAL VOLTAGE ICE BOX CONVERSION SYSTEM 120 VOLTS A.C. & 12/24 VOLTS D.C. MODELS: SCQT-4408F-U1-L SCQT-4408F-U1-I OWNER'S GUIDE SAWAFUJI ELECTRIC CO., LTD. GENERAL: This appliance is designed to convert
Instant Hot Water Dispenser Owner s Manual
 Model Hot1 Instant Hot Water Dispenser Owner s Manual Installation, Care & Use Instalacion, cuidado & uso Installation, soin et utilisation WHAT YOU SHOULD KNOW BEFORE YOU BEGIN For your satisfaction and
Installation Manual. For Australian refrigerator models: N304M.3 (93 liter 3-way operation with LP gas, 240 volts AC, or 12 volts DC )
") Installation Manual For Australian refrigerator models: N304M.3 (93 liter 3-way operation with LP gas, 240 volts AC, or 12 volts DC ) N404M.3 (128 liter 3-way operation with LP gas, 240 volts AC, or 12
Installation Manual For Australian refrigerator models: N304M.3 (93 liter 3-way operation with LP gas, 240 volts AC, or 12 volts DC ) N404M.3 (128 liter 3-way operation with LP gas, 240 volts AC, or 12
Warning Do not attempt to install A/C units unless you are experienced with servicing A/C systems! Wire Cutter / Crimper Socket set
 INSTALLATION INSTRUCTIONS PT-A-405 Rear HVAC System for 2014-2018 RAM PROMASTER with OEM rear AC/Heat Prep Package Fittings For Installation with Havis Prisoner Transport Insert Warning Do not attempt
TOOLS REQUIRED: Crimping tool A/C Recovery Unit Wrench set up to 1 ¼ 4 Hole saw
 INSTALL INSTRUCTIONS PT-A-401 HVAC UNIT for 2003-2018 CHEVROLET/GMC VAN (For 2007 ALL WHITE Prisoner Transport Inserts ONLY) Not Recommended for diesel engine application because of lack of space needed
PME. Series Enclosures. Battery Enclosure (BE) Field Upgrade Installation Instructions. Effective: January, Alpha Technologies
 Field Upgrade Installation Instructions. Effective: January, Alpha Technologies") PME Series Enclosures Battery Enclosure (BE) Field Upgrade Installation Instructions Effective: January, 2004 Alpha Technologies Power Alpha Technologies. Protecting The Power in Communications. Preface
PME Series Enclosures Battery Enclosure (BE) Field Upgrade Installation Instructions Effective: January, 2004 Alpha Technologies Power Alpha Technologies. Protecting The Power in Communications. Preface
WATLOW IND. WATROD Modular Duct Heater Installation & Maintenance Manual I&M NUMBER: Page: 1 Date:6/11/2008 Rev: 2
 I&M NUMBER: 316-42-15-1 Page: 1 _ Pre Installation Check to make sure that heater received is the same as that ordered. Elements may come in contact with each other during shipment. Minor adjustments to
SEA FROST BD 12 OR 24-VOLT D.C. AIR-COOLED SYSTEM
 148 OLD CONCORD TURNPIKE BARRINGTON, NH 03825 USA TEL (603) 868-5720 FAX (603) 868-1040 1-800-435-6708 E-Mail:sales@seafrost.com www.seafrost.com SEA FROST BD 12 OR 24-VOLT D.C. AIR-COOLED SYSTEM CONDENSING
INSTALLATION INSTRUCTIONS TXV Horizontal Slab Coils WLSH
 TXV Horizontal Slab Coils WLSH These instructions must be read and understood completely before attempting installation. It is important that the Blower and Duct System be properly sized to allow the system
Ford Falcon, Ranchero Condenser Kit with Drier (014150)
") an ISO 900:2008 Registered Company 964-65 Ford Falcon, Ranchero Condenser Kit with Drier (0450) 8865 Goll St. San Antonio, TX 78266 Phone: 20-654-77 Fax: 20-654-33 www.vintageair.com 903250 REV A 06/23/5,
an ISO 900:2008 Registered Company 964-65 Ford Falcon, Ranchero Condenser Kit with Drier (0450) 8865 Goll St. San Antonio, TX 78266 Phone: 20-654-77 Fax: 20-654-33 www.vintageair.com 903250 REV A 06/23/5,
INSTALLATION INSTRUCTIONS TXV Horizontal Duct Coils EHD
 TXV Horizontal Duct s EHD These instructions must be read and understood completely before attempting installation. It is important that the Blower and Duct System be properly sized to allow the system
Please Read and Save These Instructions.
 Page 1 of 8 RadonAway Ward Hill, MA. GP500 Fan Installation Instructions Please Read and Save These Instructions. DO NOT CONNECT POWER SUPPLY UNTIL FAN IS COMPLETELY INSTALLED. MAKE SURE ELECTRICAL SERVICE
569, 570, 571, 572 Series
 Please read and save this Repair Parts Manual. Read this manual and the General Operating Instructions carefully before attempting to assemble, install, operate or maintain the product described. Protect
SAFETY AND INSTALLATION MANUAL MODEL 8100
 SAFETY AND INSTALLATION MANUAL ENERGY RECOVERY VENTILATORS MODEL 8100 Provides year-round fresh air Recovers 77% of the apparent heating or cooling energy from the exhausted air See Warnings Page 3 Table
SPX SERIES PACKAGED AIR CONDITIONING/HEAT PUMP UNITS INSTALLATION, OPERATION AND MAINTENANCE INSTRUCTIONS
 SPX SERIES PACKAGED AIR CONDITIONING/HEAT PUMP UNITS INSTALLATION, OPERATION AND MAINTENANCE INSTRUCTIONS **WARNING TO INSTALLER, SERVICE PERSONNEL AND OWNER** Altering the product or replacing parts with
User Manual Box Exhaust Fan Series (Belt Drive)
") User Manual Box Exhaust Fan Series (Belt Drive) 36" Box Exhaust Fan with Three Wing Blade Box with Aluminum Shutter 54" Box with Cone 800-779-3267 sales@schaeferfan.com www.schaeferfan.com 2013 Schaefer
User Manual Box Exhaust Fan Series (Belt Drive) 36" Box Exhaust Fan with Three Wing Blade Box with Aluminum Shutter 54" Box with Cone 800-779-3267 sales@schaeferfan.com www.schaeferfan.com 2013 Schaefer
GENERAL 2004 HVAC SYSTEMS. Manual HVAC System - Sorento SPECIFICATIONS. Fig. 1: Air Conditioner Specifications Courtesy of KIA MOTORS AMERICA, INC.
 Fig. 2: Blower & Evaporator Unit Specifications 2004 HVAC SYSTEMS Manual HVAC System - Sorento GENERAL SPECIFICATIONS AIR CONDITIONER Fig. 1: Air Conditioner Specifications BLOWER AND EVAPORATOR UNIT HEATER