Assembly Instructions SMH 3 Stage MSA
|
|
|
- Angela McBride
- 5 years ago
- Views:
Transcription


1 Assembly Instructions SMH 3 Stage MSA MSA Assembly is a 2 Person Operation Pre Assembly instructions: Find suitable level ground Layout Bases in position with directional arrows Insert Duck Board Flooring Start build with Dirty End Erect Door panel Insert into base channel Pre assemble side panels with corner posts Insert Left & Right Side Panels and slot into doorway and base channel runners Next stage Shower Section Locate next stage door panel into side panels & base channels Fit roof section to provide stability.


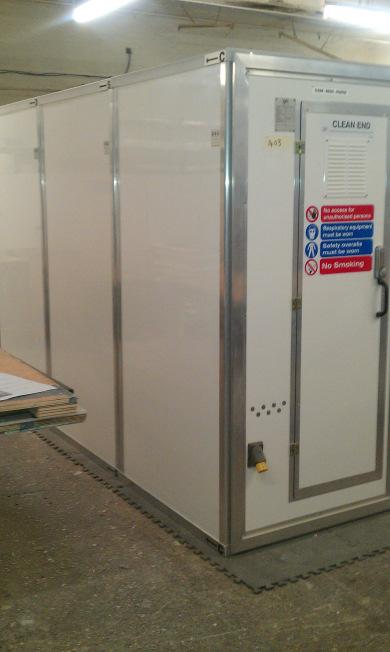
2 Assembly Instructions SMH 3 Stage MSA MSA Assembly is a 2 Person Operation Pre assemble 2 nd stage side panels with corner posts slot into doorway and base channel runners Locate next stage door panel into side panels & base channels Fit roof section to provide stability. Repeat Operation Pre assemble 3 nd stage side panels with corner posts slot into doorway and base channel runners Final Stage Clean End Locate final stage door panel into side panels & channels Fit roof section to provide stability. External assembly is Complete


3 Assembly Instructions SMH 3 Stage MSA ADEQUATE LIGHTING ; Ensure that poorly illuminated worksites have adequate lighting fitted externally, directly above the translucent roof panels MSA Assembly is a 2 Person Operation Check Internal integrity of build ensure that all Door Way s open and all parts are located securely into channels Fit heated bench into Dirty End NPU 300 under bench fitted check cert s and connections Ensure HEPA is fitted Check and Install Water management system Connect to Water supply Inlet & outlet source Check equipment box checklist (provided with system) Your SMH MSA is now ready to use Contact your nearest branch if you have any queries.
4 Assembly Instructions SMH 3 Stage MSA (Tick box) MSA Modular Components Date of Manufacture Code Number of Stages EH47 Yes/No Size Doorway s Side Panel s Roof Sections Bases Corner Post s Duck Boards Bench seat with Heaters x 2 Equipment box Checklist Water hose 2 x 3mtr (with hose connectors) Water hose 2 x 2mtr (with single connector) Air ducting 1 x 150mm Pre Filter 1 x 300mm Shower set x 1 Water filters 10 x 10 Washers M6 x 25mm x 8 Wing nuts M6 x 8 Bolts M6 x 30mm Heater Board Fixing Kit Electrical Equipment 1 x 110v Splitter Box 4 x 5mtr Extensions Additional Equipment For poorly lit work sites use portable Festoon Lighting (available to hire from SMH) Water Management System Negative Pressure Unit MSA 3 Stage assembly parts Door s (with Digi locks) Side Panels Bases Corner posts Roofs Fixed Mirrors Heated benches Duck Boards 4 x sockets Bench & Heater NPU 300 Bench & Heater 4 x sockets Dirty End Shower Section Clean End 1 x x NPU300 X 4 X 6 X 3 X 12 X 3 X 2 X 2 X 3 Mirror Mirror Shower & Waste Set
5 SMH Products Ltd Multi-system Operating Procedure Neil Diamond 5/8/2011
6 Multi System Operating Procedure (MSA) Setting up the Water Management System Hose connection Position the Water Management System (WMS) adjacent to the Multi System shower compartment, in an area which will not obstruct walkways or fire exits. Remove the water hoses from the equipment box and uncoil each hose, 2 x 3mtr hoses fitted with ½ hose connectors and 2 x 2mtr hoses 1 x fitted with ½ hose connectors and the other open ended with one ½ hose connector. The WMS has 4 x ½ male hose connectors located adjacent to the water filter bottles built onto the side of the WSM. Each hose connector is identified for connection. 1.Water In 2.Water Out 3.Waste In 4.Waste Out Connect 1 x 3mtr hose to the Water In male hose connector and connect the opposite end of the hose to the mains water supply outlet. Connect 1 x 3mtr hose to the Water Out male hose connector and connect the opposite end of the hose to the shower head male hose connector, located on the shower cubicle external wall at high level. Connect 1 x 2mtr hose (fitted with ½ hose connectors at both ends) to the Waste In male hose connector and connect the opposite end of the hose to the shower waste male hose connector, located on the shower cubicle wall at low level. Connect 1 x 2mtr hose (fitted with 1 x ½ hose connector) to the Waste Out male hose connector, extend the open ended hose to a drainage point and adequately secure to prevent flooding. Where a suitable drainage point cannot be accessed, waste water collection tanks should be used. Electrical Connection The WMS electrical specification requires 2 x 110v 16amp supplies Remove 2 x 110v, 16amp, 5mtr extension leads from the equipment box, and also the 110v, 16amp splitter box. Connect the 110v, 16amp female trailing coupler of each extensions to both 110v 16amp mains inlet sockets, located on the front of the WMS adjacent to the control panel. Connect the 2 x 110v, 16amp plugs to 2 x 110v, 16amp socket outlets on the 110v, 16amp splitter box. Connect the 110v, 16amp mains lead plug from the splitter box into the 110v, 16amp socket outlet on the supply transformer. On the WMS control panel located on the front of the unit, check that the mains indication lamp has illuminated to confirm there is power being supplied to the WMS.
7 Filling the water tank The WMS has a self filling system when used with mains water supply. With the hose connections and electrical connections made and powered the WMS will self fill and refill automatically. Turn on the mains water cock linked to the WMS, when the unit is powered a solenoid valve in the unit will open and allow the water tank to fill automatically. When the unit reaches its required capacity the solenoid valve will close until the water level drops during its operation, this will then activate the solenoid valve and refill the WMS Where there are no means of local or accessible water supplies, the WMS will require to be manually filled using fresh water canisters. When the water level drops below the minimum operating level a low water alarm will sound to alert the operator. Operating the WMS Heating The WMS control panel is located on the front of the WMS system, using the 3 position selector switch, turn the switch to position 1, on the control panel the indication lamps for power and heater on, should now be illuminated. Set the water temperature thermostat on the control panel to the required temperature (40 degrees as standard). When the water has reached the required operating temperature the indication lamp for operating temperature will illuminate. Pump system Turn the selector switch to the second position to activate the shower and waste pumps, the shower pump will pressurise the shower hose and switch off, the shower pump is controlled by a water pressure switch that will activate when the shower tap is opened and the water runs freely, when the shower tap is closed the pump will stop. The waste pump will run continuously whilst the shower pump is in operation and after the shower pump pressure switch is activated, to ensure that all of the waste water is removed from the shower tray. The waste pump can be activated without the shower pump by turning the selector switch to position 3. Changing water filters Regular checks of the waste water filter should be undertaken to prevent the failure of the waste pump system. Remove the filter bottle from the filter bottle bracket; turn the bottle anti-clockwise and unscrew the bottle from the bracket. Remove the filter bottle O ring, located in the recess of the internal bottle housing. Empty the contents of the waste water bottle into a red asbestos bag and follow your company procedures to dispose of asbestos containing materials. Refit a new water filter and replace the filter bottle O ring; screw the water filter bottle back onto the filter bottle bracket, the bottle must have a tight seal between the bottle holder flange and O ring seal to prevent any air leaking into the pump system.
8 Negative Pressure Unit (NPU) The negative pressure unit is located in the dirty end of the MSA A beneath the bench seat. Remove the filter plate by unclipping the over centre clips; place the cover plate where it will not cause an obstruction, underneath the bench seat. Plug the NPU into the 110v 16amp socket outlet provided, remove the 5mtr extension lead from the equipment box and connect the 110v 16amp trailing coupler to the 110v 16amp inlet socket located on the external wall, w connect the extension lead, 110v 16amp plug to an outlet on the 110v 16amp splitter box to power the NPU. The NPU pre-filter should be changed daily to prevent any failure to the negative pressure system. Filters should be changed by a qualified, competent person wearing full PPE and RPE. Filters must be disposed of in accordance with the removal of ACM s regulations and within the method statement of the principal contractor. Where a unit has received a clean air certificate on completion of work; the NPU must be returned with a clean pre-filter. Installing the bench seat heater pads Plug the 110v 16amp mains lead from the heater pad into the 110v 16amp socket outlet provided on the compartment wall. Remove the 2 x 5mtr extension leads from the equipment box and connect c the 110v 16amp trailing coupler to the 110v 16amp inlet socket located l on the external wall, connect the extension lead 110v 16amp plug to an outlet on the 110v 16amp splitter box to power the heater pad. Use the same procedure to connect both the clean end and dirty end e heater pads. Adequate Lighting Ensure that poorly illuminated worksites are adequately lit. It is advised that external sourced lighting is erected outside of the enclosure situated directly above the translucent roof panels. This will provide illumination through into each section of the multi - system
Floor Standing Bath Shower Mixer. Fitting instructions. Please keep these instructions for future reference and request of replacement parts.
 Floor Standing Bath Shower Mixer Fitting instructions Please keep these instructions for future reference and request of replacement parts. We have taken great care to ensure that this product reaches
THE TINY LIGHTWEIGHT
 Specification for AMS Decontamination Units THE TINY LIGHTWEIGHT DIMENSIONS & WEIGHTS: BODY LENGTH: LENGTH INC. A FRAME AND COUPLING: WIDTH: HEIGHT (INTERNAL): OVERALL HEIGHT FROM FLOOR: GROSS LADEN WEIGHT:
INSTALLATION INSTRUCTION
 INSTALLATION INSTRUCTION Thermostatic Mixer Shower System NOTICE The instruction manual includes part lists, installation instructions, usage of thermostatic and suitable inlet system. Make sure the installation
A HEATER KIT With Diesel Engine Connection Fittings
 A-12142 HEATER KIT With Diesel Engine Connection Fittings Figure 1 (General Layout and Parts I.D.) Page 1 of 6 Read these instructions and identify all components. Please retain these instructions for
Chapter 3 Cooling, heating and ventilation systems
 3 1 Chapter 3 Cooling, heating and ventilation systems Contents Antifreeze mixture..............................see Chapter 1 Cooling fan assembly - testing, removal and refitting.............8 Cooling
Technical data. Bathroom/shower room installations. Water services (WRAS approved)
") Technical data The Closomat toilet MUST be installed by a competent or qualified person. Explanation of symbols Safety instructions in this manual are identified by symbols. The safety instructions are
Technical data The Closomat toilet MUST be installed by a competent or qualified person. Explanation of symbols Safety instructions in this manual are identified by symbols. The safety instructions are
AUTOMATIC MODULAR ICE-CUBE MAKER WITH VERTICAL EVAPORATOR SYSTEM
 AUTOMATIC MODULAR ICE-CUBE MAKER WITH VERTICAL EVAPORATOR SYSTEM INSTRUCTIONS AND WARNINGS 24481 ed. 11-2007 It is strictly forbidden to reproduce this instruction manual or any part thereof. Dear
INSTALLATION MANUAL. Ecoline Geo RI HP PLEASE LEAVE THIS MANUAL WITH THE OSO UNIT AFTER INSTALLATION
 PLEASE LEAVE THIS MANUAL WITH THE OSO UNIT AFTER INSTALLATION Ecoline Geo RI HP INSTALLATION MANUAL The Ecoline GEO is an indirect unvented cylinder designed and approved for use with a heat pump. The
EBAC MODEL WM150 INDUSTRIAL DEHUMIDIFIER OWNER S MANUAL
 EBAC MODEL WM150 INDUSTRIAL DEHUMIDIFIER OWNER S MANUAL WM150 OWNERS MANUAL Page 1 of 9 INTRODUCTION Designed for a wide range of applications, the WM150 is a rugged, industrial unit, which utilizes an
MODULAR AUTOMATIC GRANULAR ICE FLAKER
 MODULAR AUTOMATIC GRANULAR ICE FLAKER INSTRUCTIONS AND WARNINGS 24479 rev. 03 It is strictly forbidden to reproduce this instruction manual or any part thereof. Dear Customer, Congratulations on having
Hanson LED C e i l i n g F a n
 Hanson LED C e i l i n g F a n model no. 052-8398-2 Toll-free 1-866-827-4985 IMPORTANT: For your safety please read and understand this manual before installing or operating this product. OWNER S MANUAL
Hodge Clemco Ltd. MJC Mini Cartridge Filters Owners Manual. TSOM 556 Date of issue 13/07/04. Hodge Clemco Ltd
 1 MJC Mini Cartridge Filters Owners Manual TSOM 556 Date of Issue: 13.07.04 Orgreave Drive, Sheffield South Yorkshire. S13 9NR Tel:0114 254 0600 Fax: 0114 2540250 Email:sales@hodgeclemco.co.uk www.hodgeclemco.co.uk
POWERFLOW Series. Unvented Electric Storage Water Heaters. Installation & Operating Instructions Manual
 POWERFLOW Series Unvented Electric Storage Water Heaters Installation & Operating Instructions Manual These Instructions must be left with the user after installation. Version 3.0 June 2009 Hyco POWERFLOW
THE BLACK PROVAC BACK PACK VACUUM CLEANER
 Issue: 2 THE BLACK PROVAC BACK PACK VACUUM CLEANER OPERATOR AND PARTS MANUAL Model: BLACK PROVAC Model No: PROBFT1000 Safety approval No: NSW21128 EMC Approval No: N14590 Serial No: Before using machine:
Single Cyclonic Cylinder Vacuum Cleaner
 Single Cyclonic Cylinder Vacuum Cleaner Model Number: RHCV3001 220-240V~, 50/60Hz, 800W For Customer Services & Spare Parts please call 0345 209 7461 Opening times: Monday - Friday 8am 8pm & Saturday 9am
Closomat Lima Vita installation & user guide
 Closomat Lima Vita installation & user guide design manufacture supply install service recycle Technical data The Closomat toilet MUST be installed by a competent or qualified person. Explanation of symbols
TTB 345 OPERATION - INFORMATION INDEX 1. Part Identification Diagram 2. Basic Operation Instructions 3. Do s and Don ts 4. Fitting The Brush / Drive B
 LAST PAGE RETURN TO MENU TTB-345 OPERATION MANUAL the knowledge is in our hands TTB 345 OPERATION - INFORMATION INDEX 1. Part Identification Diagram 2. Basic Operation Instructions 3. Do s and Don ts 4.
Tornado Operations & Maintenance Manual
 TORNADO INDUSTRIES 7401 W. LAWRENCE AVENUE CHICAGO, IL 60706 (708) 867-5100 FAX (708) 867-6968 www.tornadovac.com Tornado Operations & Maintenance Manual MODEL NO. 99690 BD 22/14, 99720 BD 26/14 L9722
INSTALLATION INSTRUCTIONS John Deere One Series; 1023E, 1025R and 1026R Models A HEATER KIT. Figure 1 (General Layout and Parts I.D.
 A-11978 HEATER KIT Figure 1 (General Layout and Parts I.D.) Read these instructions and identify all components. Please retain these instructions for future reference and parts ordering information. Refer
CROWN WATER HEATERS CPU10 - CPU15 CPOS10 - CPOS15
 CROWN WATER HEATERS CPU10 - CPU15 CPOS10 - CPOS15 COMPACT PLUS 10 and 15 Litre Unvented Under and Over Sink Water Heater INSTALLATION AND USER GUIDE 1 DIMENSIONS 10L - 250mm 15L - 310mm 100mm 80mm 410mm
Service Manual for X9.5 and Older Models
 Service Manual for X9.5 and Older Models I. Common Issues... 2 A. Direct Air Motor... 2 A.1. Direct Air Motor will not run.... 2 A.2. Direct Air Motor is making a squealing sound.... 2 B. Full Bag Indicator
HORIZONTAL COOKING SERIES: 700 / 900 S.A.V MAINTENANCE & AFTER SALES WORK PPS-3WE711911CH
 SERIES: 700 / 900 S.A.V MAINTENANCE & AFTER SALES WORK PPS-3WE711911CH GENERAL Tools Every time you se this symbol it is vital that you have the tool indicated to ensure correct and compliant work is undertaken
User and Installation Instructions. Opus 700 Electric Salamander Grill OE7304 IS318 ECN3011
 User and Installation Instructions Opus 700 Electric Salamander Grill OE7304 IS318 ECN3011 USER / INSTALLATION INSTRUCTIONS Please read the following carefully before using this appliance. Warnings and
IMPORTANT SAFETY REMINDERS
 USER Manual IMPORTANT SAFETY REMINDERS This appliance should only be used for domestic cleaning, as described in this user guide. Please ensure that this guide is fully understood before operating the
Aqua & Instantaneous Electric Shower Installation Instructions SERVICE POLICY
 SERVICE POLICY In the event of you needing to contact the Galaxy Customer Service Department, the following procedure should be followed:- 3 5 Before telephoning the Galaxy Customer Service Department
Shower Thermostatic Mixer Fitting Instructions
 Shower Thermostatic Mixer Fitting Instructions Thank you for selecting this product. We have taken great care to ensure that this product reaches you in perfect condition. However should any parts be damaged
CARVER CASCADE 2 & CASCADE 2 GE CARAVAN WATER HEATER INSTALLATION INSTRUCTIONS LEAVE THESE INSTRUCTIONS WITH THE USER
 CARVER - CASCADE 2 & CASCADE 2 GE CARAVAN WATER HEATER INSTALLATION INSTRUCTIONS LEAVE THESE INSTRUCTIONS WITH THE USER 1:0 SPECIFICATIONS Water capacity Water connections Water supply 9 litres (2 gallons)
Cleaning unit for coolant. :_decftez`_>r_fr] Book No.: V2
![Cleaning unit for coolant. :_decftez`_>r_fr] Book No.: V2](/thumbs/90/104143238.jpg "Cleaning unit for coolant. :_decftez`_>r_fr] Book No.: V2") Cleaning unit for coolant :_decftez`_>r_fr] Book No.: 1271526-02 V2 Alfa Laval Separation AB Separator Manuals, dept. SKEL S-147 80 Tumba, Sweden Telephone: +46 8 53 06 50 00 Telefax: +46 8 53 03 10 40
Cleaning unit for coolant :_decftez`_>r_fr] Book No.: 1271526-02 V2 Alfa Laval Separation AB Separator Manuals, dept. SKEL S-147 80 Tumba, Sweden Telephone: +46 8 53 06 50 00 Telefax: +46 8 53 03 10 40
EXPOSED BATH SHOWER MIXER INSTRUCTION MANUAL W INST 300. Please note: Tap heads shown is for illustration purposes only.
 EXPOSED BATH SHOWER MIXER INSTRUCTION MANUAL W INST 300 Please note: Tap heads shown is for illustration purposes only. CONTENTS GUARANTEE GENERAL SAFETY INSTRUCTIONS PARTS SUPPLIED HOW TO INSTALL AFTER
INSTALLATION MANUAL TBA Evaporative Cooler
 INSTALLATION MANUAL TBA Evaporative Cooler (English) (TBA) INDEX CABLE LENGTHS, STANDARD WALL CONTROL........................................ 2 COOLER COMPONENTS.............................................................
PLEASE LEAVE THIS MANUAL WITH THE OSO UNIT AFTER INSTALLATION INSTALLATION MANUAL
 PLEASE LEAVE THIS MANUAL WITH THE OSO UNIT AFTER INSTALLATION 0 RD 0 RI 0000-06 IM/ IM/a INSTALLATION MANUAL This manual gives detailed advice for installation and should be read carefully prior to fitting
METIS. Installation instructions. Riser rail kit INSTALLERS PLEASE NOTE THESE INSTRUCTIONS ARE TO BE LEFT WITH THE USER.
 METIS Riser rail kit Installation instructions INSTALLERS PLEASE NOTE THESE INSTRUCTIONS ARE TO BE LEFT WITH THE USER 2180531A September 2006 CONTENTS Page General installation notes 1 Main components
INSTANTANEOUS ELECTRIC SHOWER
 GUARANTEE / SERVICE POLICY INSTANTANEOUS ELECTRIC SHOWER GUARANTEE Designa guarantee this DS3000 product for a period of two years, from date of purchase, against mechanical and electrical defects arising
Powerflow Unvented water heater
 Product Instruction Manual Powerflow Unvented water heater 30, 50 and 90 litres v15.6/5 Thank you for purchasing a Powerflow series unvented electric water heater. The Powerflow is suitable for hand washing
Compact Cyclonic Bagless Cylinder Vacuum Cleaner
 Compact Cyclonic Bagless Cylinder Vacuum Cleaner Model Number: RHCV35BM01 220-240V AC 50/60Hz 700W For Customer Services & Spare Parts please call 0345 209 7461 Opening times: Monday - Friday 8am 8pm &
TECHNICAL INFORMATION T1500 Series Clothes Dryers
 TECHNICAL INFORMATION T1500 Series Clothes Dryers 2003 Miele - Table of Contents 1.0 CONSTRUCTION & DESIGN 1.1 Appliance Overview - Vented 1 1.2 Appliance Overview Condenser Models 2 1.3 Controls Overview
Installation & Operating Instructions. Models: York Midi & Serrano Electric Stoves
 Installation & Operating Instructions Models: York Midi & Serrano Electric Stoves PLEASE NOTE THAT THIS APPLIANCE USES A MOTOR TO OPERATE THE FLAME EFFECT AND THAT IT MAY BE POSSIBLE TO HEAR IT WHERE THE
DUST MANAGER USER INSTRUCTIONS GENERATION FUTURE indd 1 28/11/ :27:15
 GENERATION FUTURE DUST MANAGER USER INSTRUCTIONS 0565-5287.indd 1 28/11/2007 15:27:15 IMPORTANT SAFETY REMINDERS User s manual - This cleaner should only be used for its intended purpose as described in
MOD. i300 i500. Pagina 1/1. All our products are in accordance with CEE rules: 89/392/CEE 91/368/CEE 93/44/CEE 93/68/CEE 73/23
 Reliable Corporation 100 Wingold Ave. Unit 5 Toronto, ON Canada M6B 4K7 Toll-free: 1-800-268-1649 Website: www.reliablecorporation.com MOD. i300 i500 Pic. 1. Ironing Machine i300 Pic. 2. Ironing Machine
MIX Boiler & Font Range Service Manual
 MIX Boiler & Font Range Service Manual 1000870# 1000871# 1000875# 1000880# 1000887# 1000878 1000879 2300268 www.marcobeveragesystems.com Ireland Tel: +353 (1) 295 2674 UK Tel: +44 (0207) 2744577 Service
SERVICE MANUAL DISHWASHERS DIVA ACCESSIBILITY DISHWASHERS
 SERVICE MANUAL DISHWASHERS DIVA ELECTROLUX HOME PRODUCTS S.p.A. Publication no. Spares Operations Italy Corso Lino Zanussi,30 I - 33080 PORCIA /PN (ITALY) 599 38 70-09 Fax +39 0434 394096 EN DISHWASHERS
SERVICING INFORMATION
 SERVICING INFORMATION OPTIKINETICS SOLAR 250 (Early Type) M.Ginda 06/03/08 1 Servicing the Solar 250 effects projector. This is a short guide on how to service the main component parts of the projector.
MXn RACK OVEN SPARES MANUAL MACHINE NO.FG164
 www.monoequip.com MXn RACK OVEN SPARES MANUAL MACHINE NO.FG164 When ordering spares please quote the machine serial number which can be found on the silver information plate of the machine and on the front
AUTOMATIC MODULAR ICE-CUBE MAKER
 AUTOMATIC MODULAR ICE-CUBE MAKER INSTRUCTIONS AND WARNINGS 24851 ed. 06-2012 It is strictly forbidden to reproduce this instruction manual or any part thereof. Dear Customer, Congratulations on having
JOHN DEERE GATOR HPX/XUV 2 PASSENGER HEATER INSTALLATION INSTRUCTIONS (p/n: 9PH20S30)
") P. 1 of 12 JOHN DEERE GATOR HPX/XUV 2 PASSENGER HEATER INSTALLATION INSTRUCTIONS (p/n: 9PH20S30) Item: Qty: Description: 1 2 1 x 1 x 5/8 Tee Fitting 2 2 Plastic Snap-in Hose Grommet 3 4 1-1/2" Hose Clamps
P. 1 of 12 JOHN DEERE GATOR HPX/XUV 2 PASSENGER HEATER INSTALLATION INSTRUCTIONS (p/n: 9PH20S30) Item: Qty: Description: 1 2 1 x 1 x 5/8 Tee Fitting 2 2 Plastic Snap-in Hose Grommet 3 4 1-1/2" Hose Clamps
The Danger signal indicates an immediately hazardous situation which, if not avoided, will result in death or serious injury.
 The Danger signal indicates an immediately hazardous situation which, if not avoided, will result in death or serious injury. The Warning signal alerts you to potential hazards or unsafe practices which,
CBT LW MAINTENANCE GUIDE
 CBT LW MAINTENANCE GUIDE PICTOGRAMS Each Signifier displayed here is specific to this User Manual. Menu Previous Advance Note Tip Example Powder Feeder Mixing Bowl Weigh Scale CBP Tanks Control Panel PSD
INSTALLATION INSTRUCTIONS
 INSTALLATION INSTRUCTIONS BUILT-IN BOTTOM MOUNT REFRIGERATOR/FREEZER DBRTGK72SS-GRILLE KIT (FOR designer SERIES ONLY) VIKING RANGE CORPORATION 111 Front Street Greenwood, Mississippi (MS) 38930 USA (662)
Recirculating Chiller RC350G-RC400G RC1400G-RC3000G. Operating Manual
 Recirculating Chiller RC350G-RC400G RC1400G-RC3000G Operating Manual Part No 09931/Issue 10 Page 2 April 2010 CONTENTS 1 Safety 4 2 Installation 5 2.1 Connection for closed loop circulation 6 2.2 Connection
INSTALLATION MANUAL. TBA Evaporative Cooler. (English) (TBA) ILL1456-A
 (TBA) ILL1456-A") INSTALLATION MANUAL TBA Evaporative Cooler ILL1456-A (English) (TBA) TIMER AUTO COOL ILL1128-A ILL239-D TIMER AUTO COOL ILL1128-A ILL972-A Step 1 Step 2 Step 3 Step 4 SAFETY FIRST! 1. Read & understand
INSTALLATION MANUAL TBA Evaporative Cooler ILL1456-A (English) (TBA) TIMER AUTO COOL ILL1128-A ILL239-D TIMER AUTO COOL ILL1128-A ILL972-A Step 1 Step 2 Step 3 Step 4 SAFETY FIRST! 1. Read & understand
Puro Mini Dual Control Shower Mixer PU90010CP
 Puro Mini Dual Control Shower Mixer PU90010CP Installation and Maintenance Instructions In this procedure document we have endeavoured to make the information as accurate as possible. We cannot accept
COOKER HOOD USER HANDBOOK FOR INSTALLATION AND OPERATION MODELS CRC95
 COOKER HOOD USER HANDBOOK FOR INSTALLATION AND OPERATION MODELS CRC95 Your new Cooker Hood Using your new Cooker Hood is very simple. Nevertheless, to get the best results it is important that you read
SCHWAN INSTALLATION GUIDE
 SCHWAN INSTALLATION GUIDE For Schwan Versatap SC52E Instant Hot Cold Filtered Water FOR SERVICE OR ASSISTANCE CALL MERQUIP ON 0800 636 0 636. Schwan recommends that a qualified tradesperson installs your
900 Quadrant Steam Shower Cabin with 6 Body Jets
 Product Specification Working Pressure 1.5 to 4 bar Pressure MUST be balanced Dimensions 2250 H x 900 D x 900 W Door Opening 480mm Steam Generator 2.8Kw Fuse size: 13 amp fuse spur 900 Quadrant Steam Shower
Product Support Bulletin
 MODEL: SUBJECT: CONVENTIONAL, W/ C7 CAT ENGINE WEBASTO TSL-17 HEATER Body DATE: APRIL 13, 2004 INDEX: 6 PAGE: 1 OF 16 Before you start this procedure, perform Freightliner Service Bulletin #20-7 first.
GEM TRAP FITTING & MAINTENANCE INSTRUCTIONS
 GEM TRAP FITTING & MAINTENANCE INSTRUCTIONS IMPORTANT Please read these instructions before fitting any traps. The following pages describe how each type of GEM Trap should be installed. If you are unsure
Compact Cyclonic Pro Bagless Cylinder Vacuum Cleaner
 Compact Cyclonic Pro Bagless Cylinder Vacuum Cleaner Model Number: RHCV15SB05 220-240V AC 50/60Hz 1000W For Customer Services & Spare Parts please call 0345 209 7461 Opening times: Monday - Friday 8am
E2 Series Installation
 E Series Installation Residential Modular Steam Shower Systems IMPORTANT: The following information should be used in conjunction with guidance from your electrician, plumber, architect and other contractors
INSTALL INSTRUCTIONS KK-S-HVAC SPRINTER VAN REAR HVAC SYSTEM
 INSTALL INSTRUCTIONS KK-S-HVAC-2 2007-2014 SPRINTER VAN REAR HVAC SYSTEM TOOLS REQUIRED: Aeroquip (#FT1357) Pliers A/C Refrigerant Charging machine Refrigerant Hose Cutter Open-end wrench set (up to 1
PrimePour TM Operation Manual
 COT2000 SERIES PrimePour TM Operation Manual READ BEFORE USE. 840247001 7/14 For more Good Thinking visit www.commercial.hamiltonbeach.com 840247001_v18.indd 1 IMPORTANT SAFETY INSTRUCTIONS WARNING When
INSTRUCTION MANUAL Model: SU3022
 INSTRUCTION MANUAL Model: SU3022 GUARANTEE This product is guaranteed for 2 years from the date of original purchase. If any defect arises due to faulty materials or workmanship, the unit will, either
Mikrofill Ethos Condensing combination boiler. Maintenance Instructions 24cc
 Mikrofill Ethos Condensing combination boiler Maintenance Instructions 24cc IMPORTANT Benchmark Installation, Commissioning and Service Record Log Book is enclosed in your customer information pack. This
BMW E36 Thermostat Removal And Coolant Flush
 BMW E36 Thermostat Removal And Coolant Flush Disclaimer: The cooling system is critical to the proper operation of your car. Failure to properly install all of the components of the cooling system could
Imperial Electric Fires
 Imperial Electric Fires GB IE MODELS: Flamescape II Curvascape II manual & remote. Installation and User Instructions PLEASE READ THESE INSTRUCTIONS CAREFULLY AND RETAIN FOR FUTURE REFERENCE This electric
Plus Bath Shower Mixing Valve CP and PL30020CP
 Plus Bath Shower Mixing Valve 920000CP and PL30020CP Installation and Maintenance Instructions In this procedure document we have endeavoured to make the information as accurate as possible. We cannot
Installation Instructions
 Installation Instructions For Free Standing NoFrost Combined Refrigerator-Freezers CS 1660 7082 653-00 PLEASE READ AND FOLLOW THESE INSTRUCTIONS These instructions contain Warning and Caution statements.
Australia. New Zealand
 .... Australia New Zealand 2 5 3 4 JA JB JC JD JE JF JG JH JI JJ JK JL JM JN JO 5 Intended use Your Black & Decker vacuum cleaner has been designed to vacuum dry substances. This product is intended for
THESE INSTRUCTIONS ARE TO BE LEFT WITH THE USER
 Standard & Memory models covered ELECTRIC SHOWERS Installation Operation &B Maintenance Guide THESE INSTRUCTIONS ARE TO BE LEFT WITH THE USER 1 Contents Section Page 1... Important Safety Information...
AUTOMATIC GRANULAR ICE FLAKER
 AUTOMATIC GRANULAR ICE FLAKER INSTRUCTIONS AND WARNINGS 24480 rev. 01 It is strictly forbidden to reproduce this instruction manual or any part thereof. Dear Customer, Congratulations on choosing a
GAS GRIDDLE INSTRUCTIONS MODEL: PGG6 MODEL: PGG7
 Page 1 of 17 GAS GRIDDLE INSTRUCTIONS MODEL: PGG6 MODEL: PGG7 SAFETY INSTRUCTIONS INSTALLATION INSTRUCTIONS OPERATION INSTRUCTIONS MAINTENANCE INSTRUCTIONS CONVERSION INSTRUCTIONS TECHNICAL DATA PARTS
Installation Manual PS-225 & PS-275
 Installation Manual PS-225 & PS-275 Table of Contents Pre-Uncrating Checklist... 1 Verifying System Requirements... 2 Verifying System Direction... 2 Verifying the Electrical Requirements... 2 Removal
User, Installation and Servicing Instructions. Panther Static Hot Cupboards G1, G2 and G3 IS86 ECN1881
 User, Installation and Servicing Instructions Panther Static Hot Cupboards G1, G2 and G3 Panther Static Hot Cupboard User Instructions Installation Remove all packaging and protective coatings from both
DMX fog machine User manual
 DMX fog machine User manual 1 Safety precautions WARNING: This unit may cause serious injury when used incorrect. It therefore is strongly advised to read this user manual carefully, to get familiar with
Tempest /PowderPro. Installation Instructions. Heidelberg QM46DI X /98
 Tempest /PowderPro Installation Instructions Heidelberg QM46DI X88-126 8/98 POWDERPRO GENERAL INFORMATION ATTENTION POWDERPRO OWNER! Accel Graphic Systems provides parts and service through its authorized
The i500 Series Professional Steam Products
 The i500 Series Professional Steam Products INSTRUCTION MANUAL USER INSTRUCTIONS i500 Thank you for purchasing the Reliable i500 series iron system. Please follow the instructions carefully. With proper
BLADE BATH SHOWER MIXER DECK MOUNTED CHR WITH KIT INSTALLATION INSTRUCTIONS P BS-E A/2
 BLADE BATH MIXER DECK MOUNTED CHR WITH KIT 20007014600 INSTRUCTIONS P5-65511339-1-BS-E A/2 20007014600 INTRODUCTION DIMENSIONS Please read these instructions carefully and keep in a safe place for future
Installation GUIDE VDWU524SS VDWU524WSSS FDWU524WS FDWU524 VDWU324SS FDWU324
 Installation GUIDE VDWU524SS VDWU524WSSS FDWU524WS FDWU524 VDWU324SS FDWU324 To prevent accidents, which could cause serious injury or death, as well as machine damage read these instructions before installation
Please do not hesitate to contact us with any enquiries.
 PRIMARILY DESIGNED TO BE FITTED INTO ANY CARAVAN WITH AN ONBOARD WATER PUMP SUCH AS THE WHALE, SHURFLO OR FIAMMA PUMPS, WHICH MOST CARAVAN MANUFACTURERS FIT AS STANDARD. IDEAL FOR WINTER CARAVANING. THE
Geberit AquaClean 8000plus UP Service instructions
 Geberit AquaClean 8000plus UP Service instructions 01-2010 998.601.00.1 (00) Contents Contents ESD protection... 4 Service spare parts... 5 Fault clearance by fault pattern... 8 Fault clearance by error
getting the best from your new cleaner...
 VC73360MUK-CyclonicBaglessRev3 3/11/05 4:41 pm Page 1 Cyclonic bagless vacuum cleaner Please read and keep these instructions getting the best from your new cleaner... If your cleaner isn t picking up
USER GUIDE VOGUE COMBI GEN2 C26 C32 C40
 USER GUIDE VOGUE COMBI GEN2 C26 C32 C40 When replacing any part on this appliance, use only spare parts that you can be assured conform to the safety and performance specification that we require. Do not
HEATING AND AIR CONDITIONING
 PL HEATING AND AIR CONDITIONING 24-1 HEATING AND AIR CONDITIONING TABLE OF CONTENTS page REMOVAL AND INSTALLATION EVAPORATOR CORE R. H. D....1 HEATERCORE R.H.D...3 page SPECIFICATIONS TORQUE SPECIFICATIONS...6
RICCAR VIBRANCE VIBC.2
 RICCAR VIBRANCE VIBC.2 LRPB-VIBC.2 BODY GROUP BODY GROUP Key Part No Description Key Part No Description 1 D224-0630 Dust Cover Assembly 25 B210-0605 Rear Wheel Axle 2 A732-5300 Combination Washer and
THAMES. Dual Control. Installation and Operating Instructions. Thermostatic built-in mixer shower
 THAMES Dual Control Thermostatic built-in mixer shower Installation and Operating Instructions INSTALLERS PLEASE NOTE THESE INSTRUCTIONS ARE TO BE LEFT WITH THE USER 2180376E December 2005 CONTENTS Page
Please take time to carefully read through these guidelines before using your Kamco pump.
 The Kamco CLEARFLOW CF30 CLASSIC pump is a purpose built unit for Power Flushing central heating systems, designed to cure circulation and boiler noise problems caused by the accumulation of sludge, corrosion
Instruction Manual BELLSOUTH TM 100 EGG INCUBATOR. Bellsouth TM 100 egg incubator Models. Bellsouth TM 100 egg incubator (Manually hand turn eggs)
") BELLSOUTH TM 100 EGG INCUBATOR Instruction Manual Bellsouth TM 100 egg incubator Models Bellsouth TM 100 egg incubator (Manually hand turn eggs) Bellsouth TM 100 egg incubator with Automatic turner Bellsouth
BELLSOUTH TM 100 EGG INCUBATOR Instruction Manual Bellsouth TM 100 egg incubator Models Bellsouth TM 100 egg incubator (Manually hand turn eggs) Bellsouth TM 100 egg incubator with Automatic turner Bellsouth
Parts & Material Included
 O² Hydro Well System Installation, Use & Care Guide Parts & Material Included 1. Funnel 11. Drain Line 21. Air Head 2. Media Tank Distributer Tube 12. Air Release 22. Drain Fitting 3. Air Tank Distributer
Hot Chocolate Dispenser
 Hot Chocolate Dispenser Instruction manual Model: CN219-A AU Telephone Helpline: 1300225960 Safety Tips Position on a flat, stable surface. A service agent/qualified technician should carry out installation
Please take time to carefully read through these guidelines before using your Kamco pump.
 The Kamco CLEARFLOW CF190 / CF230 DDV pumps are purpose built units for Power Flushing central heating systems, designed to cure circulation and boiler noise problems caused by the accumulation of sludge,
Inta City Shower Mixing Valve CT20010CP
 Inta City Shower Mixing Valve CT20010CP Installation and Maintenance Instructions In this procedure document we have endeavoured to make the information as accurate as possible. We cannot accept any responsibility
SINGLE DISHDRAWER TM DISHWASHER
 SINGLE DISHDRAWER TM DISHWASHER DD4SA & DD4SCT models INSTALLATION GUIDE US CA 595B 08.7 SAFETY AND WARNINGS! WARNING! Electrical Shock Hazard Before installing the dishwasher, remove the house fuse or
Tornado Operations & Maintenance Manual
 TORNADO INDUSTRIES 7401 W. LAWRENCE AVENUE CHICAGO, IL 60706 (708) 867-5100 FAX (708) 867-6968 www.tornadovac.com Tornado Operations & Maintenance Manual MODEL NO. 99760 BD26/30 & 99780 BD33/30 L9718AB
PLEASE LEAVE THIS MANUAL WITH THE OSO UNIT AFTER INSTALLATION INSTALLATION MANUAL
 PLEASE LEAVE THIS MANUAL WITH THE OSO UNIT AFTER INSTALLATION SOLARCYL IM/SC INSTALLATION MANUAL This manual gives detailed advice for installation and should be read carefully prior to fitting any unvented
SMART SHOWERS ELITE SP P0985 READ ME THIS IS A HIGH PERFORMANCE HIGH SPECIFICATION PUMP AND HAS PRECISE INSTALLATION REQUIREMENTS
 ELITE SP P0985 80TX, & 150TX SUPERGEN TWIN SHOWER PUMP READ ME THIS IS A HIGH PERFORMANCE HIGH SPECIFICATION PUMP AND HAS PRECISE INSTALLATION REQUIREMENTS THIS DOCUMENT SHOULD BE PASSED TO THE HOUSEHOLDER
Mix Boiler & Font Range ( #, #, #, , )
") Mix Boiler & Font Range (1000870#, 1000871#, 1000880#, 1000878, 1000879) Service Manual Marco Beverage Systems Ltd. 63d Heather Road, Sandyford Industrial Estate, Dublin 18, Republic of Ireland Ireland
Mix Boiler & Font Range (1000870#, 1000871#, 1000880#, 1000878, 1000879) Service Manual Marco Beverage Systems Ltd. 63d Heather Road, Sandyford Industrial Estate, Dublin 18, Republic of Ireland Ireland
DUAL VOLTAGE ICE BOX CONVERSION SYSTEM 120 VOLTS A.C. & 12/24 VOLTS D.C. MODELS: SCQT-4408F-U1-L SCQT-4408F-U1-I OWNER'S GUIDE
 DUAL VOLTAGE ICE BOX CONVERSION SYSTEM 120 VOLTS A.C. & 12/24 VOLTS D.C. MODELS: SCQT-4408F-U1-L SCQT-4408F-U1-I OWNER'S GUIDE SAWAFUJI ELECTRIC CO., LTD. GENERAL: This appliance is designed to convert
Installation guide Billi B-3000 Sparkling Dual levered slimline tap option
 Installation guide Billi B-3000 Sparkling Dual levered slimline tap option Installation requirements. IMPORTANT: This Billi appliance is to be installed by a licensed trades person in accordance with AS/NZS
Safety procedures: Wear your PPE. Gloves and goggles when filling the chemical bottle, using the machine, and cleaning the machine.
 iclean Custodian who Learns, Educates, Achieves & Networks Success. Providing Safe, Clean, Efficient & Attractive Schools. KAIVAC TRAINING Recommended PPE: GFCI, goggles, and gloves. Safety procedures:
Table of Contents What to Expect with Your Installation. Ceiling Plate. Tools Needed.
 Table of Contents Congratulations on purchasing your new Casablanca ceiling fan! It will provide comfort and performance in your home or office for many years. This installation and operation manual contains
User Manual. Refrigerator ZRG16605WA
 EN User Manual Refrigerator ZRG16605WA Contents Safety information 2 Safety instructions 3 Operation 4 First use 5 Daily use 5 Hints and tips 5 Care and cleaning 6 Troubleshooting 7 Installation 9 Technical