Introductions General Information. Receiving/Shipping Damage/Lost Items
|
|
|
- Marilynn Ross
- 5 years ago
- Views:
Transcription
1
2 Page 2
3 Table of Contents Introductions General Information... 4 Case Description... 4 Receiving/Shipping Damage/Lost Items... 4 Refrigerant... 5 Condensing Unit... 5 Condensate Evaporator Pan Heater:. 5 Plan View and Cross Section... 6 Case Data... 7 Electrical Specification... 7 Control Settings... 7 Case Installation... 8 Preparation... 8 Installation... 9 Unpacking... 9 Installing Case... 9 Installation of Trim, Caps, & Shelves Case Front Part Selection Case Trim Selection Canopy and Front Rail Alignment.. 11 Canopy End Trim Installation All Models Glass Cap Rail End Trim Installation Glass Models Glass Cap Rail Joint Trim Installation Glass Models Bumper, Rub Rail Cap, and Raceway Cover Installation Drain Strainer Electrical Connections General Electrical Termination Paragon ERC-2 Set-Up Instruction. 18 Wiring Diagram Expansion Valve and Superheat Operation Loading Normal Operation Cleaning Honeycomb Assembly Parts List and Drawings Parts List Warranty One-Year Warranty Parts Warranty Policy New Equipment Parts Shortages and Defects Parts Ordering Procedure Return Authorization Procedure Page 3
4 Introductions General Information This manual has been prepared for our customers and the personnel involved in setting up and maintaining our cases. The Kysor //Warren case is designed to provide years of trouble free service.. These levels provide excellent visibility and accessibility to the displayed products and are designed to merchandise packaged sandwiches, cheese, deli, prepared food, produce and meat. These units offer exceptional display facing area and the shelves are fully adjustable. These cases should be installed and operated according to the instructions contained in this manual to insure proper performance. They are designed for display of products in an airconditioned store where temperature and humidity are maintained at a maximum of 75º dry-bulb temperature and 55% relative humidity. Icon Key Caution Special Note Warning Case Description Model QWM1GDC-08 Description Self-service, self-contained, prepared food display case with glass front and produced in 8 ft. lengths. (Off Cycle Only) These cases are connected to a single condensing unit. Installation and Service instructions are provided by the condensing unit manufacturer and are not part of this manual. Receiving/Shipping Damage/Lost Items All equipment should be examined for shipping damage before and during unloading. If there is any damage, the carrier should be notified immediately and an inspection requested. The delivery receipt must be noted that the equipment was received damaged. If damage is of a concealed nature, you must contact the carrier within three (3) days following delivery. The consignee for all damages must file a claim with the carrier. Note: All claims for shortages must be within 10 days after receipt of shipment. Page 4

5 Refrigerant A variety of refrigerants can be used in the Kysor//Warren cases provided the correct expansion valve is equipped with the case when ordered (i.e., R 22 required for the end user requires specifying the correct expansion valve for R 22 refrigerant when the order is placed). Multiple expansion valves are available, depending on end user refrigerant requirements. Expansion valves are supplied for the refrigerant specified on the original sales order. In addition, cases can be modified in the field to allow changing the type of refrigerant used. This requires changing the expansion valve and distributor orifice that is currently equipped in the case. Contact your Kysor//Warren Service Representative for additional information. Note: Refer to Case Data Control Settings for refrigeration requirements. Condensing Unit The condensing unit is not intended to be removed from the case except in the event a compressor must be replaced. To remove the condensing unit, disconnect the flare suction/liquid connections on the base valves at the right front of the case. CAUTION: Before attempting to remove the condensing unit, be sure that all electrical power to the case has been turned off. Also, caution should be used when releasing pressure on the refrigerant system. NOTE: The refrigerant charge for this case is very critical. If the case should need to be recharged, an accurate charging device must be used. No refrigerant should be released into the atmosphere. It must be reclaimed. There are several different refrigerant configurations to these units. Refer to Case Data for detail. CAUTION: During installation and service of this equipment, precautions should be taken to prevent loss of refrigerant to the atmosphere. Condensate Evaporator Pan Heater: The Condensate Evaporator Pan Heater has following features Electrical rating of 120V/60Hz/1Ph, 8.3A, 1000 W Condensate dissipation rate: 8.5 Gallons per day 3 Gallon Evaporator Pan (1.8 times the condensate /defrost of 3 Door Case) Page 5

6 Plan View and Cross Section Page 6
7 Case Data QWM1GDC-08 Capacities Cubic Capacity Dimensions 31.8 cu ft Overall Length (w/o ends) Thickness Pair Ends 1.5 /End Defrost (Off Cycle only) Per Day Fail Safe Termination ºF(*) (*)=Thru factory supplied thermostat mounted on evaporator. Electrical Specification Circuit Data / Amps 8 Refrigeration Cycle Defrost Cycle Anti-Sweat Amps 0.24 Evaporator Fan Motor Amps 0.44 BTU +20 F 4952 Condensate Pump Amps N/A Condensate Pan Heater Amps 7.21 Compressor RLA 8.3 Condenser Fan Motor Amps 0.7 Minimum Circuit Amperage 21.4 Maximum Over current Protection 25 Power Supply 208/115 Cycle 60 Phase 1 Control Settings Thermostat Discharge Air/Temperature Cut-Out and Cut-In ºF Discharge Air Velocity Discharge Air Temperature (1 hour after defrost) 200 FPM ºF Page 7
8 Refrigerant and Charge Case Refrigerant Type Charge (lbs) QWM1GDC-08 R-404A 4.5 Note: Temperature is measured in discharge air. Defrost frequency is at design conditions. Higher temperature or humidity may require more defrost and longer failsafes. These cases are not designed to operate environments where the ambient temperature is greater than 75ºF and the relative humidity is greater than 55%. Refer to for other electrical data and information. Case Installation Preparation Prepare the installation area as follows: 1. Clean area where case is to be installed. 2. Verify installation area is at least 15 feet from any outside entrances or heating and cooling outlets. Caution: To prevent condensation on the end panels of cases, a minimum of 18 inches between walls or other cases is required for air flow. If 18 inches is not possible, then the space between the cases must be completely filled and sealed or an updraft fan kit must be installed to provide air circulation through the space. 3. Ensure floor loading will support the case and the case contents. 4. Ensure proper AC power is available. Refer to case AC input requirements located in the electrical connections section of this manual. 5. Ensure expansion valve in case is the proper valve for the type of refrigerant used at the installation site. Page 8
9 Installation The following instructions are provided for unpacking, moving, loading, and lifting the case prior to installation. Note: READ ALL INSTRUCTIONS CAREFULLY BEFORE BEGINNING INSTALLATION Unpacking 1. Remove all shipping tape from lamps and ensure that all lamp ends are snapped in place. WARNING!: Use caution when removing the strapping in the following procedure as the shelves are very heavy and could fall causing personal injury or equipment damage. 2. Ensure the evaporator cover is installed correctly with the deck pans installed. 3. Move the case into position, install, adjust superheat, and perform the operational checkout procedures following the instructions within this manual. Caution: Be careful not to damage the factory-installed end while moving the case. Use the case lift points on the case to move it to the proper location. Installing Case 1. Ensure all preparation for installation, as outlined in the above paragraphs, have been fully complied with and are complete. 2. Allow a minimum of 18 inches between the rear of the case and the store walls and/or other cases. This space reduces the possibility of condensation problems. It may be necessary to provide forced air ventilation in some installations. 3. This case must be located on a firmly based floor and leveled within plus or minus 1/16 inch. 4. Connect input AC power. Reference electrical installation procedure later in this manual. 5. Install all caps, and trim per the applicable instructions contained in this manual. 6. Remove all other shipping materials. Page 9
10 CASE MUST BE LEVELED FROM FRONT TO BACK AND END-TO-END AND SUPPORTED CONTINUOUSLY AS NEEDED WITH SHIMS. Installation of Trim, Caps, & Shelves We offer several different trim packages. Below are basic instructions for our 3000 trim. For any other trim packages or questions not answered below, please contact the Technical Service Department at Kysor//Warren ( ). Case front part selection and case trim selection are provided in the information that follows: Case Front Part Selection For Cases In A Lineup: Rub Rail Cap Starter 1/lineup Std. or w/ptm Raceway Cap Starter 1/lineup 1 Mccue Bumper Starter 1/lineup 3 Mccue Bumper Starter 1/lineup Rub Rail Cap 1/case Std. or w/ptm Raceway Cap 1/case 1 Mccue Bumper 1/case 3 Mccue Bumper 1/case For Single Case: Rub Rail Cap 1/case Std. or w/ptm Raceway Cap 1/case 1 Mccue Bumper 1/case 3 Mccue Bumper 1/case Canopy End Trim - 2/lineup Glass Cap End Trim 2/lineup Glass Cap Joint Trim 1/joint Front Panel End Trim 2/lineup Page 10

11 Case Trim Selection The only trim provided is on the right and left end cases. All exterior panels slide from right to center and left to center. For Single Case W/ Two Ends: Trim is factory installed. For Mutual End In A Lineup: Proper additional piece of end trim should be used. Canopy and Front Rail Alignment After the display cases are properly joined and sealed, align the canopies by sliding the alignment pins across the joint from one canopy into the adjoining canopy. It may be necessary to loosen and/or remove the screws at the top of the canopy to aid in the alignment of the two canopies and to eliminate any gap between the canopies. The screws should be tightened after canopies are aligned. Align the case front rails with a single alignment pin sliding the pin across the joint into the adjoining front rail. It may be necessary to loosen the screws holding the front rail to aid in the alignment process. The screws should be tightened after the front rails are aligned. Page 11


12 3 Bumper Install the 3 bumper parts to the raceway using the same procedure as described for the 1 bumper parts. Raceway Cap Install the raceway cap parts to the raceway using the same procedure as described for the rub rail cap. Note: The raceway cover parts do not overlap as the rub rail cap parts do. Page 12


13 Canopy End Trim Installation All Models Hook the end trim under the lower edge of the canopy then rotate the part over the top of the canopy and snap into place. Glass Cap Rail End Trim Installation Glass Models Hook the back inside edge of the end trim to the back side of the glass cap rail then rotate the part forward and snap into place. Page 13

14 Glass Cap Rail Joint Trim Installation Glass Models Hook the back inside edge of the joint trim to the back side of the glass cap rail then rotate the part forward and snap into place. Bumper, Rub Rail Cap, and Raceway Cover Installation 1 Bumper Install the two-foot length of 1 bumper to the left hand end of the first case in the lineup. To install the bumper, hook the lower edge of the bumper to the aluminum retainer and rotate the bumper up and snap the top edge onto the retainer. Install this part as close to the case flat end panel as possible. Install the additional case length 1 bumper parts, crossing over the joint of the cases in the lineup and trimming the last piece to fit the last case in the lineup. Rub Rail Cap Install the four foot rub rail cap part to the left hand of the first case in the lineup. To install the rub rail cap hook the lower edge of the cap to the aluminum front rail just above the 1 bumper then rotate the cap toward the case and snap it down to the back hook on the aluminum front rail on non-glass models and the top hook on the aluminum rail on glass models. Install this part as close to the case flat end panel as possible. Install the additional case length rub rail cap parts as close to one another as possible, crossing over the joint of the cases in the lineup and overlapping each part where provided. Trim the last part to fit the last case in the lineup. Page 14


15 Note: If a mutual end is used in a lineup, the proper additional pieces of trim should be used. Page 15
16 Drain Strainer Note: Not all of our cases have drain strainers. This information applies only to the cases equipped with the strainers. Purpose: Keep debris or any foreign objects from entering the PVC drain, which could cause blockage. Installation: Insert into drain until drain strainer stops it will not be flush. Strainer will exceed hub by 1. DO NOT flatten drain strainer Note: 1 ½ Drain Pipe Page 16
17 Electrical Connections General Cases are standard with one row of high output lamps. Ballasts are located in the canopy or in the raceway if no canopy is provided. See wiring diagram for layout. An electrical box is provided with each refrigerator for wiring your fan, anti-sweat heaters, and light circuits. This is an approved method by the Underwriters Laboratories; however, field wiring must be in accordance with local and national electrical codes. All field connections are made in the electrical box. Make sure that proper voltage is supplied to your refrigerator. Check refrigerator nameplate for the required voltage for fans, anti-sweat heaters, lights and defrost heaters. ALL REFRIGERATORS MUST BE GROUNDED. The Recommended Control Settings in the Case Data shows the electrical ratings for your case. This is the same information that appears on your refrigeration nameplate. NOTE: Fan motors must operate continuously and panel must be marked sufficiently to prevent the fan motors from being turned off accidentally. When refrigerators are multiplexed, add the total of these amperage values to determine wire size and circuit protection. Anti-condensate controllers can be used to control the anticondensate heater. WARNING! Ensure the Kickplate does not come in contact with the case electrical wiring. Live electrical wiring that comes in contact with the case is a shock hazard that may cause severe injury or death by electrocution. WARNING! Always disconnect the electrical power at the main disconnect when servicing or replacing any electrical component. This includes, but is not limited to, such items as fans, heaters, thermostats and light bulbs. Failure to disconnect the electrical power may result in personal injury or death. Page 17

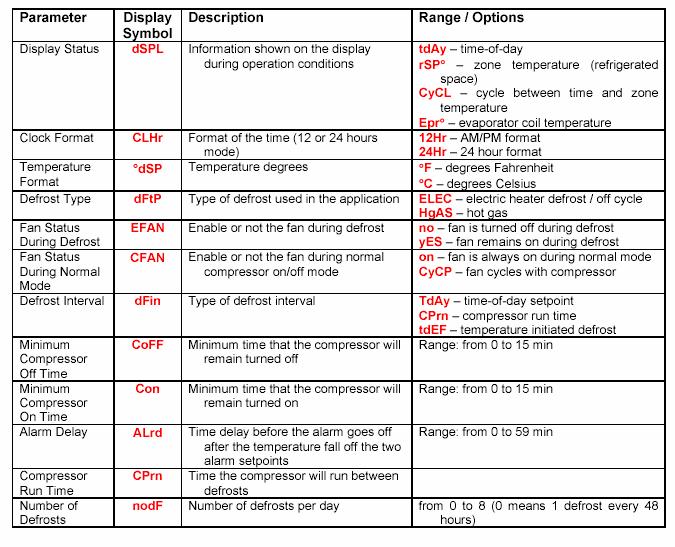
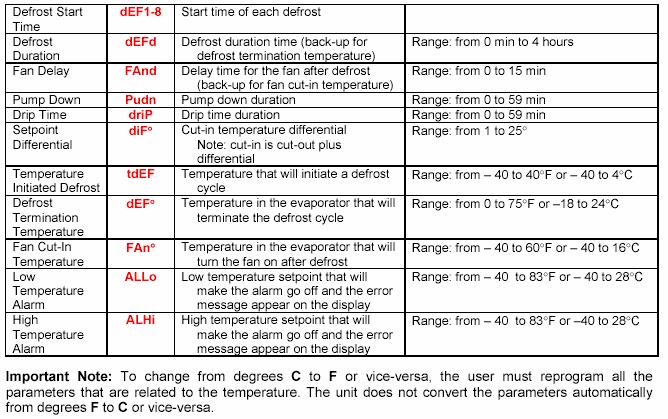
18 Electrical Termination All electrical connections are made in the control box located in the base of the case. The wires are clearly identified for termination purposes as follows: Component Wire Number Anti-Sweat Heater 1 and 2 Refrigerator Fan Motors and Drain Heater 3 and 4 Lighting Circuit 5 and 6 Defrost Heaters 7 and 8 Temperature Control 9 and 10 Dual Temperature? 15 and 16 Defrost Termination Control 17 and 18 Paragon ERC-2 Set-Up Instruction Remote Display 1. Remove cover from Paragon display so the display LED is visible. The display must be shown on Figure 1: Page 18
19 FIGURE 1 2. Set Clock to local time as shown on figure Set Setpoint Temperature, SEt, TO 20. FIGURE 2 Page 19
20 FIGURE 3 4. Set Clock Format, CLHr, TO 12HR 5. Set Temperature Format, dsp, TO F 6. Set Defrost Type, dftp, TO Elec 7. Set Fan Status During Defrost, EFAN, to Yes 8. Set Fan Status During Normal Mode, CFAN, to On 9. Set Defrost Interval, dfin, to Tday 10. Set Minimum Compressor Off Time, CoFF, to Set Minimum Compressor On Time, Con, to Set Alarm Delay, Alrd, to Set Compressor Run Time, CPrn, to Set Number Defrost, nodf, to Set Start time, def1, defrost in 6 hr intervals 16. Set Defrost Duration, defd, to 35 minutes 17. Set Fan Delay, Fand, to Set Pump Down, Pudn, to Set Drip Time, drip, to Set Setpoint Differential, DIFF, to Set Temperature Initiated Defrost, tdef, to n/a 22. Set Defrost Termination Temp, def, to Set Fan Cut-In to, FAn, to n/a 24. Set Low Temperature Alarm, ALLo, to Set High Temperature Alarm, ALHi, to 60 Page 20
21 Page 21


22 PLEASE SEE BELOW PARAGON DISPLAY AND ERROR CODE Page 22
23 Wiring Diagram Page 23
24 Expansion Valve and Superheat Caution: During service of this equipment, precautions should be taken to prevent loss of refrigerant to the atmosphere. Always install the expansion valve stem cap after making valve adjustments. The expansion valve furnished with your case has been sized for maximum coil efficiency. To adjust superheat perform the following: 1. Place a thermocouple near the expansion valve bulb. Read the suction line pressure as near coil as possible. (If at the condensing case, estimate suction line loss at 2 PSIG). 2. Convert coil suction pressure to temperature. The difference between coil temperature and the thermocouple temperature is superheat. (Use average superheat when expansion valve is hunting). 3. Do not set superheat until cases have pulled down to operating temperature and never open or close the valve over ¼ turn between adjustments and allow 10 minutes or more between adjustments. 4. Superheat should be set to 6-8 F. 5. After the initial setting, the superheat should be rechecked when product is stocked and at desired temperature. Page 24
25 Operation Loading Merchandise should not be placed in the fixture until all controls have been adjusted and the case is at the proper temperature. AT NO TIME SHOULD THE CASE BE STOCKED BEYOND THE LOAD LINE OR OVER THE FRONT EDGE OF ADJUSTABLE SHELVES. All cases have load limit line markings. Product must be kept within the load limit line for cases to function properly. Do not place product in cases until it is at proper operating temperature. Air discharge and return flues must remain open and free of debris or obstruction at all times to provide proper refrigeration and air current performance. Do not allow any product, signs, debris, etc. to block these grilles. Do not use any non-approved shelving, display racks or any accessory that could hamper air current performance. Warning! Do not walk on top of the cases! This could result in damage to the case and serious personal injury could occur. These cases are not designed to support excessive external weight. Do not use top of cases for storage. Page 25
26 Normal Operation 1. Off-Cycle Defrost is standard on these models and the fans run continuously. 2. Electric Defrost Models are optional. Electric heaters are utilized to melt the frost and ice on the coil. The heaters are located in the air stream in front of the coil. The defrost cycle is time initiated and should be temperature terminated. Case fans operate continuously in defrost and refrigeration. As a safety precaution, a safety cutoff Klixon is wired in series with the defrost heater to turn the heater off at temperatures above 70 F. 3. Hot Gas Defrost Models (optional for parallel compressor operation only) hot gas is routed through the suction line and evaporator coil. It exits the coil through a by-pass around the expansion valve and heat exchanger to return to the liquid line where the condensed liquid is use to feed the other cases on the same parallel case. The case fans continue to operate during defrost to warm up the drain pan and air ducts. The defrost cycle is time initiated and should be temperature terminated. (See case data information on page 4.) 4. Single Condensing Case Systems A thermostat should be used to control case temperatures. The thermostat bulb should be mounted in the discharge air (see case data if your case is a single condensing case system). Cleaning As a general rule, always use mild soap and water to wipe the case down. Special precautions must be taken when cleaning some components of the case. Exterior surfaces should be cleaned with warm water and mild soap to protect and maintain the finish. Do not use cleaners containing abrasive materials or ammonia, which will scratch or dull the finish. The waste outlet should be flushed with water following each cleaning. Interior surfaces may be cleaned with most mild soap formulas, ammonia based cleaners and sanitizing solutions with no harm to the surface. WARNING! Always shut power off during the cleaning process. Cleaning the case with electrical power applied is a shock hazard that may cause serious injury or death. WARNING! DO NOT USE HOT water on COLD glass surfaces. This could cause the glass to shatter and could result in personal injury. Glass fronts and ends should be warm before applying hot water. Caution: The following could damage the case: Do not use solvent, oil or acidic-based cleaners on any interior surfaces as the surface may become damaged. Page 26
27 Do not use abrasive cleaners and scouring pads as these will mar the finish. Never introduce water into the case faster than the waste outlet can release it. DO NOT USE STEAM OR HIGH PRESSURE SYSTEMS TO CLEAN THE CASE AS SEALS MAY BE BROKEN WHICH WILL CAUSE THE CASE TO LEAK. Shelves Do not use a hose or submerge shelves in water. When cleaning lighted shelves, wipe down with a wet sponge or cloth so that water does not enter the light rails. Mirrors Mirrors are sheets of clear glass that have a very thin reflective coating applied to one side. These coatings are susceptible to deterioration if certain cleaning solutions and even water are allowed to come in contact with them. Every precaution should be made to keep liquids away from the coated side of the mirrors. If liquids are allowed to flow along the face side of the mirror to its edge, the liquid can seep between the coating and the glass, causing serious damage. To help prolong the life of the mirrors: Use only mild cleaning solutions (Windex, Solox, or a weak solution of vinegar and water.) Do NOT spray liquids on mirrors. Dampen the cleaning cloth, then use the cloth to wipe the mirror. Wipe water from the mirrors immediately to prevent difficult to remove water spots and also to prevent the water from reaching the mirrors edge. Never use dirty cloths, scrapers or any other abrasive materials for cleaning. Condensing Units Follow the previous general cleaning of the interior and exterior parts with the exception of DO NOT USE WATER HOSE to clean evaporator or tub of the case. Caution: Condensing units should have at least 18 clearance from any wall or other obstruction in order to operate properly. WARNING! Always shut power off at the main breaker during the cleaning process. Cleaning the case or condensing unit with electrical power applied is a shock hazard that may cause serious injury or death. Caution: DO NOT FLUSH WITH WATER. This case is not connected to a drain system and has its own evaporating pan with limited capacity. Page 27


28 Condensing Units: Once a month compressed air should be blown through evaporator to clear any debris or dust opposite to direct normal air flow. Caution: Care should be taken with compressed air. Debris and dust may be blown into eyes. Note: Do not stack anything that may block air flow in front of louvers or rear of case. Self-contained cases draw air from back to front and blocking this air flow will cause case to overheat and shut down. Honeycomb Assembly Honeycomb should be cleaned every 6-8 months, depending on store conditions. The honeycomb may be cleaned with a vacuum cleaner or removed to be washed with soap and water. The honeycomb must be completely dry before returning it to the case. To remove honeycomb from case, take out screws located here. Note the position and angle of the honeycomb when removing from the case. Honeycomb must be replaced at the same angle. Page 28
 at the time they were manufactured.")
29 Parts List and Drawings Honeycomb Wire Rack Fan Motors Fan Blades (below plenum) Front Glass Top Bumper Lower Bumper Condensate Pan Heater Condensing Unit Note: Standard parts are provided in the parts lists. Cases may be equipped with specialty parts that were incorporated into the case(s) at the time they were manufactured. It is important to have the case serial number when contacting Kysor//Warren for replacement parts. Page 29
30 Parts List Description Expansion Valve Evap Fan Mtr 6W PSC 03A A10097 Evap Fan Blade 09B10013 Top Bumper Bstn - Red Lwr Bumper Bstn Polar Wht Thermopane Front Glass Rack Wire Adjust. Black Fan Wiring Harness Condensing unit Condensate Pan Heater Honeycomb White Honeycomb Black 24B B D G M D H A A15134 Note: Standard parts are provided in the parts lists. Cases may be equipped with specialty parts that were incorporated into the case(s) at the time they were manufactured. It is important to have the case serial number when contacting Kysor//Warren for replacement parts. Page 30
31 Warranty IN THE CONSTANT EFFORT TO IMPROVE OUR PRODUCTS, WE RESERVE THE RIGHT TO CHANGE AT ANY TIME SPECIFICATIONS, DESIGN, OR PRICES WITHOUT INCURRING OBLIGATION. One-Year Warranty KYSOR//WARREN warrants to the original purchaser this new equipment and all parts thereof, to be free from defects in material and workmanship under normal use and service. If any part or parts of the equipment should prove defective during the period of one year from installation date (not to exceed one year and thirty days from the date of original shipment from the factory), KYSOR//WARREN hereby guarantees to replace or repair, without charge (F.O.B. Columbus, Georgia), such part or parts as proven defective, and which KYSOR//WARREN S examination disclosed to its satisfaction to be thus defective, with a new or functionally operative part. The liability of KYSOR//WARREN under this warranty shall be limited to claims made by the original purchaser to KYSOR//WARREN or its local distributor within the warranty period. THIS WARRANTY IS IN LIEU OF ALL OTHER WARRANTIES, EXPRESSED, IMPLIED OR STATUTORY, INCLUDING, BUT NOT LIMITED TO ANY WARRANTY OF MERCHANTABILITY OR FITNESS, AND ALL OTHER OBLIGATIONS OR LIABILITIES OF KYSOR//WARREN. I. GLAZING: Glass is not guaranteed against breakage. If this refrigerator is equipped with a glazing assembly carrying the manufacturer s brand name (Thermopane, Twindow, etc.), the manufacturer s glazing warranty in effect at the time of this shipment is extended to that assembly. It is void outside the continental United States. II. BULBS: Light bulbs and fluorescent lamp tubes are not covered by any warranty for length of life or for any type of breakage. III. THIS WARRANTY SHALL NOT APPLY: 1. To the condensing case used with refrigerated equipment unless it was sold and shipped by KYSOR//WARREN. 2. When this equipment or any part thereof is damaged by fire, flood, act of God, or when the original model and serial number plate has been altered, defaced, or removed. Page 31
32 3. When this equipment or any part thereof is subject to accident, alteration, abuse, misuse, tampering, operation on low or improper voltages, or is put to a use other than recommended by KYSOR//WARREN. 4. When this equipment or any part thereof is damaged, or when operation is impaired, due to failure to follow installation manual (improper installation is the responsibility of the installer). 5. Outside the continental United States, Canada and Mexico. 6. To labor cost for replacement of parts, or for freight or shipping expenses. 7. To freight or shipping charges or to customs duties to any country. 8. If the Warranty holder fails to comply with all the provisions, terms and conditions of this Warranty. Parts replaced under this Warranty are warranted only through the remainder of the original Warranty. KYSOR//WARREN may, at its option and in its discretion, elect to honor this Warranty and to disregard the original purchaser s non-compliance with any of the provisions, terms and conditions of the Warranty. THIS WARRANTY DOES NOT COVER CONSEQUENTIAL DAMAGES. KYSOR//WARREN shall not be liable under any circumstances for any consequential damages, including loss of profits, additional labor costs, loss of refrigerant or food products, or injury to person or property caused by defective material or parts or for any delay in the performance of this Warranty due to causes beyond its control. The foregoing shall constitute the sole and exclusive remedy of any purchase and the sole and exclusive liability of KYSOR//WARREN in connection with this product. Parts Warranty Policy The following procedures are in accordance with Kysor//Warren s standard one-year warranty, which covers any part to be free of defects under normal use and service for one year from the date of installation. Not to exceed one year and thirty days from the date of original shipment from the factory. New Equipment Parts Shortages and Defects Any parts shortages or damage must be reported to Kysor//Warren no more than 10 working days from the date of delivery. After this time has expired Kysor//Warren will assume the parts were lost during installation and all parts required will be charged cost plus shipping to replace. Parts Ordering Procedure All parts must be ordered through the Kysor//Warren parts department with the following information: Store Name and Number Page 32
33 Location Case or Case Model and Serial Number Firm or Contractor Placing Order Shipping Address Parts Description Reason for Defect If the order is for a replacement part still in warranty a Purchase Order Number will be required from the contractor placing the order. We will then issue a Return Material Authorization Tag (RMA) that will be sent to the firm or contractor who has ordered the part. Return Authorization Procedure Warranty parts must be returned postage prepaid to Kysor//Warren within 30 days from replacement part ship date and must be accompanied by a RMA in order to ensure the proper credit. The RMA should also be written on the outside of the box. Any parts not returned within 30 days will be invoiced to the firm or contractor who has placed the order. IN THE CONSTANT EFFORT TO IMPROVE OUR PRODUCTS, WE RESERVE THE RIGHT TO CHANGE AT ANYTIME SPECIFICATIONS, DESIGN, OR PRICES WITHOUT INCURRING OBLIGATION. KYSOR//WARREN 5201 Transport Boulevard Columbus, Georgia Page 33
34
Introductions General Information. Receiving/Shipping Damage/Lost Items
 Page 2 Table of Contents Introductions General Information... 4 Case Description... 4 Receiving/Shipping Damage/Lost Items... 4 Refrigerant... 5 Condensing Unit... 5 Plan View and Cross Section... 6 Case
QM5, QM5G Multi-Deck Meat Display Case. Part Number: 31E03028 Date: 08/13/2007
 Part Number: 31E03028 Date: 08/13/2007 5201 Transport Boulevard Columbus, GA. 31907 706-568-1514 Installation & Operation Manual QM5, QM5G Multi-Deck Meat Display Case IMPORTANT KEEP IN STORE FOR FUTURE
Installation & Operation Manual
 Part Number: 31E11040 Date Revised: 11/14/2011 5201 Transport Boulevard Columbus, GA 31907 706-568-1514 Installation & Operation Manual QWM1GD Single Deck Display Case IMPORTANT KEEP IN STORE FOR FUTURE
Installation & Operation Manual
 5201 Transport Boulevard Columbus, GA. 31907 706-568-1514 Installation & Operation Manual QFGCEIX/Low Temperature Reach-In Display Cases with modular condensing unit IMPORTANT KEEP IN STORE FOR FUTURE
IMPORTANT KEEP IN STORE FOR FUTURE USE
 Part Number: 31E11030 Date: 8/24/2011 5201 Transport Boulevard Columbus, GA 31907 706-568-1514 Installation & Operation Manual QM2T(E) QM3T(E) Wide Island Multi-Deck Display Case IMPORTANT KEEP IN STORE
INSTALLATION & OPERATION MANUAL QDV5V-A QDV5VT-A QIV5V-A, QIV5VT-A QLV5V-A, QLV5VT-A REACH-IN DISPLAY CASES IMPORTANT KEEP IN STORE FOR FUTURE USE
 Part No. 31E10015 Date: 3/2/10 5201 Transport Boulevard Columbus, GA 31907 706-568-1514 INSTALLATION & OPERATION MANUAL QDV5V-A QDV5VT-A QIV5V-A, QIV5VT-A QLV5V-A, QLV5VT-A REACH-IN DISPLAY CASES IMPORTANT
INSTALLATION & OPERATION MANUAL QDV6V-A QIV6V-A, QLV6V-A REACH-IN DISPLAY CASES IMPORTANT KEEP IN STORE FOR FUTURE USE. Part No. 31E11043 Date: 1/5/15
 Part No. 31E11043 Date: 1/5/15 5201 Transport Boulevard Columbus, GA 31907 706-568-1514 INSTALLATION & OPERATION MANUAL QDV6V-A QIV6V-A, QLV6V-A REACH-IN DISPLAY CASES IMPORTANT KEEP IN STORE FOR FUTURE
INSTALLATION & OPERATION MANUAL
 Part No. 31E11044 Date: 4/11/11 5201 Transport Boulevard Columbus, GA 31907 706-568-1514 INSTALLATION & OPERATION MANUAL QFGCEID-A, QFGTD-A QNGCEID-A REACH-IN DISPLAY CASES IMPORTANT KEEP IN STORE FOR
INSTALLATION & OPERATION MANUAL
 series K//W Part #:31E03-027 Date: 9-00 Supersedes: INSTALLATION & OPERATION MANUAL M4N3 Multi-Deck, Narrow, Meat Merchandiser This case conforms to the Commercial Refrigerator Manufacturers Association
Installation and Operation Manual
 series Installation and Operation Manual FGCEID GLASS DOOR REACH-IN This refrigerator conforms to the Commercial Refrigerator Manufacturers Association s Health and Sanitation Standard. series Page 2 INSTALLATION
Introductions General Information
 Table of Contents Introductions General Information... 4 Case Description... 4 Receiving/Shipping Damage/Lost Items... 4 Refrigerant... 5 Glass Cylinders... 5 Plan View and Cross Section... 6 Case Data...
INSTALLATION AND OPERATING MANUAL
 INSTALLATION AND OPERATING MANUAL Refrigerated Island Merchandiser FOR PARTS & SERVICE Contact: Piper Products, Inc. Phone: (800) 544-3057 Ask for Service Department IMPORTANT! This manual contains important
INSTALLATION AND OPERATING MANUAL
 INSTALLATION AND OPERATING MANUAL Refrigerated Merchandisers with Air-Over Displays Refrigerated Low-Profile Mobile Merchandiser Refrigerated High-Profile Mobile Merchandiser Refrigerated Grab-N-Go Merchandiser
Blue Air. Commercial Refrigeration Inc. Installation & Operation Manual Ice Cream Freezers
 Blue Air Commercial Refrigeration Inc. Installation & Operation Manual Ice Cream Freezers Please read this manual completely before installing or operating this unit! BACF11 BACF15 BACRF14 Blue Air reserves
HANDBOOK O3EIF MEAT CASES INSTALLATION & OPERATION
 HANDBOOK INSTALLATION & OPERATION O3EIF MEAT CASES Table of Contents General Information... 2 Using Casters... 3 Case Dimensions... 4 Case Operations... 5 Line Up & Trim Out... 6 Piping: Refrigeration
Installation & Operation Manual Ice Cream Freezers
 Installation & Operation Manual Ice Cream Freezers Please read this manual completely before installing or operating this unit! BACF11 BACF15 Blue Air reserves the right to make product modification at
INSTALLATION AND OPERATING MANUAL
 INSTALLATION AND OPERATING MANUAL Refrigerated Cases with Air-Over Displays Refrigerated High Profile Grab-N-Go FOR PARTS & SERVICE Contact: Piper Products, Inc. Phone: (800) 544-3057 Ask for Service Department
REFRIGERATED DROP-INS (2-6)FT-DI Installation and Operating Manual
FT-DI Installation and Operating Manual") REFRIGERATED DROP-INS (2-6)FT-DI Installation and Operating Manual For service information call 800-544-3057 Please have the following information available before calling. Information can be found on
REFRIGERATED DROP-INS (2-6)FT-DI Installation and Operating Manual For service information call 800-544-3057 Please have the following information available before calling. Information can be found on
INSTALLATION AND OPERATING MANUAL
 INSTALLATION AND OPERATING MANUAL Salad Bars Olive Bars Food Prep Cases Refrigerated Cases with Air-Over Displays Refrigerated Cases with Coppered Cold Well Displays Cases with Under-Counter Refrigerators
Field Top Mounted Condensing Unit
 Field Top Mounted Condensing Unit INSTALLATION & OPERATIONS MANUAL RF/RF-N, RM/RM-N IMPORTANT Keep in store for future reference! REVISION HISTORY VERSION 1.0 New manual This manual is specific to the
INSTALLATION AND SERVICE MANUAL REMOTE TYPE DISPLAY CASE
 Multi-Deck Self Service Fresh Meat Merchandiser Multi-Deck Self Service Fresh Meat Merchandiser FPW-EXA085 FPW-EXA085 FPW-EXA025 FPW-EXA025 INSTALLATION AND SERVICE MANUAL REMOTE TYPE DISPLAY CASE TABLE
RPI Industries, Inc.
 IMPORTANT: THE FOLLOWING INFORMATION SHOULD BE RETAINED FOR FUTURE REFERENCE RPI Industries, Inc. building a better case for sales BAKERY and DELI USE AND SERVICE MANUAL WARRANTY INFORMATION SPECIFICATIONS
POLAR TEMP FARM MORTALITY UNIT OPERATION MANUAL
 POLAR TEMP FARM MORTALITY UNIT OPERATION MANUAL www.polartemp.com TABLE OF CONTENT Disclaimer.......................................... Page 3 Inspection, unpacking and FMU setup.................. Page
OPERATING INSTRUCTIONS
 OPERATING INSTRUCTIONS SPECIALTY REFRIGERATED TRANSPORT CABINETS FOR SATELLITE LOCATIONS RBQ-96 Caution: Read the instructions before using the machine. CONGRATULATIONS......and thank you for purchasing
PARAGON Commercial Refrigeration Controls
 PARAGON Commercial Refrigeration Controls ERC 2 Electronic Refrigeration Control The ERC 2 Electronic Refrigeration Control is a microprocessor-based electronic controller designed to control both the
ISLAND PRODUCE MODELS: OIP, OIPB, &OIPBB INSTALLATION & OPERATION HANDBOOK. P054956H Rev. 7 11/06 COMPONENT
 ISLAND PRODUCE C A S E S MODELS: OIP, OIPB, &OIPBB INSTALLATION & OPERATION HANDBOOK COMPONENT P054956H Rev. 7 11/06 Welcome to the ORIGIN 2 display case family. We re very pleased you joined us. This
RPI Industries, Inc.
 RPI Industries, Inc. AIR SCREEN and SELF-SERVE OPERATION AND SERVICE MANUAL WARRANTY INFORMATION For Models Stratus SCRFC48R-SSI SCRFC60R-SSI SCRFC72R-SSI SCRFC48R-SSII SCRFC72R-SSII SCRFC48R-SSIII SCRFC72R-SSIII
SERIES NIM. Low Temperature Merchandisers PLEASE READ THIS MANUAL BEFORE USING THE PRODUCT
 SERIES NIM Low Temperature Merchandisers PLEASE READ THIS MANUAL BEFORE USING THE PRODUCT Hussmann Monterrey, Mexico Carretera Mexico-Laredo KM. 1009 Cienga de Flores, Nuevo Leon 65550 Mexico Phone: (52)
OPERATING INSTRUCTIONS
 OPERATING INSTRUCTIONS MOBILE HEATED DISH CABINET TM HDC Series Stores, heats, and holds dishes. CONGRATULATIONS... HDC-252-I Heated model shown with flip back top opened....and thank you for purchasing
RPI Industries, Inc.
 RPI Industries, Inc. AIR SCREEN and SELF-SERVE OPERATION AND SERVICE MANUAL WARRANTY INFORMATION For Models Olympus Bandit Bravo SCAS36R SCRFC3660R SCRFC3648R SCAS48R SCRFC4860R SCRFC4848R SCAS60R SCRFC6060R
ERC2 Control Instructions
 Programg ERC2 Control Instructions The ERC 2 control initially powers up displaying 12: AM otherwise it will show the last configured selection (time or temperature). If a power outage occurs during normal
Horizontal Bottle Cooler Installation and Operation Manual
 Speeds Up the Pace of Innovation Horizontal Bottle Cooler Installation and Operation Manual Please read this manual completely before attempting to install or operate this equipment! TBC-50SD, 50SB/ TBC-95SD,
Installation & Operation Manual. STRATUS Multi- Deck Display Case. Stratus Multi Deck Installation and Operations. Manual
 Installation & Stratus Multi Deck Installation and Operations Operation Manual Manual KW-IOM-2030 January 2015 Part No. 31E02030 Contents STRATUS Multi- Deck Display Case Introduction General Information
Installation & Operation Manual. STRATUS Multi- Deck Display Case. Stratus Multi Deck Installation and Operations. Manual
 Installation & Stratus Multi Deck Installation and Operations Operation Manual Manual KW-IOM-2040 March 2013 Part No. 31E02040 Contents STRATUS Multi- Deck Display Case Introduction General Information
Instruction Sheet. ERC2 Retrofit Instructions Series Refrigerators/Freezers and SPEC LINE Refrigerators 6000 & SPEC LINE SERIES
 DELFIELD 980 SOUTH ISABELLA ROAD, MOUNT PLEASANT, MI 48858 844-724-CARE WWW.DELFIELD.COM Instruction Sheet ERC2 Retrofit Instructions 6000 & SPEC LINE SERIES 6000 Series Refrigerators/Freezers and SPEC
JUMBO ISLAND FROZEN FOOD/ICE CREAM/MEDIUM TEMP MERCHANDISERS Low, Medium and Dual Temperature Self Serve Display Cases
 Installation & Service Manual JUMBO ISLAND FROZEN FOOD/ICE CREAM/MEDIUM TEMP MERCHANDISERS Low, Medium and Dual Temperature Self Serve Display Cases This manual has been designed to be used in conjunction
Installation & Operation Manual. STRATUS Multi- Deck Display Case. Stratus Multi Deck Installation and Operations. Manual
 Installation & Stratus Multi Deck Installation and Operations Operation Manual Manual KW-IOM-2042 January 2015 Part No. 31E02042 Contents STRATUS Multi- Deck Display Case Introduction General Information
Instruction Manual. 36 in. and 42 in. Popcorn Staging Cabinets
 Instruction Manual 36 in. and 42 in. Popcorn Staging Cabinets Model Series 2856 and 2855 42 in. Model 2855-00-000 36 in. Model 2856-00-000 10700 Medallion Drive, Cincinnati, Ohio 45241-4807 USA 2016 Gold
Installation & Operation Manual. STRATUS Multi- Deck Display Case. Stratus Multi Deck Installation and Operations. Manual
 Installation & Stratus Multi Deck Installation and Operations Operation Manual Manual KW-IOM-2098 March 2013 Part No. 31E02098 Contents STRATUS Multi- Deck Display Introduction General Information 2 Plan
L3MGB. THREE DECK MEAT/DELI MERCHANDISERS Medium Temperature Self Serve Display Cases
 Installation & Service Manual THREE DECK MEAT/DELI MERCHANDISERS Medium Temperature Self Serve Display Cases This manual has been designed to be used in conjunction with the General Installation & Service
Instruction Manual. Cheese Warmer with Pump
 Instruction Manual Cheese Warmer with Pump 10700 Medallion Drive, Cincinnati, Ohio 45241-4807 USA 2013 Gold Medal Products Co. Part No. 38298 SAFETY PRECAUTIONS Page 2 INSTALLATION INSTRUCTIONS Inspection
Milk Coolers Installation and Operation Manual Please read this manual completely before attempting to install or operate this equipment!
 Turbo Air Speed up the Pace of Innovation CAUTION! PLEASE KEEP POWER SWITCH ON BEFORE OPERATING THIS EQUIPMENT Milk Coolers Installation and Operation Manual Please read this manual completely before attempting
DUAL VOLTAGE REFRIGERATORS 220/240 VOLTS AC AND 12/24 VOLTS DC INSTALLATION AND OWNER S MANUAL
 DUAL VOLTAGE REFRIGERATORS 220/240 VOLTS AC AND 12/24 VOLTS DC INSTALLATION AND OWNER S MANUAL Service Information If service or parts are required, contact the nearest Norcold Service Center. To find
G-7s. Instruction Manual. G-Series Cooler COUNTERTOP COOLER. Part No.11IPA
 G-Series Cooler COUNTERTOP COOLER Part No.11IPA-061000 Instruction Manual FOR YOUR FUTURE REFERENCE This easy-to-use manual will guide you in getting the best use of your cooler. Remember to record the
e Bath Fan with Light User s Guide
 e Bath Fan with Light User s Guide abfl100rnl, BFL125RNL Item Stock Number(s): BFL100RNL, BFL125RNL IMPORTANT INSTRUCTIONS - OPERATING MANUAL READ AND SAVE THESE INSTRUCTIONS READ CAREFULLY BEFORE ATTEMPTING
Important Information Read Before Use Please Save These Instructions!
 ACR-26S, Air Curtain Refrigerator Service and Installation Manual Please read this manual completely before attempting to install this equipment! Notify carrier of damage! Inspect all components immediately.
Installation & Operation Manual. STRATUS Multi- Deck Display Case. Stratus Multi Deck Installation and Operations. Manual
 Installation & Stratus Multi Deck Installation and Operations Operation Manual Manual KW-IOM-2031 January 2015 Part No. 31E02031 Contents STRATUS Multi- Deck Display Case Introduction General Information
G-10s. Instruction Manual. G-Series Cooler UPRIGHT COOLER. Part No.11IPA
 G-Series Cooler UPRIGHT COOLER Part No.11IPA-062800 Instruction Manual FOR YOUR FUTURE REFERENCE Thank you for using our product. This manual will guide you in getting the best use of your cooler. Remember
INSTALLATION, OPERATION AND MAINTENANCE INSTRUCTIONS
 INSTALLATION, OPERATION AND MAINTENANCE INSTRUCTIONS AquaArctic Remote Water Chiller A9100080 -A TECHNICAL ASSISTANCE TOLL FREE TELEPHONE NUMBER: 1.800.591.9360 Technical Assistance Fax: 1.626.855.4894
Air Cleaning Equipment, Inc. 303 N. Main St. Broadway, NC iers.com
 Read and Save These Instructions Horizon Galaxy - Installation and Operations Manual Air Cleaning Equipment, Inc. 303 N. Main St. Broadway, NC 27505 www.horizondehumidif iers.com 1 Safety Notes: The Horizon
RPI Industries, Inc.
 IMPORTANT: THE FOLLOWING INFORMATION SHOULD BE RETAINED FOR FUTURE REFERENCE RPI Industries, Inc. building a better case for sales CONFECTIONERY USE & SERVICE MANUAL WARRANTY INFORMATION For Models Bradford
e Heater/Exhaust Fan/Light User s Guide
 e Heater/Exhaust Fan/Light User s Guide abflh70l, BFLH85L Item Stock Number(s): BFLH70L, BFLH85L IMPORTANT INSTRUCTIONS - OPERATING MANUAL READ AND SAVE THESE INSTRUCTIONS READ CAREFULLY BEFORE ATTEMPTING
Professional Warming Drawer and Warming Drawer Cabinet
 Professional Warming Drawer and Warming Drawer Cabinet Care & Use/Installation Instructions Models: (C)VQEWD5300SS (C)VQEWD5420SS IMPORTANT SAFETY INSTRUCTIONS WARNING: Read this manual carefully and completely
e Bath Fan with Light User s Guide
 e Bath Fan with Light User s Guide abfl50uq, BFL60UQ, BFL70, BFL85 Item Stock Number(s): BFL50UQ, BFL60UQ, BFL70, BFL85 IMPORTANT INSTRUCTIONS - OPERATING MANUAL READ AND SAVE THESE INSTRUCTIONS READ CAREFULLY
e Bath Fan with Light User s Guide
 e Bath Fan with Light User s Guide abfl125rok Item Stock Number(s): BFL125ROK IMPORTANT INSTRUCTIONS - OPERATING MANUAL READ AND SAVE THESE INSTRUCTIONS READ CAREFULLY BEFORE ATTEMPTING TO ASSEMBLE, INSTALL,
3-DECK ISLAND PRODUCE INSTALLATION & OPERATION HANDBOOK. P053096D Rev. 9 11/10 COMPONENT
 3-DECK ISLAND PRODUCE C A S E S M O D E L S : O 3 I P & O 3 I P B INSTALLATION & OPERATION HANDBOOK COMPONENT P053096D Rev. 9 11/10 Welcome to the Hill PHOENIX display case family. We re very pleased
L6FA. MULTI-SHELF FROZEN FOOD MERCHANDISER Low Temperature Self Serve Display Cases
 Installation & Service Manual L6FA MULTI-SHELF FROZEN FOOD MERCHANDISER Low Temperature Self Serve Display Cases This manual has been designed to be used in conjunction with the General Installation &
Turbo Air Speed up the Pace of Innovation TBB-4SB CAUTION! PLEASE KEEP POWER SWITCH ON BEFORE OPERATING THIS EQUIPMENT
 Turbo Air Speed up the Pace of Innovation CAUTION! PLEASE KEEP POWER SWITCH ON BEFORE OPERATING THIS EQUIPMENT Underbar Equipment Back Bars Installation and Operation Manual Please read this manual completely
Installation & Service Manual
 Installation & Service Manual NFJCX, NCJCX, NTJCX, JUMBO ISLAND FROZEN FOOD/ICE CREAM/MEDIUM TEMP MERCHANDISERS Low, Medium and Dual Temperature Self Serve Display Cases This manual has been designed to
FOR EASY, FAST INSTALLATION AND FOR RESULTS
 Page 1 INSTALLATION & OPERATING INSTRUCTIONS FOR FEDERAL FLOOR FURNACE OFB-100 AND OFB100L UNPACK SHIPMENT CAREFULLY AND INSPECT FOR DAMAGE. ALL GOODS ARE CAREFULLY MANUFACTURED, INSPECTED, CHECKED, AND
Installation & Operation Manual. STRATUS Multi- Deck Display Case. Stratus Multi Deck Installation and Operations. Manual
 Installation & Stratus Multi Deck Installation and Operations Operation Manual Manual KW-IOM-2142 January 2015 Part No. 31E02142 Contents STRATUS Multi- Deck Display Case Introduction General Information
CLIMAGUARD Air-to-Air Outdoor Heat Exchangers INSTRUCTION MANUAL. Rev. H 2015 Pentair Equipment Protection P/N
 CLIMAGUARD Air-to-Air Outdoor Heat Exchangers TX23, TX33, TX38, TX52 Model INSTRUCTION MANUAL Rev. H 2015 Pentair Equipment Protection P/N 10-1008-221 87976519 TABLE OF CONTENTS RECEIVING THE HEAT EXCHANGER...3
WCPT-3 and WCPT-4. Effective Date: 2017 IMPORTANT INFORMATION READ BEFORE USE. Drop-in Display Cases
 WCPT-3 and WCPT-4 Service and Installation Manual Please read this manual completely before attempting to install or operate this equipment! Notify carrier of damage! Inspect all components immediately.
MODEL 925W FEATURES: ELECTRICAL DATA: DIMENSIONS: SHIPPING INFORMATION: FOOD WARMING/ MERCHANDISING CABINET
 FOOD WARMING/ MERCHANDISING CABINET MODEL 925W This warmer/merchandiser provides heated circulating air to keep foods fresh and evenly warmed. It is constructed of stainless steel and tempered glass for
Refrigerator Freezer Installation and Operation Manual
 Speeds Up the Pace of Innovation CAUTION! Refrigerator Freezer Installation and Operation Manual PLEASE KEEP POWER SWITCH ON BEFORE OPERATING THIS EQUIPMENT Please read this manual completely before attempting
Installation & Service Manual
 Installation & Service Manual NMFG Shown NMF / NMFG SINGLE DECK FROZEN MEAT MERCHANDISERS Low Temperature Self Serve Display Cases This manual has been designed to be used in conjunction with the General
Installation & Service Manual
 Installation & Service Manual NFJGCX, NCJGCX, NTJGCX, NFMJGCX, NFJGECX, NCJGECX GLASS FRONT JUMBO ISLAND FROZEN FOOD/ICE CREAM/ MEDIUM TEMP MERCHANDISERS Low, Medium and Dual Temperature Self Serve Display
SERIES NAV S Display Merchandisers
 SERIES NAV S Display Merchandisers Medium Temperature Merchandisers PLEASE READ THIS MANUAL BEFORE USING THE PRODUCT Installation & Operation Manual P/N 2400204D NAV S Series May 2006 HUSSMANN CORPORATION
For Additional Copies Please Contact:
 Service & Installation Instructions Keep this booklet for Future Reference CWC SERIES CW SERIES HW SERIES SB SERIES SBI SERIES For Additional Copies Please Contact: Hillphoenix Barker Specialty Products
For Additional Copies Please Contact:
 Service & Installation Instructions Keep this booklet for Future Reference BWU SERIES BWU-BCC SERIES BWU-RB SERIES For Additional Copies Please Contact: Hillphoenix Barker Specialty Products 703 Franklin
OPERATING INSTRUCTIONS
 OPERATING INSTRUCTIONS HLC WITH DIXELL CONTROLS Quick Start On Page 7 Detailed Operating Manual for Controller Included Separately HLC SERIES WITH RADIANT HEAT SYSTEM FWE HLC WITH DIXELL CONTROLS HLC-SL1826-5L
Instruction Manual. Cheddar Easy All-In-One Cheese Corn Shop
 Instruction Manual Cheddar Easy All-In-One Cheese Corn Shop Model No. 2703-00-000 10700 Medallion Drive, Cincinnati, Ohio 45241-4807 USA 2017 Gold Medal Products Co. Part No. 110028 SAFETY PRECAUTIONS
Instruction Manual. Double Candy Apple Cooker
 Instruction Manual Double Candy Apple Cooker Model No. 4416 10700 Medallion Drive, Cincinnati, Ohio 45241-4807 USA 2014 Gold Medal Products Co. Part No. 46841 SAFETY PRECAUTIONS DANGER Machine must be
Glass Door Merchandiser Refrigerator and Freezer
 Glass Door Merchandiser Refrigerator and Freezer (Swing and Sliding Door ) Service, Installation and Care Manual Please read this manual completely before attempting to install or operate this equipment.
InstructIon Manual KrEs EQuIPMEnt stands
 Instruction Manual Instruction Manual SELF-CONTAINED AND REMOTE Kairak KRES model refrigerated equipment stand units are available in many lengths from 36 to 120 inches long. These units are available
UNDERCOUNTER REFRIGERATORS AND FREEZERS Installation, Operation and Maintenance Instructions
 UNDERCOUNTER REFRIGERATORS AND FREEZERS Installation, Operation and Maintenance Instructions Please read this manual completely prior to installing and operating this equipment. This manual describes how
T-SERIES Air Conditioner. T62 Model INSTRUCTION MANUAL nvent Rev. F P/N
 T-SERIES Air Conditioner T62 Model INSTRUCTION MANUAL Rev. F P/N 10-1008-239 TABLE OF CONTENTS RECEIVING THE AIR CONDITIONER... 3 HANDLING AND TESTING THE AIR CONDITIONER... 3 INSTALLATION INSTRUCTIONS...
Model 2016, 2025, 2025BN, 2025ST Staging Cabinets Instruction Manual
 Model, 2025BN, 2025ST Staging Cabinets Instruction Manual Part No 53021 Cincinnati, OH 45241-4807 USA SAFETY PRECAUTIONS DANGER Machine must be properly grounded to prevent electrical shock to personnel.
ref. com Owner s Manual for models: A Step Above the Standard Thank you for choosing EVEREST
 www.everest ref. com Owner s Manual for models: Back Bar Coolers " Deep Back Bar Coolers Glass Door Back Bar Coolers " Deep Galss Door Back Bar Coolers " Deep Galss Sliding Door Back Bar Coolers EBB3,
OPERATING INSTRUCTIONS
 OPERATING INSTRUCTIONS ORIGINAL INSTRUCTIONS MOBILE HUMI-TEMP CABINETS "ETC-1826-HD" SERIES: Non-Insulated 18"x26" Tray Server "ETC-UA-HD" SERIES: Non-Insulated Universal Server P SERIES: Banquet Servers
Instruction Manual. Nacho Cheese Dispenser and Warmer
 Instruction Manual Nacho Cheese Dispenser and Warmer 10700 Medallion Drive, Cincinnati, Ohio 45241-4807 USA 2013 Gold Medal Products Co. Part No. 36060 SAFETY PRECAUTIONS Page 2 INSTALLATION INSTRUCTIONS
Mobile Hot Food Merchandiser Series. Series: MHB Operation Manual
 Mobile Hot Food Merchandiser Series Series: MHB Operation Manual BKI LIMITED WARRANTY Grandview Drive Simpsonville, SC 0 USA () - Toll Free: (00) - Fax: () - WHAT IS COVERED WHO IS COVERED COVERAGE PERIOD
GCG-10. Instruction Manual. G-Series Cooler. Manual is for the following models: GCG-10-N33EB G-10-N33EB UPRIGHT COOLER
 G-Series Cooler GCG-10 UPRIGHT COOLER Manual is for the following models: GCG-10-N33EB G-10-N33EB Instruction Manual Manual is for the following models: GCG-10-N33EB G-10-N33EB Instruction Manual GCG-10
Cincinnati, OH USA
 Heated Portion Pack Display Case Instruction Manual Model #5580BV1, Model #5588 and Model #5581 Part No. 74797 Revised April 2000 Cincinnati, OH 45241-4807 USA e-mail: goldme19@eos.net www.gmpopcorn.com
OPERATING INSTRUCTIONS
 OPERATING INSTRUCTIONS TOP MOUNT HEATED HOLDING Heated Holding Food Warmers With Dial Face Controls or HDM Controls FWE TOP MOUNT HEAT SYSTEM FWE Heated Holding Cabinets Keep your food oven fresh longer!
ELECTRICAL DATA: FEATURES: SHIPPING INFORMATION: FOOD WARMING/ MERCHANDISING CABINET. 15 Width 7 Width
 FOOD WARMING/ MERCHANDISING CABINET MODEL 323HH MODEL 323HH-7 15 Width 7 Width With the ability to hold a point-of-purchase advertisement, these sleek, compact warmers are sure to draw eye catching attention.
NFW, NCW, NFWG, NCWG, NFWE, NCWE
 Installation & Service Manual WIDE ISLAND FROZEN FOOD & ICE CREAM MERCHANDISERS Low Temperature Self Serve Display Cases This manual has been designed to be used in conjunction with the General (UL/NSF)
User Manual / Installation Instructions
 User Manual / Installation Instructions Outdoor Refrigerator MODEL: L24REF Lynx Professional Grills 5895 Rickenbacker Rd., Commerce, CA 90040 Service: (888) 289-5969 Tel: (323) 838-1770 Fax: (323) 838-1778
COMMERCIAL REFRIGERATOR INSTRUCTION MANUAL
 COMMERCIAL REFRIGERATOR INSTRUCTION MANUAL Model No.: TGM-69R FEATURE CHART ADVERTISING PANEL FLOURESCENT SWITCH COOLING FAN FLOURESCENT LAMP EVAPORATOR INNER DRAIN PAN SHELF DOOR HANDLE GLASS DOOR CONDENSER
MODEL (Single Door) MODEL (2 Door pass through)
 MODEL (2 Door pass through)") FOOD WARMING/MERCHANDISING CABINET MODEL 680-1 (Single Door) MODEL 680-2 (2 Door pass through) This warmer provides bottom heat to keep crusts crisp. The illuminated shelves are thermostatically controlled
FOOD WARMING/MERCHANDISING CABINET MODEL 680-1 (Single Door) MODEL 680-2 (2 Door pass through) This warmer provides bottom heat to keep crusts crisp. The illuminated shelves are thermostatically controlled
REFRIGERATED PREP TABLES Installation, Operation and Maintenance Instructions
 REFRIGERATED PREP TABLES Installation, Operation and Maintenance Instructions Please read this manual completely prior to installing and operating this equipment. This manual describes how to install,
WKS 4000 SERIES (USA only) --INSTALLATION INSTRUCTIONS--
 --INSTALLATION INSTRUCTIONS--") 8610 Production Avenue San Diego, California 92121 (858) 566-7465 Fax (858) 566-1943 WKS 4000 SERIES (USA only) --INSTALLATION INSTRUCTIONS-- Thank you for choosing a BREEZAIRE cooling unit. We believe
8610 Production Avenue San Diego, California 92121 (858) 566-7465 Fax (858) 566-1943 WKS 4000 SERIES (USA only) --INSTALLATION INSTRUCTIONS-- Thank you for choosing a BREEZAIRE cooling unit. We believe
CHEST FREEZER INSTRUCTION MANUAL. Model No.: EWCF5WBX EWCF7WBX
 CHEST FREEZER INSTRUCTION MANUAL Model No.: EWCF5WBX EWCF7WBX To ensure proper use of this appliance and your safety, please read the following instructions completely before operating this appliance.
MANUAL FOOD HOLDING & TRANSPORT CABINETS WITTCO MODEL NUMBERS
 O P E R A T I O N S M A I N T E N A N C E MANUAL FOOD HOLDING & TRANSPORT CABINETS WITTCO MODEL NUMBERS 1826-4 1826-7-BC-IS 1826-7 1826-13-BC-IS 1826-7-BC 1826-15-BC-IS 1826-13-BC 1826-15-BC 1826-40-BC
Compact Refrigerator. User's Manual PLEASE READ THIS MANUAL CAREFULLY BEFORE USING YOUR REFRIGERATOR AND KEEP IT FOR FUTURE REFERENCE.
 Compact Refrigerator User's Manual Model MCBR445B2 / MCBR445S2 PLEASE READ THIS MANUAL CAREFULLY BEFORE USING YOUR REFRIGERATOR AND KEEP IT FOR FUTURE REFERENCE. Product Registration Thank you for purchasing
IAQ Series. Bosch IAQ Photo Catalytic Oxidizer (PCO) Residential Application. Installation Manual and Owner s Guide
 Residential Application. Installation Manual and Owner s Guide") Installation Manual and Owner s Guide IAQ Series Bosch IAQ Photo Catalytic Oxidizer (PCO) Residential Application PCOB-09012-0--A - 9" PCO BULB PCOB-14024-0--A - 14" PCO BULB 67202220344 Revised 07-12
Installation Manual and Owner s Guide IAQ Series Bosch IAQ Photo Catalytic Oxidizer (PCO) Residential Application PCOB-09012-0--A - 9" PCO BULB PCOB-14024-0--A - 14" PCO BULB 67202220344 Revised 07-12
Hot Dog Roller Grills
 Part No. 87630 Hot Dog Roller Grills Model No. 8022, 8022PE, 8023, 8023SL, 8023PE, 8024, 8024PE, 8024SL, 8025, 8025SL Cincinnati, OH 45241-4807 USA SAFETY PRECAUTIONS DANGER Machine must be properly grounded
OWNER/OPERATOR MANUAL COMPONENTS, INSTALLATION, OPERATION AND SERVICE INSTRUCTIONS
 OWNER/OPERATOR MANUAL COMPONENTS, INSTALLATION, OPERATION AND SERVICE INSTRUCTIONS REFRIGERATED COMPRESSED AIR DRYER WRA-0050 WRA-0200 WARNING READ ALL INFORMATION IN THIS MANUAL BEFORE BEGINNING INSTALLATION
Cincinnati, OH USA
 Heated Portion Pack Display Case Instruction Manual Model #5580BV1, Model #5588 and Model #5581 Part No. 74797 Revised April 2000 Cincinnati, OH 45241-4807 USA e-mail: goldme19@eos.net www.gmpopcorn.com
Whynter Portable Ice Maker 33 lb capacity - White
 Whynter Portable Ice Maker 33 lb capacity - White Model # : IMC-330WS INSTRUCTION MANUAL Congratulations on your new Whynter product. To ensure proper operation, please read this Instruction Manual carefully