Preference ICC. Sterilization Center
|
|
|
- Sophia Parks
- 5 years ago
- Views:
Transcription


1 Instructions for Use Preference ICC Sterilization Center
2 Copyright 2018 A-dec Inc. All rights reserved. A-dec Inc. makes no warranty of any kind with regard to this material, including, but not limited to, the implied warranties of merchantability and fitness for a particular purpose. A-dec Inc. shall not be held liable for any errors contained herein or any consequential or other damages concerning the furnishing, performance or use of this material. The information in this document is subject to change without notice. If you find any problems in the documentation, please report them to us in writing. A-dec Inc. does not warrant that this document is error-free. No part of this document may be copied, reproduced, altered, or transmitted in any form or by any means, electronic or mechanical, including photocopying, recording, or by any information storage and retrieval system, without prior written permission from A-dec Inc. Trademarks and Additional Intellectual Property Rights A-dec, the A-dec logo, A-dec Inspire, Cascade, Century Plus, Continental, Decade, ICX, ICV, Performer, Preference, Preference Collection, Preference ICC, Radius, and reliablecreativesolutions are trademarks of A-dec Inc. and are registered in the United States and other countries. A-dec 500, A-dec 400, A-dec 300, A-dec 200, and EasyFlex are also trademarks of A-dec Inc. None of the trademarks or trade names in this document may be reproduced, copied, or manipulated in any manner without the express, written approval of the trademark owner. Certain touchpad symbols are proprietary to A-dec Inc. Any use of these symbols, in whole or in part, without the express written consent of A-dec Inc., is strictly prohibited. Pozidriv is a registered trademark of Phillips Screw Company. GOJO is a registered trademark of GOJO Industries Inc. All other trademarks cited herein are the property of their respective owners. Regulatory Information Regulatory information mandated by agency requirements is provided in the Regulatory Information, Specifications, and Warranty document (p/n ), which is available in the Document Library at Product Service Product service is available through your local authorized A-dec dealer. For service information, or to locate an authorized dealer, contact A-dec at in the USA and Canada or worldwide, or visit IFUbk10
3 CONTENTS 1 Introduction... 1 About Preference ICC Basic Operation... 3 Clock/Timer... 3 Foot-Activated and Hands-Free Operations...4 Foot-Activated Faucets... 4 Upper Storage... 5 Dryer Activation... 6 Waterproof Drawers, Inserts, and Shelves... 7 Presoak Drawers... 7 Plastic Drawer Inserts... 8 Pull-Out Shelves... 8 Soap Dispensers... 9 Motion-Activated Soap Dispenser... 9 Cleaning and Maintenance Manual Soap Dispensers Towel and Glove Dispensers Paper Towel Dispenser Glove Dispensers Heavy Duty Glove Holder Task Lighting Specialized Waste Containers Biowaste Drawer Large Waste Container Counter-Mounted HVE Extendable Chrome Faucet Adjustments Hinges Doors Soft Close Adjustment Drawer Fronts Foot-Activated Doors Knee-Activated Drawers Knee-Activated Drawer Fronts Knee-Activated Door Front Knee-Activated Drawer Latches Dryer Front Tub Drawer Fronts Tray Drawer Fronts Water Shutoff Valves Rev G i
4 Preference ICC Sterilization Center Instructions For Use Cleaning Surfaces...29 Solid Surface Laminate Quartz Cleaning the Preference ICC Dryer Asepsis Recommendations Appendix: Warranty Warranty ii Rev G

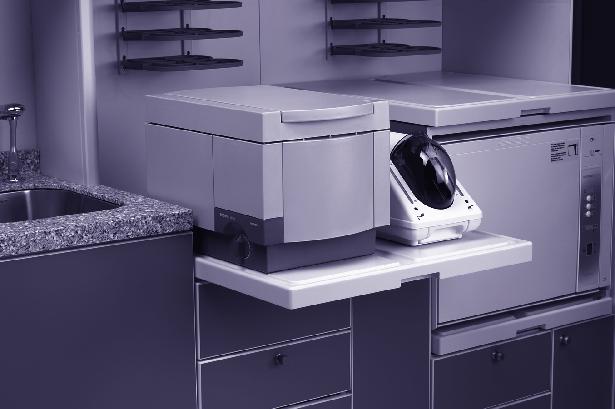
5 INTRODUCTION 1 Thank you for choosing A-dec equipment. This guide contains basic operating instructions, adjustments, and maintenance for your Preference ICC sterilization center. Before using Preference ICC, please note all cautions and warnings. Read the component descriptions, and become familiar with the locations of features and controls. About Preference ICC Preference ICC offers a long list of module configurations and options, which means your system is specifically designed for your practice. Figure 1. Example Configuration Rev G 1
6 Preference ICC Sterilization Center Instructions For Use Rev G

7 BASIC OPERATION 2 Clock/Timer Table 1. Clock/Timer Settings To Do This Function... Set the time. Set 12-/24-hour display formats. Set the countdown timer. Do this... Start the timer. Stop the timer. Clear the timer. Recall last start time. Select timer 1 or 2. Press timer 1 2. Press and hold set clock while pressing hour, min, or sec. Press and hold set timer and set clock (AM/PM will only be displayed for the 12-hour format). Press and hold set timer and min or sec until the desired time is reached. Press start. Press start. Stop the timer, then press and hold set timer for three seconds. Press recall while the timer is stopped. Countdown Timer When the countdown timer reaches ten and five seconds, the alarm will beep once. When it reaches zero, the alarm beeps three times. The timer continues to run until start is pressed again or the timer reaches - 60 seconds Rev G 3

8 Preference ICC Sterilization Center Instructions For Use Low-Battery Indicator When the low-battery indicator light begins to flash, replace the 9 volt alkaline battery. If the battery is removed and replaced within 14 seconds, the clock will not require resetting. The battery connector is polarized, so the battery will easily snap into place if it is in the correct orientation. Foot-Activated and Hands-Free Operations Foot-Activated Faucets CAUTION Do not force the battery into place. If the battery doesn t snap to the connectors easily, reverse the orientation of the battery and reinsert it. Do not change the battery while the audible alarm is active. Preference ICC reduces the risk of contamination by limiting touch surfaces. The optional hands-free features for faucets, storage, and the dryer allow fast efficient workflow without touch points and the need to change gloves. An on/off toggle located on the main air supply line restores manual functions should there be a valve or cylinder failure in hands-free operations. The faucet turns on with pressure on the kickplate. Figure 2. Foot-Activated Kickplate To adjust the water temperature: 1. Press and hold the faucet activation kickplate. 2. Adjust the faucet handle until the desired temperature is reached. 3. Release the kickplate and leave the handle in position Rev G

9 Basic Operation Upper Storage Press the kickplate to access the upper storage areas in clean storage and receiving modules with optional foot-activated doors. Figure 3. Hands-Free Activation of the Upper Storage Doors Rev G 5


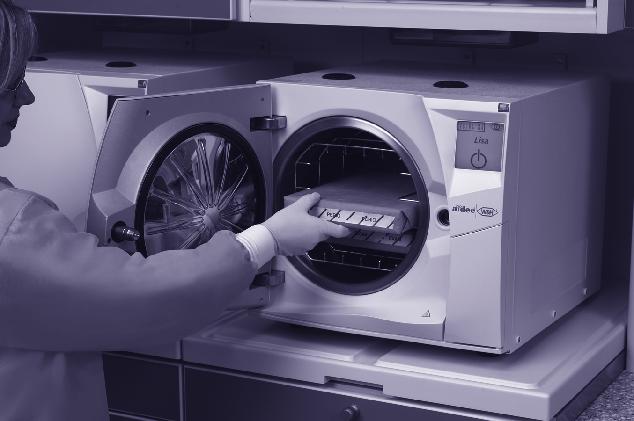
10 Preference ICC Sterilization Center Instructions For Use Dryer Activation Press the kickplate to open or close the dryer door. Close the door and pass your hand over the electronic eye, mounted under the upper cabinet, to start the dryer. The green indicator light will blink when the cycle begins and continues blinking during the full 15-minute cycle. When the cycle is finished, the green light will stop blinking but remain illuminated. Figure 4. Open and Close Dryer / Electronic Eye Indicator Light Electronic Eye NOTE Each time you load anything into the dryer, use the complete 15-minute cycle. Opening the door mid-cycle stops the cycle; when you re-close the door, the cycle resets. If you use transfer baskets, remove the cassette holders before loading the dryer. To optimize your dryer performance, shake off the cassettes or instruments in the sink to remove excess liquid before placing them in the dryer. CAUTION Accumulation of water in the dryer can compromise the electronics. Never rinse instruments inside the dryer and do not spray water into the dryer. Do not use the unit as a drying rack. To function properly, the dryer must be activated immediately after the instruments are loaded. Otherwise, water can accumulate in the bottom of the unit, which can damage the dryer. CAUTION If the dryer cycle is interrupted, contents will be hot. CAUTION Metal surfaces can be hot during and following the dry cycle Rev G

11 Basic Operation Waterproof Drawers, Inserts, and Shelves Presoak Drawers Preference ICC drawers, inserts, and shelves help contain contaminated fluids and keep the sterilization area clean and dry. Designed with deep sides and a fitted cover, the presoak drawers provide: Anti-spill design to help contain fluids for presoaking A reduction in airborne contaminates by containing them in liquid Moist storage to prevent drying of debris on instruments Figure 5. Presoak Drawers Rev G 7


12 Preference ICC Sterilization Center Instructions For Use Plastic Drawer Inserts Drawer inserts come with single, two, four, or six compartments. Plastic drawer inserts provide: Interchangeable or removable storage within the module Storage for different size bags and materials Flat recessed drawers for wrapping Reduced countertop clutter Figure 6. Plastic Drawer Inserts Pull-Out Shelves Pull-out shelves are located on the countertop and in the lower portions of the clean storage or receiving modules. Pullout shelves provide: A grooved design to contain liquid spills Quick clean up with the HVE Easy placement and access to small equipment Figure 7. Pull-Out Shelves Pull-Out Shelf Rev G


13 Basic Operation Soap Dispensers Motion-Activated Soap Dispenser The optional motion-activated soap dispenser operates with an infrared detector. The dispenser activates within one second after you place your hand under the nozzle. If the dispenser was just installed, but is not working, ensure that the shipping tab was removed. Access the Cartridge/Battery Compartment 1. Press both release buttons at the top of the dispenser. 2. Pull down the dispenser cover. Figure 8. Access Cartridge/Battery Compartment Press release buttons on both sides. Pull down the cover. 3. Remove the shipping tab. Figure 9. Shipping Tab Shipping Tab Rev G 9


14 Preference ICC Sterilization Center Instructions For Use Status Indicator An indicator on the dispenser provides the following cartridge and battery status: No light Shipping tab has not been removed or the batteries are dead or missing. Red blinking light Cartridge is empty or missing. Red solid light Batteries are low. Green blinking light Normal operation. Figure 10. Status Indicator Indicator Install a Soap Cartridge 1. Press the dispenser release buttons and pull down the cover. See Access the Cartridge/ Battery Compartment on page Insert the soap cartridge and ensure that the nozzle is properly seated, as shown below, before closing the cover. Figure 11. Proper Soap Cartridge Installation Rev G

15 Basic Operation Cleaning and Maintenance Clean the outside of the dispenser with warm water and mild soap. Do not use abrasive cleaners. Dry the dispenser with a soft cloth. Install the Batteries Replace the batteries when the indicator light is solid red. To replace: 1. Press the dispenser release buttons and pull down the cover. See Access the Cartridge/ Battery Compartment on page Use a Phillips head screwdriver to remove the two battery cover screws. 3. Press the release tab on both sides to remove the cover. 4. Insert three new size D alkaline batteries. TIP Do not mix old and new batteries. Figure 12. Replace the Batteries Battery Cover Screws Press release tab on both sides to remove. Troubleshooting Use the table below to troubleshoot the soap dispenser: Problem Refill Products Cause No soap will dispense Hands are not directly beneath the sensor. No soap bottle is loaded. Incorrect soap bottle is loaded. Soap bottle is empty. Motor does not run Batteries are not installed, are installed incorrectly or are dead. For soap dispenser refills, order the following: Product GOJO Soap Refill Dispenser Specification GOJO 2 Pack Refill Kit For more information about your soap dispenser, contact your authorized A-dec dealer Rev G 11
16 Preference ICC Sterilization Center Instructions For Use Manual Soap Dispensers Preference ICC accommodates two types of manual soap dispenser fill systems: Under-the-counter small dispenser bottle Large commercial container dispenser NOTE CDC Infection Control guidelines indicate that dispensers should be washed and dried before refilling. The guidelines state: Handwashing products, including plain (i.e. nonantimicrobial) soap and antiseptic products, can become contaminated or support the growth of microorganisms. Liquid products should be stored in closed containers and dispensed from either disposable containers or containers that are washed and dried thoroughly before refilling. Soap should not be added to a partially empty dispenser, because this practice of topping off might lead to bacterial contamination. Store and dispense products according to manufacturers directions. NOTE Contact your local Delta dealer for individual parts of the RP1000 Pump Assembly. Order replacement Chrome Soap Dispenser Assembly (p/n ) from A-dec Rev G
17 Basic Operation Large Commercial Soap Container To install a large commercial container for the soap dispenser: 1. Attach the appropriate cap to the soap container. Slide the remaining caps into the free end of the tubing for storage. 2. Push the end of the tubing down through the attached cap to the bottom of the soap container. 3. Place the pump assembly in the dispenser base and pump until soap is dispensed. 4. Secure the soap container to the cabinet with the straps. Figure 13. Install Commercial Soap Container Pump Assembly Vinyl Ring Dispenser Base Base Cabinet Spare Caps Soap Container Straps Rev G 13


18 Preference ICC Sterilization Center Instructions For Use Towel and Glove Dispensers Paper Towel Dispenser Each middle module with a sink has a towel dispenser located in the bottom of the upper storage. The dispensers hold C- or Z-fold towels, such as 9-1/2" x 9-1/4" Crown-Zellerbach or equivalent. Figure 14. Paper Towel Dispenser Glove Dispensers Optional glove dispensers are available in the upper storage of middle sink modules. To refill a glove dispenser: 1. Open the cabinet doors. 2. Remove the empty glove box. 3. Place a new box in the space and secure it with the elastic bands. 4. Close the cabinet doors. Figure 15. Glove Dispenser Rev G


19 Basic Operation Heavy Duty Glove Holder All sink modules include a heavy duty glove holder conveniently located inside the door. Figure 16. Heavy Duty Glove Holder Task Lighting Preference ICC uses four different lengths of light bulbs for the task lights. All of these task light bulbs are available at your local hardware store. Task Light Length Bulb Part Number 18 inches 15WT8 24 inches 17WT8 36 inches 25WT8 48 inches 32WT8 Figure 17. Task Light Bulb Rev G 15

20 Preference ICC Sterilization Center Instructions For Use To replace a task light bulb: 1. Remove the cover from the task light. 2. Pull the bulb towards you in a horizontal motion. NOTE Unlike Preference Collection task lights, these bulbs do not rotate into position. 3. Line up the pins on the new bulb with the horizontal slots. 4. Gently push the bulb in with a horizontal motion. 5. Replace the cover. To replace the light bulbs in Clean Storage or Receiving modules: 1. Remove the light cover. Figure 18. Remove/Replace the Light Bulb 2. Pull the bulb out the socket. 3. Push the new bulb in the socket. 4. Replace the light cover. NOTE Clean Storage and Receiving module light bulbs are 9W PL-S, which are available at your local hardware store Rev G


21 Basic Operation Specialized Waste Containers Preference ICC offers receptacles for two kinds of waste management: Sharps collection Regular trash These specialized containers offer your staff the ability to manage waste according to guidelines. BIOHAZARD Infectious waste may be present. Follow asepsis protocol to prevent cross contamination. Biowaste Drawer The biowaste drawer accommodates a large sharps container. Figure 19. Biowaste Drawer and Large Sharps Container Biowaste Drawer Large Sharps Container Large Waste Container The large waste container drawer is located in the sink module. Figure 20. Sink Drawer with Large Waste Container Sink Module Drawer Large Waste Container Rev G 17


22 Preference ICC Sterilization Center Instructions For Use Counter-Mounted HVE The optional HVE is available on all sink modules. Its convenient counter-mounted position is easily accessible for the removal of liquids around the sterilization area. It also helps facilitate the draining and cleaning of presoak drawers and spill troughs in slide-out trays. CAUTION Immersing the HVE in liquid may damage the vacuum pump. Please check the manufacturer s requirements for vacuum pump protection before vacuuming liquids. Figure 21. Counter-Mounted HVE Extendable Chrome Faucet Cleaning, rinsing and debris removal are made easier with the added versatility of an extendable faucet. You can use it to rinse items outside of the sink or to reach around awkward items in the sink. The faucet head has two different spray options to allow for a soft easy rinse, or a more focused spray for debris removal. Press the button on the faucet head to change the spray intensity. Figure 22. Extendable Faucet Rev G
23 ADJUSTMENTS 3 Hinges Use the quick-release hinges for convenient door removal and replacement. To remove the doors: 1. Press in the hinge locking tab. 2. Unlatch and remove the hinge. To reinstall the doors: 1. Align the pin in the hinge with the front of the mounting plate. 2. Snap the latch in place. 3. Swing the door back and forth several times to ensure the hinge is secure. Figure 23. Removing Doors Locking Tab Rev G 19
24 Preference ICC Sterilization Center Instructions For Use Doors The console doors are adjustable for depth, height, and side-to-side alignment. NOTE When making adjustments to the door hinges, use a #2 Pozidriv screwdriver to avoid stripping the screws. Table 2. Console Door Adjustments To Adjust... A Depth B Height C Side-to-side Do This... Turn screw A on both the upper and lower door hinges until the door is in the desired position. Loosen screws B on both the upper and lower hinge mounting plate 1/4 turn. Move the door up or down to the desired position, then tighten the screws. Turn screw C on both the upper and lower door hinges until the door is in the desired position. Figure 24. Hinge Adjustment Screws Height B Depth A Side-to-Side C Rev G
25 Adjustments Figure 25. Door Adjustment Gap = 3/16" (5 mm) Depth Height Door Gap = 5/32" (4 mm) Side-to-Side Rev G 21
26 Preference ICC Sterilization Center Instructions For Use Soft-Close Adjustment To increase the soft-close dampening, turn the adjustment screw counterclockwise. Figure 26. Soft Close Adjustment Adjustment Screw NOTE The soft close device can be over extended causing it to stick. Turn the adjustment screw clockwise until the mechanism releases Rev G
27 Adjustments Drawer Fronts 1. To move the drawer front up, turn the screw in the hinge clamp clockwise. Figure 27. Adjust Drawer Front Up Adjustment Screw 2. To move the drawer front down, open the hinge with a screwdriver, turn the screw counterclockwise, and push the drawer front down. Figure 28. Adjust Drawer Front Down Adjustment Screw 3. Close the clamp and turn the screw clockwise until the drawer front is in the desired position Rev G 23

28 Preference ICC Sterilization Center Instructions For Use Foot-Activated Doors You can easily adjust the foot-activated upper storage doors to close in line with the side of the cabinet: 1. Loosen the screw in the slotted hole of the wedge. 2. Slide the wedge until the door is in the desired position, and tighten the screw. 3. Drill a pilot hole (1/8" or 3 mm dia.) in the untapped hole of the wedge. 4. Install a locking screw to secure the wedge. Figure 29. Foot-Activated Door Wedge Knee-Activated Drawers Two bungee cords in the knee-activated drawers create the tension necessary to have the drawers open when you press them with your knee. If your drawer needs more spring, tie a knot in each bungee. Bungees are located behind the drawer. Figure 30. Knotted Bungee Rev G
29 Adjustments Knee-Activated Drawer Fronts To even up gaps between the knee-activated drawer front and surrounding doors, drawers, and end panels: 1. Loosen the locking screws from the drawer front. 2. Turn the leveling screws in to push the drawer out at the bottom. 3. Remove the leveling screws and install them in the top position. 4. Turn the leveling screws in to push the drawer out at the top. 5. Tighten the locking screws. Figure 31. Adjust Knee-Activated Drawer and Door Fronts Cam Screws Locking Screws Leveling Screws Knee-Activated Door Front For side-to-side and top-to-bottom adjustment of the knee-activated door front: 1. Remove the locking screws (see Figure 31). 2. Loosen the cam screws. 3. Position the front panel so it has 5/32" (4 mm) gap above and 3/32" (2 mm) gap on both sides. 4. Tighten the cam screws. Verify the panel is still in the correct position. 5. Drill a 1/16" (1.6 mm) pilot hole in the untapped holes and install the locking screws to secure the front panel in place Rev G 25
30 Preference ICC Sterilization Center Instructions For Use Knee-Activated Drawer Latches To adjust the drawer cricket touch latches: 1. Remove the locking screws from the non-slotted holes in the latch. 2. Loosen the screws in the slotted holes. 3. Position the latch to catch the drawer front at the desired distance from the cabinet. 4. Tighten the screws in the slotted holes. 5. Drill 1/16" (1.6 mm) pilot holes and attach the locking screws to secure the latch in place. Figure 32. Adjust Knee-Activated Drawer Latches Non-Slotted Hole Slotted Hole Dryer Front The dryer face adjusts similarly to the knee-activated door front (see Figure 31 on page 25). 1. Loosen the four existing cam screws slightly. 2. Position the front panel so it has 5/32" (4 mm) gap above, and 3/32" (2 mm) gap on both sides. 3. Tighten the cam screws. Verify the panel is still in the correct position. 4. Drill a 1/16" (1.6 mm) pilot hole in the untapped holes and install the locking screws to secure the front panel in place Rev G
31 Adjustments Tub Drawer Fronts 1. Remove the inner two locking screws. 2. Loosen the outer two cam screws. 3. Position the front panel so it has 5/32" (4 mm) gap above and below, and 3/32" (2 mm) gap on both sides. 4. Tighten the cam screws. Verify the panel is still in the correct position. 5. Drill a 1/16" (1.6 mm) pilot hole in the untapped holes and install the locking screws to secure the front panel in place. Figure 33. Remove the Inner Locking Screws Locking Screw Cam Screw Tray Drawer Fronts 1. Remove the locking screw from each bracket. 2. Loosen the cam screw on each bracket. 3. Position the front panel so it has 5/32" (4 mm) gap above and below, and 3/32" (2 mm) gap on both sides. 4. Tighten the cam screws. Verify the panel is still in the correct position. 5. Drill a 1/16" (1.6 mm) pilot hole in the untapped holes and install the locking screws to secure the front panel in place. Figure 34. Remove the Locking Screws Locking Screw Cam Screw Rev G 27
32 Preference ICC Sterilization Center Instructions For Use Water Shutoff Valves Preference ICC modules with wash stations require water shutoff valves. The water shutoff valves, located in the subbase, control the flow of water to the sink faucets. If the flow of water to a faucet is restricted, the water shutoff valve may have a water screen that has filled with debris. To check for a clogged water screen: 1. Turn off the valve. 2. Use a 5/8" open-end or an adjustable wrench to loosen the nut. 3. If a water screen is present and found to be clogged, replace it. Figure 35. Water Shutoff Valve Water Screen Rev G
33 Adjustments Cleaning Surfaces Solid Surface Use warm water and mild soaps to clean solid surface countertops. Non-abrasive household cleaners such as Fantastik and Formula 409 may also be used. Cleaning products with bleaching agents should not be used on solid surface. Large quantities of these agents and extended periods of exposure may cause discoloration. Abrasive cleaners (such as Comet, Soft Scrub, Bon Ami, etc.) should not be used on solid surface except for removing tough stains, minor scratches, and burns. If a stain develops on the surface, wipe it away with soap and water or glass cleaner. If a stain doesn t respond to soap and water and your surface has a matte finish, apply an abrasive cleanser and buff with a purple Scotch-Brite pad (#744B) using a circular motion. The same technique can be used for burns, minor cuts, and scratches. CAUTION Do not expose the surface to harsh chemicals. If these chemicals come in contact with the surface, immediately wash them off with water, using appropriate safety measures to avoid injury. Laminate To clean a laminate surface, use a damp cloth or a sponge and a mild soap or detergent. Difficult stains can be removed using a mild household cleaner/detergent and a soft bristle brush, repeating as necessary. If a stain persists, use a paste of baking soda and water, apply with a soft bristled brush. Light scrubbing for seconds should remove most stains. CAUTION Although baking soda is low abrasive, excessive scrubbing or exerting too much force could damage the decorative surface, especially if it has a high gloss finish. Cleaner containing lye, steel wool or other abrasives will permanently damage any laminate surface. Quartz To maintain Quartz surfaces, simply wash with a soft cotton cloth and warm water, using a mild soap if desired. CAUTION Do not use abrasive or strong alkaline or acid (high or low ph) cleaners such as bleach, oven cleaners, Comet, Soft Scrub, SOS, products with pumice, paint removers, furniture strippers, tarnish or silver cleaners. Do not use abrasive or harsh scrub pads and do not apply any sealers, penetrants or topical treatments to the Quartz surface under any circumstances. Such products will wear off and cause the gloss to appear dull or inconsistent Rev G 29
34 Preference ICC Sterilization Center Instructions For Use Cleaning the Preference ICC Dryer Use a soft cloth and warm soapy water to wipe the interior of the dryer clean, then dry it using a soft clean cloth. Do not pour any liquids into the dryer for cleaning. CAUTION Accumulation of water and other liquids in the dryer can compromise the electronics. Do not allow water or cleaning liquids to accumulate in the bottom of the unit, which can damage the dryer. Asepsis Recommendations For additional recommended asepsis instructions, refer to the A-dec Equipment Asepsis Guide (p/n ), which came with your Preference ICC sterilization center Rev G
35 APPENDIX: WARRANTY A Warranty Warranty information is provided in the Regulatory Information, Specifications, and Warranty document (p/n ), which is available in the Document Library at Rev G 31
36 A-dec Headquarters 2601 Crestview Drive Newberg, Oregon United States Tel: within USA/CAN Tel: outside USA/CAN Fax: A-dec Australia Unit Ricketty Street Mascot, NSW 2020 Australia Tel: within AUS Tel: +61.(0) outside AUS A-dec China A-dec (Hangzhou) Dental Equipment Co., Ltd. 528 Shunfeng Road Qianjiang Economic Development Zone Hangzhou ,Zhejiang, China Tel: within China Tel: outside China A-dec United Kingdom EU Authorized Representative Austin House, 11 Liberty Way Nuneaton, Warwickshire CV11 6RZ England Tel: 0800.ADEC.UK ( ) within UK Tel: +44.(0) outside UK ÍvÈ.Ç&.È.00ÊÎ Rev G Copyright 2018 A-dec Inc. All rights reserved.
Instructions for Use. A-dec 461 Cuspidor with Support Center
 Instructions for Use A-dec 461 Cuspidor with Support Center A-dec 461 Cuspidor with Support Center Instructions for Use Copyright 2014 A-dec Inc. All rights reserved. A-dec Inc. makes no warranty of any
InstructIons for use A-dec 561 Cuspidor
 Instructions for Use A-dec 561 Cuspidor Copyright 2014 A-dec Inc. All rights reserved. A-dec Inc. makes no warranty of any kind with regard to this material, including, but not limited to, the implied
A-dec 300 Support Systems
 Instructions for Use A-dec 300 Support Systems 351, 352, and 353 Assistant s Instrumentation 362 and 363 Support Center and Cuspidor A-dec 300 Support Systems Instructions for Use Copyright 2017 A-dec
reference ICC A complete system for efficient sterilization
 reference ICC A complete system for efficient sterilization Streamline your sterilization process At A-dec, streamlining processes in the dental practice is always a key design requirement for our equipment
PREFERENCE ICC. A Complete System For Efficient Sterilization
 PREFERENCE ICC A Complete System For Efficient Sterilization 2 Streamline your sterilization process 1 RECEIVING AND CLEANING 2 RINSING, PREPAR At A-dec, streamlining processes in the dental practice is
Instructions for Use A-dec Inspire Dental Furniture
 Instructions for Use A-dec Inspire Dental Furniture Models 591, 592, 593, 595 Content Map... 1... 2 Clean / Maintain... 22 Specifications... 27 Copyright 2016 A-dec Inc. All rights reserved. A-dec Inc.
Instructions for Use A-dec Self-Contained Water System
 Instructions for Use A-dec Self-Contained Water System The self-contained water system supplies water to handpieces, syringes, and the cuspidor cupfill. The system includes a 2- or 0.7-liter water bottle
Model: D-66CM3 Details
 Model: D-66CM3 Details Clock / Timer Operation The top display is the Time-of-Day clock. The bottom display is the TIMER. Normal operation: The ON/OFF buttons are used to power the relay output
D-Series Dental Cabinetry System
 D-Series Dental Cabinetry System Installation Manual Model: D-5CM Version: 04272010 D-5CM Assembly Instructions Component Identification C D A Component Identification A Cabinet ase Sliding Top C Upper
A-dec Inspire. Dental Furniture Collection
 A-dec Inspire Dental Furniture Collection 2 a-dec.com/inspire INSPIRE PEAK PERFORMANCE. How can dental furniture inspire peak performance? It must look beautiful, yet be functional. It must have proper
GE JB400 Steam Clean Range. Range Models: JB400DP1WW JB400DP1BB JB400SPSS
 GE JB400 Steam Clean Range Range Models: JB400DP1WW JB400DP1BB JB400SPSS IMPORTANT SAFETY NOTICE The information in this presentation is intended for use by individuals possessing adequate backgrounds
Preference Productivity refined
 Preference Productivity refined Preference by A-dec Dental cabinetry should do more than store ancillaries and supplies. It should increase productivity, streamline workflow and save precious time. Designed
Operator s Manual. Model G14TC-3 Disinfection Soak Station for Transesophageal Ultrasound Probes
 Model G14TC-3 Disinfection Soak Station for Transesophageal Ultrasound Probes Operator s Manual CIVCO Medical Solutions 102 First Street South Kalona, IA 52247 USA Tel: 1-800-445-6741 Fax: 1-877-329-2482
Performer Cuspidor. Installation Instructions. (For Performer III Chair & International Performer I Chair) You Will Need. About This Install
 You Will Need. About This Install") Installation Instructions Performer Cuspidor (For Performer III Chair & International Performer I Chair) You Will Need Adjustable wrench or 9/16" open-end wrench Magnetic leveling device 3/16" hex key
Installation Instructions Performer Cuspidor (For Performer III Chair & International Performer I Chair) You Will Need Adjustable wrench or 9/16" open-end wrench Magnetic leveling device 3/16" hex key
TOASTER OVEN INSTRUCTION MANUAL. Model: MCSTO6B. 6 Slice
 TOASTER OVEN 6 Slice INSTRUCTION MANUAL Model: MCSTO6B THANK YOU FOR PURCHASING A MAGIC CHEF PRODUCT. PLEASE READ ALL INSTRUCTIONS CAREFULLY BEFORE USING THE PRODUCT. CONTENTS SAFETY INSTRUCTIONS.... 3
installation and operation manual for Hunter Ceiling Fans
 For Your Records and Warranty Assistance Model Name: Catalog/Model No.: Serial No.: Date Purchased: Where Purchased: For reference also attach your receipt or a copy of your receipt to the manual. installation
OPERATING and MAINTENANCE INSTRUCTIONS Models: H138NPSCLCMCQRL Merchandising Hot Cabinets
 Rev. (/) Page of 0 OPERATING and MAINTENANCE INSTRUCTIONS Models: H8NPSCLCMCQRL Merchandising Hot Cabinets Cabinet model number: Cabinet serial number: Authorized Service Agency: Ph: Fax: Keep this manual
ESS-2200 Double Station Scrub Sink. with Two Sensor Operated Gooseneck Spout. ESS-3200 Deluxe Double Station Scrub Sink
 ESS-2000/3000 Series I.I. Rev. 2 (02/03) Code No. 016162 INSTALLATION INSTRUCTIONS SINGLE, DOUBLE AND TRIPLE STATION SENSOR OPERATED SYSTEMS ESS-2000 SERIES ESS-2100 Single Station Scrub Sink with One
2175DWRWC Wine Captain Drawer
 Installation Guide 2175DWRWC Wine Captain Drawer www.u-lineservice.com Phone (414) 354-0300 FAX (414) 354-7905 Service & Parts Tech Lines Phone (800) 779-2547 FAX (414) 354-5696 OnlineService@U-Line.com
Model:WHS-109FB1/WHS-109FW1/WHS-109FSS1
 Model:WHS-109FB1/WHS-109FW1/WHS-109FSS1 WHS-109FB1/WHS-109FW1 WHS-109FSS1 R600a,1.59Oz 21.26 When using, please use scissors to cut out the plastic cable ties in the picture from top to bottom, a total
TUB AND SHOWER FAUCET
 AquaSource is a registered trademark of LF, LLC. All Rights Reserved. ITEM #004057 0040555 TUB AN SHOWER FAUCET MOEL #873-370 873-377H Francias / Español p. 3 ATTACH YOUR RECEIPT HERE Serial Number Purchase
WARMING AND MERCHANDISING CABINET
 WARMING AND MERCHANDISING CABINET MODEL 695 MODEL 695-S (Two door unit shown) (Single door unit shown) Snack foods have to be hot and moist to be appealing. Cold won t do... Dry won t do. Wisco s model
Suits all KPF849 models
 Kambrook - Australia Ground Floor, Suite 2, 170-180 Bourke Rd Alexandria NSW 2015, Australia Locked Bag 2000 Botany NSW 1455 Customer Service Line 1300 139 798 Customer Service Fax 1800 621 337 www.kambrook.com.au
Owner s Guide and Installation Manual
 For Your Records and Warranty Assistance For reference, also attach your receipt or a copy of your receipt to the manual. Model Name Type 2 Models Owner s Guide and Installation Manual Model No. Catalog
30 Misting/Oscillating Fan Model Number 01030
 30 Misting/Oscillating Fan Model Number 01030 READ AND SAVE THESE INSTRUCTIONS CAUTION: Before using this product read this manual and follow all safety rules and operating instructions. Failure to comply
OWNER S MANUAL. FLAT PANEL FIREPLACE HEATER Model Number: Serena (EF202A) WARNING CAUTION
 WARNING CAUTION") FLAT PANEL FIREPLACE HEATER Model Number: Serena (EF202A) OWNER S MANUAL WARNING Read and understand this entire owner s manual, including all safety information, before plugging in or using this product.
FLAT PANEL FIREPLACE HEATER Model Number: Serena (EF202A) OWNER S MANUAL WARNING Read and understand this entire owner s manual, including all safety information, before plugging in or using this product.
OPERATIONS MAINTENANCE MANUAL
 OPERATIONS MAINTENANCE MANUAL COOK & HOLD OVEN SYSTEMS WITTCO MODEL NUMBERS 1300-AD-SS 1300-AD-SS-SPLIT LIMITED WARRANTY Wittco warrants the Products that it manufactures to be free from defects in materials
Electric Digital Kettle
 Electric Digital Kettle OWNER S MANUAL Model EK119H 120V., 60Hz., 1800 Watts. EURO-PRO Operating LLC Boston, MA, 02465 1 (800) 798-7398 www.euro-pro.com COPYRIGHT 2008 EURO-PRO OPERATING LLC IMPORTANT
User Manual for AirFlow Convection Oven
 User Manual for AirFlow Convection Oven KEL-1100 IFU: OV401-00 7/02/2015 Tel 740.788.8107 Fax 740.788.8109 e-mail sales@klaritymedical.com www.klaritymedical.com Table of contents: Page 3 Page 3 Page 4
OWNER S MANUAL AND INSTALLATION GUIDE PLEASE READ THIS MANUAL CAREFULLY BEFORE ATTEMPTING INSTALLATION
 ClearChoice Economy Under Sink Drinking Water System OWNER S MANUAL AND INSTALLATION GUIDE PLEASE READ THIS MANUAL CAREFULLY BEFORE ATTEMPTING INSTALLATION Congratulations on the purchase of your ClearChoice
Owner s Guide and Installation Manual
 Tribeca Owner s Guide and Installation Manual English Form# M6001-01 20120416 2012 Casablanca Fan Co. Welcome Your new Casablanca ceiling fan is an addition to your home or office that will provide comfort
HW-17 Record Cleaning Machine Setup and Instruction Manual
 HW-17 Record Cleaning Machine Setup and Instruction Manual VPI Industries, Inc., 77 Cliffwood Ave. #3B, Cliffwood, NJ 07721 Phone: 732-583-6895, Email: Sales@vpiindustries.com http://www.vpiindustries.com
CC-2222C-PL, CC-2222C-PRL, CC-2222C-PR-2, CC-2222C-PL-2,
 Rev. 14 (10/08) Page 1 of 16 INSTALLATION, OPERATION and MAINTENANCE MANUAL for Cres Cor Models: CC-2222C-PR, CC-2222C-PL, CC-2222C-PRL, CC-2222C-PR-2, CC-2222C-PL-2, and CC-2222C-PRL-2 Rev. 14 (10/08)
THE MW-1 Cyclone RECORD CLEANING MACHINE
 THE MW-1 Cyclone RECORD CLEANING MACHINE SETUP AND INSTRUCTION MANUAL VPI INDUSTRIES INC., 77 CLIFFWOOD AVE #3B CLIFFWOOD, N.J. 07721 **IMPORTANT***IMPORTANT***IMPORTANT***IMPORTANT** YOUR WARRANTEE MAY
6 Assembling the Blades
 6 Assembling the Blades Hunter fans use several styles of fan blade irons (brackets that hold the blade to the fan). 6-1. Your fan may include blade grommets. If your fan has grommets, insert them by hand
FWC152, FWC303, FWC603 & FWC623 Wine Coolers Installation, Use and Maintenance
 FWC152, FWC303, FWC603 & FWC623 Wine Coolers Installation, Use and Maintenance Customer Care Department The Group Ltd. Harby Road Langar Nottinghamshire NG13 9HY T : 01949 862 012 F : 01949 862 003 E :
Operator s Manual. Model G32-S Model G32-E Disinfection Soak Stations
 Model G32-S Model G32-E Disinfection Soak Stations Operator s Manual CIVCO Medical Solutions 102 First Street South Kalona, IA 52247 USA Tel: 1-800-445-6741 Fax: 1-877-329-2482 Website: WWW.CIVCO.COM Copyright
Installation. Leveling
 Your refrigerator was packed carefully for shipment. Remove and discard shelf packaging and tape. Do not remove the serial plate. Location Do not install refrigerator near oven, radiator or other heat
INSTALLATION INSTRUCTIONS TOOLS YOU WILL NEED GETTING STARTED
 INSTALLATION INSTRUCTIONS HONEYCOMB SHADES STANDARD RECTANGULAR Thank you for your purchase. This shade has been custom built for you from the highest quality materials. To avoid errors and save valuable
72 ONYX XL FLAT PANEL ELECTRIC FIREPLACE
 72 ONYX XL FLAT PANEL ELECTRIC FIREPLACE Model Numbers: 80005 OWNER S MANUAL WARNING Read and understand this entire owner s manual, including all safety information, before plugging in or using this product.
MODULAR REFRIGERATOR. Français p. 16 Español p. 31 ITEM # MODEL #BG179B
 ITEM #0103339 Master Forge & M Design is a registered trademark of LF, LLC. All rights reserved. IMPORTANT READ THIS USER'S MANUAL PRIOR TO CONNECTING POWER AND USE. MODULAR REFRIGERATOR MODEL #BG179B
Installation & Operating Guide
 5-036 HOT WATER TANK Installation & Operating Guide Read all instructions thoroughly. Keep this guide for future reference. Proof of purchase is required for Warranty. Staple receipt or proof of purchase
SKY Stainless Steel Compact Dishwasher. Instructions
 SKY4313 - Stainless Steel Compact Dishwasher Instructions Please retain these instructions for future reference. Notice: Do not allow children to operate this appliance. Keep appliance out of reach of
OWNER S INSTRUCTION & INFORMATION
 OWNER S INSTRUCTION & INFORMATION Please read before first use. Remove all foam and bubble wrap packing material from the press machine. Please rinse stainless steel trays. Boil juice cloths in water and
JUNEAU JUN. 08/51193/0 Issue 0
 JUNEAU JUN 08/51193/0 Issue 0 The product complies with the European Safety Standards EN60335-2-30 and the European Standard Electromagnetic Compatibility (EMC) EN55014, EN60555-2 and EN60555-3 These cover
Owner s Guide and Installation Manual
 For Your Records and Warranty Assistance For reference, also attach your receipt or a copy of your receipt to the manual. Model Name Type 2A Models Owner s Guide and Installation Manual Model No. Date
FWC153, FWC304, FWC604 & FWC624
 FWC153, FWC304, FWC604 & FWC624 Wine Coolers Installation, use and maintenance www.cda.eu Important The CDA Group Ltd cannot be held responsible for injuries or losses caused by incorrect use or installation
Enteral Pump Instructions for Use To Assemble When the low
 Enteral Pump Instructions for Use Before initial use on battery power and after extended storage periods, the pump must be plugged into an AC power source for a minimum of 12 hours (pump may be operated
Owner s Guide and Installation Manual
 For Your Records and Warranty Assistance For reference, also attach your receipt or a copy of your receipt to the manual. Model Name Type 2A Models Owner s Guide and Installation Manual Model No. Date
INSTRUCTIONS FOR SAFE USE INSTRUCTIONS FOR SAFE USE
 USER MANUAL INSTRUCTIONS FOR SAFE USE This appliance should only be used for domestic cleaning, as described in this user guide. Please ensure that this guide is fully understood before operating the appliance.
Thermal Steel Care & Maintenance Guide
 Thermal Steel Care & Maintenance Guide Introduction Arcadia Custom Thermal Steel products require regular and proper inspection, cleaning and maintenance before, during and after installation in order
Operator s Manual. Model G17-EU (International) Disinfection Soak Station for Hysteroscopes, Cystoscopes and ENT scopes
 Disinfection Soak Station for Hysteroscopes, Cystoscopes and ENT scopes") Model G17-EU (International) Disinfection Soak Station for Hysteroscopes, Cystoscopes and ENT scopes Operator s Manual CIVCO Medical Solutions 102 First Street South Kalona, IA 52247 USA Tel: 1-800-445-6741
Model G17-EU (International) Disinfection Soak Station for Hysteroscopes, Cystoscopes and ENT scopes Operator s Manual CIVCO Medical Solutions 102 First Street South Kalona, IA 52247 USA Tel: 1-800-445-6741
m a i n t e n a n c e G u i d e
 Maintenance guide Table of Contents Important information to keep in mind 4 Ten-year warranty 5 Preserving the original look 6 of your cabinetry Ensuring everything is 8 properly maintained Making minor
OWNER S MANUAL. Wall Hanging Mode. Pedestal Mode ELECTRIC FLAT PANEL FIREPLACE HEATER. Model Number: EFW-XB60B WARNING CAUTION
 ELECTRIC FLAT PANEL FIREPLACE HEATER Model Number: EFW-XB60B OWNER S MANUAL Wall Hanging Mode Pedestal Mode WARNING CAUTION Read and understand this entire owner s manual, including all safety information,
INSTALLATION AND CARE GUIDE MARCO VANITY FRAME BASE & SINKTOP E E E E052463
 INSTALLATION AND CARE GUIDE MARCO VANITY FRAME BASE & SINKTOP E052131 E052431 PRE-INSTALLATION Tools Required Materials Included E052131 E052431 4 anchors (For Installation with frame only) 4 long bolts
WARMING AND MERCHANDISING CABINET
 WARMING AND MERCHANDISING CABINET Above red graphics now replace green graphics shown in photo. MODEL 695 (Single door unit shown) MODEL 695-S (Single door unit shown) Snack foods have to be hot and moist
Instructions for set-up, use and cleaning
 Nice job reading the instruction manual cover-to-cover! Here are a few extra tips to keep you & your Formula Pro Advanced happy. Push the drip tray firmly against the base to make sure it fits securely.
Owner s Guide and Installation Manual
 For Your Records and Warranty Assistance For reference, also attach your receipt or a copy of your receipt to the manual. Model Name Type 8 Models Owner s Guide and Installation Manual Model No. Catalog
 Installation Guide BI-98 Ice Maker www.u-lineservice.com Phone (414) 354-0300 FAX (414) 354-7905 Service & Parts Tech Lines Phone (800) 779-2547 FAX (414) 354-5696 OnlineService@U-Line.com 2005 U-Line
USER GUIDE. Built-in oven NZ AU. HWO60S4 single models
 USER GUIDE Built-in oven HWO60S4 single models NZ AU CONTENTS Safety and warnings 2 Oven, clock and timer controls Models with analogue 120 timer 4 Models with six-button clock 5 Models with touch control
NO VENTING REQUIRED 120V AC;
 ELECTRIC FIREPLACE Model Number: Alice (EF172B-EF176B) OWNER S MANUAL WARNING Read and understand this entire owner s manual, including all safety information, before plugging in or using this product.
READ CAREFULLY AND KEEP FOR FUTURE REFERENCE
 product safety READ CAREFULLY AND KEEP FOR FUTURE REFERENCE This product can be used by children aged 8 years and above, and persons who require supervision, provided: they are familiar with the hazards
Thank you for buying this refrigerator-freezer. To ensure that you get the best
 Dear customer: Thank you for buying this refrigerator-freezer. To ensure that you get the best results from your new refrigerator-freezer, please take time to read through the simple instructions in this
TA-12. Tabbing System USER'S GUIDE
 TA-12 Tabbing System USER'S GUIDE SAFETY PRECAUTIONS THIS EQUIPMENT PRESENTS NO PROBLEM WHEN USED PROPERLY. HOWEVER, CERTAIN SAFETY RULES SHOULD BE OBSERVED WHEN OPERATING THE TA12 TABBER. BEFORE USING
G-7s. Instruction Manual. G-Series Cooler COUNTERTOP COOLER. Part No.11IPA
 G-Series Cooler COUNTERTOP COOLER Part No.11IPA-061000 Instruction Manual FOR YOUR FUTURE REFERENCE This easy-to-use manual will guide you in getting the best use of your cooler. Remember to record the
KOHLER Care and Cleaning Guide
 KOHLER Care and Cleaning Guide We believe in creating kitchen and bath products that endure from timeless designs to reliable performance. Because we use materials of exceptional quality, the right care
STONETECH Maintenance & Care Porcelain, Ceramic & Quarry Tile with Cement Grout
 STONETECH Maintenance & Care Porcelain, Ceramic & Quarry Tile with Cement Grout MCI-1104 NOTE: For all recommended products: read the entire product label before using. Use only as directed. Always test
Undercounter Refrigeration
 INSTALLATION GUIDE Undercounter Refrigeration Contents Undercounter Refrigeration..................... 3 Undercounter Specifications.................... 4 Site Preparation..............................
CO1175 Ice Maker/Refrigerator
 Installation Guide CO1175 Ice Maker/Refrigerator www.u-lineservice.com Phone (414) 354-0300 FAX (414) 354-7905 Service & Parts Tech Lines Phone (800) 779-2547 FAX (414) 354-5696 OnlineService@U-Line.com
- website: Vax Ltd., Kingswood Road, Hampton Lovett, Droitwich, Worcestershire WR9 0QH, UK
 V-026PT User Guide.qxd 7/9/06 15:13 Page 12 EEC STATEMENT OF COMPLIANCE Manufacturer/EEC importer: Vax Limited, hereby on our own responsibility, declare that the product V-026PT is manufactured in compliance
- 2 - IMPORTANT SAFETY REMINDERS IT IS IMPORTANT THAT YOU:
 USER MANUAL IMPORTANT SAFETY REMINDERS This cleaner should only be used for domestic cleaning, as described in this user guide. Please ensure that this guide is fully understood before operating the appliance.
Owner s Guide and Installation Manual
 For Your Records and Warranty Assistance For reference, also attach your receipt or a copy of your receipt to the manual. Model Name Type 2 Models Owner s Guide and Installation Manual Model No. Date Purchased
INSTRUCTION MANUAL SUPREME V2400 CORDLESS WET DRY VAC
 INSTRUCTION MANUAL SUPREME V2400 CORDLESS WET DRY VAC INDEX PG PG IMPORTANT SAFEGUARDS 4 ABOUT YOUR DIRTTAMER SUPREME 6 VACUUM DESCRIPTION 7 WALL MOUNTABLE CHARGING BASE 8 BATTERY CHARGING PROCEDURE 9
Electrical Double Oven
 0 0 0 Electrical Double Oven Operating & Installation Instructions -Please keep for future reference AE66DCW AE66DCA AE66DCSS Important - Please read these instructions fully before using These instructions
Downloaded from manuals search engine CORDLESS WET DRY VAC
 CORDLESS WET DRY VAC I N D E X P G P G IMPORTANT SAFEGUARDS 4 ABOUT YOUR DIRTTAMER DELUXE 6 VACUUM DESCRIPTION 7 WALL MOUNTABLE CHARGING BASE 8 BATTERY CHARGING PROCEDURE 9 HOW TO USE 14 Picking Up Dry
OPERATING and MAINTENANCE INSTRUCTIONS Models: H138NPS36CLCMQRL i7 Hot Cabinet
 Rev. 0 (/) Page of 9 OPERATING and MAINTENANCE INSTRUCTIONS Models: HNPS6CLCMQRL i7 Hot Cabinet Cabinet model number: Cabinet serial number: Authorized Service Agency: Ph: Fax: Keep this manual for future
Korean Side-by-Side Refrigerator Use and Care Manual
 Korean Side-by-Side Refrigerator Use and Care Manual Part No. 10488010 Printed in U.S.A 1996 Raytheon Appliances Amana, Iowa 52203 Contents Electrical Requirements... 2 Model Identification... 2 Model
INSTALLATION, OPERATION and MAINTENANCE MANUAL for Cres Cor AQUATEMP TM HUMIDITY CONVECTION and RETHERM OVENS with MICROPROCESSOR CONTROLS
 9 Heisley Road Mentor, OH 0- Rev. (6/0) Page of INSTALLATION, OPERATION and MAINTENANCE MANUAL for Cres Cor AQUATEMP TM HUMIDITY CONVECTION and RETHERM OVENS with MICROPROCESSOR CONTROLS ROFWB-Q COFWUAB-Q
Built-in Conventional Oven
 Built-in Conventional Oven LAM3204 User & Installation Guide using this manual Thank you for choosing LAMONA Built - In Oven. This user Manual contains important information on safety and instructions
Wall Hanging Mode. Pedestal Mode
 ELECTRIC FLAT PANEL FIREPLACE HEATER Model Number: EFW-XB60D OWNER S MANUAL Wall Hanging Mode Pedestal Mode WARNING CAUTION Read and understand this entire owner s manual, including all safety information,
Compact Refrigerator. User's Manual PLEASE READ THIS MANUAL CAREFULLY BEFORE USING YOUR REFRIGERATOR AND KEEP IT FOR FUTURE REFERENCE.
 Compact Refrigerator User's Manual Model MCBR445B2 / MCBR445S2 PLEASE READ THIS MANUAL CAREFULLY BEFORE USING YOUR REFRIGERATOR AND KEEP IT FOR FUTURE REFERENCE. Product Registration Thank you for purchasing
Installation Instructions
 Instructions for Frontload Washers Original Instructions Keep These Instructions for Future Reference. (If this machine changes ownership, this manual must accompany machine.) www.alliancelaundry.com Part
TECHNICAL INSTRUCTIONS
 TID-0137_0A TECHNICAL INSTRUCTIONS AM Series Boiler Heat Exchanger Maintenance & Replacement For all models of AM Series Boilers, Including: Boilers: AM 399B AM 500B AM 750B AM 1000B Water Heaters: AM
Decon Scrubber Owner s Manual
 Decon Scrubber Owner s Manual Serial # TM REV0001111209 TABLE OF CONTENTS Warning 1 Operating the Decon Scrubber 2 System Placement 4 Caring for your Decon Scrubber 5 Cleaning Instructions 6 Optic Replacement
Flat Wall Mounted / Free stand Electric Fireplace. Model Numbers: S OWNER S MANUAL. Wall Hanging Mode. Freestanding Mode AC 120V / 60HZ 1500W
 Flat Wall Mounted / Free stand Electric Fireplace Model Numbers: 80-421S OWNER S MANUAL Wall Hanging Mode Freestanding Mode AC 120V / 60HZ 1500W WARNING Read and understand this entire owner s manual,
USER AND MAINTENANCE MANUAL
 AXIOM TM USER AND MAINTENANCE MANUAL Rev. EC-AX-UM-V1.2 Rev. EC-AX-UM-V1.2 i Table of Contents IMPORTANT NOTICE... 1 FOR THE SUPERVISOR / ADMINISTRATOR... 1 ABOUT EVANS... 2 ABOUT THIS MANUAL... 2 CONTACTING
Important Safeguards. Topic 2 SAVE THESE INSTRUCTIONS - FOR HOUSEHOLD USE ONLY SAVE THESE INSTRUCTIONS - FOR HOUSEHOLD USE ONLY 3
 User s Manual Index Topic Important safeguards 03 Safety features 05 Parts and accessories 05 Before first use 06 Operating instructions 06 Programme settings 08 Care and cleaning 09 Pressure canning guide
BEFORE USE, PLEASE READ AND FOLLOW ALL SAFETY RULES AND OPERATING INSTRUCTIONS.
 INSTRUCTION MANUAL Model Number: BLZ-SSRF130 BEFORE USE, PLEASE READ AND FOLLOW ALL SAFETY RULES AND OPERATING INSTRUCTIONS. 1 TABLE OF CONTENTS REFRIGERATOR SAFETY 3 IMPORTANT SAFEGUIDES 4 PARTS AND FEATURES
User Manual. Dishwasher ZDM17301SA ZDM17301WA
 EN User Manual Dishwasher ZDM17301SA ZDM17301WA Contents Safety information 2 Safety instructions 3 Product description 4 Control panel 5 Programmes 6 Daily Use 7 Hints and tips 10 Care and cleaning 11
Pet. Easy Guide. VAX Ltd., Kingswood Road, Hampton Lovett, Droitwich, Worcestershire, WR9 OQH, UK - website:
 V-027P Rapide Pet User Guide 10/7/07 10:05 Page 14 EEC STATEMENT OF COMPLIANCE Manufacturer/EEC importer: VAX Limited, hereby on our own responsibility declare that the products V-027/V-027PT/V-027P/CCW-701
TA-12/HT12 Tabber. OPERATING GUIDE Revised:
 TA-12/HT12 Tabber OPERATING GUIDE Revised: 2-27-13 Neopost USA would like to Thank You for investing in our quality built products. Please record the following information for future reference: Model:
OWNER S MANUAL ELECTRIC FLAT PANEL FIREPLACE. AC V 60Hz. Model# : /60 - Built-in & Wall Mounted Electric Fireplace WARNING CAUTION
 ELECTRIC FLAT PANEL FIREPLACE Model# :80017 OWNER S MANUAL 50/60 - Built-in & Wall Mounted Electric Fireplace AC 110-120V 60Hz WARNING Read and understand this entire owner s manual, including all safety
Owner s Manual READ AND SAVE THESE INSTRUCTIONS
 16 Outdoor Misting / Oscillating Fan Model Number: AMMF16R-1 Owner s Manual READ AND SAVE THESE INSTRUCTIONS CAUTION: Before using this product, read this manual and follow all safety rules and operating
SUNBEAM IRON. User Guide SR6300 SR6400. SR6300 Sunbeam Sprint Iron SR6400 Sunbeam Aerostream Iron
 SUNBEAM IRON User Guide SR6300 Sunbeam Sprint Iron SR6400 Sunbeam Aerostream Iron SR6300 SR6400 Contents Sunbeam s Safety Precautions 3 Features of your Sunbeam Sprint Iron 4 Features of your Sunbeam Aerostream
For routine maintenance of polished granite installations with a cleaner and protector:
 NOTE: For all recommended products: read the entire product label before using. Use only as directed. Always test in a small inconspicuous area with a 24-hour cure time to determine ease of application
ConserveWell DROP-IN UNIT
 ConserveWell DROP-IN UNIT MODEL: CW-DI 87772 120V USA with Countdown Timer Thank You...for purchasing our ConserveWell Drop-In Heated Utensil Holder. This unit holds serving utensils above 140 F, keeping
USER GUIDE DEEP FRYER WITH OIL FILTRATION SYSTEM
 USER GUIDE DEEP FRYER WITH OIL FILTRATION SYSTEM Emeril is a trademark of Martha Stewart Living Omnimedia, Inc. Copyright 2017, Martha Stewart Living Omnimedia, Inc. All rights reserved. Important Safeguards
Instruction Manual. Nacho Cheese Dispenser and Warmer
 Instruction Manual Nacho Cheese Dispenser and Warmer 10700 Medallion Drive, Cincinnati, Ohio 45241-4807 USA 2013 Gold Medal Products Co. Part No. 36060 SAFETY PRECAUTIONS Page 2 INSTALLATION INSTRUCTIONS
Installation and Operation Manual For Hunter Ceiling Fans
 Installation and Operation Manual For Hunter Ceiling Fans 1 2 CONGRATULATIONS! Your new Hunter ceiling fan is an addition to your home or office that will provide comfort and performance for many years.
6L PRESSURE COOKER. Instruction Manual. Model: PLA1424
 6L PRESSURE COOKER Instruction Manual Model: PLA1424 Due to ongoing product improvements, specifications and accessories may change without notice. Actual product may differ slightly to that depicted.