Gas Pressure Fryer MODELS LGF, LGF-F, & LGF-FC Installation and Operation Manual Serial Numbers and higher
|
|
|
- Rosemary Conley
- 5 years ago
- Views:
Transcription

1 MODELS LGF, LGF-F, & LGF-FC Installation and Operation Manual Serial Numbers and higher
2 LIMITED ONE YEAR WARRANTY Warranty Information BKI (The Company ) warrants to the original purchaser/user, that at time of shipment from the Company factory, this equipment will be free from defect in materials and workmanship. Written notice of a claim under this Warranty must be given within ONE YEAR AND THREE MONTHS from date of shipment from the factory. Defective conditions caused by abnormal use or misuse, lack of maintenance, damage by third parties, alterations by unauthorized personnel, acts of God, failure to follow installation instructions or any other events beyond the control of the company will NOT be covered under Warranty. The obligation of the Company under this Warranty shall be limited to repairing or replacing (at the option of the company) any part which is defective in reasonable opinion of the Company. The user will have the responsibility and expense of removing and returning the defective part to the Company as well as the cost of reinstalling the replacement or repaired part. IN NO EVENT SHALL THE COMPANY BE LIABLE FOR LOSS OF USE, LOSS OF REVENUE OR LOSS OF PRODUCT OR PROFIT OR FOR INDIRECT OR CONSEQUENTIAL DAMAGES INCLUDING BUT NOT LIMITED TO, FOOD SPOILAGE OR PRODUCT LOSS. WARRANTY DOES NOT COVER GLASS BREAKAGE. THE ABOVE WARRANTY IS EXCLUSIVE AND ALL OTHER WARRANTIES, EXPRESS OR IMPLIED, ARE EXCLUDED INCLUDING THE IMPLIED WARRANTIES OF MERCHANTABILITY AND FITNESS FOR A PARTICULAR PURPOSE. THIS WARRANTY SHALL APPLY ONLY WITHIN THE CONTINENTAL UNITED STATES, ITS TERRITORIES, AND POSSESSIONS AND IN CANADA. LIMITED NINETY DAY LABOR WARRANTY All labor necessary to repair or replace factory defective parts will be performed, without charge, to the end user, by service personnel of a BKI Authorized Distributor during the first ninety days after the date of installation of the new equipment. Replacement parts: Any appliance replacement part, except lamps and fuses, which proves to be defective in material or workmanship within 90 days from date of original installation will be repaired or replaced without charge F.O.B. Factory, Simpsonville, S.C. or F.O.B. authorized distributor. The purchaser must post, in a prominent location, instructions to be followed in the event the user smells gas. This information shall be obtained by consulting the local gas supplier. FOR YOUR SAFETY Do not store or use gasoline or other flammable vapors or liquids in the vicinity of this or any other appliance. Improper installation, adjustment, alteration, service or maintenance can cause property damage, injury or death. Read the installation, operation and maintenance instructions thoroughly before installing or servicing this equipment.
3 Table of Contents Table of Contents Table of Contents... 1 Introduction... 2 Safety... 2 Safety Signs and Messages... 2 Safe Work Practices... 3 Safety Labels... 8 Operation Controls and Indicators Care of the Shortening LGF and LGF-F Operation Start-Up (LGF and LGF-F) Cooking (LGF and LGF-F) LGF-FC Operation System Programming Product Programming Start-Up (LGF-FC) Cooking (LGF-FC) Recipes Operation After Gas or Power Outage Normal Shutoff Installation Inspection for Shipping Damage Preparation Location and Clearance Installation Procedure Initial Test and Adjustment Gas Conversion Instructions Maintenance Scheduled Maintenance Safety Pop Valve Procedure Filtering Procedure LGF-F and LGF-FC LGF Boil-Out Procedure Filter Pad Replacement Troubleshooting Notes Appendix A
4 Introduction Introduction The LGF Pressure Fryer is compact, attractive and functional in design. It is constructed of a stainless steel fryer pot for cleaning ease. Exclusive BKI patented features and safety devices offer flexibility, efficiency and reliability plus PERFECTION IN PRESSURE FRYING! The BKI name and trademark on this unit assures you of the finest in design and engineering -- that it has been built with care and dedication -- using the best materials available. Attention to the operating instructions regarding proper installation, operation, and maintenance will result in long lasting dependability to insure the highest profitable return on your investment. PLEASE READ THIS ENTIRE MANUAL BEFORE OPERATING THE UNIT. If you have any questions, please contact your BKI Distributor. If they are unable to answer your questions, contact the BKI Technical Service Department, toll free: Outside the U.S., call Safety Always follow recommended safety precautions listed in this manual. Below is the safety alert symbol. When you see this symbol on your equipment, be alert to the potential for personal injury or property damage. Safety Signs and Messages The following Safety signs and messages are placed in this manual to provide instructions and identify specific areas where potential hazards exist and special precautions should be taken. Know and understand the meaning of these instructions, signs, and messages. Damage to the equipment, death or serious injury to you or other persons may result if these messages are not followed. This message indicates an imminently hazardous situation which, if not avoided, will result in death or serious injury. This message indicates a potentially hazardous situation, which, if not avoided, could result in death or serious injury. This message indicates a potentially hazardous situation, which, if not avoided, may result in minor or moderate injury. It may also be used to alert against unsafe practices. This message is used when special information, instructions or identification are required relating to procedures, equipment, tools, capacities and other special data. 2

5 Introduction Safe Work Practices Do Not Store Or Use Anything Flammable Near The Fryer Your pressure fryer is powered by either natural gas or LP gas. Do not store or use gasoline or any flammable liquids or vapors near this or any other appliance. Flammable materials will burn easily. Letting any flammable liquid or vapor get too close to the fryer could cause an explosion or fire. Serious injury could result. Examples of flammables that you should not store near the fryer are gasoline, paint, thinners or removers, gas tanks, and cleaning materials. Use Gas Safely-- Avoid Danger Gas can be a dangerous fuel if not handled safely. Make sure to ventilate the fryer properly. If the fryer is not properly ventilated, carbon monoxide can be released around the fryer. Asphyxiation or suffocation can occur if gas is not ventilated properly. Before using this appliance for the first time, contact your local gas supplier for instructions about what to do if you smell gas. Post those instructions somewhere near the fryer, so that everyone who uses or works near the fryer knows what to do if they smell gas. Beware of High Voltage This equipment uses high voltage. Serious injury can occur if you or any untrained or unauthorized person installs, services, or repairs this equipment. Always Use an Authorized Service agent to Service Your Equipment. Use the Fryer On Noncombustible Floors Only Make sure your floor is noncombustible. Do not operate your fryer on floors that are wood, carpeted or have rubber mats. Placing your fryer on a combustible floor could cause a fire. Serious injury could result. Examples of noncombustible floors where you can safely place your fryer are concrete, tile, and ceramic. Keep The Area Around Your Fryer Uncluttered Make sure to keep the area around your fryer clear of any obstacles. Serious injury can occur if you trip or fall near the fryer. You could be burned by hot shortening that splashes out of the fryer or by falling against the hot metal of the fryer. 3


6 Introduction Keep The Floor Around Your Fryer Clean Of Shortening Make sure to keep the floor around your fryer clean of shortening and other liquids. Serious injury can occur if you slip near your fryer. You could be burned by hot shortening that splashes out of the fryer or by falling against the hot metal of the fryer. Keep The Lid Closed When The Fryer Is Not In Use Hot shortening can splash if someone moves the fryer or bumps into it. Serious injury can occur if hot shortening splashes out of the fryer. Do not lean, sit or stand on the fryer or perform any maintenance or cleaning duties while the fryer or the shortening is hot. You could be burned. Keep The Casters Locked To avoid spilling shortening, keep the casters locked. If any shortening spills near your fryer, clean it up immediately. Do Not Overfill The Fryer With Shortening Hot shortening and steam may escape and burn you if you put too much shortening in the fryer. Fill the fryer to approximately one inch below the fill marks that are inside the fryer pot. Heat the shortening. If needed, carefully add more shortening to bring the level to the fill marks. Do Not Let Any Water Get Into The Fryer Always remove excess moisture from food before placing it into the fryer basket. Water will cause the hot shortening to spatter. You could be burned. Do Not Overload The Basket With Food Hot shortening and steam may escape and burn you if you place too much food in the basket. 4


7 Introduction Always Make Sure The Lid Hook Is Latched When Closing The Fryer To make sure the lid hook is latched properly, press down the lid until the hook snaps shut. Hot shortening and steam can escape if the lid hook is not latched properly. You could be burned. Always Tighten The Spin Handle When Closing The Fryer Hot shortening and steam can escape if you do not tighten the spin handle properly. You could be burned. Line up the orange knobs on the fryer lid handle and the front hook when tightening. Do Not Over-Tighten The Spin Handle You could damage the fryer. Wear Safe Clothing Appropriate To Your Job Always wear your insulated mitts when handling the fryer basket or touch any hot metal surfaces. You received a pair of insulated mitts with your fryer. If you lose or damage your mitts, you can buy new ones at your local restaurant equipment supply store or from your local BKI Distributor. Always wear non-skid shoes when working around the fryer or any other equipment that uses shortening. Never wear loose clothing such as neckties or scarves while operating your fryer. Keep loose hair tied back or in a hair net while operating your fryer. Always wear appropriate personal protection equipment during the filtering process to guard against possible injury from hot oil. Always wear appropriate personal protection equipment during the boil-out process to guard against possible injury from hot cleaning solution. Never Loosen The Spin Handle Until The Pressure Gauge Is At Zero Steam may escape suddenly if you loosen the spin handle before the gauge is at zero. If steam escapes suddenly, you could be burned. After the pressure gauge is at zero, wait 5 seconds. Then loosen the spin handle slowly to open the lid of the fryer. By doing this, the steam will escape slowly and you will not be burned. Seal The Safety Valve Properly To seal the safety valve, lift the arm on the side of the valve. Then release it. The valve should snap closed. Hot steam can escape from the valve and you could be burned if you do not seal the valve properly. 5


8 Introduction Keep Away From The Vent Hot steam escapes from the vent continuously when you are using your fryer. You could be burned if you get too close to the vent. Keep this manual with the Equipment This manual is an important part of your equipment. Always keep it near for easy access. If you need to replace this manual, contact: BKI Technical Services Department P.O. Box Simpsonville, S.C Or call toll free: Outside the U.S., call Protect Children Keep children away from this equipment. Children may not understand that this equipment is dangerous for them and others. NEVER allow children to play near or operate your equipment. Keep Safety Labels Clean and in Good Condition Do not remove or cover any safety labels on your equipment. Keep all safety labels clean and in good condition. Replace any damaged or missing safety labels. Refer to the Safety Labels section for illustration and location of safety labels on this unit. If you need a new safety label, obtain the number of the specific label illustrated on page 8, then contact: BKI Technical Services Department P.O. Box Simpsonville, S.C Or call toll free: Outside the U.S., call


9 Introduction Be Prepared for Emergencies Be prepared for fires, injuries, or other emergencies. Keep a first aid kit and a fire extinguisher near the equipment. You must use a 40-pound Type BC fire extinguisher and keep it within 25 feet of your equipment. Keep emergency numbers for doctors, ambulance services, hospitals, and the fire department near your telephone. Know your responsibilities as an Employer Make certain your employees know how to operate the equipment. Make certain your employees are aware of the safety precautions on the equipment and in this manual. Make certain that you have thoroughly trained your employees about operating the equipment safely. Make certain the equipment is in proper working condition. If you make unauthorized modifications to the equipment, you will reduce the function and safety of the equipment. Do Not Smoke Near The Fryer. 7

10 Introduction Safety Labels 8
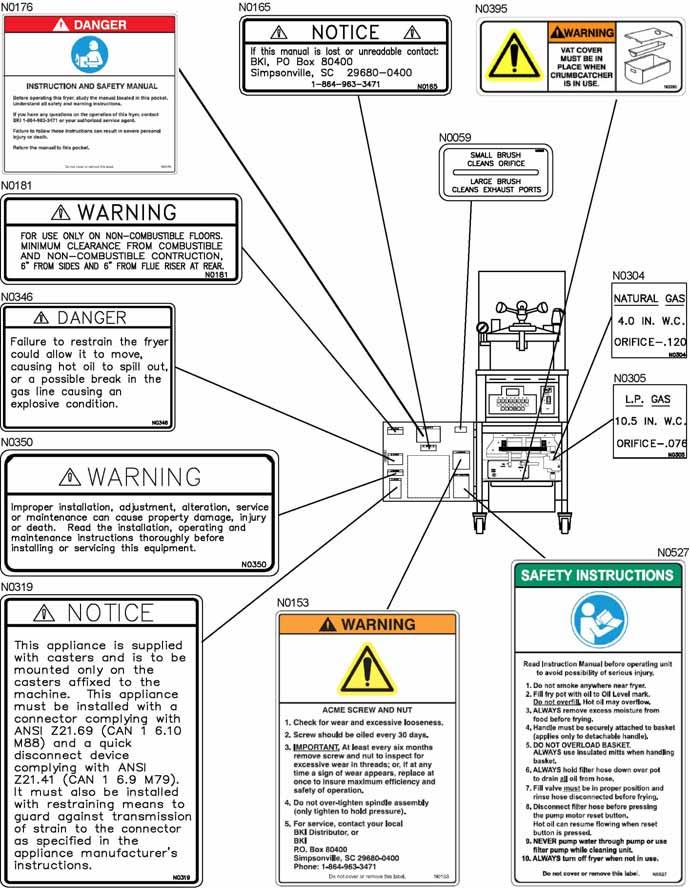
11 Introduction 9
12 Operation Operation Controls and Indicators Refer to the figure and table below for an explanation of the fryer s controls and indicators. 10
13 Operation Item Description Function 1 Pressure Gauge Indicates the pressure inside the pot. 2 Spin Handle Used to tighten the lid to the pot once it is latched. 3 Pop Safety Valve lever Used to release pressure periodically to prevent the seat from sticking. 4 Computer Used to set and activate product programs. 5 Rocker Switch FILTER When placed in this position, power is applied to the motor and shorting is pumped into the pot directly or thru the fill hose. OFF When placed in this position, power is removed from both the pump motor and gas system. FRY When placed in this position, power is supplied to the thermostat and gas system. 6 Thermostat Knob Used to set the temperature of the shortening. 7 Thermostat Light Illuminates when the thermostat calls for heat. Extinguishes when the shortening temperature is reached. 8 Analog Timer The analog timer consists of a light, dial, switch and buzzer described below: Light Illuminates when the timer has been started and is counting down. Cuts off when the timer is stopped. Timer Dial Used to set and display the time. Timer Switch (ON/OFF) Used to cut the timer on and off. To prevent damage to the timer, always turn the timer switch OFF before setting the timer dial. Buzzer A buzzer sounds when the timer counts down to 0. Placing the timer switch to the OFF position will stop the buzzer. 9 High Limit Reset Switch If shortening inside the pot reaches an unsafe temperature, power is automatically removed from the control panel and the gas system shuts off. Pressing this switch returns power to the control panel and resets the gas system. 10 Gas Control Valve Switch ON Allows gas to flow when the FILTER/OFF/FRY switch is set to the FRY position and the thermostat calls for heat. OFF Prevents gas flow regardless of FILTER/OFF/FRY switch and thermostat settings. 11 Drain Lever DRAIN OPEN When placed in this position, the drain valve opens and shortening drains into the vat. Also power is removed from the control panel and gas system. DRAIN CLOSED When placed in this position, the drain valve is closed to prevent shortening from draining into the pot. Also power is restored to the control panel and gas system. 12 Fill Lever FILL THRU POT When placed in this position, shortening will be pumped from the vat to the pot if the rocker switch is in the FILTER position. FILL THRU HOSE When placed in this position, shortening will be pumped from the vat to the pot via a fill hose if the rocker switch is in the FILTER position. 13 Pump Motor Reset Switch If the motor overheats while filtering, it will automatically shut off. Wait 15 minutes to allow motor to cool before pressing this switch. 14 Rinse Hose Connector Used to connect the Rinse hose for cleaning and refilling the pot. 11
14 Operation Care of the Shortening Solid shortening should always be returned to the filter vat while in the liquid state. If this is not done, it will have to be heated to a liquid state. When using solid shortening, the fryer must be equipped with a pump heater. After filtering with solid shortening, the filter lines must be completely emptied of shortening. The pump heater will take care of any residual shortening in the pump, but cannot melt all of the shortening in the filter lines. The pump heater accessory may be purchased separately from BKI. To extend the life of your shortening, for the best possible flavor in your products, and for economy and efficiency of operation, we urge you to follow these recommendations: 1. Use only high-quality frying shortening without additives, of low moisture content and with a high smoke point. 2. Press excess moisture from products before breading. The more moisture released in the shortening, the quicker it will break down. 3. Filter at least once a day or once every three loads during frequent cooking. 4. Clean any residue or crust formations from the sides and bottom of the pot each time you filter the shortening. 5. Add fresh shortening as needed to maintain the proper shortening level TO THE FILL MARK ON THE POT WALL. 6. DO NOT HOLD SHORTENING AT HIGH TEMPERATURE when the fryer is not in use. If you expect an elapsed time of one hour or more between cooking, close the lid and press the 0 button on the LGF-FC model. On Models LGF and LGF-F, set the thermostat to 150º F. 7. Shortening changes are determined by the quantity and type of food prepared. Excessive boiling and foaming are definite signs of shortening breakdown. 8. After you have finished frying for the day, filter the shortening and replace the filter pad. Also, thoroughly clean the pot of sediment and crumbs and empty the condensate pan. 9. IMPORTANT! Before the first cooking operation each day, stir the shortening freely while it is heating to provide a balanced shortening temperature for excellent results with the first cooking. Failure to do this can result in a crusty skin on the product surface with an undercooked product internally. In addition, in some cases, failure to stir the shortening while it is initially heating may cause the HI-LIMIT safety to disable the power due to a false overshoot condition. 12
15 Operation LGF and LGF-F Operation Start-Up (LGF and LGF-F) 1. Make sure the main drain valve is closed. 2. Fill pot with shortening to about one inch below the fill mark. Use only high-quality shortening that has low moisture content, a high smoke point and no additives. Overfilling the fryer pot with shortening could lead to serious injury. Ensure that the fryer pot is filled with shortening only to the fill mark when shortening is hot. Do not use any shortening other than what is specified in this manual and do not overfill the fryer pot. 3. Place the gas control ON/OFF switch in the ON position. 4. Place the FILTER/OFF/FRY switch in the FRY position. 5. Set the thermostat to the desired temperature. The temperature light will go on. When the temperature is reached, the light will go off. The light will continue to cycle on and off as the fryer tries to maintain the set temperature. 6. Set the correct cook time. To prevent damage to the timer, always turn the timer switch OFF before setting the timer dial. 7. The shortening should begin to heat and begin to reach the fill mark inside the pot. Add more shortening as required to reach the fill mark. IMPORTANT! Before the first cooking operation each day, stir the shortening freely while it is heating to provide a balanced shortening temperature for excellent results with the first cooking. Failure to do this can result in a crusty skin on the product surface with an undercooked product internally. In addition, in some cases, failure to stir the shortening while it is initially heating may cause the HI-LIMIT safety to disable the power due to a false overshoot condition. Cooking (LGF and LGF-F) 1. Ensure that the Start-Up procedures have been performed. 2. When frying chicken, connect the basket handle and lower the basket into the shortening in the fryer pot. Hot shortening may splash out of the pot causing severe injury when dropping chicken into pot. Carefully drop pieces of chicken into pot to prevent shortening splashes. 3. Carefully drop the chicken in the shortening one piece at a time starting with thighs and drumsticks. The fryer is designed to accommodate 32 pieces of chicken. Failure to use the insulated mitts will result in severe injury. Always use the insulated mitts when handling the hot fry basket. 4. Lift the basket approximately 2 to 3 inches (6.35 cm.) above the shortening and shake it. This keeps the food from sticking together and causing white spots on the cooked food. 13
16 Operation Hot shortening may splash out of the pot causing severe injury when lowering basket into pot. Carefully lower basket into pot to prevent shortening splashes. 5. Slowly lower the fryer basket into fryer pot and remove the detachable handle. 6. Close the lid. Make sure the lid hook latches securely under the catch. 7. Tighten the spin handle until the lid is firmly sealed. Then line up the orange knob on the spin handle with the orange knob at the front of the fryer. 8. Activate the timer by placing the timer switch in the ON position to begin the countdown. 9. At the end of the frying cycle the timer buzzer will sound and the fryer will automatically release pressure into the baffle box. Set the timer to OFF. If the timer knob is set at 0, the timer will continue to buzz regardless of the position of the ON/OFF switch. 10. When the pointer on the pressure gauge is at zero, wait 5 seconds then slowly turn the spin handle counterclockwise to break the seal around the lid. The fryer has a locking pin that prevents turning the spin handle until the pressure drops to zero. Do not force the spin handle to open the lid. 11. Slowly open the lid. Failure to use the insulated mitts will result in injury. Always use the insulated mitts when handling the hot fry basket. 12. Connect the basket handle then lift the basket and hang it on the front of the fryer pot to drain. 13. Empty the basket. 14. Remember to filter the shortening at least every third frying cycle load. Refer to the procedure in this manual. Also filter the shortening and clean the fryer at the end of each day. If you do not plan to use the fryer for an hour or more, turn the thermostat down to 150 F and close the lid. 15. When you have finished frying for the day, turn the FILTER/OFF/FRY switch to the OFF position. 16. Place the gas control ON/OFF switch in the OFF position. 14
17 Operation LGF-FC Operation System Programming Use the following figure and table to set options that apply to each product programs. Figure 1. System Programming Sequence 15
18 Operation Table 1. System Programming Procedure STEP ACTION DISPLAY COMMENTS 1 Press the FILTER/OFF/FRY switch to FRY. LOW 2 Press PROG on the keypad. PROGRAM CODE 3 Input 1712 and ENTER. PROGRAM SYSTEM 4 Press ENTER. PROGRAM DEGREES F 5 Press TOGGLE/CLEAR until the desired option is displayed. PROGRAM DEGREES X 6 Press ENTER. PROGRAM APL TYPE GAS 7 Press TOGGLE/CLEAR until the desired option is displayed. PROGRAM APL TYPE X 8 Press ENTER. PROGRAM MELTCYCL YES 9 Press TOGGLE/CLEAR until the desired option is displayed. PROGRAM MELTCYCL X 10 Press ENTER. PROGRAM GLBLFLTR 0 11 Press TOGGLE/CLEAR and input the number of fry cycles you want to complete among all product programs before enabling filter lockout. PROGRAM GLBLFLTR X 12 Press ENTER. PROGRAM SYSTEM 13 Press PROG to exit the LOW programming mode. This command allows you to choose the temperature scale option you want to use. The display will show either show F or C. X refers to the temperature scale you have chosen. This command allows you to choose the appliance type you are using. The display may show ELECTRIC, GAS OR ALF. X refers to the appliance type you have chosen. This command allows you to set the melt cycle option. This is normally set to yes if you are using solid shortening. The display will show either YES or NO. X refers to the melt cycle option chosen. This command allows you to specify the total number of fry cycles to complete among all product programs before a message is displayed reminding you to filter the shortening (filter lockout). X refers to the number of program cycles you want to complete among all product programs before filtering the shortening. 16
19 Operation Product Programming Use the following figure and table to set a maximum of eight product programs. The product programs must be set before cooking can begin. Figure 2. Product Programming Sequence 17
20 Operation Table 2. Product Programming Procedure STEP ACTION DISPLAY COMMENTS 1 Press the FILTER/OFF/FRY switch to FRY. LOW 2 Press PROG on the keypad. PROGRAM CODE 3 Input 1724 and press ENTER. PROGRAM PRODUCT # 4 Select the program product number (1-8). PROGRAM PRODUCT X 5 Press ENTER. PROGRAM TIME1 00:00 6 Press TOGGLE/CLEAR and input the number of minutes you want to cook. PROGRAM TIME1 XX:XX 7 Press ENTER. PROGRAM TEMP1 000 F 8 Press TOGGLE/CLEAR and input the cooking temperature for product to be cooked. PROGRAM TEMP1 XXX F 9 Press ENTER. PROGRAM TEMPCOM1 FLEX TIME 10 Press TOGGLE/CLEAR until the desired option is displayed. PROGRAM TEMPCOM1 X 11 Press ENTER. PROGRAM VALVE1 CLOSED 12 Press TOGGLE/CLEAR until the desired option is displayed. PROGRAM VALVE1 X X refers to the program number you selected. This command allows you to specify the cooking time for this stage. The time displayed may be a previously programmed value. XX:XX refers to the number of minutes you input. This command allows you to specify the cooking temperature for this stage. The temperature displayed may be a previously programmed temperature. The temperature scale may also display C depending on the system option that is set. XXX refers to the cooking temperature you input. This command enables you to select whether or not time is allowed for the fryer to recover from temperature loss while cooking during this stage. The FLEX TIME option will allow the fryer to recover from temperature loss. X refers to the temperature compensation option selected. This command allows you to specify whether the solenoid valve will be open or closed during this stage. X refers to the solenoid valve option selected. OPEN is used for Models ALF and BLF Automatic Lift fryers. If your program requires the solenoid valve to be closed while cooking, choose the CLOSED option. 18
21 Operation STEP ACTION DISPLAY COMMENTS 13 Repeat steps 5-12 when programming stages 2, 3, 4 and 5 for Electric and Gas appliance types. The time and temperature of each stage has to be less than the preceding stage. Repeat steps 5-10 when programming stages 2, 3, 4 and 5 for an ALF appliance type. 14 Press ENTER. PROGRAM PREALARM 00:00 15 Press TOGGLE/CLEAR and input the prealarm minutes. PROGRAM PREALARM XX:XX 16 Press ENTER. PROGRAM FILTER 0 17 Press TOGGLE/CLEAR and input the number of fry cycles you want to complete before enabling filter lockout. PROGRAM FILTER X 18 Press ENTER. PROGRAM PRODUCT # 19 If you wish to input more programs, proceed by pressing the next program number and follow steps 5 through 18 or press PROG to exit the programming mode. This command allows you to specify the number of minutes before the end of the cooking time (for each stage) until the alarm sound The prealarm value displayed may be a previously programmed value. XX:XX refers to the prealarm minutes you input. This command allows you to specify the number of fry cycles you want to complete for this program before a message is displayed reminding you to filter the shortening (filter lockout). The filter value displayed may be a previously programmed value. X refers to the number of program cycles you want to complete before filtering the shortening. Start-Up (LGF-FC) 1. Make sure the main drain valve is closed. 2. Fill pot with shortening to about one inch below the mark. Use only high-quality shortening that has low moisture content, a high smoke point and no additives. Overfilling the fryer pot with shortening could lead to serious injury. Ensure that the fryer pot is filled with shortening only to the fill mark when shortening is hot. Do not use any shortening other than what is specified in this manual and do not overfill the fryer pot. 3. Place the gas control ON/OFF switch in the ON position. 19
22 Operation 4. Place the FILTER/OFF/FRY switch to the FRY position. LOW will appear on the computer display. The shortening should begin to heat and begin to reach the fill mark inside the pot. Add more shortening as required to reach the fill mark. IMPORTANT! Before the first cooking operation each day, stir the shortening freely while it is heating to provide a balanced shortening temperature for excellent results with the first cooking. Failure to do this can result in a crusty skin on the product surface with an undercooked product internally. In addition, in some cases, failure to stir the shortening while it is initially heating may cause the HI-LIMIT safety to disable the power due to a false overshoot condition. Cooking (LGF-FC) 1. Ensure that the Start-Up procedures have been performed. 2. Press the desired program number on the keypad. The computer will still display "LOW". The fryer will begin to heat to the temperature that has been factory preset. When "READY" appears on the display, the fryer is up to the desired temperature and the product can be loaded. 3. When frying chicken, connect the basket handle and lower the basket into the shortening in the fryer pot. Hot shortening may splash out of the pot causing severe injury when dropping chicken into pot. Carefully drop pieces of chicken into pot to prevent shortening splashes. 4. Carefully drop the chicken in the shortening one piece at a time starting with thighs and drumsticks. The fryer is designed to accommodate 32 pieces of chicken. Failure to use the insulated mitts will result in severe injury. Always use the insulated mitts when handling the hot fry basket. 5. Lift the basket approximately 2 to 3 inches (6.35 cm.) above the shortening and shake it. This keeps the food from sticking together and causing white spots on the cooked food. Hot shortening may splash out of the pot causing severe injury when lowering basket into pot. Carefully lower basket into pot to prevent shortening splashes. 6. Slowly lower the fryer basket into fryer pot and remove the detachable handle. 7. Close the lid. Make sure the lid hook latches securely under the catch. 8. Tighten the spin handle until the lid is firmly sealed. Then line up the orange knob on the spin handle with the orange knob at the front of the fryer. 9. Press the desired program number a second time. The red light above the program number will flash and the computer will display COOK. This will start a countdown in minutes and seconds until the end of the cycle. 10. At the end of the cooking cycle, the computer will display "DONE" and signal with a series of audible "beeps". Press the selected number once again to stop the cook cycle. Fifteen seconds before the end of the cook cycle, the program will automatically release the pressure from the fryer. For your safety, the lid will not unlock, even at the end of the cook cycle, until the pressure has been fully released. Hot steam will escape when you open the lid possibly causing severe injury. Keep your face and arms away from the fry pot. 20
23 Operation 11. Slowly turn the spin handle counterclockwise to break the seal around the lid. Your fryer has a locking pin that prevents turning the spin handle until the pressure drops to "0". 12. Slowly open the lid. Failure to use the insulated mitts will result in injury. Always use the insulated mitts when handling the hot fry basket. 13. Connect the basket handle then lift the basket and hang it on the front of the fryer pot to drain. 14. Empty the basket. 15. Remember to filter the shortening at least every third frying cycle load. Refer to the procedure in this manual. Also filter the shortening and clean the fryer at the end of each day. 16. Close the lid and press the 0 button. Idle 255 F will display. This will automatically hold the shortening at a cooler temperature. 17. To escape the idle mode, press the 0 button again and the fryer will heat to its original temperature. 18. When you have finished frying for the day, turn the FILTER/OFF/FRY switch to the OFF position. 19. Place the gas control ON/OFF switch in the OFF position. Recipes Fried Onion Rings 1. Take frozen onion rings from freezer or bread fresh onion rings with Imperial breading. 2. Place onion rings into fryer basket. 3. Close cover to begin pressure frying. 4. Cook for 4 minutes at 350 F for frozen product. OR 5. Cook for 3 minutes at 350 F for fresh product. Potato Wedges 1. Wash and cut potatoes. 2. Season and bread each stick with Imperial breading. 3. Place potato wedges into fryer basket. 4. Close cover to begin pressure frying. 5. Cook for 7 to 8 minutes at 325 F depending on size. French Fries 1. Take frozen french fries from freezer or wash and cut fresh potatoes. 2. Place french fries into fryer basket. 3. Close cover to begin pressure frying. 4. Cook for 4 to 6 minutes at 325 F depending on size. Fresh Chicken Use fresh 8 or 9-piece cut chicken. Use 2-1/2 to 3 pounds for best results. 1. Rinse product under cold water. 2. Bread each piece with Imperial breading. 3. Place product into fryer basket. 4. Close the cover to begin pressure frying. 5. Cook for 12 minutes at 325 F. 21
24 Operation Frozen Chicken ( MRB ) except wings 1. Take product from freezer. 2. Place product into fryer basket. 3. Cook for 3 minutes (open) at 325 F. 4. Add wings to fryer basket. 5. Close the cover to begin pressure frying. 6. Cook for 17 minutes at 325 F. Fresh Chicken Wings 1. Rinse product under cold water. 2. Bread each piece with Imperial breading. 3. Place product into fryer basket. 4. Close cover to begin pressure frying. 5. Cook for 12 minutes at 325 F. Chicken Wings (Frozen - 5 kilograms or 10 pounds) 1. Take product from freezer. 2. Place wings into fryer basket. 3. Close cover to begin pressure frying. 4. Cook for 8 minutes at 325 F or 9½ to 10 minutes at 320 F. Chicken Drummettes 1. Take product from freezer. 2. Place drummettes into fryer basket. 3. Close cover to begin pressure frying. 4. Cook for 9 to 11 minutes at 325 F. Whole Turkey (12 to 14 pounds) 1. Rinse and bread turkey with Imperial breading. 2. Place turkey into fryer basket. 3. Close cover to begin pressure frying. 4. Cook for 45 to 55 minutes at 300 F. Whole Duckling 1. Rinse and bread duck with Imperial breading. 2. Place duck into fryer basket. 3. Close cover to begin pressure frying. 4. Cook for 20 to 25 minutes at 300 F. Pork Chops 1. Bread each chop with Imperial breading. 2. Place pork chops into fryer basket. 3. Close cover to begin pressure frying. 4. Cook for 8 to 10 minutes at 325 F depending on size. Cube Or Minute Steaks 1. Bread each steak with Imperial breading. 2. Place steaks into fryer basket. 3. Close cover to begin pressure frying. 4. Cook for 2 to 4 minutes at 325 F depending on size. Milanese It is best to use 5 to 7 ounce beef steaks. 1. Season and bread each steak as desired. 2. Place steaks into fryer basket. 3. Close cover to begin pressure frying. 4. Cook for 5 to 6 minutes at 325 F depending on size. 22
25 Operation Fresh Shrimp 1. Season and bread shrimp as desired. 2. Place shrimp into fryer basket. 3. Close cover to begin pressure frying. 4. Cook for 2½ to 3½ minutes at 350 F depending on size. Fresh Fish or Frozen Fish For best results, use a tiered basket. The best fish for frying are Flounder, Cod, Walleyed Pike, or any other popular frying fish. 1. Bread each piece of fish as desired. 2. Place fish in tiered basket. 3. Close cover to begin pressure frying. 4. Cook for 5 to 7 minutes at 325 F depending on size for fresh fish. OR 5. Cook for 8 to 10 minutes at 325 F depending on size for frozen fish. Corn On The Cob Corn can be fried either plain or breaded. 1. Take frozen corn ears from freezer and rinse. 2. Bread with Imperial breading as desired. 3. Place corn ears into fryer basket. 4. Close cover to begin pressure frying. 5. Cook for 6 to 8 minutes at 325 F depending on size. Egg Rolls (frozen) 1. Take egg rolls from freezer. 2. Place egg rolls into basket. 3. Close the cover to begin pressure frying. 4. Cook for 6 to 8 minutes at 325 F depending on size. Operation After Gas or Power Outage The fryer may shut off automatically if the gas supply is interrupted or the power goes out. If either of these conditions occur you should perform the following procedure: For your safety, if the gas supply stops, or, if the power goes out, make sure to wait for at least five minutes before restarting your fryer. This allows time for any unburned gas to dissipate. (LP gas may take longer than five minutes.) If you smell gas, do not start your fryer. 1. Place the gas control ON/OFF switch in the OFF position. 2. Place the FILTER/OFF/FRY switch in the OFF position. 3. Wait at least five minutes to allow any gas that may have accumulated in the burner compartment to escape. 4. Follow normal operating procedures once the power or gas is restored. Normal Shutoff 1. Place the FILTER/OFF/FRY switch in the OFF position. 2. Place the gas control ON/OFF switch in the OFF position. 3. Wait at least five minutes to allow any gas that may have accumulated in the burner compartment to escape. 23
26 Installation Installation Inspection for Shipping Damage It is the owners responsibility to file all freight claims with the delivering truck line. Inspect all cartons and crates for damage as soon as they arrive. If damage to cartons or crates is found, or if a shortage is found, note this on the bill of lading (all copies) prior to signing. If damage is found when the equipment is opened, immediately call the delivering truck line and follow up the call with a written report indicating concealed damage to your shipment. Ask for an immediate inspection of your concealed damage item. Packaging material MUST be retained to show the inspector from the truck line. Preparation There are several things the installer must know before installing the fryer. These are listed below: The fryer installation must conform with city or county standards for gas appliances and gas piping. If your area does not have local codes, consult the National Fuel Gas Code, ANSI Z223.1/NFPA 54, or the Natural Gas and Propane Installation Code, CSA B In Europe, city and country codes are enforced. Do not attempt to test the gas pressure of your fryer. Pressure testing should be done only by an authorized Service Agent. During any pressure testing of the gas supply system, the fryer must be protected. The fryer and its individual shutoff valve must be disconnected from the gas supply piping system during any pressure testing of that system at test pressures in excess of ½ psi (3.5 kpa). The fryer must be isolated from the gas supply piping system by closing its individual manual shutoff valve during any pressure testing of the gas supply piping system at test pressures equal to or less than ½ psi (3.5 kpa). The fryer must be electrically grounded to conform with the local code of your city or county. If your area does not have local codes, consult the latest version of the National Electrical Code ANSI/NFPA 70, or the Canadian Electrical Code, CSA C22.2. In EUROPE, city and country codes are enforced. A schematic diagram of the unit is glued to the back of either the left or right side panel. The Authorized Service Agent that installs your fryer must connect the cord set at the rear of the fryer to an electrical source with a voltage matching that stamped on the name and rating tag. Refer to the wiring diagrams in this manual. Make sure a connector is used that complies with the Standard for Connectors for Movable Gas Appliances, ANSI Z21.69 CSA Make sure a quick-disconnect device is used that complies with the Standard for Quick-Disconnect Devices for Use With Gas Fuel, ANSI Z21.41 CSA 6.9. In Europe, the installer must supply the gas supply connector. Make sure a restraining device is used that complies with the Standard for Commercial Gas Ranges, ANSI Z83.11/CGA 1.8 (such as BKI part number FT0279) to guard against transmission of strain to the connector. Retain the manual for future reference. 24
27 Installation Location and Clearance Install your fryer in a well-ventilated area. This will ensure that the gas burns properly and will help prevent any fires. When deciding on a location for your fryer, remember the following: All gas-burning appliances need enough fresh air for combustion. Locate the fryer where it can be vented into an adequate exhaust hood. Your local gas utility must approve your ventilation system. Consult a ventilation or heating company to help you design an adequate system that meets ventilation codes and standards for your city or county. In Europe, install according to local codes. Keep the fryer away from any combustibles such as curtains, wood paneling, boxes, or towels. The flue riser at the rear of the fryer should also be kept away from any flammable material. Use this fryer on non-combustible flooring only. Examples of non-combustible floors where you can safely locate your fryer are concrete, tile, and ceramic. Minimum clearance from combustible and noncombustible construction is 6 inches from the sides and 6 inches from the flue riser at the rear. DO NOT locate your fryer on floors that are wood, have rubber mats, or, are carpeted. In Europe, no less than 6" (15.24 cm.) from the rear and 0" to the sides of non-combustible walls. Keep the work area around the fryer free of objects that might block fresh air or that might cause a fire. Do not attach an extension to the exhaust stack. This may stop the burner from operating properly, cause the burner to go off, or, cause other dangerous malfunctions. It may also cause a strong draft in the room. A draft can interfere with the burner. Do not locate the fryer near strong drafts. Keep the fryer away from doors that are opened and closed frequently. Installation Procedure Ensure that an authorized BKI service agent installs the fryer. An authorized BKI service agent should be a qualified gas service technician and a licensed electrician. 1. Remove the shipping packing clip from underneath the dead weight cap. 2. Replace the dead weight and cover. 25
28 Installation Failure to restrain the fryer could allow it to move, causing hot shortening to spill out, or a possible break in the gas line causing an explosive condition. 3. Install an ANSI Z83.11/CGA 1.8 compliant restraining device (such as BKI part number FT0279) per the instructions below: Mount the wall attachment according the restraining device manufacturer instructions. Attach the spring-loaded hook on the restraining device to the eye-bolt mounted to the fryer then attach the other spring-loaded hook to the wall attachment. Use appliance connectors and quick-disconnect devices that are in compliance with the applicable ANSI and CSA standards. 4. Attach an appliance connector to the fryer according to the instructions provided by the appliance connector manufacturer. 5. Connect the gas supply to the fryer. In Europe, the gas supplier must provide the gas hookup connecting line. 6. Lock the casters so the fryer does not move. Every time you use the fryer, make sure the casters are locked so the fryer cannot move. (In Canada: refer to caster codes CAN M88 and CAN M79.) 7. Turn on the gas at the gas supply valve. 8. Check for gas leaks from the gas supply to the fryer gas valve using a soap and water solution. If a leak is detected, tighten the connection where the leak occurs. 9. Connect fryer wiring according to the appropriate wiring diagram in this manual. 10. Apply power to the fryer. 11. Perform the following procedures provided in the Startup and Checkout section of the SV9401/SV9402/SV9403, SV9501/SV9502/SV9503, SV9601/SV9602 SmartValve SYSTEM CONTROLS Installation Instructions ( ). Refer to Appendix A. Gas Leak Test Check and Adjust Pilot Flame Check and Adjust Gas Input Burner Ignition Initial Test and Adjustment 1. Cut on the gas at the gas supply valve. 2. Place the DRAIN handle in the CLOSED position. 3. Fill pot with shortening to about one inch below the mark. Use only high-quality shortening that has low moisture content, a high smoke point and no additives. Overfilling the fryer pot with shortening could lead to serious injury. Ensure that the fryer pot is filled with shortening only to the fill mark when shortening is hot. Do not use any shortening other than what is specified in this manual and do not overfill the fryer pot. 26
29 Installation 4. Place the gas control ON/OFF switch in the OFF position. 5. Place the FILTER/OFF/FRY switch in the OFF position. 6. Before you turn on the gas, wait at least five minutes to allow any gas that may have accumulated in the burner compartment to escape. 7. Place the gas control ON/OFF switch in the ON position. 8. Place the FILTER/OFF/FRY switch to the FRY position. The shortening should begin to heat and begin to reach the fill mark inside the pot. Add more shortening as required to reach the fill mark. Gas Conversion Instructions To convert the gas system from a Natural Gas to LP Gas application or vice versa, contact the BKI Technical Service Department, toll free: Outside the U.S., call
30 Maintenance Maintenance Failure to comply with the maintenance below could result in a serious accident. Do not over-tighten the spindle assembly. (Only tighten to hold pressure.) Your fryer will need periodic maintenance and servicing. We strongly suggest that you use only a service company that is authorized by BKI to do this work. The restraining device must always be connected when the appliance is in service. Disconnect for movement, such as servicing or cleaning. Reconnect the restraint when fryer has been returned to its normal position. Scheduled Maintenance Use the following table to help manage scheduled maintenance activities. FREQUENCY PERFORMED BY PART ACTIVITY Each Fry Cycle User Pressure Gauge Check for proper display of cooking vat pressure. Contact authorized BKI service agent if adjustment or replacement is required. User Lid Gasket Check for unusual wear such as cracks and deformation, and pressure leaks. Contact authorized BKI service agent if adjustment or replacement is required. Daily User Dead Weight Assembly Clean weight and orifices daily and check for wear. User Filter Pad Replace filter pad. Refer to the procedure in this manual. User Condensation Pan Remove and drain. User Filter system Filter the shortening using the procedure in this manual. Weekly User Safety Pop Valve Check for release of pressure and proper seal. Refer to the procedure in this manual. Every 6 Months User Fryer Pot Perform the boil-out procedure in this manual. Authorized BKI service agent Authorized BKI service agent Authorized BKI service agent Authorized BKI service agent Acme Screw and Nut Solenoid Valve Hook, Catch, Spring Connections, Fittings Check for wear on the threads. Check that the valve is holding and releasing pressure when the timer or computer activates it. Check for wear and ease of operation. Check for leakage while oil is pumping. 28
31 Maintenance Safety Pop Valve Procedure The safety pop valve should be blown under pressure periodically to prevent the seat from sticking. Failure to use the insulated mitts will result in injury. Always use the insulated mitts when handling the arm on the safety valve. 1. After the pressure is up during a cooking cycle, use the insulated glove to lift the arm on the edge of the safety valve and let some steam escape. This will clean the valve. 2. Release the lever on the valve, and let it slam shut to seal the valve. 29
32 Maintenance Filtering Procedure Breaded foods require frequent filtering. An excess amount of breading left in the fryer pot will reduce the life of the shortening. We recommend the shortening be filtered after every three frying cycle loads. When the shortening starts to show signs of foaming and has a bad taste, do not use it. The fryer pot should be cleaned before refilling with new shortening. Best results for filtering are obtained while the shortening is hot. You should filter at the end of every business day. You should also remove and drain the condensation pan daily. LGF-F and LGF-FC Always wear appropriate personal protection equipment during the filtering process to guard against possible injury from hot oil. If the pump motor automatically shuts off while filtering, place the FILTER/OFF/FRY switch in the OFF position, wait 15 minutes, press the pump motor reset button, then follow the appropriate refill procedure below. 1. Set the FILTER/OFF/FRY switch to OFF. 2. Remove the fryer basket. 3. Make certain that the filter pad is clean and not torn. IMPORTANT: Make certain the vat cover is properly positioned underneath the drain valve. Also make certain the filter vat and filter screen is under the main drain valve before starting the filtering process. 4. Move the DRAIN handle slowly to the OPEN position so that the shortening starts to flow evenly. This is to prevent excessive splashing of hot shortening. 5. When the pot is empty, place the DRAIN handle in the CLOSED position. To refill the pot automatically, use the steps below: Hot shortening may splash out of the pot causing severe injury when filling the pot if the lid is not closed. To prevent shortening splashes, close the lid before filling. Close the lid to prevent shortening splashes. Place the FILL handle to the THRU POT position. Position the FILTER/OFF/FRY switch to FILTER and shortening will automatically pump into the pot. After 1 minute carefully open the lid to check the level of the shortening. Let the filter continue to pump the shortening until the fill mark in the fryer pot is reached or until air starts bubbling through the shortening. As soon as air is seen in the shortening, first place the FILL handle to the THRU HOSE position then position the FILTER/OFF/FRY switch to OFF to prevent shortening degradation and prevent the filter pump and lines from filling up with shortening. Add new shortening if the fill mark has not been reached. 30
Extra-Large Gas Pressure Fryer Series. SERIES: FKG Operation Manual
 Extra-Large Gas Pressure Fryer Series SERIES: FKG Operation Manual BKI LIMITED WARRANTY 2812 Grandview Dr. Simpsonville, SC 29680 USA (864) 963-3471 Toll Free: (800) 927-6887 Fax: (864) 963-5316 WHAT IS
Extra-Large Electric Pressure Fryer Series. SERIES: FKM Operation Manual
 Extra-Large Electric Pressure Fryer Series SERIES: FKM Operation Manual BKI LIMITED WARRANTY 2812 Grandview Dr. Simpsonville, SC 29680 USA (864) 963-3471 Toll Free: (800) 927-6887 Fax: (864) 963-5316 WHAT
Extra-Large Electric Auto-Lift Fryer. SERIES: BLF Operation Manual
 Extra-Large Electric Auto-Lift Fryer SERIES: BLF Operation Manual BKI LIMITED WARRANTY 2812 Grandview Dr. Simpsonville, SC 29680 USA (864) 963-3471 Toll Free: (800) 927-6887 Fax: (864) 963-5316 WHAT IS
Large All-Purpose Fryer Series. SERIES: DNF Operation Manual
 Large All-Purpose Fryer Series SERIES: DNF Operation Manual BKI LIMITED WARRANTY 2812 Grandview Dr. Simpsonville, SC 29680 USA (864) 963-3471 Toll Free: (800) 927-6887 Fax: (864) 963-5316 WHAT IS COVERED
Fried Food Warmers Series. Series: FW Operation Manual
 Fried Food Warmers Series Series: FW Operation Manual BKI LIMITED WARRANTY 2812 Grandview Dr. Simpsonville, SC 29680 USA (864) 963-3471 Toll Free: (800) 927-6887 Fax: (864) 963-5316 WHAT IS COVERED WHO
Ventless Hoods For Rotisseries. SERIES: VGH Operation Manual
 Ventless Hoods For Rotisseries SERIES: VGH Operation Manual BKI LIMITED WARRANTY 2812 Grandview Dr. Simpsonville, SC 29680 USA (864) 963-3471 Toll Free: (800) 927-6887 Fax: (864) 963-5316 WHAT IS COVERED
GPC PASTA PRO INSTALLATION & USER OPERATION MANUAL
 GPC-14/18/20 GPC PASTA PRO INSTALLATION & USER OPERATION MANUAL GPC-18 shown with optional rinse station. NOTICE! After installation of your equipment, immediately contact your local gas supplier to obtain
INSTALLATION & OPERATION MANUAL
 INSTALLATION & OPERATION MANUAL EF SERIES ECONOFRY GAS FRYERS MODEL EF3 EF4 EF5 ML-52099 ML-114943 ML-114944 MODEL EF3 For additional information on Vulcan-Hart or to locate an authorized parts and service
INSTALLATION, OPERATION & MAINTENANCE AVANTCO SERIES 177AG OWNER S MANUAL
 INSTALLATION, OPERATION & MAINTENANCE AVANTCO SERIES 177AG OWNER S MANUAL Manual Griddles: Radiant Charbroilers: Hot Plates: 177AG24MG 177AG36MG 177AG24RC 177AG36RC 177AGR212 All equipment manufactured
CINCINNATI, OH USA
 INSTRUCTION MANUAL Part No. 89731 Revised October 1997 CINCINNATI, OH 45241-4807 USA GAS SAFETY PRECAUTIONS Instructions on what to do when a user smells gas can be obtained from the local gas supplier.
Installation and Operation Manual For Electric Fryers. Covering Models SE, SEH, SEM Series
 Installation and Operation Manual For Electric Fryers Covering Models SE, SEH, SEM Series Pitco Frialator, Inc., P.O. Box 501, Jct I-89 & I-93 Concord, NH 03302-0501 509 Route 3A, Bow, NH 03304 (603) 225-6684
Mobile Hot Food Merchandiser Series. Series: MHB Operation Manual
 Mobile Hot Food Merchandiser Series Series: MHB Operation Manual BKI LIMITED WARRANTY Grandview Drive Simpsonville, SC 0 USA () - Toll Free: (00) - Fax: () - WHAT IS COVERED WHO IS COVERED COVERAGE PERIOD
PLEASE RETAIN THIS MANUAL FOR FUTURE REFERENCES. This equipment is design engineered for commercial use only
 OWNER S MANUAL INSTALLATION OPERATION MAINTENANCE FRYER SRF-40/50 All equipment manufactured by SIERRA CORP. is for use with the type of gas specified on the rating plate and for installation will be in
Countertop Rotisserie Oven Series. SERIES: DR Operation Manual
 Countertop Rotisserie Oven Series SERIES: DR Operation Manual BKI LIMITED WARRANTY 2812 Grandview Dr. Simpsonville, SC 29680 USA (864) 963-3471 Toll Free: (800) 927-6887 Fax: (864) 963-5316 WHAT IS COVERED
Autolift Open Fryer. CR-40F & CR-60F Instruction Manual
 Autolift pen Fryer Instruction Manual 735 Rossiter, St-Jean-sur-Richelieu, Quebec, Canada, J3B 8A4 E-Mail : info@resfab.com Website : www.resfab.com 2007-05 TABLE F CNTENTS Page Limited warranty.. 03 Unpacking..
USER MANUAL Gas Step Up Hot Plate
 USER MANUAL Gas Step Up Hot Plate MODELS: CK HPSU, CK HPSU, CK HPSU 0 / 07 IMPORTANT FOR FUTURE REFERENCE Please complete this information and retain this manual for the life of the equipment. For Warranty
User Manual. 110 Cup (55 Cup Raw) Gas Rice Cooker. Model: 177GRCLP, 177GRCNAT 12/2018. Please read and keep these instructions. Indoor use only.
 Gas Rice Cooker. Model: 177GRCLP, 177GRCNAT 12/2018. Please read and keep these instructions. Indoor use only.") 110 Cup (55 Cup Raw) Gas Rice Cooker Intertek 5010781 Conforms to ANSI STD Z83.11-2016 Model: 177GRCLP, 177GRCNAT 12/2018 FOR YOUR SAFETY Do not store or use gasoline or other flammable vapors or liquids
110 Cup (55 Cup Raw) Gas Rice Cooker Intertek 5010781 Conforms to ANSI STD Z83.11-2016 Model: 177GRCLP, 177GRCNAT 12/2018 FOR YOUR SAFETY Do not store or use gasoline or other flammable vapors or liquids
PRO SERIES GAS FRYERS OWNER S MANUAL
 PRO SERIES GAS FRYERS OWNER S MANUAL MODELS: PF-1 PRO-FRYER, PF2 DUAL PRO-FRYER REVISED OCTOBER, 2009 *PLEASE RETAIN FOR FUTURE REFERENCE This appliance has been tested according to ANSI Z83.116-2009/CSA1.86-2009.
INSTALLATION & OPERATIONAL MANUAL
 INSTALLATION & OPERATIONAL MANUAL LG SERIES GAS FRYERS MODELS: LG300 LG400 LG500 ML-136528 ML-136622 ML-136643 For additional information on Vulcan-Hart or to locate an authorized parts and service provider
OVATION SERIES FIRE TABLES ASSEMBLY INSTRUCTIONS
 OVATION SERIES FIRE TABLES ASSEMBLY INSTRUCTIONS CSA Model98900 DRS02403 Installer: Leave these instructions with consumer. Consumer: Keep these instructions for future reference. DANGER If you smell gas:
Owner s Guide Installation & Operation
 Owner s Guide Installation & Operation Fryer HFR Series Hestan Commercial Corporation 3375 E. La Palma Ave Anaheim, CA 92806 (888) 905-7463 RETAIN THIS MANUAL FOR FUTURE REFERENCE P/N 002137 REV 1 IMPORTANT
OWNERS MANUAL INSTALLATION, OPERATION, & MAINTENANCE INSTRUCTIONS
 OWNERS MANUAL INSTALLATION, OPERATION, & MAINTENANCE INSTRUCTIONS 1128 Sherborn Street Corona, CA 92879-2089 (951) 281-1830 (951) 281-1879 IPC SERIES PASTA COOKER All Imperial Mfg. Co. equipment is manufactured
USER MANUAL Gas Countertop Charbroilers
 Gas Countertop Charbroilers REVISED 2/209 382799 LAVA BRIQUETTE MODELS: 35CLCPG5NL, 35CLCPG24NL, 35CLCPG36NL, 35CLCPG48NL, 35CLCPG60NL, 35CLCPG72NL Congratulations on your purchase of Cooking Performance
Electric Pressure Fryer MODELS FKM, FKM-F, & FKM-FC Service Manual Serial Numbers and higher
 MODELS FKM, FKM-F, & FKM-FC Service Manual Serial Numbers 137733 and higher LIMITED ONE YEAR WARRANTY Warranty Information BKI (The "Company") warrants to the original purchaser that at time of shipment
CATALINA FIRE TABLE ASSEMBLY INSTRUCTIONS
 CATALINA FIRE TABLE ASSEMBLY INSTRUCTIONS CSA Model 98300 DRF01000 Installer: Leave these instructions with consumer. Consumer: Keep these instructions for future reference. DANGER If you smell gas: 1.
Using it in an enclosed space can kill you.
 38 X 56 GAS FIRE PIT - OWNER S MANUAL Carlisle Chat Fire Table Base Model # 00GBC7 (6877B) Fits 6877A Carlisle Chat Fire Table Top For Propane and *Natural Gas (*See Page 7) Certified to CSA International
INSTRUCTION MANUAL. Full Size Gas Convection Oven
 INSTRUCTION MANUAL Full Size Gas Convection Oven This manual contains important information regarding your unit. Please read this manual thoroughly prior to equipment set-up, operation and maintenance.
GAS RACK OVENS WITH ELECTRONIC OVEN CONTROL
 GAS RACK OVENS WITH ELECTRONIC OVEN CONTROL MODELS DRO2G DRO2GH GAS GAS 701 S. RIDGE AVENUE TROY, OHIO 45374-0001 937-332-3000 www.hobartcorp.com FORM 19202 Rev. D (Dec. 2003) IMPORTANT FOR YOUR SAFETY
Repeat procedures for other side.
 Repeat procedures for other side. ASSEMBLY INSTRUCTIONS Installer: Leave these instructions with consumer. Consumer: Keep these instructions for future reference. CSA Model 98900 Printed in China DANGER
Gas Countertop Fryer lb Model lb Model NG and LPG Models
 Gas Countertop Fryer 35-40 lb Model 45-50 lb Model NG and LPG Models This manual contains important information regarding your unit. Please read this manual thoroughly prior to equipment set-up, operation
INSTALLATION AND OPERATION MANUAL GAS SKILLETS MODELS: GTS-30 GTS-40
 INSTALLATION AND OPERATION MANUAL GAS SKILLETS MODELS: GTS-30 GTS-40 CROWN FOOD SERVICE EQUIPMENT LTD. 70 OAKDALE ROAD, DOWNSVIEW, (TORONTO), ONTARIO, CANADA, M3N 1V9 TELEPHONE: (416) 746-2358, FAX: (416)
Cool-Touch Deep Fryer / Fondue Maker
 Cool-Touch Deep Fryer / Fondue Maker Use and Care Instructions Model EP64 For information or assistance call 514-842-8691 EURO-PRO Corporation In U.S.: 178 West Service Rd., Champlain, NY 12919 In Canada:
Operating Instructions
 Operating Instructions Fryer KM 403 To prevent accidents and reduce machine damage, read these lnstructions before installation or use. UV M.-Nr. 05 825 170 2 Contents IMPORTANT SAFETY INSTRUCTIONS.................................
WEST BEND DELUXE DEEP FRYER L 5265
 WEST BEND DELUXE DEEP FRYER L 5265 TO PREVENT PERSONAL INJURY OR PROPERTY DAMAGE, READ AND FOLLOW THE INSTRUCTIONS AND WARNINGS IN THIS CARE AND USE INSTRUCTION MANUAL. Register this and other West Bend
Owner s Guide Installation & Operation
 Owner s Guide Installation & Operation Hot Top HHT Series Hestan Commercial Corporation 3375 E. La Palma Ave Anaheim, CA 92806 (888) 905-7463 RETAIN THIS MANUAL FOR FUTURE REFERENCE P/N 002130 REV 1 IMPORTANT
Conversion Instructions Logano G234X. Gas boiler. Please read carefully before installing and servicing. Gas boiler
 Gas boiler UPON COMPLETION OF THE INSTALLATION THE INSTALLER MUST INSTRUCT THE OWNER AND OPERATOR ON THE FUNCTIONALITY AND THE PROPER OPERATION OF THE BOILER AND THE HEATING SYSTEM. INSTALLER MUST REVIEW
WEST BEND DEEP FRYER L 5181
 WEST BEND DEEP FRYER L 5181 TO PREVENT PERSONAL INJURY OR PROPERTY DAMAGE, READ AND FOLLOW THE INSTRUCTIONS AND WARNINGS IN THIS CARE AND USE INSTRUCTION MANUAL. Register this and other West Bend products
Installation Requirements for Models:
 900 & 9100 Series Refrigerators Installation Requirements for Models: 9162 9163 9182 9183 962 963 982 983 WARNING Improper installation, adjustment, alteration, service, or maintenance can cause injury
SR42G/52G Series Gas Fryers
 SR42G/52G Series Gas Fryers Installation & Operation Manual PRINTED IN THE UNITED STATES For Service, Call (318) 865-1711 Dean, 8700 Line Avenue, PO Box 51000, Shreveport, Louisiana 71135-1000 Shipping
ULTRA-MAX GAS RADIANT CHARBROILER. ULTRA-MAX GAS LAVA ROCK CHARBROILER MODELS 8024CBB, 8036CBB, 8048CBB, 8060CBB, and 8072CBB
 Star Manufacturing International Inc. 10 Sunnen Drive St. Louis, MO 63143 Phone: (314) 678-6303 Fax: (314) 781-2714 Installation and Operating Instructions 2M-Z20327 Rev. A 10/05/15 ULTRA-MAX GAS RADIANT
TRI-STAR INC SOUTH STANDARD AVENUE, SANTA ANA, CA Ph: Fax: MODEL #. OWNER S MANUAL
 TRI-STAR INC 2205 SOUTH STANDARD AVENUE, SANTA ANA, CA 92707 Ph: 714 424 9380 Fax: 714 424 9385 MODEL #. OWNER S MANUAL INSTALLATION OPERATION MAINTENANCE All equipments manufactured by Tri-star Inc. for
USER GUIDE DEEP FRYER WITH OIL FILTRATION SYSTEM
 USER GUIDE DEEP FRYER WITH OIL FILTRATION SYSTEM Emeril is a trademark of Martha Stewart Living Omnimedia, Inc. Copyright 2017, Martha Stewart Living Omnimedia, Inc. All rights reserved. Important Safeguards
IMPORTANT WARNINGS Therefore, to avoid breaking it, do not turn it manually in order to seek the correct position.
 IMPORTANT WARNINGS Before use check that the voltage power supply corresponds to the one shown on the appliance data plate. Only connect the appliance to electrical sockets which have a minimum load of
INSTALLATION AND OPERATION MAINTENANCE
 INSTALLATION AND OPERATION MAINTENANCE TSF SERIES FRYER OWNER S MANUAL Models: TSF-3540, TSF-4050, TSF-6575 FOR YOUR SAFETY: Do not store or use gasoline or other flammable vapors or liquids in the vicinity
FRYMASTER TCF. Chicken Fryer
 Hardee s Food Systems, Inc. FRYMASTER TCF Chicken Fryer EQUIP 501 Chicken Fryer October 1, 1994 CALIBRATION EQUIPMENT and TOOLS Digital Thermometer Flat Blade or Phillips w/immersion Probe Screwdriver
CYLINDER NOT INCLUDED
 OPERATING INSTRUCTIONS AND OWNER S MANUAL Model # HS125NG / MH125LP / HS125LP READ INSTRUCTIONS CAREFULLY: Read and follow all instructions. Place instructions in a safe place for future reference. Do
Operations & Service Manual
 Operations & Service Manual CF-400G Giles Enterprises, Inc. An ISO9001 Registered Company 2750 Gunter Park Drive West Montgomery, AL 36109 USA Fax: (334) 272-3561 Internet: www.gilesent.com Service Hotline
WEST BEND DEEP FRYER L 5179
 WEST BEND DEEP FRYER L 5179 TO PREVENT PERSONAL INJURY OR PROPERTY DAMAGE, READ AND FOLLOW THE INSTRUCTIONS AND WARNINGS IN THIS CARE AND USE INSTRUCTION MANUAL. Register this and other West Bend products
ASSEMBLY INSTRUCTIONS
 ASSEMBLY INSTRUCTIONS Installer: Leave these instructions with consumer. Consumer: Keep these instructions for future reference. CSA Model99000 BRH01000 DANGER If you smell gas: 1. Shut off gas to the
ASSEMBLY INSTRUCTIONS
 ASSEMBLY INSTRUCTIONS CSA Model 99000 ARL00100 Installer: Leave these instructions with consumer. Consumer: Keep these instructions for future reference. DANGER If you smell gas: 1. Shut off gas to the
ASSEMBLY INSTRUCTIONS
 ASSEMBLY INSTRUCTIONS CSA Model: 98910L Printed in China Installer: Leave these instructions with consumer. Consumer: Keep these instructions for future reference. WARNING: If the information in this manual
GAS COOKTOP INSTALLATION INSTRUCTIONS
 INSTALLATION AND SERVICE MUST BE PERFORMED BY A QUALIFIED INSTALLER. IMPORTANT: SAVE FOR LOCAL ELECTRICAL INSPECTOR'S USE. READ AND SAVE THESE INSTRUCTIONS FOR FUTURE REFERENCE. WARNING If the information
Hanover Outdoor Furniture IMPORTANT. If you have any problems with this product (missing or damaged parts, assembly issues, etc.),
,") Hanover Outdoor Furniture IMPORTANT If you have any problems with this product (missing or damaged parts, assembly issues, etc.), PLEASE DO NOT RETURN TO THE RETAILER/STORE from where you purchased the
Hanover Outdoor Furniture IMPORTANT If you have any problems with this product (missing or damaged parts, assembly issues, etc.), PLEASE DO NOT RETURN TO THE RETAILER/STORE from where you purchased the
ASSEMBLY INSTRUCTIONS
 ASSEMBLY INSTRUCTIONS Installer: Leave these instructions with consumer. Consumer: Keep these instructions for future reference. WARNING: If the information in this manual is not followed exactly, a fire
Hanover Outdoor Furniture IMPORTANT. If you have any problems with this product (missing or damaged parts, assembly issues, etc.),
,") Hanover Outdoor Furniture IMPORTANT If you have any problems with this product (missing or damaged parts, assembly issues, etc.), PLEASE DO NOT RETURN TO THE RETAILER/STORE from where you purchased the
Hanover Outdoor Furniture IMPORTANT If you have any problems with this product (missing or damaged parts, assembly issues, etc.), PLEASE DO NOT RETURN TO THE RETAILER/STORE from where you purchased the
TECHNICAL MANUAL TM... Fryer, Deep-Fat, Electric w/solid State Controls 440 Volt, 60 HZ, 3 Phase NSN:
 TM... TECHNICAL MANUAL MODEL USN-50 DESCRIPTION Fryer, Deep-Fat, Electric w/solid State Controls 440 Volt, 60 HZ, 3 Phase NSN: Commercial & Marine Cooking Equipment Gas & Electric Last Updated September
Read this manual carefully before installing and using the appliance. This will ensure optimum results and maximum safety.
 GB Read this manual carefully before installing and using the appliance. This will ensure optimum results and maximum safety. DESCRIPTION (see drawing on cover) A. Lid B. Viewing window (not all models)
INSTRUCTIONS FOR USE. Deep Fryer. Model : EW-3K043 Voltage: 120V~60Hz Wattage: 1600W
 INSTRUCTIONS FOR USE Deep Fryer Model : EW-3K043 Voltage: 120V~60Hz Wattage: 1600W THIS PRODUCT IS ONLY FOR HOUSEHOLD USE ONLY. READ AND SAVE THESE SAFETY INSTRUCTIONS BEFORE USE IMPORTANT SAFEGUARDS When
southbend A MIDDLEBY COMPANY INSTALLATION AND OPERATION MANUAL CG214 (E) CG314 (E) CG414 (E) CG220 (E) CG320 (E) CG325 (E) GAS BOILERS MODELS:
 CG314 (E) CG414 (E) CG220 (E) CG320 (E) CG325 (E) GAS BOILERS MODELS:") INSTALLATION AND OPERATION MANUAL GAS BOILERS MODELS: CG214 (E) CG314 (E) CG414 (E) CG220 (E) CG320 (E) CG325 (E) southbend A MIDDLEBY COMPANY 1100 Old Honeycutt Road Fuquay-Varina, NC 27526 (919) 552-9161
INSTALLATION AND OPERATION MANUAL GAS BOILERS MODELS: CG214 (E) CG314 (E) CG414 (E) CG220 (E) CG320 (E) CG325 (E) southbend A MIDDLEBY COMPANY 1100 Old Honeycutt Road Fuquay-Varina, NC 27526 (919) 552-9161
Filtration. General Instructions
 Filtration General Instructions Ultrafryer Systems 302 Spencer Lane P.O. Box 5369 San Antonio, TX 78201 Local: (210) 731-5000 Toll-Free: (800) 525-8130 Fax: (210) 731-5099 Web: www.ultrafryer.com 30A181-Jul2007
V SERIES HDR GAS RANGES
 SERVICE MANUAL ONE POWERFUL PACKAGE V SERIES HDR GAS RANGES TOPS Open Top Hot Top Griddle Top Work Surface BASES Standard Oven Convection Oven Cabinet Base - NOTICE - This manual is prepared for use by
Installation and Operation Manual Covering Model 40S, 40C, 40D with Millivolt Gas Valve
 IMPORTANT FOR FUTURE REFERENCE Please complete this information and retain this manual for the life of the equipment: Model #: Serial #: Date Purchased: ENGLISH Installation and Operation Manual Covering
Installation / Assembly
 Cabinet Cut-out Dimensions...4 Gas Requirements and Connection...5 Leak Testing Procedure....6 LP Gas...7 Natural Gas...9 Installing Side Burner with a Grill...10 Save these instructions! Copyright 2009-2010
Installation Instructions Dual Fuel Ranges
 Installation Instructions Dual Fuel Ranges E30DF74EPS E36DF76EPS E48DF76EPS 5995447082 2 Safety IMPORTANT SAFETY INSTRUCTIONS Safety Precautions Do not attempt to install or operate your unit until you
User Manual. 3.5L Deep Fryer Stainless Steel Model Number: MDF35S READ AND SAVE THESE INSTRUCTIONS
 User Manual 3.5L Deep Fryer Stainless Steel Model Number: MDF35S READ AND SAVE THESE INSTRUCTIONS IMPORTANT Read and follow the instructions in this user manual even if you feel you are familiar with the
718LFG, 724FG, & 734FG
 Open Kettle Gas Fryer 718LFG, 724FG, & 734FG Operator s Manual Belshaw Adamatic Bakery Group 814 44 Tth Street NW, Suite 103 Auburn, WA 98001 USA Phone: 800 578-2547 (Toll free USA/.Canada) (+1) 253-886-5340
Owner s Information Manual
 48ES---A and 48VL---A Comfort and Performance 13 and 14 SEER Single Packaged Air Conditioner and Gas Furnace System With Puron (R---410A) Refrigerant Single and Three Phase 2---5 Nominal Tons (Sizes 24---60)
Operating Instructions for the KM 410 Electric Grill
 Operating Instructions for the KM 410 Electric Grill To prevent accidents and machine damage, ]ö read the Operating Manual before installation or use. M.-Nr. 05 060 910 Contents Contents Description of
R-RCM & R-RSB SERIES
 R-RCM & R-RSB SERIES CHEESEMELTER & SALAMANDER BROILERS INSTALLATION - OPERATION - MAINTENANCE CHEESEMELTERS R-RCM-24 R-RCM-36 R-RCM-48 R-RCM-60 SALAMANDERS R-RSB-24 R-RSB-36 R-RSB-48 Telephone: (802)
RCM-77. Instruction Manual. G-Series Cooler. Manual is for the following model: RCM-77-N23EB. U.S. Patent No. 8,215,125 RECHARGEABLE COLD MERCHANDISER
 G-Series Cooler RCM-77 RECHARGEABLE COLD MERCHANDISER Manual is for the following model: RCM-77-N23EB U.S. Patent No. 8,215,125 Instruction Manual Manual is for the following model: RCM-77-N23EB Instruction
USE AND CARE GUIDE PEDESTAL FIREBOWL
 DANGER If you smell gas: 1. Shut off gas to the appliance. 2. Extinguish any open flame. 3. If odor continues, keep away from the appliance and immediately call your gas supplier or fire department. WARNING
GAS COOKTOP INSTALLATION INSTRUCTIONS BEFORE YOU BEGIN. IMPORTANT Save these instructions for local electrical inspector s use.
 GAS COOKTOP INSTALLATION INSTRUCTIONS Please read this guide thoroughly before installation. To contact LG Electronics, 24 hours a day, 7 days a week: 1-800-243-0000 (U.S.A.) 1-888-542-2623 (Canada) Or
OPERATION, SERVICE & PARTS MANUAL
 OPERATION, SERVICE & PARTS MANUAL BROASTER 620NXP & 621 EASY BREADER Be sure ALL installers read, understand, and have access to this manual at all times. MODEL 620NXP MODEL 621 Genuine Broaster Chicken,
DIGITAL DOUBLE DEEP FRYER
 DIGITAL DOUBLE DEEP FRYER Customer Service: 1-800-423-4248 Printed in China Digital Double Deep Fryer ITEM NO.8387SI. The Sharper Image name and logo are registered trademarks. Manufactured and Marketed
User Manual. 3.5L Deep Fryer Stainless Steel Model Number: MDF35
 User Manual 3.5L Deep Fryer Stainless Steel Model Number: MDF35 READ AND SAVE THESE INSTRUCTIONS IMPORTANT Read and follow the instructions in this user manual even if you feel you are familiar with the
TERRACE AND PATIO HEATER
 TERRACE AND PATIO HEATER USER INSTALLATION AND OPERATION GUIDE INDEX General and specifications.11 Security and caution.. 12, 13 Tools and accessories required 13 Assembly instructions 14,15 & 16 Verifying
INSTALLATION MANUAL. Double Electric Wall Oven
 INSTALLATION MANUAL Double Electric Wall Oven 799258 BLUESTAR INSTALLATION INSTRUCTIONS FOR THE RESIDENTIAL ALL ELECTRIC WALL OVEN FOR THE HOME MODELS DEWO THIS APPLIANCE WAS DESIGNED FOR EASE OF INSTALLATION
Portable Dehumidifier
 Portable Dehumidifier OPERATING INSTRUCTIONS HMT-D30-A Model Numbers: HMT-D30-A HMT-D45E-A HMT-D70E-A HMT-D45E-A HMT-D70E-A 3058080 V.161115 PURCHASE INFORMATION Thank you for choosing a Soleus Air Portable
OPERATION, SERVICE & PARTS MANUAL
 OPERATION, SERVICE & PARTS MANUAL BROASTER 620N & 621 EASY BREADER Be sure ALL installers read, understand, and have access to this manual at all times. MODEL 620N MODEL 621 Genuine Broaster Chicken, Broasted,
Fig. 1 - Unit PGD4, PGS4, WPG4
 OWNER S MANUAL 14 SEER Single -Package Air Conditioner and Gas Furnace System with R -410A Refrigerant Single Phase 2 to 5 Nominal Tons Three Phase 3 to 5 Nominal Tons PGD4andPGS4SeriesE,WPG4SeriesB Fig.
Fryer. Instructions for Use
 Fryer Instructions for Use Fryer TABLE OF CONTENTS Important Safeguards................................... 3 Introduction........................................... 4 Descriptive Diagram/Reset Function........................
L&C Deep Fryer INSTRUCTION MANUAL MODEL:
 L&C Deep Fryer INSTRUCTION MANUAL MODEL: IMPORTANT SAFEGUARDS.... 1 Part Name... 3 To Use... 4 General Frying Advice... 7 Cleaning and Maintenance... 9 The Reset Feature... 10 Troubleshooting... 11 Technical
Operations & Service Manual
 Operations & Service Manual KD-GAL FRYER Model KD-GAL-45-C KD-GAL-75-C PO Box 160 170 Commerce Drive Holts Summit, MO 65043 USA www.kitdel.com COV1 Email: KitDel@PFSbrands.com Toll Free 855.632.3373 Fax
MODELS LRO-1 and LRO-2 Roll-in Rack Ovens
 A MODELS LRO-1 and LRO-2 Roll-in Rack Ovens Operator s Manual REV 06/2011 THIS MANUAL MUST BE RETAINED FOR FUTURE REFERENCE. READ, UNDERSTAND AND FOLLOW THE INSTRUCTIONS AND S CONTAINED IN THIS MANUAL.
Operator Manual Countertop Pizza Oven
 Operator Manual Countertop Pizza Oven PO18, PO18-220, PO22 Model PO-18 Table of Contents Safety Information...2 Specifications...3 Unpacking...4 Installation...4 Operation...4 Cleaning and Maintenance...5
Failure to follow these instructions could result in fire or explosion which could cause property damage, personal injury or death.
 Failure to follow these instructions could result in fire or explosion which could cause property damage, personal injury or death. For use with outdoor LP gas appliances ONLY! Not recommended for use
Instruction Manual for the APOLLO Gas Countertop Griddle Models: Manually Controlled: AMG-24, AMG-36, AMG-48 & AMG-60
 Instruction Manual for the APOLLO Gas Countertop Griddle Models: Manually Controlled: AMG-24, AMG-36, AMG-48 & AMG-60 For Service on Your Gas Griddle: Please call the APOLLO Service Department and ask
Installation and Operation Manual Covering Model 35C+, 45C+ with Millivolt Gas Valve
 IMPORTANT FOR FUTURE REFERENCE Please complete this information and retain this manual for the life of the equipment: Model #: Serial #: Date Purchased: ENGLISH Installation and Operation Manual Covering
TERRACE AND PATIO HEATER
 TERRACE AND PATIO HEATER USER INSTALLATION AND OPERATION GUIDE INDEX General and specifications.1,2 Security and caution.. 3 Tools and accessories required 5 Assembly instructions 5-7 Operation (Lighting
Operations & Service Manual
 Operations & Service Manual GGF SERIES GGF-400, GGF-720 Models: GGF-400 GGF-720 Giles Enterprises, Inc. An ISO-9001 Registered Company 2750 Gunter Park Drive West Montgomery, AL 36109 USA Phone: 334.272.1457
Owner s Manual. FMI BRANDS INC Avenue Surrey, B.C. Canada V3Z 3V7 Toll Free Fax Model number FMPPC2F
 Owner s Manual Model number FMPPC2F Series number 863 2017 FMI Brands Inc. Patent Pending D.863.000.V3 FMI BRANDS INC. 107 19052 26 Avenue Surrey, B.C. Canada V3Z 3V7 Toll Free 1-888-514-1663 Fax 1-888-797-9931
2 Liter Deep Fryer. OWNER S MANUAL Model F V., 60Hz., 1500 Watts
 OWNER S MANUAL Model F1052 120V., 60Hz., 1500 Watts 2 Liter Deep Fryer EURO-PRO Operating LLC U.S.: 94 Main Mill Street, Door 16 Canada: 4400 Bois-Franc Plattsburgh, NY 12901 St-Laurent, QC H4S 1A7 Tel.:
2 Finding Information
 2 Finding Information PLEASE READ AND SAVE THIS GUIDE Attach your sales receipt to this page for future reference. Thank you for choosing Electrolux, the new premium brand in home appliances. This Use
Dashley Outdoor Fire Table
 Dashley Outdoor Fire Table MODEL N0. 085-557-8 L-FT047PST-F ASSEMBLY INSTRUCTIONS Toll-free 888 670-6684 IMPORTANT: Please read this manual carefully before beginning assembly of this product. Keep this
Stoneridge Fire Pit High Dining Table Assembly Instruction
 Stoneridge Fire Pit High Dining Table Assembly Instruction Item# L-DN1773SST-D-T WARNING: For Outdoor Use Only. DANGER If you smell gas: 1. Shut off gas to the appliance. 2. Extinguish any open flame.
Operator s Manual CAYENNE GAS COUNTERTOP CHAR BROILER ENGLISH
 NGLISH CAYNN GAS COUNTRTOP CHAR BROILR Thank you for purchasing this Vollrath Counter Top Cooking quipment. Before operating the equipment, read and familiarize yourself with the following operating and
HMT-D30-A HMT-D45E-A HMT-D70E-A. Model Numbers: HMT-D30-A HMT-D45E-A HMT-D70E-A. Portable Dehumidifier Operating Instructions V.
 HMT-D30-A HMT-D45E-A HMT-D70E-A Model Numbers: HMT-D30-A HMT-D45E-A HMT-D70E-A Portable Dehumidifier Operating Instructions 3058080 V.151201 General Dehumidifier Information RECOMMENDED HUMIDITY LEVELS
Upholstery and Drapery Cleaner. Operator and Parts Manual. Model No.: gal Extractor. MNL32506 Rev. 00 (08-98)
") 32506 Upholstery and Drapery Cleaner Model No.: 32506 3 gal Extractor Operator and Parts Manual KLEENRITE 1122 MAPLE STREET MADERA CA 93637 U.S.A. FAX: 1-559-673-5725 CUSTOMER SERVICE: 1-800-241-4865 MNL32506
32506 Upholstery and Drapery Cleaner Model No.: 32506 3 gal Extractor Operator and Parts Manual KLEENRITE 1122 MAPLE STREET MADERA CA 93637 U.S.A. FAX: 1-559-673-5725 CUSTOMER SERVICE: 1-800-241-4865 MNL32506
Operating instructions
 Operating instructions Gas condensing boiler WARNING: If the information in this manual is not followed exactly, a fire or explosion may result causing property damage, personal injury or loss of life.
OPERATIONS MAINTENANCE MANUAL
 OPERATIONS MAINTENANCE MANUAL COOK & HOLD OVEN SYSTEMS WITTCO MODEL NUMBERS 1300-AD-SS 1300-AD-SS-SPLIT LIMITED WARRANTY Wittco warrants the Products that it manufactures to be free from defects in materials