Installation Manual for the Manual Control Aquassure Bathtub For Models:
|
|
|
- Phillip Boyd
- 5 years ago
- Views:
Transcription
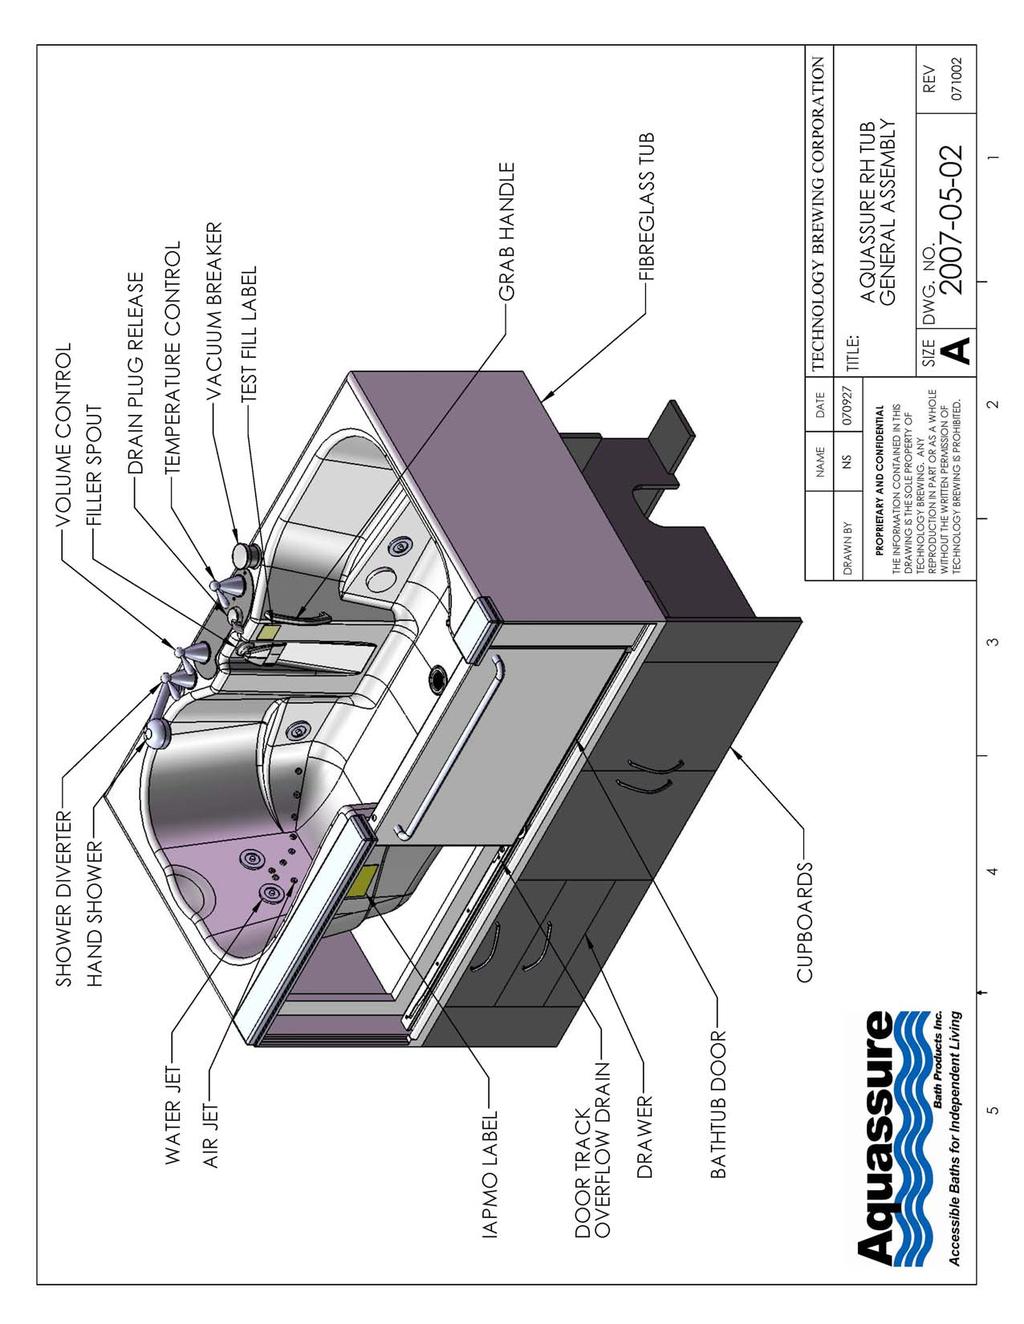
1 Installation Manual for the Manual Control Aquassure Bathtub For Models: MRC MRCA MRCW MRCAW MLC MLCA MLCW MLCAW MRBN MRBNA MRBNW MRBNAW MLBN MLBNA MLBNW MLBNAW REV
2 Introduction Aquassure products are designed for safety and ease of use. We have endeavored to make installation and maintenance of our products as simple as possible. If you have any comments or suggestions that can help us improve our bathtubs or installation procedures, please let us know. Installation questions and comments can be directed to or call toll free: TUBS (8827). 2
3 Table of Contents Responsibility of the Installer... 4 Important Safety Instructions... 5 Parts List Cabinet Base Hardware... 6 Cabinet Base...7 Drain Parts... 8 Bathtub & Fixtures... 9 Water Pump (optional) Air Pump (optional) Trim...10 Specifications Sizes and Clearances Bathtub and Base Dimensions...12 Overall Dimensions...13 Installation Area Preparation...14 Cabinet Base: Frame...15 Cabinet Doors and Door Trim...18 Overflow and Main Drain Setup...21 Hot/Cold Water Supply Metal Trim Strip Grab Bar Installation Tile Trim (optional) Whirlpool Water Jet System (optional) Air Massage System (optional) Pump Access Operating Instructions Maintenance and Cleaning Warranty Warranty Limitations Complete Bathtub Assembly
4 RESPONSIBILITY OF THE INSTALLER The installer must inspect and water test the product prior to installation to ensure the unit is free of defect or damage. In the event of a problem, this unit must not be installed. If the crate or product has been damaged, please call immediately This product complies with many nationally recognized standards. You are responsible for any local codes that may apply. This product is designed to be installed by a licensed tradesperson. Licensed plumbers and electricians should be used to ensure proper installation. Installers assume all liability for the correct installation procedures. Licensed tradespersons may call for installation questions. USE ONLY MANUFACTURER AUTHORIZED ACCESSORIES WITH THIS PRODUCT. DO NOT LIFT THE BATHTUB BY THE PLUMBING FIXTURES OR BY THE DOOR OR TOP FRONT EDGE ABOVE THE DOOR. Doing so can result in personal injury or damage and leaks for which the installer is responsible. Remove all packing material before installing. Take care not to scratch or damage the tub surface when handling. TEST YOUR AQUASSURE BATHTUB BEFORE INSTALLATION. All Aquassure bathtubs are 100% water tested at the factory. However, transportation and poor handling may cause leaks. It is necessary to test the bathtub for leaks before installing to prevent water damage. To test for water leaks, place the unit outside on a flat surface where it may be drained after testing and fill with a garden hose. Seal the drain (tape can be used for the test). Fill the bathtub above the jets or to at least 14. Let the water stand in the tub for 10 minutes and then inspect all plumbing and seals for leaks. Using an extension cord, operate each pump (air and hydro system, if applicable) for 10 minutes and inspect for leaks. Inspect the unions around the pump; if leaks persist from the unions after tightening, loosen the unions and ensure that the O-ring is seated properly. Ensure all jets are open and working. If there are leaks, call for further instructions. Often leaks can be fixed with Locktite. If the pumps do not operate: check the breaker to make sure the power is on and that the cable connecting the controls to the pump is attached. Also make sure that there is sufficient water in the pump the water pump will not operate without sufficient water. Damage to the pumps due to dry running is not covered under warranty. FAILURE TO PERFORM THESE TESTS BEFORE INSTALLATION WILL MAKE THE INSTALLER LIABLE FOR FU- TURE REPAIR COSTS. 4
5 Important Safety Instructions READ, FOLLOW AND SAVE THESE INSTRUCTIONS Read the entire manual and safety instructions before operating your Aquassure Bathtub. 1. DANGER: RISK of FIRE, ELECTRIC SHOCK OR INJURY TO PERSONS. When using this product basic precautions should always be followed. Use this unit only for its intended purposes or as described in this manual. 2. DANGER: RISK of ACCIDENTAL DROWNING: Exercise extreme caution when children or people in poor health are using the spa. To avoid accidents or risk of drowning, ensure children or frail adults do not use this bathtub without direct and close supervision at all times by an adult. 3. DANGER: RISK of INJURY: to avoid injury, exercise care when entering or exiting the Aquassure bathtub. 4. DANGER: RISK of ELECTRIC SHOCK: If a jetted option is purchased, this unit must be connected to a circuit interrupter (GFCI). All pumps and heaters must be connected to GFCI protected outlets. Such a circuit is provided by your installer and should be tested on a routine basis. To test the GFCI, push the test button; the GFCI should interrupt power. To restore power, push the reset button. If the GFCI fails to operate in this manner, there is a ground current flowing, indicating the possibility of electric shock. Do not use the bathtub. Disconnect the bathtub and have the problem corrected by a qualified electrician before using. 5. DANGER: RISK of INJURY: the suction fittings included in this bathtub are designed to match the water flow of the pump. To ensure safety and compatible flow rates, install the same model suction fitting for pump, in the event a replacement is required. Do not remove the suction grate. (jetted systems only) 6. DANGER: RISK of INJURY: Never operate the bathtub if the suction fittings are broken or missing. (jetted systems only) 7. DANGER: RISK of ELECTRIC SHOCK: Never operate any electrical appliances from inside the bathtub or if you are wet. Do not permit any electrical appliance, such as hair dryer, light, radio, telephone or television within 5 ft (1.5 m) of the bathtub. 8. WARNING: RISK of INJURY: Water temperatures between 100 degrees F (38 degrees C) and 104 degrees F (40 degrees C) are considered safe for a healthy adult. Your bathtub is equipped with a thermostatic valve to easily regulate the water temperature. a. Lower water temperatures are recommended for young children, those with poor circulation and heart conditions and when the spa use exceeds 10 minutes. Never allow the water temperatures to exceed 104 degrees F (40 degrees C). b. Pregnant women should not set the water temperature above 100 degrees F (38 degrees C). High temperatures above 100 degrees F (38 degrees C) have the potential to cause fetal damage in the early stages of pregnancy. c. Individual tolerance of water temperature can vary and regulating devices may not reflect the proper temperature. Adjust the water temperature accordingly when filling the bathtub. d. The use of alcohol, drugs, or medication before or during bathtub use may lead to unconsciousness with the possibility of drowning and is strictly prohibited. e. Those people with a history of heart disease, low or high blood pressure, circulatory system problems, diabetes, or obesity should consult a physician about the maximum water temperature and length of time soaking in bathtub that they should use. f. Do not use the bathtub immediately after any strenuous exercise. g. WARNING: RISK of INJURY: Hyperthermia: Hyperthermia occurs when the internal temperature of the body reaches a level several degress above the normal body temperature of 98.6 degrees F or 37 degrees C. Symptoms include dizziness, fainting, drowsiness, lethargy, increase in internal body temperature. If you experience any of these symptoms while using the bathtub, consult a physician immediately. This is most often the result of staying in the bathtub longer than the recommended time and at a higher temperature than recommended. h. WARNING: RISK of ELECTRIC SHOCK: Only service the bathtub jet system if the circuit breaker and/or power to the bathtub are off. WARNING: RISK of INJURY: Frail elderly persons, and those with poor health or a history of stroke, heart conditions, weakness, fainting, high or low blood pressure or circulatory problems should not use the bathtub alone. They should be accompanied by a healthy adult who can assist if there is a medical need. 5


6 Parts List: Cabinet Base Hardware Angle Bracket Screws X 24 Euro Screws X 28 Magnetic Catches X 6 Angle Brackets X 12 Euro Hinge Base X 4 Euro Hinge X 4 Right X 2 Left X 2 Drawer Sliders X 4 Front View Side View Plastic U-Channel X 4 R L Cabinet Handles (optional) X 4 Drawer Front Brackets x 4 (2 Right, 2 Left) 6
7 Parts List: Cabinet Base Drawer Front Drawer Front Spacer Spacer Cabinet Doors Left & Right Spacer Cabinet Base Front Pieces Drawer X 2 Vertical Gable X 4 Horizontal Stringers x 3 General overview of how cabinet parts fit together. 7
 D.")


8 Parts List: Drain Parts A B C D E G E F A. Drain Lever Handle B. Waste overflow drain C. ABS Long Pipe Section (X2) D. Primary Tub Drain and Lever Control Base with Cable E. Sanitary Tees (X2) F. Medium ABS Pipe Section G. Short ABS Pipe Section H. Back flow Check Valve I. ABS Adapter J. Door track Overflow Drain K. Chrome 90 degree Elbow 1 1/4 K J I G H C Step One Assembly Step Two Assembly Step Three Assembly Final Drain Assembly on Installed Tub Picture of assembled drain system for reference. 8
 Volume Control Shower Wand ** Vacuum Breaker Shower Diverter Factory Installed")

9 Parts List: Bathtub and Fixtures Temperature Control Drain Control Filler (waste overflow drain is behind filler) Volume Control Shower Wand ** Vacuum Breaker Shower Diverter Factory Installed Fixture Assembly (above) ** Note: Shower Wand will ship unattached to prevent shipping damage. Fibreglass Bathtub, with Factory Installed Door (above shows just the shell and door on a left-hand model bathtub) 9

 Connector Hose (Factory")
 Parts List:")
10 Parts List: Water Pump System Factory Installed Water Jets (Three directional side jets & Four rotating back and foot jets.) 1 Syllent Water Pump NEMA on-off module (partially factory installed) Top Side Air Volume Controller (factory installed) Connector Hose (Factory installed) Parts List: Air Pump System 20 Factory Installed Heated Air Jets 14 back jets and 6 foot jets On-off switch (factory installed) Parts List: Trim 5 strip of chrome trim 10
11 Parts List: Specifications Whirlpool Water Jet System Syllent Pump: 3/4 Horsepower 115 volts 60 Hz Current 8.2A Pressure (ft) 48.8 Max Flow (at 15 ft) 77 gpm 7 Water Jets: 2 rotating massage jets on back, 2 rotating massage jets at feet, 3 directional jets on tub sides Dry jet system drains all but 0.2 oz of water per jet Heated Air Massage System Max Air Pump 1 Horsepower 110 Volts 500 Watt motor 105 CFM (Air Flow) 95 Sealed pressure (inches of water) Field Pressure: 95 of Water Heater 250 Watts 7 Amp System 20 Pin Valve Air Jets no retained water Tempress Valve Concealed thermostat mixing valve Integral service stops and check valves Thermostatic cartridge automatically compensates for fluctuations in inlet pressure and temperature Cartridge restricts hot water supply should the cold supply pressure fall to prevent scalding Operating Pressure: minimum 20 psi (140 kpa), maximum 125 psi (860 kpa), recommended psi ( kpa); Maximum test pressure 500 psi (3450 kpa) Max hot water temperature 180 degrees F/ 80 degrees C Connections: hot and cold water inlets 3/4" female NPT (factory installed), outlets 3/4" f NPT (factory installed) Stop Ring: factory set with 45 psi (310 kpa) inlet pressure and using 60 degree F (16 degree C) cold water and 140 degree F (60 degree C) hot water. This setting limits the outlet water temperature to 120 degrees F (49 degrees C) and limits rotation of the cartridge stem, which could damage the cartridge. In this position the ring will point up when the valve is adjusted to 100 degrees F (38 degrees C). 11

12 Sizes and Clearances: Bathtub Dimensions 35 1/4 Tub shell (side view) Drain system 38 1/4 Cutouts to run drain lines to facility/household drain lines. Overall outside dimensions 12
13
14 Installation Preparation Before installing the cabinet and tub assembly: Remove the existing tub. Make sure the opening for the tub is 60 across, by high. You will need clearance for the tub, plus a bit of extra height so that you have room to maneuver the tub into the enclosure. If your space is too narrow (i.e. under 60 ), you may need to remove the drywall in the enclosure up to the If required, the wall studs at one or both ends of the tub can often be cut and turned 90 degrees to increase the available length to accommodate a 60 bathtub. Please ensure that you do not cut the studs to a load-bearing wall. Hot and cold water supply: It is recommended that on/off valves be attached to the hot and cold supply lines for safety and maintenance. The hot and cold supply lines will need to have male 3/4 pipe thread ends (MIP). The tub will connect to these with a pair of 3/4 flexible hoses with 3/4 female hex ends. These flexible supply hoses come pre-installed on the Aquassure bathtub. They are attached to the thermostatic valve. (The 3/4: valves and plumbing allow for up to 2 1/4 times the water flow of standard fixtures. Standard 1/2 supply lines to the tub are not restricted by back pressure and can also deliver improved flow.) Ensure the floor of the installation area is clean and level with the surrounding floor area. The cabinet base is open to the floor at the bottom, so a finished floor is preferred. Use a 5 foot level and determine if the floor is level. If the floor is not level, shims within the U-channels must be used. Note: it is important that all 4 gables must be completely touching the bottom of the u-channels and be completely level for the door system and cabinet doors and drawers to look and work properly. The cabinet base includes cutouts and clearances for easy retrofits. If the original tub has a drain at one end, the drain lines from the Aquassure tub can pass through the clearances and cutouts to connect with the original drain and P trap in the floor. For a new installation, the floor drain connections can be directly beneath the Aquassure tub drain. All plumbing should fit within the tub shell and cabinet eliminating the need to cut access clearance in the floor or walls. If you have purchased a jetted tub system you will need to have a certified electrician install a power supply for the pump(s). Depending on the code in your area, the pumps may be hard wired or a standard 120 volt GFI plug (built in circuit breaker) may be used. The air and water pumps may require separate circuits. Before installing the bathtub, ensure that the proper electrical service has been installed in the proper location by a certified electrician. Be sure that hot/cold cutoffs or electrical connections are installed where they can be easily accessed underneath the tub assembly. (see diagrams page 25) If you are installing a heat lamp/fan, have the electrician run power to this at the same time. Once the tub is in place, verify that he tub is completely level by checking the deck surface with a 5 foot level. After installation: After plumbing and electrical connections have been made the tub should be cleaned of dirt and debris. Pay special attention to cleaning the door track. Debris in the door track can cause the wheels to squeak or stick. Debris near the air pump intake may cause injury to the bather or damage the air pump system. Installation is not complete until the bath has been water tested in place. 14


15 Installation: Cabinet Base Frame Step 1: Attach hinge brackets and drawer sliders to the vertical gables. Right Side Left Side Hinge Base Screw Holes Drawer Slider Euro Screw Holes Front Back Step 2: Slide U-channels onto bottom of vertical gables. Optionally, a bead of silicone sealant can be run inside the U- channels before attaching to the gables as an additional adhesive and moisture sealant. See page 16 for Hardware locations. 15
16 Installation: Cabinet Base Frame Step 3: Place the first stringer down at the back of the alcove in the orientation shown. Place the bottom rear horizontal stringer at its final location and anchor to the floor or place against a wall as a backstop for assembly. Slide the vertical gables with U-channels into the slots on the bottom stringer. The rear top stringer can be slid into the top slots of the vertical gables to stabilize the top of the cabinet frame. For Left Side Door on tub: Gable 1: attach hinge brackets to Right side Gable 2: no parts added Gable 3: attach hinge bases to Left side, drawers slides to Right side Gable 4: attach hinge bases to Left side For Right Side Door on tub: Gable 1: attach drawer slides to Right side Gable 2: attach drawer slides to Left side, hinge bases to Right side Gable 3: no parts added Gable 4: attach hinge bases to Left side 16

.")

 This spaces the vertical gables evenly so that the U- channels can be anchored to the floor")


17 Installation: Cabinet Base Frame Note that plumbing cutouts on the horizontal stringers are lined up. For a right-sided door bathtub, this would be reversed. Note the location of the plumbing cutout next to the gable notch. Layout of cabinet base frame for a left-sided door bathtub (above). Note that plumbing cutouts on the horizontal stringers are lined up. For a right-sided door bathtub, this would be reversed. Step 4: Take the final stringer and slide it over the front of the vertical gables at the bottom of the cabinet to stabilize them. (This is not the final installation location of the stringer.) This spaces the vertical gables evenly so that the U- channels can be anchored to the floor using adhesives, screws or nails. The last stringer can then be slotted onto the top front of the cabinet base. Angle Bracket Locations Note: The cabinet shown in this diagram is set up for a left side door. Step 5: Make sure the vertical gables are located properly and have all hardware attached for cabinet drawers and fronts. Angle brackets should be screwed to the bottom stringer and vertical gables and the top rear stringer. 17


18 Cabinet Doors and Door Trim Step 1: The euro hinges should be attached to the cabinet doors. Slide the round base of the hinge into the round cutout on the door. Line up the holes in the door with the holes on the hinge base. Fold the cover plate down. This will lock the hinge base onto the cabinet door. Step 2: To attach the cabinet doors to the base frame: Slide the door end of the hinge over the hinge base on the cabinet so that it hooks on the front of the hinge base. The back end of the hinge should be pressed down until it clicks onto the back of the hinge base. To remove the cabinet doors, pull the hinge release catch on the back of the hinge body. 18


19 Cabinet Doors and Door Trim Step 3: The drawer fronts are pre-drilled for the drawer brackets which are labeled L and R for the left and right side of the drawer. Attach the brackets using the euro screws. The drawer front can now be attached to the drawer body. Loosen the brackets by backing off the centre screw on the side. Adjust door front height with the lower adjusting screw before tightening the centre screw to lock the front onto the drawer. L R Centre Lock Screw Height Adjustment Screw Step 4: The left, right, and under drawer spacer panels can be attached with angle brackets (included) or magnetic clips for future access. Magnetic clips are recommended. 19
20 Cabinet Doors and Door Trim Once the tub base and doors have been assembled, the end spacers can be permanently attached using the angle brackets supplied or they can be attached using magnetic clips so they can be removed for future access. The cabinet doors should be temporarily removed at this stage so that the tub and drains can be installed on top of the cabinet. Pictured above is the cabinet assembled for a right hand door model. The drawers and cupboards would be reversed for a left hand door model. 20


21 Overflow and Main Drain Setup. The overflow drain system is installed on the bathtub in three stages. (see page 8 for drain part list) Stage 1: The tub waste overflow is connected to the primary drain using the vertical drain assembly. The tub can now be placed on top of the cabinet base. C ABS Long Pipe Section E Sanitary Tee C ABS Long Pipe Section Stage 2: Place the tub on top of the cabinet base frame. The secondary door track overflow drain can now be connected to the chrome 90 degree elbow. Slide the tub forward on the cabinet base or lift the front edge from the bottom; DO NOT lift the front top edge of the tub. This may result in damage to the front track and shell covers. The chrome elbow pipe can be threaded onto the bottom of the door track overflow drain. Attach the chrome to ABS pipe adapter to the end of the chrome elbow. K Chrome 90 degree Elbow I ABS Adapter 21


22 Overflow and Main Drain Setup Stage 3: Move the tub back onto the cabinet base so that it is in its installation position. The drain adapter, check valve and ABS pipe can be connected to the TEE and primary drain system. H Backflow check valve G Short ABS Pipe Section D Sanitary Tee C ABS Long Pipe Section G Short ABS Section K Chrome 90 degree Elbow Stage 4: The bath drain system can now be connected to the home drain and P trap. The cabinet base has cutouts to allow the drain to connect to preexisting drain lines beneath the tub at either end. We suggest that you include a cleanout in the drain line for future maintenance. Stage 5: The hot and cold water supply lines can now be connected to the home water supply. The home water supply lines should be fitted with 3/4 mail (MIP) ends. The flexible supply lines factory assembled on the thermostatic valve can be threaded onto these ends. Please ensure that the drain system is fully connected before the water is turned on. 22

23 Metal Trim Strip After the cabinet doors are on, the final step is to use a thin strip of silicone glue to attach the metal trim strip to the bottom edge of the bathtub. Secure with masking tape until the glue dries. Grab Bar Installations If this bathtub is being installed in a private residence or will be installed in a bathing facility for a single occupant accessed only through a private office and not for common use or public use, then grab bars are not required to be installed. However, reinforcement will need to be installed in walls and located so as to permit the installation of grab bars complying with Section of the ANSI A Standard. The reinforcement should comply with Section of ANSI A Standard. Reinforcement should be added to the entire wall enclosure area 9 inches (230 mm) above the rim of the bathtub horizontally to permit future installation of grab bars, if needed. Reinforcement should also be added to the wall by the door to facilitate installation of a vertical grab bar. This reinforcement should be 18 (455 mm) minimum in length and be positioned 12 to 15 above the rim of the bathtub, and no more than 4 from the front of the bathtub. Reinforcement should withstand stress of up to 250 pounds. If this bathtub is to be installed in a facility for public or common use, grab bars will need to be installed as per ICC/ANSI A section Bathtubs without Permanent Seats. Tile Trim (optional) If the tub is installed against a wall or in an alcove, tile flange can be attached to the tub using silicone caulking adhesive. Tile flange is available at most hardware stores. 23 If the tub is installed in a drop-in style (has a shelf around the back and sides of the tub), then we suggest that the shelf extends at least 1/2 underneath the tub rim. This edge can now be siliconed or tiled and grouted.
. Depending on local building code; the electrical connections may require hardwiring into the circuit.")
24 Heated Air Massage System For tubs installed with the 20 jet heated air massage system: The air massage system is controlled by an on/off air switch, located on the door side at the back end of the tub. Electricity must be supplied by a grounded circuit with a GFI ( ground fault interrupter). Depending on local building code; the electrical connections may require hardwiring into the circuit. The deck mounted on/off switch is connected to the blower motor by an air hose. Make sure that the air hose is connected to the deck switch and the free end can reach the blower motor location. Plug this hose into the blower when the blower is connected to the air massage jet system. The one way air inlet valve is located at the rear wall side of the tub, below the level of the tub floor. The inlet valve and hose hang vertically, with the valve at the bottom. Connect the 14 section of air hose to the bottom of the inlet valve. Attach the 90 degree elbow to the bottom end of the air hose. The air blower can be placed or bolted (recommended) on the floor at the back of the tub cabinet. The space behind the drawer location works well for this. The air blower outlet can then be connected to the 90 degree elbow using the remaining section of air hose. This section can either be glued to the elbow or attached with screws to allow future maintenance removal. The blower motor can then be connected to the electrical supply. Make sure that the immediate area surrounding the air blower is free of insulation, dust, and debris. Material can be sucked into the blower, causing potential bather injury and damage to the blower and air jets. All air blowers will automatically purge the water from the lines approx. 20 minutes after the unit is turned off. Do not be alarmed. Whirlpool Water Jet System The whirlpool system is controlled by an on/off air switch, located on the door side at the back end of the tub. Electricity must be supplied by a grounded circuit with a GFI ( ground fault interrupter). The NEMA on/off module is plugged into a GFI equipped outlet and the water pump electrical cord is plugged into this. The topside air button connects to the NEMA module with the supplied air hose. Depending on local building code; the electrical connections may require hardwiring into the circuit. The top side air volume controller located on the wall side of the back end of the tub is factory installed and connected. The water pump is equipped with a water lever sensor and should not be attempted to be operated dry. The water pump should not be plugged directly into the building s electricity supply. Pictured above is the NEMA on-off module for the Syllent Water Pump. This unit is plugged into the wall, the water pump (see pic at right) is plugged into this unit. 24
 Note location of water pump behind the access panel, behind the back area of the bathtub.")
 To remove door to access pump system: A slotted screwdriver is required for this.")
25 Pump and Fixture Access Water pump location Installation must provide access for servicing the air and/or water pump. All Aquassure bathtubs come with an access panel for the air and water pump. (see pictures above and removal instructions below) Note location of water pump behind the access panel, behind the back area of the bathtub. Suitable locations for the air pump include: on the floor behind the drawers or at the back of the cupboard area on the floor. Air pump should be secured to prevent loosening of connections and vibration noise. (also see diagram p.12) To remove door to access pump system: A slotted screwdriver is required for this. The bottom of the sliding door has an "L" shaped track guide. This is located at the lower inside corner at the foot end of the door. Line up the track guide with the slot cut into the inside edge of the bottom door track. The door should be nearly at its fully open position. The top of the door has a spring-loaded guide roller that moves in the top door track. Use a flat screwdriver to press down on the metal roller support, at the same time, gently pull the top edge of the door outward from the top track. Take care not to damage the top track cover in the process. If additional downward clearance is needed for the top guide roller; try rotating the scewdriver rather than levering the guide downwards. Once the top of the door is pulled clear, it can be lifted off the bottom track. The access panel behind the door can then be removed using the 2 top screws. To replace the door: line up the bottom track guide with the bottom track slot. Place the bottom door guide rollers in the track grooves. Press down on the top guide roller support and press inwards until the top guide roller pops back into the top track groove. Slide the door open and closed to make sure the guide rollers are back in the proper track grooves. 25
26 Operating Instructions 1. Pour a cup or two of warm, soapy water in the bottom of the bathtub to facilitate sliding in. 2. Sit down in the doorway, like in a chair. Slide back as if you are getting into bed. Your legs can slide in without any strain or bending. The handy grab bars help you move safely. 3. Close the door, make sure it is closed all the way. The automatic latch system will engage by dropping a pin into the door track. 4. Close the drain by rotating the drain control handle. 5. Check the temperature setting. 6. Rotate the volume control lever away from you (clockwise) to turn on the water. 7. Fill the bathtubs to at least 2 inches below the overflow before activating any air or water jets. 8. The pump for the air and/or water jets systems is operated by pressing the on-off control(s) at the door side, near the bather s shoulder. 9. The water jets at the sides of the tub are directional and the centre of the jet can be moved for greater comfort. 10. The water jet turbulence and pressure can be increased or decreased by turning up the water jet air control. Simply rotate the water air control clockwise or counter clockwise. This control is located by wall near the bathers shoulder. 11. The water jet pump will maintain the water temperature as the heat of the motor heats the water. The air jet pump is equipped with a heater, so the air used in the system is also heated so it does not cool down the water. 12. Do not use bubble bath while any pumps are operating. 13. Bath oils may be used; however their frequent use will require more frequent cleaning of the water jet system. 14. Both air and water jet systems are plumbed so water will drain from the plumbing after each use. 15. To turn on the shower wand, rotate the diverter handle counter-clockwise. The volume control must be turned on for the shower to operate. Be careful not to aim the shower wand outside the tub enclosure to avoid water damage to your bathroom. The shower wand has over 4 feet of hose for your convenience and to make washing the bathtub easy. The shower hose should never be wrapped around any body part to avoid injury or choking. 26
27 Maintenance and Cleaning DO NOT USE ABRASIVE CLEANERS as they will scratch and dull the surface of the fiberglass. DO NOT use wire brushes, metal scouring pads or other metal implements in the bathtub as this will damage the surface of the bathtub. To clean the water jet system: close the door, fill the bathtub with warm water, add 2 capfuls of Plumb Fresh cleaner or other spa cleaner (as directed). Run the water jets for 10 minutes. Drain the tub completely. Rinse with the shower wand to wash away any residue. DO NOT EXCEED MORE THAN 90 DAYS between flushing and cleaning the water jet system. Flushing the water jet system will ensure proper function of the water pump and minimize deposits in the system. Weekly, spray out the inside of the door seal using the hand shower and then wipe clean. For a lustrous finish use GelGloss cleaner on the tub and fixtures. Warranty All items manufactured by Aquassure Bath Products Inc. are warranted in accordance with the following warranty: This warranty is extended to the first purchaser and does not extend to products previously used as display models or products that have been modified or repaired by anyone else but Aquassure Bath Products unless approved by Aquassure Bath Products Inc.. Aquassure Bath Products Inc. warranties its bathtubs for two years on the air pump (if applicable), two years on the electronic control system (if applicable) and two years on the fixtures and all other components of the bathtub, including tub shell and cabinetry. 10 years on the water pump (if applicable) and LIFETIME on the door seal. Warranty Limitations In the event of a defect in the material or workmanship of a product, defective products will be repaired or replaced by Aquassure Bath Products Inc.. Aquassure Bath Products Inc. shall not be liable for the expense of removing defective products or installing replacement products or the expense of adjoining components such as tile, marble, wall panels, ceilings, etc. No liability shall exist for incidental or consequential damages caused in whole or in part by any defect in Aquassure Bath Products Inc. s products. No warranty for loss of use is expressed or implied. No warranty, expressed or implied, including any warranty of merchantability or fitness for a particular purpose, shall apply after the warranty period described above. This warranty does not cover damage from deliberately opening the door with water in the bathtub. This warranty does not cover defects or damage caused by common carrier or installer from, without limitation, any of the following: careless handling, lifting whirlpools by the piping, lifting by the door or front of bathtub, lifting by fixtures, modification of the product for any reason, improper installation (including installation not in accordance with instructions provided with the unit), and acts of God. 27
28
Installation and Operation Manual MG-304. Please read this manual carefully before use.
 Installation and Operation Manual MG-304 Please read this manual carefully before use. 1 P a g e Important Safety Instructions: Warning! Use this unit only for its intended purposes or as described in
FREWIN STEAM SHOWER ENCLOSURE
 FREWIN STEAM SHOWER ENCLOSURE INSTALLATION AND USER MANUAL CONTENTS Steam Shower Enclosure Installation...2 Technical Information...2 Plumbing Requirements...2 Assembly...3 Tools and Materials...3 Installation...3
LEVENS STEAM SHOWER ENCLOSURE
 LEVENS STEAM SHOWER ENCLOSURE INSTALLATION AND USER MANUAL CONTENTS Steam Shower Enclosure Installation...2 Technical Information...2 Plumbing Requirements...2 Assembly...3 Tools and Materials...3 Installation...3
ARLEY STEAM SHOWER ENCLOSURE
 ARLEY STEAM SHOWER ENCLOSURE INSTALLATION AND USER MANUAL CONTENTS Steam Shower Enclosure Installation...2 Technical Information...2 Plumbing Requirements...2 Assembly...3 Tools and Materials...3 Installation...3
Whirlpool Bathtub Model Number: MT618
 INSTALLATION AND OWNER'S MANUAL Whirlpool Bathtub Model Number: MT618 Please carefully read these instructions before you begin to install the products. 07/11 Rev A P/N:100056-03 Thank you for purchasing
WALK-IN BATH INSTALLATION INSTRUCTIONS AND OWNER S MANUAL
 WALK-IN BATH INSTALLATION INSTRUCTIONS AND OWNER S MANUAL CONGRATULATIONS! You are now the owner of a walk-in bathtub from the most trusted name in plumbing. We thank you for your purchase. Your American
AWP 3260 CWH Installation Instructions Hydro-massage Bathtub - UL 1795
 Tools you might need for proper installation galvanized nails or screws large level hammer or screw gun shims adhesive Thank you for purchasing Praxis Bathware. For best results, please read and follow
Spa Control System OWNER S MANUAL
 LIMITED WARRANTY ONE YEAR LIMITED WARRANTY: UNITED SPAS, INC. warrants, to the original purchaser, the Spa Equipment against defects in materials or workmanship for a period of one year from date of purchase.
SYSTEM BASIC WHIRLPOOLS
 SYSTEM BASIC WHIRLPOOLS 114847-2-CB 2000 Kohler Co. IMPORTANT SAFETY INSTRUCTIONS ATTENTION INSTALLER: INSTRUCTIONS PERTAINING TO RISK OF FIRE, ELECTRIC SHOCK, OR INJURY TO PERSONS READ AND FOLLOW ALL
CONGRATULATIONS! You are now the owner of the world s best walk-in bathtub from the inventor and manufacturer of acrylic walk-in bathtubs.
 OWNER S MANUAL CONGRATULATIONS! You are now the owner of the world s best walk-in bathtub from the inventor and manufacturer of acrylic walk-in bathtubs. We thank you for your purchase. Your Safety Tub
ELLA SOAKING WALK IN BATHS OWNERS MANUAL. Representing these model numbers: L / R Elite Soaking L / R Royal Soaking
 Representing these model numbers: 03057 L / 03058 R Deluxe Soaking 03107 L / 03108 R Elite Soaking 03167 L / 03168 R Petite Soaking 03085 Companion Soaking 03117 L / 03118 R Royal Soaking ELLA SOAKING
Important Installation Guide & Operating Instruction
 Important Installation Guide & Operating Instruction To be removed for use by the occupant Packing Slip Included: 1. Faucets & Valves 2. Riser Rod 3. Shower Rod & Curtain 4. Grab Bar 5. Quick Hose 6. Front
Ella Gel Coat Walk In Tub E SERIES OWNER'S MANUAL
 Ella Gel Coat Walk In Tub E SERIES OWNER'S MANUAL REPRESENTING THESE MODEL NUMBERS: 26 x 52 E2645SL / E2645SR SOAKING E2645AL / E2645AR AIR MASSAGE E2645DL / E2645DR DUAL MASSAGE 30 x 48 E3048SL / E3048SR
Destination Collection Whirlpool Bath Installation Instructions
 Tools you might need for proper installation Galvanized Nails or Screws Large Level Hammer or Screw Gun Shims Adhesive Thank you for purchasing Praxis Bathware. For best results, please read and follow
AirBath Hydro-Massage Tubs UL1795 Installation and Operating Instructions
 Tools you might need for proper installation Galvanized Nails or Screws - For Units with a Tiling Flange Four Foot Level Shims Caulking Gun Screw Gun Adhesive Thank you for purchasing the Praxis AirBath
Factory Direct Walk-In Tubs WALK-IN TUB. Installation Manual. For Model Numbers VT2848, VT2853, VT3153 and VT3255
 Factory Direct Walk-In Tubs WALK-IN TUB Installation Manual For Model Numbers VT2848, VT2853, VT3153 and VT3255 FACTORY DIRECT WALK-IN TUBS Thank you for choosing an Vitality Tubs Walk-In Tub. Vitality
RELAX. REVITALIZE. RESTORE. LUXURY SPA UNIT Installation Manual. English. For Model Numbers 2848, 2853, 3153 and 3255
 RELAX. REVITALIZE. RESTORE. LUXURY SPA UNIT Installation Manual For Model Numbers 2848, 2853, 3153 and 3255 English RELAX. REVITALIZE. RESTORE. Thank you for choosing a Secure Spa Luxury Spa Unit. Secure
WALK IN BATH TUB OWNER S MANUAL
 WALK IN BATH TUB OWNER S MANUAL USWIBOWMAN-V1-10/12/07 1 TABLE OF CONTENTS WALK IN BATH TUB GENERAL INFORMATION INTENDED USE. 3 SAFETY INSTRUCTIONS. 4 CLASSIFICATION & TECHNICAL DETAILS. 4 OPERATING INSTRUCTIONS
IMPORTANT INSTALLATION and OPERATING INSTRUCTIONS
 IMPORTANT INSTALLATION and OPERATING INSTRUCTIONS To be provided to the Walk-In Tub owner/user. INSTRUCTIONS PERTAINING TO A RISK OF FIRE, ELECTRIC SHOCK OR INJURY TO PERSONS IMPORTANT SAFETY INSTRUCTIONS
TRANQUILITY ADVANCED HEATING SYSTEM
 TRANQUILITY ADVANCED HEATING SYSTEM MODELS: PBES-6010 PBES-6040 1000W Advanced Heating System 4000W Advanced Heating System Operation / Installation Instructions 85-0059-G Rev.03-6/13 INTRODUCTION The
COPPER FREESTANDING TUB
 COPPER FREESTANDING TUB INSTALLATION INSTRUCTIONS AND CARE GUIDE CONTENTS Tub Installation...2 Rough-In...2 Drain Installation...3 Drain without Overflow...3 Waste and Overflow Drain...3 Trimming Drain
BATHBAY COLLECTION INSTALLATION AND OPERATION INSTRUCTIONS
 Pre-Installation Planning READ INSTRUCTIONS COMPLETELY BEFORE BEGINNING INSTALLATION. 1. Do Not store units out of doors.- Keep out of sunlight and exposure to weather. 2. There are four different models
Laurel Mountain Whirlpools. Walk-In Bathtub Installation Manual
 Laurel Mountain Whirlpools Walk-In Bathtub Installation Manual IMPORTANT SAFETY INSTRUCTIONS PLEASE READ AND FOLLOW ALL INSTRUCTIONS PROVIDED CAREFULLY Install to permit access for servicing An equipment
Access Tubs. Installation & operating instructions COSTCO MODEL # / RIGHT COSTCO MODEL # / LEFT
 Installation & OPERATING INSTRUCTIONS Installation & operating instructions MODEL 3060SI HYDRO COSTCO MODEL # 391186/394862 - RIGHT COSTCO MODEL # 391197/394842 - LEFT Page 25 Access Tubs 5701 NW 35 Avenue
Installation & operating instructions
 Installation & OPERATING INSTRUCTIONS Installation & operating instructions MODEL 2747SEN Meditub 5701 NW 35 Avenue Miami, FL 33142 Phone 866-633-4882 Fax 866-560-1060 info@meditub.com http://www.meditub.com
ELLA SOAKING WALK IN BATHS OWNERS MANUAL REPRESENTING THESE MODEL NUMBERS: L / R Elite Soaking L / R Royal Soaking
 REPRESENTING THESE MODEL NUMBERS: 03057 L / 03058 R Deluxe Soaking 03107 L / 03108 R Elite Soaking 03167 L / 03168 R Petite Soaking 03085 Companion Dual Massage 03117 L / 03118 R Royal Soaking ELLA SOAKING
Technical Specifications Section 1
 Technical Specifications Section 1 STANDARD UNIT: MODEL# RH4 Description: Model RH4 is a built-in, 60-gallon, side access bathing tub. Construction: The tub shell is a seamless piece of 3/16" thick fiberglass-reinforced
UNIVERSAL TEE STYLE Hydromassage Bath Heater INSTALLATION INSTRUCTIONS
 UNIVERSAL TEE STYLE Hydromassage Bath Heater INSTALLATION INSTRUCTIONS This Manual Covers: 7 Models SG100-15UP - 120V, 1500W SG202-20UP - 240V, 2000W CARTON CONTENTS: A - One (1) Whirlpool Bath Heater
Meditub. Installation & operating instructions. Operating instructions
 Installation & OPERATING INSTRUCTIONS ditub Installation & operating instructions structions MODEL 3260 Page 25 Meditub 5701 NW 35 Avenue Miami, FL 33142 Phone 866-633-4882 Fax 866-560-1060 info@meditub.com
Important Installation Guide & Operating Instruction
 Important Installation Guide & Operating Instruction Email: MobilityBathworks@gmail.com WARRANTY & REGISTRATION Important : 1. To ensure that your warranty is granted please fill out the product registration
RELAX. REVITALIZE. RESTORE. LUXURY SPA UNIT Owner s Manual. English. For Model Numbers 2848, 2853, 3153 and 3255
 RELAX. REVITALIZE. RESTORE. LUXURY SPA UNIT Owner s Manual For Model Numbers 2848, 2853, 3153 and 3255 English This Page is Intentionally Left Blank For Printing Purposes Relax. Revitalize. Restore. Thank
Before you begin, carefully read the installation instructions below. Observe all local electrical safety and plumbing codes.
 AIR TUB INSTALLATION Before you begin, carefully read the installation instructions below. Observe all local electrical safety and plumbing codes. Unpack and inspect tub and parts for damage. If any damage
WALK-IN BATH INSTALLATION INSTRUCTIONS AND OWNER S MANUAL
 WALK-IN BATH INSTALLATION INSTRUCTIONS AND OWNER S MANUAL CONGRATULATIONS! You are now the owner of a walk-in bathtub from the most trusted name in plumbing. We thank you for your purchase. Your American
IMPORTANT SAFETY INSTRUCTIONS READ AND FOLLOW ALL INSTRUCTIONS SAVE THESE INSTRUCTIONS
 IMPORTANT LEAVE THESE INSTRUCTIONS WITH THIS UNIT Whirlpool / Chromatherapy / BubbleAir Operating Instructions IMPORTANT SAFETY INSTRUCTIONS READ AND FOLLOW ALL INSTRUCTIONS SAVE THESE INSTRUCTIONS INSTRUCTIONS
ESSENCIA INSTALLATION INSTRUCTIONS IMPORTANT INFORMATION FOR THE INSTALLER AND THE OWNER TO BE KEPT BY THE OWNER
 IMPORTANT INFORMATION FOR THE INSTALLER AND THE OWNER TO BE KEPT BY THE OWNER TABLE OF CONTENT IMPORTANT SAFETY INSTRUCTIONS...1 PARTS & TOOLS...3 SITE PREPARATION...6 INSTALLATION REMOTE MOUNTING OF TURBINE
Access Tubs 3238 DUAL ( AIR/HYDRO ) INSTALLATION & OPERATING INSTRUCTIONS MODEL INSTALLATION & OPERATING INSTRUCTIONS. Costco Item # /394831
 INSTALLATION & OPERATING INSTRUCTIONS MODEL INSTALLATION & OPERATING INSTRUCTIONS. Costco Item # /394831") INSTALLATION & OPERATING INSTRUCTIONS INSTALLATION & OPERATING INSTRUCTIONS MODEL 3238 DUAL ( AIR/HYDRO ) Costco Item # 391096/394831 Page 25 3238 DUAL WALK-IN TUB DESCRIPTION: The 3238 features a wide,
INSTALLATION & OPERATING INSTRUCTIONS INSTALLATION & OPERATING INSTRUCTIONS MODEL 3238 DUAL ( AIR/HYDRO ) Costco Item # 391096/394831 Page 25 3238 DUAL WALK-IN TUB DESCRIPTION: The 3238 features a wide,
INSTALLER: Save these instructions. for owner. owner s + operator s. manual
 INSTALLER: Save these instructions for owner owner s + operator s manual Americh welcomes you to our family of fine products. We know you will enjoy our craftsmanship, quality and luxury. Please pay special
RECEIVING & INSTALLATION INFORMATION
 RECEIVING & INSTALLATION INFORMATION WHAT TO DO WHEN YOU RECEIVE YOUR NEW WATERTECH TUB IT IS YOUR RESPONSIBILITY TO INSPECT THE TUB: Notices are placed on and in the tub and shipping carton advising of
RM3 Superior PRODUCT MANUAL
 RM3 Superior PRODUCT MANUAL *Shown with optional equipment IMPORTANT SAFETY INSTRUCTIONS PERTAINING TO A RISK OF FIRE, ELECTRIC SHOCK, FETAL INJURY, DROWNING, HYPERTHERMIA, OR INJURY TO PERSONS READ AND
Vintage Whirlpool Baths: K-702-AC K-702-H-AC CA (9427) Copyright 1994 Kohler Co.
 Copyright 1994 Kohler Co.") Vintage Whirlpool Baths: K-702-AC K-702-H-AC K-702-JA-AA K-702-JB-AA 110051-CA (9427) Copyright 1994 Kohler Co. IMPORTANT SAFETY INSTRUCTIONS ATTENTION INSTALLER: INSTRUCTIONS PERTAINING TO RISK OF FIRE,
Vintage Whirlpool Baths: K-702-AC K-702-H-AC K-702-JA-AA K-702-JB-AA 110051-CA (9427) Copyright 1994 Kohler Co. IMPORTANT SAFETY INSTRUCTIONS ATTENTION INSTALLER: INSTRUCTIONS PERTAINING TO RISK OF FIRE,
RA2 Tahoe PRODUCT MANUAL
 RA2 Tahoe PRODUCT MANUAL IMPORTANT SAFETY INSTRUCTIONS PERTAINING TO A RISK OF FIRE, ELECTRIC SHOCK, FETAL INJURY, DROWNING, HYPERTHERMIA, OR INJURY TO PERSONS READ AND FOLLOW ALL INSTRUCTIONS WARNING:
Ella Acrylic Outward Swing Walk In Tub OWNER'S MANUAL
 Ella Acrylic Outward Swing Walk In Tub OWNER'S MANUAL REPRESENTING THESE MODEL NUMBERS: Kai 30 in. x 57 in. OW5130SL / OW5130SR SOAKING OW5130AL / OW5130AR AIR MASSAGE OW5130DL / OW5130DR DUAL MASSAGE
Access Tubs. Installation & operating instructions. Costco Item # /394831
 Installation & OPERATING INSTRUCTIONS Installation & operating instructions MODEL 3238 DUAL ( AIR/HYDRO ) Costco Item # 391096/394831 Page 25 Access Tubs 5701 NW 35 Avenue Miami, FL 33142 Phone 877-249-2388
Warranty MyControl Bathing System Signature Series
 Warranty MyControl Bathing System Signature Series With Touch Assist Touch Screen Technology PDF VERSION Please review product warranty carefully prior to purchase Accessible Bath Technologies, LLC For
Installation Instructions / Warranty
 Installation Instructions / Warranty IP C 04210000 04211000 04212000 IP S 04203000 04204000 04205000 IP E 04199000 04200000 04201000 IP Trim Sets Valve trim only IP C 04212000 IP E 04201000 IP S 04205000
Avenue (HY) Series Installation & Operation Manual
 Series Installation & Operation Manual") Avenue (HY) Series Installation & Operation Manual Note: You must read all installation & operation instructions prior to assembly and use of this unit. 1 P a g e Table of Contents Warnings. 3 HY Series
Avenue (HY) Series Installation & Operation Manual Note: You must read all installation & operation instructions prior to assembly and use of this unit. 1 P a g e Table of Contents Warnings. 3 HY Series
Installation Instructions
 Installation Instructions KFN 9855 ide en - CA Installation, repair and maintenance work should be performed by a Miele authorized service technician in accordance with national and local safety regulations
Aquapeutics GENERAL INSTALLATION GUIDE. Toll Free Customer Service line 1 (800)
") Aquapeutics GENERAL INSTALLATION GUIDE Toll Free Customer Service line 1 (800) 290-6812 Thank you for choosing an Aquapeutics product. Please read the following guide in its entirety before assembling
Aquapeutics GENERAL INSTALLATION GUIDE Toll Free Customer Service line 1 (800) 290-6812 Thank you for choosing an Aquapeutics product. Please read the following guide in its entirety before assembling
Infinity Whirlpool Bath: K-1477-V-AB K-1487-V-AB K-1482-V1-AB K-1484-V1-AB
 Infinity Whirlpool Bath: K-1477-V-AB K-1487-V-AB K-1482-V1-AB K-1484-V1-AB 111465-CA (1093) Copyright 1993 Kohler Co. IMPORTANT SAFETY INSTRUCTIONS ATTENTION INSTALLER: INSTRUCTIONS PERTAINING TO RISK
ELECTRIC SPA-PAK HEATER INSTALLATION & OPERATING INSTRUCTIONS
 ELECTRIC SPA-PAK HEATER INSTALLATION & OPERATING INSTRUCTIONS CATALOG NO.: 6100.53O Effective: 03-15-05 Replaces: 02-01-05 INTRODUCTION The SPA-PAK Spa Heaters have been designed to provide efficient,
RESIN FREESTANDING TUB
 RESIN FREESTANDING TUB INSTALLATION INSTRUCTIONS AND CARE GUIDE CONTENTS Tub Installation...2 Rough-In...2 Drain Installation...3 Air Tub Installation...4 Electrical Installation...4 Remote Control Installation...5
sanctuary walk-in bathtubs PROUDLY BROUGHT TO YOU BY
 Thank you for choosing an Sanctuary Walk In Tub, the world s highest quality walk-in bathtub. Our mission at is to help you maintain independence over your essential bathing needs and to improve your overall
GULFSTREAM PLASTICS LTD.
 GULFSTREAM PLASTICS LTD. Cambridge, Ontario, Canada N1R 6T4 Phone (519) 622-0950 Toll Free 1-877-622-4853 Fax (519) 622-6926 Website: www.gulfstreamplastics.com Manufacturers of Acrylic Baths Whirlpools
Precedence Bath Whirlpools: K-1355-H1 K-1356-H1
 Precedence Bath Whirlpools: K-1355-H1 K-1356-H1 114189-2-CA (9608) Copyright 1996 Kohler Co. IMPORTANT SAFETY INSTRUCTIONS ATTENTION INSTALLER: INSTRUCTIONS PERTAINING TO RISK OF FIRE, ELECTRIC SHOCK,
ELLA OUTWARD SWING DOOR WALK IN BATHS OWNERS MANUAL
 2016 ELLA OUTWARD SWING DOOR WALK IN BATHS OWNERS MANUAL REPRESENTING THESE MODEL NUMBERS: O2SA3060 Tub4Two OA3052 Dealer Exclusive OAF2639 Tiny Front Entry O2SA3671 Big4Two OA2652 Slim OA2660 Lounger
NEPTUNE Steam Room Installation Instructions
 NEPTUNE Steam Room Installation Instructions IMPORTANT Please read carefully the following instructions before installing your shower cabin. If you have any questions on this shower cabin installation
4230/6230/9230 SERIES OWNERS OPERATION GUIDE
 4230/6230/9230 SERIES OWNERS OPERATION GUIDE 104 CONTENTS Important Safety Instructions 2 INTRODUCTION Major Component Illustration 4 SYSTEM OPERATION Features & Function Visual Diagnostic System (VDS)
Diamond Whirlpool/Air pool INSTALLATION & OPERATION INSTRUCTION
 Diamond Whirlpool/Air pool INSTALLATION & OPERATION INSTRUCTION WARNING When using this unit, precautionary steps should be followed to prevent electrical shock or personal injury. 1. Do not permit children
Assembly instructions. Alexandria Pedicare System ALEXANDRIA. Perfect design. Personal service.
 R Assembly instructions Alexandria Pedicare System ALEXANDRIA Perfect design. Personal service. IMPORTANT SAFETY PRECAUTIONS 1. Read and follow all instructions.. Danger: To reduce the risk of injury,
K-870-JA-AA K-872-JA-AA
 Seawall 6 Whirlpool Baths: K-870-AA K-872-AA K-870-H-AA K-872-H-AA K-870-JA-AA K-872-JA-AA 111818-BA (1093) Copyright 1993 Kohler Co. IMPORTANT SAFETY INSTRUCTIONS ATTENTION INSTALLER: INSTRUCTIONS PERTAINING
IMPORTANT INSTALLATION & OPERATING INSTRUCTION
 IMPORTANT INSTALLATION & OPERATING INSTRUCTION To be provided to the owner/user. DIGNITY CUSTOMER SERVICE Contact Customer Service at (877) 711-TUBS (8827) Monday Friday 8:00 5:00 PST. Page 1 of 15 HLS
Operating and Maintenance Instruction Manual. Combination Whirlpool and Air Bath Systems with Chromatherapy Lights
 Operating and Maintenance Instruction Manual Combination Whirlpool and Air Bath Systems with Chromatherapy Lights T h a n k y o u fo r c h o o s i n g A m e r i c a n S t a n d a rd ATTENTION INSTALLER:
Important Safety Instruction
 WARNING: To reduce the risk of drowning, electrical shock, or injury, read the following important precautions before using the unit. If you do not fully understand the meaning of any of the precautions
Installation Guide. Pedicure Spa D K-163, K-1006, K-1011, K-1012
 Installation Guide Pedicure Spa K-163, K-1006, K-1011, K-1012 1063564-2-D Important Information WARNING: When using electrical products, basic precautions should always be followed, including the following:
Access Tubs 3060WCA AIR INSTALLATION & OPERATING INSTRUCTIONS MODEL INSTALLATION & OPERATING INSTRUCTIONS
 INSTALLATION & OPERATING INSTRUCTIONS INSTALLATION & OPERATING INSTRUCTIONS 3060WCA AIR MODEL Costco Item # 558600/580183 Right Costco Item # 558596/580185 Left Page 25 3060WCA AIR WALK-IN TUB DESCRIPTION:
MOJAVE. Mojave ShowerSpa Model #1016 Owner's Manual
 MOJAVE Mojave ShowerSpa Model #1016 Owner's Manual Mojave ShowerSpa Model #1016 Please Read The Following Instructions COMPLETELY Before Beginning! Our goal is to ensure your installation goes smoothly
Vanity Installation Instructions
 Vanity Installation Instructions Contents Getting started 01 Required tools & materials 01 Vanity installation 01 Hinge adjustment 02 Soft close drawers 03 Trouble shooting 04 Plumbing recommendations
Access Tubs 3053 HYDRO INSTALLATION & OPERATING INSTRUCTIONS MODEL INSTALLATION & OPERATING INSTRUCTIONS
 INSTALLATION & OPERATING INSTRUCTIONS INSTALLATION & OPERATING INSTRUCTIONS MODEL 3053 HYDRO Costco Model # 321118/356196 - RIGHT Costco Model # 332440/356220 - LEFT Page 1 ACCESS TUBS 5701 NW 35 Avenue
e Bath Fan with Light User s Guide
 e Bath Fan with Light User s Guide abfl125rok Item Stock Number(s): BFL125ROK IMPORTANT INSTRUCTIONS - OPERATING MANUAL READ AND SAVE THESE INSTRUCTIONS READ CAREFULLY BEFORE ATTEMPTING TO ASSEMBLE, INSTALL,
America s Walk-In Tub. Installation & Instructions. Manufactured by. A Division of Spa World Corp NW 35th Avenue ANSI-Z124.1
 America s Walk-In Tub Installation & Operational Instructions REEF SOAKER ASME A112.19.7-2006 ANSI-Z124.1 Manufactured by ACCESS TUBS A Division of Spa World Corp. 5701 NW 35th Avenue Miami, Florida 33142
Installation Instructions / Warranty
 Installation Instructions / Warranty Wallbar Sets Unica E 06890XX0 Croma E 75 3-Jet 06494XX0 Croma E 75 2-Jet 06496XX0 Monsoon II 04043XX0 Clubmaster 04044XX0 Raindance E 120 3-Jet 04098XX0 Unica E Wallbar
Cascade Premier and Elite Premier Bathing Systems with Aqua-Aire Installation / Assembly Instructions
 Cascade Premier and Elite Premier Bathing Systems with Aqua-Aire Installation / Assembly Instructions Premier Elite Premier PENNER PATIENT CARE, INC Box 523 / 102 Grant St. Aurora, NE 68818 360745P Revision
Hourglass Whirlpool Bath: K-1506-H-AB Hourglass Optional Apron: K-1507-AA
 Hourglass Whirlpool Bath: K-1506-H-AB Hourglass Optional Apron: K-1507-AA 111976-CA (1093) Copyright 1993 Kohler Co. IMPORTANT SAFETY INSTRUCTIONS ATTENTION INSTALLER: INSTRUCTIONS PERTAINING TO RISK OF
Installation Instructions PRO SERIES
 Installation Instructions PRO SERIES If you are a plumber installing this unit, please leave this owners manual & warranty card with the owner when you finish the installation. Thank You! DO NOT USE THIS
PIPELESS WHIRLPOOL FOOT BATH OWNER S MANUAL. Model: FB2-S115
 PIPELESS WHIRLPOOL FOOT BATH OWNER S MANUAL Model: FB2-S115 TABLE OF CONTENTS IMPORTANT SAFETY INSTRUCTIONS...3 WARNINGS..4 INSTRUCTIONS PRIOR TO USE. 5 GROUNDING INSTRUCTIONS.... 5 HOW TO USE...6 HOW
AQUAPEUTICS MONACO INSTALLATION MANUAL
 AQUAPEUTICS MONACO INSTALLATION MANUAL Monaco schmatic diagram Cross sectional illustration of gaskets Recommended tools 4 5 5 5 5 Installation steps Steam generator hook-ups Troubleshooting n Steam dispenser
INSTALLATION & OPERATIONAL INSTRUCTIONS. Manufactured by ATLANTIS WHIRLPOOLS A Division of Spa World Corp NW 35th Avenue ANSI-Z124.
 INSTALLATION & OPERATIONAL INSTRUCTIONS ASME A112.19.7-2006 ANSI-Z124.1 Manufactured by ATLANTIS WHIRLPOOLS A Division of Spa World Corp. 5701 NW 35th Avenue Miami, Florida 33142 INSTALLATION INSTRUCTIONS
Installation, Operation & Service Procedures
 Installation, Operation & Service Procedures Baptistry Heater System Model EQAS-CH HEATER ONLY PT#: 04-10029 REV.02 85-0139-C 08/12 TABLE O CONTENTS TABLE O CONTENTS/WARRANTY 1 IMPORTANT SAETY INSTRUCTIONS
Installation & Operating Guide
 5-036 HOT WATER TANK Installation & Operating Guide Read all instructions thoroughly. Keep this guide for future reference. Proof of purchase is required for Warranty. Staple receipt or proof of purchase
Whirlpool Baths INSTALLATION, OPERATION, AND MAINTENANCE
 TO BE REMOVED FOR USE BY THE OCCUPANT. Jason International, Inc. 8328 MacArthur Drive North Little Rock, AR 728 www.jasoninternational.com 49-000-209 Date 07/0 Integrity INSPECTION Inspect the unit prior
Installation Guide BUBBLEMASSAGE. English page T01-A
 Installation Guide BUBBLEMASSAGE BATH 368 201419 English page 1-9 10-17 Before You Begin Please read these instructions carefully to familiarize yourself with the required tools, materials, and installation
1-866-PENNERS
 Cascade Premier and Elite Premier Bathing Systems with Aqua-Aire Installation / Assembly Instructions Premier Elite Premier PENNER PATIENT CARE, INC Box 523 / 102 Grant St. Aurora, NE 68818 360745P Revision
PL-004-SS. * Proper water pressure is required for simultaneous operations
 PL-004-SS Features - Stunning stylish European inspired design - Elegant durable stainless steel frame construction - 4 stage shower functions (Rainfall, Waterfall, Massage Spray, Hand Shower) - Simultaneous
Bathroom furniture installation instructions. Contents. Fitting of wall hung brackets 05. Getting started 02. Plumbing recommendations 05
 Bathroom furniture installation instructions Contents Getting started 02 Required tools & materials 02 Vanity installation 02 Hinge adjustment 03 Soft close drawers 04 Fitting of wall hung brackets 05
ATTENTION INSTALLER: Please deliver this manual to homeowner.
 INSTALLATION INSTRUCTIONS SEAGRAM 5-1/2' x 36" MODEL D60545 FITZGERALD 5-1/2' x 36" MODEL D62645 (Includes Base) ST. GEORGE 5-1/2' x 36" OVAL MODEL D62745 (Includes Base) ST. GEORGE 5-1/2' x 36" OVAL MODEL
Infrared Room Installation & Operation Instructions
 Warning Do not use the infrared room if using alcohol, drugs or medications. Pregnant women or persons with poor health should consult their physician before using any infrared room. This manual covers
e Bath Fan with Light User s Guide
 e Bath Fan with Light User s Guide abfl100rnl, BFL125RNL Item Stock Number(s): BFL100RNL, BFL125RNL IMPORTANT INSTRUCTIONS - OPERATING MANUAL READ AND SAVE THESE INSTRUCTIONS READ CAREFULLY BEFORE ATTEMPTING
Leilani ShowerSpa Model #1022-B Owner's Manual
 Leilani ShowerSpa Model #1022-B Owner's Manual Leilani ShowerSpa Model #1022-B Please Read The Following Instructions COMPLETELY Before Beginning! Our goal is to ensure your installation goes smoothly
OWNER MANUAL PLEASE SAVE THIS MANUAL FOR FUTURE REFERENCE
 OWNER MANUAL PLEASE SAVE THIS MANUAL FOR FUTURE REFERENCE IDJET, Selena Bench, Gulfstream Inc. are trademarks of Gulfstream Inc. Patent #D709619, #8726430, #8680699, #D701318, #8662848, #8531048, #8366418,
ELLA MASSAGE WALK IN BATHS OWNERS MANUAL
 2016 ELLA MASSAGE WALK IN BATHS OWNERS MANUAL REPRESENTING THESE MODEL NUMBERS: 93057 L / 93058 R Deluxe Dual Massage 93107 LNF / 93108 RNF Elite Dual No Faucet 93167 L / 93168 R Petite Dual Massage 93057
ESS-2200 Double Station Scrub Sink. with Two Sensor Operated Gooseneck Spout. ESS-3200 Deluxe Double Station Scrub Sink
 ESS-2000/3000 Series I.I. Rev. 2 (02/03) Code No. 016162 INSTALLATION INSTRUCTIONS SINGLE, DOUBLE AND TRIPLE STATION SENSOR OPERATED SYSTEMS ESS-2000 SERIES ESS-2100 Single Station Scrub Sink with One
OPALIA INSTALLATION INSTRUCTIONS IMPORTANT INFORMATION FOR THE INSTALLER AND THE OWNER TO BE KEPT BY THE OWNER
 OPALIA TM IMPORTANT INFORMATION FOR THE INSTALLER AND THE OWNER TO BE KEPT BY THE OWNER TABLE OF CONTENT IMPORTANT SAFETY INSTRUCTIONS...1 PARTS & TOOLS...3 SITE PREPARATION...6 INSTALLATION REMOTE MOUNTING
INSTALLATION AND OPERATING INSTRUCTIONS Page 1
 INSTALLATION AND OPERATING INSTRUCTIONS Page 1 Do not take a sauna if using alcohol, drugs or medications. Pregnant women or persons with poor health should consult their physician before using any sauna.
Invacare TheraPure Side Entry Whirlpool Tubs. Model 3602GXL Model 3652G
 Invacare TheraPure Side Entry Whirlpool Tubs Model 3602GXL Model 3652G User Manual EN This manual MUST be given to the user of the product. BEFORE using this product, read this manual and save for future
INSTALLATION INSTRUCTIONS & OWNER S MANUAL (Refer to individual model sheets for specifications)
") INSTALLATION INSTRUCTIONS & OWNER S MANUAL (Refer to individual model sheets for specifications) BEFORE BEGINNING INSTALLATION, CHECK THE FOLLOWING ITEMS AND READ THE INSTRUCTIONS CAREFULLY. CHECK ENTIRE
INSTALLATION INSTRUCTIONS & OWNER S MANUAL (Refer to individual model sheets for specifications) BEFORE BEGINNING INSTALLATION, CHECK THE FOLLOWING ITEMS AND READ THE INSTRUCTIONS CAREFULLY. CHECK ENTIRE
Oahu Showerspa Model #1035 Owner's Manual
 O A H U Oahu Showerspa Model #1035 Owner's Manual Oahu ShowerSpa Model #1034 Please Read The Following Instructions COMPLETELY Before Beginning! Our goal is to ensure your installation goes smoothly and
e Bath Fan with Light User s Guide
 e Bath Fan with Light User s Guide abfl50uq, BFL60UQ, BFL70, BFL85 Item Stock Number(s): BFL50UQ, BFL60UQ, BFL70, BFL85 IMPORTANT INSTRUCTIONS - OPERATING MANUAL READ AND SAVE THESE INSTRUCTIONS READ CAREFULLY
walk-in bathtubs Thank you for choosing an AmeriGlide Sanctuary Walk In Tub, the world s highest quality walk-in bathtub.
 Thank you for choosing an AmeriGlide Sanctuary Walk In Tub, the world s highest quality walk-in bathtub. Our mission at AmeriGlide is to help you maintain independence over your essential bathing needs
SPA HEATER INSTALLATION, OPERATION AND MAINTENANCE
 SPA INSTALLATION, OPERATION AND MAINTENANCE MODELS: ST SERIES 5.5 & 11kW 240V SINGLE PHASE BEFORE YOU BEGIN CHECK ALL ELECTRICAL CONNECTIONS TO ALL COMPONENTS WITHIN THE FOR TIGHTNESS. CONNECTIONS CAN
A301 SHOWER PANEL INSTALLATION GUIDE
 A301 SHOWER PANEL INSTALLATION GUIDE Shower Panel Installation Read Before Using Your New Shower Panel Congratulations on purchasing an Ariel Shower Panel. Your new shower panel will be a great addition