Model UVGMD-AL MULTIVERSA CAN PACKAGING MACHINE Operators Manual
|
|
|
- Piers Robinson
- 5 years ago
- Views:
Transcription


1 Model UVGMD-AL MULTIVERSA CAN PACKAGING MACHINE Operators Manual MODEL UVGMD-AL
2 INTRODUCTION Model UVGMD-AL offers your choice of atmospheric, vacuum only, vacuum then gas, or multiflush double seaming. RANGE: 1½" to 6¼" diameter, up to 7" tall. Change parts are required for each size can. CAPACITY: 10 Cans Per Minute - Atmospheric 8 Cans Per Minute - Vacuum 6 Cans Per Minute - Vacuum and Gas 3 Cans Per Minute - Multiflush For other than atmospheric mode, averages are based on 15" vacuum and, in the multiflush mode, 3 sequences of vacuum then gas flush. ***CAUTION*** BEFORE OPERATING YOUR DIXIE DOUBLE SEAMER REVIEW THIS MANUAL and supplementary information pertaining to the Vacuum Pump and other accessory items, if any. Also make certain that: 1. The machine is properly connected to your electrical supply. 2. Auxiliary and accessory items are properly attached. 3. Oil filling port on the vacuum pump is filled to recommended levels. *IMPORTANT* Use only SAE 20 motor oil. Capacity is 0.5 quart. 4. All moving parts are oiled. These parts will require periodical oiling to prevent unnecessary wear. 5. The machine is properly adjusted for the cans to be closed. Inspect machine adjustments periodically to assure proper results. 6. The machine is cleaned and oiled as needed. Give special attention to servicing before and after a period of inactivity or storage. OPERATION Pull red ON/OFF switch to supply power to the machine. Select or change the Operating Mode as follows. ATMOSPHERIC: Turn black selector switch to Atmospheric (ATMOS). Position lid and can. Depress the green start button. The can will automatically be lifted, doubled seamed, and lowered. When machine stops, remove can. The chamber door remains open during the entire process. VACUUM ONLY: Turn black selector switch to Vacuum Only (VAC ONLY). Position lid and can; close door. The preset vacuum value is performed; the can is lifted and double seamed automatically then stops turning: remaining chamber vacuum is released, and the can is lowered. Operator opens door, removes can and repeats the operation. Preset desired vacuum value (P1) as per instructions on page 3 for the Digital Vacuum and Gas Programer (648). The factory has preset the "hold" time for vacuum at 0.1 second, unless otherwise specified at time of order; (i.e., the vacuum value will be held for 0.1 second before the container is double seamed. The "hold" time for vacuum may be changed for up to 10 seconds. This value may be changed using the Preset Loader (660-2) located inside the electrical box on the back of the seamer cabinet. Refer to instructions on page 10. VACUUM THEN GAS: Turn the black selector switch to Vacuum Then Gas (VAC/GAS). Position lid and can; close door. The preset vacuum and gas values are performed; the can is lifted and double seamed automatically then stops turning: remaining chamber vacuum is released, and the can is lowered. Operator opens door, removes can and repeats the operation. Preset desired vacuum and gas values (P1 + P2) as per instructions on page 3 for the Digital Vacuum and Gas Programer (648). Also, refer to any instructions provided with your gas regulator [Gas regulator and tank are not provided by Dixie Canner]. The factory has preset the "hold" time for both vacuum and gas values at 0.1 second, unless otherwise specified at time of order; (i.e., the vacuum value(s) will be held for 0.1 second before another operation is performed and/or the gas value(s) will be held for 0.1 second before another operation is performed or the container is double seamed. The "hold" time for vacuum and gas values may be changed for up to 10 seconds. These values may be changed using the Preset Loader (660-2) located inside the electrical box on the back of the seamer cabinet. Refer to instructions on page 8. MULTIFLUSH: Turn black selector switch to Multiflush (MULTI). Position lid and can; close door. The preset sequences of vacuum and gas values are performed; the can is lifted and double seamed automatically then stops turning: remaining chamber vacuum is released, and the can is lowered. Operator opens door, removes can and repeats the operation. Preset desired vacuum and gas values (P1 + P2 and P3 + P4) as per instructions on page 3 for the Digital Vacuum and Gas Programer (648). Also, refer to any instructions provided with your gas regulator [Gas regulator and tank are not provided by Dixie Canner]. The factory has preset the "hold" time for both vacuum and gas values at 0.1 second, unless otherwise specified at time of order; (i.e., the vacuum value(s) will be held for 0.1 second before another operation is performed and/or the gas value(s) will be held for 0.1 second before another operation is performed or the container is double seamed. The "hold" time for vacuum and gas values may be changed for up to 10 seconds. These values may be changed using the Preset Loader (660-2) located inside the electrical box on the back of the seamer cabinet. Refer to instructions on page 10. The numbers of sequences (or operations) for vacuum/gas flushes are preset by the factory; these values may be changed using the Preset Loader (660-2) located inside the electrical box on the back of the seamer cabinet. Refer to instructions on page 10. The maximum number of possible flushes is 10. 1
3 DIGITAL VACUUM AND GAS PROGRAMER (648) The #648 Digital Vacuum and Gas Programer reads in millimeters. The 380 displayed in the diagram equals approximately 15" Hg. A convenient equation is 25 x inches Hg = mm. Calibrations are in increments of 5 mm. Since the vacuum pump is rated 29.8" Hg, the maximum recommended vacuum value which may be entered is 745 mm. The lowest recommended value for setting vacuum or gas is 25 mm which approximates 1" Hg. Use a small pointer to set a desired value in the program as explained below. 5. Press the SET button again. The display will show:" 0." The vacuum and gas values selected in the previous steps are now programed into memory and the procedure is complete. NOTE : When performing Step 5 shown above, if the display fails to return to "0" simply press the reset button. The display will now show "0" and the procedure is complete. Example - Vacuum Only: A. Set the digital programer to stop the vacuum pump at 18" Hg (450 mm) by setting the P1 mode at 450. B. See OPERATION for seaming instructions. Example - Vacuum Then Gas: A. Set the digital programer to stop the vacuum pump at 20" Hg (500 mm) by setting the P1 mode at 500. B. Set the digital programer to replace vacuum (with gas) to 5" Hg (300 mm) by setting the P2 mode at 125. C. See OPERATION for seaming instructions. P1 and P3 are VACUUM SET MODE VALUES P2 and P4 are GAS SET MODE VALUES 1. Use a small pointer to press the SET button. The display will show: P1-380 (where 380 represents the current setting for the P1 mode). Proceed to Step 2 if you do not want to change the current setting for P1. Press the key to increase the vacuum value for P1, or press the key to decrease the vacuum value for P1. 2. Press the SET button again. The display will show: P2-380 (where 380 represents the current setting for the P2 mode). Proceed to Step 3 if you do not want to change the current setting for P2. Press the key to increase the gas value for P2, or press the key to decrease the gas value for P2. 3. Press the SET button again. The display will show: P3-380 (where 380 represents the current setting for the P3 mode). Proceed to Step 4 if you do not want to change the current setting for P3. Press the key to increase the vacuum value for P3, or press the key to decrease the vacuum value for P3. Example - Multiflush: A. Set the digital programer to stop the vacuum pump at 25" Hg (625 mm) by setting the P1 mode at 625. B. Set the digital programer to replace vacuum (with gas) to 5" Hg (125 mm) by setting the P2 mode at 125. C. Set the digital programer to stop the vacuum pump at 20" Hg (500 mm) by setting the P3 mode at 500. D. Set the digital programer to replace vacuum (with gas) to 5" Hg (125 mm) by setting the P4 mode at 125. E. See OPERATION for seaming instructions. Note: The number of times the P1 + P2 and P3 + P4 vacuum and gas values will be performed (i.e., number of flushes) is set with the Preset Loader as described on page 6. (Above examples may be adjusted to change high and low vacuum/gas settings within the entire range.) 4. Press the SET button again. The display will show: P4-380 (where 380 represents the current setting for the P4 mode). Proceed to Step 5 if you do not want to change the current setting for P4. Press the key to increase the gas value for P4, or press the key to decrease the gas value for P4. 2
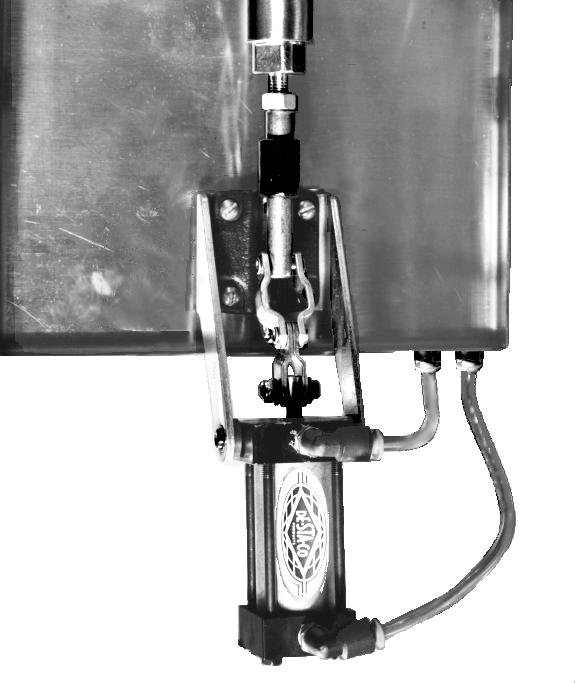
4 AIR FILTER/REGULATOR & AIR LIFT ASSEMBLY ADJUSTMENTS Recommended air supply is psi maximum. Different types of containers may require specific psi settings. The air pressure filter/regulator (816) on your machine has been set at the factory for the sample containers submitted with your order. If you find your air supply is inconsistent, or if you change containers or lids, you may need to adjust the air pressure filter/regulator. Too much air pressure may cause your container to crush your lid against the chuck. Too little air pressure will not lift the container against the lid properly. Any adjustments to the air pressure regulator should be made in small increments until a satisfactory pressure is achieved. To set or change the air pressure, pull up on the black knob on top of the regulator until the orange band is visible. Turning the adjustment knob clockwise increases the pressure and turning the knob counterclockwise reduces the pressure. Adjust as necessary while observing the pressure gauge. Do not exceed 100 psi. Push down on the adjustment knob to lock air filter/regulator at selected psi to prevent accidental setting change. The filter element should be changed after 1 year or when a pressure drop of 15 psi is reached. Periodically observe condensate level through sight glass in filter and manually drain as needed. 803 AIR LIFT ASSEMBLY NOTE: Sufficient air pressure must be provided to cause the plunger of the air lift assembly (803) to extend to its locked position. Do not exceed 100 psi. 816 AIR FILTER REGULATOR As a general rule, composite containers require a pressure setting of 70 psi; aluminum containers, 85 psi; and tin or steel containers require about 95 psi. However, particular container types may require minimal experimentation to determine the optimum pressure setting. 3

5 NOTE: CAVIAR AND OTHER CANS SHORTER THAN 1" MAY REQUIRE DV HEIGHT SPACER. MACHINES WITH 15" CHAMBER WILL REQUIRE USE OF SPECIAL HEIGHT SPACERS DEPENDING ON THE HEIGHT OF THE CONTAINER. BASE PLATE PRESSURE ADJUSTMENTS Proper base plate pressure is required to produce essential body hook, and also prevents slipping during the seaming cycle. Initially, the machine was set-up and adjusted to close cans size 603 x 700 then changed and tested for closing other size cans. Before shipping the machine was equipped and tested to close the cans specified on your order. To make minute adjustments in base plate pressure or to change to cans shorter than 7" proceed as follows: 1. Cans 7" tall do not require a height spacer. Base plate pressure adjustments are made by loosening the 5/16" nut at the base of the 805 lift shaft then turning the lift shaft with a 5/8" open-end wrench at the "flats" on the lift shaft. 2. Cans shorter than 7" require a height spacer and a separate base plate which has an adjusting screw (57) and set screw (56) in it's stem. After loosening the set screw with a screwdriver inserted into the hole, the adjusting screw can be turned with fingers to the proper setting. After making adjustments, tighten jam nuts or set screw. 4
6 SEAMING ROLL ADJUSTMENTS: There are ten (10) revolutions per seaming cycle, five (5) for each seaming roll. The function of the first operation seam roll is to curl the cover hook and body hook into proper position. The second operation seam roll is to complete the sealing of the can. FIRST OPERATION 1. Put machine in neutral position. 2. With power ON, press and release the actuator on the clutch/brake assembly four (4) times. Turn machine OFF, then press the actuator ONE more time to release the clutch brake. Then manually turn the clutch ONE HALF revolution. Grasp the collar (508) by hand, OR, use a wrench to turn the chuck shaft, to turn the assembly in a clockwise direction. These 4½ revolutions of the clutch/brake assembly places the first operation seam roll in its innermost position with the chuck. 3. While power to machine remains OFF, loosen lock nut (D-16) and adjust set screw (D-17-A) until the first operation seam roll is snugly in position with the chuck. While holding the first operation gauge wire (D-40) in position between the chuck lip and the ground profile of the first operation seam roll, tighten the lock nut. The larger diameter gauge wire (D-40) is the approximate THICKNESS of the first operation seam. Final adjustments may be made after a can is closed and the double seam inspected. 4. Close a can, tear down and inspect the double seam. Make final adjustments of the seaming rolls and base plate pressure to produce essential body hook, cover hook, overlap and tightness recommended by the container manufacturer or for a hermetically sealed can. NOTE: If you are unable to obtain the essential measurements recommended or a hermetically seamed container, you may need seam rolls with different profiles. CHANGING FROM ONE SIZE CAN TO ANOTHER: Change parts consisting of a chuck, a base plate and a height spacer may be required for each different can diameter, top or style. Also, a different set of seaming rolls may be required for each. Your can manufacturer or supplier may recommend the seam roll profiles for your cans. Dixie stocks or may be able to furnish the seam roll profile needed. Therefore, make sure you have the correct change parts available when changing your machine from one can size to another, then proceed as follows: 1. Put seam rolls in neutral position. 2. Loosen lock nuts (16) and adjust set screws (17-A) until both seaming roll levers (206) are back as far as they will go. If needed, change seaming rolls and/or reposition seam levers on the splined shafts (204). Leave the seaming roll levers backed into this position until after the chuck has been changed. 3. Change chucks. Make certain that the new chuck is properly tightened into position against the shoulder of the chuck shaft. CAUTION: (a) Use an open end wrench at the flat surface on the chuck shaft and the chuck wrench while loosening or tightening the chuck. Otherwise, the clutch/brake unit may be damaged. (b) If it is necessary to reposition 206 and 204, make certain the lip of each seaming roll runs freely in the chuck groove when in their innermost (seaming) position after the cap screws (322) are tightened. CHANGING CHUCKS SECOND OPERATION 1. Turn power to machine ON which will automatically complete the fifth revolution. Press and release the actuator FOUR times and turn power to machine OFF. This is a total of nine (9) revolutions from the beginning and puts the second operation seam roll into its innermost position with the chuck. 2. Using your wrench and screwdriver, adjust the second operation seam roll into position. Use the second operation gauge wire (D-41) to fit the seam roll snugly in position with the chuck then tighten the lock nut. The small diameter gauge wire (D-41) represents the approximate THICKNESS of the second roll seam. Final adjustments may be made after a can is closed and the double seam inspected. 3. Press the actuator ONE time and turn power to machine ON to complete the 10th revolution and cycle. This will return the machine to its neutral position. To remove the chuck, hold the chuck shaft with a 5/8" wrench on the cut side of the shaft, located in the exposed area under the gear housing. Then place the two pins of the chuck wrench (44) provided with your seamer) into two of the four holes located on the bottom of the chuck. [The pins of the chuck wrench will fit into either diagonal or adjacent holes depending on the diameter of the chuck.] To loosen, turn the chuck to the left. Finish removing the chuck by hand. To install a new chuck, hold the chuck shaft with a 5/8" wrench, as described above, while using your hand to thread the chuck onto the lower end of the chuck shaft. Turn to the right to thread the chuck onto the chuck shaft. Use the chuck wrench, as described above, to tighten snugly. 4. When necessary remove and reset the seam roll levers (206) so the seam rolls will be about 1/2" from the chuck lip. Minimum travel of the seam roll levers is desired when turning the adjusting screws. CAUTION: Use a box wrench to loosen or tighten the bolt securing the seaming roll levers in position on the splined seam roll lever drive shaft. After tightening the bolt make certain that the lip of each seaming roll runs freely in the chuck groove when they are in their innermost (seaming) position and if necessary repeat the adjustment until the seaming roll levers are properly secured into position on the splined shaft. 5. Install the proper base plate and height spacer for the can to be closed. Adjust the base pressure and seaming rolls as outlined above. 5
7 ADJUSTING THE CAN TOP RETAINER The purpose of the can top retainer (DV-201-5) is to hold the can top in position on the chuck, separated from the can, when desired. It is adjusted into position as follows: 1. After the machine has been properly equipped and adjusted for the size cans to be closed, place can top snugly into position on the chuck. 2. Adjust the can top retainer so the plunger is snugly against the can top curled edge and tighten the thumb screw. 3. If necessary, relocate the thumb screw to another hole. This allows a greater range of adjustments. Minute adjustments may be made by adjusting the lock nut and plunger. Magnets are pressed in chucks fabricated for steel or tin can tops to hold the tops in position on the chuck. NOTES AND TROUBLESHOOTING < Machine won't operate: 1. Solenoid (666) in vacuum and gas pipes won't open or close, or the solenoid in the clutch-brake assembly (502-1) doesn't work. 2. Air lift doesn't work, or 3. Direct Drive Motor doesn't run check FUSES. Open electrical box on rear of machine. Study the schematic drawing on the inside of the door, which details the fuses (3) and their individual function. The black, 3-section fuse box is located at the bottomright section in the electrical box. Each of the sections have two (2) fuses one is a spare. Proceed to replace the top fuse, one section at a time until problem is solved. Order spare fuses as needed. NOTE: Two fuses are 4 amp and one is 10 amp. IF PROBLEM is not a "blown" fuse, your electrician may locate and correct a loose connection in the wiring or contact the factory. < Vacuum pump "labors" or cuts off. 1st, check filter (412) and clean if dirty. 2nd, disconnect the union between the filter and vacuum chamber, then swivel elbow to expose inside of pipe and if clogged, clean and reconnect the union. < Oil in the vacuum pump should be changed after 500 operating hours or every three months, whichever comes first. NEUTRAL POSITION The machine is in a neutral position when both cam rolls (D-20) are in their innermost position and both seaming rolls are in their outermost position. TIMING THE MACHINE "Timing" and "in a neutral position" are synonymous. The machine is properly timed (or in neutral position) when both cam rolls (D-20) are at their innermost position and both seaming rolls (1st and 2nd) are at their outermost position. There are ten (10) revolutions per seaming cycle. Therefore, with power to the machine ON, by pressing the actuator on the clutch/brake assembly to turn the clutch/brake assembly one revolution at a time, the machine will have been "timed" by or before the 9th revolution. Then turn the power OFF, which allows the revolutions counter to "reset" while the machine is in a neutral position. Turn power ON again and continue closing cans. < Machine won't stop, continues running. Check the clutch-brake (502-1) to see if the Magnet (664-A) is in place. The Sensor (664) needs the magnet in place on the clutch-brake to count each revolution. Use "Krazy Glue" to replace the magnet if needed. < Power "accidentally" turned OFF during a seaming cycle will cause the machine to be "out of time" or "not in neutral." < Close door and machine does NOT start: (659) switch and (659-1) magnet on door may be out of alignment. Realign and adjust to c" space when door is closed. If it should be necessary to turn the clutch/brake assembly less that a full revolution, proceed as follows. Turn power to machine OFF. Press the actuator one time to release the clutch brake. Grasp the collar (508) by hand, OR, use a wrench to turn the chuck shaft, to turn the assembly in a clockwise direction as needed. Turn power to machine ON and verify that the machine is now in time. 6
8 CHANGE PARTS AND REPAIR PARTS: Photographs or schematics of parts, assemblies, machine sections, base plates and height spacers with the corresponding part number are shown on other pages. A Parts/Price List is furnished separately. When ordering parts, always furnish both the part number and the name of the part. When ordering change parts for cans, always send six (6) loose tops and can bodies of the size can(s) to be closed. REPAIR PARTS AND REBUILDING SERVICE A complete stock of parts is maintained by Dixie Canner Equipment Co., Athens, Georgia, USA. Parts may be ordered as needed to replace worn or damaged parts. Your Dixie Model UVGMD-AL Multiversa Can Packaging Machine may be returned to Athens, Georgia for a complete rebuilding at a nominal service charge, plus the cost of parts needed. When returning the machine for the rebuilding service please observe the following: 1. Return the complete machine and include several cans and tops of the exact size and type closed. Properly crate the machine and cans for safe delivery and return shipment, and prepay the shipping cost. 2. Write a letter authorizing the rebuilding service and mention any problem with the machine. Also mention particular instructions concerning return shipment, urgency, and other pertinent instructions. DOUBLE SEAM DEFECTS and COMMON CAUSES A. Cut over. Unusually sharp edge at top inside edge of seam 1. 1st or 2nd operation seam roll set too tight 2. Worn seam rolls or worn chuck B. Cut or fractured seam 1. Seam rolls set too tight C. Droop or lap in double seam at or near can body side seam 1. Too much base pressure 2. 1st operation seam roll set too loose 3. Worn 1st operation seam roll D. Excessive countersink depth 1. Too much base pressure 2. 1st operation seam roll set too loose 3. Chuck not properly seated in can top 4. Chuck groove worn E. False seam. Body hook and cover hook do not overlap 1. Can top not properly seated on can 2. Damaged can flange or can top curl F. Long body hook 1. Too much base pressure G. Long cover hook 1. HELPFUL HINTS TROUBLESHOOTING Until the operator is familiar with the mechanics of your can closing machine and learns to recognize irregularities in the essential requirements of the double seam, the outline below is intended to help notice obvious defects and list some causes that may serve as a guide in correcting minor troubles. MECHANICAL DEFECTS AND COMMON CAUSES A. Can slips during seaming operation 1. Damage or lack of oil in the base plate, lift shaft, height spacer or steel ball 2. Insufficient base plate pressure 3. Worn or wrong size chuck 4. Seaming rolls binding on pins B. Machine operates with undue noise or "locks" 1. Machine not properly timed C. Unusually loose seaming rolls 1. Seaming roll or pins worn D. Seaming rolls do not return to neutral position 1. Seaming roll levers binding 2. Seaming lever spring weak or broken 3. Machine not properly timed E. Machine seems to "labor" or freeze tight 1. Needs oil. 2. Too much base plate pressure 3. Seaming rolls too tight 4. Misalignment of moving parts 7
9 TO CHANGE COUNTER DELAY (i.e., number of repetitions of vacuum or gas flushes) NOTE: Counter No. 1 controls number of Vacuum/Gas repetitions on P1 and P2. Counter No. 2 controls number of Vacuum/Gas repetitions on P3 and P4. CAUTION: DO NOT CHANGE FOLLOWING: Counter No. 20 controls timing of clutch/brake. Turn on power to seamer. If not already installed, plug Preset Loader into base unit in large box on back of the machine. The display will read. Wait for Beep to indicate Preset Loader is ready to program. NOTE: TO CHANGE TIME DELAY (i.e., number of seconds to hold vacuum or gas flush) Timer No. 1 controls time delay or hold for Vacuum. Timer No. 2 controls time delay or hold for Gas Flush. CAUTION: DO NOT CHANGE FOLLOWING: Timer No. 20 controls delay for air lift mechanism to raise can. Timer No. 21 controls delay for air lift mechanism to lower can. Turn on power to seamer. If not already installed, plug Preset Loader into base unit in large box on back of the machine. The display will read. Wait for Beep to indicate Preset Loader is ready to program. Move switch from RUN to STOP. Depress. ; the display will read Move switch from RUN to STOP. Depress. ; the display will read Depress ; the display will now read. Depress (for repetition counter to change P1 and P2 values); the display will now read. Depress ; the display will read. (1 indicates Counter No. 1 for number of repetitions for P1 and P2 values; xx indicates total combined number of vacuum and gas flushes.) Enter new value for total number of vacuum/gas repetitions of P1 and P2 values. Depress to sequentially read and change the next counter number (2) for P3 and P4 values. Depress after all changes are complete to recordthe new vacuum/gas repetition values. Depress to transfer new values to base unit. Display will read. Depress ; display will read, then approximately 5 seconds later, the display will change to to indicate new program has been accepted and operation is complete. A beep will sound to indicate program has been accepted. Move switch back to RUN. If you make a mistake at any time during programing, an message will appear; depress and began again. Depress ; the display will now read. Depress (for vacuum delay); the display will now read. [If changing delay for gas flush, depress instead of ]. Depress ; the display will read. (1 indicates Timer No. 1 for vacuum delay; xx indicates seconds of delay expressed in 10th's i.e. 20 = 2 seconds) Enter new value for vacuum delay as desired. [If changing delay for gas flush, enter new gas delay values now.) NOTE: Remember numeric values are expressed in 10ths of a second; i.e. 20 represents 2 seconds, or 30 represents 3 seconds. Depress to record the new vacuum delay value. Depress to transfer new values to base unit. Display will read. Depress ; display will read, then approximately 5 seconds later, the display will change to to indicate new program has been accepted and operation is complete. A beep will sound to indicate program has been accepted. Move switch back to RUN. If you make a mistake at any time during programing, an message will appear; depress and began again. 8
10 648-1 POWER SUPPLY MODULE PROGRAMER & PRESET LOADER 9
11 10
12 11
13 12
Bliss Box Former Troubleshooting. 6.1 Troubleshooting Chart. Troubleshooting INTRODUCTION SAFETY PROCEDURES
 6.0 Bliss Box Former 1.0 INTRODUCTION Table 6-1 provides a logical sequence of tests that are designed to isolate problems with the Bliss Box Former machines. This table includes a list of probable causes
DOCUMENT CREASING MACHINE
 DOCUMENT CREASING MACHINE OPERATORS MANUAL Morgana Systems Limited Snowdon Drive Winterhill Milton Keynes Buckinghamshire MK6 1AP United Kingdom Telephone: ( 01908 ) 608888 Facsimile: ( 01908 ) 692399
Technical Data. Name: ERIKA Automat fully automatic machine to divide and to round dough pieces of the same size
 AUTOMAT MANUAL 1 Technical Data Name: ERIKA Automat fully automatic machine to divide and to round dough pieces of the same size Type Divisions Dough Portions (in ounces) Plate Nos. 3 30 1.0 3.5 #35 4/40A
Page 1 of 18. Part# /5/2013
 Part# 1002655-06 8/5/2013 This manual contains important information concerning the installation and operation of the gun washers listed above. Read manual thoroughly and keep for future reference INSTRUCTIONS
Food Waste Disposer Instruction Manual
 Food Waste Disposer Instruction Manual See insert for specific information about your new disposer NOTE: IMPORTANT: CAUTION: This Food Waste Disposer has been designed to operate on 110-120 Volt, 60 Hz
MacDonald Steel Limited
 DELUXE FILLER / CROWNER MODEL - DFC4 1 REV 00 CAUTION / WARNING READ MANUAL BEFORE OPERATING MACHINE DO NOT EXCEED 50 PSI ON Co2 OR BEER LINES DO NOT EXCEED 100 F (35 C) ON Co2 OR BEER LINES DO NOT HOSE
541D19 SERIES. Technical Manual. A Division of Aquion Partners L.P.
 541D19 SERIES Technical Manual A Division of Aquion Partners L.P. Table of Contents Introduction... Page 1 Technical Specifications... Page 2 Flow Diagrams... Page 3 Injector & Flow Control Selection Injector...
MEMOIRS VITREOUS CHINA TOILETS
 MEMOIRS VITREOUS CHINA TOILETS BEFORE YOU BEGIN HOW TO USE THESE INSTRUCTIONS Please read these instructions carefully to familiarize yourself with the required tools, materials, and installation sequences.
The Danger signal indicates an immediately hazardous situation which, if not avoided, will result in death or serious injury.
 The Danger signal indicates an immediately hazardous situation which, if not avoided, will result in death or serious injury. The Warning signal alerts you to potential hazards or unsafe practices which,
1500 RPM BURNISHER. Model P WARNING: OPERATOR MUST READ AND UNDERSTAND THIS MANUAL COMPLETELY BEFORE OPERATING THIS EQUIPMENT.
 OPERATOR S MANUAL & PARTS LIST 1500 RPM BURNISHER Model P1500-3 U.S. Patent Number 4,845,798 U.S. Patent Number 4,756,042 U.S. Patent Number 296,252 WARNING: OPERATOR MUST READ AND UNDERSTAND THIS MANUAL
REVIVAL LITE VITREOUS CHINA REVERSE TRAP TOILET
 REVIVAL LITE VITREOUS CHINA REVERSE TRAP TOILET BEFORE YOU BEGIN HOW TO USE THESE INSTRUCTIONS Please read these instructions carefully to familiarize yourself with the required tools, materials, and installation
Models: GW/R-T GW/R-2-T GW/R-3-T
 Part# GW/R-T-OM 1/12/04 TN Models: GW/R-T GW/R-2-T GW/R-3-T This manual contains important information concerning the installation and operation of the gun washers listed above. Read manual thoroughly
PROAIR Air Conditioner. CR23 Model INSTRUCTION MANUAL nvent Rev. D P/N
 PROAIR Air Conditioner CR23 Model INSTRUCTION MANUAL Rev. D P/N 89112522 TABLE OF CONTENTS Warranty and Return Policy...2 RECEIVING THE AIR CONDITIONER...3 HANDLING AND TESTING THE AIR CONDITIONER...3
Welcome to the Ice-O-Matic on-line training modules. Ice. Pure and Simple
 Welcome to the Ice-O-Matic on-line training modules. Ice. Pure and Simple DIAGSING FREEZE-UP ISSUES This module will help in diagnosis of a freeze up should it occur on various models of ICE Series Cubers.
SuperKlean Washdown Products
 DURAREEL DR8 & DR8S INSTALLATION AND MAINTENANCE INSTRUCTIONS **DO NOT THROW AWAY AFTER INSTALLATION** **SAVE AND DISPLAY PROMINENTLY WHERE THIS EQUIPMENT IS USED** GENERAL WARNINGS High pressure and hot
TK-1001, 1101, 1201, 1301, 1601
 TK-1001, 1101, 1201, 1301, 1601 Pneumatic Room Thermostats General Instructions DEVICE INFORMATION Identification Thermostats of this family may be easily identified by referring to the part number located
OPERATOR S MANUAL & PARTS LIST Ultra High Speed Burnishers
 OPERATOR S MANUAL & PARTS LIST Ultra High Speed Burnishers 1200 RPM Model M1200-3 1600 RPM Model M1600-3 2000 RPM Model M2000-3 U.S. Patent Number 4,845,798 U.S. Patent Number 4,756,042 U.S. Patent Number
OPERATING INSTRUCTIONS MIGHTYLAM 2700 ROLL LAMINATOR
 OPERATING INSTRUCTIONS MIGHTYLAM 2700 ROLL LAMINATOR TABLE OF CONTENTS Safety Messages and Electrical Safeguards...3-4 Introduction... Laminator Features...5 Specifications...5 Intial Set-up...6 Operating
Instruction Book for HD Punch Machines
 Instruction Book for HD Punch Machines HD7700, HD7000 & HD7500H Setup & Operator Manual Issue 5 February 2012 Performance Design LLC. These electric punches have been designed to punch most any job that
CAUTION All safety information must be followed as provided in this Technical Sheet and in Service Manual RS
 Domestic Washer Technical Information 120 V, 60 Hz Models SAV2555AW* Due to possibility of personal injury or property damage, always contact an authorized technician for servicing or repair of this unit.
SAN RAPHAEL PRESSURE LITE VITREOUS CHINA SIPHON JET TOILET
 SAN RAPHAEL PRESSURE LITE VITREOUS CHINA SIPHON JET TOILET BEFORE YOU BEGIN HOW TO USE THESE INSTRUCTIONS Please read these instructions carefully to familiarize yourself with the required tools, materials,
EAGLE 2000B EAGLE 2000BE EAGLE 2000EBT MUST READ MANUAL PRIOR TO INSTALLING MACHINE
 EAGLE 2000B EAGLE 2000BE EAGLE 2000EBT MUST READ MANUAL PRIOR TO INSTALLING MACHINE Contents 1 Machine Safety Information 3 1.5 Safety Precautions Prior to Operating Machine 6 2 Machine Installation 7
BARRINGTON PRESSURE LITE VITREOUS CHINA SIPHON JET TOILET K-4327
 BARRINGTON PRESSURE LITE VITREOUS CHINA SIPHON JET TOILET K-4327 BEFORE YOU BEGIN INSTALLER HAZARD NOTIFICATION WARNING: Risk of injury or water damage. Contents of vessel under pressure can cause severe
COUTURE ECO-LITE VITREOUS CHINA REVERSE TRAP TOILETS
 COUTURE ECO-LITE VITREOUS CHINA REVERSE TRAP TOILETS BEFORE YOU BEGIN HOW TO USE THESE INSTRUCTIONS Please read these instructions carefully to familiarize yourself with the required tools, materials,
CONSTANT SUCTION UNIT
 CONSTANT SUCTION UNIT OPERATOR/MAINTENANCE M A N U A L Squire-Cogswell/Aeros Instruments Inc 1111 Lakeside Drive Gurnee, IL 60031-4099 1-800-662-5822/847-855-0800 Fax: 847-855-6218 www.aerosinstruments.com
BL Series INSTRUCTIONS
 BL Series Models: EX5204/BL514 EX5204/BL515 EX5214/BL524 EX5214/BL525 EXT5214/BL524 EXT5214/BL525 EX5404/BL614 EX5404/BL615 EX5414/BL624 EX5414/BL625 EXT5214H/BL528 EXT5214H/BL529 Automatic Backlatcher
PROAIR Air Conditioner. CR29 Model INSTRUCTION MANUAL nvent Rev. I P/N
 PROAIR Air Conditioner CR29 Model INSTRUCTION MANUAL Rev. I P/N 89104461 TABLE OF CONTENTS Warranty and Return Policy...2 RECEIVING THE AIR CONDITIONER...3 HANDLING AND TESTING THE AIR CONDITIONER...3
model NO. LSS GALLON SKID MOUNTED HIGH PRESSURE SPRAYER ASSEMBLY / OPERATION INSTRUCTIONS / PARTS
 000 model NO. LSS- 00 GALLON SKID MOUNTED HIGH PRESSURE SPRAYER ASSEMBLY / OPERATION INSTRUCTIONS / PARTS Part number and descriptions can be obtained from the illustrated parts list section of this manual.
PUREPOWER SERIES CENTRAL VACUUM POWER UNITS PP500, PP600 & PP650
 USER GUIDE PUREPOWER SERIES CENTRAL VACUUM POWER UNITS PP500, PP600 & PP650 AB0039 FOR RESIDENTIAL USE ONLY!! MODELS SFDB-DQ, SFDB-DR AND SFDB-DS 30042509E IMPORTANT SAFETY INSTRUCTIONS SAVE THESE INSTRUCTIONS
ASTRO ENVELOPE FEEDER AMC FOR HEIDELBERG PRINTMASTER INSTALLATION AND OPERATING INSTRUCTIONS
 ASTRO ENVELOPE FEEDER AMC-2000-17 FOR HEIDELBERG PRINTMASTER INSTALLATION AND OPERATING INSTRUCTIONS INTRODUCTION Thank you for purchasing the Astro Envelope Feeder. It is fast, efficient, reliable, and
TA-12. Tabbing System USER'S GUIDE
 TA-12 Tabbing System USER'S GUIDE SAFETY PRECAUTIONS THIS EQUIPMENT PRESENTS NO PROBLEM WHEN USED PROPERLY. HOWEVER, CERTAIN SAFETY RULES SHOULD BE OBSERVED WHEN OPERATING THE TA12 TABBER. BEFORE USING
Safety, Operation and Maintenance Manual with Parts List
 Safety, Operation and Maintenance Manual with Parts List Important Information and Safety Instructions PLEASE READ BEFORE USE! 961130022-10/10-Rev1 TABLE OF CONTENTS Safety Instructions...2 Grounding Instructions...4
AquaSaver DISPOSER CONTROL CENTER Installation Manual. Model AS-101K
 AquaSaver DISPOSER CONTROL CENTER Installation Manual Model AS-1K The Danger signal indicates an immediately hazardous situation which, if not avoided, will result in death or serious injury. The Warning
Getz Equipment Innovators 450 lb Dual Portable Dry Chemical Fill System
 Getz Equipment Innovators 450 lb Dual Portable Dry Chemical Fill System 1 Revised 11/18/10 2320 Lakecrest Drive, Pekin IL 61554 PH. (888) 747-4389 Fax (309) 495-0625 Website: www.getzequipment.com LIMITED
PORTABLE HAND POWER THREADER 1/2-2
 PORTABLE HAND POWER THREADER 1/2-2 Read this Operator s Manual carefully before using this tool. Failure to understand and follow the contents of this manual may result in electrical shock, fire and/or
WSK300 Multifunction Wall Control
 WSK300 Multifunction Installation & Operating Instructions WARNING Hearth & Home Technologies disclaims any responsibility for, and the warranty will be voided by, the following actions: Installation and
Introduction... 3 Setup & Suggestions... 4 Basic Use... 4 Setting Time... 4 Setting Temperature... 5 Setting Height / Pressure...
 Table of of Contents Contents... 2 Introduction... 3 Setup & Suggestions... 4 Basic Use... 4 Setting Time... 4 Setting Temperature... 5 Setting Height / Pressure... 6 Aligning the pedestal... 6 Guidelines
PROAIR Air Conditioner. CR43 Model INSTRUCTION MANUAL nvent Rev. H P/N
 PROAIR Air Conditioner CR43 Model INSTRUCTION MANUAL Rev. H P/N 10-1008-130 TABLE OF CONTENTS Warranty and Return Policy...2 RECEIVING THE AIR CONDITIONER...3 HANDLING AND TESTING THE AIR CONDITIONER...3
Food Waste Disposer Instruction Manual
 Food Waste Disposer Instruction Manual NOTE: IMPORTANT: CAUTION: This Food Waste Disposer has been designed to operate on 220-240V~, 50/60 Hz exclusively. Using any other voltage or Hz adversely affects
BAG ON A ROLL SYSTEM USING THIS MANUAL UNPACK AND INSPECT uline.com READ MANUAL FIRST SAFETY INFORMATION
 BAG ON A ROLL SYSTEM 18002955510 ulinecom USING THIS MANUAL READ MANUAL FIRST IMPORTANT: Please read this manual and familiarize yourself with the equipment before use The manual contains valuable information
 www.whitakerbrothers.com The Challenge Machinery Company provides owner's manuals on its products solely as a courtesy to its customers. See the information below before using this manual. These manuals
LC Series - Light Commercial Pump Station Installation and Operation Manual
 LC Series - Light Commercial Pump Station Installation and Operation Manual Please keep this manual with the pump station Content Rain Bird LC Series Overview... Safety Instruction... Operation... 3 Pump
OWNER S MANUAL. Models: Herkules Equipment Corporation 2760 Ridgeway Court Walled Lake, MI USA Fax
 Part# 1000692 7/12/99 tn INSTRUCTIONS This manual contains important information concerning the installation and operation of the gun washers listed at the right. Read manual thoroughly and keep for future
ONTIME TIMER SPECIFICATION
 ONTIME TIMER SPECIFICATION Quick Start Guide SKU #102719 Revised: 01.16.2008 Thank you for purchasing the Ontime Timer. This timer enables automatic on and off control of an electronic device such as lights
TROUBLESHOOTING GENERAL TROUBLESHOOTING PROBLEM PROBABLE CAUSE CORRECTIVE ACTION
 GENERAL TROUBLESHOOTING Compressor Conditioning system OFF Turn ON conditioning system will not run No electrical power Check fuses Wrong voltage to applied to unit Compressor internal overload tripped
IMAGE V. Parts and Service Manual
 IMAGE 0V Section II Parts and Service Manual (88B) CLARKE TECHNOLOGY Image Operator's Manual Page AUTHORIZED PERSONNEL MAINTENANCE To Access Pump Motor. Remove brush housing from machine. See "Brush Motor
Power Washer Maintenance
 Power Washer Maintenance Purpose The maintenance of your MART Power Washer. In general, the washer is not maintenance-intensive. A few key items, however, need regular, scheduled care: Use the information
OPERATING MANUAL MODEL AIR 1500TM AIR DRYER
 OPERATING MANUAL MODEL AIR 500TM AIR DRYER Puregas, LLC 226-A Commerce St. Tel: 800-52-535 Broomfield, Colorado Fax: 303-657-2205 P/N P0255 REV A, 02/9/4 TABLE OF CONTENTS.0 GENERAL... 3 2.0 SPECIFICATIONS...
EP-21F Manual Letter Folder Operation Manual
 EP-21F Manual Letter Folder Operation Manual EP Equipment Co.,Ltd. Introduction Thank you for selecting EP folder. This machine is designed for efficiently folding paper up to legal size (216 356mm). To
T-SERIES Air Conditioner. T43 Model INSTRUCTION MANUAL nvent Rev. I P/N
 T-SERIES Air Conditioner T43 Model INSTRUCTION MANUAL Rev. I P/N 10-1008-145 TABLE OF CONTENTS Warranty and Return Policy...2 IMPORTANT NOTICE...2 RECEIVING THE AIR CONDITIONER...3 HANDLING AND TESTING
3500 SERIES CONVECTION STEAM COOKER PARTS AND SERVICE MANUAL
 3500 SERIES CONVECTION STEAM COOKER PARTS AND SERVICE MANUAL EFFECTIVE JULY 30, 2014 Superseding All Previous Parts Lists. The Company reserves the right to make substitution in the event that items specified
WELLWORTH /HIGHLINE WITH PEACEKEEPER VITREOUS CHINA TOILET
 WELLWORTH /HIGHLINE WITH PEACEKEEPER VITREOUS CHINA TOILET BEFORE YOU BEGIN HOW TO USE THESE INSTRUCTIONS Please read these instructions carefully to familiarize yourself with the required tools, materials,
PowerVac G Single to Twin Conversion Kit [ ]
![PowerVac G Single to Twin Conversion Kit [ ]](/thumbs/81/84358219.jpg "PowerVac G Single to Twin Conversion Kit [ ]") PowerVac G Single to Twin Conversion Kit [002-1371-00] warning Motors are thermally protected with automatic reset. Unit may start without warning. Caution Vac unit weighs 375 lbs (170 kgs). Use care when
PowerVac G Single to Twin Conversion Kit [002-1371-00] warning Motors are thermally protected with automatic reset. Unit may start without warning. Caution Vac unit weighs 375 lbs (170 kgs). Use care when
SPECTRACOOL Air Conditioner. N21 Model INSTRUCTION MANUAL nvent Rev. G P/N
 SPECTRACOOL Air Conditioner N21 Model INSTRUCTION MANUAL Rev. G P/N 89115088 TABLE OF CONTENTS WARRANTY AND RETURN POLICY...2 RECEIVING THE AIR CONDITIONER...3 HANDLING AND TESTING THE AIR CONDITIONER...3
VPMmini. Operator's Manual
 VPMmini Operator's Manual Whip Mix Corporation 361 Farmington Ave. P.O. Box 17183 Louisville, KY 40217-0183 USA 502-637-1451 800-626-5651 Fax 502-634-4512 www.whipmix.com Features The Whip Mix VPMmini
Installation Manual CARBONATOR With Plain-Water Booster
 CORNELIUS INC One Cornelius Place Anoka, MN 55303-6234 Telephone (800) 238-3600 Facsimile (763) 422-3246 Installation Manual CARBONATOR With Plain-Water Booster IMPORTANT: It is the responsibility of the
T-Series Air Conditioner T15 Model
 INSTRUCTION MANUAL T-Series Air Conditioner T15 Model Protecting Electronics. Exceeding Expectations. McLean Cooling Technology 11611 Business Park Blvd N Champlin, MN 55316 USA Tel 763-323-8200 Fax 763-576-3200
The POWER. In PRESENTATION PRODUCTS. Instruction Book For Professional Electrol DA-LITE SCREEN COMPANY, INC.
 Instruction Book For Professional Electrol The POWER In PRESENTATION PRODUCTS DA-LITE SCREEN COMPANY, INC. 3100 North Detroit Street Post Office Box 137 Warsaw, Indiana 46581-0137 Phone: 574/267-8101 800-622-3737
T-SERIES Air Conditioner. T20 Model INSTRUCTION MANUAL nvent Rev. C P/N
 T-SERIES Air Conditioner T20 Model INSTRUCTION MANUAL Rev. C P/N 89114993 TABLE OF CONTENTS Warranty and Return Policy... 2 IMPORTANT NOTICE... 2 RECEIVING THE AIR CONDITIONER... 3 HANDLING AND TESTING
CONTENTS 1. SPECIFICATIONS SET-UP FOR THE OPERATOR MAINTENANCE... 34
 ENGLISH ii CONTENTS. SPECIFICATIONS... 2. SET-UP.... Installing the motor unit... 2. Installing the control box... 3. Installing the belt... 2 4. Adjusting the pulley cover... 2 5. Installation and adjustment
PORTRAIT LITE VITREOUS CHINA REVERSE TRAP TOILET
 PORTRAIT LITE VITREOUS CHINA REVERSE TRAP TOILET BEFORE YOU BEGIN HOW TO USE THESE INSTRUCTIONS Please read these instructions carefully to familiarize yourself with the required tools, materials, and
FLUSH WATER SAVER DUAL FLUSH KIT
 FLUSH CH ICE Version 12.26.08 FC002 WATER SAVER DUAL FLUSH KIT Dear Consumer; You have purchased a high quality water saver dual flush toilet valve kit. Every care has been taken during manufacturing to
ARCHERTM ORDERING INFORMATION NOTES T01-C INSTALLATION INSTRUCTIONS VITREOUS CHINA ONE-PIECE TOILET K-3639T/K-3639T-C
 ARCHER TM INSTALLATION INSTRUCTIONS VITREOUS CHINA ONE-PIECE TOILET K-3639T/K-3639T-C Please read these instructions carefully to familiarize yourself with the required tools, materials, and installation
HEATING AND AIR CONDITIONING
 WJ HEATING AND AIR CONDITIONING 24-1 HEATING AND AIR CONDITIONING TABLE OF CONTENTS page SERVICE PROCEDURES REFRIGERANT OIL LEVEL...1 REFRIGERANT RECOVERY....1 REFRIGERANT SYSTEM CHARGE...1 REFRIGERANT
IMPORTANT SAFETY INSTRUCTIONS
 CONTENTS 1.SPECIFICATIONS... 1 2.INSTALLATION... 1 3.INSTALLATION OF THE SYNCHRONIZER... 2 4.ASSEMBLY OF HAND WHEEL... 2 5.INSTALLATION OF HAND WHEEL... 2 6.INSTALLING THE BELT COVER... 3 7.ADJUSTING THE
MAINTENANCE MANUAL TAIYO SEIKI CO., LTD.
 MAINTENANCE MANUAL TAIYO SEIKI CO., LTD. Introduction This Maintenance Manual explains how to replace and adjust the major components of the Automatic Taping Machine when required in daily operation.
57" Fiberglass Exhaust Fan with Cone
 OPERATORS MANUAL Fiberglass Exhaust Fan IMPORTANT: READ AND SAVE THESE INSTRUCTIONS Read all instructions carefully before attempting to assemble, install, operate or service the product described. Failure
T-SERIES Air Conditioner. T50 Model INSTRUCTION MANUAL nvent Rev. F P/N
 T-SERIES Air Conditioner T50 Model INSTRUCTION MANUAL Rev. F P/N 10-1008-203 TABLE OF CONTENTS Warranty and Return Policy...2 RECEIVING THE AIR CONDITIONER...3 HANDLING AND TESTING THE AIR CONDITIONER...3
OTO BONDER OWNER S MANUAL WITH CIRCULATING SYSTEM MACHINERY DIVISION - - L to R Unit Shown
 GBAC RROTO OTO BONDER BONDER WITH CIRCULATING SYSTEM G B MACHINERY DIVISION OWNER S MANUAL L to R Unit Shown - - IMPORTANT FOREWORD 1) To ensure efficiency, the GBAC must be properly maintained. Carefully
OWNER S MANUAL CAVN SERIES SELF CONTAINED RETRACTABLE NOZZLE VACUUM SEALER WITH GAS PURGE
 OWNER S MANUAL CAVN SERIES SELF CONTAINED RETRACTABLE NOZZLE VACUUM SEALER WITH GAS PURGE WHAT S IN THE PACKAGE? This Operation Manual. (1) Vacuum Sealer. (1) E-(unit size) Heating Element, inside the
User s Information Manual
 Gas-fired Water boiler Series 2 NOTICE: Series 1/Series 2 identification Read the boiler rating plate to determine the series number. The rating plate is located on the right side of the boiler. User s
KC22/32 SERIES Sealless Non-Metallic Centrifugal Pumps Installation and Maintenance Instructions
 KC22/32 SERIES Sealless Non-Metallic Centrifugal Pumps Installation and Maintenance Instructions ASSEMBLY Unpack pump from carton and check for shipping damage. WARNING: Magnetic field hazard. This pump
Parts and Service Manual BURNISHER MODEL: MR , MR , MR , MR
 Parts and Service Manual BURNISHER MODEL: MR2000-115, MR1500-115, MR2000-220, MR1500-220 TABLE OF CONTENTS RECEIVING YOUR EQUIPMENT... 3 WARNINGS AND SAFETY... 3 ELECTRICAL INFORMATION... 4 GROUNDING INSTRUCTIONS...
Maintenance 5-1. Good maintenance is essential for cleaning results, and long economical life of the washer.
 Maintenance 5-1 5 Maintenance Purpose This chapter discusses the maintenance of your StingRay Parts Washer. In general, the washer is not maintenance-intensive. A few key items, however, need regular,
UNIQUE USER FRIENDLY MICROMETER STYLE ADJUSTMENT
 The series hose crimper with Micrometer Style Adjustment and 62 tons of crimping force has the capability to crimp hoses up -¼" -2 wire, -¼" 4 wire, and " 6 wire. UNIQUE USER FRIENDLY MICROMETER STYLE
Altra Series Dampener
 Crestline TM Altra Series Dampener Installation Instructions Heidelberg MO X88-66 10/97 Rev-A GENERAL INFORMATION ATTENTION CRESTLINE ALTRA SERIES TM DAMPENER OWNER! Accel Graphic Systems provides parts
Installation & Maintenance Instructions
 B2451 & B2452 Series Wall Heaters SPECIFICATIONS MODEL VOLTS HZ AMPS WATTS BTUH B2451 120 60 12.5 1500 5120 B2452 240 60 8.3 2000 6826 208 60 7.2 1500 5120 DIMENSIONS OVERALL Height - 14 1/4 Width - 11
BQ-260/260L. Important Information BOOK BINDER
 BOOK BINDER BQ-260/260L Important Information - This manual is designed to help you to install, operate and maintain Perfect Binder BQ- 260/260L. Read, understand and keep this manual in a safe and convenient
OWNER S MANUAL CAVS SERIES SELF CONTAINED RETRACTABLE NOZZLE VACUUM SEALER
 OWNER S MANUAL CAVS SERIES SELF CONTAINED RETRACTABLE NOZZLE VACUUM SEALER WHAT S IN THE PACKAGE? This Operation Manual. (1) Vacuum Sealer. (1) E-(unit size) Heating Element, inside the manual sheet protector.
Food Waste Disposer Owner s Manual
 H. WARRANTY TERMS FOR ECOSINK FOOD WASTE DISPOSER Warranty Period: 1 Year Homelektro Ltd. warrants that, with appropriate installation and use, the EcoSink food waste disposer shall be free from defects
Armstrong J Series Float, Thermostatic Steam Traps, Condensate Controllers & Liquid Drainers Installation and Maintenance Manual
 Armstrong J Series, Thermostatic Steam Traps, Condensate Controllers & Liquid Drainers Installation and Maintenance Manual This bulletin should be used by experienced personnel as a guide to the installation
Garb-el Free Standing Models
 Garb-el Products Company Promoting Environmental Responsibility Since 1950 Garb-el Free Standing Models Installation, Operation & Maintenance Manual Garb-el Products Company 240 Michigan Street Lockport,
BQ-260/260L. Important Information BOOK BINDER
 BOOK BINDER BQ-260/260L Important Information - This manual is designed to help you to install, operate and maintain Perfect Binder BQ- 260/260L. Read, understand and keep this manual in a safe and convenient
CHLORIDE GASES CHLORIDES
 Note: Always have this machine s model and serial number (printed on the first page of this document) ready when calling Consolidated for service or parts. WARNING If this sterilizer s chamber is constructed
CELDEK Evaporative Cooler Module Installation, Operation, and Maintenance Manual. CELDEK Evaporative Cooler
 CELDEK Evaporative Cooler Module Installation, Operation, and Maintenance Manual CELDEK Evaporative Cooler RECEIVING AND INSPECTION Upon receiving unit, check for any interior and exterior damage, and
1217A Operating Instructions
 1217A Operating Instructions Reversible Motor Friction Fed Conveyor Stacker Easy Disassembly Adjustable Folds Counter Available MADE IN USA SPECIFICATIONS Paper Weight.28 Lbs. Bond, 90Lbs. Cover, 135Lbs.
ENGINEER S MANUAL No.01
 1-NEEDLE, UNISON FEED, LOCKSTITCH MACHINE (AUTOMATIC LUBRICATION) LU-1510 1-NEEDLE, UNISON FEED, LOCKSTITCH MACHINE WITH AUTOMATIC THREAD TRIMMER (AUTOMATIC LUBRICATION) LU-1510-7 1-NEEDLE, UNISON FEED,
Owner's Manual. Please read this document carefully before installing and/or using your vacuum cleaning system.
 Owner's Manual for household use only Please read this document carefully before installing and/or using your vacuum cleaning system. Model : Serial No : Important Safety Instructions When using an electrical
CROWN SERVICE MANUAL ELECTRIC COUNTERTOP STEAMERS MODELS: PX-3 PX-5
 CROWN SERVICE MANUAL ELECTRIC COUNTERTOP STEAMERS MODELS: PX-3 PX-5 CROWN FOOD SERVICE EQUIPMENT LTD. 70 OAKDALE ROAD, DOWNSVIEW, (TORONTO), ONTARIO, M3N 1V9 TELEPHONE: (416) 746-2358, FAX: (416) 746-8324
918 Clock Gauge Installation, Operation, and Maintenance Instructions
 98 Clock Gauge Installation, Operation, and Maintenance Instructions The 98 Clock Gauge is designed to measure liquid level in an aboveground storage tank. The gauge mounts on top of the tank and is activated
AMS-224EN4530R / AW-3 AMS-224EN6030R / AW-3 INSTRUCTION MANUAL
 AMS-224EN4530R / AW-3 AMS-224EN6030R / AW-3 INSTRUCTION MANUAL 1 CONTENTS 1. GENERAL...1 1-1. Specifications of AW-3...1 1-2. Configuration...2 2. INSTALLATION...4 2-1. Installation procedure...4 2-2.
Built-In Dishwasher. Installation Instructions. BEFORE YOU BEGIN Read these instructions completely and carefully. IMPORTANT The dishwasher MUST be
 Installation Instructions Built-In Dishwasher If you have questions, call 800.GE.CARES (800.432.2737) or visit our website at: www.ge.com BEFORE YOU BEGIN Read these instructions completely and carefully.
Model Series ELECTRIC WATER SYSTEM PUMP. PumpAgents.com - buy pumps and parts online. Model Series. Automatic Multi-Outlet FEATURES
 PumpAgents.com - Click here for Pricing/Ordering Model 36950-2 Series ELECTRIC WATER SYSTEM PUMP Automatic Multi-Outlet FEATURES Self-Priming Diaphragm Design Allows Dry Running Built-in Discharge Check
Panel Fan Series Operators Manual (Galvanized and Polymer)
") Panel Fan Series Operators Manual (Galvanized and Polymer) Galvanized Panel Fan with Three Wing Blade IMPORTANT: READ AND SAVE THESE INSTRUCTIONS Read all instructions carefully before attempting to assemble,
Panel Fan Series Operators Manual (Galvanized and Polymer) Galvanized Panel Fan with Three Wing Blade IMPORTANT: READ AND SAVE THESE INSTRUCTIONS Read all instructions carefully before attempting to assemble,
INSTRUCTION MANUAL FOR DUTCHESS MODEL 260 BAGEL & BUN SLICER
 INSTRUCTION MANUAL FOR DUTCHESS MODEL 260 BAGEL & BUN SLICER Table of Contents Safety Information I thru VII Uncrating Instructions 1 Introduction 2 Adjustment Instructions 3 Operating Instructions, Cleaning,
SELF-PRIMING CENTRIFUGAL PUMPS BMLS-M & BMLS-H
 SELF-PRIMING CENTRIFUGAL PUMPS BMLS-M & BMLS-H INSTALLATION, OPERATION & MAINTENANCE INSTRUCTIONS HP Phase Medium Head High Head 3 1 BMLS 300 M BMLS 300 H 3 3 BMLS 300 M3 BMLS 300 H3 5 1 BMLS 500 M BMLS
COOLING SYSTEM 1. Section V CONTENTS DATA AND SPECIFICATIONS. Page. Fluid Fan Drive (Silent Flite) 3. Water Pump 4. Radiator 5
 3. Water Pump 4. Radiator 5") Section V COOLING SYSTEM CONTENTS Fluid Fan Drive (Silent Flite) 3 Water Pump 4 Radiator 5 Water Temperature Gauge 6 Thermostat 7 Radiator Pressure Cap 7 Service Diagnosis 7 DATA AND SPECIFICATIONS COOLING
Section V COOLING SYSTEM CONTENTS Fluid Fan Drive (Silent Flite) 3 Water Pump 4 Radiator 5 Water Temperature Gauge 6 Thermostat 7 Radiator Pressure Cap 7 Service Diagnosis 7 DATA AND SPECIFICATIONS COOLING
FOOD WASTE DISPOSER Owner s Manual & Installation Instructions
 FOOD WASTE DISPOSER Owner s Manual & Installation Instructions IMPORTANT SAFETY INSTRUCTIONS. READ ALL INSTRUCTIONS BEFORE USING WARNING! When using electrical appliances, basic safety precautions should
Instruction Manual - Anti-Siphon Ejector Chlorine & Sulfur Dioxide 500 PPD (10 kg/h) Maximum Capacity
 Maximum Capacity") - Anti-Siphon Ejector Chlorine & Sulfur Dioxide 500 PPD (10 kg/h) Maximum Capacity 100 PPD (2 kg/h) Chlorine or Sulfur Dioxide 250 & 500 PPD (5 & 10 kg/h) Chlorine or Sulfur Dioxide Anti-Siphon Ejector
- Anti-Siphon Ejector Chlorine & Sulfur Dioxide 500 PPD (10 kg/h) Maximum Capacity 100 PPD (2 kg/h) Chlorine or Sulfur Dioxide 250 & 500 PPD (5 & 10 kg/h) Chlorine or Sulfur Dioxide Anti-Siphon Ejector
T-Series Air Conditioner T20 Model
 INSTRUCTION MANUAL T-Series Air Conditioner T20 Model Protecting Electronics. Exceeding Expectations. McLean Cooling Technology 11611 Business Park Blvd N Champlin, MN 55316 USA Tel 763-323-8200 Fax 763-576-3200