WIA Craftsmanship Awards Final Judging
|
|
|
- Elvin Lamb
- 6 years ago
- Views:
Transcription

1 WIA Craftsmanship Awards Final Judging
2 WIA Craftsmanship Awards Final Judging Judging Instructions: NOTE: You will need a piece of paper and pen. As the judge for this final round, your task is to select the single best entry from each of the four categories. The entry with the highest number of votes will be the winner for its category. The slide show is segmented into four categories : Specialty, Small Spaces, Commercial and Residential. These correspond to the categories used for submission of the entries. To judge these entries, please review each entry in the category before making a decision regarding which ONE entry you wish to cast your vote for. o You will find that each entry has been assigned a number and consists of three slides: The first slide will show the completed project photo The second slide is the written narrative information as submitted by the entrant The third slide will show various photos and details of the work in progress Take whatever notes you feel necessary. Please review each entry in each of the 4 categories before you select the ONE entry in each for which you will cast your vote. Be sure to write down both the category and the entry number of your chosen selection.
3 WIA Craftsmanship Awards Judging Instructions: Continued Final Judging You will find two marker slides in between each category so you will know when you are about to move on to the next category. o Please be sure that you have noted your chosen selection for that prior category before moving on. You will be prompted to do so when you see this graphic: o The next slide will state the title of the next category you will be judging. At the end of the presentation, and just like you find in a voting booth, you will find a click here button. That will take you to the ballot portion. On that ballot, you will simply locate the empty circle which is next to your selection s entry number and click on that circle to select it. Bingo, as you proceed, you should wind up with four selections, one in each category. Now just fill in your name (we need to know who you are just like a voting booth) and select SUBMIT to formally send us your ballot choices. You may contact the WIA Headquarters with any questions at (800) or info@wallcoveringinstallers.org.
4 WIA Craftsmanship Awards Final Judging Note: There are more than five finalists in some categories either because of a tie or because some entries were reclassified after the initial round. Yes, we should have caught this error before the initial round of voting began, but due to time constraints the projects went out in the categories as entered by each contestant. Some incorrectly entered projects won a category but didn't belong there, so for the final voting round we have put them where they belong and also advanced the second place winner in the categories involved. This seems to be the fairest treatment. We appreciate your patience as we go through our first-year learning curve.
5 WIA Craftsmanship Awards Final Judging Category: Specialty

6 Entry 1
7 WIA 2015 Craftsmanship Awards Entry Number 1 Category: Specialty Project: Glass Bead Installation Project Summary: This project entailed installing a 54" glass bead wallcovering with a matched pattern. The walls where first primed with Zinsser Shieldz. The outlets where sprayed with Fusion Paint gloss black. The Base board was also painted a gloss black enamel. Then the wall where plotted out right to left. Six sheets total would complete the install. The sheets would be twelve foot long. The wall where the coated with a coat of Romans Pro 880 clear. Since the sheets where to be cut at twelve foot the decision was made to drop out the floor and cut the sheets on the floor. This made things a lot easier due to the weight of the bolts. A piece of 1/2" plywood was used under the wallcovering to make any cuts on the floor. The pattern of the wallcovering used for the top was decided and the six sheets where cut with minimal waste between sheets. Two six foot Perry scaffold would be u sed. one for the installer pasting the wall. The other for two installers one hanging top the other bottoms. The first sheet was to be installed on a curved part of the wall with about a 200+ radius. A level line was drawn on the left side where the sheet was to be placed. This would give us a level starting point for our second sheet. Since this radius was not true this was going to be the safest way to install. The first sheet area was then pasted. The weight of this material was very heavy so installing this radius was quite tedious. The trimming at the ceiling especially. The base was flush with the wall with a small caulk line to be trimmed to. The second sheet area was pasted during the installation of the first sheet. This sheet went up into the ceiling about twenty inches with a gap of ten inches full of accent lights. By the third sheet installation got easier learning how the material handled. The wall was completed after about six or seven hours. The outlet and switch plates where then covered to match the pattern. The register was also covered using 3M #77 spray adhesive. Two coats where used on both the material and register to insure proper adhesion. The pattern also matched, and all cutting was done form the backside of the register making cutting much easier. What makes this project unique: That it is a 54" glass bead wallcovering with a match pattern on a curved wall. What was the most difficult part of this project? The trimming of the material at the tops and bottoms on this curved wall. Additional Project Details: Safety glasses where used to keep any loose small glass beads from getting in eyes. Also several boxes of blades. Proper floor protection was installed on floors for scaffolding use so as not to crake any of the 3 x3 ft. black marble tiles. A Project completed that I could put my name on!


8 Entry 1

9 Entry 2
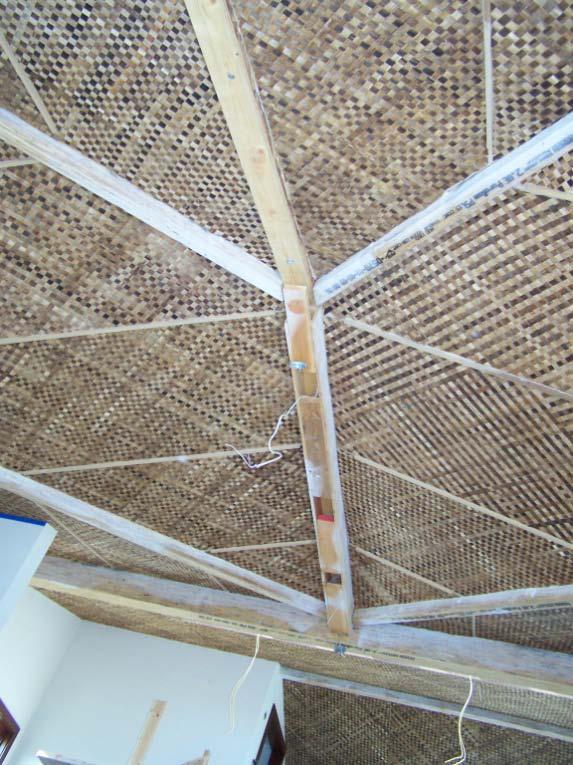
10 WIA 2015 Craftsmanship Awards Entry Number 2 Category: Specialty Project: Bali Ceiling Project Summary: This project was the installation of raw banana leaves, which were cut into strips and woven into 4' x 8' mats, on a 40'x 50' ceiling. The ceiling was sloped, 16' being the highest I had to reach off the floor. After meeting with the homeowner and surveying the jobsite I felt I could do the job to his expectations but wasn't sure about a lot of details. I told him I would charge my daily rate times amount of days the job took and the amount of days was to be opened ended. He agreed. Ceiling was primed with a high quality universal primer that has worked well for me over the years. I took a 4' x 8' mat home and experimented with it on my garage ceiling. I settled on Shurstik 111 as my adhesive. Rolling a layer of paste on the ceiling and letting it dry and then pasting the mat worked best for adhesion. I limited the amount of paste on the mat because I didn't want paste oozing through the mat upon installation. Even though pasting the ceiling and mat was the best option, it barely held it up until paste was dried. Once past dried, it held securely. My solution for making sure the mat stayed up until paste dried was to use big push pins during installation and remove them once paste dried. The panels were to be installed between cleats which were to receive faux beams. I had a tolerance of 1\4' between the cleat and the mat. Where the ceiling met the wall, mats had to be cut to fit. Once I began the job I was confronted with some issues I didn't anticipate. One was, once the edges were cut off the mats, they would easily distort. It was easy to cut a piece to install and find it was bigger than the space on the ceiling when I went to install it. My solution was to clamp a backstop on my pasting table to keep the edge of the mat straight when trimming. A second issue was come of the sections on the ceiling were longer than 8'. I couldn't just butt two cut pieces because the strips of banana leaves were of different widths. the transition from one panel to another was very obvious. I determined the only way to extend panels was to weave them longer. I took a mat and unwove it to produce a pile of strips. I then extended some strips up to 14' It required taping the unpasted side so it wouldn't fall apart. Tape was kept on until paste was dried. A third issue was at the wall mats needed to be cut to fit at inside and outside corners. Carpenters squared worked well. What makes this project unique: This project took some creative thinking. What was the most difficult part of this project? Extending panels so they didn't look like they had been added to. Additional Project Detail: Sixty-five 4' x 8' panels were used on this project. Project took 9 days.


11 Entry 2
12 Entry 3
13 WIA 2015 Craftsmanship Awards Entry Number 3 Category: Specialty Project: DeGournay Panels Project Summary: Walls were primed above wainscoting with Prep Coat Primer by Swing Paints out of Canada. All the panels were inspected matched up and plotted in there correct positions. The stone wall and buildings were lined up at eye level with a horizontal laser level line. A medium weight lining paper from Cavalier was installed vertically so as to miss any future seems from the DeGournay panels. The DeGournay panels were dry trimmed at the table and pasted with a thinned down mix of Pro 880 by Romans Adhesives. Then lightly spritzed with a spray bottle and rolled once more with a 3/8 nap roller. Cut 2 inch rolls of wax paper were used on top and bottom of each sheet. This helps with handling single sheets and keeping woodwork clean at the edge when trimming and pealing off excess material. Tops and bottoms along with edges of liner paper where seems fall were lightly brushed so as to enhance adhesion. 12" Liebco wallpaper smoother was used to smooth main part of sheets and Olfa Vinyl smoother to tuck edges in. Olfa snap off knife with Japanese blades from Steve Bogus was used to trim edges along with thin blue smoother. Vertical and Horizontal lines were achieved for positioning sheets with my PLS 2 Laser Level. Seams were butted first before smoothing the rest of each sheet. There is no forgiveness in repositioning this product once paper is on the wall so you must get it right the first time, clean hands at all times with light pressure on seems. I used the edge of my vinyl sweep and the edge of my seem roller very lightly to get seems down flush with surface. DeGournay panels will vary in color from panel to panel. That is the nature of this hand produced product. The switch plates were templated by cutting the edges just 1/8th" under the edge of each plate cover and saving the scraps, then laminating them over another layer of matched up scrap on the edge of each plate. Gouaches were used for detailing anything that needed additional coloration. This paper is hand painted silk on a pulpy laminated backing which does not like to be booked at all or wet too long. The backing will shred and surface will wrinkle if not installed within about five minutes. What makes this project unique: Anyone who works with delicate materials can appreciate installation techniques which go way beyond the normal care. What was the most difficult part of this project? The challenge of handling, positioning and dealing with switch plate covers. Working around fixtures with a sensitive delicate material. Additional Project Details: This kind of a project has many challenges. Thinking and planning ahead of the process with tools, techniques and a test sample help me to predict what the product will do when wet and applied to the wall. Lining the table with lining paper helped to keep the face of the paper clean. Working slow, double checking everything, and learning something from previously installed strips helped to give me more confidence in each following step.


14 Entry 3

15 Entry 4
16 WIA 2015 Craftsmanship Awards Entry Number 4 Category: Specialty Project: Mission Impossible - NOT Project Summary: This project was a renovation of an historical building with a tight event dead line. We faced many difficulties such as: The product was an untrimmed heavy plastered paper that came in 6 yd lengths. The ceiling was 25 long. This required us to join the ends with horizontal double cuts avoiding the heavy plastered areas and with a vertical repeat of 31 and limited material, we had to be creative. The faux painter gold leafed the product, BEFORE we installed. We found that had rounded off the two angles in the ceiling with dry wall compound which then prevented us from trimming the wallcovering in the angle to adjust for the out of square room. We had to start in the middle and force the wallcovering to follow the now rounded off curves in the ceiling. The weight of the material and the extra maneuvering needed to force the material required two people on the scaffolding and walk board. The difficulty there was the difference in height of the two people requiring us to set the scaffolds at different heights to allow the walk board to be put at an angle to give us both a height to reach the ceiling and hand off the job of applying the material at each of our best height. After heavily priming, we lined the ceiling and used that experience to see where our problem areas would lie in not being able to utilize the angles to make corrections. We laid out the room to make sure to center an element for the chandeliers and also to assure that we would not have a seam in the problem areas. Things went smooth until those rounded off angles. As we suspected, the ceiling started tracking off to the outside and with no way to double cut this thick material without losing important elements, we fought the natural line of the product and forced it to curve out of a straight line. The liner did its job and locked down the product. But with two drops left to go luck left us and we were forced to cut slits in the middle of the material in the flat areas and double cut creating a turn in the material. We were careful in utilizing the start of every drop to not waste material and sometimes started an inch from the edge knowing that the crown would cover it. Afterward we were informed that the crown had been changed to a flat 1/2" trim. With no more material in stock, we got creative and used scraps to create patterns in those areas and inlayed them to continue to the newly planned trim area. This job was a test of skills and creative ideas. What makes this project unique: Degree of difficulty in dealing with problems beyond our control and how we solved every problem we were faced with. What was the most difficult part of this project? Finding a way to make the material follow a turn in the plumb line without losing pattern and dealing with a shortage of material. Additional Project Detail: Lori Weitzner Palmette - Unique paintable Plaster paper heavily embossed, Draw Tite, Roman's 838 Adhesive, Cavilier Liner, Dynamite 234 Adhesive


17 Entry 4

18 Entry 5
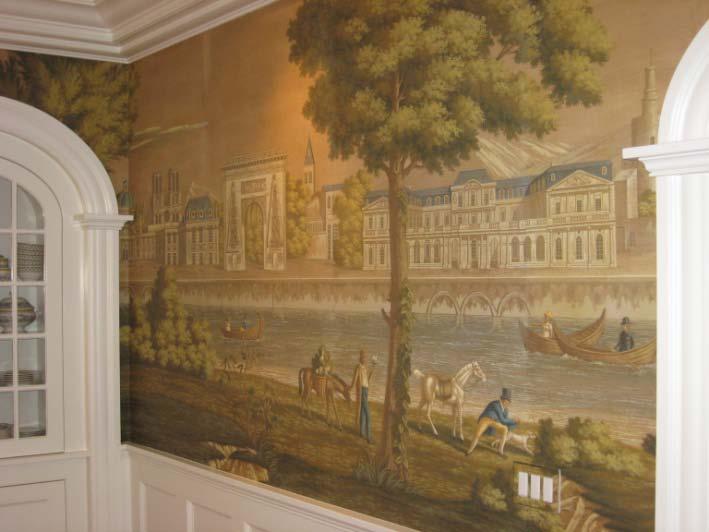
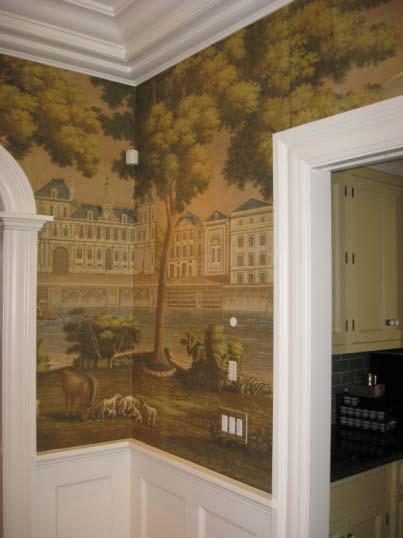
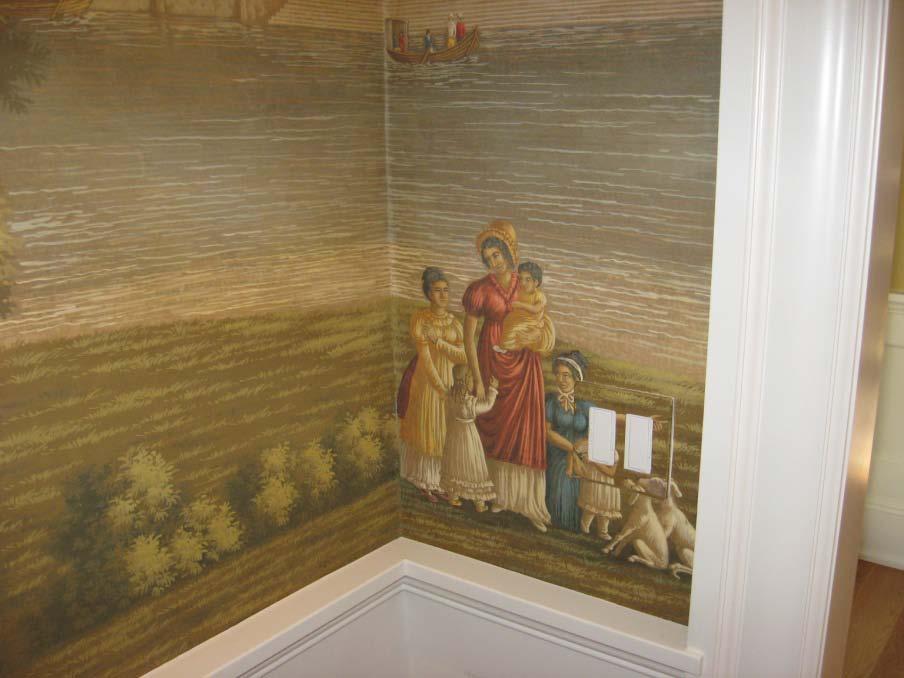
19 WIA 2015 Craftsmanship Awards Entry Number 5 Category: Specialty Project: The Gallery Job Project Summary: This project was a true test of planning and engineering skills. More than 1200 posters, mostly approximately 17" wide by 23" had to be combined to create larger patterns, and then those patterns repeated and layered to create full wall images. The finished project served as a background for an exhibit of the artist's work. 10 walls, all 15' tall needed to be converted from an artists vision into his completed work of art. Making the project more difficult, there were no measurements given to the installers, only computer diagrams of the finished walls. None of the s sent to the installers contained enough detail to see the layering of images either. Of course only 4 days were available for the entire project. The first day of the job was setup, sort and organize the posters, and start engineering the installation. The artist was not due to arrive from Germany until late that day to start discussing the installation and his vision for the completed project, so the crew had to rely on the computer renderings and no measurements to do the priming of the walls. since the job was a temporary job, it was critical to ensure the future removability of the job and that it could be stripped quickly and without wall damage. That meant two coats of Gardz primer over the flat paint. The artist wanted the wall areas that were not to be covered left with a flat finish, making the priming just as much of a challenge as the installation. As the priming was being completed the artist arrived, looked at the walls and decided he liked the sheen of the primed walls, so now all the areas that were masked off and not primed had to be double coated! While the crew was doing the additional priming the artist and lead installer went over the layout in detail. That was when the layering of posters was revealed to the installer. Every wall was different, with varying amounts of layering, exposed wall, and complex combinations of posters creating the final backdrop. The posters were digitally printed on a high quality stock, but expansion in the width created a challenge in lining up the elements of the posters, as the were installed both horizontally and vertically, making the alignment of the pattern a challenge. A combination of Roman 880 and Eco-Fix P-7 adhesive was used, and posters were booked for a minimum of 10 minutes. Almost every tool in the kits of the 5 installers, and every bit of their skill were used to create this incredible work of art. What makes this project unique: Teamwork between WIA members, and skills honed through the organization made this intricate job possible, and the resulting work of art a masterpiece What was the most difficult part of this project? Having only a computer drawn image of the artists concept without measurements made translating the concept to reality a challenge. Additional Project Details: The time frame allowed on the job was very tight. Only 4 working days for the 5 man crew were allowed. Losing the ability to do more than simply prep and set up on the first day due to the artist not being on site made this a 3 day installation. Going past the 3 days was not an option, as the opening gala was scheduled for the next day, and all of the artwork needed to be installed. Teamwork between the installers was excellent, with each person doing an outstanding job, using their own talents and skills. Minimal supervision was necessary, making production go at the needed pace. The logistics of this job, including normally small details such as parking, lodging, and loading in and out were complicated by a winter storm the night before the job started, but delays were not an option, again due to the tight schedule. One of the toughest parts of this type of work is knowing that it is temporary. The entire job was stripped by 3 of the original crew members in 5 hours, 6 weeks after completing the installation. The preparation of the surface, as well as the adhesive combination made the removal process go easily, and left the gallery owner and staff thrilled with the entire job from start to finish.


20 Entry 5


21 Entry 6
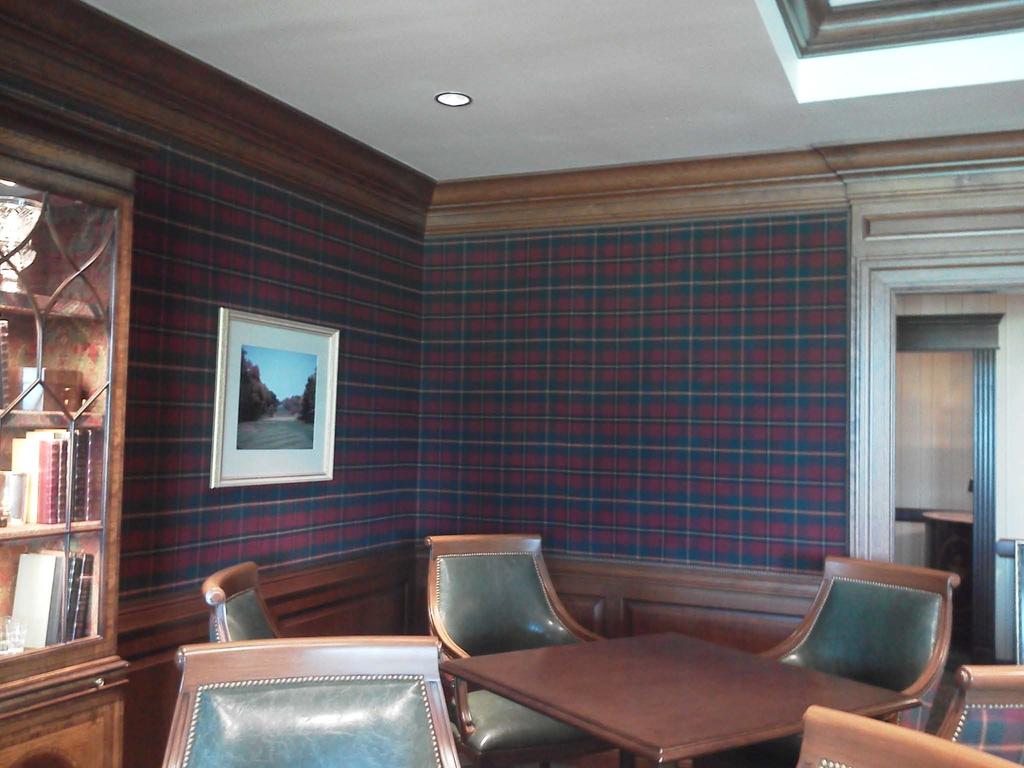
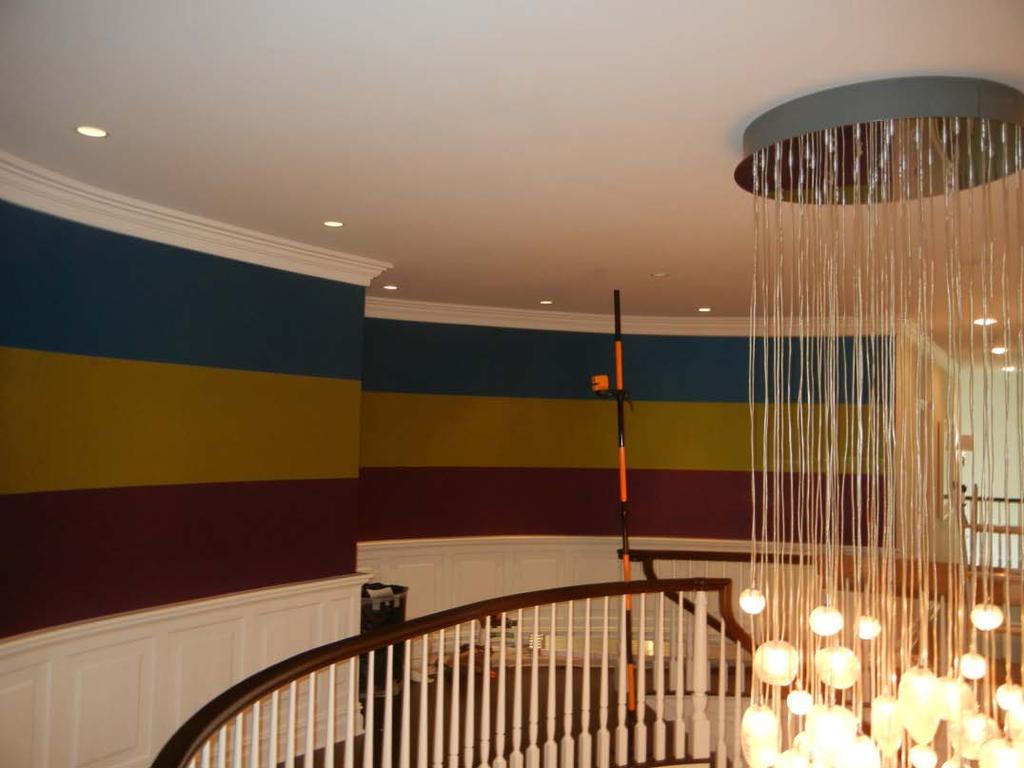
22 WIA 2015 Craftsmanship Awards Entry Number 6 Category: Specialty Project: Plaid Wool Fabric Installation Project Summary: This install was one that you never forget! It just tested you every day. The install started out smoothly we went in and striped all the residential grade wallcovering off the walls scrubbing and washing them down. Then all the walls where primed. The fabric was delivered to the site straight from a company that flame proofed and put a acyclic backing on the fabric. After setting up our fabric tables we opened one of the bolts. The fabric was all distorted and wavy. The first fifteen yards was like card board. The fabric was on a bias over eight inches on a six foot drop vertically and three inches horizontally. We opened up the second and it was just as bad. We informed the designer and contractor of the situation and all things came to a stop. The designer called to see if the manufacture of the fabric had any more inventory in stock. A heated discussions where al so going on with the flame retardant people. So hopefully there would be some word in the morning. Well when we walked into the job site in the morning the staircase leading up to the second floor where we where working was a water fall with water running out the front doors! The first floor where the lockers and equipment room was. Was entirely under water.. The cold weather had broken a main water line in the ceiling of the bar area and run all night. On entering our area there was my table, fabric, and tools under a drywall ceiling lying on the floor. We salvaged our equipment but everything else was trash. Sadly there was over six million dollars worth of damage. So after about a month the entire install changed. All new drywall, ceilings, electric, lighting and new millwork throughout the space. So walls where primed again. This time the fabric was just raw. No flame proofing or acrylic backing. The walls where very long so we had to come up with a way to keep the lines horizontally and vertically straight. So we found a the most prominent lines and taped the line straight with painters tape horizontally and vertically. This allowed us to keep our top line straight when applying the fabric to the wall. Then the seam was aligned. Then a two foot level was used to align the lines a block at a time. Once the outline of the block was aligned by tacking down the tape. the center could be easily smoothed out straight. The install went block by block starting at the top and working down to chair rail. After the fabric was completed a one inch wide welting was installed on the edges. What makes this project unique: A way to keep printed fabrics straight for installation. What was the most difficult part of this project? Everything about this install was difficult. Mostly coming up with a way to install the plaid horizontal and vertical s. Additional Project Detail: All the fabric was trim edged to butt, along with the tops. The walls where pasted and allowed to dry to a tack. The wall was pasted again when a sheet was ready to be hung. This helps keep moisture to a minimum for fabrics. The tape took a lot of time to apply to the fabric before installation. But all in all it was the only way to keep everything aligned. It really became very easy. I have used it on other patterned fabrics since. This job was a test and I passed! There was 245 yards of Wool Fabric. *50 feet of welting. 5 gallons of Zinsser Shieldz. 20 gallons of Pro 880 clear adhesive. One bag of Duro Bond #5. A case of 1" painters tape " hot glue sticks. 4 months of patience! One Miracle preformed!


23 Entry 6

24 Entry 7
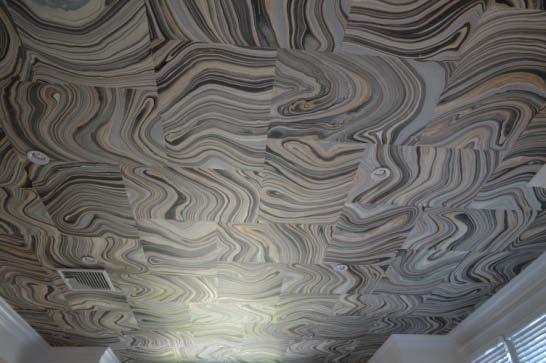
25 WIA 2015 Craftsmanship Awards Entry Number 7 Category: Specialty Project: Thai Marbled Mulberry Momi Ceiling Project Summary: This project started when a client asked if a product not used for wallcovering could be installed on a ceiling in her living room. The product was imported from Thailand. Very delicate lightweight paper. Paper is called Thai Marbled Mulberry Momi. A Handcrafted paper with flowing marbled patterned colors with no two sheets being the same. Every sheet is like a piece of art. Sheet size was 25" x 37". This paper is the thickness of tissue paper. So things were going to get interesting. The client was not sure about placement or design details on how she wanted the ceiling to look other than she wanted that paper. Taking the square foot we calculated that we would need 108 sheets for the project. This would allow us to offer several different ceiling design layouts. Paper was ordered and delivered within a week. Then the fun began with one person laying out about twenty sheets in different designs on the floor and then taking photographs of each from atop a 6ft ladder. Which allowed her to see it as if it were installed. While that was taking place the ceiling was being sanded, caulked and primed with Zinsser Sheilz. Also test sheets were being tested for expansion and shrinkage. The type of paste that was also decided was Romans 880 using a 1/4" nap roller. Finally a decision was made to cut the sheets down to 24' x 36' sheets. A template was then made out of cardboard so multiple sheets of paper could be cut at one time. Usually no more than 10 at a time. No lines could be drawn on the ceiling for sheet placement because of the paper being very transparent. So small dots were used to allow us proper vertical and horizontal placements of our sheets. The paper was installed from the center of the room out. Great care and cleanliness had to be taken in pasting the sheets as they would tear very easily. The paper was carried from the paste table without being book folded directly to two hangers who very carefully and gently positioned the sheet on to the ceiling. Plastic smoothers were used to apply the paper. Microfiber cloths were used to gently wipe down the sheets so that no residue or fingerprints would be left on any sheet. Water was changed as soon as it would start to get cloudy. Also a Perry scaffold was used so water and tools were at hand and hangers did not have to keep climbing up and down making installation much quicker. What makes this project unique: That the impossible is always possible. This product can open some doors in our field with clients and designers. What was the most difficult part of this project? Coming up with a design layout. Took a lot of patience and creativity. Hours of time before even getting the paper. Additional Project Detail: Three hangers where used in this project. I have to give these guys a lot of credit for this install. I am very grateful to have such great craftsman who know it s not all about the money it s about the craft!


26 Entry 7
27 To Do: Make your selection for the Specialty Category and note the number for your entry selection. Number of entries in Specialty: 7
28 WIA Craftsmanship Awards Final Judging Category: Small Spaces

29 Entry 8
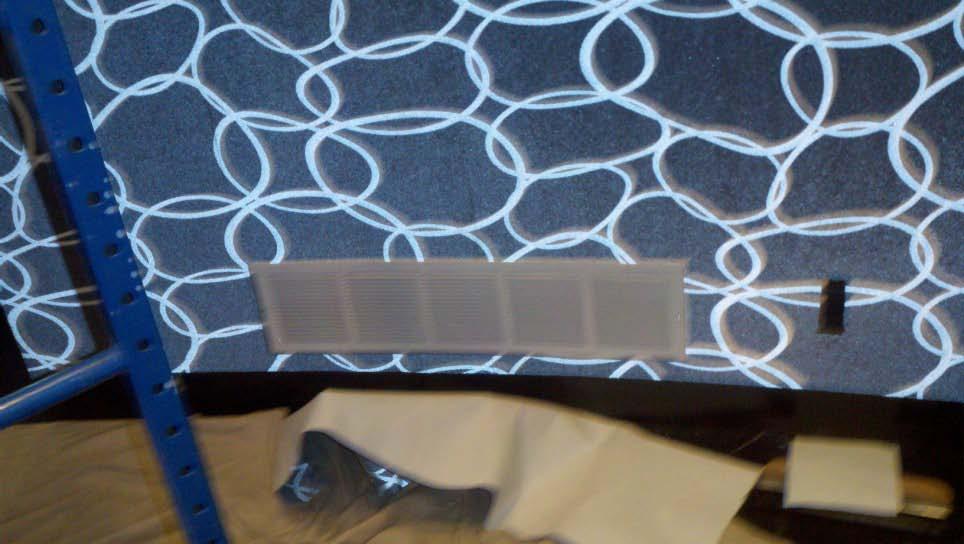
30 WIA 2015 Craftsmanship Awards Entry Number 8 Category: Small Spaces Project: Disguising a Large Vent Cover Project Summary: This project entailed covering a wall and a large vent cover with a scenic mural of Chicago printed on canvas. The area was about 8' x 6'. We were to repair a large crack in the wall, cover it with heavy duty liner paper to keep it from coming back and then cover the wall and the vent with a canvas mural. The image was under copyright by the photographer and the rights of the image had to be secured before it could be used. Murals Your Way in Minnesota printed the image on canvas. A large reoccurring crack in the drywall was patched with tape and joint compound and then the whole wall was covered with heavy duty liner paper. The large vent measured 18" by 4' and was unsightly. I sanded the vent and then primed it with R-35. I let it dry overnight. I then pasted the vent to help velcro the mural to the vent. I then pasted the canvas with Roman HD Clay. I used the HD Clay to reduce the moisture and thus the shrinkage of the canvas mural and installed the mural on the wall. I cut out the canvass over the opening in the wall over the vent. Then I used that piece to cover the vent. I did not have enough material to wrap the vent so I cut it on its edge. I then cut the slats and folded them onto the fins. Then I wiped the mural clean and let it sit of about 15 minutes. Once I was assured the canvas adhered to the vent, I installed it on the wall. Just like a giant switch plate cover. What makes this project unique: This was very small area that was covered to hide a large heating vent. You could barely make it out even when you were right next to it. What was the most difficult part of this project? Waiting for the rights to use the photo. Additional Project Details: I tested all of Roman primers and Guardz to see which one would hold better. Roman R-35 held the best. It would not scratch off the surface of the vent. Installation had to be fast so as to not stretch or shrink the canvass. We used all Roman products on this.

31 Entry 8

32 Entry 9
33 WIA 2015 Craftsmanship Awards Entry Number 9 Category: Small Spaces Project: Tented Treasure Project Summary: This was a wonderful job. The designer chose the Osborn and Little stripped paper. The owner wanted something different than just a regular stripe on the wall. So when we met onsite to measure and chat about this tiny 5x5 powder room. The space was above the wainscot and perhaps to include the ceiling. I asked if I could tent the ceiling. They both liked the idea. Sounds good they said. I drew a quick sketch having the strips running up the walls and onto the ceiling, converging in the center. There was no ceiling fixture to consider so I could have all the strips meet dead center. We talked about perhaps having a band run around the top of the wall to break the line of the stripes in case it appeared to heavy. We talked about a stripe running horizontally around the top of the wainscot. And when I left they both said for me to have fun, do what I wanted, and "we trust you". As I walked to the car I thought "what have I gotten myself into this time!!!" The day of the install I was a bit nervous, which is always good. And excited. This was a challenge, but fun. So I began by measuring the four walls. The room was a rectangle, not a square. But when I laid out the stripes, if I centered the white stripe on each wall the black stripes ended in each corner. This corner black stripe would be a bit larger than the rest of the wall stripes, but I figured that a black corner would hide the extra width better than the white stripe would. So I hung the walls first. Then started on the ceiling. I had to hang it twice, the two opposing shorter areas went up first. I used my PLSHVL 100 laser to get the ceiling corner to corner lines. So I matched the ceiling to each wall and hung a bit beyond the center point four times. There was a lot of overlapping paper up there! With the laser lighting my way, I double cut corner to corner and pulled paper. Holding my breath as I put all the good parts into place. It looked amazing! the white stripes that centered on each wall traveled up the walls and met dead center on the ceiling. But it needed more. The double cuts were not at 45 degrees as the room was not square so I cut some of the one inch pewter stripe and turned it into a miter cover. Looked good. But the center point looked rough. I decided to use a block of the black stripe. Making a square of black. And then trimmed the black square with the miter cover and ran it around the perimeter as well. I was done and happy. What makes this project unique: Sometime as installers we get to think out of the box. This job allowed be to take my skill and add in my craft. What was the most difficult part of this project? Measuring the walls and ceiling to be sure it would come together in a way that would look right. Additional Project Detail: Hung with Sure Stik 234, Used the PLSHVL 100 laser.


34 Entry 9

35 Entry 10
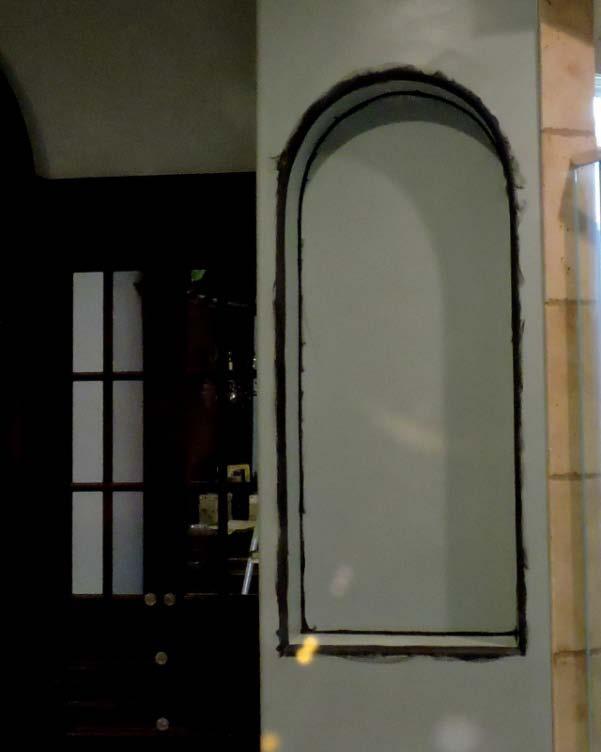
36 WIA 2015 Craftsmanship Awards Entry Number 10 Category: Small Spaces Project: Mica Niche Project Summary: This is a niche that you immediately face when walking into a master bathroom. The mica wallcovering by Pacific Designs was too thick to overlap at any point on an outside corner. Being a naturally glittery wallcovering, I needed this to appear as "sprayed-on" as possible. I decided to do the unthinkable and seam the entire niche all along the outermost part of the bullnose corner. The procedure was to be simple. One 24 by 54 inch template was made of the back of the niche, then measurements were taken and marked on the back side of a 3 by 9 foot sheet of wallcovering. The template was pasted and placed within those markings. Then the section was trimmed out and set aside to install later and the remaining full was pasted with full strength Dynamite 234. The outer corner had been previously painted and paste-sized with the same adhesive. I eased the wallcovering down to make the half-turn around the outside corner with fingers and a rubber seam roller along the edge. It needed about 5 more minutes to fully stick. Then two 6 by 54 inch strips were cut and pasted for the side returns and 6 by 24 inches for the lower return. When I trimmed out the back section I had used a straightedge, negotiating the crooked edges of the template. This allowed me to bring the return strips right up and seam them along the corners at the bottom and lower sides, without any single or double-cutting. Some single and double-cutting was needed along the arch area and to join the two return strips up top. The seam was colored on the wall using a grey Crayola marker. What makes this project unique: Papering an arch with no relief cuts or overlaps. What was the most difficult part of this project? Seaming the material all along the bullnose corner. Additional Project Detail: The walls were dusted and primed with Gardz. Washable Crayola markers were used for seam coloring. The wallcovering is Pacific Designs GT3936.


37 Entry 10

38 Entry 11
39 WIA 2015 Craftsmanship Awards Entry Number 11 Category: Small Spaces Project: Cascadia Peacock Feature Wall (Real feathers) Project Summary: The project was to install wallpaper made of real peacock feathers on a feature wall in the entrance of this NYC Townhouse. The challenges were; #1 a sample in advance for this very expansive material ($5000/sheet 4 sheets) was not available. #2 Ordering a extra sheet wasn't in the budget. #3 The material was measured and ordered by the designer before I had a say. It was decided the prep for the wall would be Rx 35. After measuring the material (38" wide) and the wall (151" wide) leaving one inch to spare. The material came in 10' lengths and the walls were less then 9' leaving material to test with. If the material didn't grow we would have to butt seam, if it grew we would experiment double cutting. We weren't crazy about the butt seam and the material grew 1/2" after booking. It was decided to double cut, it had to happen quick, clean, and flawlessly. We (Phil Reinhard & myself) carefully pasted all four sheets and went right to work. We stared from opposite sides, butting the corners and meeting in the middle, we used two inch low tact tape to protect the surface and carefully double cut. It worked flawlessly with indistinguishable seams. What makes this project unique: The location, expense of material, and the expertise and experience needed to make it work. What was the most difficult part of this project? The concentration needed to apply the four sheets so quickly. Additional Project Detail: I didn't realize I was going to enter it to this contest so I didn't take enough pictures. I will be back on 7/15 and can take more if that's acceptable.

40 Entry 11

41 Entry 12
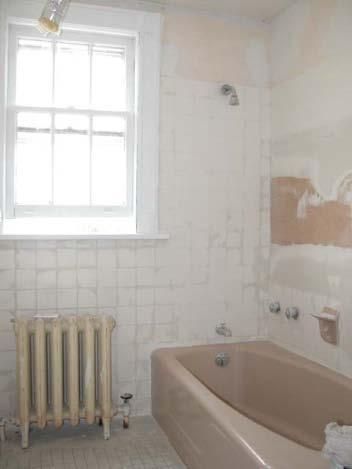
42 WIA 2015 Craftsmanship Awards Entry Number 12 Category: Small Spaces Project: Bathing With Fishes Project Summary: I was offered the opportunity to design a "Wallpaper Room" in a designer show house for a local charity. I agreed to take on the project and after seeing the room I was being offered I almost regretted my decision. But the chance to do such a major transformation using fresh ideas in wallcoverings made me decide to move ahead with the project. The room was a bathroom that was in horrible condition. Missing and broken tiles outnumbered whole tiles. The walls were in very bad condition. The tub needed to be refinished. But that tub was the inspiration for the design. The tub was a corner tub, attached to the front wall and a side wall, with the back and one side open to the room. I envisioned a glass enclosure and an aquarium inside the glass walls. After researching underwater tropical fish photography I found two very good pictures taken by the same photographer at the same time and location. That gave me equal color tone, lighting and scale on the two pictures. For the repair of the tile walls outside the shower, and to frame the digital images inside the shower I chose a Weathered Stone tile in an aquamarine color. The upper portion of the walls and the ceiling needed to stay simple with all the other features of the room so a Vahallan torn-edge paper was chosen in a sand color. Now all that was left was the floor. In one of those middle of the night inspirations I woke up to an image of water on the floor in my mind. So back to the computer to do more research and I found a perfect picture of tropical water. The only problem was that the image had a copyright mark and the photographer wanted $1000 to supply a copy of the image without the trademark. We negotiated a much better price and all the elements of the room were in place. All surfaces were filled and smoothed to be better than new condition, and the floor floated with a leveling compound. Then primer was applied and after painting the trim and refinishing the tub white, the various wallcoverings were installed. Protection of the surfaces was the next order of business, and several coats of a crystal clear high gloss acrylic finish were applied. 4 coats on the Weathered Stone and the images in the tub area, and 8 coats on the floor. New fixtures were installed, a local artist donated artwork for the walls, and the room was accessorized, transforming a room that looked like it should be condemned into a wonderful whimsical space. What makes this project unique: This room brought new ideas in wallcovering to the 4500 people who toured this show house, and inspired many to use wallpaper again. What was the most difficult part of this project? The repairs and prep work in this room were extensive, requiring many techniques new to me as an installer, particularly the tile repair. Additional Project Details: The digital images were supplied by 4Wallls.com and they were extremely helpful in helping with artwork and scaling of the images. The tile areas of the job were supplied by Weathered Stone, and they were happy to custom size the tiles to fit the scale of the room. All wall areas were primed with 2 coats of Draw Tite primer, with sanding between coats on the areas getting the digital images. This ensured a perfectly smooth finish. This little room consisted of only 400 square feet of wall, ceiling and floor space, yet looked perfectly scaled, even when using 4 different wallcoverings. As a final note, the homeowner who moved in after the show house closed became a regular customer, and the Aquarium Bath is the favorite of the grandchildren and the ONLY room from the original show house that has not been changed. That's a very satisfying feeling!


43 Entry 12
44 To Do: Make your selection for the Small Spaces Category and note the number for your entry selection. Number of entries in Small Spaces: 5
45 WIA Craftsmanship Awards Final Judging Category: Commercial

46 Entry 13
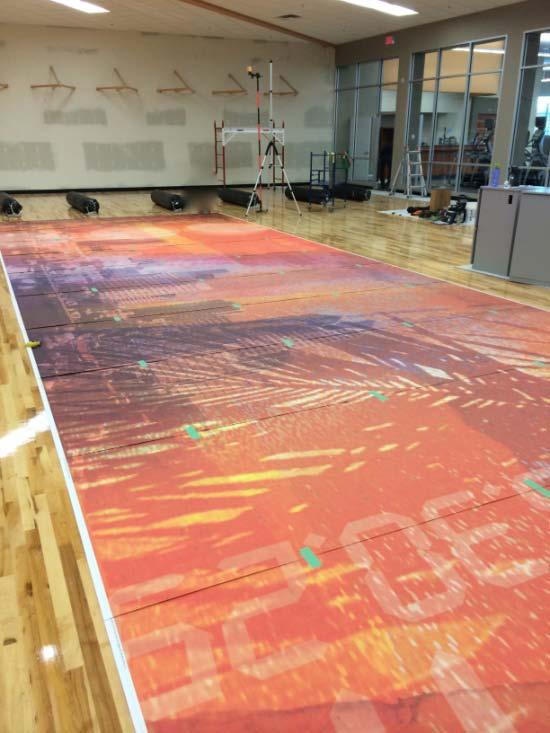
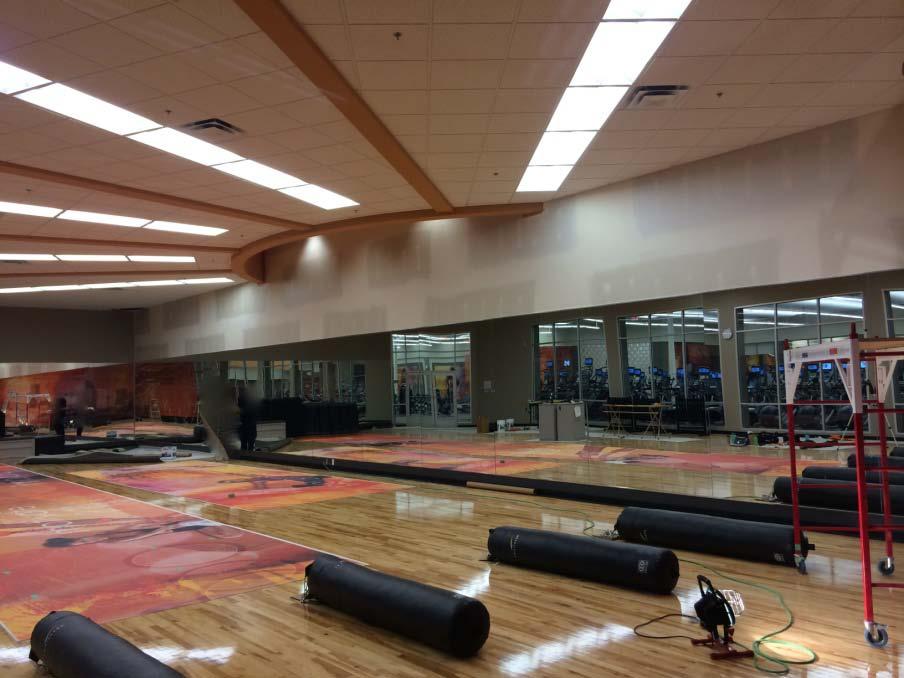
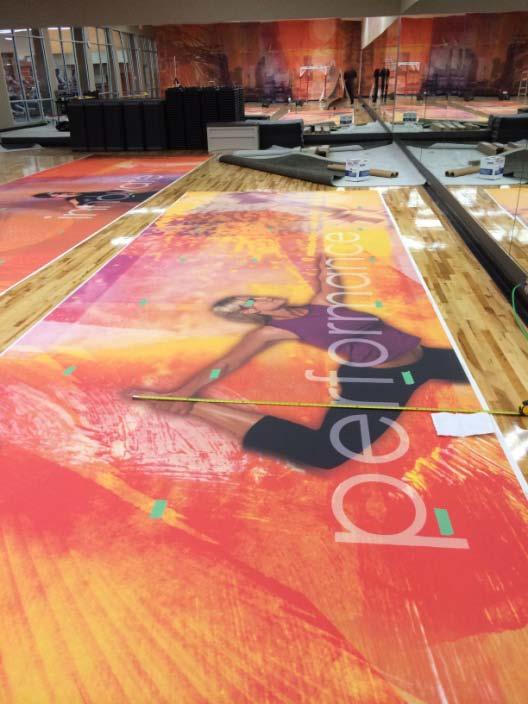
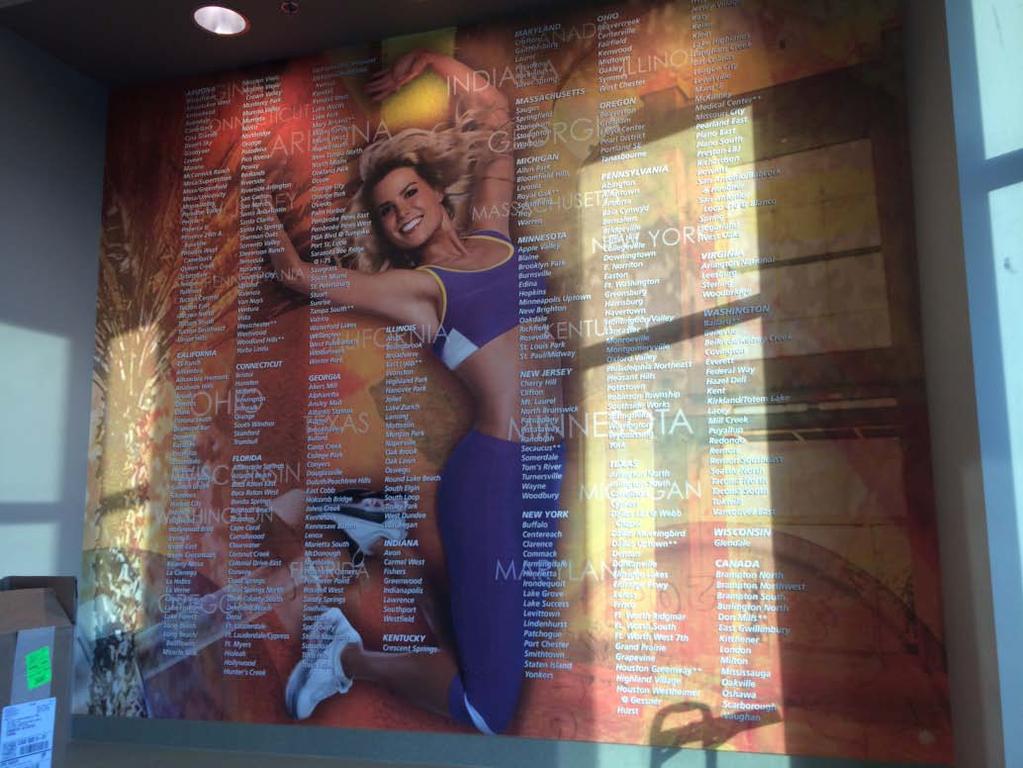
47 WIA 2015 Craftsmanship Awards Entry Number 13 Category: Commercial Project: LA Fitness Challenge Project Summary: There were three graphics in this install. The kickboxing wall was the most challenging because of the six iron bag supports protruding three feet from the wall making access difficult. The scaffold had to be low enough to roll underneath the girders, but then wasn't high enough to reach the top of the wall - this was achieved by placing a box on top and crawling in and around the beams as necessary. The girders were not level on the wall so we used a horizontal laser line as a reference point to measure for placement and transferred that to the graphic which was laid out and taped together on the floor and actually split it in two so the joint would occur just above the base row of supports. We installed all the lower sections first precisely cutting around the beams and then the top pieces were filled in from right to left matching the panels below. The aerobics graphic was 42' long and 9-1/2' high and was printed full size but only 5' height was needed for much of it with the height increase in the centre section. it took a long time to engineer placement to make sure none of the wording or any part of the athletes bodies were cut off. This was accomplished by again laying out all the panels on the floor in two sections (it was too big to fit in a single run) and taping the overlaps. Careful measuring and snapping a white chalk line marked the excess that could be cut off the upper portion of the outer panels. The panels were cut apart leaving the tape on the face as a reference for accurate and faster alignment as the graphic had large abstract areas with no obvious match. Any mismatch would cause the image to drift off and endanger the placement of the wording which was already dangerously close to the lower edge due to the graphics scale being too big. Installing the higher center section was challenging because of the bowed shape making it difficult to get into the corners to trim - too tight to get hands and trimming tools in there - so again there was some precise measuring and the vertical cut was made on the table so it could just be placed and then the ceiling trimmed. The last graphic was up above a cabinet/counter so after determining that it could bear weight we padded it off and were able to put a narrow ladder to reach for install. This three piece graphic was loaded with text all through the seam area so careful alignments and choosing exactly where in the lettering to cut through for the best seam was important. What makes this project unique: The engineering and planning required to overcome a variety of obstacles: physical barriers, height, tight spaces What was the most difficult part of this project? Figuring out how to install the 14' kickboxing graphic without damaging it while dealing with 24 iron posts to work and cut around. Additional Project Detail: Custom graphics totaling 1880 square feet. Primer used was Roman Rx-35. Adhesive - Gardner Gibson Dynamite 234 The panels were pulled through a pasting machine.


48 Entry 13

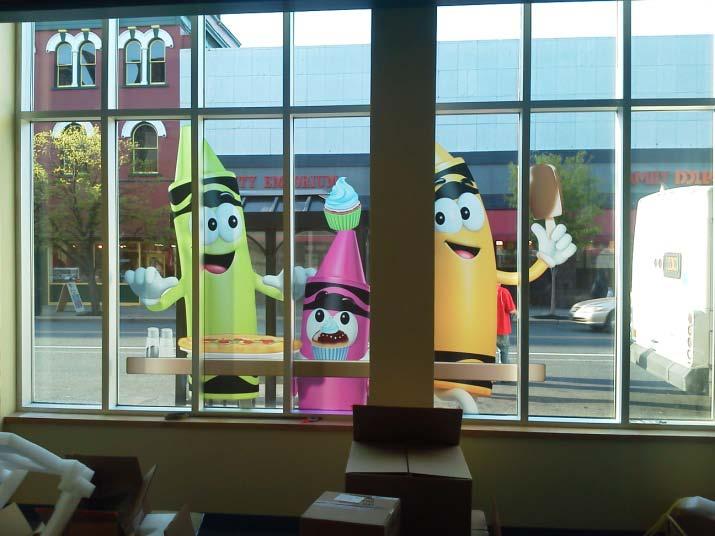
49 Entry 14
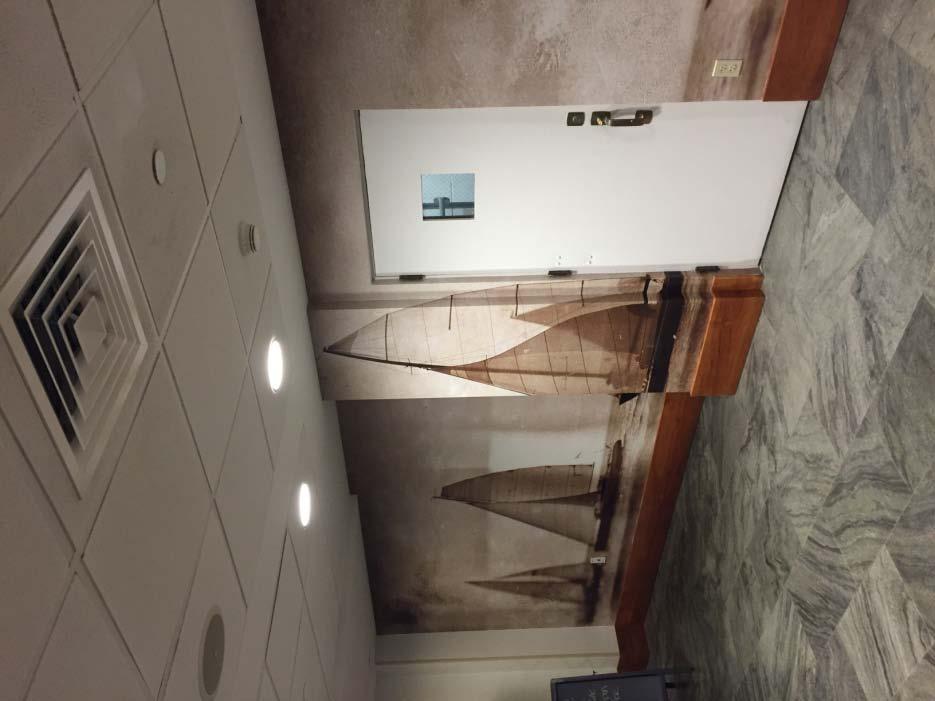
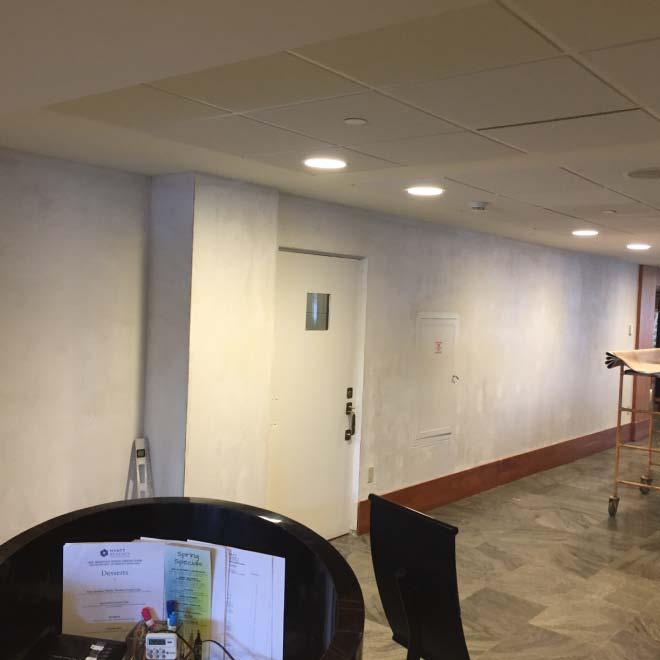
50 WIA 2015 Craftsmanship Awards Entry Number 14 Category: Commercial Project: Lobby mural at Hyatt Regency Newport RI Project Summary: Before we start do the mural we need first took old paper off from the lobby, we process to repaired walls and get ready to we can install the mural this process took us two days of work during this process we had to close the area where we worked. When we have walls ready we proceed to install the mural from left to right follow the instructions. We used roman 880 clear paste to install the mural, the mural was overlap cuts to have a perfect match. We cut the paper and pasted 6 to 7 sheet a the same time depend on the mural was 3 different mural but when you installed looks just one piece. What makes this project unique: Shows the meaning of the hotel. Located on front of sea. What was the most difficult part of this project? Match the lower wall sheet with the high wall sheet in the front wall next to the reception area.


51 Entry 14

52 Entry 15
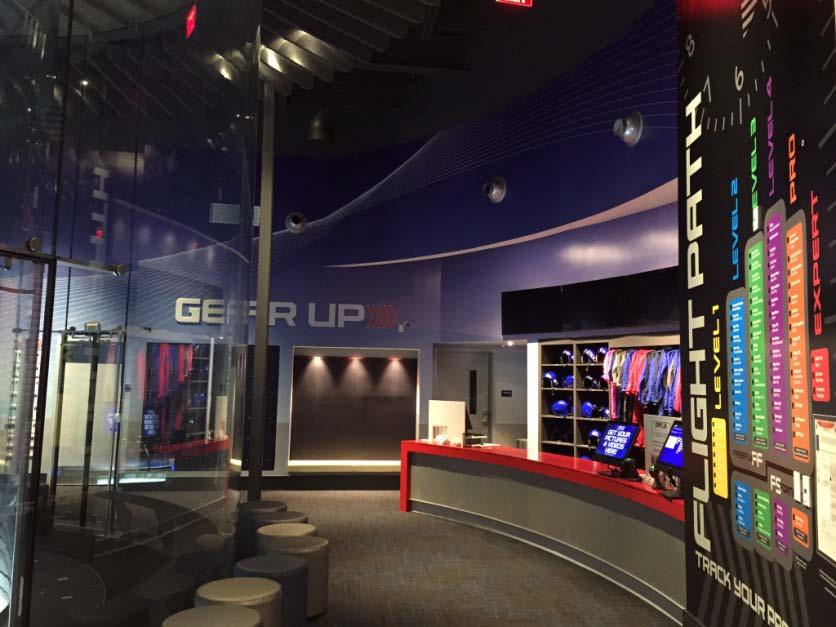
53 WIA 2015 Craftsmanship Awards Entry Number 15 Category: Commercial Project: ifly Indoor Skydiving Project Summary: Murals were hung in 6 different rooms. Walls were primed with GARDZ primer. Material was 54 inches wide. Dynamite 234 clear adhesive was used. Gluing the sheets on the floor seemed to work best after experimenting gluing the wall which caused some bubbling. We used pacific cloth on a plastic smoother so as to not scratch the delicate surface of the mural. A scissor lift and scaffolding were used to reach the high areas. A laser and blue tape were used to align sheets and double cut using a two foot straight edge with a handle. What makes this project unique: Curved walls ranging from eighty to ninety feet and also maneuvering a scissor lift. What was the most difficult part of this project? Lack of communication between printer and IFLY, receiving the murals in time to meet the deadline for a promotion filming, Additional Project Detail: Due to the delay in receiving the correct murals, we had to not only work after hours, but also during business hours around customers to meet the deadline.


54 Entry 15

55 Entry 16
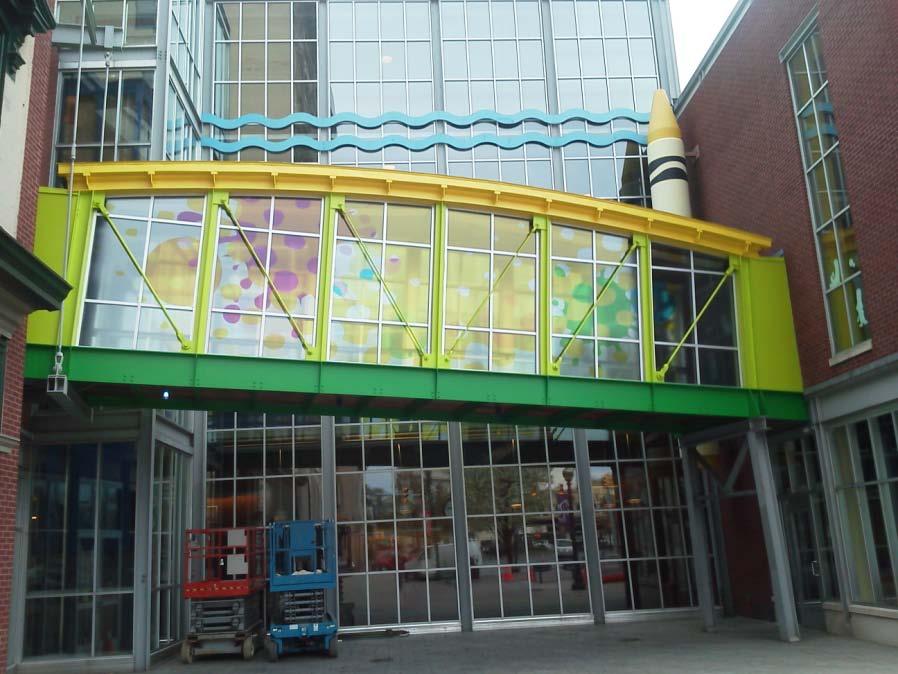
56 WIA 2015 Craftsmanship Awards Entry Number 16 Category: Commercial Project: Crayola Fun Factory Project Summary: This project consisted of a large amount of glass graphic being installed on two large windows on the exterior of the building. A connecting bridge between two buildings on the exterior glass and a restaurant on street level with a interior installation. The large windows on the corner of the building would take thirty graphic panels each. Two high lifts where rented to go as high as 75'. All graphic panels where then numbered for proper placement starting at the bottom left side of the window and working left to right. Two teams of two men would install dividing the window sets in half one team taking the right the other taking the left. Both lifts where then loaded with glass cleaner, cloths, Graphic panels rolled separately and placed in five gallon buckets so they would not get blown away. All men where set up with safety equipment such as fall protection the ground below was the roped off for the safety of the public. Starting from the bottom sets of panels the glass was cleaned free of any dirt. These graphics where very translucent and would show and contaminants on the glass. Spray tack was used to help in mounting and ease in positioning of each panel. This installation got to be quite difficult do to it was the month of April it was quite cold in the mornings and very windy especially the higher we got. Also the side walk was out of level about two inches so after twenty feet or so the safety on the lifts would kick and not allow you to go any higher. So a new lift that had a very large deck and self leveling was ordered. So we moved to the bridge installation until delivery. The bridge install went like clock work in just enough time for the new lift. The new lift gave use a lot more working room and allowed multiple installs at the same time. It actually cut our install time in half which helped for additional rental and when your up seventy feet a lot more safe. After completion of the high windows we moved to the restaurant install. It was nice to finally get our feet back on the ground. There where about twenty five different characters place on the inside of the restaurant windows. We actually had children sitting and watching us install to see what was coming next. It was really fun to see such joy in their faces. This install took five days to complete. What makes this project unique: This Installation project came along a the perfect time when the economy was slow and I was trying to find other avenues to expand our field. What was the most difficult part of this project? The wind in April in the east is killer!! My hats off to my fellow installers in the east!!!! Additional Project Details: There where ninety two graphic panels installed with no back up panels in case of a mistake. Easton was a fantastic place to work and this was one of my favorite projects ever.


57 Entry 16
58 Entry 17
59 WIA 2015 Craftsmanship Awards Entry Number 17 Category: Commercial Project: Digital Doc Project Summary: This job was a large format digital print panels for the entirety of one 11w x 14h wall and self- stick cut out graphics for several spaces on another wall in the same room. Straightforward enough, except, no instructions, no diagrams, no pictures, and oh yeah, the wall with the digital print was slightly larger than the print no matter how minimally it could be trimmed. The print was laid out on the floor on clean drop cloths to see its size and discover what it was supposed to look like. At that point, it was decided that the wall ( 2 tone color block) needed to be painted to extend the colors around the inside corner as the print was not wide enough. The print was then installed using clay based adhesive using a Velcro method( clay the wall, let dry, clay the back of the print) and hung as the vinyl was very heavy. The panels were single cut as we had no room for a double cut on the print. The cut out self sticks were positioned on the wall taking special care with spacing and leveling. some compensation was needed for spacing on the color block as it was not completely level, nor was the ceiling! The entire job was an overwhelming success (dispute the lack of direction). What makes this project unique: A custom digital print that does not fit the wall, and has no picture or instructions is made to look as planned by the installer. What was the most difficult part of this project? Making the digital look correct and the cut outs appear level and properly positioned. Additional Project Details: This job was a large format digital print panels for the entirety of one 11w x 14h wall and self- stick cut out graphics for several spaces on another wall in the same room. Straightforward enough, except, no instructions, no diagrams, no pictures, and oh yeah, the wall with the digital print was slightly larger than the print no matter how minimally it could be trimmed. The print was laid out on the floor on clean drop cloths to see its size and discover what it was supposed to look like. At that point, it was decided that the wall ( 2 tone color block) needed to be painted to extend the colors around the inside corner as the print was not wide enough. The print was then installed using clay based adhesive using a Velcro method( clay the wall, let dry, clay the back of the print) and hung as the vinyl was very heavy. The panels were single cut as we had no room for a double cut on the print. The cut out self sticks were positioned on the wall taking special care with spacing and leveling. some compensation was needed for spacing on the color block as it was not completely level, nor was the ceiling! The entire job was an overwhelming success (dispute the lack of direction).


60 Entry 17
61 To Do: Make your selection for the Commercial Category and note the number for your entry selection. Number of entries in Commercial: 5
62 WIA Craftsmanship Awards Final Judging Category: Residential

63 Entry 18
64 WIA 2015 Craftsmanship Awards Entry Number 18 Category: Residential Project: Summer Home Stairway Project Summary: This project was a wallpaper installation in a 3 story stairway in a summer home on the beach on Lake Michigan. The designer wanted the wallpaper installed horizontally within the hand carved wood panels on the walls. The waves in the wallpaper were supposed to give the impression of the waves on the lake. At the time of the measurement, the General Contractor agreed to scaffolding the stairways and back walls for the installation of the hand carved columns and the wallpaper. This fell through so we had to rig the job using a 22 ft stringer plank off the stairs to a 3 1/2 section baker scaffold. We then used the baker scaffolding to install the paper around the corner of the stairway and wrapping the paper around the corner where it died into the outside wall. The whole setup had to be dropped down as we installed the paper. At 1st glance the wallpaper pattern looked random. However, that was not the case and there was a very specific pattern match that had to be maintained with each sheet all the way around the walls. The walls were primed with an acrylic pigmented wallcovering primer and then installed with a clear paste. Because, the walls were broken up with the columns we were lucky in the installation because we had no long runs and each piece was manageable with one person. The only areas that took 2 people were the outside corners. The install took 3 days. What makes this project unique: The fact that most of the install took place in the air on scaffolding and that the wallpaper was installed horizontally to mimic the waves. What was the most difficult part of this project? Being able to reach the wall and install while working over stairs, appliances and one of a kind countertops. Additional Project Details: The wallpaper came in a unmarked box with no instructions. We had to determine best practices once we opened the boxes. The 36 inch width of the paper did help in planning the install. This width was easier to handle than 54 inch commercial paper and not as many seams if it was 27 inch wide wallpaper. The materials hung beautifully and seamed up really well. It had a metallic background and a flocked pattern. The lighting made it sparked at night. The paper made us look really good. It was a high quality nicely produced wallcovering. The designer said the stairway with the hand carved columns, floating stairway and wallpaper is the show piece of the house. It was a fun job to do. We primed with Roman ultra prime and installed the paper with Roman 880.


65 Entry 18

66 Entry Entry 1019
67 WIA 2015 Craftsmanship Awards Entry Number 19 Category: Residential Project: Designer Show House Entrance Foyer Project Summary: A short deadline, only stairway in the home, every trade in the world doing there own room all at the same time, and we get to paint and wallpaper that entry foyer. All custom sized untrimmed papers figured from drawings and unfinished walls. Oversized hand cut design put onto ceiling from a blown up size image from paper on walls(that had to be adjusted to hit wall at exactly the same place all around the room even with the chandelier not being centered). All stair treads centered with untrimmed paper. Small ceilings and a niche papered with untrimmed paper. All walls hung horizontally, and spaced to have equal direction through reversing trimming points and reversing certain strips. Hand stenciled floor carpet, hand antiqued glass panels and some metallic paint. All done while every trade was on the same deadline and using this (the only) stairwell in the house. What makes this project unique: The space, the timeline, all the unknown variables, and adjusting the installation to fit the designers vision hat was ever changing. What was the most difficult part of this project? Time frame and other trades constantly going through the workspace. Additional Project Detail: Job was also done pro bono for the designer so we had only one guy there with a helper to try and keep the cost down and keep other jobs going. The papers used where also never used before anywhere so this was there test run for the designers line of wallcovering. We used around two five gallon buckets of 234, two gallons of Gardz, five gallons of wall, trim, and other paint(all approximate). Approximately 150 yards of untrimmed paper. The paper was from Bridget Beari as was all the paints.


68 Entry 19

69 Entry 20
70 WIA 2015 Craftsmanship Awards Entry Number 20 Category: Residential Project: Gift Wrapped Project Summary: This install was for one of my favorite designers in her personal home. She had a hard time choosing Wallcovering for this huge guest bedroom. It was around 40 single rolls of a trimmed 27" paper. First we did the 12' walls, angles, and ceiling in the inset. The paper was pulled through a paste machine and booked for 3-5 minutes. We then smoothed the paper down with plastic smoother and trimmed with an Olfa knife. Then she decided to cover the doors. The doors were very time consuming, and Nick did a great job wrapping them. The paper was flexible enough to work into all the tiny grooves and spaces. She loved the doors so much that she added the trim too. Thankfully she orders lots of extra Wallcovering for her personal projects. What makes this project unique: Wrapping the doors and then the molding around the doors. What was the most difficult part of this project? The very tall slanted walls, and covering six panel doors. Additional Project Detail: Romans " pre-trimmed paper 40 single rolls


71 Entry 20

72 Entry 21
73 WIA 2015 Craftsmanship Awards Entry Number 21 Category: Residential Project: Second Times A Charm Project Summary: The grand foyer had a circular wall 20 ft. off the floor with 45 ft. pieces running horizontally. The install was a dry hang which required meticulously trimmed edges. The material a shimmering paperbacked rayon blend was 58.5 inches wide for each color with no reference for a straight edge. A dual straight edge method was employed and a few attempts were made because the material was out as much as 3 inches for the lengths needed. We only needed 22 inches for each strip. We split the rolls so we could fit them on our commercial machine trestle for handling the 45 ft. lengths. The timing and coordination had to be spot on in order to apply the adhesive to the wall, wet the back of the sheets just enough to reverse roll them, and get them to the second floor. Our primary challenge was judging the amount of paste film. The curved walls made it difficult to set up planks so that we could run the full lengths. The material was absolutely unforgiving cleanliness wise. We started with swing prep coat and roman 880 as glue size then re-wet. We began on a 18 ft. balcony section to finish the first day. The second day started with the balcony 24 ft. section. Discussion the day before affirmed that an additional tower would be needed. Once the second tower was set and adjusted to the stairs we could plank from an extension ladder and leg leveler with a small platform to support the short plank needed to get closer to the wall. We were ready for the 45 ft. section. This required all three of us as we timed pasting, wetting and handling, while negotiating step ladders, hand rails, scaffolding towers and our planked stairway. Two pieces were applied that afternoon. While preparing to finish our last piece the next morning we began to notice some edges had loosened. We carefully lifted and pasted the areas needed. This proved to be the most tedious as any mistake would cost us huge pieces of material. The last piece did not go easily. We had lost our timing groove. We found ourselves having to re-paste just before applying to insure no loosening edges for we would be taking down our equipment. Our ongoing challenge from the beginning had been fraying. Once we installed a full wall we used a small beard trimmer. By slightly blowing on the seam to raise the fibers we were able to shave them. This totally impressed the owner because this was one of her major concerns in reusing this fabric. What makes this project unique: Dry hanging silk like fabric in a circular stairway with 45ft. lengths horizontally. What was the most difficult part of this project? The co-ordination of 3 installers in timing our trimming, wetting and paste film before installing very delicate material in challenging conditions. Additional Project Detail: Emotional intensity for the highest of expectations by the owner because she had already paid once, this was a redo. 3 days from setup to takedown. Swing prep coat as primer, Roman 880 adhesive glue size and re-wet. Custom laminated rayon blend fabric in 3 colors 525 sq. ft. total. 280 linear ft. of double straight edge trimmed 22'' widths. two 12ft.scaffolding towers, 1 little giant 6ft. extension and a 14ft. extension plank, 1 extension ladder with leg leveler and ladder bracket, 2 6ft. straight edges, 2 6ft. tables end to end and a commercial pasting machine trestle and bar for fabric bolt. 2 step ladders.


74 Entry 21

75 Entry 22
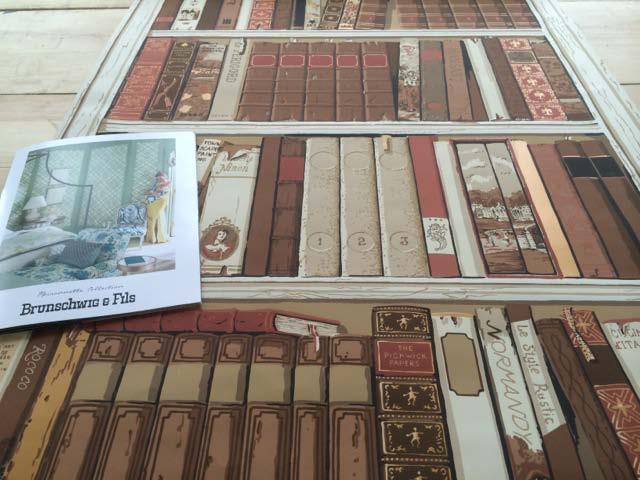
76 WIA 2015 Craftsmanship Awards Entry Number 22 Category: Residential Project: Foyer Library Project Summary: Brunschwig& Fils library books. Screen Print paper with salvages. Project was to turn a foyer into a library with printed books and printed bookshelves. Side walls and ceiling were checked for smoothness and primed with Draw-Tite Sealer by Scotch Paint. Dry Trimmed all salvages. Sheets were cut at 63 inches, height of walls. I matched up sheets so that the books were random with no two books or shelves too close together. I engineered walls from doors to corners to doors with scrap pieces the width of paper. Spacing all the vertical printed wood strips to create the look of built-in bookshelves of books. I pasted sheets of paper with a 9 inch paint roller with clear Shur-Stik 780. Booked and relaxed. Using a plastic smoother, I hung strips starting at doors and working toward corners spacing vertical printed wood by cutting sheets wider or narrow for the best balance/spacing pleasing to the eye. Cutting and replacing vertical wood strips without cutting books in half. Over the doors I used scraps from the long sheets. I cut out books and placed them sideways and making shorter books to fill the spaces. I also used the border trim from salvages to recreate the molding at ceiling. Grasscloth was hung on the ceiling. What makes this project unique: Creating a room into a library wall to wall of bookshelves and books with printed rolls of paper with a repeat. What was the most difficult part of this project? Engineering the room by thinking like a carpenter. Building and spacing bookshelves. Making duplicated printed books look random. Additional Project Detail: 8 rolls pf Brunschwig & Fils Bibliotheque/Brown BR-69080, 29 inch width, 41.5 vertical repeat, 29 inch horizontal repeat. Hand print with salvages. 10 rolls of Manila Hemp/Saddle 3435, 36inch Grasscloth by Phillip Jeffries Draw-Tite sealer by Scotch Paint on all side walls and ceiling. Shur-Stik clear 780 past on both papers.


77 Entry 22

78 Entry 23
79 WIA 2015 Craftsmanship Awards Entry Number 23 Category: Residential Project: Turning Bradbury Project Summary: Bradbury is certainly one of the nicest papers to hang. I love the balancing of the pattern, and the way it lets an installer hide their work. Here is a special parlor that asked for a lot of this! The ceiling was an unusual shape. It had two unusual 130degree turns. And installing the corner turns there had to be some kind of adjustment to the turn. At fist the homeowner said to leave the turns out because there was no way to make these fit. We thought otherwise. There had to be a way. Perhaps deconstructing the turn and using elements to make the change in direction of the 6 inch border might work. So that is what we did. And the pictures show the completed elements. Also look at the enrichment at it make the turns. The accepted way to turn an enrichment is to do a miter and then cover with a miter cover. We prefer to stretch the ivy block enrichment so that it travels the perimeter of the ceiling with no miter. This involves lengthing and shortening the pattern whenever we come to a turn. It takes over an hour for each turn but the seamlessness is worth it. A similar weaving was done with the dado. The dado space was 9 inches wider than the dado paper. So we cut an additional 12" panel and grew the dado to the needed 36" width. Because the dado paper was cut along the pattern, the overlay did not show. Plus we colored off the edge of the pieces to hide the white edge of the paper. Again the wonder of Bradbury. What makes this project unique: Sometimes we have to make paper fit the space, along with hiding our work! What was the most difficult part of this project? Deconstructing the corner blocks and reconstructing them into 130 degree turns. Additional Project Detail: Romans Clay


80 Entry 23

81 Entry 24
82 WIA 2015 Craftsmanship Awards Entry Number 24 Category: Residential Project: Weathered Metals Hand-painted Paper Project Summary: I installed lining paper first and let 24 hours to dry, I have to trimmed one inch for each side of the paper on each sheet, I used roman adhesive 880 clear strippable pasting the backside of each sheet and let relaxing for 2 minutes, I have to install the wallpaper roll #1 following the numbers until last sheet #54.(the order has been graded and numbered for proper installation) When a installed the wallpaper I have to allow the paste on the fade of the product, I double-cutting each seam. I used soft-bristled nylon brush and plastic smoother to remove bubbles. What makes this project unique: Quality of Material. What was the most difficult part of this project? The wall of 22 feet high with a stairway curve.


83 Entry 24
84 To Do: Make your selection for the Residential Category and note the number for your entry selection. Number of entries in Residential: 7

85 WIA Craftsmanship Awards Final Judging To Do: Please click on the link button below to complete the survey.
MagScapes Product Guide
 MagScapes Product Guide At last, wallcoverings that work with magnets...so which to use? We ve got something for everyone. Use this guide to find the material that s right for you. MagScapes wallcoverings
CEILINGS BACKSPLASHES WALLS PROJECTS INSTALLATION GUIDE.
 CEILINGS BACKSPLASHES WALLS PROJECTS INSTALLATION GUIDE Installation videos available online at: /videos Ceiling Components: A tin ceiling is comprised of two primary components and two optional components.
Porta Mural Wallpaper
 Porta This large-scale artwork was translated from an original painting. Available as custom panels based on ceiling height. A complete mural artwork includes 5 wallpaper panels (A,B,C,D,E). All production
DIY Cabinet Painting Guide
 Before tackling a cabinet project on your own consider these simple steps to getting the job done like a pro without the trial and error Color Theory 2 Process Overview Looking at Colors Materials and
decorating ideas under
 decorating ideas under 10 volume $ 0 1 table of contents windows, floors, page 2 walls, and more 3 field of flowers 4 go dotty 5 botanical backsplash 6 the last lath 7 ceiling frame 8 a tin line 9 painted
INSTALLATION INSTRUCTIONS FOR VINYL WALLCOVERING
 www.designtex.com INSTALLATION INSTRUCTIONS FOR VINYL WALLCOVERING STOP AND READ BEFORE INSTALLING If at any time during the installation a product or installation issue should be discovered STOP! Contact
A Family History Time Capsule
 A Family History Time Capsule For many years my wife has dreamed about remodeling the entry to our home. Her heart was set on having a new alder hand railing. She also wanted the decorative bricks removed
c. Oko-Tex (European environmental health standard)
") SECTION 09720 Wall Covering Texturglas WALL FINISH SYSTEM GENERAL 1.1 SUMMARY A. Section Includes: Texturglas Wall Finish System. B. Related Sections: Section(s) related to this section include: 1. Gypsum
SECTION 09720 Wall Covering Texturglas WALL FINISH SYSTEM GENERAL 1.1 SUMMARY A. Section Includes: Texturglas Wall Finish System. B. Related Sections: Section(s) related to this section include: 1. Gypsum
Here is my experience and a few things I learned about my metallic epoxy floor install purchased from
 Here is my experience and a few things I learned about my metallic epoxy floor install purchased from http://www.garageflooringllc.com This was my first dealings with metallic epoxy. Overall I am happy
Water in Buildings: Chemical-Free Clean Up & Resotration for Builders & Facility Managers Case Study #2 Duration: 4-6 hours
 Water in Buildings: Chemical-Free Clean Up & Resotration for Builders & Facility Managers Case Study #2 Duration: 4-6 hours USGBC Professional Development Course EPP0002-002 Case Study #2 Course Outline
Madagascar Sky Blue Wallpaper
 Madagascar Sky Blue Wallpaper This pattern is printed on Prima wallpaper. All production is done per order and takes up to 6 weeks to ship. Please be sure to order a sample before purchasing custom panels.
Banda Cay Wallpaper. eskayel.com T South 6th Street Brooklyn, NY 11249
 Banda Cay Wallpaper This pattern is printed on Wide Format wallpaper. All production is done per order and takes up to 6 weeks to ship. Please be sure to order a sample before purchasing rolls. Wide Format
HP PVC-free Durable Wall Paper
 HP PVC-free Durable Wall Paper Installation tips and tricks 1 In addition to the instructions below, you may be interested in more detailed information on hanging wall fabric back paper. Please visit http://www.wallcoveringinstallers.org/wiauniversity/courses/.
CREATIVE INNOVATIONS IN HOME IMPROVEMENT & DESIGN
 By Dom DeSantis, Home Improvement Contractor And Brenda Ferrell, Design Coordinator INTRODUCTION: Your home is probably your single, highest investment. As a home owner you are aware of the costs and responsibilities
Be inspired... hanging wallpaper. CONTACT US ON 0861 SHAVES OR VISIT OUR WEBSITE AT FOR A STORE NEAR YOU
 Be inspired... hanging wallpaper CONTACT US ON 0861 SHAVES OR VISIT OUR WEBSITE AT www.shavepaints.co.za FOR A STORE NEAR YOU Wallpaper has seen a dramatic resurgence in recent years as a unique and lasting
How to bring Heart of house to life A step by step guide
 How to bring Heart of house to life A step by step guide Version 3 - Dec 2011 How to bring Heart of house to life A step by step guide Introduction Page 3 Heart of house Page 4 Using this guide Page 5
Professional Flooring Contractor Shares Secrets To A Successful Garage Floor Coating Project
 2 Professional Flooring Contractor Shares Secrets To A Successful Garage Floor Coating Project Picking the right flooring for your garage can be tough. There are a lot more options than you probably realize.
Re: New Interior Graphics Booth Décor Standards
 Re: New Interior Graphics Booth Décor Standards In order for FN PLATFORM to maintain our first-in-class show aesthetic, we respectfully ask for your support on the new standards for booth décor. We realized
CLEANCUT CONVERTIBLE INSTALLATION GUIDE
 Page 1 of 16 CLEANCUT CONVERTIBLE INSTALLATION GUIDE COPYRIGHT 2016 SAFEWAY SAFETY STEP, LLC All Rights Reserved Reproduction or Distribution of this Installation Manual is Strictly Prohibited Page 2 of
First Attempt - Promising!
 I figured out a way (after hearing some rumors it was possible) to through plate vias and thru holes using a liquid from a "car defroster repair kit" sold by permatex.com. I found it at Advanced Auto Parts
Non Woven Wallcoverings with or without Crystals Installation and Maintenance Guidelines
 Non Woven Wallcoverings with or without Crystals Installation and Maintenance Guidelines For Vescom Non Wovens: Basic, Patterns, and Swarovski Crystals BEFORE YOU BEGIN Examine the material carefully to
Kalos Cameo Wallpaper
 Kalos Cameo Wallpaper This pattern is printed on Classic wallpaper. All production is done per order and takes up to 6 weeks to ship. Please be sure to order a sample before purchasing rolls. Classic wallpaper
STRESS-FREE RENOVATIONS By Nick Brownlee, Managing Director Procuro Building and Renovation
 STRESS-FREE RENOVATIONS By Nick Brownlee, Managing Director Procuro Building and Renovation BUILDING & RENOVATION RENOVATING YOUR HOUSE INTO YOUR DREAM HOME IS A PRIVILEGE WE ENJOY EVERY DAY. Procuro Building
Target: Observes and identifies plant parts and characteristics. Criteria: Describes shapes and patterns in leaves, stems, seeds, and flowers.
 ARTS ENVIROCHALLENGER EnviroFlower Mandalas: Turning Trash into Treasure Teaching Environmental Sustainability, Visual Arts, and Science Author: Meredith Essex Grade Level: First Enduring Understanding
How To Measure For Curtains, Drapes & Other Window Coverings: Fabulous Fall with Fabric.com
 Published on Sew4Home How To Measure For Curtains, Drapes & Other Window Coverings: Fabulous Fall with Fabric.com Editor: Liz Johnson Thursday, 25 September 2014 1:00 Window coverings seem to be one of
Milkweed Seed Separator
 Milkweed Seed Separator Chip Taylor s design is for a 30 gallon metal trashcan (plans and video http://monarchwatch.org/bringback-the-monarchs/milkweed/seed-separator). Bryan Bockbrader of the Wood County
TRISKAIDEKAPHILIA: 2016 GRAPHIC DESIGN SENIOR SHOW. Jordan Colston. Honors College. East Carolina University. In Partial Fulfillment of the
 TRISKAIDEKAPHILIA: 2016 GRAPHIC DESIGN SENIOR SHOW by Jordan Colston A Senior Honors Project Presented to the Honors College East Carolina University In Partial Fulfillment of the Requirements for Graduation
70 summer
 70 summer 2009 www.capecodlife.com Buck s Creek redo Chris Hereford redesigns an old ranch to create a bright, airy summer house. by elspeth pierson photos by eric roth www.capecodlife.com cc&i home 71
REMODELING SUCCESS BY DFW IMPROVED
 DFW IMPROVED REMODELING SUCCESS BY DFW IMPROVED What To Expect During Your Remodel Most home renovation projects start out with a little idea, and grow into a dream. When you pair your vision and budget
Girls parents, aunts, uncles, older siblings, etc. Other volunteers who have offered to help with the meeting.
 Overview Note to Volunteers Send a note to parents before the meeting asking them to have their Girl Scout bring an old t-shirt of any size. It can be plain or have graphics on it, but make sure they know
Entire House $750,001 - $1M
 Entire House $750,001 - $1M Project Statement To describe this house as a diamond in the rough, may be quite the understatement. After years of neglect it was easy to see only the worst in this home -
English as a Second Language Podcast ESL Podcast 168 The Home Improvement Store
 GLOSSARY to need work has to be improved or made better * This house is big, but it is old and really needs work. to put off to delay, to wait * I ve been putting off washing the car and I think it s time
CLEANCUT ULTRA-LOW INSTALLATION GUIDE
 Page 1 of 16 CLEANCUT ULTRA-LOW INSTALLATION GUIDE COPYRIGHT 2017 SAFEWAY SAFETY STEP, LLC (DBA CleanCut ) All Rights Reserved Reproduction or Distribution of this Installation Manual is Strictly Prohibited
TenPlus GUIDES. 10+ Tips For A Magnificent Bathroom Remodel. RemodelCapeCod.com
 TenPlus GUIDES 10+ Tips For A Magnificent Bathroom Remodel RemodelCapeCod.com Ten+ Tips For A Magnificent Bathroom Remodel by John Clark of @designremodel CONTENT Everyone loves a good top ten list. Read
Jonda Beattie is a Professional
 She is a member of NAPO, The National Association of Professional Organizers and ICD, the Institute for Challenging Disorganization as well as CHADD, Children and Adults with Attention Deficit/Hyperactivity
INSTALLATION INSTRUCTIONS FOR. ProTek RIGID VINYL WALLCOVERING
 INSTALLATION INSTRUCTIONS FOR ProTek RIGID VINYL WALLCOVERING HIGH IMPACT, PROTECTIVE, STAIN-RESISTANT RIGID VINYL WALLCOVERING SHEETS FOR: HEALTHCARE/ELDERCARE FACILITIES LODGING & HOSPITALITY RETAIL
Tucked Roman Shade. Roman Shade $ Tucked Roman Shade Copyright of 7 Vol. 7 No. 8
 Tucked Roman Shade Copyright 2009 1 of 7 Vol. 7 No. 8 Tucked Roman Shade U For an outside mount add 2" to window width. Fabricate as a flush mount when possible or mount shade to back of board & use valance;
Home Upgrade Report. Our Goals. Plan A
 Home Upgrade Report Thank you for choosing Style By Stephanie for your staging needs! Home staging is a proven & essential marketing process that, if done correctly, will enable you to sell faster and
INSTALLATION MANUAL FOR MODELS: TERAZZA, TRACCIO, MILANO, CERRATO
 INSTALLATION MANUAL FOR MODELS: TERAZZA, TRACCIO, MILANO, CERRATO TABLE OF CONTENTS ROOM SPECIFICATIONS ELECTRICAL SPECIFICATIONS PLUMBING SPECIFICATIONS TECHNICAL SPECIFICATIONS INTRODUCTION ASSEMBLY
There are a few tips to follow, and I will definitely go into more detail on them. But, first the TIPS!
 Guide to Better Landscaping Let s Begin: There are a few tips to follow, and I will definitely go into more detail on them. But, first the TIPS! 1. Placement and Reasonability 2. Quality Over Quantity
Reference Packet. Move List
 BIG ENOUGH TO DO THE JOB, SMALL ENOUGH TO CARE Reference Packet Thank you for considering us for the replacement of the pipe in your home. Below you will find a move list that tells you how to prepare
Redneck Air Conditioner
 Redneck Air Conditioner I have been somewhat successful in gleaning information from multiple sources and have put together a portable 12 volt and ice powered air conditioner. In an effort to give back,
Freshmen Year Trimester 2
 Portfolio Requirements Painting & Design Technologies Students choose their own Portfolio assignments; it must be something they felt they did a good job on and meet one of the required State given Competencies
Instructions for Installing the MMD Rear Window Louvers
 Instructions for Installing the MMD Rear Window Louvers Time Required: Less than 1 hour of labor (5 hours total installation if the 4 hours of letting the brackets set are included). Required Tools: Socket
2725 SW 91st Street Gainesville, FL Lic (352)
") Paula C. We don't feel that there were any areas that HKB fell short of our expectations. Honestly, it's hard to narrow down the areas that we were most satisfied with. We were especially happy (and grateful)
Paula C. We don't feel that there were any areas that HKB fell short of our expectations. Honestly, it's hard to narrow down the areas that we were most satisfied with. We were especially happy (and grateful)
Interior Colour & Design Consultation
 Thank you for your Interest in our Colour & Design Services! Interior Colour & Design Consultation *This consultation is live with me on the phone, this way you can tell me immediately what works and what
mason What It Means To Be Green VINYL WALLCOVERING High Durability (Fed. Spec. CCC-W-408D) Fire Testing Type II
 Fire Testing Type II") mason VINYL WALLCOVERING Type II High Durability (Fed. Spec. CCC-W-408D) Fire Testing Width Pattern Match 54" (137 cm) reverse hang / random match NFPA 255 / ASTM E-84 Tunnel Test: Class A Flame Spread
mason VINYL WALLCOVERING Type II High Durability (Fed. Spec. CCC-W-408D) Fire Testing Width Pattern Match 54" (137 cm) reverse hang / random match NFPA 255 / ASTM E-84 Tunnel Test: Class A Flame Spread
INTERIOR DESIGN. What You Will Do in Interior DesignE. Use your imagination and creativity. Take a glimpse into new career opportunities..
 Wherever you live country or city; house, apartment, or mobile home; private bedroom or one you share with a brother or sister there are things to learn and do to make your home more enjoyable. Interior
venetian plaster exclusivewallcovering Low VOC LEED IEQ 4.2 CAL 1350 & CHPS certified VINYL WALLCOVERING Fire classification
 LEED IEQ 4.2 Low VOC venetian plaster CAL 1350 & CHPS certified VINYL WALLCOVERING Type II (Fed. Spec. CCC-W-408A) Width 54 Pattern match Weight 21 oz/ly Backing osnaburg Fire classification ASTM E-84
Muskogee Public Schools Custodial Procedures for Floor Care
 FLOOR CARE ENTRANCE MATS PURPOSE OF ENTRANCE MATS A. Exterior Mats a. Remove sand and gravel from shoes prior to entering the building. b. Minimize the amount of abrading material that will scratch and
How To Sew A Lined Slatted Roman Shade
 How To Sew A Lined Slatted Roman Shade An illustrated step-by-step guide to sewing lined slatted roman shades. by: Jennifer Thoden www.makingromanshades.com Copyright 2009 Thoden Publications LLC 2 Copyright
Winter. The. Issue GREAT GETAWAYS GRACIOUS GIVING EMBEDDED IN LUXURY. Debbie Travis s vacations for body and soul. Our annual holiday gift guide
 The Winter Issue GREAT GETAWAYS Debbie Travis s vacations for body and soul GRACIOUS GIVING Our annual holiday gift guide EMBEDDED IN LUXURY Latest trends in beds and bedding www.vancouverhomemag.com $5.95
INTERIOR DESIGN. What You Will Do in Interior DesignE. Use your imagination and creativity. Take a glimpse into new career opportunities..
 Wherever you live country or city; house, apartment, or mobile home; private bedroom or one you share with a brother or sister there are things to learn and do to make your home more enjoyable. Interior
EAST COAST HOME + DESIGN CONNECTICUT NEW JERSEY NEW YORK THE 2016 DESIGNERS ISSUE $5.95 US
 EAST COAST HOME + DESIGN CONNECTICUT NEW JERSEY NEW YORK THE 2016 DESIGNERS ISSUE $5.95 US 92 www.eastcoasthomepublishing.com Kelly Weldon and Michael Smith take a bow in the beautifully redesigned kitchen.
{designerstyle} 32 ANNUAL EDITION SouthernNEHome.com
 {designerstyle} The den s dark chocolate walls are a backdrop for a navy sofa, patterned wing chairs and ottomans covered in an embroidered faux leather fabric, trimmed with nailheads. 32 ANNUAL EDITION
IDEAS FOR ADDING HOT FIX CRYSTALS TO DESIGNS. NOTE: Examples used are from BFC679 Art Deco Bling
 IDEAS FOR ADDING HOT FIX CRYSTALS TO DESIGNS NOTE: Examples used are from BFC679 Art Deco Bling Often when you purchase designs created to be used with crystals they will have guides that stitch to show
Experiencing BIG Growth in a Small Town. Somerset is a great place to live and pressure washing back around 1999
 Wash Kleen: Experiencing BIG Growth in a Small Town by Allison Hester Troy Whitaker is the owner of Wash Kleen, a small exterior cleaning company in the small community of Somerset, Kentucky. He has three
How To Sew A Lined Flat Roman Shade
 How To Sew A Lined Flat Roman Shade An illustrated step-by-step guide to sewing lined flat roman shades. by: Jennifer Thoden www.makingromanshades.com Copyright 2009 Thoden Publications LLC 2 Copyright
PRODUCT INFORMATION FOR CHARLES RUPERT DESIGNS WALLPAPERS October 2007
 PRODUCT INFORMATION FOR CHARLES RUPERT DESIGNS WALLPAPERS October 2007 This information is divided into four sections: 1. Product Information 2. Installation Information 3. Ordering Information 4. Eco
Interior Design. 4-H Interior Design lets you: Use your imagination and creativity. Take a glimpse into new career opportunities
 4-H Interior Design lets you: Use your imagination and creativity. Take a glimpse into new career opportunities Wherever you live country or city; house, apartment, or mobile home; private bedroom or one
Laurel Forest Punta Grasscloth
 Laurel Forest Punta Grasscloth This pattern is printed on Grasscloth wallcovering. All production is done per order and takes up to 6 weeks to ship. Please be sure to order a sample before purchasing rolls.
Timber Venetians Manual
 Timber Venetians Manual Measuring & Limitations Timber Venetians Measuring Architrave & Reveal Face & Reveal Corners Bays Options & Limitations Maximum Width Minimum Width Fixed Control Minimum Width Tilt
KITCHEN INSTALLATION GUIDE
 KITCHEN INSTALLATION GUIDE The step-by-step guide to installing your new kitchen right This brochure is your guide to preparing and installing your new kitchen yourself. Inside you ll find tips and ideas,
Seed Starting Indoors and Outdoors
 Seed Starting Outdoors Indoors and Are you getting the urge to get seed starting? The time for seed starting indoors and outdoors is fast approaching. When you are a true gardener you have been carefully
White Speckles on the Garment
 GT DIGITAL GARMENT For Technical Assistance Please Call Toll Free 1-877-4BROTHER Email: tsupport@brother.com White Speckles on the Garment White speckles on the garment may appear in three ways: On areas
Wallpaper Buying Guide
 Wallpaper Buying Guide LAURA ASHLEY Superior Quality Wallcovering The Laura Ashley wallpaper range draws upon a rich heritage of traditional values and originality to offer a wealth of inspirational and
INSTALLATION GUIDE Novitherm TM heat reflector panels
 INSTALLATION GUIDE Novitherm TM heat reflector panels 1. Introduction Installing Heat Reflectors is fast and simple. To ensure maximum benefit from your Heat Reflectors, it is important that you read and
2011 Dumpster Dive totals
 2011 Dumpster Dive totals Volunteers signed in: 94 Faculty sending students: Effland, Bass, Dinchak, McLaughlin, Clinton Total bags placed on the lawn: 349 Total bags sorted: 222 After the recyclables
Write Walls Dry Erase Specification Data (Section 09720)
") Write Walls Dry Erase Specification Data (Section 09720) Section 1 Part 1 GENERAL 1.1 SUMMARY A. Section Includes: 1. Dry Erase Wallcovering 2. Accessories B. Related Sections / Items 1. Section 09250
Write Walls Dry Erase Specification Data (Section 09720) Section 1 Part 1 GENERAL 1.1 SUMMARY A. Section Includes: 1. Dry Erase Wallcovering 2. Accessories B. Related Sections / Items 1. Section 09250
Product instruction manual Easymount Wide Format Laminators
 Product instruction manual Easymount Wide Format Laminators The Easymount has been designed to be user friendly, however we strongly recommend you take a few minutes to read through this manual to ensure
furnishing happiness Karen Bow picks all the right pieces to make this house a custom fit
 furnishing happiness Karen Bow picks all the right pieces to make this house a custom fit I think every space should have a touch of black, says Bow. It just really grounds it. In the entryway and dining
HOME. Design. Kitchen Bath. trends. eco 10+ FINDS BONUS CANADIAN BATHROOM DESIGNER STYLES BY GLEN PELOSO TRENDS. 27+ FAUCETS for your design project
 BONUS 10+ eco PRODUCTS PlUs2011 TRENDS FINDS NOW MORE PAGES & 100% CANADIAN CONTENT HOME CANADIAN trends CANADA S HOME DÉCOR & LIFESTYLE MAGAZINE & Kitchen Bath Design 27+ FAUCETS for your design project
Interior Design & Styling: Greta Apap Bologna, Greta Design Photography: MAS Words: Lisa Borain
 THIS IS ME INTERIOR DESIGNER GRETA APAP BOLOGNA BRINGS HOMEWORKS A STRIKING APARTMENT OVERLOOKING PJAZZA TIGNÉ WITH A STRONG ARCHITECTURAL BACKDROP CONTRASTED BY SOFT, ELEGANT FURNISHINGS Interior Design
Home Staging Action Kit
 www.stagingspecialist.com Home Staging Action Kit HOW TO Set The Stage Outside So You Make A Great First Impression! As a homeowner, you want potential buyers who drive up to your house to get excited
Workbook Clean floors
 Workbook Clean floors US 1563 Level 2 Credits 4 Name Prepare to clean floors Creative Commons This work is licenced under a Creative Commons Attribution-NonCommercial Licence. You are free to copy, distribute
TAILOR-MADE. Unique design choices give homeowner custom-built home BY PHILLIPA RISPIN PHOTOGRAPHY: ERICH SAIDE STYLING: BRENDAN POWER DESIGN
 VANCOUVER SUMMER 2016 TAILOR-MADE Unique design choices give homeowner custom-built home BY PHILLIPA RISPIN PHOTOGRAPHY: ERICH SAIDE STYLING: BRENDAN POWER 74 75 VANCOUVER SUMMER 2016 The house is built
FeelsWarm Installation Instructions Stick On Heaters
 Stick On Heaters Thank you for purchasing a FeelsWarm patented (pending) heater to eliminate the cold feel of stone countertops and to create a soothing and calming feel to accompany the elegance and beauty
A PART OF THE GENERATIVE CODE
 A PART OF THE GENERATIVE CODE The process starts with operations that fix positions, shapes and sizes of the main house volumes, the verandas, the secondary house volumes, and the gardens. Houses in Santa
Green Engineering. E-Design 100 Section 020. Group 5: The Lemons Submitted to Professor Smita Bharti (missing picture)
") Green Engineering E-Design 100 Section 020 Group 5: The Lemons Submitted to Professor Smita Bharti (missing picture) By: Bo Hui, 19980119bo@gmail.com Adel Rizk, adelrizk1998@gmail.com Dylan Dirkmaat ddirkmaat@yahoo.com
Green Engineering E-Design 100 Section 020 Group 5: The Lemons Submitted to Professor Smita Bharti (missing picture) By: Bo Hui, 19980119bo@gmail.com Adel Rizk, adelrizk1998@gmail.com Dylan Dirkmaat ddirkmaat@yahoo.com
Solus S T A I R L I F T CURVED STAIRCASES
 Solus S T A I R L I F T CURVED STAIRCASES 600,000 people worldwide have chosen a Stannah stairlift to help them keep their independence Stannah. Enjoy freedom in your home Life is better when you have
WRITTEN BY: MEGAN ANN OSWALD PHOTOGRAPHED BY: BUTCH IRELAND
 WRITTEN BY: MEGAN ANN OSWALD PHOTOGRAPHED BY: BUTCH IRELAND After working for many clients in the area, Designer Kristina Wiggins knew exactly in which part of town she wanted to build her forever home.
SECTION (09950) - WALL COVERINGS
 - WALL COVERINGS") PART 1 GENERAL 1.01 SUMMARY A. Section Includes: SECTION 09 72 00 (09950) - WALL COVERINGS 1. Vinyl Wall Covering a. Furnished by Owner, installed by Contract 2. Prime Coat on Walls 3. Adhesives and Cleaning
PART 1 GENERAL 1.01 SUMMARY A. Section Includes: SECTION 09 72 00 (09950) - WALL COVERINGS 1. Vinyl Wall Covering a. Furnished by Owner, installed by Contract 2. Prime Coat on Walls 3. Adhesives and Cleaning
LEVEYINDUSTRIES.COM
 800.588.3990 LEVEYINDUSTRIES.COM 800.588.3990 LEVEYINDUSTRIES.COM 1" tack rail accessories 1. Flag holder 2. Hook/Clip 3. Map hanger (pair) tack finishes: available in all tac wall colors; refer to tac
What do you like about spring? Check all that apply. (If you don t live in an area with distinct season changes, use your imagination.
 SPRING Field Notes What do you like about spring? Check all that apply. (If you don t live in an area with distinct season changes, use your imagination.) The blossoms on the trees The grass turning green
chiang mai What It Means To Be Green VINYL WALLCOVERING High Durability (Fed. Spec. CCC-W-408D) Fire Testing Type II
 Fire Testing Type II") chiang mai VINYL WALLCOVERING Type II High Durability (Fed. Spec. CCC-W-408D) Fire Testing Width Pattern Match 54" (137 cm) reverse hang / random match NFPA 255 / ASTM E-84 Tunnel Test: Class A Flame Spread
chiang mai VINYL WALLCOVERING Type II High Durability (Fed. Spec. CCC-W-408D) Fire Testing Width Pattern Match 54" (137 cm) reverse hang / random match NFPA 255 / ASTM E-84 Tunnel Test: Class A Flame Spread
Recommended Floor Care Procedures
 TB11 Recommended Floor Care Procedures PREFAC E To achieve optimum appearance and proper film protection for your floor coverings, it is extremely important to use the right equipment for each task. The
L.A. Designer s WALK. Earth. Wind. And Fire. One designer captures elemental nature.
 Designer s By RICHARD HOWLAND, EXECUTIVE EDITOR Photos BY William MacCullum. L.A. NATURALS Earth. Wind. And Fire. One designer captures elemental nature. Ever want to walk among the stars? Or at least
Well Insulated Houses: Helping to Stay Warm in Winter and Cool in Summer
 CON EDISON WEB-BASED MIDDLE SCHOOL ACTIVITY Well Insulated Houses: Helping to Stay Warm in Winter and Cool in Summer Overview In this activity, you and your students will build two house models from discarded
IN THIS ISSUE// POP UP SHOPS OVER 6 MONTHS. How to meet Hammerson s design standards and create an outstanding pop up shop design, including...
 POP UP SHOPS OVER 6 MONTHS IN THIS ISSUE// How to meet Hammerson s design standards and create an outstanding pop up shop design, including... # Creating something unique # Maximising your signage # Presenting
The 3 Common Landscape Challenges. & How to Transform them into Features
 The 3 Common Landscape Challenges & How to Transform them into Features Think That Your Landscape is Doomed Because of its Limited Size, Slope, or Drainage Issue? There are many common issues that homeowners
4-H Interior Design Contest Packet
 4-H Interior Design Contest Packet Helpful Hints 4-H Interior Design Things to Remember 1. Do not cut paint samples with pinking shears. 2. All fabric samples are to be pinked or wrapped. 3. Make sure
Art Bound Says: KCET's Nic Cha Kim recently met up with Hollyhock House curator Jeffery Herr to discuss the details of the extensive renovation.
 Behind the Scenes of the Hollyhock House Renovation By Nic Cha Kim http://www.kcet.org/arts/artbound/counties/los- angeles/hollyhock- house- renovations- los- angeles.html Art Bound Says: After years of
ENRGY CURB APPLICATION GUIDE FOR TPO ROOFING SYSTEMS
 1. Introduction The ENRGY Curb mounting system is a lightweight, nonpenetrating, roof-integrated, photovoltaic (PV) mounting system designed to maintain roof integrity and maximize power density. This
BUILDING ON HISTORY. Two historic homes in the Woodland Heights tell unique stories of renovation and preservation
 BUILDING ON HISTORY Two historic homes in the Woodland Heights tell unique stories of renovation and preservation BY SANDRA COOK PHOTOGRAPHY BY MARK SCHEYER Several years ago Wendy Parker was a successful
WRIGHT WAY 31ST HOMES YEAR FOR RENOVATION EDITOR S CHOICE FOR HISTORIC RENOVATION OF THE ANNUAL
 HOMES OF THE YEAR 31 31ST ANNUAL EDITOR S CHOICE FOR HISTORIC RENOVATION DESIGNER: ARCHITECT KIM GRANT, AIA CONTRACTOR: TONY E. PARKER, GENERAL BUILDERS, INC. HOMEOWNER: BETTY EDWARDS WRIGHT WAY FOR RENOVATION
Fixing my Fisher and Paykel Fridge Active Smart Fridge/Freezer Model E440T
 Fixing my Fisher and Paykel Fridge Active Smart Fridge/Freezer Model E440T ** DISCLAIMER ** I am not a fridge technician, an electrician or a representative of Fisher and Paykel. I am an average Australian
Gardening: Growing Vegetables
 Gardening: Growing Vegetables 9:30-9:45 Ice Breaker What was the best thing that happened this last week? What was the worst thing that happened this last week? Have you ever grown your own vegetables?
SAFETY ZONE SHEET & TILE MAINTENANCE
 SAFETY ZONE SHEET & TILE MAINTENANCE Maintenance Recommendations For Resilient Flooring The following are general guidelines for maintaining Armstrong commercial flooring products. They are based on general
Here are three photos of the room as it stands today:
 So I've started my latest project - a walk-in cooler. It will be roughly 5' X 5' X 7' and will be located in our utility closet / laundry room in the garage and take up slightly more than half of the room.
Dreams FIELD. home & builder
 LEFT: A foil painted wall depicting an abstract of trees is found in the open stairwell leading to the lower level. BELOW: Homeowners Christine and Gord Quaile in their kitchen. BOTTOM: The fireplace column