Merloni Elettrodomestici. Service Manual. Dishwashers Mark II. Language Issue/Edition GB /
|
|
|
- Anthony Golden
- 6 years ago
- Views:
Transcription
1 Dishwashers Mark II GB /
2 GB /
3 Contents 1 DIWA 126 TIMER SAFETY DEVICE MANAGEMENT Alarms displayed and operations to be carried out Types of alarms not displayed valid for all models of Electronic Dishwashers Examples of programs available for Free Installation Machines with DIWA 126 Timer8 1.4 DIWA 126 cycles Testing/Autotest procedure 11 2 DIWA 123 LCD TIMER Description of Faults Displayed for Machines with DIWA 123 LCD Timer and operations to be performed Examples of available programs for the Free Installation Machines with DIWA 123+LCD Timer DIWA 123 cycles DIWA 123 cycles with Turbidity Sensor Testing/Autotest procedure 27 3 TOTAL EMBEDDING DISAPPEARANCE WITH DIWA 126 TIMER Warnings 28 4 TOTAL EMBEDDING DISAPPEARANCE WITH DIWA 123 TIMER Functioning 32 5 EMBEDDING WITH FRONTAL VIEW Functioning Entry in testing Faults Warnings 39 GB /
4 6 DISASSEMBLY OF MOTOR-SUMP UNIT 40 7 NEW OVERFLOW SYSTEM New Float 44 8 NEW SYSTEM TO FI MOTOR 46 9 NATURAL DRYING SYSTEM ALTERNATE WASH MOTOR Alternate Wash Motor Wiring Diagram Sensing signal 51 GB /
5 1 DIWA 126 TIMER SAFETY DEVICE MANAGEMENT N.B. All the machines with four LEDS are equipped with a DIWA 126 Timer. 1.1 Alarms displayed and operations to be carried out Acquastop Sensor Operation (overflow) LED 1 activation The control continually monitorises the status of the acquastop sensor switch. If it is closed for more than 5", there is a permanent fault. Machine performance Resets all active settings Deactivates all loads Drains until pressure switch empty +1' Checks to be carried out 1. Empty the tray 2. Set a cycle 3. Check if there is a leak, through the two inspection openings located in the lower part of the machine, behind the skirting. If there is no leak check or replace: Pressure Switch Sump pressure drop (air trap) Solenoid valve jammed/higher capacity Lower/upper impeller blocked Levelling the Dishwasher Excessive loss of rinse aid Small pressure switch tube loose (air leak) or there is water inside Drain pump disconnected GB /
6 1.1.2 NTC fault LED 3 activation The electronic control constantly checks the temperature sensor status; if it is open or there is a short circuit, there is a fault. Machine performance Resets all active settings Deactivates all loads Checks to be carried out Short-circuited thermistor open Thermistor connector incorrectly joined to timer Thermistor fault Timeout empty from Pressure switch during Draining LED alternating activation During the draining phase the control waits for the empty pressure switch signal for max 3'20", after which a fault has occurred. Machine performance Resets all active settings Deactivates all loads Drains until pressure switch empty +1' Checks to be carried out Drain pump interrupted/faulty Air bubble in drain hose Drain hose obstructed/plugged Pressure switch stuck on full Electronic timer Water in small pressure switch tube GB /
7 1.1.4 Pressure switch full timeout during water filling LEDS alternate activation During the static filling phase (with washing pump deactivated) the control waitsfor max 6', after which a fault has occurred. Machine performance Resets all active settings Deactivates all loads Drains until pressure switch empty +1' Checks to be carried out Water pressure not less than 0.2 bar (for correct operation is must be more than or equal to 0.2 bar) Water supply tap closed Pressure switch stuck on empty Faulty solenoid valve Water Heating Timeout LED 4 activation During the washing + heating phase, the control waits for the set temperature to be reached for max 70', after which there is a fault. Machine performance Resets all active settings Deactivates all loads Drains until pressure switch +1' Checks to be carried out Thermistor support bracket Capsule contact with tank base Heater operation GB /
8 1.2 Types of alarms not displayed valid for all models of Electronic Dishwashers Machine jammed (programming impossible) 1. Reset the dishwasher when it is operating, by turning the knob to Reset or pressing the Reset button. Open the door to allow program resetting. 2. Leakage, in this case the machine is blocked: invert position of the plug in the socket check plug earth if the fault continues, disconnect the earths of the motor, heater, filter Condensate Warning: Condensate can block the dishwasher, check the gasket seal and machine levelling. It is advisable to replace the timer, once the condensate has been eliminated. Drying information Warning: machines without fan motor hold the water in the tank for many minutes at the end of the warm rinsing phase. 1.3 Examples of programs available for Free Installation Machines with DIWA 126 Timer INDESIT ARISTON 1 Energic Energic 2 Normal Normal 3 Recently soiled Recently soiled 4 Delicate items Glass 5 Rapid Drying Rapid 55 6 Rapid Rapid 25 7 Soak Soak GB /
9 1.4 DIWA 126 cycles No CYCLES Pressure switch status NTC INTENSIVE DAILY Pre-washes Draining 16" V Static filling up to P P Filling time 20" Dynam. filling up to P P Washing pump 8' Heats 40 Drains+1' V Static filling up to P P Filling time 20" Dynam. filling up to P P Washing pump 8' Washing pump 7' Draining 1' V Washes Static filling up to P P Filling time 20" Dynam. filling up to P P Pump+detergent 1' Pump+regenerate 1' Heats 38 Pump+detergent 1' Heats+pump 8' 50 Heats+pump 5' 56 Washing pump 8' Washing pump 8' Heats+pump 5' 68 Min. temp. control Filling time 15'' Draining 1' V Filling time 15'' Draining 1' V Filling time 15'' Draining 1' V Rinses Static filling up to P P Filling time 20" Dynam. filling up to P P Crystal load P Resis. impulses Washing pump 8' Draining 1' V Static filling up to P P Filling time 20" Dynam. filling up to P P Washing pump 4' Draining 1' V Static filling up to P P Filling time 20" Dynam. filling up to P P Rinse aid reset 0.3'' Pump+regenerate 1' Heats 50 Pump+detergent 1' Pump+detergent 15'' Heats 68 Drying Draining 1' V Drying 8.5'' Filling time 15'' Draining 1' V Drying 1' Draining 30'' V Filling time 15'' Draining 30'' V Drying 1' Draining 30'' V Drying 5.5' End NORMAL GLASS RAPID DRYING 68 RAPID 25 SOAK GB /
10 As from the beginning of January, 2001 the following new DIWA 126 cycles will come into production No CYCLES Pressure switch status NTC INTENSIVE DAILY Pre-washes Draining 16" V Static filling up to P P Filling time 20" Dynam. filling up to P P Washing pump 8' Washing pump 28' Heats 40 Drains+1' V Static filling up to P P Filling time 20" Dynam. filling up to P P Washing pump 4' Heats V Washes Static filling up to P P Filling time 20" Dynam. filling up to P P Pump+detergent 1' Pump+regenerate 1' Heats+pump 8' 48 Washing pump 8' Washing pump 8' Washing pump 8' Heats+pump 5' 48 Washing pump 8' Heats+pump 5' 68 Min. temp. control Filling time 15'' Draining 1' V Filling time 15'' Draining 1' V Filling time 15'' Draining 1' V Rinses Static filling up to P P Filling time 20" Dynam. filling up to P P Crystal load P Resis. impulses Washing pump 8' Draining 1' V Static filling up to P P Filling time 20" Dynam. filling up to P P Washing pump 4' Draining 1' V Static filling up to P P Filling time 20" Dynam. filling up to P P Rinse aid reset 0.3'' Pump+regenerate 1' Heats 50 Pump+detergent 1' Pump+detergent 15'' Heats 68 Drying Draining 1' V Drying 8.5'' Filling time 15'' Draining 1' V Drying 1' Draining 30'' V Filling time 15'' Draining 30'' V Drying 1' Draining 30'' V Drying 5.5' End NORMAL GLASS RAPID DRYING 68 RAPID 25 SOAK GB /
11 1.5 Testing/Autotest procedure To start the procedure, follow the instructions below: 1. Reset the machine with the Reset button 2. Select OFF (machine shutdown) 3. Check that the appliance door is closed 4. Turn the selector to 2 5. Select ON (machine operating) and then turn the selector from 2 to 1 and vice versa, until the LEDS 1-4 start blinking Switch the machine off and then on again. 7. Turn the knob from 1 to 2 and vice versa, until the LEDS 2 and 4 remain alight 8. After about 4" the testing cycle will start, during which the LEDS 2 and 3 will alternately blink Starting Functional Testing 1. Fills up and washes up to the 2nd level 2. Washing motor + heater 5" 3. Washing motor 5" 4. Heater 5" 5. Dispenser 5" 6. Alternate wash 5" 7. Regenerate 10" 8. Drain pump 15" 9. Load solenoid valve 25" To exit the testing cycle/autotest, turn the knob to Reset ; after 4" the cycle will stop. GB /
12 2 DIWA 123 LCD TIMER N.B. All the machines with a display are equipped with a DIWA 123 LCD Timer. 2.1 Description of Faults Displayed for Machines with DIWA 123 LCD Timer and operations to be performed Displays A01 Acquastop Sensor Operation The control continually monitorises the status of the acquastop sensor switch. If it is closed for more than 5", there is a fault. Machine performance Resets all active settings Deactivates all loads Drains until acquatop empty +1' Checks to be carried out 1. Empty the tray 2. Set a cycle 3. Check whether there is a leak by means of the two inspection openings located on the lower front part of the machine If there is no leak check or replace: Pressure Switch Sump pressure drop (air trap) Solenoid jammed /higher capacity Lower/upper impeller blocked Levelling the Dishwasher Excessive loss of rinse aid Small pressure switch tube loose (air leak) or there is water inside Drain pump disconnected GB /
13 2.1.2 Displays A02 Heater Relay in Closed Circuit - Open Circuit All the time the drive relay of the heating element is idle with the door closed, the electronic control checks that its contacts are actually open. If the control contacts are erroneously closed, a fault has occurred. Machine performance Resets all active settings Deactivates all loads Fills with water until pressure switch full Activates the washing pump indefinitely (if necessary, the water level is topped up) Checks to be carried out Electronic timer (Card) relay stuck heater interrupted Safety thermostat: 1) off setting 2) open/faulty 3) crimped thermostat support bracket bent Thermistor disconnected or thermal interface material missing (which activates the safety thermostat) Displays A03 Probe Short-Circuited or Open (NTC) The electronic control costantly checks the temperature sensor status; if it is open or there is a short circuit, a fault has occurred. Machine performance Resets all active settings Deactivates all loads Drains until pressure switch +1' Checks to be carried out Check probe cables (red) Check probe connector on timer Faulty probe with C.C. or O.C. GB /
14 2.1.4 Displays A04 Incorrect heating time During the washing + heating phase, the control waits for the set temperature to be reached for max 70', after which there is a fault. Machine performance Resets all active settings Deactivates all loads Drains until pressure switch +1' Checks to be carried out Thermistor support bracket (probably disconnected) Capsule contact with tank base heater operation Displays A05 Incorrect time for Pressure switch Empty During the draining phase, the control waits for the pressure switch empty signal for max 3'20", after which a fault has occurred. Machine performance Resets all active settings Deactivates all loads Drains until pressure switch empty +1' Checks to be carried out Faulty drain pump Air bubble in drain hose Drain hose obstructed/plugged Pressure switch stuck on full Water in small pressure switch tube GB /
15 2.1.6 Displays H2O Incorrect Pressure switch Full time During the static filling phase (with washing pump off) the control waits for max 6', after which it is definitely faulty. Checks to be carried out Water pressure not less than 0.2 bar (for correct operation is must be more than or equal to 0.2 bar) Water supply tap closed Pressure switch stuck on empty Electric timer (Card) blocked Solenoid valve Displays A07 Washing pump triac in Closed Circuit - Open Circuit Checks to be carried out Drain pump disconnected Acquastop operation in case of water leak Displays A08 Auxiliary winding pump triac with Closed Circuit - Open Circuit Machine performance Draining until pressure switch empty +30" Checks to be carried out Wash motor correct operation GB /
16 2.1.9 Displays A09 Main winding pump triac with Closed Circuit - Open Circuit Machine performance Drains until pressure switch empty +30" Checks to be carried out Wash motor correct operation Displays A10 Load solenoid valve triac with Closed Circuit - Open Circuit Machine performance Drains until pressure switch empty +30" Checks to be carried out Disconnected load solenoid valve correct operation Displays A11 1 / 2 load solenoid valve triac or alternating motor Machine performance Drains until pressure switch empty +30" Checks to be carried out Correct operation of solenoid valve and alternating motor Replace electrical timer (Card) Displays A12 Heater relay with Open Circuit Machine performance Drains until pressure switch empty +30" Checks to be carried out Heater Electronic timer (Card) GB /
17 Displays A13 Dispenser triac incorrect operation with Closed Circuit - Open Circuit Machine performance The appliance continues the wash cycle, but the detergent compartment lid does not function properly Some machine faults which are not displayed change the washing performance required. Solenoid valve triac malfunction with Closed Circuit - Open Circuit The appliance continues the wash cycle, but is not able to collect the salt to soften the water Fan Triac + Heater malfunction with Closed Circuit - Open Circuit or disconnected cables The appliance continues the wash cycle but does not dry properly Eeprom malfunction The appliance finishes the wash before it is completed, then it stops Turbidity sensor fault The appliance continues its wash cycle assuming a default turbidity Displays A14 Pressure switch surveyed empty during washing phase During the cycle the water is discharged from the tank through the discharge pipe. This is a problem of incorrect installation. This is what could have happened: the discharge pipe is below the water level in the tank (in this case the water will overflow from the tank) the discharge pipe does not siphon the discharge pipe is siphoning but is immersed into the water. 2.2 Examples of available programs for the Free Installation Machines with DIWA 123+LCD Timer INDESIT ARISTON ARISTON with Sensor 1 Intensive Intensive Auto-Intensive 2 Normal Normal Auto-Normal 3 Recently soiled DuoWash Auto-DuoWash 4 Delicate items Glass Glass 5 Rapid Rapid Rapid 6 Warm rinse Rinses Rinses 7 Soak Soak Soak GB /


18 2.2.1 DuoWash This cycle is extremely delicate on glass and strong and energic on heavily soiled pots. All inside the same washing load: The delicate dishes are washed with reduced pressure and only for 30% of the total cycle time, The heavily soiled dishes are washed with maximum pressure and for 70% of the total cycle time. Wash performance 1. Alternate wash (first above and then below and vice versa) 2. When it is washing above, one of the two motor windings disconnects and the jet is more delicate 3. The washing temperature is 50 C instead of 55 C In the other cases the alternate wash takes place with both motor windings, above and below. Moreover, all the warm rinses of all cycles, are performed with one winding only up to SensorSystem The turbidity sensor reads the type of dish soil, establishing the best washing strategy as regards cycle time, number of rinses and quantity of water used. In this way the best result is obtained with the minimum costs and minimum pollution level. GB /
19 2.3 DIWA 123 cycles No CYCLES Pressure switch status NTC Alternation Intensive Daily Pre-washes Draining 16'' V Total static load P Washing pump 8' Drains+1' V Total static load P Heats 45 Washing pump 4' Washing pump 24' Draining 1' V Washes Total static load P Pump+detergent 1' Pump+regenerate 1' Heats 38 Pump+detergent 1' Heats 50 Washing pump 8' Heats+pump 5' 56 Washing pump 8' Heats 70 Washing pump 24' Min. temp. control Filling time 15'' Draining 1' V Filling time 15'' Draining 1' V Filling time 15'' Draining 1' V Rinses Total static load P Crystal load P Resis. impulses Washing pump 8' Washing pump 20' Draining 1' V Total static load P Rinse aid reset 0.3'' Pump+regenerate 1' Heats 50 Pump+rinse aid 1' Pump+rinse aid 15' Heat+2"pump 70 Drying See: Drying Phases After Dinner Crystal Rapid Hot Rinse Soak Drying phases 1. Dishwater with drying fan ON In this case drying time will be 40' 2. Dishwasher with drying fan OFF. In this case drying time will be 15' 1. Dishwasher without drying fan ON. In this case drying time will be 15' 2. Dishwasher without drying fan OFF. In this case drying time will be 0 In some models (see column Alternation), there is an alternate wash with a complete cycle of 4': 3' in the lower basket and 1' in the upper basket. GB /
20 In the first part of the ramp the auxiliary winding is disconnected so that only the upper basket is washed. As shown in the line chart, there are two regenerate steps. The first is carried out by all the 15' drying cycles. In the 40' cycles, the regenerate phase takes place when the drying starts. Dishwasher with Drying Fan ON Drying Regenerate Drying 13'+Vent. Drying 27' Draining 1' V Filling time 15" Draining 1' V Drying 1' Draining 30" V Filling time 15" Draining 30" V Drying 1' Draining 30" V End Dishwasher with Drying Fan OFF Drying Drying 10'+Vent. Drying 5' Draining 1' V Filling time 15" Draining 1' V Drying 1' Draining 30" V Filling time 15" Draining 30" V Drying 1' Draining 30" V End Dishwasher without Drying Fan ON Drying Regenerate Drying 10' Drying 5' Draining 1' V Filling time 15" Draining 1' V Drying 1' Draining 30" V Filling time 15" Draining 30" V Drying 1' Draning 30" V End Dishwasher without Drying Fan OFF Drying Draining 1' V Filling time 15" Draining 1' V Drying 1' Draining 30" V Filling time 15" Draining 30" V Drying 1' Draining 30" V End GB /
21 2.4 DIWA 123 cycles with Turbidity Sensor No CYCLES Pressure switch status NTC Alternation Auto Intensive Auto Normal Level of turbidity Pre-washes Draining 16'' V Total static load P Washing pump 8' Drains+1' V Total static load P Heats 30 Heats 35 Heats 40 Heats 45 Heats 50 Washing pump 4' Washing pump 8' Washing pump 12' Washing pump 16' Washing pump 24' Draining 1' V Washes Total static load P Pump+detergent 1' Pump+regenerate 1' Heats 38 Pump+detergent 1' Heats 50 Washing pump 8' Heats+pump 5' 56 Washing pump 8' Heats 65 Heats 70 Washing pump 12' Washing pump 16' Washing pump 20' Washing pump 24' Min. temp. control Filling time 15'' Draining 1' V Filling time 15'' Draining 1' V Filling time 15'' Draining 1' V Rinses Total static load P Crystal load P Resis. impulses Washing pump 8' Washing pump 12' Washing pump 16' Washing pump 20' Draining 1' V Total static load P Rinse aid reset 0.3'' Pump+regenerate 1' Heats 50 Pump+rinse aid 1' Pump+rinse aid 15' Heats+2"pump 70 Auto crystal&pot DuoWash Crystal Rapid Hot Rinse Soak GB /
22 Drying phases 1. Dishwater with drying fan ON In this case drying time will be 40' 2. Dishwasher with drying fan OFF. In this case drying time will be 15' 1. Dishwasher without drying fan ON. In this case drying time will be 15' 2. Dishwasher without drying fan OFF. In this case drying time will be 0 Alternating steps In some models (see column Alternation), there is an alternate wash with a complete cycle of 4': 3' in the lower basket and 1' in the upper basket. Warm rinse In the first part of the ramp the auxiliary winding is disconnected so that only the upper basket is washed. Regenerate As shown in the line chart, there are two regenerate steps. The first is carried out by all the 15' drying cycles. In the 40' cycles, the regenerate phase takes place when the drying starts. Dishwasher with Drying Fan ON Drying Regenerate Drying 13'+Vent. Drying 27' Draining 1' V Filling time 15" Draining 1' V Drying 1' Draining 30" V Filling time 15" Draining 30" V Drying 1' Draining 30" V End Dishwasher with Drying Fan OFF Drying Drying 10'+Vent. Drying 5' Draining 1' V Filling time 15" Draining 1' V Drying 1' Draining 30" V Filling time 15" Draining 30" V Drying 1' Draining 30" V End GB /
23 Dishwasher without Drying Fan ON Drying Regenerate Drying 10' Drying 5' Draining 1' V Filling time 15" Draining 1' V Drying 1' Draining 30" V Filling time 15" Draining 30" V Drying 1' Draining 30" V End Dishwasher without Drying Fan OFF Drying Draining 1' V Filling time 15" Draining 1' V Drying 1' Draining 30" V Filling time 15" Draining 30" V Drying 1' Draining 30" V End GB /
24 As from the end of January, 2001 the following new DIWA 123 cycles with Turbidity Sensor will come into production: No CYCLES Pressure switch status NTC Alternation Auto Intensive Auto Normal Level of turbidity Pre-washes Draining 16'' V Total static load P Washing pump 8' Washing pump 28' Drains+1' V Total static load P Heats 30 Heats 35 Heats 40 Heats 45 Heats 50 Washing pump 4' Washing pump 8' Washing pump 12' Washing pump 16' Washing pump 24' Draining 1' V Washes Total static load P Pump+detergent 1' Pump+regenerate 1' Heats 38 Pump+detergent 1' Heats 48 Washing pump 8' Heats+pump 5' 56 Washing pump 8' Heats 65 Heats 70 Washing pump 12' Washing pump 16' Washing pump 20' Washing pump 28' Min. temp. control Filling time 15'' Draining 1' V Filling time 15'' Draining 1' V Filling time 15'' Draining 1' V Rinses Total static load P Crystal load P Resis. impulses Washing pump 8' Washing pump 12' Washing pump 16' Washing pump 20' Draining 1' V Total static load P Rinse aid reset 0.3'' Pump+regenerate 1' Heats 50 Pump+rinse aid 1' Pump+rinse aid 15' Heats+2"pump 66 Drying See: Drying Phases Auto crystal&pot Crystal Rapid Hot Rinse Soak GB /
25 Drying phases 1. Dishwater with drying fan ON In this case drying time will be 50' Water discharge plus 10 of the fan 2. Dishwasher with drying fan OFF. In this case drying time will be 15' 1. Dishwasher without drying fan ON. In this case drying time will be 60' Water discharge plus 0 2. Dishwasher without drying fan OFF. In this case drying time will be 15' Alternating steps In some models (see column Alternation), there is an alternate wash with a complete cycle of 4': 3' in the lower basket and 1' in the upper basket. Warm rinse In the first part of the ramp the auxiliary winding is disconnected so that only the upper basket is washed. Regenerate As shown in the line chart, there are two regenerate steps. The first is carried out by all the 15' drying cycles. In the 40' cycles, the regenerate phase takes place when the drying starts. Dishwasher with Drying Fan ON Drying Regenerate Drying 50' Draining 1' V Drying 10'+Vent. Draining 1' Filling time 15" V Draining 1' Drying 1' V Draining 30" Filling time 15" V Draining 30" Drying 1' V Draining 30" Dishwasher with Drying Fan OFF Drying Drying 15' Draining 1' V Filling time 15" Draining 1' V Drying 1' Draining 30" V Filling time 15" Draining 30" V Drying 1' Draining 30" V End GB /
26 Dishwasher without Drying Fan ON Drying Regenerate Drying 60' Draining 1' V Filling time 15" Draining 1' V Drying 1' Draining 30" V Filling time 15" Draining 30" V Drying 1' Draining 30" V End Dishwasher without Drying Fan OFF Drying Drying 15' Draining 1' V Filling time 15" Draining 1' V Drying 1' Draining 30" V Filling time 15" Draining 30" V Drying 1' Draining 30" V End GB /
27 2.5 Testing/Autotest procedure To start the procedure, follow the instructions below: 1. Reset the machine with the Reset button 2. Select OFF (machine shutdown) 3. Check that the appliance door is closed 4. Turn the selector to Reset 5. Press and hold the Deley button and select ON (switched on) At this stage an acoustic signal will sound. 6. Always keeping the Deley button pressed, select OFF (switched off) and then ON (switched on) again. At this stage an acoustic signal will sound and C 0 will appear on the display. 7. After releasing the Deley button, repress it four times consecutively. At this stage C 4 will appear on the display. 8. Turn the selector to any position (not reset) 9. After about 4" the testing cycle will start N.B. In the L 83 Duo machines the push button to press is not the Delay but is the Select button. Starting Functional Testing 1. Fill as indicated in the program, plus 5" motor and heater 2. Washing motor 5" 3. heater 5" 4. Dispenser 5" 5. Regenerate 15" 6. Drying fan 5" 7. Half load 5" If the machine is provided with the alternate wash: Only less than 5" from when the position is reached Only more than 5" from when the position is reached 8. Drain pump 15" 9. Drying fan 5" 10. Load solenoid valve 25" To exit the testing cycle/autotest, turn the selector to Reset ; after 4" the cycle will stop. GB /
28 3 TOTAL EMBEDDING DISAPPEARANCE WITH DIWA 126 TIMER 3.1 Warnings Led 1 Intensive Cycle Overflow Switching Led 1 Led 2 Daily Cycle NTC c.a. or in c.c. Switching Led 3 Led 3 Crystal Cycle Heating Timeout Switching Led 4 Led 4 Rapid Cycle Discharge Timeout Switching Led 1-2 Led 5 Soack Cycle Pressure switch Timeout P. Switching Led 2-3 I D C R S SS LD1 LD2 LD3 LD4 LD5 I D C R S Intensive Daily Crystal Rapid Soack GB /
29 4 TOTAL EMBEDDING DISAPPEARANCE WITH DIWA 123 TIMER AS I D C&P C R S SS SB 1/2 2h 4h 6h LD1 LD2 LD3 LD4 LD5 LD6 LD7 KS1 LD8 LD9 P LD10 KS2 LD11 LD12 LD13 KS3 D I D C&P C R S Auto Intensive Auto Daily Auto Crystal & Pot. Crystal Rapid Soack Characteristics Alternate load up Delay timer hours Turbidity sensor Use of low speed in the Crystal & Pot programme when the machine washes the upper basket Use of low speed in the Crystal programme both when the machine washes the upper basket and the lower basket. N.B. Auto means that in the cycle definition intervenes the turbidity measure, therefore, each Auto cycle is really constituted by four distinct cycles directed by the turbidity level. GB /
30 I D C&P C R HR S SS SB 1/2 2h 4h 6h LD1 LD2 LD3 LD4 LD5 LD6 LD7 KS1 LD8 LD9 P LD10 KS2 LD11 LD12 LD13 KS3 D I D C&P C R HR S Auto Intensive Auto Daily Auto Crystal & Pot. Crystal Rapid Hot Rinse Soack Characteristics Alternate load up Delay timer hours Turbidity sensor Use of low speed in the Crystal & Pot programme when the machine washes the upper basket Use of low speed in the Crystal programme both when the machine washes the upper basket and the lower basket. N.B. Auto means that in the cycle definition intervenes the turbidity measure, therefore, each Auto cycle is really constituted by four distinct cycles directed by the turbidity level. GB /
31 I D C&P C R S SS SB 1/2 2h 4h 6h LD2 LD3 LD4 LD5 LD6 LD7 KS1 LD8 LD9 P LD10 KS2 LD11 LD12 LD13 KS3 D I D C&P C R S Intensive Daily Crystal & Pot. Crystal Rapid Soack Characteristics Alternate load up Delay timer hours Turbidity sensor Use of low speed in the Crystal & Pot programme when the machine washes the upper basket Use of low speed in the Crystal programme both when the machine washes the upper basket and the lower basket. N.B. Since the turbidity sensor is not present, the C&P programme assumes the cycle corresponding to TorbLevel =1 ( after dinner light cycle). Since the turbidity sensor is not present, I and D programmes assume the cycle corresponding to TorbLevel)=4. I D R S SS SB LD4 LD5 LD6 LD7 KS1 LD8 LD9 P I D R S Intensive Daily Rapid Soack Characteristics No _ load. control not operative on ev. _ load No alternate No delay timer No sensor assumption of default of the cycles corresponding to TorbLevel=4 for the Intensive and Daily programmes. No double speed for the pump control not operative on pump auxiliary winding. GB /
32 4.1 Functioning Machine in idle If the machine is not set the programming diodes are switched off. It is possible that the salt spy and gloss spy will be on. All the setting carried out by the user must be done with the door open, because the machine will not accept any commands if the door is closed unless one wants to enter into one of the accessory cycles (Service and Running-in) Setting of delay timer (only for machines with the delay timer setting key) Every time the delay timer setting key is pressed the machine produces a beep sound and the diode relative to the set delay is switched on (2h or 4h or 6h) Setting the washing on one basket only (only for machines provided with the _ load push button, and in any case with reference to the upper basket only even if the alternate washing is present) The defaults are selected for both baskets, the diode corresponding to the setting of the upper basket is off, by pushing the basket setting key the machine will produce a beep sound and the associated diode will switch on, by pushing the basket setting key a second time the machine will produce a beep sound and the diode will switch off Setting a washing programme Every time the programming setting key is pressed the machine will produce a beep sound and the diode relating to the selected programme will light up. Instance in which the delay timer has not been set up: Upon shutting the door with a selected programme the selected washing programme signalled by a beep sound will start. Instance in which the delay timer has been set-up: If the delay timer were set at a value lower than 0 and a programme has been set-up, upon shutting the door, the machine will produce a beep sound and the count-down, highlighted by a flashing diode corresponding to the delay set, will start. Every time the door is opened the counting will stop, but the diode corresponding to the remaining hours for the programme to start, will continue to flash. GB /
33 The following scheme will apply: a) if there are 2 hours left to the starting of the programme then the diode corresponding to 2h delay will flash b) if there are 4 and > 2 hours left to go the diode corresponding to 4 h delay will flash c) there are 6 and > 4 hours left to go the diode corresponding to 6 h delay will flash Upon completion of the washing the diode, corresponding to the set programme, will continue to flash softly until the programmes setting key is pressed; having pressed the said key the machine is ready for the setting of a new cycle Resetting the setting-up It is always possible to reset the washing cycle by pressing for 2" the programmes setting key, independently as to whether is opened or closed Entry in testing 1. Door shut. 2. Feeding the machine by keeping the programme setting key pressed. 3. The produces a beep sound. 4. Stop feeding and feed again the machine by keeping the programme setting key pressed. 5. The machine will produce a beep sound and diodes LD4, LD5, LD6, LD7 will light up. 6. Press three times to enter in running in (LD4 and LD5 off, LD6, and LD7 on) and four times to enter in service (LD4 and LD5 and LD6 off, LD7 on). 7. If the pressure configurations are valid, then the machine, after 2" from the last pressure of the key will produce a beep sound and starts the chosen accessory programme. 8. It is possible to exit from the running-in programme or service by pressing for 2" the programme setting key. GB /
34 Instance in which there has been a running-in entry: During the entire running-in stage, consisting in heating and release of washing powder and subsequent discharge stage, the machine will keep the LD4, LD5, LD6, LD7 programme diodes lit up; in the subsequent loading stage the various steps indicated by the sequential activity of the LD4, LD5, LD6, LD7 diodes in the way as mentioned hereunder: LD4 LD5 LD6 LD7 1) Ev. load Off Off Off On 2) Washing Pump Off Off Off Off 3) Resistance Off Off On On 4) Dispenser Off On Off Off 5) Ev. regenerate Off On Off On 6) Fan (full Pr.) Off On On 7) Ev. _ load or alternate Off Off Off 8) Discharge pump On Off Off On 9) Fan (Empty Pr.) On Off On Off 10) Ev. load On Off On On 11) End Sequence The Leds LD4, LD5, LD6, LD7 flash 12) Press programmes setting-up key to exit from End Sequence stage and put the machine back to the user programming mode. The functioning is made up of the loading sequence only (steps 1)..11)). N.B. If the set programme is the running-in then the fault finding routine is not active. If the set programme is functional then the faults finding routine is active. GB /
35 4.1.7 Faults Warnings <Type of fault> <Visualized code> LD4 LD5 LD6 LD7 1) Water-stop intervention (1) Off Off Off On 2) Relay in c.c Off Off On Off 3) Probe in c.c./c.a. Off Off On On 4) Temperature reaching time-out Off On Off Off 5) Empty press. Reaching time-out Off On Off On 6) Discharge Triac pump in c.a. Off On On On 7) Aux. avv. Triac pump in c.c./c.a. On Off Off Off 8) Prin.avv. Triac pump in c.c./c.a. On Off Off On 9) Ev. load triac pump in c.c/c.a. On Off On Off 10) Ev._load or alt. Motor Triac. On Off On On 11) Relay in c.a. On On Off Off 12) Triac dispenser in c.c./c.a. On On Off On 13) Vacuum finding pressure switch during washing stage after the restoring sequence. On On On Off (1) Attention must be paid with scholtes machines (LVTI in case water stop intervention were to happen Led 01 (AS water-stop ) together with Led 07 (S soack ) would light up. <Bit Pos.> <Type of fault> <Visualized code> 1 Ev. Triac restore in c.c./c.a. Nothing is visualized 3 Lack of water With the door shut, it produces a beep sound every 5" waiting full pressure switch (1) 6 Eeprom Nothing is visualized 7 Turbidity sensor Nothing is visualized (1) Upon reaching full pressure switch the beep sound stops. Warning id given through the following procedure: Ev. load ON for 6 no full pressure switch Ev. load OFF 2' Ev. Load ON and warning lack of water, goes back to point 1. GB /
36 5 EMBEDDING WITH FRONTAL VIEW DG1 DG2 1/2 LD1 SS LD2 SB LD3 Reset I D C&P C R S D KS1 KS2 I D C&P C R S Intensive Daily Crystal & Pot. Crystal Rapid Soack Characteristics Alternate load up Delay timer from 1 to 9 hours Turbidity sensor Use of low speed in the Crystal & Pot programme when the machine washes the upper basket Use of low speed in the Crystal programme both when the machine washes the upper basket and the lower basket. N.B. Auto means that in the cycle definition intervenes the turbidity measure, therefore, each Auto cycle is really constituted by four distinct cycles directed by the turbidity level. GB /
37 5.1 Functioning Machine in idle If the machine is not set the 2 digits and relative diode for half load are off, the salt and glossing spies are lit up Setting up of the delay timer Every time the delay timer setting-up key is pressed the machine will produce a beep sound and will show on the 2 digits the value of the delay that has been set. Example: for a setting-up of a 6 hours delay, the machine will show 6H Setting-up of washing into one basket only The defaults are selected in both baskets, the diode corresponding to the setting-up of the upper basket is off, by pressing the basket setting-up key the machine will produce a beep sound and the relative diode well light-up. By pressing the basket setting-up key a second time the machine will produce a beep sound and the relative diode will switch off returning to the default setting-up Setting up a washing programme The setting up of one of the 6 programmes available to the user is possible through the 7 positions selector. Instance in which the delay timer has not been set-up The selector stays fixed for 4" on a position different from that of resetting, after the door has been closed, the washing programme, signalled by a beep sound will start, and the estimated time left to the of the cycle will be visualized. The time is shown in minutes, should it be more than or equal to 99 minutes the machine will flash 99. Instance in which the delay timer has been set: If the delay timer has been set for a value different from 0 and a programme has been set, after 4" from having shut the door the machine will produce a beep sound and the count down will commence before the washing cycle starts. The proceeding of the count down is highlighted by the flashing of the diode on digit 2 and by the hourly decreasing of the delay time. Every time the door is opened the count down will stop and the diode will stop flashing. At the end of the washing a soft flashing with the 00 writing will appear on machine until when the selector is not put on a resetting position. Once the selector has been put on a reset position the writing 00 will disappear and the machine is ready for a new setting cycle. GB /
38 5.1.5 Resetting the set-up It is possible to reset the washing cycle by putting the selector on the resetting position 4". 5.2 Entry in testing 1. Door shut. 2. Selector in reset position. 3. Activate the machine by keeping delay setting key pressed. 4. The machine will produce a beep sound. 5. Deactivate and reactivate the machine by keeping delay setting key pressed. 6. The machine will produce a beep sound and will show C0. 7. Press three times to enter into running-in (it shows C3) and 4 times to enter in to service (it shows C4). 8. If the configuration of the pressing action is one of the valid ones then the machine, after 4" from the last key pressing will produce a beep sound and the chosen accessory programme will start. 9. At this point there are 4" available to bring the selector in a different position from the reset one, if this happens then the programme is reset. 10. It is possible to exit from the running-in or the assistance programme by bringing the selector back on the reset position. Instance in which there is an entry in running-in: During the entire running-in stage, consisting in heating with discharge of washing powder and subsequent discharge phase until the pressure switch is empty +10" the machine shows C3, in the subsequent loading phase the various steps are indicated by the visualization of the step carried out as mentioned hereunder: 1) Ev. load 00 2) Washing Pump 01 3) Resistance 02 4) Dispenser 03 5) Ev. regenerate 04 6) Fan (full Pr.) 05 7) Ev. _ load or alternate 07 8) Discharge pump 08 9) Fan (Empty Pr.) 09 10) Ev. load 10 11) End Sequence 00 flashes 12) Put the selector in the reset position to exit from End Sequence phase and put the machine back in user s programming mode. GB /
39 The functioning is made up of the loading sequence only (steps 1)..11)). N.B. If the set programme is the running-in then the fault finding routine is not active. If the set programme is functional then the faults finding routine is active. 5.3 Faults <Type of fault> <Visualized code> 1) Water-stop intervention 01 2) Relay in c.c 02 3) Probe in c.c./c.a. 03 4) Temperature reaching time-out 04 5) Empty press. Reaching time-out 05 6) Discharge Triac pump in c.a. 07 7) Aux. avv. Triac pump in c.c./c.a. 08 8) Prin.avv. Triac pump in c.c./c.a. 09 9) Ev. load triac pump in c.c/c.a ) Ev._load or alt. Motor Triac ) Relay in c.a ) Triac dispenser in c.c./c.a ) Vacuum finding pressure switch during washing stage 14 after the restoring sequence. 5.4 Warnings <Bit Pos.> <Type of fault> <Visualized code> 1 Ev. Triac restore in c.c./c.a. Nothing is visualized 3 Lack of water H2 will flash until full Pr is not reached 6 Eeprom Nothing is visualized 7 Turbidity sensor It doesn t visualize anything, it assumes the turbidity level to be equal to 4 for the auto cycles GB /

40 6 DISASSEMBLY OF MOTOR-SUMP UNIT Fig. 1 The overflow system is integral with the motor unit. After releasing the impeller, to disassemble the motor it is necessary to unscrew the overflow head as shown in the Fig. 1 and then unscrew the lower clearance ring. GB /

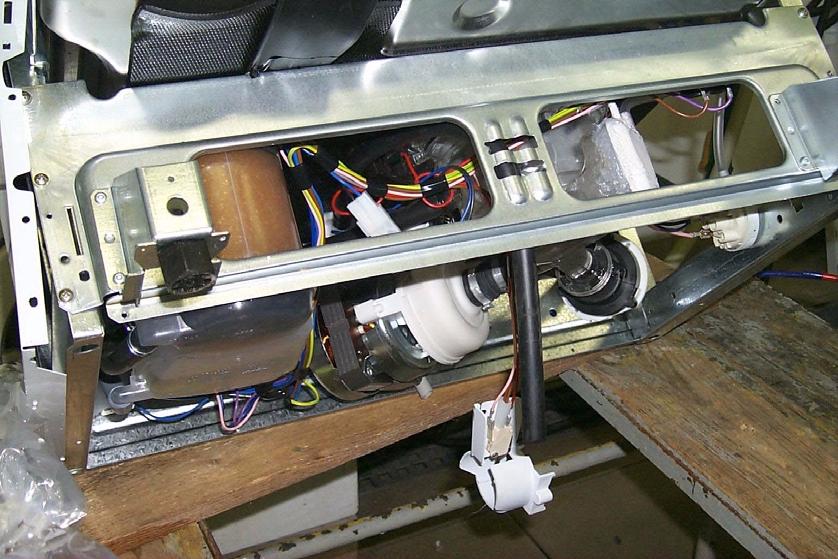
41 Fig. 2 Fig. 3 GB /


42 Fig Remove and replace band after operation Fig Lower part of the overflow head, located above the motor with non barycentric spring. 2 Non barycentric spring fixed to motor 3 Overflow hose resting on tray GB /

43 7 NEW OVERFLOW SYSTEM Fig. 6 The system is activated when a water overflow occurs, due to component malfunction (e.g.: Pressure switch, Timer, etc.) thus avoiding flooding. If more than 9.5 litres of water enter into the tank the system is activated. The water overflow level in the tank is determined by the position of the holes on the head, as shown in Fig Overflow drain system seen from inside of tank GB /


44 Fig. 7 The overflowing water flows through the drain hose (Fig. 7) and triggers the micro switch with about 0.5 litres Overflow tray under dishwasher 2 Float with microswitch 3 Correct position of overflow hose on tray 7.1 New Float Fig. 8 The new float which will replace the current one is shown in the Fig. 8. The new float is designed to prevent dishwashers with an alternate wash motor from obstructing the movement if there is an overflow. N.B. If the hose is positioned incorrectly, in case of overflow, the anti-flood system operation may be delayed or stopped completely. The new float will replace the old one, but not vice versa. GB /

45 Fig. 9 The Fig. 9 shows the incorrect position of the overflow hose which passes under the wiring, not allowing correct operation of the system. 1 1 Incorrect position of overflow hose N.B. The overflow hose must pass over the wiring, because if it is positioned as shown in the figure, it would create a loop which would not allow the water to flow, thus preventing the overflow system from working properly. GB /

46 8 NEW SYSTEM TO FI MOTOR Fig. 10 The new system consists in a non-barycentric spring, locked on the right-hand side of the motor and fixed to the base of the tank with the lower part of the overflow head. This allows motor suspension, thus reducing noise caused by vibrations Lower part of overflow head located over the motor with non barycentric spring 2 Overflow hose 3 Non barycentric spring GB /

47 Fig. 11 The Fig. 11 shows how to proceed to disassemble the non barycentric spring. 1 1 Non barycentric spring GB /

48 9 NATURAL DRYING SYSTEM Fig. 12 This new airbrak, located above the tank, allows the steam produced during the warm rinse (temperature reaches 66 C/67 C) to be released more easily. Part of the steam will be eliminated through the airbrak and a smaller part will condense. Condensate will be eliminated by means of a lateral pocket connected to the drain of the appliance. GB /

49 Fig Airbrak position N.B. The position of the airbrak is very important, as indicated in the Fig. 13, to prevent steam from leaking and damaging the machine top. GB /

50 10 ALTERNATE WASH MOTOR Fig Turbidity sensor 2 Alternate Wash Motor GB /
51 10.1 Alternate Wash Motor Wiring Diagram Fig M Electronic timer 4 Sensing 2 Motor 5 Driven actuator for alternate wash 3 Common 10.2 Sensing signal The sensing device determines the water flows on the upper and lower impeller, alternately, reducing wash noise. Fig A + B A B A + B ON OFF T3 T1 T2 T3 3.05" " 97 15" " Upper/lower sprayers open T1 1.75" 2 Upper sprayer open T2 3.15" 3 Lower sprayer open T3 7.05" A+B; A; BSTOP positions N.B. Every STOP position occurs 0.1" after contact opening. Tolerance limit ±0.1". GB /
52 Merloni Elettrodomestici spa viale Aristide Merloni, Fabriano tel. 0732/ telex fax 0732/ GB /
EDW500 / EDW503. Electronic Controls for Dishwashers
 EDW500 / EDW503 Electronic Controls for Dishwashers ESSE-N / A.S. October 2004 EDW500 - EDW503 EDW500 and EDW503: new entry level electronic controls for dishwashers in the DIVA family Intended to replace
SERVICE MANUAL DISHWASHERS. Dishwasher with EDW 1503 electronic control system (Functionalities)
") SERVICE MANUAL DISHWASHERS ELECTROLUX HOME PRODUCTS ITALY S.p.A. Spares Operations Italy Publication no. Corso Lino Zanussi, 30 I - 33080 PORCIA /PN (ITALY) 599 35 64-85 Fax +39 0434 394096 EN Dishwasher
SERVICE MANUAL DISHWASHERS ELECTROLUX HOME PRODUCTS ITALY S.p.A. Spares Operations Italy Publication no. Corso Lino Zanussi, 30 I - 33080 PORCIA /PN (ITALY) 599 35 64-85 Fax +39 0434 394096 EN Dishwasher
aáëüï~ëüéê=ëéêáéë=bat=nrmp cìååíáçå~äáíáéë
 aáëüï~ëüéê=ëéêáéë=bat=nrmp cìååíáçå~äáíáéë Service Manual: H7-74-03D Product identification Code for the production numbers used for the various models (PNC) F.S. - Free-standing B. I. - Partially integrated
document property of unauthorised reproduction and distribution prohibited
 document property tribution prohibited After Sales Service TECHNICAL INFO FAULTS DIAGNOSIS AND CODING DWS 2001 with electronic timer Faults diagnosis ans coding- Dws 2001 Rev 00 21/02/02 Page 1 ALARMS
SERVICE MANUAL DISHWASHERS. Dishwasher with EDW 1500 electronic control system (Functionalities)
") SERVICE MANUAL DISHWASHERS ELECTROLUX HOME PRODUCTS Publication no. ITALY S.p.A. Spares Operations Italy Corso Lino Zanussi, 30 I - 33080 PORCIA /PN (ITALY) 599 37 82-86 Fax +39 0434 394096 Edition: 2006-04
SERVICE MANUAL DISHWASHERS ELECTROLUX HOME PRODUCTS Publication no. ITALY S.p.A. Spares Operations Italy Corso Lino Zanussi, 30 I - 33080 PORCIA /PN (ITALY) 599 37 82-86 Fax +39 0434 394096 Edition: 2006-04
WARNING. Electrical Shock Hazard FOR SERVICE TECHNICIAN ONLY DO NOT REMOVE OR DESTROY L WASHER. Pub # /18/10 GE
 L WASHER WARNING Electrical Shock Hazard Disconnect power before servicing. Replace all parts and panels before operating. Failure to do so can result in injury or death. IMPORTANT Electric Discharge (ESD)
Service Information. Hotpoint. Fully Integrated DISHWASHER with Display and. O 3 Active Oxygen
 5407758 Issue 2 Jan. 2014 SM003860 ~ C00303163 Hotpoint Fully Integrated DISHWASHER with Display and O 3 Active Oxygen Models Covered LTF11M121OUK 82906 Using DEA700 power module. Service Information Indesit
COMPONENTS AND FUNCTIONALITY
 COMPONENTS AND FUNCTIONALITY ESSE-N / A.S. 1 Common Circulation Pumps DIVA ZM+DGN 2 suppliers (FHP - Sole) fully interchangeable same performances versions: with / without tachymetric generator with /
FAVORIT 34502VI0. EN User manual
 FAVORIT 34502VI0 EN User manual 2 www.aeg.com CONTENTS 1. SAFETY INSTRUCTIONS...................................................... 3 2. PRODUCT DESCRIPTION.....................................................
FOR SERVICE TECHNICIAN ONLY DO NOT REMOVE OR DESTROY WARNING
 WARNING Electrical Shock Hazard Disconnect power before servicing. Replace all parts and panels before operating. Failure to do so can result in injury or death. IMPORTANT Electric Discharge (ESD) Sensitive
SERVICE MANUAL DISHWASHERS DIVA ACCESSIBILITY DISHWASHERS
 SERVICE MANUAL DISHWASHERS DIVA ELECTROLUX HOME PRODUCTS S.p.A. Publication no. Spares Operations Italy Corso Lino Zanussi,30 I - 33080 PORCIA /PN (ITALY) 599 38 70-09 Fax +39 0434 394096 EN DISHWASHERS
DRAFT. SERVICE MANUAL Dishwasher 2005 SEVEN DIGIT
 SERVICE MANUAL Dishwasher 2005 SEVEN DIGIT DRAFT All the parts included in this document are the property of Indesit Company S.p.A. All rights reserved. This document and the information it contains are
REPAIR PART DIAGRAMS. Pages: 1-6
 REPAIR PART DIAGRAMS PRODUCT: MODEL: DISHWASHER LL S The information included in this Ariston Spare Parts List may change without notice please see our web site www.usservicenet.com for updates, corrections
User manual. Dishwasher ZDT15010FA
 EN User manual Dishwasher ZDT15010FA Contents Safety instructions 2 Control panel 3 Programmes _ 4 Options _ 5 Before first use _ 6 Daily use _ 7 Hints and tips 9 Care and cleaning _ 10 Troubleshooting
Fault Codes and Service Programs
 E:02 Dishwasher runs without heating. Sanitized LED flashes and E:02 E:04 Sanitized LED flashes and E:04 E:05 Water switch runs continually. Sanitized LED flashes, E:05 shows on display, dishwasher will
Engineers manual. Under counter machines
 Table of Contents 1. INTRODUCTION... 3 1.1 1.2 1.3 INSTALLATION AND COMMISSIONING... 3 SERVICE AND REPAIRS... 3 MODIFICATION... 3 2. EXPLANATION OF SYMBOLS USED... 3 3. WARNING AND SAFETY INFORMATION...
FOR SERVICE TECHNICIAN ONLY DO NOT REMOVE OR DESTROY
 L WASHER WARNING Electrical Shock Hazard Disconnect power before servicing. Replace all parts and panels before operating. Failure to do so can result in injury or death. IMPORTANT Electric Discharge (ESD)
Dishwasher technical manual
 07/2017 ENG Dishwasher technical manual UNIKO WI-FI 1 CONTENTS CONTENTS... 2 MEANING OF THE ICONS... 4 START-UP... 5 CONNECTION TO WI-FI 1.0... 7 Wi-Fi activation... 7 Dishwasher connection... 7 CONNECTION
User Manual. Dishwasher ZDM17301SA ZDM17301WA
 EN User Manual Dishwasher ZDM17301SA ZDM17301WA Contents Safety information 2 Safety instructions 3 Product description 4 Control panel 5 Programmes 6 Daily Use 7 Hints and tips 10 Care and cleaning 11
Operating principle. Bolero XL (2008)
") Operating principle Bolero XL (2008) All rights reserved. No part of this document may be copied and/or published by means of printing, photocopying, microfilming or by any other means whatsoever without
Operating principle Bolero XL (2008) All rights reserved. No part of this document may be copied and/or published by means of printing, photocopying, microfilming or by any other means whatsoever without
Service. Manual EOS DISHWASHER PLATFORM FREE STANDING KNOB-LED INTERFACE (LEVELS I AND II) 1 ISSUE - APRIL 2008
 1 ISSUE - APRIL 2008") 1 ISSUE - APRIL 2008 EOS DISHWASHER PLATFORM FREE STANDING KNOB-LED INTERFACE (LEVELS I AND II) MODELS COMM Covered Code LKF 72 50257 LKF 71 50256 LBF 51 50255 LBF 5 53185 Service GB Manual CONTENTS Chapter
1 ISSUE - APRIL 2008 EOS DISHWASHER PLATFORM FREE STANDING KNOB-LED INTERFACE (LEVELS I AND II) MODELS COMM Covered Code LKF 72 50257 LKF 71 50256 LBF 51 50255 LBF 5 53185 Service GB Manual CONTENTS Chapter
User manual. Dishwasher ZDT12041FA
 EN User manual Dishwasher ZDT12041FA Contents Safety instructions 2 Control panel 3 Programmes _ 4 Options _ 4 Before first use _ 5 Daily use _ 7 Hints and tips 9 Care and cleaning 9 Troubleshooting 10
FAVORIT34502VIO. EN User Manual
 FAVORIT34502VIO EN User Manual 2 www.aeg.com CONTENTS 1. SAFETY INFORMATION...3 2. SAFETY INSTRUCTIONS... 4 3. PRODUCT DESCRIPTION... 6 4. CONTROL PANEL...6 5. PROGRAMMES... 7 6. SETTINGS... 8 7. BEFORE
User manual. Washing machine ZWQ 6120 ZWQ 6100
 EN User manual Washing machine ZWQ 6120 ZWQ 6100 Product description 1 1. The control panel 2. Lid handle 3. Adjustable levelling feet 2 3 The control panel 1 2 3 4 5 6 1. Programme selector 2. Pushbuttons
FAVORIT VI DISHWASHER USER MANUAL
 FAVORIT 55002 VI DISHWASHER USER MANUAL 2 CONTENTS 4 SAFETY INFORMATION 6 PRODUCT DESCRIPTION 7 CONTROL PANEL 8 PROGRAMMES 9 OPTIONS 10 BEFORE FIRST USE 13 DAILY USE 16 CARE AND CLEANING 17 TROUBLESHOOTING
FAVORIT W0P. EN User manual
 FAVORIT 88419 W0P EN User manual 2 www.aeg.com CONTENTS 1. SAFETY INSTRUCTIONS...................................................... 3 2. PRODUCT DESCRIPTION.....................................................
SERVICE MANUAL REFRIGERATION
 SERVICE MANUAL REFRIGERATION Electrolux Home Products S.p.A. Spares Operations Italy Corso lino Zanussi, 30 I - 33080 Porcia (PN) Fax +39 0434 394096 S.O.I. Edition: 10.2006 Publication no. 599 38 38-50
REPAIR PART DIAGRAMS. Pages: 1-6
 REPAIR PART DIAGRAMS PRODUCT: MODEL: WASHER AW NA The information included in this Ariston Spare Parts List may change without notice please see our web site www.usservicenet.com for updates, corrections
user manual Dishwasher ESL 46510
 user manual Dishwasher ESL 46510 2 electrolux CONTENTS Electrolux. Thinking of you. Share more of our thinking at www.electrolux.com Safety information 2 Product description 5 Control panel 5 Use of the
REPAIR PART DIAGRAMS PRODUCT: WASHER MODEL: AW 120
 REPAIR PART DIAGRAMS PRODUCT: WASHER MODE: AW 0 The information included in this Ariston Spare Parts ist may change without notice please see our web site www.usservicenet.com for updates, corrections
INDEX D1976 DISHWASHER (DW955)
") 1 INDEX D1976 DISHWASHER (DW955) PROGRAMS 2 ELECTRICAL FUNCTIONS 6 PART NUMBER SUFFIX DEFINITIONS 8 SPARE PARTS LIST Casing and related parts 10 Container and related parts 12 Door 14 Control Panel 16
1 INDEX D1976 DISHWASHER (DW955) PROGRAMS 2 ELECTRICAL FUNCTIONS 6 PART NUMBER SUFFIX DEFINITIONS 8 SPARE PARTS LIST Casing and related parts 10 Container and related parts 12 Door 14 Control Panel 16
Service Manual - Series 450/451 IG IGV IG IGV IG IG IG IGV IG
 Service Manual - Series 450/451 IG 448... IGV 449... IG 458... IGV 459... IG 459... IG 4408.0 IG 4406.0 IGV 4408.0 IG 4408.1 Service Manual: H7-71-04 Responsible: Dieter Rutz KÜPPERSBUSCH HAUSGERÄTE AG
SPECIFICATIONS PART NAME
 SPECIFICATIONS MODEL High HEAT RATING Low FUEL TANK CAPACITY BURNING TIME DIMENSIONS(W x D x H) WEIGHT VOLTAGE / FREQUENCY ELECTRICAL CONSUMPTION LC-S27 9,900 BTU / 2.9 kw 2,900 BTU / 0.8 kw 4.0 lit. 14.2~
INDEX D1876 DISHWASHER (DW954)
") 2000-06 1 INDEX D1876 DISHWASHER (DW954) PROGRAMS 2 ELECTRICAL FUNCTIONS 5 PART NUMBER SUFFIX DEFINITIONS 7 SPARE PARTS LIST Casing and related parts 8 Container and related parts 10 Door 12 Control Panel
2000-06 1 INDEX D1876 DISHWASHER (DW954) PROGRAMS 2 ELECTRICAL FUNCTIONS 5 PART NUMBER SUFFIX DEFINITIONS 7 SPARE PARTS LIST Casing and related parts 8 Container and related parts 10 Door 12 Control Panel
TECHNICAL SERVICE DEPARTMENT Technical Service Bulletin Heat Pump Water Heater (Generation 4) Troubleshooting (Effective 1 Nov 2016)
 Troubleshooting (Effective 1 Nov 2016)") No Power,, Fan or Compressor Nothing happens at all. No compressor motor; no fan; no display. 1. See use and care manuals to turn unit ON and set operating MODE. 2. Check for the presence of power at the
No Power,, Fan or Compressor Nothing happens at all. No compressor motor; no fan; no display. 1. See use and care manuals to turn unit ON and set operating MODE. 2. Check for the presence of power at the
WC600 Integrated Dishwasher Installation, Use and Maintenance
 WC600 Integrated Dishwasher Installation, Use and Maintenance Customer Care Department The Group Ltd. Harby Road Langar Nottinghamshire NG13 9HY T : 01949 862 012 F : 01949 862 003 E : customer.care@cda.eu
Before loading dishes into the baskets, remove coarse food remains: e.g. bones, fish bones etc. that may block the filter, or damage the wash pump.
 FOR THE FIRST TIME: 1. Set the water hardness. This will ensure optimum wash performance. Contact your local water board to find out the water hardness of the area in which you live. Adjust the dishwasher
Operating principle. Quinto
 Operating principle Quinto All rights reserved. No part of this document may be copied and/or published by means of printing, photocopying, microfilming or by any other means whatsoever without the prior
FAVORIT DISHWASHER USER MANUAL
 FAVORIT 77000 DISHWASHER USER MANUAL 2 CONTENTS 4 SAFETY INFORMATION 6 PRODUCT DESCRIPTION 7 CONTROL PANEL 8 PROGRAMMES 10 OPTIONS 11 BEFORE FIRST USE 14 DAILY USE 17 CARE AND CLEANING 18 TROUBLESHOOTING
WC370 Integrated Intelligent dishwasher Manual for Installation, Use and Maintenance
 WC370 Integrated Intelligent dishwasher Manual for Installation, Use and Maintenance Customer Care Department The Group Ltd. Harby Road Langar Nottinghamshire NG13 9HY T : 01949 862 012 F : 01949 862 003
User manual. Dishwasher ZDT15002
 EN User manual Dishwasher ZDT15002 Contents Safety information 2 Product description _ 3 Control panel 4 Programmes 4 Options _ 5 Before first use _ 5 Daily use 7 Care and cleaning 9 Troubleshooting 10
Dishwasher. Instruction for installation and use D 41
 Dishwasher Instruction for installation and use D 41 Safety Is a Good Habit to Get Into NOTICE Carefully read the instructions contained in this manual, as they provide important information which is
B/S/H/ Fault Codes and Service Programmes PG
 LED LED LED off E:00 No error - - - - - - h:00 h:24 No error Appliance does not start Delay timer is activated! No appliance fault! All LED s are on LED s flashing Interface error Appliance without function
GETTING STARTED? EASY.
 User Manual GETTING STARTED? EASY. ZDF26001WA ZDF26001XA EN User Manual Dishwasher SAFETY INFORMATION Before the installation and use of the appliance, carefully read the supplied instructions. The manufacturer
GB User manual. Washing machine ZWQ 5130
 GB User manual 2 Washing machine ZWQ 5100 ZWQ 5101 ZWQ 5130 Product description 1 1. The control panel 2. Lid handle 3. Adjustable levelling feet 2 3 The control panel 1 2 3 4 5 6 1. Programme selector
PC 640 GB. Built-in cooking tables 60 Instructions for installation and use
 PC 640 GB Built-in cooking tables 60 Instructions for installation and use Congratualtions on choosing an Ariston appliance, which you will find is dependable and easy to use. We recommend that you read
User manual. Dishwasher ZDI12001
 EN User manual Dishwasher ZDI12001 Contents Safety information 2 Product description _ 3 Control panel 3 Programmes 4 Before first use _ 4 Daily use 7 Care and cleaning 9 Troubleshooting 9 Technical information
Service Test Mode
 Service Test Mode The washer control has a service test mode that can be utilized by the service technician in order to test critical components and to access error codes. This test mode will help the
Dishwasher. Instruction for installation and use DE 43
 Dishwasher Instruction for installation and use DE 43 Safety Is a Good Habit to Get Into NOTICE Carefully read the instructions contained in this manual, as they provide important information which is
wc431 Slimline Integrated Dishwasher Manual for Installation, Use and Maintenance
 wc431 Slimline Integrated Dishwasher Manual for Installation, Use and Maintenance Contents Contents... 2 Important... 3 Important Notes... 4 Recommendations... 5 Before First Use... 5 Control Panel...
FAVORIT W0P. EN User manual
 FAVORIT 77000 W0P EN User manual 2 www.aeg.com CONTENTS 1. SAFETY INSTRUCTIONS...................................................... 3 2. PRODUCT DESCRIPTION.....................................................
User manual. Dishwasher ZDF14001WA ZDF14001KA ZDF14001SA
 EN User manual Dishwasher ZDF14001WA ZDF14001KA ZDF14001SA Contents Safety instructions 2 Control panel 4 Programmes _ 4 Options _ 5 Before first use _ 6 Daily use _ 7 Hints and tips 9 Care and cleaning
Service manual. Type: TD25. Contents
 Service manual Type: TD25 Contents Introduction...3 Type overview...4 Programme...5 Indication of programme sequence...5 Options and settings...6 Variant settings...8 Test programme...9 Troubleshooting...11
User manual. Washing machine ZWQ 590 SO ZWQ 585 SO ZWQ 580 SO ZWQ 575 SO ZWQ 570 SO
 EN User manual Washing machine ZWQ 590 SO ZWQ 585 SO ZWQ 580 SO ZWQ 575 SO ZWQ 570 SO Product description 1 The control panel 2 Lid handle 3 Filter access cover 4 Adjustable levelling feet Control panel
SERVICE MANUAL DISHWASHERS DIVA DISHWASHER. F. S. - Free-standing B. I. - Partially integrated F. I. - Fully integrated. Basic characteristics
 SERVICE MANUAL DISHWASHERS DISHWASHER ELECTROLUX ZANUSSI S.p.A. Spares Operations Italy Corso Lino Zanussi,30 Publication number I - 33080 PORCIA /PN (ITALY) 599 38 72-30 Fax +39 0434 394096 EN DIVA F.
Intelligent Security & Fire Ltd
 Product Data Sheet Mx-4000 Series User Manual MX-4100, MX-4200, MX-4400, Mx-4400/LE & Mx-4800 Fire Alarm Control Panels The operation and functions described in the manual are available from Software Versions
User manual. Dishwasher ZDI12010XA
 EN User manual Dishwasher ZDI12010XA Contents Safety instructions 2 Control panel 4 Programmes _ 4 Before first use _ 5 Daily use _ 7 Hints and tips 9 Care and cleaning 9 Troubleshooting 10 Technical information
Refrigerated air dryers
 Refrigerated air dryers OPERATING AND MAINTENANCE MANUAL Original instructions 38178800319 OPERATING AND MAINTENANCE MANUAL - Contents 1 CONTENTS CONTENTS... 1 Chapter 1 IDRY ELECTRONIC CONTROLLER...
User manual. Washing Machine ZWP 581 ZWQ 5102 ZWQ 5103 ZWQ 5122
 EN User manual Washing Machine ZWP 58 ZWQ 502 ZWQ 503 ZWQ 522 Contents Safety information 2 Product description _ 3 How to run a wash cycle? 4 Daily use _ 5 Washing programmes 6 Care and cleaning 8 Safety
DAILY REFERENCE GUIDE PRODUCT DESCRIPTION APPLIANCE CONTROL PANEL. Before using the appliance carefully read Health and Safety guide.
 DAILY REFERENCE GUIDE EN THANK YOU FOR BUYING A HOTPOINT PRODUCT. In order to receive a more complete assistance, please register your appliance on: www.hotpoint.eu/register You can download the Safety
REPAIR PART DIAGRAMS. Pages: 1-7
 REPAIR PART DIAGRAMS PRODUCT: MODE: WASHER/DRYER COMBO AWD A The information included in this Ariston Spare Parts ist may change without notice please see our web site www.usservicenet.com for updates,
HOKKIM INTEGRATED AMF CONTROL BOARD MANUAL FOR MODELS: HAMF-8 AND HAMF-4
 HOKKIM INTEGRATED AMF CONTROL BOARD MANUAL FOR MODELS: HAMF-8 AND HAMF-4 INTRODUCTION Thank you for purchasing the Hokkim Integrated Automatic Mains Failure Control Board model HAMF- 8 or HAMF-4. We shall
Glass and Dishwashers AMX / AUX Series
 Glass and Dishwashers AMX / AUX Series INSTALLATION OPERATION REV. 8.xx 04.07.2005 Installation and Operation Instructions for Models of AMX / AUX Series Content Page 1 Installation... 3 2 Connections...
Essentia Project Artica Platform No Frost 60 cm Appliances 2011
 Essentia Project Artica Platform No Frost 60 cm Appliances 2011 Event Ca Maiano, May 2011 Presenter Piotr Kelm Francesco Nieli 0 Legend and User Interface Legend THR3 Interface (SQG_CL_32) MID Indesit
UNDERCOUNTER SERVICE MANUAL. Ecoboiler UC4L 2.4kW Ecoboiler UC10L 2.8kW Ecoboiler UC10L 5.6kW Ecosmart UC4L 2.
 UNDERCOUNTER SERVICE MANUAL Ecoboiler UC4L 2.4kW 1000740 Ecoboiler UC10L 2.8kW 1000741 Ecoboiler UC10L 5.6kW 1000742 Ecosmart UC4L 2.4kW 1000750 Ecosmart UC10L 2.8kW 1000751 Ecosmart UC10L 5.6kW 1000752
1 SAFETY Aqua Stop valve INSTALLATION OPERATION FUNCTIONS REPAIR COMPONENTS
 REPAIR INSTTRUCTTI I ION Dishwasher 1 SAFETY... 3 4.3 Aqua Stop valve... 21 2 INSTALLATION... 4 2.1 Aligning the appliance... 4 2.2 Electrical connection... 4 2.3 Water connection... 4 3 OPERATION... 5
Dishwasher. Instructions for installation and use D 61
 Dishwasher Instructions for installation and use D 61 D 61 Dishwasher Installation and use Safety Is a Good Habit to Get Into NOTICE Carefully read the instructions contained in this manual, as they
CAUTION: DISCONNECT ELECTRICAL POWER BEFORE SERVICING
 Tech Sheet Laundry Center FFL(E/G)3911/4033 GD000006035-B DIAGNOSTIC SYSTEM FFL(E/G)3911QW and FFL(E/G)4033QW (Washer) This information is intended for Qualified Technicians Only. CAUTION: DISCONNECT ELECTRICAL
Ecoboiler SERVICE MANUAL. Marco Beverage Systems Ltd. 63d Heather Road, Sandyford Industrial Estate, Dublin 18, Republic of Ireland
 Ecoboiler SERVICE MANUAL Marco Beverage Systems Ltd. 63d Heather Road, Sandyford Industrial Estate, Dublin 18, Republic of Ireland Ireland Tel: (01) 295 2674 Ireland Fax: (01) 295 3715 UK Tel: (0207) 274
Clothes Refreshment Machine - CRM. Based on the Nexus 4 dryer structure
 Clothes Refreshment Machine - CRM Based on the Nexus 4 dryer structure Introduction New Dryer Platforms ENV 06 will substitute all the electronic and timer plattforms for tumble dryers. The substitution
The Professional s Choice
 SureFlow compact range: 1000-C & 1000-M Auto-Fill Catering Water Boiler Installation And User Instructions The Professional s Choice CONTENTS CONTENTS & INTRODUCTION 2 SAFETY & ENVIRONMENTAL INFORMATION
11/2012. Mod: D281/EKA-NP. Production code:
 11/2012 Mod: D281/EKA-NP Production code: 916658 INSTRUCTION MANUAL FOR DISHWASHERS UK CONTENTS CHAP 1 PREFACE... 2 CHAP 2 INSTALLATION... 2 2.1 UNPACKING... 2 2.2 POSITIONING... 3 2.3 ELECTRICAL CONNECTION...
MW001 Integrated Dishwasher. Manual for Installation, Use and Maintenance
 MW001 Integrated Dishwasher Manual for Installation, Use and Maintenance Important The CDA Group Ltd cannot be held responsible for injuries or losses caused by incorrect use or installation of this product.
GETTING STARTED? EASY.
 User Manual GETTING STARTED? EASY. ZDF21001WA ZDF21001XA ZDF21001NA EN User Manual Dishwasher SAFETY INFORMATION Before the installation and use of the appliance, carefully read the supplied instructions.
MW402 Integrated Dishwasher
 MW402 Integrated Dishwasher Manual for Installation, Use and Maintenance 1 Customer Care Department The Group Ltd. Harby Road Langar Nottinghamshire NG13 9HY T : 01949 862 012 F : 01949 862 003 E : customer.care@cda.eu
A/23 MFFI - A/27 MFFI
 A/23 MFFI - A/27 MFFI G.C.N. 47-6-0 / 47-6-2 Servicing Instructions Type C Boilers LEAVE THESE INSTRUCTIONS ADJACENT TO THE GAS METER TABLE OF CONTENTS Page No.. SERVICING INSTRUCTIONS. Replacement of
ESL 5201LO EN DISHWASHER USER MANUAL
 ESL 5201LO EN DISHWASHER USER MANUAL 2 www.electrolux.com CONTENTS 1. SAFETY INFORMATION... 2 2. SAFETY INSTRUCTIONS...4 3. PRODUCT DESCRIPTION... 5 4. CONTROL PANEL...6 5. PROGRAMMES...6 6. SETTINGS...
User Manual Dishwasher FAVORIT 56302MO FAVORIT 56302WO
 EN User Manual Dishwasher FAVORIT 56302MO FAVORIT 56302WO 2 www.aeg.com CONTENTS 1. SAFETY INFORMATION...3 2. SAFETY INSTRUCTIONS... 4 3. PRODUCT DESCRIPTION... 5 4. CONTROL PANEL...6 5. PROGRAMMES...
B/S/H/ Fault Codes and Service Programmes PG
 off on E:00 No error - - - - - - h:00 h:24 No error Appliance does not start Delay timer is activated! No appliance! All s are on s flashing Interface error Appliance without function Appliance without
Glass and Dishwashers AMX / AUX Series
 Glass and Dishwashers AMX / AUX Series INSTALLATION OPERATION VERSION 24.02.04 Important Notes Use in Accordance with Regulations This machine is exclusively to be used to wash ware such as plates, cups,
AQUARIUS 45 MARINE SERVICE MANUAL
 AQUARIUS 45 MARINE SERVICE MANUAL CONTENTS: PAGE 1. INTRODUCTION 3 2. SAFETY INSTRUCTIONS 4 3. BASIC INSTRUCTIONS 5 3.1. Installation Details 5 3.2. Operating the Boiler for the First Time 6 3.3. Troubleshooting
User Manual Dishwasher FAVORIT 66602VI0P
 EN User Manual Dishwasher FAVORIT 66602VI0P 2 www.aeg.com CONTENTS 1. SAFETY INFORMATION...3 2. SAFETY INSTRUCTIONS... 4 3. PRODUCT DESCRIPTION... 5 4. CONTROL PANEL...6 5. PROGRAMMES... 7 6. SETTINGS...
Service Quick Guide SQG_CL_15/01_EN
 Service Quick Guide SQG_CL_15/01_EN Indesit Company, Service Department Table - New Platform 2005 Electronic Refrigerators, combination and double-door 1 LED1 LED2 LED3 2 Table 1 In the case of the Led
SERVICE MANUAL REFRIGERATION
 SERVICE MANUAL REFRIGERATION ELECTROLUX ZANUSSI S.p.A. Publication No. Spares Operations Italy 599 35 40-29 Corso Lino Zanussi, 30 020806 I - 33080 PORCIA / PN (ITALY) ITZ/SERVICE/AA EUROFLEC With exposed
Service Information. WNes 2956 appliance documentation. Service Information no. 27/2004 LHG/TKD-Fe/June SI
 After Sales Service International Service Information Service Information no. 27/2004 LHG/TKD-Fe/June 2004 WNes 2956 appliance documentation Page 1/26 Contents 2.0. Extract from Operating Instructions
SERVICE MANUAL WASHING WM-WD. Front loader. Platform. EWM1000 EWM1000plus EWM2000evo EWM3000new ENV06 11xx21xx 25xx/35xx
 SERVICE MANUAL WASHING WM-WD ELECTROLUX ITALIA S.p.A. Spares Operations Italy Publication no. Corso Lino Zanussi, 30 I - 33080 PORCIA /PN (ITALY) 599 72 40-80 Fax +39 0434 394096 Edition: 12-2009 EN Front
SERVICE MANUAL DRYERS. Condenser dryer with electronic control system. ELECTROLUX ZANUSSI S.p.A. Spares Operations Italy
 SERVICE MANUAL DRYERS ELECTROLUX ZANUSSI S.p.A. Spares Operations Italy Publication No. Corso Lino Zanussi, 30 I - 33080 PORCIA /PN (ITALY) 599 38 46-21 Condenser dryer with electronic control system ENV
Servicing Instructions Type C Boilers G.C.N: LEAVE THESE INSTRUCTIONS ADJACENT TO THE GAS METER
 Servicing Instructions Type C Boilers G.C.N: 4-6-0 47-6-08 47-6-09 47-6-3 LEAVE THESE INSTRUCTIONS ADJACENT TO THE GAS METER TABLE OF CONTENTS Page No.. SERVICING INSTRUCTIONS. Replacement of Parts 3.2
SERVICE MANUAL New Electronic Cold Platform 2005.
 SERVICE MANUAL New Electronic Cold Platform 2005. All the parts included in this document are the property of Indesit Company S.p.A. All rights reserved. This document and the information it contains are
Installation & User Guide
 Installation & User Guide All spares available from The Engine Shed Top Station Road Brackley NN13 7UG Tel: 0845 1308060 Fax: 01280 845345 Web: www.caterparts.com Copyright Notice: All rights reserved.
WC141 Integrated Dishwasher Installation, Use and Maintenance
 WC141 Integrated Dishwasher Installation, Use and Maintenance Customer Care Department The Group Ltd. Harby Road Langar Nottinghamshire NG13 9HY T : 01949 862 012 F : 01949 862 003 E : customer.care@cda.eu
Instruction Manual. Model S05 / CAPO
 Instruction Manual Model S05 / CAPO Table of contents 1 2 3 4 5 6 7 8 9 10 11 12 Introduction Intended use... 25 Follow the instructions - Symbols... 25 Your Map Coffee contact... 25 Safety warnings...
GETTING STARTED? EASY.
 User Manual GETTING STARTED? EASY. ZDT24001FA EN User Manual Dishwasher SAFETY INFORMATION Before the installation and use of the appliance, carefully read the supplied instructions. The manufacturer is
HX-30/40 and HX-30/40 S Glass and Dishwashers
 HX-30/40 and HX-30/40 S Glass and Dishwashers INSTALLATION OPERATION VERSION 18/01/00 2 Installation and Operation Instructions for Model HX-30/40 and HX-30/40 S (with built-in softener) Content Page 1
51AKS I S O OWNER S MANUAL
 LLOYD'S REGISTER QUALITY ASSURANCE 51AKS I S O 9 00 1 OWNER S MANUAL This manual applies to the following models Stand-alone Split 51AKS 085--- 51AKS 010--- 51AKS 185--- 51AKS 013--- 51AKS 113--- 51AKS
Scotsman Technical Training. CU50 Cube Ice Machine
 Scotsman Technical Training CU50 Cube Ice Machine Major Topics Overview Installation Start Up Sequence of Operation Maintenance Diagnostics Service Procedures Models Two Base Models Gravity Drain Pump
VIKING RANGE CORPORATION, P.O. DRAWER 956, GREENWOOD, MS USA
 VIKING RANGE CORPORATION, P.O. DRAWER 956, GREENWOOD, MS. 38930-USA TABLE OF CONTENTS Model / Serial Number... 3 Cycle Options... 3 Superclean System... 5 Trouble Shooting... 5 Voltage / Resistance Readings...
DAILY REFERENCE GUIDE PRODUCT DESCRIPTION APPLIANCE CONTROL PANEL. Before using the appliance carefully read Health and Safety guide.
 DAILY REFERENCE GUIDE EN THANK YOU FOR BUYING A ARISTON PRODUCT. In order to receive a more complete assistance, please register your appliance on: www.aristonbrand.com You can download the Safety Instructions
DAILY REFERENCE GUIDE PRODUCT DESCRIPTION APPLIANCE CONTROL PANEL. Before using the appliance carefully read Health and Safety guide.
 DAILY REFERENCE GUIDE EN THANK YOU FOR BUYING A HOTPOINT PRODUCT. In order to receive a more complete assistance, please register your appliance on: www.hotpoint.eu/register You can download the Safety
T6580 FAN COIL CONTROLLER
 20 DESCRIPTION A pleasing and modern appearance makes the T6580 ideal for living quarter applications, in particular offices and hotels. In all versions, the control is Proportional + Integral (P+I). This