019 ASSEMBLING THE HOTEND
|
|
|
- Oswin Brown
- 5 years ago
- Views:
Transcription
 you will have to assemble the heater block first.")
1 019 ASSEMBLING THE HOTEND Take the bag labelled with 31 out of the box. You should have these parts. Take EXTRA care with the small NTC THERMISTOR! It is very fragile. If on the other hand you have the parts shown in the picture below (NTC Thermistor not shown in this picture) you will have to assemble the heater block first. Note how the heater cartridge and the heater block are not assembled in the picture below.


2 To assemble the heater block select these parts:


3 Insert the small grub screw into the heater block. Insert the heater cartridge as shown in the picture below. Make sure the orientation is correct; note the small holes on the side of the heater block.

4 Tighten the grub screw (do not over tighten!). You have now finished the heater block assembly. From this point on the manual will use pictures of the heater block assembly with the heater cartridge sealed into the heater block. Both versions (with grub screw and the one with red sealant) have the same function.

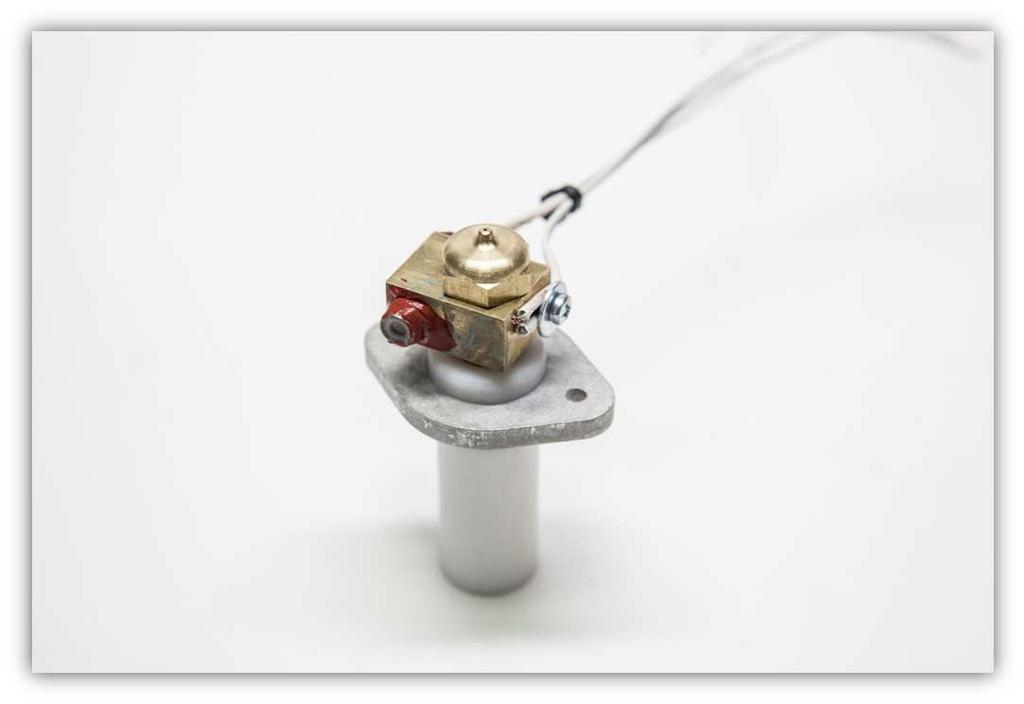
5 Next slide the white plastic spacer into the aluminium bracket. You may need to use some force. Slide the copper barrel into the white spacer. Watch the orientation closely.

6 Screw on the white plastic barrel.
7 Take the heater block (again it does not matter if you have the version with the small grub screw, they are the same). Slide the 2 sleeves of the cartridge, cut them in half and slide two of them back onto the heater cartridge.
8 Cut the wires of the heater cartridge in half.
 all the ends of the wires you have")
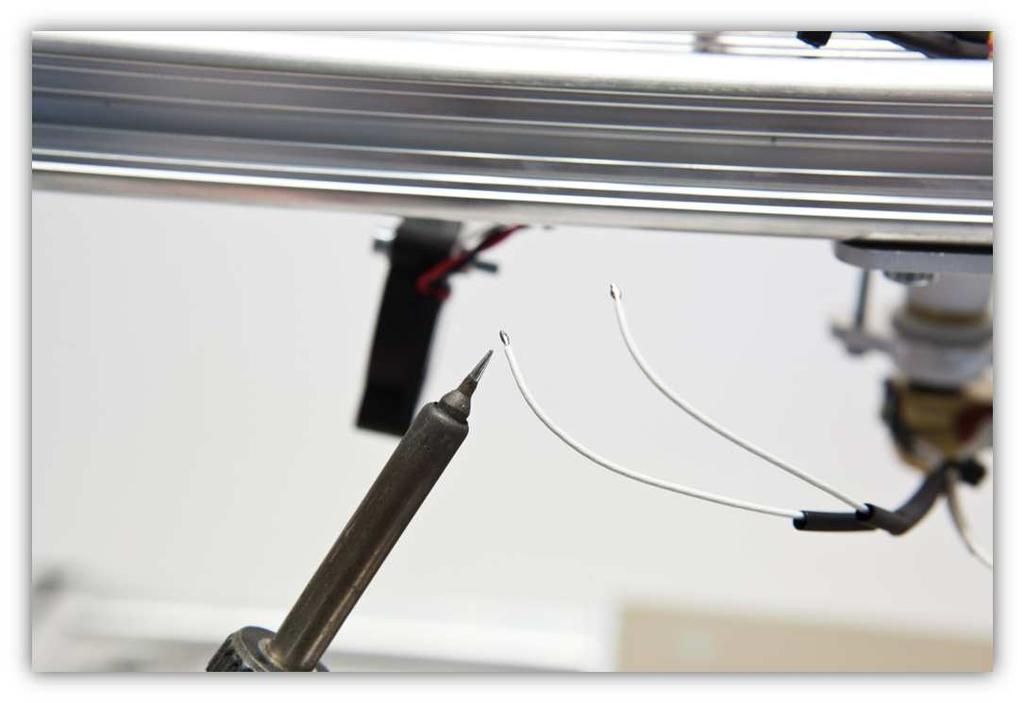
9 Strip 5 mm (0.2") all the ends of the wires you have cut. Take the two loose wires.
10 Carefully (!) wrap one leg of the NTC onto the bare wire. Solder it in place.
11 Carefully (!) wrap the other leg of the NTC onto the second bare wire. Solder it in place.

12 Slide the 2 remaining sleeves over the connections. Use the small washer and the small copper screw to lightly fasten the wires to the heater block. Make sure that the glass bead of the NTC fits snugly in the small hole and that you don t over tighten the small screw (this could cause a short circuit between the 2 wires!!


13 Use a small tie-strip to hold the wires of the NTC and the heater block together.

14 Slide the big washer over the copper barrel. Slide the heater block over the copper barrel. Watch the orientation!

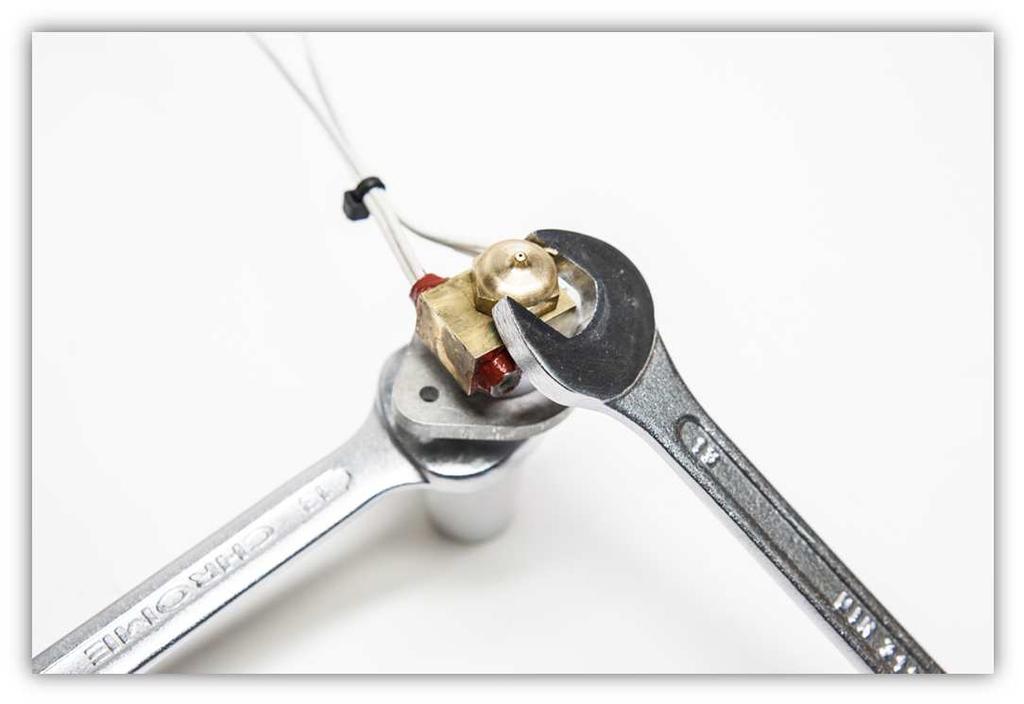
15 Screw the nozzle on the copper barrel. Tighten it firmly. You can unscrew the white plastic barrel and use another wrench on the copper barrel to tighten the nozzle firmly. Do not forget to screw the white plastic barrel back on firmly afterwards. Warning: If you do not tighten these pieces firmly enough you risk having a leaking extruder. This is irreparable. If you use too much force you can strip the threads of the barrel rendering the piece useless! We recommend tightening the nozzle with a torque of 3.5 Nm.
16

17 Put your multimeter on 200 kω and measure the leads of the NTC. You should measure something between 70 to 100 KΩ depending how hot the NTC is. If your measurement is way lower than it is possible that the NTC is shorting out. Detach it, check it and attach it again. Unscrew the two bolts where the HOTEND needs to be mounted.


18 Slide these bolts and washer into the aluminium bracket.
 long and 1 large piece of the biggest heat shrink tubing of 4 cm (1.57\").")
19 Slide the white plastic barrel into the opening in the EXTRUDER BASE. Screw the bolts into the metal spacers. Notice how the NTC side of the extruder faces away from the fan. Make sure this is correct! Cut 2 small pieces of the medium size heat shrink tubing of 1.5 cm (0.59") long and 1 large piece of the biggest heat shrink tubing of 4 cm (1.57"). You can find the heat shrink tubing in the bag labelled with 40. Slide the big heat shrink tubes over the 4 wires of the HOTEND.


20 Slide the 2 medium size heat shrink tubes over the 2 wires of the heater cartridge. Make sure these are the wires of the heater cartridge and not the ones of the NTC!

21 Tin the wires of the heater cartridge. Take the 2 groups with the following wires: Group 1: Grey, Violet, Blue Group 2: Green, Yellow, Orange


22 Solder the 2 wires of the heater cartridge to the 2 groups. Slide the medium size heat shrink tubes over the solder joints and heat them up so they shrink.

23 Now slide the big piece of heat shrink tubing over the 2 medium size pieces, heat the big piece so it covers and protects the 2 heat shrinked joints.

.")
24 Cut 2 small pieces of the smallest heat shrink tubing of 1.5 cm (0.59") long and 1 large piece of the medium size heat shrink tubing of 4 cm (1.57"). You can find the heat shrink tubing in the bag labelled with 40.

25 Slide the medium size heat shrink tubes over the 2 wires of the NTC. Make sure these are the wires of the NTC. Slide the 2 medium size heat shrink tubes over the 2 wires of the NTC.

26 Tin the wires of the NTC.

27 Solder the 2 wires of the NTC to the Black and White wires of the flat cable. Slide the small heat shrink tubes over the solder joints and heat them up so they shrink.

28 Now slide the medium size piece of heat shrink tubing over the 2 small size pieces, heat is piece so it covers and protects the 2 heat shrinked joints.


29 Use 2 small tie strips to keep all the wires together.

30 Congratulations! The K8200 3D PRINTER is now finished! In the next chapters we will speak about the basics of printing, calibrating your printer, more advanced settings and so on. Make sure to read and understand these next chapters, because they contribute a whole lot to the printing quality of the K8200.

31
Chimera Aqua Assembly
 Written By: Daniel Halsall 2019 e3d-online.dozuki.com/ Page 1 of 22 INTRODUCTION The Chimera+ Aqua assembly is easy, and we provide most of the tools you'll need. Please note, though, that you should be
SE300 Build Guide. SeeMeCNC Guides. SE300 Build Guide. Written By: SeeMeCNC seemecnc.dozuki.com/ Page 1 of 16
 SeeMeCNC Guides SE300 Build Guide Written By: SeeMeCNC 2018 seemecnc.dozuki.com/ Page 1 of 16 Step 1 SE300 Hot End Assembly This guide will show you how to assemble the SE300 hot end and effector platform.
HE280 Assembly. SeeMeCNC Guides. HE280 Assembly. Assembly of the HE280. Written By: JJ Johnson seemecnc.dozuki.
 SeeMeCNC Guides HE280 Assembly Assembly of the HE280. Written By: JJ Johnson 2017 seemecnc.dozuki.com/ Page 1 of 51 TOOLS: Phillips Screwdriver, size P1 (1) small flat blade screwdriver (1) 1/4" or 6mm
Upgrading to a Volcano
 Upgrading to a Volcano Learn how to upgrade your existing V6 or Lite6 to a Volcano heater block. Written By: Gabe S. 2018 e3d-online.dozuki.com/ Page 1 of 14 TOOLS: Hex Wrench, 2.5mm (1) Hex Wrench, 1.5mm
Building a new Volcano
 Building a new Volcano Building a Volcano HotEnd from scratch? Look here for build instructions. Written By: Gabe S. 2018 e3d-online.dozuki.com/ Page 1 of 10 TOOLS: Hex Wrench, 1.5mm (1) Hex Wrench, 2.5mm
Written By: John Bamford
 Prusa I3 with Titan + V6 Upgrade your older (non-mk2) Prusa i3 to Titan + V6! Written By: John Bamford 2018 e3d-online.dozuki.com/ Page 1 of 15 INTRODUCTION There are many incarnations of the Prusa i3,
3D Industries Aluhotends
 The Aluhotend V7 In any 3D printer typically that using thermoplastic or similar materials, the plastic is ejected from a pool of molten plastic within a nozzle by the forced arrival of un-melted plastic.
SuperKlean Washdown Products
 DURAREEL DR8 & DR8S INSTALLATION AND MAINTENANCE INSTRUCTIONS **DO NOT THROW AWAY AFTER INSTALLATION** **SAVE AND DISPLAY PROMINENTLY WHERE THIS EQUIPMENT IS USED** GENERAL WARNINGS High pressure and hot
HELIATOS Bottom Feed Connector Installation Instructions Introduction. Step 1
 Introduction The Bottom Feed solar water heater connector is meant to connect solar water heater panels directly to your existing standard water heater. It's main advantages are ease of installation, efficiency,
ARIN THERMOSTATIC SHOWER SYSTEM
 ARIN THERMOSTATIC SHOWER SYSTEM INSTALLATION INSTRUCTIONS Before installing, read entire shower system installation instructions. Observe all local building and safety codes. For the following installation
STONE TROUGH CONSOLE SINK
 STONE TROUGH CONSOLE SINK INSTRUCTIONS CONTENTS Console Installation Sink Support 2 2 Backsplash 2 Undermount Sink Semi-Recessed Sink 3 4 Vessel Sink 5 Drain Installation 6 1 CONSOLE SINK Read entire Console
General System Layout Sketch
 General System Layout Sketch EZ-37 Solar Panels PV panel Can use Standard Copper, CPVC or PEX Pipes Pump Existing Water Heater Bottom Feed Connector 1 Introduction This document describes how to install
Installation Instructions
 Installation Instructions Outdoor Installation Kit Models AD250 & AW250 Part No. 24097 Qualifications for installation of the kit: You must be able to read and understand all instructions provided with
Installation Manual PS-200 & PS-201
 Installation Manual PS-200 & PS-201 Table of Contents Pre-Uncrating Checklist... 1 Verifying System Requirements... 2 Verifying System Direction... 2 Verifying the Electrical Requirements... 2 Removal
DM60-xxx Antennas. 1. Assembly. Installation Instruction for CMAX Antennas
 Installation Guide for CMAX-DM20/DM22S/DM30/ DM60-xxx Antennas Note: Please read the complete description before starting the installation. Be sure that connectors are properly sealed from water if no
Installation Manual PS-225 & PS-275
 Installation Manual PS-225 & PS-275 Table of Contents Pre-Uncrating Checklist... 1 Verifying System Requirements... 2 Verifying System Direction... 2 Verifying the Electrical Requirements... 2 Removal
DR. E. HORN GmbH / Schoenaich, Germany
 Manual DK002111, rev.15. June 2015 DR. E. HORN GmbH / Schoenaich, Germany Water in Oil Identification System for standalone installation: Sensor FRG00032... Connection box GHG02088-4 3x relay outputs optional:
GRANITE COMPOSITE SINK
 GRANITE COMPOSITE SINK CONTENTS Sink Installation Faucet Drilling Drop-In Sink Undermount Sink Drain Installation 2 3 4 5 Materal Care and Maintenance 6 1 FAUCET DRILLING The hole for the faucet can be
FIREPLACE INSTALLATION
 CHECK GAS TYPE Use proper gas type for the fireplace unit you are installing. If you have conflicting gas types, do not install fireplace. See retailer where you purchased the fireplace for proper fireplace
Impeller Stack Kit Dismantling and Reassembly CR(I/N) 1S 1 3 5
 1S 1 3 5") GRUNDFOS CR Series Impeller Stack Kit Dismantling and Reassembly CR(I/N) 1S 1 5 Grundfos Pumps Corporation 17100 W. 118th Terrace Olathe, Kansas 66062 Telephone: 91.227.00 Fax: 91.227.500 www.grundfos.com
GRUNDFOS CR Series Impeller Stack Kit Dismantling and Reassembly CR(I/N) 1S 1 5 Grundfos Pumps Corporation 17100 W. 118th Terrace Olathe, Kansas 66062 Telephone: 91.227.00 Fax: 91.227.500 www.grundfos.com
Instructions. Certifications Brass w/built-in Stop Valve. Pressure Balance Shower Valve. Tools Required. Important Points.
 Instructions Tools Required Adjustable Wrench Groove Joint Pliers Pipe Wrench Phillips Screwdriver Pipe Tape or Pipe Thread Compound Safety Tips If you solder the joints during installation, the seats,
Acrylic Claw Foot Tub
 Acrylic Claw Foot Tub Wrench or socket Drill & Bits Parts Recommended 2-2 x12 boards 4 Lag Bolts 4 Flat Washers Be sure to re-inforce the floor before securing tub. We recommend 2-2 x12 s securely fastened
Acrylic Claw Foot Tub
 Acrylic Claw Foot Tub Wrench or socket Drill & Bits Parts Recommended 2-2 x12 boards 4 Lag Bolts 4 Flat Washers Be sure to re-inforce the floor before securing tub. We recommend 2-2 x12 s securely fastened
IMPORTANT INFORMATION. Revised Dishwasher Installation Instructions
 IMPORTANT INFORMATION Revised Dishwasher Installation Instructions To obtain a revised copy of the entire Dishwasher User s Manual, go to www.eurotechappliances.com. SPECIAL EDITION 11-20-02 SAVE THESE
VERTICAL COOKING PRECISIO/PRECIJET COMBI OVEN PRECISIO/ PRECIJET OVENS S.A.V. MAINTENANCE AND REPAIR
 VERTICAL COOKING S.A.V. PRECISIO/ PRECIJET OVENS MAINTENANCE AND REPAIR 27/03/2012 PPS-3BEFM10PC GENERAL Tools Every time this symbol appears, it is imperative to have the appropriate tool in order to
INSTALLATION MANUAL FOR MODELS: TERAZZA, TRACCIO, MILANO, CERRATO
 INSTALLATION MANUAL FOR MODELS: TERAZZA, TRACCIO, MILANO, CERRATO TABLE OF CONTENTS ROOM SPECIFICATIONS ELECTRICAL SPECIFICATIONS PLUMBING SPECIFICATIONS TECHNICAL SPECIFICATIONS INTRODUCTION ASSEMBLY
Instructions. Certifications CH Chrome SS Stainless Steel. Single Handle, Industrial Style, Pull-Down Kitchen Faucet.
 Instructions *Image may vary slightly from actual product Tools Required Adjustable Wrench Groove Joint Pliers Pipe Wrench Phillips Screwdriver Pipe Tape or pipe thread compound Safety Tips If you solder
BMW E36 Thermostat Removal And Coolant Flush
 BMW E36 Thermostat Removal And Coolant Flush Disclaimer: The cooling system is critical to the proper operation of your car. Failure to properly install all of the components of the cooling system could
Basin Set INSTALLATION INSTRUCTIONS
 P24130-CR, P24130-LV, P24131-CR, P24131-LV, P24400-CR, P24400-LV, P24401-CR, P24401-LV, P24402-CR, P24402-LV, P24500-LV, P24500-TT 1 of 5 INSTALLATION INSTRUCTIONS Thank You For Choosing Kallista We appreciate
DISHWASHER INSTALLATION INSTRUCTIONS
 DISHWASHER INSTALLATION INSTRUCTIONS IMPORTANT! Read all of these instructions before installing the dishwasher. AUTOMATIC HIGH LOOP The drain hose is fastened to the back of the machine at the best height.
Fitting Instructions: Street Triple Rx, Daytona 675 from VIN and Daytona 675 R from VIN A
 English Fitting Instructions: Street Triple Rx, Daytona 675 from VIN 564948 and Daytona 675 R from VIN 564948 A9808114 Thank you for choosing this Triumph genuine accessory kit. This accessory kit is the
Installing the Cisco ONS FAP-4 Fuse Alarm Panel
 Installing the Cisco ONS 15454-FAP-4 Fuse Alarm Panel Product Number: 15454-FAP-4= This document explains how to install, test, operate, and maintain the Cisco ONS 15454-FAP-4 fuse alarm panel. This document
Table of Contents. What to Expect with. Tools Needed. Mounting Options. Blades
 www.hunterfan.com Table of Contents Ceiling Bracket 30 inches Downrod Ladder 3 Wiring Operation, Maintenance & Cleaning Light Kit 11 Troubleshooting??? 16 15 1 12 10 9 5 Blades Canopy 6 4 PÁGINA 2 7 feet
Installation Instructions
 Installation Instructions For Fully Integrated NoFrost Combined Refrigerator-Freezers HC 2062 HCB 2062 HC/HCB 20 7082 373-00 Important PLEASE READ AND FOLLOW THESE INSTRUCTIONS These instructions contain
General System Layout Sketch
 General System Layout Sketch EZ-37 Solar Panels PV panel Glycol Fill Valve Expansion Tank ` 1 Introduction This document describes how to install a Heliatos GH type solar water heating system. These systems
Table of Contents. What to Expect with. Tools Needed. Mounting Options. Blades
 Table of Contents 1.888.830.1326 Ceiling Bracket 30 inches Ladder Downrod 3 Wiring 10 Operation, Maintenance & Cleaning Light Kit 11 Troubleshooting??? 17 15 1 13 5 Blades 9 Switch Housing 12 Canopy 6
INSTALLATION INSTRUCTIONS UNDERCOUNTER DISHWASHERS
 INSTALLATION INSTRUCTIONS UNDERCOUNTER DISHWASHERS VIKING 111 Front Street Greenwood, Mississippi 38930 USA (662) 455-1200 IMPORTANT - PLEASE READ AND FOLLOW Before beginning - please read these instructions
INSTALLATION INSTRUCTIONS M SHOWER SLIDING RAIL
 INSTALLATION INSTRUCTIONS M1-4533 SHOWER SLIDING RAIL Dimensions in Inches (& Millimetres) M1-4533 Ø15/16" (Ø24mm) 2 11/16" (68mm) 1 3/8" (35.6mm) 2 11/16" (68.7mm) 2 13/16" (71mm) 2 3/8" (60mm) 2 11/16"
INSTALLATION INSTRUCTIONS
 INSTALLATION INSTRUCTIONS Accessory Application Publication No. HEATER KIT P/N 0SE01-HL3-102 (SXS700M2/M4) P/N 0SE01-HL3-103 (SXS700M2D/M4D) SXS700M2/M2D/M4/M4D MII 14607-15172 Issue Date REVISED: June
Table of Contents. What to Expect with. Mounting Options. Tools Needed
 Table of Contents www.hunterfan.com What to Expect with Your Installation Congratulations on purchasing your new Hunter ceiling fan! It will provide comfort and performance in your home or office for many
INSTALLATION INSTRUCTIONS
 Accessory Application Publication No. INSTALLATION INSTRUCTIONS HEATER KIT P/N 0SE01-HL3-101 SXS700M4/M2 Honda Dealer: Please give a copy of these instructions to your customer. PARTS LIST REPAIR KIT (P/N
Basin Mixer. Installation & Aftercare Instructions. Please retain for future reference.
 Basin Mixer Installation & Aftercare Instructions Please retain for future reference. This guide covers the installation of all basin mixer varients. Please select the installation diagram suited to the
HWT-P HWAT POWER CONNECTION KIT WITH END SEAL INSTALLATION INSTRUCTIONS
 HWT-P HWAT POWER CONNECTION KIT WITH END SEAL INSTALLATION INSTRUCTIONS DESCRIPTION The Raychem HWT-P Power Connection and End Seal Kit is for use with HWAT heating cables. Materials for one power connection
Table of Contents What to Expect with Your Installation. Top Housing. Ceiling Plate. Tools Needed.
 Table of Contents Congratulations on purchasing your new Hunter ceiling fan! It will provide comfort and performance in your home or office for many years. This installation and operation manual contains
Mounting Instructions Adapter for ventilation duct BWP-143A-SS, Stainless Steel version
 Mounting Instructions Adapter for ventilation duct BWP-143A-SS, Stainless Steel version 116-P-BWP143ASS/DGB Rev A, 2015-11-20, Autronica Fire And Security AS COPYRIGHT This publication, or parts thereof,
MPS-425 e-drum set. assembly instructions
 MPS-425 e-drum set assembly instructions Musikhaus Thomann Thomann GmbH Hans-Thomann-Straße 1 96138 Burgebrach Germany Telephone: +49 (0) 9546 9223-0 E-mail: info@thomann.de Internet: www.thomann.de 20.07.2015,
INSTALLATION INSTRUCTIONS
 INSTALLATION INSTRUCTIONS 5000 700069 50055 MODEL: Dillon 5000 (RH-600) 50055 (RH-600X) 700069 (TRRH-600) REV D Restoration Hardware Faucet Product Size Specification Diagram Recommended Deck Hole Size
Heater Core Replacement
 Page 1 of 14 2003 Chevrolet Impala : Heating, Ventilation, & Air Conditioning > Repair Instructions > Heater Core Replacement Heater Core Replacement HEATER CORE REPLACEMENT Tools Required J 38185 (Image
Thermostatic Valve and Trim
 ML8950-xx Thermostatic Valve and Trim Description Installation instructions Trim and PL8950 valve Brass lever handles and face plate Standards ASME A112.18.1 Listed IAPMO / UPC & CUPC ADA Accessibility
Installation Manual Mopar Engine Compartment Upgrade Kit
 Installation Manual 64-75 Mopar Engine Compartment Upgrade Kit Congratulations... You have just purchased the highest quality, best performing A/C system upgrade ever designed for your Classic Vehicle.
Installation Guide Europa
 Installation Guide Europa One Less Thing to Forget... Sign up now for cartridge auto-renew and save 10%! Stop stressing about when to purchase your next nuvoh2o replacement cartridge. Sign up for our auto-renew
Table of Contents. Ceiling Bracket Installation
 Table of Contents What to Expect with Your Installation Congratulations on purchasing your new Casablanca ceiling fan! It will provide comfort and performance in your home or office for many years. This
Instructions CH Chrome SS Stainless Steel Certifications. Single Handle, Pull-Down, Kitchen Faucet. Tools Required.
 Instructions *Image may vary slightly from actual product Tools Required Adjustable Wrench Groove Joint Pliers Pipe Wrench Phillips Screwdriver Pipe Tape or pipe thread compound Safety Tips If you solder
CircuFlow Quick Setup Guide
 CircuFlow 5150 Quick Setup Guide LB134 Rev C 201414 TABLE OF CONTENTS Setup Treatment Notes SETUP 01 01 Open the shipping box and lift device up and out of box. Remove the protective foam covers on each
One Less Thing to Forget...
 Installation Guide One Less Thing to Forget... Sign up now for cartridge auto-renew and save 10%! Stop stressing about when to purchase your next nuvoh2o replacement cartridge. Sign up for our auto-renew
Installation Instructions
 Installation Instructions For Fully Integrated NoFrost Combined Refrigerator-Freezers HC 2060/2061 7082 485-00 Important PLEASE READ AND FOLLOW THESE INSTRUCTIONS These instructions contain Warning and
FRL 10 Centrifugal blowers
 FRL 10 Centrifugal blowers User instructions 2 Kongskilde Blower model FRL10. Motor mounting instructions Motor Specifications: Model FRL 10 Blower/Aspirator fans are designed to be driven by Single or
Table of Contents. What to Expect with. Tools Needed. Mounting Options. Preparation. Downrod. Maintenance.
 www.hunterfan.com Table of Contents What to Expect with Your Installation Congratulations on purchasing your new Hunter ceiling fan! It will provide comfort and performance in your home or ofice for many
Sign Planogram: Plumbing Repair Bay Name: Plumbing Repair 4.1. Toilet Repair. 72" from floor to bottom of AV. Replacing a Fill Valve
 70054 Toilet Repair 700539 70054 Bay Name: Plumbing Repair 4.1 1 of 1 1 Toilet Repair 72" from floor to bottom of AV 2 3 4 5 6 7 2 Installing a Toilet Ensure that Install a new Place the toilet Tighten
Instructions. 110-KVD-CYSCH-AD-Z Chrome 110-KVD-CYSSS-AD-Z Stainless Steel Certifications. Single Handle, Pull-Down, Kitchen Faucet
 Instructions *Image may vary slightly from actual product Tools Required Adjustable Wrench Groove Joint Pliers Pipe Wrench Phillips Screwdriver Pipe Tape or pipe thread compound Safety Tips If you solder
Condair Esco. Steam humidification system INSTALLATION INSTRUCTIONS EN 1310
 Condair Esco Steam humidification system L INSTALLATION INSTRUCTIONS 1117775 EN 1310 3 Contents 1 Introduction 4 1.1 General 4 1.2 Safety 4 2 Esco DL40 5 2.1 Overview Esco DL40 5 2.2 Mounting the Esco
Table of Contents What to Expect with. Mounting Options. Tools Needed. Downrod. Blades
 Table of Contents Congratulations on purchasing your new Hunter ceiling fan! It will provide comfort and performance in your home or office for many years. This installation and operation manual contains
kk21 installation Kk21-WF21 Things you might need for the installation: vessel sink,
 Kk21-WF21 Things you might need for the installation: vessel sink, plumber's putty(home depot), liquid nails(home depot), Bucket silicone caulk(home depot), Putty knife Plumber's putty Pipe wrench Channel-lock
AUBEREE CENTERSET FAUCET INSTALLATION
 SKU(s): 917558 BEFORE YOU BEGIN We recommend consulting a professional if you are unfamiliar with installing plumbing fixtures. Signature Hardware accepts no liability for any damage to the faucet, plumbing,
TRW-17 READ PRIOR TO UNPACKAGING COMPONENTS
 Rotary Woofer Setup & Installation Guide for the Eminent Technology Model TRW-17 READ PRIOR TO UNPACKAGING COMPONENTS Contents: 1) Removing Rotary Woofer Stand (optional) from Shipping Crate 2) Removing
Pentz EF5 Installation Guide
 Pentz EF5 Installation Guide Clear Vue Cyclones 145 Nix Road Liberty, SC 29657 888-299-0221 www.clearvuecyclones.com Disclaimers & Warnings WARNING: All persons, by purchasing a motorized dust collection
BLADE BATH SHOWER MIXER DECK MOUNTED CHR WITH KIT INSTALLATION INSTRUCTIONS P BS-E A/2
 BLADE BATH MIXER DECK MOUNTED CHR WITH KIT 20007014600 INSTRUCTIONS P5-65511339-1-BS-E A/2 20007014600 INTRODUCTION DIMENSIONS Please read these instructions carefully and keep in a safe place for future
CBT Bowl & wrap replacement
 CBT bowl & wrap replacement 2 CBT BOWL & WRAP REPLACEMENT Revision History rev. level 01_03.14.2012 rev. level 02_03.19.2012 rev. level 03_03.23.2012 rev. level 04_05.30.2013 NOTE: due to the fact that
Component. Maintenance. Manual Z SERIES. Evaporator Assembly
 Component Maintenance Manual with Illustrated Parts List for Z21-701-SERIES Evaporator Assembly 1 of 16 Record of Revision REVISION ISSUE POSTED NO: DATE DATE INSERTED BY: 2 of 16 List of Effective Pages
Models , Equinox, and Sirens Clutch Replacement Service Manual
 Models 2001-130, Equinox, and 508-128 Sirens Clutch Replacement Service Manual 25500297 Rev. A0 1115 Printed in U.S.A. Copyright 2015 Federal Signal Corporation Contents Safety Messages... 3 General Description...
Table of Contents. What to Expect with Your Installation. Tools Needed. Mounting Options. Ceiling Bracket. Wiring.
 www.hunterfan.com Table of Contents What to Expect with Your Installation Congratulations on purchasing your new Hunter ceiling fan! It will provide comfort and performance in your home or office for many
ESD Safe UL Approved INSTRUCTIONAL MANUAL EX V EX V TEMPERATURE CONTROLLED SOLDERING STATION
 ESD Safe UL Approved INSTRUCTIONAL MANUAL MODEL PART NUMBER EX-685 110V 0685-0000 EX-685 220V 0685-2000 TEMPERATURE CONTROLLED SOLDERING STATION AUTOMATED PRODUCTION EQUIPMENT 3661 Horseblock Road, Medford,
Technical Data Sheet No. JS-SM-38 DOCUMENT TITLE 3.5KG CARBON DIOXIDE FIRE EXTINGUISHERS
 PAGE: ISSUE: DATE: of 2 A 00 07/22/5 DOCUMENT TITLE 3.5KG CARBON DIOXIDE FIRE EXTINGUISHERS MODELS: R3.5CO2 0 07/22/5 FIRST ISSUE A WJJ LRL LHG REV DATE REVISION DESCRIPTION BY CHK APP COVER PAGE/REVISION
F AN-ASPIRATED RADIATION SHIELD
 F AN-ASPIRATED RADIATION SHIELD I NSTALLATION MANUAL (For all models with Mfg. Code beginning with B or higher) The Fan-Aspirated Radiation Shield uses fan aspiration and passive shielding to minimize
JB-RTD-STAND RTD PIPE STAND FOR COMBINATION POWER CONNECTION BOX AND ELECTRONIC CONTROLLER INSTALLATION INSTRUCTIONS
 JB-RTD-STAND RTD PIPE STAND FOR COMBINATION POWER CONNECTION BOX AND ELECTRONIC CONTROLLER INSTALLATION INSTRUCTIONS JB-RTD-STAND with Raychem heating cable DESCRIPTION The Raychem JB-RTD-STAND is a combination
INSTALLATION & OPERATING INSTRUCTIONS
 INSTALLATION & OPERATING INSTRUCTIONS WARNING RISK OF ELECTRIC SHOCK. CONNECT ONLY TO A CIRCUIT PROTECTED BY A GROUND-FAULT CIRCUIT-INTERRUPTER. THE UNIT SHOULD BE INSTALLED BY A QUALIFIED SERVICE REPRESENTATIVE.
Table of Contents. What to Expect with. Preparation. Tools Needed. Wiring. Hanging the Fan. Blades.
 www.hunterfan.com Table of Contents Tools Needed Preparation Ceiling Bracket 30 inches Hanging the Fan 3 4 Wiring 5 9 Ladder 2 7 feet We are proud of our work and appreciate the opportunity to supply you
AQUAPEUTICS MONACO INSTALLATION MANUAL
 AQUAPEUTICS MONACO INSTALLATION MANUAL Monaco schmatic diagram Cross sectional illustration of gaskets Recommended tools 4 5 5 5 5 Installation steps Steam generator hook-ups Troubleshooting n Steam dispenser
1 Remove not required parts from sewing machine
 Assembly instruction 7974 e 117_B / 0207254 page 1 1 Remove not required parts from sewing machine 1.1 Remove pulley 1.2 Remove air channel Assembly instruction 7974 e 117_B / 0207254 page 2 2 Mount toothed
MENZA CENTERSET FAUCET INSTALLATION
 SKU(s): 929372 BEFORE YOU BEGIN We recommend consulting a professional if you are unfamiliar with installing plumbing fixtures. Signature Hardware accepts no liability for any damage to the faucet, plumbing,
Installation Instructions
 www.aquanta.io Aquanta by Sunnovations Inc. www.sunnovations.com Installation Instructions For online instructions go to: https://portal.aquanta.io/setup 1 Tools Needed: Phillips screw driver Flathead
Installation Instructions
 Installation Instructions For Fully Integrated NoFrost Combined Refrigerator-Freezers HC 2062 HCB 2062 HC/HCB 2062 7084 445-00 Important Please read and follow these instructions These instructions contain
METRO BASIN MONO MIXER CHR
 METRO BASIN MONO MIXER CHR 20004010020 This product should only be fitted by a qualified plumber to NVQ (National Vocational Qualification) or SNVQ (Scottish National Vocational Qualification) Level 3.
Table of Contents. What to Expect with. Mounting Options. Tools Needed. Downrod. Blades. Maintenance & Cleaning.
 Table of Contents Tools Needed Mounting Options Ceiling Bracket 30 inches Downrod 3 4 Wiring Canopy 5 11 Ladder 2 7 feet We are proud of our work and appreciate the opportunity to supply you with the best
RAVEN 5.6K Institutional Sprinklers Pendent and Horizontal Sidewall Quick Response, Standard and Extended Coverage General Description
 5.6K Institutional Sprinklers Pendent and Horizontal Sidewall Quick Response, Standard and Extended Coverage General Description TYCO 5.6K Institutional Pendent and Horizontal Sidewall (HSW) Sprinklers
BURWELL BIDET TOILET SEAT INSTALLATION
 BEFORE YOU BEGIN We recommend consulting a professional if you are unfamiliar with installing plumbing fixtures. Signature Hardware accepts no liability for any damage to the product, plumbing, toilet,
INSTALLATION INSTRUCTIONS
 INSTALLATION INSTRUCTIONS Water Model rev 3 06/04/09 Hekos s.r.l. Via Cadola, 13 -Paiane- 31011 Ponte nelle Alpi (BL) -ITALY- Tel +39 0437 999647 Fax +39 0437 999849 info@hekos.com www.hekos.com THERMODUL
I<enmore Elite. instructions dlnstallation. Installation Guide Instrucciones de Instalaci6n. English / Espafiol/Frangais
 Installation Guide Instrucciones de Instalaci6n instructions dlnstallation English / Espafiol/Frangais Models/Modelos/Mod_les: 630.1390% 630.1 391_ I
Installation Instructions
 Installation Instructions For Fully Integrated NoFrost Combined Refrigerator-Freezers HCB 1560/1561 7084 429-00 Important Please read and follow these instructions These instructions contain Danger, Warning
569, 570, 571, 572 Series
 Please read and save this Repair Parts Manual. Read this manual and the General Operating Instructions carefully before attempting to assemble, install, operate or maintain the product described. Protect
569, 570, 571, 572 Series
 Please read and save this Repair Parts Manual. Read this manual and the General Operating Instructions carefully before attempting to assemble, install, operate or maintain the product described. Protect
Fillmore Small Pendant Assembly and Installation Instructions
 CAUTION: Fillmore Small Pendant Assembly and Installation Instructions BEFORE INSTALLING FIXTURE, MAKE SURE THE POWER TO THE CIRCUIT IS TURNED OFF AT THE MAIN FUSE BOX / CIRCUIT BREAKER UTILITY BOX. Important
Installation Instructions
 Installation Instructions KFN 9855 ide en - CA Installation, repair and maintenance work should be performed by a Miele authorized service technician in accordance with national and local safety regulations
PERFECT FIT IN-DASH HEAT/ COOL/ DEFROST FORD PICKUP
 specializing in AIR CONDITIONING, PARTS AND SYSTEMS for your classic vehicle PERFECT FIT IN-DASH HEAT/ COOL/ DEFROST 1960-66 FORD PICKUP CONTROL & OPERATING INSTRUCTIONS The controls on your new Perfect
CMU701/ 705 OPERATIONS & INSTRUCTION MANUAL
 CMU701/ 705 OPERATIONS & INSTRUCTION MANUAL MANUFACTURED BY 2519 Fairmont Road Morgantown, West Virginia 26501 PHONE: (304)-983-2642 FAX: (304)-983-2643 www.imswv.com 1 TABLE OF CONTENTS: 1.) Introduction
INSTALLATION INSTRUCTIONS
 INSTALLATION INSTRUCTIONS INSTALLATION REQUIREMENTS Tools and Parts Gather required tools and parts before starting installation. Tools needed: Optional tools: Flashlight Options: Bucket Pedestal: You
FOCAL/RENAULT DACIA. INSTALLATION OF LIVE / PREMIUM RENAULT DACIA Lodgy July Version 1.0
 FOCAL/RENAULT DACIA INSTALLATION OF LIVE / PREMIUM RENAULT DACIA Lodgy July 2017 Version 1.0 1 RECOMMENDATIONS BEFORE INSTALLATION Reset all car radio audio settings: Ambience = Natural Bass / Midrange
Standard Downrod for ceilings 8-10 feet high. Longer Downrod for ceilings 10 feet or higher
 Table of Contents www.casablancafanco.com To register your fan, please visit: www.casablancafanco.com/register What to Expect with Your Installation Save your receipt for proof of purchase. Ceiling Bracket??
Ceiling Sweep Fan Assembly Instructions
 Ceiling Sweep Fan Assembly Instructions CSF Series Installation Note: This fan must be installed by a licenced electrical contractor Improperly installed ceiling sweep fans can be dangerous and expensive
VT-DESOL2 DESOLDERING STATION DESOLDEERSTATION STATION DE DESSOUDAGE ENTLÖTSTATION USER MANUAL GEBRUIKERSHANDLEIDING MANUEL D'UTILISATION
 DESOLDERING STATION DESOLDEERSTATION STATION DE DESSOUDAGE ENTLÖTSTATION USER MANUAL GEBRUIKERSHANDLEIDING MANUEL D'UTILISATION GEBRAUCHSANLEITUNG : DESOLDERING STATION 1. Introduction Congratulations!