Modline 5. Series 52, 56, 5G and 5R Sensors. Operating Instructions. Infrared Thermometer. Rev. L4 12/
|
|
|
- Loreen Edwards
- 6 years ago
- Views:
Transcription


1 Modline 5 Series 52, 56, 5G and 5R Sensors Infrared Thermometer Operating Instructions Rev. L4 12/
2
3 Contacts Worldwide Headquarters Santa Cruz, CA USA Tel: (USA and Canada only) Fax: European Headquarters Berlin, Germany Tel: ircon@ircon.eu Fluke Service Center Beijing, China Tel: Tel: (Service) info@ircon.com.cn Internet: A Word About Ircon: The IRCON quality system is certified to International Quality Standard ISO 9001, model for quality assurance in design/development, production, installation, and servicing. IRCON has committed to providing quality products and services that meet customers needs and provide total customer satisfaction. Ircon, Inc. Ircon, the Ircon Logo, and Modline are registered trademarks of Ircon, Inc. All rights reserved. Specifications subject to change without notice.

4 Regarding European Electromagnetic Compatibility Directive 2004/108/EC and Low Voltage Directive 2006/95/EC Safety Requirements for Electrical Equipment for Measurement, Control, and Laboratory use; this device carries the CE mark. The Modline 5 Sensor, POI Box and TSP terminal strip plate have been tested to and meet the following standards: EN :2006 Immunity Test Requirements in Industrial Locations (EMC) EN , 2001 Safety Requirements for Electrical Equipment for Measurement, Control and Laboratory Use. Covered by Patent No.: when Dirty Window Detector Option installed. Use the product only as specified or hazardous laser radiation exposure can occur!
5 Warranty IRCON, Inc. warrants equipment manufactured by it to be free from defects in materials and workmanship for a period of one year from the date of shipment by IRCON. Customer-paid repairs are warranted for 90 days from date of shipment. If within such period any such equipment shall be proved to IRCON s satisfaction to be so defective, such equipment shall be repaired or replaced at IRCON s option, provided the defective equipment is returned to IRCON, transportation charges prepaid by purchaser. This warranty shall not apply (a) to equipment not manufactured by IRCON, (b) to equipment which shall have been repaired or altered by others than IRCON so as, in its judgement, to affect the same adversely, or (c) to equipment which shall have been subject to negligence, accident or damage by circumstances beyond IRCON s control or to improper operation, maintenance or storage, or to other than normal use or service. With respect to equipment purchased by IRCON but not manufactured by IRCON, the warranty obligations of IRCON shall in all respects conform and be limited to the warranty actually extended to IRCON by its supplier (the manufacturer). The foregoing warranties do not cover reimbursement for transportation, removal, installation, or other expenses which may be incurred in connection with repair or replacement. Except as may be expressly provided in an authorized writing by IRCON, IRCON shall not be subject to any other obligations or liabilities whatsoever with respect to equipment manufactured by IRCON or services rendered by IRCON. THE FOREGOING WARRANTIES ARE EXCLUSIVE AND IN LIEU OF ALL OTHER EXPRESS AND IMPLIED WARRANTIES EXCEPT WARRANTIES OF TITLE, INCLUDING BUT NOT LIMITED TO IMPLIED WARRANTIES OF MERCHANTABILITY AND FITNESS FOR A PARTICULAR PURPOSE. LIMITATION OF LIABILITY. Anything to the contrary herein contained notwithstanding, IRCON, ITS CONTRACTORS AND SUPPLIERS OF ANY TIER, SHALL NOT BE LIABLE IN CONTRACT, IN TORT (INCLUDING NEGLIGENCE OR STRICT LIABILITY) OR OTHERWISE FOR ANY SPECIAL, INDIRECT, INCIDENTAL OR CONSEQUENTIAL DAMAGES WHATSOEVER. The remedies of the purchaser set forth herein are exclusive where so stated and the total cumulative liability of IRCON, its contractors and suppliers of any tier, with respect to this contract or anything done in connection therewith, such as the use of any product covered by or furnished under the contract, whether in contract, in tort (including negligence or strict liability) or otherwise, shall not exceed the price of the product or part on which such liability is based. IRCON Limited Use Software License Agreement and Limited Warranty Modline 5 ModView Configuration Software Distributed with Ircon Modline 5 Sensors IMPORTANT! THE ENCLOSED SOFTWARE IS LICENSED ONLY ON THE CONDITION THAT THE LICENSEE (REFERRED TO IN THIS AGREEMENT AS "YOU") AGREES WITH IRCON, INC. (REFERRED TO IN THIS AGREEMENT AS "IRCON") TO THE TERMS AND CONDITIONS SET FORTH IN THE FOLLOWING LEGAL AGREEMENT. READ THIS SOFTWARE LICENSE AGREEMENT CAREFULLY. AT THE END, YOU WILL BE ASKED TO ACCEPT THIS AGREEMENT AND CONTINUE TO INSTALL THE SOFTWARE, OR, IF YOU DO NOT WISH TO ACCEPT THIS
6 AGREEMENT, TO NOT ACCEPT THIS AGREEMENT, IN WHICH CASE YOU WILL NOT BE ABLE TO INSTALL AND USE THIS SOFTWARE. LIMITED USE LICENSE AGREEMENT IRCON will grant You a nonexclusive, nontransferable license to use the enclosed computer program and accompanying documentation including software updates, if any, if you agree to the following terms and conditions: 1.TERM. This Agreement is effective from the date on which You install the Software. This Agreement may be terminated by You at any time by uninstalling the Software on any and all computers on which You have installed the Software, together with all copies, modifications, and adaptations in any form. It will also terminate if You fail to comply with any material term or condition of this Agreement. 2. LICENSE. The license granted to You by IRCON when You install the Software authorizes You to use the Software on any computer that may be owned or operated by You or Your subsidiary or affiliated company. YOU MAY NOT USE, COPY, OR MODIFY THE SOFTWARE IN WHOLE OR IN PART, EXCEPT AS EXPRESSLY PROVIDED IN THIS AGREEMENT. 3. OWNERSHIP. The Software is the sole and exclusive property of IRCON and/or its software suppliers. By accepting distribution of this Software and accepting this Software agreement license by installing the Software, You do not become owner of the Software, but are entitled to use the Software according to the terms of this Agreement. 4. COPYRIGHT. The Software, including the related screen displays, are copyrighted materials. You agree not to copy, modify or adapt the Software without the written consent of IRCON, in whole or in part, except (1) for backup or archival purposes, and (2) as an essential step in the utilization of the Software in conjunction with a computer, provided that such copy, modification, or adaptation is strictly for IRCON's intended purpose for the Software as defined in this Agreement and in the accompanying documentation materials. Any other copying, modification or adaptation is a violation of this license agreement and of applicable copyright laws, and shall result in the termination of your rights to use the Software. 5. PROTECTION and SECURITY. You agree not to deliver or otherwise make available the Software or any part thereof, including without limitation the object code of the Software, to any party other than IRCON or its employees, except for purposes specifically related to your use of the Software on Your computers, without the prior written consent of IRCON. You agree to use reasonable efforts and take all reasonable steps to safeguard the Software to ensure that no unauthorized copy, publication, disclosure or distribution, in whole or in part, in any form shall be made. You acknowledge IRCON's claim that the Software contains valuable confidential information and trade secrets that are the property of IRCON and/or its suppliers, and that unauthorized use and/or copying are harmful to IRCON and/or its software suppliers. LIMITED WARRANTY Limited Warranty. Ircon warrants that (1) the Software will perform substantially in accordance with the accompanying written materials, and (2) any media and/or hardware accompanying the Software will be free from defects in materials and workmanship under normal use and service. Your Limited Warranty commences upon receipt of the Software and continues for a period of ninety (90) days. Customer Remedies. Ircon's entire liability and Your exclusive remedy shall be at Ircon's option, either (1) return of the license fee paid, if any, or (2) repair or replacement of the Software and/or
7 media and/or hardware that does not satisfy Ircon's Limited Warranty and which is returned to Ircon with a copy of Your receipt or purchase order. This Limited Warranty is void if failure of the Software has resulted from accident, abuse, or use that is not in accordance with the accompanying written materials. Any replacement of the Software or hardware accompanying the Software will be warranted for the remainder of the original warranty period or thirty (30) days, whichever is longer. No Other Warranties. Ircon and its suppliers disclaim all other warranties, both express and implied, including but not limited to implied warranties of merchantability and fitness for a particular purpose, with respect to the Software, media, hardware, and the accompanying written materials. You expressly acknowledge that no representations other than those contained in this agreement and the accompanying materials have been made regarding the Software, media, and hardware and you have not relied on any representation not expressly set out in this agreement or in the accompanying materials. Disclaimer of Liability. In no event shall Ircon and its suppliers be liable for any damages whatsoever (including, without limitation, damages for loss of business profits, business interruption, loss of business information, property damage, personal injury, and other pecuniary loss) arising out of the use of or inability to use this Ircon product, even if Ircon has been advised of the possibility of such damages. The forgoing limitation shall apply regardless of legal theory and shall include liability based on contract, tort, and strict products liability principles. Warning! Ircon is not responsible for: (1) User-provided information used in connection with the Software, and (2) the use of the Software except as described in the accompanying written materials. In order to minimize the likelihood of property damage and personal injury, the user should follow guidelines provided in the appendix of the user manual and establish independent safety procedures and systems. U.S. GOVERNMENT RESTRICTED RIGHTS The Software is provided with RESTRICTED RIGHTS. Use, duplication, or disclosure by the Government is subject to restrictions as set forth in subparagraph (c)(1)(ii) of The Rights in Technical Data and Computer Software clause at Contractor/manufacturer is IRCON, Inc., 1201 Shaffer Road, Building 2, Santa Cruz, CA If any provision or portion of a provision of this Agreement is determined to be invalid under any applicable law, it shall be deemed omitted and the remaining provisions and partial provisions of this Agreement shall continue in full force and effect. This Agreement is to be governed by and construed in accordance with the laws of the State of Illinois. This Agreement constitutes the entire agreement between the parties with respect to the subject matter hereof, and all prior agreements, representations, statements and under-takings are hereby expressly cancelled. Should you have any questions concerning this Agreement, or if you wish to contact Ircon for any reason, please write: Ircon, Inc., Customer Service, 1201 Shaffer Road, Building 2, Santa Cruz, CA
8 Content 1 SAFETY INSTRUCTIONS PRODUCT DESCRIPTION Modline 5 Sensors, Cable and Interface Accessories Preliminary Inspection Modline 5 Description Sensor Standard Features Optional Sensor Features Model Configuration and Required Selections Model Configuration Modline 5 Model Number Summary Accessories Interconnecting Cable Required Accessory Power and Interface Accessories Installation Accessories Specifications Sensor Specifications Accessory Specifications SENSOR INSTALLATION Mechanical Installation Sensors Sensor Parts Sighting Methods Sighting and Focusing Visual Sight Laser Sight Sensor Optical Characteristics Optical Resolution Lens Focusing Ranges and Optical Resolution Factor Table of Model and Lens Type Combinations with Focusing Ranges Spot Size and Viewing Distance Measuring Temperature with Brightness and Ratio Sensors Resolving Targets with Brightness Sensors Obstructions in Cone of Vision Resolving Targets with Two Color Ratio Sensors Signal Reduction Summary Sensor Installation Planning Sensor Mechanical Installation Installation Accessories Sensor Dimensions General Installation Requirements DWD Installation Requirements Modline 5 Mounting, Cooling and Air Purging Accessories UAA Universal Adapter Accessory Description and Dimensions RAM Right Angle Mount Description and Dimensions APA Air Purge Accessory Description and Dimensions MFL Mounting Flange Large Description and Dimensions... 40
9 3.9.5 MFS Mounting Flange Small Description and Dimensions WJA Water Jacket Accessory Description and Dimensions WJA Water Cooling Requirements WJA Air Cooling Requirements Sensor Temperature Alarm BMA Base Mount Accessory Description and Dimensions ESA Extension Sleeve Adapter Description and Dimensions Accessory Combinations with Break-out Drawings Recommended Accessory Groupings Installation Drawings and Illustrations Installation Drawing for the UAA Universal Adapter for Tripod or Custom Mounting Installation Drawing for the RAM Right Angle Mount Installation Drawing using the WJA Water Jacket Accessory with Flange Mounts Installation Drawing using the WJA Water Jacket Accessory with the Base Mount Adapter Other Accessories (Sight Tube, Window, WJ-5 Water Cooling) M5WJ5 Mounting Kit Sensor Installation Checklist SENSOR WIRING Modline 5 Components Modline 5 Sensor System Interfacing Modline 5 Sensor Cable Sensor Interconnecting Cable Model POI Power Supply/Signal Interface Box Mounting the POI Box AC Power and Earth Ground Connections Connecting the AC Power and Ground Wires Connect the 24 VDC Power Supply Wires TSP Terminal Strip Plate Dimensions and Installation Sensor Interconnecting Cable Preparation Cable Preparation Interconnecting Cable Assembly Continuity Check Grounding Strain Relief Fitting Assembly POI Box Sensor Interconnecting Cable Installation Terminal Strip Plate Sensor Interconnecting Cable Installation Connecting Device Cables to POI Box or Terminal Strip Plate Recommended Cable Types Grounding and Shielding System Connections RS-485 Digital Communications Analog Output Temperature Signal Converting the Analog Output from a ma output to a 10 Volt Output Current Input for Remote Emissivity, E-Slope or Laser Operation POI BOX or Terminal Strip Plate Current Input Terminal Connections for Remote Laser Operation Peak/Hold Switch for Remote Peak Picker Reset, Track and Hold or Laser Operation Sensor Alarm Relay Contacts Selection of a Power Supply for Sensors used with TSP Terminal Strip Plates TSP Terminal Strip Plate DC Power Supply Connections Power Supply Common Ground Connection... 80
10 4.11 Installing and Wiring the Chassis Mount 24 Volt DC Switching Power Supply RS-485 Multi-Drop Network Power Supply and System Wiring Computer Communications Requirements POI Power Supply/Operator Interface Box Multi-drop Wiring TSP Terminal Strip Plates Multi-drop Wiring Sensor and Cable Connection Cable Plug and Sensor Receptacle System Grounding and Shielding POI Box and Terminal Strip Plate Diagram Summary Caution and Warning OPERATION Sensor Rear Panel Setup and Operation Introduction Rear Panel Keyboard, Displays and Sight and Laser Aiming Description Navigation and Menus Enter and Up / Down Arrow Pushbuttons Main Menus Warm-up and Initial Setup Series 5R, 5G, 52 Power On and Warm-up Series 56 Models Power On and Warm-up Initial Rear Panel Display Initial Sensor Setup ENGR Setup of Engineering Functions LOCK Panel Lock Security MODL Sensor Model Number F/C Selection of Fahrenheit or Celsius Indication ( F or C) CHK Initiate Manual System Check HOUR Automatic System Check CHK Manual System Calibration for 56 Models HOUR Automatic Calibration Check for 56 Models WRNL Dirty Window Detector Option Warning Level VER Sensor Firmware Version ialm Selects Ratio Invalid Measurement Condition as an Alarm ATTN Selects Attenuation Alarm Threshold AOUT Setup of Analog Signal Output Current Range and Temperature Scaling Fatl Analog Output Operation for Sensor or Dirty Window Detector Malfunction Alarms A LO Analog Output Low Temperature Alarm A HI Analog Output High Temperature Alarm COMM Setup of RS-485 Digital Communication Configuration CLCK Communications Lock ADDR Sets the Sensor Address BRAT Baud Rate LASR Laser Operation (Sensor Firmware Versions 1.08 and Higher) HEAD Setup of Sensor Operating Functions R.T. Response Time COLR Ratio Unit Operation Selection E-SL Ratio Unit Two Color Operation E-Slope Adjustment Remote E-Slope Current Input EMIS Emissivity Adjustment for Brightness Sensors
11 5.9.6 Remote Emissivity Current Input MTCH E-Slope or Emissivity Selection Based on Temperature Match SIGL Signal Conditioning Selection PSEL Peak Picker Functions D.R. Decay Rate Function RSET Manual Peak Picker Reset External Switch For Remote Peak Picker Reset AUTO Auto Peak Picker Reset RBEL Reset Below Temperature DEL Peak Picker Delay Laser Sighting Operation Out of Range Displays and Error Codes Summary DIGITAL COMMUNICATIONS RS-485 Digital Communications Introduction Basic Operation Sensor Rear Panel Setup for RS-485 Communication CLCK Communications Lock ADDR Sets the Sensor Address BRAT Baud Rate Communication Protocol Command Message Format Command Codes Introduction Engineering Function Command Codes Analog Output Function Command Codes Head Function Command Codes Measurement Condition and Alarm Command Codes Introduction Command Code Summary MAINTENANCE Routine Maintenance Maintenance Checklist Sensor Optics Cleaning Cleaning the Optics Restoring the Sensor to Operation Servicing Factory Calibration and Service Measurement Condition Displays, Error Codes and Troubleshooting Status Displays and Error Code Details Troubleshooting APPLICATIONS GUIDE Introduction Analog Outputs Analog Output Range Scaling Example Measured Temperature Calculations Analog Output Operation Notes Response Time Description
12 8.3.2 Determining Response Time to Use Emissivity Settings Using Emissivity Tables Using Emissivity Thermocouple Test Setting the Emissivity Using Relative Readings Practical Limits on Emissivity Ratio Sensors E-Slope Settings Setting the E-Slope Peak Picker Signal Conditioning Turning Peak Picker On and Off External Switch for Remote Peak Picker Operation Peak Picker Signal Conditioning Peak Picker Reset Peak Picker Decay Rate Auto Peak Picker Reset with Reset Below Peak Picker Delay Track and Hold External Switch Control of Track and Hold Avoiding Common Measurement Problems Viewing Angle Limitations Background Interference Transmission Effects Transmission Path Effects Reflectance Effects Use of Mirrors Use of Windows Special Considerations for Ratio Units Preventing Sensor Overheating DPM INSTALLATION AND OPERATION Introduction Using the DPM DPM Installation DPM Pre-installation F and C Units Overlay (Part Number /SBPAX03) Quad Relay Card (Part Number PAXCDS20) Panel Installation and Wiring Sensor RS485 Connections: AC Power Wiring Critical Process Safety Guideline Modline 5 Laser Sight Option RS-485 Communication Setup CLCK Communications Lock ADDR Sets the Sensor Address BRAT Baud Rate DPM Operation Introduction Display and Programming Flow Diagram Sensor Setup with the DPM DPM Quick Programming Mode
13 9.8.1 Quick Programming Menu Navigation DPM Temperature Display Mode Engineering Menu Sensor Setup Head Menu Sensor Setup Analog Output Functions DPM Sensor Diagnostic Functions Full Programming Mode Full Programming Quad Relay Card Setpoint Basic Setup and Operation MAX and MIN Temperature Display Basic Setup and Operation Overlay Backlight Factory Default Restoration APPENDIX A APPENDIX B

14 Safety Instructions 1 Safety Instructions This document contains important information, which should be kept at all times with the instrument during its operational life. Other users of this instrument should be given these instructions with the instrument. Eventual updates to this information must be added to the original document. The instrument can only be operated by trained personnel in accordance with these instructions and local safety regulations. Acceptable Operation This instrument is intended only for the measurement of temperature. The instrument is appropriate for continuous use. The instrument operates reliably in demanding conditions, such as in high environmental temperatures, as long as the documented technical specifications for all instrument components are adhered to. Compliance with the operating instructions is necessary to ensure the expected results. Unacceptable Operation The instrument should not be used for medical diagnosis. Replacement Parts and Accessories Use only original parts and accessories approved by the manufacturer. The use of other products can compromise the operation safety and functionality of the instrument. Instrument Disposal Disposal of old instruments should be handled according to professional and environmental regulations as electronic waste. Operating Instructions The following symbols are used to highlight essential safety information in the operation instructions: Helpful information regarding the optimal use of the instrument. Warnings concerning operation to avoid instrument damage and personal injury. Incorrect use of 110 / 230 V electrical systems can result in electrical hazards and personal injury. All instrument parts supplied with electricity must be covered to prevent physical contact and other hazards at all times. 12 Rev. L4 12/2012 Modline 5

15 Product Description 2 Product Description 2.1 Modline 5 Sensors, Cable and Interface Accessories. The basic Modline 5 System consists of either a standard Sensor or Sensor with the Dirty Window Detection option with an interconnecting cable and Terminal Strip Plate. Optional components include the POI Power Supply/Signal Interface Box and the remote DPM Digital Meter operator interface Preliminary Inspection The Modline 5 is delivered in plastic wrappings, cradled in foam inside rugged cartons. The Sensor and any accessories you have ordered are shown on the packing list. The photograph above identifies Modline 5 system components. See Section 3 Sensor Installation, page 22 to identify mounting, air purging, water cooling and other mechanical accessories. Figure 1: Sensors, Cable and Interface Accessories Place all items on a workbench or desk before removing the plastic covers. Inspect each item carefully to determine if any damage occurred in transit. If you find such damage, promptly inform the freight agent delivering the components. Save the carton until you are sure you will have no further use for it. Return items for repair in their original packaging. Contact Ircon before returning any products for service. See Section 7 Maintenance, page 127 on how to contact IRCON. For Modline 56 sensors: occasionally, a calibration flag that operates during the Sensor internal Calibrate test may move into the viewing area during shipment. If this occurs, the viewing area will be dark and appear obstructed. This flag will be positioned correctly when power is applied to the Sensor. Modline 5 Rev. L4 12/
16 Product Description 2.2 Modline 5 Description The IRCON Modline 5 is an Infrared Thermometer Sensor. State of the art digital circuitry and firmware provide excellent measurement accuracy, repeatability and overall performance. New diagnostics check the status of the Sensor (such as detector temperature, sensor failure) and some of its external environment (such as analog current output open circuit condition and case temperature). An internal function check is performed without the need to block the lens. The check tests for and internal circuit and detector operation. Alarms and Error Codes are outputted when out of limit conditions are sensed. The Patented Dirty Window Detector option checks the Sensors front window for loss of signal because a build up of contaminants. An easy to read, bright LED alphanumeric temperature display and three pushbuttons on a keyboard is located at the rear of the Sensor. Each Sensor has a full complement of easy to navigate rear panel setup and operating functions. Operation as a stand alone Sensor is accomplished simply by using its rear panel keyboard to access and setup operating parameters. The Sensor can display and output temperature signals, and operates with an external dc power source. The Sensor optics and electronics are contained in a small, rugged stainless steel NEMA 4 (IP65) rated housing. Modline 5 accessories for mounting, air purging and cooling the Sensor have been designed to maintain a small installation footprint Sensor Standard Features Through the lens visible rear focusing and sighting with standard or close focus lenses. Field selected F or C measuring units. Field selectable analog current outputs, 0 to 20 ma or 4 to 20 ma. Temperatures within the span of the Sensor can be assigned to the Analog output Zero and Full scale current values to customize the corresponding output temperature range. Peak Picker and Track and Hold Signal Conditioning with remote switch input for Peak Picker Reset or Track and Hold operation. RS-485 Digital Communications allows interfacing with any RS-485 capable device to setup and operate the Sensor remotely. This allows use of a Host computer, Programmable Logic Controller (PLC), etc. with the Sensor Analog current input for remote adjustment of Emissivity or E-Slope. Sensor diagnostic Alarm relay contacts are brought out on the interconnecting cable Optional Sensor Features The Dirty Window Detector and Laser Sight are optional features that can be ordered when the Sensor is purchased. These options are not field upgradeable. 14 Rev. L4 12/2012 Modline 5
17 Product Description 2.3 Model Configuration and Required Selections Model Configuration The Modline 5 Model number contains seven alphanumeric characters. The first two designate the Sensor Series. The Series defines the type of Sensor, brightness or ratio, and the operating wavelength. The next four digits define the Sensor s temperature range and optical resolution with the standard lens installed. Selection of sight, Visible through the lens or optional Laser aiming, is next. Permanent factory installation is required. Each is exclusive of the other. The Dirty Window Detector Option (DWD) is the next required selection. Permanent factory installation is required. The product is covered by Patent Number when the Dirty Window Option is installed. A Sensor can also be ordered to be used a Transfer Standard to calibrate other Modline 5 Sensors. ModView Calibration Software and an expanded Calibration Certificate is supplied with this Sensor Model. A lens selection is required. Lens types for each Sensor must be specified. Lenses are factory installed and are not field changeable. Series designation, temperature range, optical resolution, optional Laser and DWD information is provided in the tables sections below. Lens focusing ranges are found in Section 3.4 Sensor Optical Characteristics, page 26. Ordering information and Model Number examples follow the tables. Two Digit Sensor Series Designation Sensor Series Sensor Type Spectral Response in μ (microns) 52 Brightness 0.85 to Brightness Lowest Temperature Range 2.0 to 2.8 Other Ranges: 2.3 to 2.6 5G Brightness 1.6 5R Selectable Modes: Ratio or Brightness (1 Color Mode) Ratio Mode: 0.75 to 1.05; 1.0 to 1.1 Brightness Mode: 1.0 to 1.1 Series 52: Sensor Model Numbers Model Temperature Range in C and ( F) Optical Resolution with Type 2A Lens to 1400 C (932 to 2552 F) D/ to 2000 C (1112 to 3632 F) D/ to 3000 C (1382 to 5434 F) D/240 Modline 5 Rev. L4 12/
18 Product Description Series 56: Sensor Model Numbers Emissivity span is limited to 0.3 to 1.0 for the first 55 C (100 F) for all temperature ranges Model Temperature Range in C and ( F) Optical Resolution with Type 6A Lens to 300 C (122 to 572 F) D/ to 400 C (212 to 752 F) D/ to 800 C (392 to 1472 F) D/150 Series 5G: Sensor Model Numbers Emissivity span is limited to 0.3 to 1.0 for the first 55 C (100 F) for all temperature ranges Model Temperature Range in C and ( F) Optical Resolution with Type 2A Lens 5G to 1000 C ( F) D/75 5G to 1400 C ( F) D/150 5G to 2000 C ( F) D/240 Series 5R: Sensor Model Numbers Model Temperature Range in C and ( F) Optical Resolution with Type RA Lens 5R to 1400 C ( F) D/100 5R to 1800 C ( F) D/100 5R to 3000 C ( F) D/150 Through the Lens Sight Required Selection Visible or Optional Laser Sighting. Lens Types Lens selection requires matching the lens to specific models. Lens types ending in A are considered standard focusing range lenses. Lens types ending in B are considered close focus lenses. Lens types ending in C are considered very close focus lenses. Complete lens focusing ranges and spot size information are found in Section 3 Sensor Installation, page 22 of this manual. Dirty Window Detector Option Required Selection, The selection is Installed or None. The product is covered by Patent Number when the Dirty Window Detector Option is installed. 2.4 Modline 5 Model Number Summary Modline 5 Model Number as Found on Serial Number Label 16 Rev. L4 12/2012 Modline 5
19 Product Description Series Model Sighting: Visible or Laser DWD None or Installed Transfer Standard Lens Type (Two Characters) (Four Digits) 0 or 1 0 or 1 0 or T (Two Characters) Example and Explanation 5 R RA Lens 5R 600 to 1400 C D/100 Laser Sight DWD Installed This unit is not a Transfer Standard Focusing Range: 13 inches to infinity D/100 The Model Number explanation information provided above defines a Modline 5 Sensor having the following characteristics and features: Model 5R-1410 is a Series 5R Ratio Type Sensor with the temperature range of 600 to 1400 C (1112 to 2552 F) and D/100 Resolution. The Sensor Sight is Laser through the lens (Visible sighting was not selected). The Dirty Window Detector Option (DWD) is installed The Sensor is not a Transfer Standard. (T = Transfer Standard) The installed lens is for the 5R Series and provides the standard focusing range of 13 inches to infinity. The Sensor Model and lens combination provide a D/100 Optical Resolution 2.5 Accessories Interconnecting Cable Required Accessory An IRCON supplied interconnecting cable with the Sensor mating connector attached on end one and termination prepared wires on the other end is required. Special assembly of the cable is required and the cable is only sold with the Sensor connector attached. Maximum cable length is 350 feet (107 meters). The cable length limitation is due to the power supply voltage requirements of the Sensor. The power supply voltage drop across this length of cable are low enough to provide proper Sensor operation. Power supply cable wires are 22 AWG (0.35 mm²). Input and Output wires are 24 AWG (0.25 mm²). RS-485, Alarm relay output, and analog outputs, can extend beyond the 107 meter limitation. See Section 4 Sensor Wiring, page 62 for more information. The cable must be terminated into a POI Power Supply/Signal Interface Box or a TSP Terminal Strip Plate to ensure that the Sensor and cable installation meets RF immunity and emission standards for CE compliance. These items are described below. 2.6 Power and Interface Accessories Model POI Power Supply/Signal Interface Box. This box includes a 24VDC power supply and interconnecting cable termination strip. Input power is 100 to 240 VAC 50/ 60 HZ, 15 Watts maximum. Model TSP Terminal Strip Plate This plate includes an interconnecting cable termination strip and suppression components. Modline 5 Rev. L4 12/
20 Product Description Model DPM Digital Panel Meter Digital Temperature Indicator and RS-485 Communication Operator Interface. 85 to 250 VAC 50/ 60 HZ, 15VA. The DPM does not provide power to Sensor. 2.7 Installation Accessories Details on the following standard accessories can be found in Section 3 Sensor Installation, page 22. An extended family of accessories is available and they are referenced in Section 3. Standard Modline 5 Accessories Model MFS Model BMA Model APA Model WJA Model ESA Model UAA Model MFL Model RAM Model M5WJ5 Mounting Flange (Small Diameter Pattern) Base Mount Adapter Air Purge Accessory Water Jacket Accessory Dirty Window Detector Extension Sleeve Adapter (one included with Dirty Window Detector Option) Universal Accessory Adapter Mounting Flange Large Right Angle Mount Mounting Kit to mount Sensor in WJ-5 Water Cooling Jacket Protective Window / Sight Accessory The EP 5 with a dimming filter is available for viewing very high temperatures. This window replaces the standard rear protection / sight window supplied with the Sensor. This filtered window is for viewing high temperature targets from 1200 C (2192 F) to 2300 C (4172 F). Spare part standard protection windows are identified as the RPW, rear protection window assembly with clear sight window. One of these is supplied with every Sensor. 18 Rev. L4 12/2012 Modline 5
21 Product Description 2.8 Specifications Sensor Specifications Spectral Response Series to 1.1 microns Series to 2.8 microns (Model 56 to 0315 only) 2.3 to 2.6 microns (All other models) Series 5G 1.6 microns Series 5R Ratio Mode: 0.75 to 1.05; 1.0 to 1.1 microns Single Color Brightness Mode 1.0 to 1.1 * All specifications subject to change without notice. Calibration / Blackbody Accuracy at 25 C Sensor Series 52 Within 0.3% of reading plus 1 C up to 2800 C (5072 F) indication up to 3000 C (5432 F) Sensor Series 5G Within 0.3% of reading plus 1 C Sensor Series 56 Sensor Series 5R Repeatability at 25 C Within 0.3% of reading plus 1 C, or 2C (whichever is greater) Within 0.5% of reading plus 2 C up to 2800 C (5072 F) indication up to 3000 C (5432 F) Within 0.1% of full-scale temperature (+1 digit) Response Time for Display and Outputs Series 5R Series 52, 5G Series 56 Selectable Analog Current Output Digital Communications Adjustable from 0.01 to 60 seconds. Adjustable from to 60 seconds. Adjustable from to 60 seconds. 0 to 20 madc or 4 to 20 madc 600 Ω maximum load including cable resistance Output is not isolated from power supply common. RS-485 Digital Interface Emissivity Range Emissivity is 0.10 to Series 52, 56, 5G and 5R (single color mode) Emissivity Limitations for Series 5G and 56 Emissivity span is limited to 0.3 to 1.0 for the first 100 F (55 C) for all temperature ranges of these models E-SLOPE Range Model 5 R (Two color Ratio Mode) to Signal Reduction Range Tolerated Sensor Series 5R will tolerate 95% reduction in radiation intensity caused by low emissivity, non-resolved or obscured 1 All specifications subject to change without notice. Modline 5 Rev. L4 12/
22 Product Description targets or combinations of these conditions above target temperatures of 1500 F (800 C). System ALARM Relay Contacts Peak Picker Rise Time 24 V AC/DC at 1 Amp. Resistive Same as selected Response Time Peak Picker Decay Rate Adjustable 0.00 to 300 degrees F (0.00 to 166 degrees C) per second Peak Picker Reset: Track and Hold Power Requirements Internal Reset has two Modes: Manual and Auto. External Reset: Contact closure greater than.08 second Tracking Mode is elected with external contact closure 24 VDC +/- 5%, 8 Watts Maximum Operating Ambient Temperature Sensor Series 52, 56, 5R and 5G: 0 to 55 C F (32 to 130 ) With WJA Accessory Air Cooling 0 to 105 C (32 to 220 F) With WJA Accessory Water Cooling: 0 to 200 C (32 to 400 F) Sensor Environmental Sensor Housing Sensor Cable Plug and Housing Connector Humidity Sensor Dimensions Weight NEMA 4 (IP65). NEMA 4 (IP65). 10 to 90% non-condensing See dimensional drawings in Section 3 Sensor Installation, page 22 of this manual. 4 lbs (1.8 kg) approximate, Model and option dependent Laser Sight Option Laser: Class II Less than 1 mw at 635 nm Shock IEC Vibration IEC See the first manual pages for CE information for Modline 5 Sensor and POI Box Accessory Specifications POI Power Supply/Signal Interface Box Ambient Temperature: 0 to 55 C (32 to 130 F) Environmental: NEMA 4 (IP65) Power Requirements: 100 to 240VAC 50/ 60 HZ, 40 VA. DPM Digital Panel Meter Ambient Temperature: 0 to 50 C (32 to 122 F) Environmental: NEMA 4X (IP65) Sealed Front Bezel Power Requirements: 85 to 250 VAC 50/60 HZ, 15VA. Terminal Strip Plate Ambient Temperature: 0 to 55 C (32 to 130 F) Sensor Standard Teflon Interconnecting Cable Maximum temperature: 200 C (392 F) 20 Rev. L4 12/2012 Modline 5
23 Product Description Maximum cable length: 107 meters (350 feet) See the first manual pages for CE information for Modline 5 Sensor and POI Box. See Red Lion Bulletin PAX P for completing the specifications for DPM. Modline 5 Rev. L4 12/
24 Sensor Installation 3 Sensor Installation 3.1 Mechanical Installation This section provides instructions for installing the Modline 5 Sensor. Sighting, aiming, focusing and resolving targets are explained. Mounting and protection of the Sensor in hot and dirty environments using installation, air purging and water cooling accessories are presented. 3.2 Sensors Figure 2: Standard Sensor Figure 3: Sensor with Dirty Window Detector Two Sensors types are available in the Modline 5 Series, standard Sensor or Sensor with the Dirty Window Detector option. The front of the standard Sensor consists of a front objective lens only. The Sensor with the Dirty Window Detector option has internal components and an external protection window located in front of the objective lens. A hooded mirror extends out in front of protection window. The sensors are illustrated in the photographs above and below. The Patented Dirty Window Detector option, IRCON, inc. Patent Number , checks the Sensors front window for loss of signal caused by a build up of contaminants. A Coarse or Sensitive level of signal loss can be selected. Visual Alarms and a relay output are provided to indicate window contamination. Dimensions for the Sensor with the DWD is slightly different because of the additional components. Measurement of the optical working distance on the standard Sensor is made from the front surface of the unit. The working distance determination on the Sensor with DWD requires a simple calculation. Measurement is made from the front tip of the hooded mirror and 66 mm (2.6 inches) is added to the distance to compensate for the extended optics. Standard Sensor Lens Sensor with DWD Mirror Window Figure 4: Standard Sensor Lens and Lens with DWD 22 Rev. L4 12/2012 Modline 5
 environmental rating Figure 5: Sensor Parts Rear Rotating Focusing Section Focuses the Sensor")
25 Sensor Installation Sensor Parts The photograph below illustrates the Sensor parts called out in this manual. UAA Universal Adapter Accessory for mounting Cable Connection, Match Red Dots to connect NEMA 4 (IP65) environmental rating Figure 5: Sensor Parts Rear Rotating Focusing Section Focuses the Sensor optical system on the target. Lens Lock Thumb Screw Locks the focusing section in place after focusing. (Do Not Use Tools) Rear Protection / Visual Sight Window. Threads on focusing section to cover rear panel display and keypad. Provides NEMA 4 (IP65) environmental rating. See note below about EP-5 window. The EP 5 Protective / Visual Sight Window with a dimming filter is available for viewing very high temperatures. This replaces the standard rear protection and sight window shown above. 3.3 Sighting Methods The Modline 5 Sensor is a precision electro-optical instrument that senses infrared radiation. This signal is processed by the unit s digital circuits to provide an output proportional to the temperature being measured. The Sensor s linear analog current output and RS-485 digital temperature signals are brought out through a connector on the bottom of the Sensor with a shielded cable. The output signals are then connected to compatible devices within the process measurement system Sighting and Focusing The Modline 5 is a variable focus instrument that features visual through-the-lens sighting by means of a viewing sight at the rear panel of the Sensor. An optional internal Laser for through-the-lens aiming is available. Focusing with either the visible or laser sight is accomplished using the rotating rear section of the Sensor Visual Sight The Modline 5 visible sight is aimed and focused onto the target to be measured as simply as an ordinary camera. The rear focus is smooth, utilizing almost one turn of the focusing section. A circular reticle is contained within the Sensor s optical system and is visible when viewing through the sight. During temperature measurement, the target image is superimposed on the reticle. Focusing is performed by adjusting the rear focusing section while viewing the scene until the target area is clear and well defined. Illustrated below is a properly focused Sensor viewing an induction heated rod. The visible sight rear panel is shown below. Modline 5 Rev. L4 12/
26 Sensor Installation Figure 6: Visible Sight Figure 7: Reticle When properly focused, the area of the target within the reticle will be measured. The Sensor infrared detector will see the same image seen defined by the reticle. Approximately 97% of the measured energy will come from the area defined by the reticle. To check or adjust focus, slowly move your head slightly from side to side or up and down. Note whether the target appears to move with respect to the reticle. If it does, adjust the lens focusing section, until there is no perceived motion between the reticle and target (hence eliminating parallax between the two). The instrument is then in sharp focus. Lock the lens rear focusing section in place using the locking thumbscrew on the bottom of the Sensor. If looking through a sight tube or sight hole, position, align and rotate the Sensor and Sight tube to center the reticle in the field of view. For Modline 56 sensors: occasionally, a calibration flag that operates during the Sensor Calibrate test may move into the viewing area during shipment. If this occurs, the viewing area will be dark and appear obstructed. This flag will be positioned correctly when power is applied to the Sensor Laser Sight With the optional Laser sight, a laser light spot is projected onto the target and used to aim the Sensor. The same rear focusing method applies and is to be used to adjust for the smallest laser light spot. The projected focused laser image will be approximately the same diameter spot as measured by the detector. See Section 3.4 Sensor Optical Characteristics, page 26 for determining spot size. The Laser image is reflected from the target surface. The image can easily be seen on most targets at distances of 10 feet and further. The visibility of the reflected image is dependent on the reflection characteristics of the target material as well as the intensity of the ambient lighting. When viewing hot glowing targets, the visibility of the image also depends upon its temperature. The color and intensity of a hot glowing object may override the reflected Laser image. Use of the laser on distant targets or poorly reflecting targets may require some white paint on the target or a white substitute target such as a sheet of paper to accomplish focusing. Ambient light dimming may be required for targets that reflect poorly. For difficult conditions, pre-focus the Sensor optics while aiming the laser at a white reflective target. Then use the Laser to aim the pre-focused Sensor on to the target. 24 Rev. L4 12/2012 Modline 5


27 Sensor Installation Figure 8: Laser Sight If looking through a sight tube or sight hole, position, align and rotate the Sensor and Sight tube to center the laser image in the field of view. The Sensor is a Class II Laser Product with the Laser Sight option installed, see section 5.11 Laser Sighting Operation, page 110 of this manual for safe and full operating instructions. Install Sensor and setup Laser operating procedures so that personnel are not exposed to the laser beam at any time whether the Laser is energized remotely or at the Sensor Rear Panel. Certification and Identification Label Warning Label Figure 9: Sensor Laser Labels These two Sensor Laser labels are shown in detail in Figure 10. Warning Label Certification and Identification Label Figure 10: Sensor Laser Labels in Detail Modline 5 Rev. L4 12/
28 Sensor Installation 3.4 Sensor Optical Characteristics Optical Resolution The Sensing Head is sensitive to infrared radiation in the area indicated by the Cone of Vision in the illustration below. Focal Point Cone of Vision d = D / F where: d = D = diameter of cone at focal point distance from front of Sensor to focal point. For Sensors with DWD Option, add 2.6 inches (66 mm) for distances measured from tip of front hood. F = Resolution Factor of Sensor Model and Lens combination Sensor Figure 11: Cone of Vision and Spot Size Formula The diameter of the cone at any point will determine the area of measurement at that point. Any part of the target or other intervening object positioned within the cone will be imaged on the detector. Anything seen by the detector will become part of the measurement. When the Sensor is sighted on an object, you are aiming or positioning the cone of vision on the object. When you focus, you are adjusting the optical system elements so the focal point is at the surface of the object. The measurement area, as seen by the detector, will then be outlined in the reticle. The reticle only defines the measured area (spot size) in the focused condition. The formula d = D/F defines the spot size at the focal point. Simply divide the Working Distance (D), measured from the front of the Sensor to target by the Resolution Factor (F) to determine the Spot Size (d). Resolution factors for Sensor Model and Lens combinations are provided in the table on the following page. The focusing range for each lens type is also provided in the table. The focusing range defines the allowable range for the Working Distance. For Sensors with the Dirty Window Detector Option, the Working Distance (D) is calculated by measuring the distance from the front tip of the protruding hood to the target and then adding 2.6 inches (66 mm) Lens Focusing Ranges and Optical Resolution Factor The table below lists Lens Type and Focusing Ranges for the Modline 5 Series 52, 56, 5G and 5R. Two ranges are shown. The first range is for a Sensor without the Dirty Window Detector Option (DWD) option. The distance is measured from the front metal surface of the standard Sensor. 26 Rev. L4 12/2012 Modline 5
29 Sensor Installation The second range is for a Sensor with the DWD option. This distance is measured from the tip of the front mirror hood. Very close lens types that include alpha character C are not useable with the DWD option. Some installation, cooling and air purging accessories will limit some of the usable close focus range accessory. The Model number and installed lens type is found on the Sensor Model number tag. Range tolerance of is ±10% Table of Model and Lens Type Combinations with Focusing Ranges The Optical Resolution Factor for each Model and Lens combination is given in the table. Use the formula: d = D / F to calculate the spot size at any working distance within the specified range. The smallest spot size can be determined using the closest distance within the range. Model Number Lens Type Focusing Range in inches and millimeters (mm) Resolution Factor Standard Sensor Sensor with DWD Option , 5G A 13 to infinity (330 mm to infinity) 10.4 to infinity (264 mm to infinity) D/100, D/75 (5G) , 5G A 13 to infinity (330 mm to infinity) 10.4 to infinity (264 mm to infinity) D/200, D/150 (5G) , 5G A 13 to infinity (330 mm to infinity) 10.4 to infinity (264 mm to infinity) D/ , 5G B 6 to 12 (152 mm to 305 mm) 3.4 to 9.4 (86 to 239 mm) D/90, D/67 (5G) , 5G B 6 to 12 (152 mm to 305 mm) 3.4 to 9.4 (86 to 239 mm) D/180, D/135 (5G) , 5G B 6 to 12 (152 mm to 305 mm) 3.4 to 9.4 (86 to 239 mm) D/ , 5G C 2.25 to 2.75 (57 to 70 mm) Not Available with this lens. D/80, D/60 (5G) , 5G C 2.25 to 2.75 (57 to 70 mm) Not Available with this lens. D/160, D/120 (5G) , 5G C 2.25 to 2.75 (57 to 70 mm) Not Available with this lens. D All Models 6A 12 to infinity (305 mm to infinity) 9.4 to infinity (239 mm to infinity) D/ All Models 6B 6 to 12 (152 mm to 305 mm) 3.4 to 9.4 (86 to 239 mm) D/ All Models 6C 2.25 to 2.75 (44 to 57 mm) DWD Not Available with this lens. D/105 5R-1410, 5R-1810 RA 13 to infinity (330 mm to infinity) 10.4 to infinity (264 mm to infinity) D/100 5R-3015 RA 13 to infinity (330 mm to infinity) 10.4 to infinity (264 mm to infinity) D/150 5R-1410, 5R-1810 RB 7 to 14 (178 mm to 355 mm) 4.4 to 11.4 (112 to 289 mm) D/90 5R-3015 RB 7 to 14 (178 mm to 355 mm) 4.4 to 11.4 (112 to 289 mm) D/135 5R-1410, 5R-1810 RC 2.25 to 2.75 (57 to 70 mm) Not Available with this lens. D/80 5R-3015 RC 2.25 to 2.75 (57 to 70 mm) Not Available with this lens. D/120 Table 1: Model and Lens Type Combinations with Focusing Ranges Spot Size and Viewing Distance Viewing distance and spot size is demonstrated in the Distance and Spot Size illustration. A Sensor with a Resolution Factor of F = 100 is focused on a 0.5 inch (12.7 mm) rod at three distances. The drawings at the left for each example illustrate a large circle that represents the total area visible in the Sensor sight. The smaller circle represents the reticle. Modline 5 Rev. L4 12/
30 Sensor Installation Resolution Factor F = 100 A: Target smaller than Spot Size. Sensor measures part target and part background Move closer and Refocus! Recticle Sensor B: Target equal to Spot Size. Any shift of target or sensor will cause sensor to view part target and part background. Move closer and Refocus! C: Target twice Spot Size. Excellent! Target is safely resolved. Figure 12: Distance and Spot Size Illustration In top example A, the rod is 100 in. (2540 mm) away. The spot is 1 inch (25.4 mm) in diameter. The one half inch diameter rod does not fill the reticle in the viewing sight. Middle example B illustrates a viewing distance of 50 inch (1270 mm). The spot is 0.5 inch (12.7 mm) in diameter, the same size as the rod. Bottom example C illustrates a viewing distance of 25 inch (635 mm). The spot size is 0.25 inch (6.35 mm) one half the one half inch target size. The view in the eyepiece shows the target completely resolved by the reticle. 28 Rev. L4 12/2012 Modline 5
31 Sensor Installation 3.5 Measuring Temperature with Brightness and Ratio Sensors Resolving Targets with Brightness Sensors When using single color Series 52, 56 and 5G brightness Sensors, best results are obtained when the resolved portion of the target is two times the diameter of the reticle. The Sensor measures the average temperature of the target or object seen in the reticle. Targets smaller than the reticle will result in low temperature readings if the background (object within the cone of vision beyond the target) is lower that the target temperature. If the background temperature is higher than the target, the averaged temperature indication will be higher. Low temperature indications can also be caused by other factors. An out of focus cool object cutting the cone of vision anywhere between the target and Sensor, or a small target may shift position and move partially out of the measurement cone Obstructions in Cone of Vision Errors can be caused by objects positioned between the Sensor and target. Evaluate the Sensor s Cone of Vision and if there is any possibility that an intervening object is within the cone, select a different viewing position. An object inside the Cone of Vision will be visible to the detector and may cause an error in the temperature measurement. Obstructions in the cone of vision, whose temperatures are lower than the target temperature, will generally cause lower temperature readings when using single color brightness units. The obstruction may not be seen clearly in the instrument sight if it is some distance away from the target and out of focus. Such an obstruction is illustrated below. High temperatures can be caused by an out of focus hot object cutting the cone of vision anywhere between the target and Sensor. Two color ratio units are usually not affected by obstructions that are significantly lower in temperature than the target. Ratio units are affected by hot objects in the cone of vision that are much higher in temperature than the target. If too high, the hot targets can dominate the measurement. If the object temperature is the same, the measured temperature is not affected. Obstruction Target Sensor Cone of Vision Figure 13: Cone of Vision Obstruction Resolving Targets with Two Color Ratio Sensors Modline 5 Series 5R Ratio Sensors utilize a dual detector assembly that measures temperature by comparing infrared radiation levels in two wavelength bands (0.85 to 1.05 microns and 1.0 to 1.1 microns). Temperature readings are based on the ratio of the two signals in these bands. Modline 5 Rev. L4 12/
32 Sensor Installation Because Series 5R Sensors measure the ratio of radiation intensities at two wavelengths rather than the absolute intensity of radiation at a single wavelength, they are almost immune to error caused by loss of signal. Small targets that do not fill the field of view and partial obstructions from bursts of steam, dust and solid objects in their sight path can be tolerated Signal Reduction Three causes contribute to the loss of signal: Low target emissivity. The measured object is too small to fill the reticle as seen in the Sensor sight and is not completely resolve. Partial obstruction of the optical path caused by smoke, steam, dust, dirty window or a solid object. The total reduction in signal is the sum of the losses from all three causes. Example: Assume the target emissivity is The reduction in signal due to low emissivity is 55%. If the instrument can operate with a 95% signal reduction, another 40% can be lost due to an unresolved target and/or obstructions in the cone of vision such as smoke, steam, dust, a dirty window or partial blockage by solid objects. Target Emissivity = 0.45 Target Valid Measurement Conditions Cone of Vision Smoke in Sight Path Target Target Sensor Invalid Measurement Conditions Sensor Total Signal Loss Greater than 95 % 1. Intense Smoke in Sight Path 2. Target too small for Spot Size Sensor 3. Low Emissivity Figure 14: Invalid Measurement Conditions When you reach the maximum allowed reduction, the Sensor will indicate Invalid. An Invalid measurement condition also occurs, without any obstructions, if the target temperature signal is below a level that can be accurately measured by the instrument. Signal Reduction Tolerated The Series 5R Sensors have a limit as to how much the signal from a hot target can be reduced. The reduction in the signal can be as high as 95% with target temperatures above 800 C (1500 F). The amount of signal reduction that the Series 5R Sensors will tolerate depends upon the Sensor 30 Rev. L4 12/2012 Modline 5
33 Sensor Installation temperature range and the target temperature. The signal reduction tolerated is less in the bottom portion of the range. The Sensor will indicate invalid when the measurement is not possible Summary The spot size and target size relationship is not as critical for Series 5R Sensors which use the two color ratio method. Avoid emitted radiation from objects in the same field of view (cone of vision) either in the foreground or behind the target that are at temperatures hotter than the target. Reflected or emitted radiation from these interferences can cause measurement errors. Significantly cooler objects, well below the target temperature, will not cause measurable errors. For best results, brightness sensors that measure radiation intensity at a single wavelength should be installed so the target area is larger than the instrument spot size. If possible, adhere to the target size is twice the spot size rule for all types of instruments. 3.6 Sensor Installation Planning Mechanical Installation of the Modline 5 Sensor requires determining sighting and focusing requirements, locations for installing Sensors, accessories and cable routing. Planning also includes evaluating environmental conditions that may cause contamination of the Sensor optics or overheating of the Sensor or other Modline 5 components. Re-location of the installation or air purging and water cooling accessories may be required to overcome adverse conditions. Pre-focusing the Sensor s optical system may be necessary if the Sensor is to be mounted in a difficult location and not accessible. Pre-focus by setting up a well defined target such as a printed page at the exact distance of the target, then lock the rear focusing section. Setup of the Sensor parameters can also be pre-determined and set before installation. The following guidelines will help you in planning the Sensor installation. Mechanical Mounting Location Requirements The Sensor is installed using the mounting brackets and flanges, air purging and water cooling accessories illustrated in the Section 3.9 Modline 5 Mounting, Cooling and Air Purging Accessories, page 35. Sensor Mounted to Earth Ground Potential If the proposed mounting surface is at Earth Ground potential, you can mount the housing directly to this surface. If the surface is not at Earth Ground potential, electrical insulating material and non-conducting hardware must be used to isolate the Sensors. See Section 4.11 Installing and Wiring the Chassis Mount 24 Volt DC Switching Power Supply, page 80 for more information. Sensor Interconnecting Cable Length Maximum cable length between the Sensor and the POI Power Supply/Signal Interface Box or Terminal Plate is 350 ft (107 m). Maximum temperature rating of the Sensor Interconnecting cable is 200 C (392 F). Plan the cable route accordingly. Ambient Temperature Limits for Sensor, POI Box and Terminal Strip Plate The ambient temperature at the mounting locations for the Sensor, POI Power Supply/Signal Termination Box and The Terminal Strip Plate must be between 0 and 55 C (32 and 130 F). If the ambient temperature at the mounting location is beyond these limits, precautions must be taken to protect the Sensor. A WJA Water and Air Cooling Jacket is available for protection against excessive temperatures. Use of insulation and reflective shielding for additional protection from Modline 5 Rev. L4 12/
34 Sensor Installation extreme ambient temperatures and radiated heat are described in Section 8 Applications Guide, page 137. The POI Power Supply/Signal Termination Box and The Terminal Strip Plate must be re-located to a location that the ambient temperature is between 0 and 55 C (32 and 130 F). Lens Protection Be sure the lens is protected from contamination and is accessible for maintenance. If dust, oil, vapors, etc. collect on the lens, low temperature indications will result. Use an APA Air Purge Accessory to maintain a clean lens. Consider use of a Sensor with the Dirty window if errors caused by lens contamination can seriously affect the process. Focal Limits To permit focusing, the target distance must be within the focal range of the objective lens. Ranges for the Modline 5 objective lenses are given in Section 3.4 Sensor Optical Characteristics, page 26. Range limitations for close focus lenses may be encountered with the use of certain mechanical accessories. Use of Windows If it is necessary to view the object through a window, as is the case when the object is being heated in a vacuum or inert atmosphere, correctly select the window material. The material must have constant transmission characteristics in the operating wavelength range of the Sensor type being installed. Information on windows is provided in Section 8 Applications Guide, page 137 of this manual. Reflections Reflections from radiating objects represent a potential source of error in temperature measurement. The total radiation seen by the Sensor will be a combination of intrinsic, emitted, radiation plus reflected radiation from a nearby hot object off the target surface. Examples of interfering sources are hot furnace walls and heating elements that are hotter than or nearly as hot as the target object. Most reflection problems can be eliminated by changing the viewing angle or shielding the reflections. Suggestions for anticipating and eliminating common reflection problems are provided in Section 8 Applications Guide, page 137. Indirect Viewing In some situations, it may be necessary to view the target indirectly by means of a mirror. The characteristics of the mirror, and the positioning of both the Sensor and mirror are critical in this type of arrangement. Refer to Section 8 Applications Guide, page 137 for more information. Viewing Angle Viewing angles are limited in some situations. Guidelines are provided in Section 8 Applications Guide, page Sensor Mechanical Installation Installation Accessories The Modline 5 Sensor requires the use if one or more installation accessories to mount, align and aim the Sensor. The installation accessories also provide for cooling the Sensor and air purging the optics to keep them free from contamination. Presentation of accessories and sensor installation is organized in the Sections below as follows. 32 Rev. L4 12/2012 Modline 5
35 Sensor Installation Sensor dimensions and specifications. General requirements for all installations including cable clearances, access for aiming, focusing and setup. Description of each accessory accompanied by dimensions and specifications. A table of recommended accessory groupings. Illustrations of the groupings accompanied by overall dimensions. Other accessories such as pipe mounts, sight tubes, target tubes window assemblies, etc. are referenced at the end of this section Sensor Dimensions The dimensions of the Standard and Dirty Window Detector Modline 5 Sensors are given below. These dimensions are without any mounting accessories. Figure 15: Standard Modline 5 Sensor Sensor Front Rear Size of Cone of Vision at the Lens is 0.95inch (24 mm) Figure 16: Dimensions Standard Sensor Figure 17: Sensor with Dirty Window Detector (DWD) Modline 5 Rev. L4 12/
 clearance from the housing for connecting the cable.")
36 Sensor Installation Sensor with DWD Front Rear Dimensions in inches and (millimeters) General Installation Requirements Figure 18: Dimensions Sensor with DWD Sensor should be mounted to provide a minimum of 4 inch (101.6 mm) clearance from the housing for connecting the cable. Gently bend the cable into its routing position as shown in the photo below. Minimum cable bend radius is 3 inches (76.2 mm). Rotate the Sensor to avoid cable obstructions. Positioning of any mounting accessory on the Sensor should be as close to the front lens as possible without extending beyond it. Some accessories require clamping towards the middle of the body. Never clamp on the Dirty Window Detector hooded mirror or the DWD section! (Not shown) Never clamp on the rear focusing section of the Sensor. Figure 19: Interconnecting Cable 3.8 DWD Installation Requirements The Sensor with the Dirty Window Detector option requires the use of an ESA Extension Sleeve Adapter accessory along with other Modline 5 accessories. The ESA, combined with other accessories, serves as protection for the DWD optics. The photograph (Figure 20) illustrates several of the accessories. The ESA is used in the following combinations to provide air purging or to create a dead air space zone in front of the Sensor optics to help keep them clean. The combinations also provide shielding from stray radiation emanating from high temperature targets and thermal isolation for the Dirty Window Detector Components. The APA - Air Purge, used in combinations one and two below, provides the best performance. Groupings of accessories are shown in Section 3.10 Accessory 34 Rev. L4 12/2012 Modline 5

 provides air purging and shielding. See Section 3.")
37 Sensor Installation Combinations with Break-out Drawings page 49. Also see Section WJA Water Cooling Requirements page 45. When using a WJA Water Jacket Assembly with air cooling, the use of an APA air purge is required with Sensors with the DWD. The use of an APA is also required when viewing large targets over 1000 C (1832 F). Figure 20: DWD with ESA 1. ESA and APA air purge with clean air provides air purging, and shielding. 2. ESA and APA air purge without air provides a dead air space zone, and shielding. 3. ESA with MFL Flange provides a dead air space zone and shielding. 4. ESA with MFL and AA-3 air purge accessory (not shown) provides air purging and shielding. See Section 3.12 Other Accessories (Sight Tube, Window, WJ-5 Water Cooling), page 59 for AA-3 references. 3.9 Modline 5 Mounting, Cooling and Air Purging Accessories UAA Universal Adapter Accessory Description and Dimensions The UAA is a circular ring that clamps around the Modline 5 Sensor. A M8 screw tightens the clamp around the Sensor. Three ¼-20 threaded holes on the bottom flat surface allow fastening the UAA to a tripod, user designed mounting surface or the RAM Right Angle Mounting Bracket. Figure 21: UAA Accessory Modline 5 Rev. L4 12/
38 Sensor Installation Material: Clear Anodized Aluminum Weight: Approximately 1 Pound (0.5 kg) 3 hex Head Screws and washers supplied Flat mounting Surface Align with other Asccessoiries ¼ - 20 threaded X.375 (9.5) deep 3 places Orientation Holes 2 places Insert Front of Sensor this Direction M8 X 30 mm Socket Head Cap Screw Supplied for clamping Sensor M6 X 25 mm deep threaded Holes for IRCON Accessories 3 Places Figure 22: UAA Dimensions Dimensions are in inches and (millimeters). Do not scale. Qty Part No. Description and use User Supplied Tools C60 M8 X 30 mm socket head caps screw for sensor clamping ¼-20 x 5/8 inch (15.9 mm) stainless steel hex head bolt Stainless steel split ring lock washer Black oxide flat washer 6 mm hex key, long arm L style wrench recommended Adjustable wrench Table 2: UAA Mounting and Assembly Supplied Parts List RAM Right Angle Mount Description and Dimensions The RAM Right Angle Mount provides convenience, strength and flexibility in mounting the Modline 5 Sensor. The UAA universal adapter is required to attach the Sensor to the RAM. Two holes and one slot on the upright side of the mount are for mounting the Sensor and UAA. Use the slot and outer hole to provide vertical angular adjustment of the Sensor s optical axis. Use the two holes for fixed axis mounting. Two holes and one slot for mounting are located in the base of the RAM. Use the slot and outer hole to provide angular adjustment. Pivoting of the base provides horizontal angular adjustment. Use just the two holes for fixed axis mounting. 36 Rev. L4 12/2012 Modline 5
 Mounting and Assembly Supplied Parts List: No hardware is supplied with the RAM. UAA assembly hardware is supplied with the UAA.")
39 Sensor Installation Figure 23 RAM Accessory Material: Weight: Passivated Stainless Steel Approximately 1.2 pounds (0.55 Kilogram) Mounting and Assembly Supplied Parts List: No hardware is supplied with the RAM. UAA assembly hardware is supplied with the UAA. Two user supplied M6 or ¼-20 mounting bolts and washers are required to mount the base of the bracket. Modline 5 Rev. L4 12/
40 Sensor Installation Bolt Arc Radius Clearance Holes 4 Places Diameter (6.8) Optical Axis when mounted horizontally Pivot Axis Figure 24: RAM Dimensions Dimensions are in inches and (millimeters). Do not scale. All three axis of rotation (including optical axis) intersect at a common point. This avoids parallax during target alignment 38 Rev. L4 12/2012 Modline 5

41 Sensor Installation APA Air Purge Accessory Description and Dimensions IRCON s specially designed air purge is used to help keep the front optics of the Modline 5 clean. The purge provides a stream of air away from the Sensor to prevent dust and smoke particles from collecting on the optics. The APA is positioned in front of the Sensor with the UAA universal adapter or WJA Water Jacket. Three through holes in the APA accept mounting hardware to assemble accessories together. The front of the APA has three threaded holes to attach a MFS or MFL mounting flange. Mounting hardware is supplied with the flanges. A ¼ inch NPT threaded air inlet is located on the air purge. A flow rate of 3 SCFM (0.09 m3/min.) clean air is required for most applications. The flow rate can be increased for difficult environments. Two drain holes provide an outlet for any condensation accumulation. If necessary, these threaded holes can be plugged with M3 screws. Figure 25: APA Accessory Material: Clear Anodized Aluminum Weight: Approximately 1.5 pound (0.68 kilograms) Qty Part No. Description and use User Supplied Tools ¼ inch NPT stainless steel fitting for 0.25 inch (6.4 mm) As needed. diameter tubing. Note: Can be replaced with more suitable fitting if desired C60 ¼- M6 X 25 mm socket head cap screw for assembling to the WJA or UAA. 5 mm hex key L style wrench C60 M6 X 70 mm socket head cap screw for assembling to the WJA or UAA with ESA. Table 3: Mounting and Assembly Supplied Parts List 5 mm hex key, long arm L style wrench recommended. Modline 5 Rev. L4 12/
. Do not scale. 3.9.")
42 Sensor Installation 1/4-20 NPT Air Inlet Locating PINs 2 Places Drain Holes 2 Places Three Counterbore Holes for M6 Sockethead Cap Screws For assembling to UAA or WJA Flat surface align with flat surfaces on other Accessories Three M6 tapped Holes for mounting MFS or MFL Flanges Figure 26: APA Dimensions Dimensions are in inches and (millimeters). Do not scale MFL Mounting Flange Large Description and Dimensions The larger of the two mounting flange accessories, the MFL has the bolt circle pattern that matches many of IRCON s other products and accessories. It provides a simple means of replacing older instruments and using existing accessories. See Section 3.12 for Other Accessories. The MFL is mated to the Sensor by attaching it to the threaded holes in the front of the UAA, APA and WJA accessories. Inner and outer groups of three through holes are used for attachment. These holes are covered by a metal gasket. Figure 27: MFL Accessory 40 Rev. L4 12/2012 Modline 5
43 Sensor Installation Material: Weight: Clear Anodized Aluminum Approximately 1 pound (0.5 kilograms) Qty Part No. Description and use User Supplied Tools Metal Gasket Cover C60 M3 X 12 mm flat head cap screw to secure gasket cover 2 mm hex key wrench C60 M6 x 30 mm flat head cap screw to assemble the MFL with the APA air purge C60 M6 x 70 mm socket head cap screw to assemble the MFL to the UAA and ESA extension sleeve. (Not for use with the WJA. Use last item below) C60 M6 x 20 mm socket head cap screw to assemble the MFL directly to the WJA water jacket or the UAA adapter C60 M6 x 65 mm socket head cap screw to assemble the MFL to WJA water jacket with ESA extension sleeve. Table 4: MFL Mounting and Assembly Supplied Parts List 5 mm hex key, long arm L style wrench 5 mm hex key, long arm L style wrench 5 mm hex key, long arm L style wrench 5 mm hex key, long arm L style wrench Mounting Holes 3 Places Remove Metal Cover Gasket to expose two Groups of three trough Holes for attaching Modline 5 Accessories Outside Gasket mount Hole Back Modline 5 Accessories mount to this side Locating PINs 2 Places Mounting bolt circle Front Other Accessory interface side Figure 28: MFL Dimensions Modline 5 Rev. L4 12/

44 Sensor Installation Dimensions are in inches and (millimeters). Do not scale MFS Mounting Flange Small Description and Dimensions The MFS is a scaled down version of the MFL flange with a smaller diameter bolt circle pattern. This flange provides strength in mounting with a smaller profile. This flange also provides a means of mounting to accessories of other manufacturers. The MFS is used by first bolting it to the APA air purge. In the photograph is shown the MFS mounted to the APA. Figure 29: MFS Accessory Material: Clear Anodized Aluminum Weight: Approximately 1 Pound (0.5 kilograms) Qty Part No. Description and use User Supplied Tools C60 M6 X 30 mm flat head cap screws to assemble the MFS with the 5 mm hex key wrench APA air purge Table 5: MFS Mounting and Assembly Supplied Parts List 42 Rev. L4 12/2012 Modline 5
45 Sensor Installation Front Side Hole Mounting Bolt Circle Countersink holes for APA Air Purge 3 Places M6 flat head screws APA Air Purge mounts to Back Side Figure 30: MFS Dimensions Dimensions are in inches and (millimeters). Do not scale WJA Water Jacket Accessory Description and Dimensions The WJA uses water or air to cool the Modline 5 Sensor in high ambient temperatures. Water cooling can protect the Sensor in ambient environments up to 200 C (400 F). Air cooling can provide protection to 105 C (220 F). To properly mount the WJA, the BMA Base Mounting Bracket, MFL Mounting Flange, or the APA purge with an MFS or MFL flange should be used. The use of an APA Air Purge Assembly is recommended with the WJA. Trunions (pivoting shafts) on the side of the WJA are used to securely mount to the BMA. Threaded holes in the front of the WJA are used to mount an APA air purge or MFL Flange. The WJA can be mounted in any position. The WJA has 1/4 NPT inlet and outlet pipe fitting openings for water or air. See the drawings and information on the next page for water and cooling air requirements, and installation configurations. Designed Maximum water or air pressure: 100 PSIG (6.9 BAR) Modline 5 Rev. L4 12/

46 Sensor Installation Figure 31: WJA Accessory Material: 300 series passivated stainless steel Empty Weight: Approximately 6 pounds (2.7 Kilograms) Qty Part No. Description and use User Supplied Tools M8 X 16 mm long case hardened steel hex head bolts Adjustable wrench Extra large diameter 3/16 thick case hardened flat washers ¼ inch NPT stainless steel fitting for 0.25 inch (6.4 mm) diameter tubing As needed Safety Clamp Assembly with captive and permanent mount screws Blade Screwdriver Table 6: Mounting and Assembly Supplied Parts List Optical Axis is the same as the Mechanical Axis Safety Clamp Figure 32: WJA Dimensions 44 Rev. L4 12/2012 Modline 5
47 Sensor Installation Dimensions are in inches and (millimeters). Do not scale. Tapped Holes on both ends for Ircon, Inc. Accessories WJA Water Cooling Requirements Adequate water flow for a 200 C (400 F) ambient is 15 gallons/hr (57 liters/hr). Cooling water temperature should be 32 C (90 F) or lower. Use the opening closest to the hottest point on the mounted Sensor assembly as the water inlet. Typically this is the opening at the front of the assembly. Use only cooling water compatible with Series 300 stainless steel. When using water to cool a Sensor with the Dirty Window Detector (DWD), an ESA extension with either a MFL mounting flange or an APA air purge must be part of the assembly. An APA air purge is highly recommended for all installations and must be used when viewing large targets over 1000 C (1832 F). A typical water cooling installation for a Sensor is shown below. APA purge air temperature should be 30 C (86 F) or lower. Water OUT Water IN at 32 C (90 F) Air IN at 30 C (86 F) Ambient Maximum is 200 C (400 F) WJA APA Air Exit APA Add an ESA for Sensor with DWD Figure 33: Water Cooling Standard Sensor WJA Air Cooling Requirements. Adequate cooling air for a 105 C (220 F) ambient is 4 SCFM (114 liters/min). Air temperature should be 30 C (86 F) or lower. When using air to cool a Sensor with the Dirty Window Detector (DWD), an APA air purge must be part of the assembly and the installation should reflect the drawing below. Modline 5 Rev. L4 12/
48 Sensor Installation Ambient Maximum is 105 C (220 F) Air IN at 30 C (86 F) Air OUT WJA APA Air IN APA Air Exit ESA with APA Sensor Temperature Alarm Figure 34: Air Cooling Sensors with DWD The Modline 5 Sensor provides Alarms when the Sensor s internal temperature exceeds its allowed limit. Error Code X105 signifies the outside influences have caused the internal temperature to rise above its limit. Error Code X103 signifies outside influences have caused the detector to rise above its limit. If these alarms are triggered, check the installation for proper flow of air or water. Higher than rated ambient temperature can also be the cause. Other possible causes of overheating include radiant and conductive transfer of heat. Insulation, shielding and thermal isolation may be necessary. See Section 8 Applications Guide, page 137 for more information BMA Base Mount Accessory Description and Dimensions This trunion style U mounting bracket is used as a base mount for the WJA Water Jacket Accessory. Trunions (pivoting shafts) on the sides of the WJA are placed into the matching BMA mounting slots. The WJA is held in a vertical position, with the Sensor side down, and placed into the slots. The BMA and WJA final assembly can be mounted in any position. Vertical angular movement of the WJA and Sensor is provided by the pivoting shafts. The BMA mounting slots (gimbals) are shaped to keep the shaft in place and provide secure mounting. Two bolts and two washers are supplied with the WJA to lock it in the final position. The BMA base mount surface has one clearance hole and two radial slots for mounting bolts. Three M8 or 5/16 inch user supplied bolts and washers are required. Approximately plus and minus 10 degrees of horizontal angular movement is provided to aim the Sensor. 46 Rev. L4 12/2012 Modline 5

49 Sensor Installation Figure 35: BMA Accessory Material: Weight: Nickel Plated Steel Approximately 5.6 pounds (2.5 Kilograms) Mounting and Assembly Supplied Parts List: No hardware is supplied with BMA. UAA assembly hardware is supplied with the UAA. Three user supplied M8 or 5/16 mounting bolts and washers are required to mount the base of the bracket. Bolt mount ARC Figure 36: BMA Dimensions Modline 5 Rev. L4 12/
 option.")
50 Sensor Installation Dimensions are in inches and (millimeters). Do not scale. Use 5/16 inch or M8 mounting Bolts (3 Places) ESA Extension Sleeve Adapter Description and Dimensions This is a special accessory for Sensors with the Dirty Window Detector (DWD) option. The ESA serves as protection sleeve over the DWD optics and as the mechanical interface between the Sensor and other Modline 5 accessories. The ESA is used in the following combinations to provide air purging or create a dead air space zone in front of the Sensor optics to help keep them clean. The combinations also provide shielding from stray radiation emanating from high temperature targets. The APA air purge, shown in combinations one and two, provides the best performance. The use of an APA is required for large targets over 1000 C. 1. ESA and APA air purge with clean air (air purging and shielding). 2. ESA and APA air purge without air (dead air space zone and shielding). 3. ESA with MFL Flange (dead air space zone and shielding) 4. ESA with MFL and AA-3 air purge accessory (air purging and shielding). See Section 3.8 DWD Installation Requirements for DWD and Section 3.12 Other Accessories (Sight Tube, Window, WJ-5 Water Cooling), page 59 for AA-3 references. Figure 37 The ESA is also used with the MFL Flange when as an interface with the Right Angle Mounting Bracket. Material: Clear Anodized Aluminum Weight: Approximately 1 Pound (0.5 kg) Mounting and Assembly Supplied Parts List: No hardware is supplied with the ESA. Assembly screws are supplied with the APA and MFL. 48 Rev. L4 12/2012 Modline 5
51 Sensor Installation DIA. Locating PINs 2 Places. Flat mounting Surface Align with other Accessories Through Holes for M6 Screws 3 Places Figure 38: ESA Dimensions Dimensions are in inches and (millimeters). Do not scale Accessory Combinations with Break-out Drawings Recommended Accessory Groupings The table below lists the eighteen recommended accessory groupings. Exploded views of the groups are shown on the following two pages. The recommended groupings for Sensors with the Dirty Window Detector are identified in the DWD column. See Section 3.8 DWD Installation Requirements, for more information. Groups are illustrated with dimensions in Section 3.11 Installation Drawings and Illustrations. Modline 5 Rev. L4 12/
52 Sensor Installation Group Mounting Option Required Accessories DWD See Notes 1 ¼-20 Bolt Pattern Mount UAA N. R. (1) 2 Large Flange Interface Mount UAA MFL Add ESA (3) 3 Air Purge with ¼-20 Bolt Pattern Mount UAA APA Add ESA (2) 4 Air Purge with Small Flange Mount UAA APA MFS Add ESA (2) 5 Air Purge with Large Flange Mount UAA APA MFL Add ESA (2) 6 Right Angle Base Mount UAA RAM N. R. (1) 7 Right Angle Mount with Air Purge UAA RAM APA Add ESA (2) 8 Right Angle Mount with Large Flange. This group requires an ESA for clearing the RAM UAA RAM MFL & ESA ESA Included Note 3 9 Right Angle Mount with Air Purge UAA RAM APA MFS Add ESA (2) 10 Right Angle Mount with Air Purge UAA RAM APA MFL Add ESA (2) 11 Water Jacket, Air Purge and Small Flange APA WJA MFS Add ESA (2) Add ESA 12 Water Jacket with Large Flange Mount WJA MFL (3 and 5) 13 Water Jacket, Air Purge and Large Flange APA WJA MFL Add ESA (2) 14 Water Jacket, Base Mount WJA BMA N. R. (1) 15 Water Jacket, Base Mount, Air Purge APA WJA BMA Add ESA (2) Add ESA 16 Water Jacket, Base Mount and Large Flange WJA BMA MFL (3 and 5) Water Jacket, Base Mount, Air Purge 17 and Small Flange APA WJA BMA MFS Add ESA (2) Water Jacket, Base Mount, Air Purge 18 and Large Flange APA WJA BMA MFL Add ESA (2) DWD is Dirty Window Detector Option. See ESA on previous page for more information. Also see Sections 3.8 DWD Installation Requirements and WJA Water Jacket Accessory Description and Dimensions. Notes: 1. N. R. = Group Not Recommended for Sensors with DWD. 2. USE the ESA and APA air purge with clean air for air purging and stray radiation shielding. Use APA without air to create a dead air space zone and shielding. The use of an APA is required for large targets over 1000 C. 3. The ESA with MFL provides dead air space and stray radiation shielding. Add an AA-3 air purge accessory for air purging. See Section 3.12 Other Accessories (Sight Tube, Window, WJ-5 Water Cooling), page 59 for AA-3 information. These combinations not recommended for large targets over 1000 C. 4. The ESA adds 1.82 (46.2 mm) to length of the assembled group. 5. Use water for cooling only. Do not use air for cooling with DWD unless the APA air purge accessory is used. See information in Section WJA Water Jacket Accessory Description and Dimensions. Table 7: Recommended Accessory Groupings 50 Rev. L4 12/2012 Modline 5
53 Sensor Installation Accessory Illustrations for Groups using UAA: Front of Sensor Figure 39: Sensor without DWD UAA Accessory Groups 1 through 10 Front of Sensor Figure 40: Sensor with DWD UAA Accessory Groups 2, 3, 4, 5, 6, 7, 8, 9, 10 Modline 5 Rev. L4 12/
54 Sensor Installation Accessory Illustrations for Groups using WJA: Front of Sensor Figure 41: Sensor without DWD WJA Accessory Groups 11 through 18 Front of Sensor Figure 42: Sensor with DWD WJA Accessory Groups 11, 12, 13, 15, 16, 17, Rev. L4 12/2012 Modline 5

 DWD is Dirty Window Detector Option. Refer to notes with Grouping table in Section 3.10 Accessory Combinations with Break-out Drawings. The ESA adds 1.82 (46.")
55 Sensor Installation 3.11 Installation Drawings and Illustrations Installation Drawing for the UAA Universal Adapter for Tripod or Custom Mounting Group Mounting Option Required Accessories. See Individual Accessory Descriptions and Dimensions. DWD See Notes 1 ¼-20 Bolt Pattern Mount UAA N. R. 2 Large Flange Interface Mount UAA MFL Add ESA (3) 3 Air Purge with ¼-20 Bolt Pattern Mount UAA APA Add ESA (2) 4 Air Purge with Small Flange Mount UAA APA MFS Add ESA (2) 5 Air Purge with Large Flange Mount UAA APA MFL Add ESA (2) DWD is Dirty Window Detector Option. Refer to notes with Grouping table in Section 3.10 Accessory Combinations with Break-out Drawings. The ESA adds 1.82 (46.2 mm) to length of the assembled group. Table 8: Recommended Accessory Groupings UAA Figure 43: Front mounted Figure 44: UAA with APA When using the MFL (Group 2) or APA (Group 3, 4, 5), assemble these accessories to the UAA first. Place Sensor fully into assembly and rotate Sensor to desired position. Tighten clamping screw. Sensor front surface will be positioned at the back end of the APA or MFL. To determine working distance (D) for spot size formula d=d/f, measure or calculate from that point. Modline 5 Rev. L4 12/
56 Sensor Installation ¼ hex Head Screws (3) with flat and lock washers supplied for mounting. Dia. Dia. M8 X 30 mm Socket Head Cup Screw supplied for clamping Sensor. Optical Axis Figure 45: UAA Dimensions are in inches and (millimeters). Do not scale. Group 1 shown (UAA and Sensor). See UAA description and Dimensions. Sensor Front inserted Level with UAA Front Installation Drawing for the RAM Right Angle Mount Group Mounting Option Required Accessories. See Individual Accessory Descriptions and Dimensions. DWD See Notes 6 Right Angle Base Mount UAA RAM N. R. 7 Right Angle Mount with Air Purge UAA RAM APA Add ESA (2) Right Angle Mount with Large Flange. This group requires an ESA for 8 clearing the RAM UAA RAM ESA MFL Note 3 8 Right Angle Mount with Large Flange UAA RAM MFL Add ESA (3) 9 Right Angle Mount with Air Purge UAA RAM APA MFS Add ESA (2) 10 Right Angle Mount with Air Purge UAA RAM APA MFL Add ESA (2) DWD is Dirty Window Detector Option. Refer to notes with Grouping table in Section 3.10 Accessory Combinations with Break-out Drawings, page 49. The ESA adds 1.82 (46.2 mm) to length of the assembled group. Table 9: Recommended Accessory Groupings RAM 54 Rev. L4 12/2012 Modline 5

 for spot size formula d=d/f, measure or calculate from that point.")
57 Sensor Installation Figure 46 Figure 47 When using the MFL (Group 8) or APA (Group 7, 9, 10), assemble these accessories to the UAA and RAM first. Place Sensor fully into assembly and rotate Sensor to desired position to clear table. Tighten clamping screw. Sensor front surface will be positioned at the back end of the APA or MFL. To determine working distance (D) for spot size formula d=d/f, measure or calculate from that point. Optical Axis Coincident with Axis of Rotation Axis of Rotation Figure 48: Group 7 shown (UAA RAM and APA). Dimensions are in inches and (millimeters). Do not scale. See individual Accessory drawings. Modline 5 Rev. L4 12/

58 Sensor Installation Installation Drawing using the WJA Water Jacket Accessory with Flange Mounts Group Mounting Option Required Accessories. See Individual Accessory Descriptions and Dimensions. DWD See Notes 11 Water Jacket, Air Purge and Small Flange APA WJA MFS Add ESA (2) 12 Water Jacket with Large Flange Mount WJA MFL Add ESA (3) 13 Water Jacket, Air Purge and Large Flange APA WJA MFL ESA (2) DWD is Dirty Window Detector Option. Refer to notes with grouping table in Section 3.10 Accessory Combinations with Break-out Drawings, page 49. The ESA adds 1.82 (46.2 mm) to length of the assembled group. Table 10: Recommended Accessory Groupings WJA with Flange Mounts Figure 49WJA with Flange Mounts Insert Sensor into the WJA assembly with moderate force until it snaps into the spring catch. Secure the Sensor rear protection and sighting window. Swing safety clamp into position and tighten. 56 Rev. L4 12/2012 Modline 5
59 Sensor Installation Dia. Dia. Front of Sensor without DWD with Reference to WJA Safety Clamp Figure 50: Group 13 shown WJA, APA and MFL Flange Dimensions are in inches and (millimeters). Do not scale. Total Lengths Dimension shown with and without MFL Flange. Mechanical and optical Centerlines are coincidental Installation Drawing using the WJA Water Jacket Accessory with the Base Mount Adapter Group Mounting Option Required Accessories. See Individual Accessory Descriptions and Dimensions. DWD See Notes 14 Water Jacket, Base Mount WJA BMA N. R. (1) 15 Water Jacket, Base Mount, Air Purge APA WJA BMA Add ESA (2) 16 Water Jacket, Base Mount and Large Flange WJA BMA MFL Add ESA (3) 17 Water Jacket, Base Mount, Air Purge and Small Flange APA WJA BMA MFS Add ESA (2) 18 Water Jacket, Base Mount, Air Purge and Large Flange APA WJA BMA MFL Add ESA (2) DWD is Dirty Window Detector Option. Refer to notes with Grouping table in Section 3.10 Accessory Combinations with Break-out Drawings, page 49. The ESA adds 1.82 (46.2 mm) to length of the assembled group. Table 11: Recommended Accessory Groupings WJA with BMA Modline 5 Rev. L4 12/

 with Reference to WJA Sensor Axis of Rotation (Also Optical Axis) Through")
. Dimensions are in inches and (millimeters). Do not scale. See individual Accessory drawings.")
60 Sensor Installation Figure 51 Insert Sensor into the WJA assembly with moderate force until it snaps into the spring catch. Secure the Sensor rear protection and sighting window. Swing safety clamp into position and tighten. Dia. Front of Sensor (without DWD) with Reference to WJA Sensor Axis of Rotation (Also Optical Axis) Through Holes for 5/16 Inch or M6 Bolts (3 Places) WJA Mounting Axis Figure 52: Group 18 shown (BMA, WJA and MFL). Dimensions are in inches and (millimeters). Do not scale. See individual Accessory drawings. Total Lengths Dimension shown with and without MFL Flange. 58 Rev. L4 12/2012 Modline 5
61 Sensor Installation 3.12 Other Accessories (Sight Tube, Window, WJ-5 Water Cooling) These other accessories are described in Product Bulletin PB Specification and mounting configuration changes are required for certain items when used with the Modline 5. Consult the IRCON factory for information about using these accessories with the Modline 5 Sensor. Other Accessory Model / Part AA-3 AP-Q, AP-CF MF-1, MF-2 Threaded collars for threaded 1-1/2 inch NPT sight tubes and 2-1/2 inch NPT sight tube. PM-2 Pipe Mounts for use with STSC and STA Sight and Target Tubes STM Sight Tubes with Flange Surface WA-3 Water Cooling Accessory WJ-5 Water Cooling Jacket with Air Purge. Compatibility and main interface Requires MFL Flange to interface. Requires MFL Flange to interface. Consult Ircon, Inc. with application details. Requires the MFL Flange to interface. See note below. Requires the MFL Flange to interface. See note below. Requires the MFL Flange to interface. See note below.. Not compatible with Modline 5 Sensors. Do not use to provide cooling. A mounting kit, UAA, and MFL is required to install Modline 5 Standard Sensor in WJ-5. Maximum ambient temperature limited to 160 C (320 F). Note: Not compatible with Modline 5 Sensor with Dirty Window Detector Option (DWD) installed. See installation details below. Table 12: Compatibility with other Accessories Focus Sensor with rear rotating focus section. If looking through a sight tube or sight hole, position, align and rotate the Sensor and Sight tube to center the reticle or laser image in the field of view M5WJ5 Mounting Kit The M5WJ5 Mounting Kit is used with UAA and MFL Mounting Accessories to install a Modline 5 Sensor in an Ircon Model WJ-5 Water Cooling Jacket. The jacket provides cooling through a stainless steel coiled pipe embedded in the jacket walls. A flow rate of 20 gallons per hour (75 liters per hour) of water with a temperature of 90 F (32 C) or less is required. An air purge is included on the front of the WJ-5. Clean, dry purge air should be provided at a flow rate 6 ft 3 /min. (0.7 3 m/min). The jacket protects the Modline 5 Sensor in ambient temperatures up to 160 C (320F). Complete specifications, installation and piping instructions are included with the kit. The Modline 5 Sensor cable is rated to 200 C (400F). The Modline 5 Sensor with the Dirty Window Detector Option (DWD) cannot be installed in a WJ-5 Jacket because of its additional length. Modline 5 Rev. L4 12/
62 Sensor Installation Figure 53: M5WJ5 Mounting Kit Accessories and kit required for mounting Modline 5 Sensor in WJ-5 Water Cooling Jacket: Model WJ-5 Water Cooling Jacket with Air Purge Supplied with its own mounting hardware (M5WJ5 Kit is not included.) UAA Universal Adapter Accessory Supplied with its own mounting hardware MFL Mounting Flange Large Accessory Supplied with its own mounting hardware M5WJ5 Mounting Parts Kit: Consisting of the following. (Note: These parts are sold only as a kit.) Item Qty. Part Number Description Function INST: WJ-5 Rev. C Complete specifications, cautions and installation instructions Mod 5 WJ5 Spacer Block Spacer between UAA and Plate Mod 5 WJ5 Mounting Plate Slides assembly into WJ ¼-20 X ¾ inch long Socket Head Cap Screw Mount Spacer Block to UAA ¼-20 X ¾ inch long Hex Head Screw Mounting Plate to Spacer (2) Mounting Plate to WJ-5 (2) /4 in. Split-ring lock washers Use with ¼-20 X ¾ inch long Hex Head Screws (4) Assembly and Sighting Instructions: Table 13 Refer to Installation Instructions for WJ-5, Included in M5WJ5 Kit 1. Assemble as indicated in drawing to the right and at top of page. 2. Slide assembly into WJ-5 and tighten rear mounting plate screws. 3. Focus Sensor with rear rotating focus section. 4. If looking through a sight tube or sight hole, position, align and rotate the Sensor and Sight tube to center the reticle or laser image in the field of view. 5. Route the cable either through the center opening in the mounting plate or along the side walls of the WJ-5 and out through the insulated opening in the back door. 60 Rev. L4 12/2012 Modline 5
63 Sensor Installation MFL Mounting Flange Large Accessory UAA Universal Adapter Accessory Modline 5 Sensor (without DWD option) Socket Head Cap Screws (Qty 2) (Item 4) Spacer Block (Item 2) Mounting Plate (Item 3) Sensor Cable Lock washers (Qty 4) (Item 6) Hex Head Screws (Qty 4) (Item 5) 3.13 Sensor Installation Checklist Figure 54: Mounting Kit To ensure accurate, reliable, and trouble-free operation, check the installation for the following: Sensor is properly mounted and aligned with no obstructions in optical path. Sensor lens is focused on target. If possible, target size is at least twice diameter of reticle size as seen in the viewing sight (i.e. twice the calculated spot size at the viewing distance). Rear Protective window has been securely installed on back of Sensor. After completing the sighting and focusing routines, screw the protection window back onto the Sensor to maintain the NEMA 4 (IP65) environmental rating. Sensor lens is protected by air purge and clean purge air if atmosphere is dirty, oily or corrosive. Do not use purge air with oil or water. Use instrument air or filter adequately. Sensors with the Dirty Window Detector Option require an APA air purge or other protection as explained in Section 3.8 DWD Installation Requirements, page 34. If the purging air quality is poor, use an efficient filter. In worst cases, leave the air purge assembled to the Sensor, but disconnect the air supply. Sensor is adequately protected by water or air cooling and/or additional insulation if ambient temperature exceeds safe limits. Sensor is not subjected to direct or reflected radiated heat from oven walls, flames, etc. that cause it to exceed its temperature rating. The Sensor mounting surface is grounded (Earth Ground). If not, electrically insulate the housing from the mounting surface. See information in Section 4.14 System Grounding and Shielding, page 86. Modline 5 Rev. L4 12/
64 Sensor Wiring 4 Sensor Wiring 4.1 Modline 5 Components The basic Modline 5 system consists of either a standard Sensor or Sensor with Dirty Window Detector option, interconnecting cable, a POI Power Supply/Signal Interface Box or Terminal Strip Plate and as possible option, the DPM Digital Panel Meter Interface. This section provides instructions for connecting these components, except the DPM, to a process system. Section 9 of this manual describes the installation, wiring and operation of the Model DPM Meter with the Sensor s RS-485 Communications. Figure 55: Modline 5 Components 4.2 Modline 5 Sensor System Interfacing The following figure shows a block diagram overview for interfacing the Modline 5 into a process monitoring and control system. POI Power Supply/Signal Interface Box AC Power Input Vac 50/60Hz T A R G E T Interconnecting Cable Sensor 24Vdc Sensor Power Supply limited to 2 Amps POI BOX Or Terminal Strip Plate Analog Current Output Selectable 0-20 ma or 4-20 ma Scaled to Sensor temperature span or customized for process Single or multiple series connected differential input devices, Digital Indicators, Recorders, Controllers, Control Systems 600 Ohm maximum load resistance, including cable resistance Sensor Alarm Relay Contacts Peak Picker / Track & Hold Remote Switch Input Input 4-20 madc for Remote Emissivity/E-Slope or Laser Switch RS-485 Digital Communication to Modline 5 DPM, PLC, Host Computer or other Device Figure 56: Block diagram 62 Rev. L4 12/2012 Modline 5


65 Sensor Wiring 4.3 Modline 5 Sensor Cable Sensor Interconnecting Cable The Interconnecting cable carries all inputs, outputs and the 24 VDC power for the Sensor. The cable is routed from the Sensor to the Model POI Power Supply/Signal Interface Box or the Terminal Strip Plate supplied with each cable. All IRCON Modline 5 interconnecting cables are supplied assembled with the Sensor connector on one end and the wires stripped, tinned and ready for termination on the opposite end. The cable shield is also prepared and ready to assemble with the Ircon supplied EMI shielding strain reliefs. All cable wires are 24 AWG (0.25 mm²), except the 24 V power supply wires that are 22 AWG (0.35 mm²). Maximum Cable Temperature Maximum Cable Length Cable Diameter Cable Routing Location Cable temperature not to exceed 200 C (392 F). 350 feet (107 meters), Minimum Bend Radius 3 inches (76 mm). Nominal Diameter inch (7.6 mm). Within conduit or low-level signal plenum or cable tray. Away from high power and high frequency sources and high temperature sources. Consider the cable route. The cable should be protected from plant traffic and any hostile environments. Avoid high temperature zones or areas subject to electrical or high frequency interference. 4.4 Model POI Power Supply/Signal Interface Box A POI Power Supply/Signal Interface Box with cover removed and with full a set of Grounding Strain Relief fittings installed is shown below. The box is sent with protective NEMA 4 seals inserted in all cable and conduit entry holes. The strain relief fittings are used to ground the cable shield and are supplied with the box. Figure 57: POI Power Supply / Signal Interface Box Modline 5 Rev. L4 12/
66 Sensor Wiring The POI Box contains a DC power supply that develops 24V for the Sensor Power. The POI accessory also contains a terminal strip for connecting the Sensor cable to user supplied interface cables. Sensor inputs and outputs are interfaced to the user s system at this point. POI Box Specifications: Maximum Ambient Temperature Environmental rating Ambient temperature should not to exceed 55 C (131 F) NEMA 4 (IP65) A three wire AC power cable or individual discrete wires may be used. A 0.83 inch (21.1 mm) conduit entrance is provided for AC power wiring entry. Conduit or a suitable strain relief is required. Four cable grip strain reliefs are supplied. One is for the Sensor interconnecting cable entry and two are for user-supplied cables that connect to process system devices. These three NEMA 4 (IP65) compliant devices provide electromagnetic interference (EMI) shielding. The fourth is a plastic strain relief for a power cable. To maintain the NEMA 4 (IP65) rating, the four cable grip strain reliefs supplied and properly sized cables must be installed in the box entrance holes. Do not leave a hole empty. Use a properly sized hole seal that is NEMA 4 (IP65) rated. The hole covers shipped with the box are for shipping purposes only and are not rated Mounting the POI Box Figure 58 includes the mounting dimensions and cable entry locations of the POI Box. Locate to allow clearance for cable entry and cable fittings. Mounting is by means of four user supplied #6 (or metric equivalent) pan head sheet metal or machine screws at the four corners of the main part of the box. When you have selected your mounting location, remove the cover. Mark the hole positions for the mounting screws on the panel or mounting surface you have selected. Drill the mounting holes and attach the box to the mounting surface. Dia. Dia. Mounting Holes 4 Places under Cover Dia. Dia. Figure 58: POI Box Dimensions 64 Rev. L4 12/2012 Modline 5
67 Sensor Wiring AC Power and Earth Ground Connections The POI Box does not include a power switch. You must supply a two-pole switch for 100VAC to 240 VAC at 50 to 60 Hz. The power consumption of the unit is 40 VA maximum. The switch should be clearly marked as the power shutoff for the equipment, visible, and accessible to the operator. The AC Power Requirement for the Model POI Power Supply/Signal Interface Box is shown below. AC Power Input Requirements Nominal Continuous Typical Inrush Current 100 to 240 V; 0.3 A; 50/60 Hz 20 A at 100 VAC, 40 A at 200 VAC The typical inrush current occurs over a few cycles when power is first applied to the box. The AC supply should be from a separate branch circuit with appropriate circuit breakers. Consideration should be given to the wire size used, the continuous nominal current rating and typical inrush current. A clean power line such as instrument power line is essential. Avoid power lines serving noisy electrical equipment. The ideal solution is to power from a separate ac line, independent of all interference producing equipment. If this is not practical, consider using a line conditioner. If you use a line conditioner, connect per the manufacturer s instructions. Improper installation can result in serious injury or death to personnel! The Modline 5 Sensor and POI Power Supply were designed to meet EN : Safety Requirements for Electrical Equipment for Measurement. The installation should be performed as directed in this manual and following any local electrical codes. Compliance with EN : Safety Requirements for Electrical Equipment for Measurement requires the installation meet the following alternating current supply and earth grounding requirements. The installation should be compliant with requirements for a Category II installation. A three-wire ac supply with a third-wire earth ground, or a separate earth ground wire is required. Power cables and wires should meet recognized European and American standards for Main Voltage Safety with insulation suitable for single fault condition (600V, 105 C). Strain relief and compression fittings for the power cable must comply with European and American standards as dictated by the power cable selected. The wire size for the L and N ac power connections should be no larger than 18 AWG (1 mm²). These power wires cannot be larger in diameter than the ground wire. Ground wire must be the same size or larger than AC power wires. 18 AWG (1 mm²) is recommended. A two-pole power shutoff or safety switch should be incorporated within the main power line that powers the IRCON equipment. This switch should be in close proximity to the operator. The switch should be clearly marked as the power shutoff for the equipment. A properly sized circuit breaker is required in the ac supply lines connecting power Modline 5 Rev. L4 12/

 wire for all AC power and ground connections. Strip insulation from wires 1/4 inch (8 mm).")
68 Sensor Wiring to the Power Supply. The two-pole switch (and all circuit breakers) should comply with IEC 947 standard. Switches and circuit breakers that carry the markings of TUV, VDE or other European Agencies do meet the IEC 947 standard. Observe all Local Electrical Codes related to connecting ac power and the grounding of electrical equipment Connecting the AC Power and Ground Wires Use tinned stranded 18 AWG (1 mm²) wire for all AC power and ground connections. Strip insulation from wires 1/4 inch (8 mm). To access the power wiring and ground terminals, carefully unscrew (start each screw before removing any single screw) the four captive screws that attach the aluminum bracket with the terminal strip and wiring label. Remove the bracket away from the box. Refer to illustration below. Leave the Red and Red/White wires found in the box disconnected at one end until the aluminum bracket is installed after power wiring is performed. Wiring instructions will follow. Captive Screws (four places) AC(L) AC(N) FG Grommet Figure 59: AC Power Wiring Detail Connect the LINE and NEUTRAL wires of the AC power line to the Power Supply module inside the POI Box. Observe the polarity of these connections, LINE to AC(L) and NEUTRAL to AC(N), as indicated on the power supply module. The Power supply module FG connection is pre-wired at the factory. Do not remove this wire. You must provide an Earth Ground by connecting a ground wire to the threaded grounding stud in the POI Box exactly as shown in the Ground Wire Detail Drawing and Photo illustration shown below in Figure 60. Disassemble the ground stud assembly, double crimp the earth ground wire to Item 5. Reassemble the stud assembly exactly as shown below. Make sure all hardware is tightly fastened in each step of the reassembly. 66 Rev. L4 12/2012 Modline 5
69 Sensor Wiring All parts supplied assembled in box (Figure 60). Item 1: Threaded Ground Stud, M4 X 0.7 Item 2: Quantity 3, Hex Nut M4 X 0.7 Item 3: Quantity 3, Washer M4 External Star Item 4: Terminal, Number 8 Ring, AWG (0.35 1,5 mm²) with internal 18 AWG (1 mm²) stranded Green/Yellow wire attached Item 5: Terminal Lug, Number 8 Ring LUG, AWG (0.35 1,5 mm²) Item 5 Crimp to Ground Wire REF REF Figure 60: Ground Wire Detail Figure 61: Earth Ground Connection A qualified electrician should inspect the AC wiring and Ground connections. The complete installation should be reviewed to insure that all switches, circuit breakers and other components have been properly selected and installed Connect the 24 VDC Power Supply Wires Bring the Red and Red/White power wires through the grommet at the bottom of the terminal strip aluminum bracket. Dress the wires so they will not be pinched by the bracket. Re-install the bracket by carefully attaching and securely tightening the four retaining screws. Be sure not to cross thread or otherwise damage any screws. Start each screw before tightening any single screw. Connect the Red wire to the +24VDC terminal and Red/White wire to the Common terminal on the right side of the terminal strip. A qualified electrician/technician should apply power to the box and measure 24 VDC, +/ 5%, at the Red and Red/White power supply connections on the left side of the terminal strip. Disconnect AC power at the installed power switch and prepare for connecting the Sensor interconnecting cable and system device cables as explained later in this section. 4.5 TSP Terminal Strip Plate The TSP is required when the POI Power Supply/Signal Interface Box is not used. This plate mounted terminal strip with terminal identification label and suppression components allows use of the Modline 5 Sensor and Cable with user-supplied enclosures and power supplies. The TSP ensures Sensor and cable operation meets RF emission and immunity standards required for CE certification. Modline 5 Rev. L4 12/
. A crimp terminal is supplied to mount on the stud. 4.5.")
70 Sensor Wiring 24Vdc Power Requirements Regulated DC Voltage: 24V +/ 5% Power Rating: 8 Watts Maximum Required Current Per Sensor: 380 ma. The 24Vdc Sensor Power Supply should be limited to 2 Amps. An earth ground wire is to be connected to the ground stud at the bottom of the Terminal Plate. Minimum size wire is 18 AWG (1 mm²). A crimp terminal is supplied to mount on the stud Dimensions and Installation The Terminal Plate must be installed in a suitable user-supplied grounded enclosure for protection from electrostatic discharge (ESD). Four inch (5mm) diameter holes are used to mount the plate. See photo below for mounting dimensions. The approximate overall rectangular plate dimensions are 5.39 inches (136.9 mm) long by 3.42 inches (86.9 mm) wide and 0.8 inches (20.3 mm) high. Plan access for cables and working space. Minimum Sensor interconnecting cable bend is 3 inches (76 mm). Wiring, grounding and shielding instructions are in the sections that follow (58.9mm) 5.03 (127.8 mm) Figure 62: Dimensions TSP 68 Rev. L4 12/2012 Modline 5
71 Sensor Wiring 4.6 Sensor Interconnecting Cable Preparation Cable Preparation It is very important that the cable shield be properly prepared and installed. All signal cable shielding must be grounded to the POI Box enclosure with the IRCON supplied Grounding Strain Reliefs. If the Terminal Strip Plate is used, the shielding must be clamped to the ground shield clamps on the plate. All cables must be properly dressed for shield grounding. Twisted pair wires must remain twisted and kept as short as possible. The IRCON Sensor cable is supplied with the connector attached on one end. The opposite wiring end is prepared and supplied as per the following procedure. If the cable is shortened, the preparation procedure must be followed. User supplied cables require similar preparation. A. Strip off 9 inches (229 mm) of the outer jacket. B. Partially cut back the outer braided shield. Leave 1 inch (26 mm) of shield exposed to attach a strain relief or connection to a Terminal Strip Plate shield clamp. C. Cut wires to lengths shown in table below. Note different Red and Red/White wire lengths for POI Box and Terminal Strip Plate. Strip all wire pairs ends 3/8 inch (10 mm) and tin with solder. Pair 3.5 inches (89 mm) 3.25 inches (83 mm) 3.00 inches (77 mm) 2.50 inches (64 mm) 2.25 inches (57 mm) 1.75 inches (45 mm) Yellow and Yellow White Yellow Yellow White Blue and Blue/White Blue Blue/White Orange and Orange/White Orange Orange/White Violet and Violet/White Violet/White Violet Black and Black/White Black/White Black Table 14 Red and Red/White wire lengths for POI Box and Terminal Strip Plate: Red for POI Box Red/White for POI Box Red for Terminal Strip Plate Red/White for Terminal Strip Plate 3.25 inches (83 mm) 3.5 inches (89 mm) 10 inches (241.3 mm) 10 inches (241.3 mm) D. Select Next Step. If the preparation is for a POI Box, go to sub section Grounding Strain Relief Fitting Assembly on next page. If the preparation is for a Terminal Strip Plate, pull back and comb out the exposed shield. Preparation is now complete. Route and install the interconnecting cable. Refer to Section 4.8 Terminal Strip Plate Sensor Interconnecting Cable Installation, page 72. Modline 5 Rev. L4 12/
72 Sensor Wiring Interconnecting Cable Assembly Continuity Check If desired, a continuity check of the cable can be made. The table below identifies the receptacle pin and the color coded wire connected to the pin. The illustration below identifies the pin locations on the cable plug end. Cable Shield is connected to the plug shell. Pin 1 Black/White Pin 2 Red Pin 3 Black Pin 4 Violet Pin 5 Blue Pin 6 Yellow/White Pin 7 Blue/White Pin 8 Red/White and Violet/White Pin 9 Orange Pin 10 Yellow Pin 11 Orange/White Red Dot Up Figure Grounding Strain Relief Fitting Assembly Inspect the three metal grounding cable strain reliefs supplied with the POI Box. Identify the cable seal. The cable seal is seen from the compression nut side of the fitting assembly. The smaller diameter seal (light gray) is for cable diameters from 0.11 inch (2.8 mm) to 0.28 inch (7.1 mm). Two are supplied. Use one for the IRCON Sensor interconnecting cable. The larger cable seal (darker gray) is for cable diameters from 0.20 inch (5.1 mm) to 0.39 inch (9.9 mm). One is supplied. Select the fittings that match the user cable diameters to be installed. 1. The Strain Relief Figure 64 drawing illustrates how a braided wire shielded cable is grounded when using either the Grounding Strain Relief fittings. 2. Slip the Compression Nut (Item A) and the Compression Assembly (Item B) onto the cable, as in Figure 64. Pay attention to their order, position and direction of each part shown. 3. Unbraid and comb out the shield wires. Flare all the combed shield wires evenly all around, down, and over the Compression Fitting (Item B). If an inner foil is used in the cable, check that no inner foil drapes over the shield wires, trim it if necessary. 4. It is very important that the compression assembly rest on the un-stripped portion of the outer cable jacket to make a proper environmental seal. 5. Push the Compression Body (Item C), all the way, into the Compression Fitting (Item B). Carefully rotate until it seats properly. 70 Rev. L4 12/2012 Modline 5
 onto the Compression Fitting to make a watertight seal. Tighten all parts firmly. 8.")
73 Sensor Wiring 6. Trim the shield wires to a spot just past the o-ring on the compression fitting, as shown in Figure Hold the cable firmly, so that the cable does not twist in the fitting, as you screw the Compression Nut (Item A) onto the Compression Fitting to make a watertight seal. Tighten all parts firmly. 8. The Locking Nut (Item D) is used to fasten the cable to the POI BOX. Assembly Checklist: Check insulation resistance between all wires. Resistance should be 50 megohms or greater. Check closely for any wire strands that could cause shorting. Trim Unstranded Shield Wires Here Enclosure Wall O-Ring on the Compression Assembly (Item B) Compression Nut (Item A) Locking Nut (Item D) O-Ring on the Fitting Body (Item C) Figure 64: Grounding Strain Relief Fitting Assembly 4.7 POI Box Sensor Interconnecting Cable Installation For safety of personnel, AC power should not be applied to the POI box when its cover is removed. Use the power switch installed previously to disconnect power during wiring of the unit. Remove the protective seal from the cable entry hole on the left side of the enclosure. The left side has a single entry hole in the center position. Insert the IRCON supplied interconnecting cable using the Grounded Strain Relief fitting into that hole, attach the locking nut to the fitting and tighten. Reference Figure 64 drawing in previous section. Route all twisted wire pairs to their corresponding terminals identified by wire color. Insert the tinned wire ends of each color coded wire into its terminal and tighten. Modline 5 Rev. L4 12/
 long Red and Red/White twisted pair through the ceramic ferrite core supplied with the plate.")

74 Sensor Wiring Figure 65: POI Box 4.8 Terminal Strip Plate Sensor Interconnecting Cable Installation Clamp the cable shield to the shield clamp on the left side of the Terminal Strip Plate. Insert the 9.5 inches (241.3 mm) long Red and Red/White twisted pair through the ceramic ferrite core supplied with the plate. Keep the exposed wire length between the shielded cable end and the ferrite core as short possible. Maintain enough length to allow the core to be inserted into its mounting clip. Bring the Red and Red/White pair around the outside of the core as tight and as close to the core surface as possible. Repeat until 2 wraps have been completed as shown. Cut the pair to the required length for connection to the terminal strip. Strip wire 3/8 inch (10 mm) and tin with solder. Route all twisted wire pairs to their corresponding terminals identified by wire color. Insert the tinned wire ends of each color coded wire into its terminal and tighten. The 100 Ohm 1 watt fusible resistor placed from the ground stud to power supply common is not shown in these illustrations. Figure 66 Figure Rev. L4 12/2012 Modline 5
75 Sensor Wiring 4.9 Connecting Device Cables to POI Box or Terminal Strip Plate Recommended Cable Types To maintain signal integrity and reduce noise pick-up, twisted pair shielded cables with overall foil and braid shielding should be used for connecting to all Sensor inputs and outputs. Belden low capacitance computer cable types 9829, 9830, 9831, 9832, 9839 and 9833, or equivalent cables are recommended. Each of these cables has a different number of wire pairs varying in quantity from 2 to 7 pairs. The cable selected should have a twisted pair nominal impedance of 100 ohms and nominal capacitance between conductors should not exceed 15.5 pf/ft (50.9 pf/m). All user-supplied cables should be grounded to the POI Box with one of the supplied Grounding Strain reliefs. Two different size cable entry Grounded Strain Reliefs are supplied with the POI Box. The relief with the smaller diameter seal (light gray) is for cable diameters from 0.11 inch (2.8 mm) to 0.28 inch (7.1 mm). The larger diameter cable seal (darker gray) is for cable diameters from to 0.20 inch (5.1 mm) to 0.39 inch (9.9 mm). Select the fittings that match the cable diameters to be used. Prepare the cables as explained in Section 4.6 Sensor Interconnecting Cable Preparation, page 69. Ground cable shields on the Terminal Strip Plate by inserting the prepared braid under the shield clamps Grounding and Shielding Follow all grounding and shielding instructions provided below. Proper connection of the cable shields is important to avoid noise and ground loop problems that may cause errors. Do not connect cable shields at both ends. The use of the Grounding Strain Reliefs and cable shield clamps connect the shield to ground at the POI Box and Terminal Strip Plate side of the connection. The illustration below shows the shield not connected at the other end. Sensor Input/Output System Device Figure 68 Refer to Section 4.14 System Grounding and Shielding, page 86 before beginning wiring. The section presents an overview on grounding and shielding and contains important information for wiring system cables. Modline 5 Rev. L4 12/
76 Sensor Wiring System Connections Refer to Manual Sections 5 Operation and 6 Digital Communications for Operation Information. Yellow RS485 + RS485 Digital Communications Yellow/White RS485 Blue Analog Out or 0 20 ma output Blue/White Analog Out Orange ma In + Remote Emissivity or E-Slope current input Orange/White ma In Violet Pk/Hd Switch Can be used for Peak Picker Reset or Track Mode select or Remote Laser operation. Violet/White Pk/Hd Switch Black Alarm Relay Invalid Condition, Dirty Window and Sensor Error Code Alarm relay Black/White Alarm Relay Red +24VDC 24Vdc Sensor Power Supply Red/White Common RS-485 Digital Communications Table 15: Sensor Interconnecting Cable / Function Connections are made on the terminal strip RS485+ (DATA) and RS485 (DATA*) terminals. The Power Supply Common (-) terminal is used as the ground reference. See Section 4.12 for detailed wiring of Sensors in a RS-485 multi-drop network. Section 6 of this manual details the RS-485 operation. Maximum cumulative RS-485 cable length, from sensor to the actual process device, is 4000 feet (1220 meters) Analog Output Temperature Signal This current loop temperature signal is 4 to 20 madc or 0 to 20 madc, user selectable, linear with measured temperature. The corresponding temperature span is adjustable. Temperature signal connections are made to the Analog Output + and Analog Out terminals. Single or multiple series connected indicators, recorders or other instruments can be connected. The total current loop series DC resistance of all devices and wiring should not exceed 600 ohms. І OUT = 0 to 20 ma or 4 to 20 ma Sensor 600 Ohm Maximum Including Cable Resistance Figure 69 The minus side of the Analog Output is connected to power supply common (see section 4.14 System Grounding and Shielding, page 86). Use instruments with ungrounded differential inputs. If 74 Rev. L4 12/2012 Modline 5
77 Sensor Wiring instruments with grounded inputs are connected in the loop, the output may be inoperable or inaccurate. If the Analog output is not used, insert a jumper wire or 100 Ohm to 500 Ohm value resistor across the output terminals. This will prevent an Analog Loop malfunction Alarm (Error X108) from occurring Converting the Analog Output from a ma output to a 10 Volt Output To convert the Analog ma output to 0 to 10 Vdc Output, place a 500 Ohm resistor across the output terminals. The Sensor Analog output (SOUT) should be set to 0 to 20mA range. The minus side of the Analog Output is connected to earth ground. Use instruments with ungrounded differential inputs. If instruments with grounded inputs are connected, the output may be inoperable or inaccurate. І OUT = 0 to 20 ma Sensor 500 0,1% Figure Current Input for Remote Emissivity, E-Slope or Laser Operation You may make remote adjustments of the Emissivity or E-Slope by sending a scaled analog input of 4 to 20 madc. The Modline 5 senses an input and overrides any Sensor rear panel or RS-485 settings of Emissivity, E-Slope or Match. The input can also be used for remote Laser operation. Example for Emissivity: A 4 madc signal corresponds to an emissivity setting of A 20 madc corresponds to an emissivity of The relationship for the values in between is linear. Example for E-Slope: For the E-Slope settings, the 4 to 20 madc signals correspond to settings of to The relationship for the values in between is linear. Connections are made to Terminals ma In + and ma In. Input impedance is 120 Ohms. Use Shielded cable and ground shields at POI BOX (with grounding strain relief supplied) or at the TSP Terminal Strip Plate ground terminal. The ( ) terminal of the ma input current input is isolated, but will only tolerate a difference of approximately 2 Volts between it and Sensor Common. Remote Laser Operation is selected in COMMS LASR Menu. See manual Sections 5.8 and 5.11 for selecting and operating this function. To configure and wire for remote I IN current/switch Laser operation follow the instructions given below. When selected for remote Laser Operation, Emissivity and E-Slope are not changed by the input current. Modline 5 Rev. L4 12/
78 Sensor Wiring POI BOX or Terminal Strip Plate Current Input Terminal Connections for Remote Laser Operation Use a DC power supply with a maximum output of 24 volts. Maximum input current allowed is 20 ma. Overloading the input can cause a Sensor Fail alarm. When calculating a series resistor value to use with a supply voltage, subtract the 120 ohm Sensor internal circuit impedance from the calculated value. See Table below. On threshold is 15 ma. DC Voltage Supply Resistor Value 10 Volts 560 ohms (Plus 120 Internal = 680 ohms total) for 15 ma 24 Volts (Can be Sensor Supply) 1500 Ohms (Plus 120 Internal = 1620 ohms total) for 15 ma Table 16 Connect the supply circuit as shown in the wiring diagram. The I IN terminal can be connected to a floating or earth grounded power supply terminal. In either case, it must be connected directly to the power supply. If using the POI BOX internal 24 VDC power supply, common must be directly connected to the ma terminal. Mount the ½ Watt resistor in a series circuit on the switch or at the external power supply location. 1/2 Watt Resistor Orange Orange/White Remote Laser Switch Figure Peak/Hold Switch for Remote Peak Picker Reset, Track and Hold or Laser Operation. An external switch connected to the Pk/Hd Switch terminals will control signal conditioning of the Modline 5. These terminals can also be used for remote Laser activation. Switch action for the Peak Picker will provide the following control. Momentary closure of the switch (>0.08 second) immediately resets the Peak Picker. If the switch is continuously closed, the Temperature Display will show direct readings without any Peak Picker signal conditioning. The switch may be manually operated or it may be a contact on a timer, relay, or any other process operated switch. Switch action for Track and Hold will provide the following control. With the switch open, temperature tracking continues (Track). With the switch closed, the displayed temperature will be held at the last reading (Hold). The switch may be manually operated or it may be a contact on a timer, relay, or any other process-operated switch. 76 Rev. L4 12/2012 Modline 5
79 Sensor Wiring Remote Laser Operation is selected in COMMS LASR Menu. See manual Sections 5.8 COMM Setup of RS-485 Digital Communication Configuration, page 103 and 5.11 Laser Sighting Operation, page 110 for selecting and operating the remote laser function. The PkHd terminals are dedicated to Laser operation when selected. To wire for remote PkHd switch operation follow the diagram given below. Use Shielded cable and ground shields at POI BOX (with grounding strain relief supplied) or at the TSP Terminal Strip Plate ground terminal. Violet Violet/White Pk/Hd Switch Pk/Hd Switch Remote Laser Switch Sensor Alarm Relay Contacts Figure 72 The sensor self tests its case temperature, detector assembly temperature, output current flow, etc. The Check function checks internal circuit and detector operation. The optional Dirty Window Detector measures the Sensor s window condition. One or more out of limit conditions sensed by these tests triggers an Alarm and operates the Alarm relay within the Modline 5. The relay contacts may be used in the process control system to indicate measurement conditions do not allow process temperature measurements or Sensor operation may be impaired. Appropriate action for the various conditions can then be initiated. Alarm Relay contact connections are made to the Alarm Relay Terminals. The relay contact is rated for 24 Volts AC or DC, 1 AMP resistive loads only. The Alarm relay can be configured for Normally Open or Normally Closed operation. The configuration can be performed at the Sensor Rear panel with the Engineering RELY function, or with RS-485 digital communications. Set the relay operation to correspond to proper and safe use of the contacts in your overall measurement system. Select N C. for closed relay operation with Sensor not in Alarm condition (open in alarm state). Select N.O. for closed relay operation with Sensor in Alarm condition (open when not in alarm condition). Contacts are held open for both N.O. and N.C. operation when the Sensor is not powered, and, for 3 to 5 seconds after power is applied to the Sensor during the initiate period. Normally Closed N.C, operation is considered fail-safe operation. The table below details the alarms and measurement conditions that trigger the Alarm Relay. Details about these Alarms are found in Section 7 Maintenance, page 127. Modline 5 Rev. L4 12/
80 Sensor Wiring Sensor Error Code Alarms X101 X102 X103 X104 X105 X106 X107 X108 X109 Dirty Window Detection Out of calibration Detector block too hot Detector block too cold Case temperature too high Case temperature too low Sensor failure FAIL may be seen on the Sensor TEMP display Analog Output Current loop malfunction (open circuit) Dirty Window Detection malfunction Measurement Condition Alarms INV pinv Measurement Conditions are invalid for two color ratio temperature measurement. When the Invalid Alarm (ialm) function is set to ON, this measurement condition becomes an alarm and triggers the Alarm relay and the ALARM word on the Sensor rear panel pinv is only displayed when the Invalid Alarm (ialm) function is set to ON and Peak Picker or Track and Hold is On, this condition becomes an alarm and triggers the Alarm relay and the ALARM word on the Sensor rear panel. Temperature displayed is Peak Picked or Hold Mode Temperature values from prior valid measurement conditions Selection of a Power Supply for Sensors used with TSP Terminal Strip Plates When using a Modline 5 Sensor with the TSP Terminal Strip Plate, select a switching type power supply that will provide reliable startup. The power supply output should remain at rated voltage during the Sensor current loading that occurs at startup. Sensor displays and alarms will not properly start with low voltage. A dedicated Power supply for each Sensor is the simplest and best configuration. IRCON offers a chassis mount single sensor supply. The IRCON part number for this power supply is See Section 4.11 Installing and Wiring the Chassis Mount 24 Volt DC Switching Power Supply for all details. Multiple Sensor installations may require more than one power supply. A single supply will not be able to properly provide startup power to a large number of sensors. Limit the number of Sensors supplied from a single power supply to no more than 2 or possibly 3. Dividing the Sensors into groups can eliminate long cable runs when sensors are installed at distant locations. This is especially the case when AC power is available locally. The standard Modline 5 cable that is routed between the Sensor and TSP Plate is limited to 350 Feet (107 meters). The power supply wires in this cable are 22 gauge. This maximum cable distance and wire gauge assures enough voltage will be available at the sensor. The voltage drop developed across the power supply wire pair will be small and not cause a low voltage condition. Whether powering a single Sensor or multiple Sensors, there may also be significant voltage drops across the wires connecting the power supply to each TSP. Keep the wire lengths between the power 78 Rev. L4 12/2012 Modline 5
81 Sensor Wiring supply and Terminal Strip Plate short. The voltage drops developed are dependent upon length and gauge of the wire. A qualified electrician or technician should apply power with the all sensors connected and measure 24 VDC, +/ 5%, at the Red and Red/White power supply terminal connections on the left side of each TSP Terminal Strip Plate. A 100 Ohm1 Watt fusible resistor is supplied with all TSP plates to connect power supply common to earth ground as shown in the diagrams. The 100 Ohm resistor is built into the POI Power Supply / Signal Interface Box. To Modline 5 Sensor To Modline 5 Sensor To Modline 5 Sensor Power Supply Power Supply Power Supply 24 VDC 24 VDC 24 VDC Figure 73: Sensor Wiring one 24 VDC Supply for each Sensor To Modline 5 Sensor To Modline 5 Sensor To Modline 5 Sensor Power Supply 24 VDC Figure 74: Sensor Wiring one 24 VDC Supply and Three Sensors TSP Terminal Strip Plate DC Power Supply Connections These instructions are for the Terminal Strip Plate only. The POI Box has its own internal Power Supply that is connected to the right side of the Terminal Strip in Section 4.4. Modline 5 Rev. L4 12/
82 Sensor Wiring See Section 4.5 to review Terminal Strip Plate enclosure, power supply and ground connection requirements. Section 4.11 provides instructions for using a chassis mount 15 watt, 24 Volt DC Switching Power Supply supplied by IRCON. The part number for this power supply is The external 24 VDC power is wired to the right side of the Terminal Strip. Use 22 AWG (0.35 mm²) wire. Total power supply cable run using 22 AWG (0.35 mm²) wire is 107 meters (350 feet). Shielded cable is recommended. Paralleling two pairs of 24 AWG (0.25 mm²) cabling is equivalent to using 22 AWG (0.35 mm²) cable. Connect the positive side of the 24 VDC power source to the +24VDC Terminals. Connect the common or negative side of the source to the Common Terminal Power Supply Common Ground Connection The Common side of the power source must be connected to earth Ground. If the dc power source common is not already connected to ground at some point in the system, make the connection at the Terminal Strip Plate. The recommended and preferred method of making the ground connection to is to connect the power supply Common Terminal to Ground through a 100 Ohm 1 Watt fusible resistor The resistor is inserted between the Ground Stud and the Common Terminal Installing and Wiring the Chassis Mount 24 Volt DC Switching Power Supply The part number for this power supply is This is the same chassis mount 15 watt, 24 VDC switching power supply used in the POI Power Supply/Signal Interface Box. The supply powers one Modline 5 Sensor and must be used with the TSP Terminal Strip Plate (supplied separately). The power supply module operates with 100 to 240 VAC power, 50/60 HZ. Nominal continuous input current is 0.3 A. The power supply module and TSP are shown in Figure 75. These component parts must be installed in a grounded metal enclosure for safety and electrostatic protection. Select enclosures designed for electrical use with the NEMA and IP environmental ratings required at the point of installation. The rectangular mounting hole layout dimensions for the module are 3.39 inches (86 mm) by 1.81 inches (46 mm). Module height is 1.04 inches (26.5 mm). Design and implementation of the installation must be performed by qualified personnel. Installation instructions and important warnings are included in the carton with the power supply. Further instructions are provided on the power supply manufacturer s website. It will be useful to review Section 4.4 Model POI Power Supply/Signal Interface Box, page 63. Wiring and installation of the TSP Terminal Strip Plate is covered in Sections 4.5, 4.6, 4.8, 4.9, 4.10 and Rev. L4 12/2012 Modline 5

83 Sensor Wiring Figure 75 Compliance with relevant national regulations in the USA, Europe and the other countries must be ensured. Adhere to all safety and local electrical codes. Before operation is started, the following conditions must be ensured: Connection to mains supply in compliance with national and local regulations. Mains cables must be sufficiently fused. Supply a two-pole switch for 100 VAC to 240 VAC at 50 to 60 Hz. The switch should be clearly marked as the power shutoff for the equipment, visible and accessible to the operator. Install in environments where the power supply enclosure will not exceed 55 C (131 F). Keep away from fire and water. Tinned stranded 18 AWG (1 mm²) wire for AC power and ground connections is recommended (terminals accept 16 AWG wire maximum). Strip insulation from wires 1/4 inch (8 mm). Connect the LINE and NEUTRAL wires of the AC power line to the power supply module as indicated on the module, LINE to AC (L) and NEUTRAL to AC (N). The non-fused protective earth ground connection must be connected to the FG terminal of the module (Protection Class 1). Ground wire must be the same size or larger than AC power wires. Use tinned stranded 22 AWG (0.35 mm²) wire for the 24 VDC plus and minus connections to the TSP. Observe polarity. Improper installation or operation can result in serious injury or death to personnel! The installation should be performed following all national and local electrical codes. Never work on the power supply if mains power is supplied. Do not open the power supply until at least 5 minutes after it has been disconnected from the mains on all poles. Modline 5 Rev. L4 12/
84 Sensor Wiring 4.12 RS-485 Multi-Drop Network Power Supply and System Wiring Multiple Modline 5 Sensors communicating via RS-485 with a Host device are installed in a multidrop network configuration. The Modline 5 MSI Multiple Sensor Interface, a PC, a PLC or other Control system are Host devices. A block diagram of a multi-drop network is shown in the adjacent illustration. It is important to wire the network properly to prevent noise pickup and have reliable operation. Sensors should be wired in tandem as shown in the diagram. The RS-485 terminals from the Sensor furthest from the host device are wired to the next closest Sensor. Then the RS-485 Terminals of that Sensor should be wired back to the next closest sensor. Do this until all sensors are wired. Do not use any other configuration. A 120 ohm termination resistor should be placed across the RS-485 terminals of the Sensor furthest from the Host device as shown in the diagram. Consult the manual for the Host device to determine if any termination resistor is required at its terminals. The IRCON Model MSI Interface does not require a termination resistor at its input. To maintain signal integrity and reduce noise pick-up, twisted pair shielded cables with overall foil and braid shielding should be used for connecting to all Sensor inputs and outputs. Belden low capacitance computer cable types 9829, 9830, 9831, 9832, 9839 and 9833, or equivalent cables are recommended. Each of these cables has a different number of wire pairs varying in quantity from 2 to 7 pairs. The cable selected should have a twisted pair nominal impedance of 100 ohms and nominal capacitance between conductors should not exceed 15.5 pf/ft (50.9 pf/m). Select power supplies and install cables as instructed in previous sections of the manual. To Sensors RS-485 Multi-drop Network Power Supply More than one Required, see Manual Ground TX-A TX-B RS-485 Serial Port Sensors with TSP Terminal Strip Plates IRCON Multiple Sensor Interface (MSI) or PC, PLC, Control System Figure Rev. L4 12/2012 Modline 5
85 Sensor Wiring Computer Communications Requirements The Host device communicating with The Modline 5 Sensor should have an RS-485 communication port. If not, an RS-232 Port and a RS-485 to RS-232 converter can be used. An RS-485 to USB converter can also be utilized. The combined communications port and converters used must have the capability to communicate over a 2 wire, half duplex RS-485 network at speeds fast enough to handle command requests with reply turn around times of one-millisecond or less. The following converters will provide satisfactory performance when used with Modline 5 Sensors. CyberResearch Inc. Contact: Superverter TM Model 285 R-422/RS-485 to RS-232 Converter. CyMOD TM Model CM 4530 USB to RS-232/422/485 Converter with isolation. (Superverter and CyMOD are trademarks of CyberResearch Inc.) DGH Corporation Contact: A1000 and 2000 Series (The A1000 will also provide 24 Volt DC power for 3 Sensors) RS-232/RS-485 Converters and RS-485 Repeaters Black Box Corporation Contact: RS-422/485 PCMCIA Serial I/O Adapters, Single-Port Product Code IC114A-R2 (for laptop computers) See Section 6 of this manual for Modline 5 Sensor communications details and commands POI Power Supply/Operator Interface Box Multi-drop Wiring A block diagram of a multi-drop network using POI Box interfaces is included on below. The 100 Ohm resistor is installed inside each POI Box, do not install one externally. Use the shielded cable specified in the previous manual sections. To Modline 5 Sensor To Modline 5 Sensor To Modline 5 Sensor To Modline 5 Sensor AC Power AC Power AC Power AC Power POI Box POI Box POI Box POI Box Termination Resistor at furthest Box Modline 5 MSI Multi-Sensor Interface Or PC, PLC, other System RS-485 Ground TX-A TX-B Figure 77: Four Sensor RS-485 Multi-drop with POI Power Supply Operator Interface Box Modline 5 Rev. L4 12/

86 Sensor Wiring TSP Terminal Strip Plates Multi-drop Wiring These illustrations indicate the proper wiring when using TSP Terminal Strip Plates. A power supply for each Sensor and TSP pair is shown in the first illustration. This is the preferred method. A single power supply is shown powering three Sensors in the second illustration. A power supply should not power more than 2 or 3 Sensors. Use the shielded cable specified in the previous manual sections and install termination resistors as required. To Modline 5 Sensor To Modline 5 Sensor Termination Resistor at furthest Box Power Supply 24 VDC Power Supply 24 VDC Modline 5 MSI Multi-Sensor Interface or PLC, PC, System RS-485 Ground TX-A TX-B Figure 78: Multidrop Sensor Wiring with 24 VDC Supply for each Sensor To Modline 5 Sensor To Modline 5 Sensor To Modline 5 Sensor Termination Resistor at furthest Box Power Supply 24 VDC Modline 5 MSI Multi-Sensor Interface or PLC, PC, other System RS-485 Ground TX-A TX-B Figure 79: Three Sensor RS-485 Multi-drop with 24 VDC Supply and TSP Terminal Strip Plates 84 Rev. L4 12/2012 Modline 5
 rated.")
87 Sensor Wiring 4.13 Sensor and Cable Connection Cable Plug and Sensor Receptacle Position the red dot on the interconnecting cable plug on connector to match the red dot on the Sensor housing receptacle. Push the connector firmly and completely in to the Sensor receptacle. The cable plug and Sensor receptacle combination are NEMA 4 (IP65) rated. However, provide protection for the plug and receptacle if they are disconnected and the contacts and pins are exposed to harsh environments. Make sure the 24Vdc power to the Modline 5 Sensor is turned off whenever connecting and disconnecting the cable. Make sure the rear protection window is in place after making adjustments to maintain the Sensor s NEMA 4 (IP65) environmental rating. Figure 80 Modline 5 Rev. L4 12/

88 Sensor Wiring 4.14 System Grounding and Shielding POI Box and Terminal Strip Plate Diagram POI Power Supply Signal Interface Box Mounting surface at ground potential AC Supply Input Interconnecting cable 4) Shield to enclosure 2) Ground lead 3) Line conditioner or isolation transformer 4) Grounded shield 4) Grounded shield 2) Ground lead Analog Output ma IN EMIS/E-SLOPE AC Supply Peak Picker/Track & hold Reset switch 1) Ground 5) Sensor common 4) Grounded shield 4) Grounded shield 24 VDC Power supply Mounting surface not at ground potential Insulation Terminal Stripe Plate 1) Ground Cable clamp (3 Places) Interconnecting cable 4) Shield to clamp 11) Place Terminal Stripe Plate in metal enclosure for protection from ESD (electrostatic discharge) Analog output 4) Grounded shield ma IN EMIS/E-SLOPE 4) Grounded shield Peak Picker/Track & Hold Reset switch 4) Grounded shield 24 VDC Power supply 3) 4) Grounded shield Figure 81: POI Box and Terminal Strip Plate 2) Ground lead 1) The Sensor mounting surface should be at earth ground potential. Provide electrical insulation between the Sensor and mounting surface if the surface is not at ground potential. Use non-conductive hardware for mounting. Mounting surfaces not at ground potential could be hazardous for personnel operating and maintaining the Sensor. 2) Insure earth ground is properly connected to the POI Box enclosure or the Wiring Terminal Plate as previously instructed in this Section. 86 Rev. L4 12/2012 Modline 5
89 Sensor Wiring 3) For the POI Box: Use a clean AC Power line free from noise and transients. If a line conditioner or isolation transformer is used, connect per manufacturer s instructions. These devices must withstand the inrush current specified in Section AC Power and Earth Ground Connections, page 65. Earth ground must be properly connected. For the Terminal Strip Plate: Connect a regulated power supply. 4) The Sensor case is connected to the shield of the interconnecting cable. The cable shield connects to the grounded POI Box enclosure with the Grounding Strain Reliefs. If the Wiring Terminal Plate is used, the interconnecting cable shield is connected to ground with the shield clamp on the plate. Twisted pair shielded computer cable is required for all connections. Ground the cable shields at the POI Box with the supplied Grounding Strain Reliefs. If the Wiring Terminal Plate is used, cable shields are connected to ground with ground clamps on the plate. This manual specifies the shields of cables connecting between the POI Box or Terminal Strip Plate and system devices be connected to ground only at the Box or Plate. The recommended shield connections are shown in the drawing below. This recommendation is to prevent ground loops due to the difference in ground potential between locations of components and provide adequate shielding of cables. Some devices call for connecting the shield to ground at the device input. If ground loops develop with this connection, it may be necessary to experiment with shield connections. The ground connection at the Terminal Strip Plate or POI Box and the interconnecting cable shield should always be connected! Sensor Input/Output System Device Figure 82: Sensor shield 5) Several Sensor circuits are connected to an internal common. The minus ( ) or common terminals for the 24 VDC Power Supply, Peak Picker/Track and Hold Switch, and Analog Output are connected internally. A.) Connect the Analog Output to devices with differential inputs that have not been grounded. B.) The ( ) terminal of the ma input for remote Emissivity and E-Slope current input is isolated but will only tolerate a difference of approximately 2 Volts between it and Sensor Common. Input impedance is 120 Ohms. See Note 8 for connecting Common to ground 6) The RS485 Data connection is not isolated. Use an external isolator if isolation is required. Modline 5 Rev. L4 12/
90 Sensor Wiring 7) Alarm Relay contacts are isolated from ground and Sensor internal common. 8) For the POI Box: A 100 ohm 5 watt resistor is connected between the Sensor internal common to earth ground. For practical purposes, the minus terminals connected to the internal common should be considered grounded. For the Terminal Strip Plate: Depending on the installation, the internal common will be connected to ground through a 100 Ohm 1 Watt fusible resistor. See Section 4.10 for details. 9) The Terminal Strip Plate is supplied with a transient suppressor across the Red and Red/White power supply wires on the left side of the terminal strip. 10) The Terminal Plate is supplied with a ceramic ferrite bead for the Red and Red/White power supply wires. 11) The Terminal Strip Plate must be placed in a metal enclosure for protection from electrostatic discharge (ESD) Summary Caution and Warning Inspect the installation for proper wiring, possible loose connections or potential shorts. The installation of the Sensor described in Section 3 Sensor Installation, page 22 should be complete. The wiring of the Sensor and system devices described in this Section 4 Sensor Wiring, page 62. should also be complete. The Modline 5 Sensor can now be powered and the initial setup for operation performed as described in Section 5 Operation. Look for any signs of over heating or smoking when applying power. Investigate any signs of improper installation Please read the following important Caution and Warning. If you observe any signs of malfunctions smoke or overheating; complete lack of any indication; etc. - turn off power immediately. Recheck all wiring, and refer to Section for troubleshooting. Critical Process Safety Guideline Risk of Personal Injury When this instrument is being used in a critical process that could cause property damage and personal injury, the user should provide redundant device or system that will initiate a safe process shutdown in the event that this instrument should fail. The user should follow NEMA Safety Guidelines For the Application, Installation, and Maintenance of Solid State Control. A copy of the guidelines is reprinted in Appendix A. The National Electrical Manufacturers Association, NEMA, has published safety guidelines for the Application, Installation and Maintenance of Solid State Control. The thrust of this document is personal safety. The guidelines contained in this document should be followed for critical processes that depend upon the operation of this instrument. The user should provide a redundant system or device that will initiate a safe process shutdown in the event that this instrument or associated system should fail. The control of a process should not 88 Rev. L4 12/2012 Modline 5
91 Sensor Wiring be solely dependent upon this instrument and its peripheral components. Other measuring and controlling safe-guards should be included in a redundant system designed to provide warning of conditions that may cause personal injury or property damage. These safeguards should be in place at all times, including startup and shutdown, as well as normal operation. Procedures should be in place that verify proper instrument and system operation after service, maintenance or replacement to insure the instrument and peripheral components are returned to service properly. All alignments, settings and connections required for proper operation must be performed or verified. A computer with specialized software may be used as an operator interface for setup and operation of the system. Digital and analog communication with alarms and controllers may be part of the system making it a more complex system. Changing software configurations and settings requires that process performance be verified. Modline 5 Rev. L4 12/
92 Operation 5 Operation 5.1 Sensor Rear Panel Setup and Operation Introduction Become familiar with the displays, pushbutton controls, menus and the functions required for Sensor setup and operation as described below. Modline 5 instruments are thoroughly tested and calibrated to factory specifications before shipment and should require no more than brief function selections and adjustments to meet the requirements for measurement of process temperatures. 5.2 Rear Panel Keyboard, Displays and Sight and Laser Aiming Description Located on the rear of the Modline 5 Sensor are: a keyboard panel with three setup pushbuttons, three red word indicators for Setup, Alarm and Window (for the Dirty Window Detector optional feature), and a four character green alphanumeric Light Emitting Diode dot matrix display with adjacent green F and C indicators. The display is identified as the Temperature (TEMP) display in this manual. The TEMP display and F and C indicators are used for temperature indication in Fahrenheit or Celsius. LOW or HIGH is displayed when viewing target temperatures below or above the Sensor temperature range. INV is presented on the display for Invalid ratio temperature measurement conditions. Setup parameters will be shown on the TEMP display during setup and error codes displayed in response to an Alarm inquiry. Two of the pushbuttons are Down / Up Arrows labeled and. The third is an Enter pushbutton labeled ENT with the keyboard enter symbol. These buttons are identified as and in this manual. A sight for visually aiming the Sensor is located in the center of the keyboard. The process target and Sensor circular reticle can be seen when viewing through the sight. Sensors with the Laser aiming option have a pushbutton to energize a laser in place of the sight. Access to the keypad requires removal of a screw on protective window with O-ring gasket. The protective window must be in place during temperature measurement to maintain the NEMA 4 (IP65) Sensor housing rating. Temperature in C or F LOW HIGH INV = Below zero scale temperature = Above full scale temperature = Invalid Condition for Ratio Temperature Measurement Figure 83: Sensor with Visual Through the Lens Sight 90 Rev. L4 12/2012 Modline 5
93 Operation Figure 84: Sensor with Laser Through the Lens Aiming Option Laser pushbutton is located on the edge of rear panel. Visual sight is not available with this option installed. LED above pushbutton is on when laser is energized. See Section 5.11 Laser Sighting Operation, page 110 for complete Laser operation and safety instructions. 5.3 Navigation and Menus Enter and Up / Down Arrow Pushbuttons Up and Down Arrows are inoperative during valid temperature measurement. Arrows are operable when an Alarm Condition has been sensed and the ALARM indicator is lit. Depressing the UP Arrow will display an error code. The Up Arrow should be depressed multiple times to view simultaneous multiple Error Codes that might occur. If multiple errors have been displayed, the Down Arrow will scroll backwards through the errors. To return to the TEMP display while viewing an Error Code, press Enter. If no button is pressed after 15 seconds, the display returns to the temperature display. The ENT ( ) pushbutton is also used to navigate from the TEMP display to the Main Setup Menus. Up and Down Arrows and the ENT pushbutton are used to View, Select and Adjust Sensor Functions. 5.4 Main Menus ENT ( ) must be momentarily depressed (less than 5 seconds) when changing function values and making selections. If ENT ( ) is held depressed for 5 seconds, all adjustments made in the current menu are canceled and the unit returns to the TEMP Display. Navigate from TEMP display, by pressing ENT once. The last selected Main Menu will be displayed. USE the UP / Down Arrows to step through and view the following four Main Menus. Menus are displayed for 15 seconds before returning to the TEMP display if no further selection is made. ENGR (Engineering) AOUT (Analog Output) COMM (RS-485 Communications) HEAD (Operation Functions) Modline 5 Rev. L4 12/
94 Operation At a Main Menu, Press ENT once to enter the Menu. One of the Function selections will be displayed. USE the UP / Down Arrows to view a different Function. Functions are displayed for 15 seconds before returning to the TEMP display if no further selection or adjustment is made. The main menu functions are shown below. Some functions are model specific and only appear for those models. ENGR (Engineering Functions) LOCK (Panel Access Security Setup) VER (Sensor Firmware Version) MODL (Model Number Scrolling) RELY (Alarm Relay Operation Setup) F/C ( F and C Selection) CHK (Initiate System Check) HOUR (Automatic System Check Setup) WRNL (Optional Dirty Window Detector Setup) ialm (Sets Ratio Sensor Invalid Condition as Alarm) AOUT (Analog Signal Output Selection and Scaling) SOUT (Select Analog Output Current Range) ZERO (Set Analog Zero Scale Temperature) FULL (Set Analog Full Scale Temperature) Fatl (Set Output Current for Sensor or DWD Error) A LO (Set Alarm Current Output for Temperature Below ZERO) A HI (Set Alarm Current Output for Temperature Above FULL) COMM (RS485 Digital Communications) CLCK (Communications Lock, Read Only or Read and Write Setup) LASR (Select Laser Sight Activation Mode) ADDR (Set Sensor Address) BRAT (Set Baud Rate) HEAD (Sensor Operating Functions) EMIS (Set Emissivity for Brightness or 1 Color Sensor) E-SL (Set E-Slope for 2 Color Ratio Sensor) R.T. (Set Response Time) SIGL (Signal Conditioning Peak Picker or Track/Hold) PSEL (Peak Picker Sub Function Settings) COLR (Set Ratio Unit for 2 Color or 1 Color Operation) MTCH (Match Known Temperature) SUB FUNCTION PSEL (Peak Picker Function Settings) D.R. (Decay Rate in ºF or ºC per Second) AUTO (Auto Peak Picker Reset) RSET (Manual Peak Picker Reset) RBEL (Reset Below Temperature) DEL (Peak Signal Conditioning Delay) 92 Rev. L4 12/2012 Modline 5
95 Operation 5.5 Warm-up and Initial Setup Series 5R, 5G, 52 Power On and Warm-up When power is applied to the Sensor, a three to five second initiate condition occurs. All segments of the dot matrix TEMP display, and all word and symbol indicators are lit. The alarm relay is always held open during this short period. After application of power, a warm-up time of approximately 5 to 15 minutes is required for the Sensor s infrared detector and/or electronics. The Sensor Rear Panel Alarm indicator will be lit and Error Code X104 (Detector Cold) displayed when the arrow is depressed. During the warm-up time, temperature measurements can be made and outputs are operational. However, the Alarm signifies that the temperature indication may not be accurate. Temperature indications will be accurate after the Alarm indicator has turned off when warm-up is completed. If there is a brief power outage, Sensors may restart and go into the initiate and warm-up conditions described above. The Sensor Check function should not be initiated until the Sensor has warmed up and the Alarm indicator has turned off. An Out of Calibration Alarm (X102) may occur if initiated during warm-up. If this Alarm occurs, repeat the Check Series 56 Models Power On and Warm-up Series 56 Models include a Self Calibration feature which is performed as part of the power on routine Initial Rear Panel Display After the warm-up period is over, you should observe one or more of the Modline 5 Sensor responses described below on the TEMP display and at the outputs. During initial setup, because the Sensor is not adjusted for the process, these initial displays are expected. 1.Target Within Range If the Sensor is viewing a temperature within its range, it will display a temperature value. Equivalent analog signals will be supplied to any devices connected to the analog outputs (e.g., recorder or remote indicator). If initial setup has not been set to match operation to the process, the displayed temperature and analog outputs will not be a true measurement of the target temperature. 2. LOW / HIGH Indication If the measured temperature is below or above the Sensor temperature range limits LOW or HIGH will be shown on the temperature display. The Alarm Indicator does not light because these are normal conditions. 3. INVALID An Invalid condition will be indicated any time the sensed infrared radiation is considered to be inadequate for two color Ratio Sensor measurement. The word INV is indicated on the TEMP display. If the Invalid Alarm (ialm) is set to On, the Alarm Relay will be in alarm condition and the word Alarm lit on the Sensor rear panel Initial Sensor Setup Initial Sensor setup should follow the menu orders indicated in the following instructions. Menu navigation is shown using the & symbols for Enter and Up / Down arrows. The menus and functions available and the sequence in which they appear depends on the Sensor Model and the purchased options. A function variable is expressed as a word or as a number. A function variable may be changed from State A to State B or from a higher or lower numerical value by using the Up / Down arrows. Modline 5 Rev. L4 12/
96 Operation Momentarily depress the Up or Down Arrow pushbutton to make single digit changes starting with the least significant digit. Keep the pushbutton depressed to quickly change values. All values are retained in non-volatile memory and are automatically reloaded, in the event of a power loss. Temperature measurement continues during menu operations and changing of function values. The Analog Output and RS-485 temperature indications continue to reflect changes in target temperatures. When a changed function value that affects the measured and displayed temperature is entered with the ENT pushbutton, the temperature reading at the outputs updates in about 150 milliseconds. 5.6 ENGR Setup of Engineering Functions LOCK Panel Lock Security In the Panel Lock Off state viewing and adjustment access to all menus and functions is allowed. In the ON state, viewing all menus and functions is allowed, but changes are not allowed. This prevents unauthorized changes. Panel lock does not interfere with temperature measurement. Panel Lock can be controlled with an external RS485 device using the KL Command. Changes can be made using the RS 485 Interface or the Auxiliary Current Input (for Emissivity or E-Slope adjustment) when LOCK ON has been selected. The Password is fixed and cannot be changed. Navigate from TEMP display with & to ENGR then use & to LOCK Display Instructions Display and Limits LOCK Press ENT to view Panel Lock state, OFF or ON. Use Up / Down Arrows to enter numerical Password 751. Press ENT. Use Up / Down Arrows to turn Panel Lock OFF or ON. Press ENT to enter and save selection and return to TEMP display. OFF, ON, 0 to MODL Sensor Model Number The MODL function reports the Modline 5 Sensor Model Number as an eight character alphanumeric display. The Sensor Model number is explained in Section 2 Product Description, page 13. The Sensor series, temperature range, optical resolution, and Dirty Widow Detector and Laser Sight options are defined in the Model Number. This information is used during the selection and setup of various functions. Navigate from TEMP display with & to ENGR then use & to MODL Display Instructions Display and Limits MODL Press ENT to view Model. Use Up / Down Arrows to scroll forward and backward through model number shown in the display. Press ENT to return to TEMP display. Eight Alphanumeric Character Scroll XX-XXXXXX F/C Selection of Fahrenheit or Celsius Indication ( F or C) Modline 5 Sensors are specified and delivered in Celsius temperature ranges. The F/C function allows changing the temperature display to indicate in either Celsius or Fahrenheit. The conversion of the Sensor temperature span from Celsius to Fahrenheit follows the formula: F= (1.8 x Celsius) Example, a 600 C to 1400 C span converts to 1112 F to 2552 F. All outputs and function settings will be in the same units and correspond to the temperature range selected for display. The appropriate F or C indicator will be lit for temperature display and setup adjustments when applicable. 94 Rev. L4 12/2012 Modline 5
97 Operation After changing the Sensor operation from F to C, or C to F, fine-tuning of the parameters that are related to the F and C measuring units is required. These include: Analog output ZERO and FULL functions in the AOUT Menu; the DR peak picker decay rate and the RBEL reset below temperature functions in the Head Menu. Navigate from TEMP display with & to ENGR then use & to F/C Display Instructions Display and Limits F/C Press ENT to view ºF or ºC selection. Use Up / Down Arrows to change the setup. Press ENT to save and return to TEMP display. ºF or ºC RELY Alarm Relay Operation The RELY function configures the operation of the Modline 5 Alarm relay for Normally Open or Normally Closed operation. The Sensor internal relay contacts are available on the Black and Black/White twisted wire pair of the Sensor cable. The Alarm Relay contacts are used to report a Sensor alarm condition. The sensor self tests its case temperature, detector assembly temperature, output current flow, etc. The Check function checks internal circuit and detector operation. The optional Dirty Window Detector measures the Sensor s window condition. One or more out of limit conditions sensed by these tests triggers an Alarm. Set the relay operation to correspond to proper and safe use of the contacts in your overall measurement system. Select N C. for closed relay operation with Sensor not in Alarm condition (open in alarm state). Select N.O. for closed relay operation with Sensor in Alarm condition (open when not in alarm condition). Contacts are open for both N.O. and N.C. operation when the Sensor is not powered, and, for the 3 to 5 seconds after power is applied during the initiate period. Normally Closed N.C, operation is considered fail-safe operation. Navigate from TEMP display with & to ENGR then use & to RELY Display Instructions Display and Limits RELY Press ENT to view Alarm Relay Operation. Use Up / Down Arrows to select Normally Open, N.O., or Normally Closed, N.C. Press ENT to save and return to TEMP display. N.O. or N.C CHK Initiate Manual System Check for 52, 5G, 5R models The CHK and Auto Cal Hour functions are different for the Series 56 Models. Separate explanations and instructions are provided for Series 56 Models on the pages that follow. Modline 5 Rev. L4 12/
98 Operation Refer to the instructions for your Model! This function checks the Modline 5 Sensor performance by initiating a System Check. When this function is initiated, the Sensor s infrared detector output, internal gain and offset voltages are checked. The check cycle lasts less than ten seconds. During the Check, the Sensor TEMP display indicates CAL. The Alarm Led indicator and Alarm Relay remain at their last condition. Target temperature measurement is suspended. The Analog Output readings are not derived from real time temperature measurement during Check function. The Analog Output is held at its last output value. Peak Picker, Track and Hold and Response time functions are suspended. At the end of the cycle, operation returns to normal and temperature measurement resumes. If the Check does not pass, the ALARM Indicator on the Sensor rear panel will light. Press an Up/Down Arrow to view an Error Code on the Display. See Section 7 Maintenance, page 127, for information about alarms and error codes. Checks can be made manually or scheduled automatically with the HOUR function that follows. Process temperature measurement is interrupted for 5 to 10 seconds during the check period. After application of power, a warm-up time of approximately 5 to 15 minutes is required for the Sensor s infrared detector and/or electronics. The Sensor Rear Panel Alarm indicator will be lit and Error Code X104 (Detector Cold) displayed when the arrow is depressed. The instrument Check function should not be initiated until the Alarm indicator has turned off. An Out of Alarm (X102) may occur if initiated during warm-up. If a X102 Alarm occurs, repeat the Check after warm-up. On Sensors with firmware Versions 1.08 and higher, the Cal Check function will not operate during Sensor Alarms X107, X106, X105, X104, X103, X101. See Section 5.12 Out of Range Displays and Error Codes, page 112, for error code explanations. The Check should not be initiated when a single Alarm or multiple Alarms for Error Codes X103 (Detector block too hot), X104 (Detector block too cold), X105 (Internal case temperature too high), X106 (Internal case temperature too low) are active. Navigate from TEMP display with & to ENGR then use & to CHK Display Instructions Display and Limits CHK Press ENT to initiate Check. Sensor cycles through 10 second check and then returns to the TEMP display. CAL HOUR Automatic System Check for 52, 5G, 5R models Refer to the instructions for your Model! 96 Rev. L4 12/2012 Modline 5
99 Operation The CHK and Auto Cal Hour functions are different for the Series 56 Models. Separate explanations and instructions are provided for Series 56 Models on the pages that follow. The HOUR function provides for selection of an automatic System Check. This function automatically initiates the check described above. A selection of OFF or a time interval in hours between checks is offered. A manual Check from the Sensor Keyboard, as explained above, or by RS-485 Communication will start a new period, but not change the value of the interval. This will start a new interval. Process temperature measurement and control requirements need to be considered when using this automatic function. Real time process temperature measurement and signal conditioning is suspended for up to ten seconds. Continuous interval setting should be 8 hours or greater. A 168 hour, 1 week, (or greater) automatic interval and manually initiated checks are the recommendations that will provide minimal measurement interruption. Navigate from TEMP display with & to ENGR then use & to Hour Display Instructions Display and Limits HOUR Press ENT to view Automatic Check selection, OFF or numerical value representing hours between Checks. Use Up / Down Arrows to change selection and setting. See above recommendations. Press ENT to save and return to TEMP display. OFF or Value 1 to CHK Manual System Calibration for 56 Models This function checks a Model 56 Sensors performance by initiating a System Calibration Check. When this function is initiated, the Sensor s infrared detector signal, internal gain and offset voltages are checked. First, a flag is closed inside of the unit to block the optical path of the instrument. Operation of the Sensor is determined with no target in the field of view of the infrared detector. Second, a calibration source with a known radiance is activated inside the Sensor and the radiance is seen by the infrared detector. The response of the sensor electronics to the radiance is compared to an expected value. If the Calibrate Check determines a Model 56 Sensor requires recalibration, the sensor firmware performs a Self Calibration adjustment. Typically, only small changes in calibration will occur. During the Calibration Check, the Sensor Rear Panel TEMP display indicates CAL. The Alarm Led indicator and Alarm Relay remain at their last condition. Target temperature measurement is suspended. The Analog Output is held at its last output value. The Analog Output readings are not derived from real time temperature measurement during Calibration Check function. Peak Picker, Track and Hold and Response time functions are suspended. At the end of the cycle, operation returns to normal and real time temperature measurement resumes. Temperature indications may shift slightly upon return to normal operation. A Calibrate Check is required for to insure accurate operation of the Series 56 Sensors and should be Modline 5 Rev. L4 12/
100 Operation performed routinely, every 168 hours or less. The check can be initiated by any of the three methods described below. Upon Sensor Turn On If the Sensor has not been powered for 15 minutes or more, a Calibration Check will be performed after the unit is powered and warmed up and stabilized, approximately 15 to 20 minutes after powering on. Automatically A Calibrate Check can be initiated every 168 hours using the Sensor Auto Calibrate HOUR function. An OFF setting is also available. If the OFF is selected, Manual Calibrate Checks must be initiated every at least every 168 hours. Manually Initiate a Manual Calibrate Check using the Sensor Rear Panel Keypad or Modline 5 accessory. Accessories include the Model DPM Panel Meter, Model MSI multiple sensor interface, ModView software or an RS-485 communication command. Series 56 Manual and Automatic (HOUR Function) Initiated Calibration Check Summary Calibration Check Initiation Alarm Condition Display RS485 and 20mA Temperature Outputs Manually Initiated Calibration Check with Self Calibration, if required. It is not recommended to perform a Manual check more once than every 24 hours. Alarms Off Note 1 CAL (Sensor, ModView, DPM, MSI) Last Temperature reading held HOUR Parameter (168 Hours or OFF) User Selected Time Interval 168 hours only. (Factory default setting = 168) OFF User must perform Manual Cal every 168 hours or less. Alarms Off Note 1 CAL (Sensor, ModView, DPM, MSI) Last Temperature reading held The Calibrate Check function will not operate with Sensor Alarms X107, X106, X105, X104, X103, X101. A Detector Hot or Cold alarm must be off for at least 15 minutes before a Cal Check can be initiated. See Section 5.12 Out of Range Displays and Error Codes, page 112 for error code explanations. 98 Rev. L4 12/2012 Modline 5
101 Operation Series 56 Self Calibration at Power On or After Power Interruption of 15 minutes or longer Calibration Check Initiation Alarm Condition Temperature Display RS485 and 20mA Temperature Outputs Sensor is within Operating Temperature Range (0 to 55 C /32 to 131 F)) at Power On 15 minute warmup and Self Cal cycle time Detector Hot / Cold Alarms on Temperature is Displayed and provided at outputs but is not accurate until alarms are off and after Self Cal cycle At Power On: Sensor is outside Operating Temperature Range (0 to 55 C /32 to 131 F)) but in Storage Temperature range (-20 C to 0 C or 55 C to 65 C / -4 to 32 F or 131 to 149 F). Warm-up and Self Cal requires warm-up within Operating Temperature f Detector Hot / Cold Alarms on Temperature is Displayed and provided at outputs but is not accurate until alarms are off and after Self Cal cycle Power Interruption of less than 15 minutes Operation Power Interrupt (ON-OFF-On) Off Time Less Than 15 minutes Fifteen minute warm-up time starts on return to power on. Self Calibration is not Initiated Detector Hot / Cold Alarms on for 2 minutes Temperature is Displayed but may not be Accurate Accurate after 2 minutes Initiate a Manual Cal Check Navigate from TEMP display with & to ENGR then use & to CHK Display Instructions Display and Limits CHK Press ENT to initiate Calibration Check. Sensor cycles through Sensor Check and Self Calibration, if necessary, and then returns to the TEMP display. It is not recommended to perform a Manual check more once than every 24 hours CAL If the Check and Self Calibration does not pass, the ALARM Indicator on the Sensor rear panel will light. Press an Up/Down Arrow to view an Error Code on the Display. Multiple arrow entries may be required to view all error codes.. Error Code X102 is an Out of Calibration Alarm. See Section 7 Maintenance, page 127 for information about alarms and error codes HOUR Automatic Calibration Check for 56 Models Refer to the instructions for your Model! The HOUR function provides for selection of an automatic System Calibration Check and Self Calibration if needed. This function automatically initiates the calibration check described above. A Manual or power on Calibration Check will start a new period, but not change the value of the HOUR interval. Process temperature measurement and control requirements need to be considered when using this Modline 5 Rev. L4 12/
102 Operation automatic function. Real time process temperature measurement and signal conditioning are suspended for 15 seconds. RS485 and Current Loop Outputs are held at the last reading during the Self Calibration. Navigate from TEMP display with & to ENGR then use & to Hour Display Instructions Display and Limits HOUR Press ENT to view Automatic Calibration Check. Selection is a numerical value representing hours between a Check with Self Calibration. 168 hours only or OFF Press ENT to save and return to TEMP display. If OFF is selected, user must perform Manual Cal every 168 hours or less. Value in hours = 168 (Factory setting) or OFF WRNL Dirty Window Detector Option Warning Level The Dirty Window Detector Option is specified at the time the Sensor is ordered and must be factory installed. The WRNL function is only viewed on Sensors with the option. Select OFF, CORS or SENS. OFF turns the dirty window detection off. Coarse and sensitive Warning Levels select a greater (CORS) or lesser (SENS) amount of Sensor window transmission loss required to trigger an alarm. Navigate from TEMP display with & to ENGR then use & to WRNL Display Instructions Display and Limits WRNL Press ENT to view Dirty Window Detector Warning Level selection, OFF, SENS (Sensitive) or CORS (Coarse) Use Up / Down Arrows to select. Press ENT to save and return to TEMP display. OFF, CORS, SENS VER Sensor Firmware Version The VER function reports the Sensors installed firmware version. A four-digit numerical value is displayed. The version information is useful when discussing operation with factory personnel. The firmware cannot be updated in the field. Navigate from TEMP display with & to ENGR then use & to VER Display Instructions Display and Limits VER Press ENT to view Sensor Firmware Version. Press ENT to return to TEMP display. Numerical Value XX.XX ialm Selects Ratio Invalid Measurement Condition as an Alarm Selects the Ratio Unit Invalid Measurement Condition as an Alarm. Alarm and Invalid Condition selection sets both the Error Codes and Invalid Measurement Conditions to operate the Alarm rely and ALARM word on the Sensor rear panel. Invalid Measurement Conditions do not trigger the Alarm relay or the Alarm word with Error Code Alarms Only selected. 100 Rev. L4 12/2012 Modline 5
103 Operation Navigate from TEMP display with & to ENGR then use & to ialm Display Instructions Display and Limits ialm Press ENT to view Invalid Condition Alarm selection. OFF = Error Code Alarms only (includes the optional Dirty Window Detector alarms) ON = Error Code Alarms and Invalid Condition (INV and pinv) activated as Alarms. This function also turns on the Attenuation Alarm. Use Up / Down Arrows to select. Press ENT to save and return to TEMP display. OFF or ON ATTN Selects Attenuation Alarm Threshold Set the percent attenuation alarm threshold. Any attenuation greater than this value will turn on the alarm and also turn on the Dirty Window LED on the back panel. Setting this to 95 will turn this alarm off since that is the invalid threshold. The ialm must be set on in order to enable this alarm. Navigate from TEMP display with & to ENGR then use & to ATTN Display Instructions Display and Limits ATTN Press ENT to view Attenuation Threshold. Use Up / Down Arrows to select. Press ENT to save and return to TEMP display. 10% - 95% Background: With most two-color infrared thermometers, an invalid indication is reached when the reduction in signal from the target is greater than 95 percent. When the signal reduction is too great, an invalid condition occurs. This variation can be caused by emission characteristics of the target or the target being too small to completely resolve, as well as obstructions in the sight path (i.e., certain types of smoke). When an invalid condition occurs, an alarm output is provided to indicate the signal variation is too great between the two detectors. While this type of detection method is suitable for many applications, there are some instances where the user wants to adjust the sensitivity level of attenuation. The Modline 5 attenuation adjustment alarming feature operates independent from the optional dirty window detector, which will monitor the sensor window for contamination. It enables users to monitor any kind of signal attenuation caused by dirty viewports or other external windows. Attenuation alarm settings are configurable from 5 to 95 percent, from either the back panel of the sensing head or from the Ircon Modview program. When an alarm condition is detected, relay outputs provide notification to external process control instrumentation. When the attenuation adjustment alarming feature is enabled, the user can monitor attenuation levels in a graphical format in the Modview program providing a historical view of the levels. In addition, attenuation levels are available through the Modline 5 RS-485 output fed into an external device. 5.7 AOUT Setup of Analog Signal Output Current Range and Temperature Scaling Modline 5 Sensors provide selection of the analog output current range and scaling of the selected range to temperature. Scaling establishes a temperature span to correspond to the analog output Modline 5 Rev. L4 12/
104 Operation current range. The span can be equivalent to the Sensor s specified span or narrower. See Section 4 Sensor Wiring, page 62 for detailed information on analog output signals. This signal is available from the Blue and Blue/White twisted wire pair of the Sensor cable. See Section 4 Sensor Wiring, page 62 for wiring details. SOUT Analog Output Current Range Selection Modline 5 Sensors provide a selection of one of two analog output direct current ranges, 0 to 20 ma or 4 to 20 ma. This function selects the desired range. ZERO Analog Output Zero Scale Temperature Scaling This function sets a temperature to correspond to the selected Analog Output Current Range minimum value (0 or 4 ma). This temperature must be within the Sensor s specified temperature range and is limited to a maximum value equivalent to 10 F (-12.2 C) below the Sensor full scale temperature, or, 10 F (-12.2 C) below the adjusted Analog Output Full Scale temperature value (explained below). Minimum setting is the Sensor specified zero scale temperature. See notes after FULL explanation for ZERO FULL C operation and span setting information. FULL Analog Output Full Scale Temperature Scaling Sets a temperature to correspond to the Analog Output Current Range maximum value (20 ma). Temperature must be within the Sensor specified temperature range and is limited to a minimum value 10 F (-12.2 C) above the Sensor s specified zero scale temperature, or, 10F (-12.2 C) above the adjusted Analog Output Zero Scale temperature value (explained above). Maximum setting is the Sensor specified full scale temperature. For ZERO FULL span setting. F and C operation: The minimum 10 span is calculated by the Sensor in F. When using C units, the span will be less than 10 because the Sensor first calculates in F and then converts to C. The narrower equivalent C span is allowed. Spans more than 30 C (60 F) may be required to obtain acceptable results. Longer response times may be necessary for very narrow spans to smooth magnified temperature variations and noise Fatl Analog Output Operation for Sensor or Dirty Window Detector Malfunction Alarms Sets the Analog Output current to a specified value when unit is in one of two alarm conditions. A Sensor failure (Error Code X107) or Dirty Window Detector operation failure (Error Code X109) will trigger this alarm. Selectable range is from 0 ma to 24 ma A LO Analog Output Low Temperature Alarm Sets the Analog Output current value if the measured temperature is below the temperature that produces Analog Zero Scale Output as determined by the Analog Output Zero Scale Temperature Scaling explained above. Selectable range is 0 ma to 4 ma for the 4 to 20 ma current output range. If the current loop is set for 0 to 20 ma operation, the A LO function will not appear as a menu item. The analog output always goes to 0 ma if the measured temperature is below the Analog Output Zero Sale temperature. 102 Rev. L4 12/2012 Modline 5
105 Operation A HI Analog Output High Temperature Alarm Sets the Analog Output current value if the measured temperature is above the temperature that produces Analog Full Scale Output as determined by the Analog Output Full Scale Temperature Scaling explained above. Selectable range is 20.0 ma to 24.0 ma. Analog Output Settings Navigate from TEMP with & to AOUT then use & to SOUT or ZERO or FULL or Fatl or A-LO or A-HI Press ENT to save and return to TEMP display after each function. Display Instructions Display and Limits SOUT ZERO FULL Fatl A LO A HI Press ENT to view the SOUT output current range, 0 to 20 ma or 4 to 20 ma Use Up / Down Arrows to select output current range. Press ENT to view temperature corresponding to the selected Analog Output Current Range minimum value (0 or 4 ma) Use Up / Down Arrows to set Temperature within the Sensor temperature range and high limit shown. Press ENT to view Temperature Corresponding to the Analog Output Maximum value (20 ma) Use Up / Down Arrows to set Temperature within the Sensor temperature range and low limit shown. Press ENT to view the Analog Output selected ma current value. Use Up / Down Arrows to set the current value. This function does not appear if the SOUT selected range is 0 to 20 ma. Press ENT to view the Analog Output selected ma current value. Use Up / Down Arrows to set the current value. Press ENT to view the Analog Output selected ma current value. Use Up / Down Arrows to set the current value or 4-20 Temperature Value Maximum is 10 F below the selected FULL temperature (see below) See note above for C operation. Temperature Value Minimum is 10 F above the selected ZERO temperature (see above) See note above for C operation to to to COMM Setup of RS-485 Digital Communication Configuration The Modline 5 RS-485 Digital Communication interface permits interchange of ASCII coded information between the Modline 5 Sensor and a host computer, PLC (Programmable Logic Controller), or any other RS-485 device. The RS-485 data signal is transmitted on the Yellow and Yellow/White twisted wire pair of the Sensor s interconnecting cable. All communication is via half-duplex two wires. Refer to Section 6 Digital Communications, page 114 for the complete explanation of the RS-485 Digital Communications operation and commands CLCK Communications Lock Communications Lock provides for the configuration of the Modline 5 RS-485 Communications. Communication can be configured to allow selection and adjustment of functions in Read and Write Modline 5 Rev. L4 12/
106 Operation (R / W) operation, or in Read Only (R / O) operation. Read Only operation does not allow external RS- 485 devices to change settings in the Sensor. R / O operation still allows the unit to respond to the RS485 AC Automatic Calibrate Command to initiate a check (CHK) and the PR Peak Picker Reset Command to perform a reset ADDR Sets the Sensor Address The Unit Address is a one digit number or single letter code. It ranges from a single numeric 0 to 9 to an upper case A to Z. The Address factory-default setting is 0 (zero) BRAT Baud Rate The Sensor Baud Rate must match that of the other RS-485 device. Four baud rates are supported: 9600, 19200, 38400, and bits of information per second (Baud). The factory setting is 57.6K Baud LASR Laser Operation (Sensor Firmware Versions 1.08 and Higher) Selects Sensor Rear Panel or RS485 operation only or remote switch operation using the I IN or PkHd functions. See Section 5.11 Laser Sighting Operation, page 110. RS485 Communication Navigate from TEMP with & to COMM then use & to ADDR or BRAT or CLCK Press ENT to save and return to TEMP display after each function. Display Instructions Display and Limits CLCK ADDR BRAT LASR Press ENT to view Communications LOCK. Use Up / Down Arrows to select R / O (Read Only) or R / W (Read and Write) operation. Press ENT to view Sensor Address. Use Up / Down Arrows to set to one of thirty-six addresses. Press ENT to view baud rate. Use Up / Down Arrows to select 9600, 19.2K, 38.4K or 57.6K Baud. Press ENT to view Laser operation Selection. Use Up / Down Arrows to select R / O or R / W 0 to 9 and A to Z 9600 or 19.2K or 38.4K or 57.6K PANL or I IN or SWIT 5.9 HEAD Setup of Sensor Operating Functions The HEAD menus and functions set up the Modline 5 Sensor for process temperature measurement. The initial setup should follow the order given below. It is useful to perform the setup while the Sensor is sighted on the actual target, but not necessary. Preset of the function selections is possible and may be required if the access to the Sensor is not possible or safe conditions to perform adjustments do not exist R.T. Response Time The Modline 5 Sensor Response Time function provides signal filtering for meaningful temperature information while eliminating unwanted temperature variations. Refer to Section 8 Applications Guide, page 137 for Response Time Application Information. See section 2 Product Description, page 104 Rev. L4 12/2012 Modline 5
107 Operation 13 for Model specific response time information. If you determine that your Response Time must be greater than 30 seconds, it is recommend that you trial your process. Long Response Time settings are close approximations and may vary from the selected value. The Response Time selected affects the temperature signal input to Temperature Display, Analog Output, RS-485 Communications and the Peak Picker and Track and Hold signal conditioning functions. The Response Time setting for a Ratio Sensor in the two-color ratio mode takes effect under valid measurement conditions. Under Invalid measurement conditions, the Sensor response time is preset for a fast response regardless of the Response Time function setting. Navigate from TEMP display with & to Head then use & to R.T. Display Instructions Display and Limits R. T. Press ENT to view Response Time in Seconds. Use Up / Down Arrows to adjust Response Time. Press ENT to save and return to TEMP display to 60.0 Seconds for * 5R Ratio Sensors to 60.0 Seconds for Series 52 and 5G.006 = 6.6 milliseconds 0.02 to 60.0 seconds Model 56 Sensors* COLR Ratio Unit Operation Selection The COLR function sets the Modline 5 Ratio Sensor operation in the two color mode for ratio temperature measurement or in the single color mode for brightness temperature measurement. Navigate from TEMP display with & to Head then use & to COLR. Display Instructions Display and Limits COLR Press ENT to view Color Selection. Use Up / Down Arrows to select: 1 for single color brightness operation or 2 for two color ratio operation 1 or E-SL Ratio Unit Two Color Operation E-Slope Adjustment Ratio Sensors require the correct E-Slope value selection for measuring temperatures of both non-greybody and greybody/blackbody targets. To get a true measure of the temperature you must select the E-Slope values to match the material being measured. The value can be set in real time while viewing the process. The adjustable range for this function is to Determine the E-Slope value by referring to Section 8 Applications Guide, page 137 or other reliable source. Enter the proper E-Slope value in the E-SL function. If you change materials or if the material characteristics change, re-determine the E-Slope for the material and readjust the E-SL function if necessary. If you are viewing your target through a window, consider the effect of window transmission as described in Section 8 Applications Guide, page 137. Modline 5 Rev. L4 12/
108 Operation Navigate from TEMP display with & to Head then use & to E-SL. Display Instructions Display and Limits E-SL Press ENT to view E-Slope. Use Up / Down Arrows to adjust. Press ENT to save and return to TEMP display Remote E-Slope Current Input to You may make remote analog adjustments of the E-Slope value by sending a scaled input of 4 to 20 madc. This signal is inputted using the Orange and Orange/White twisted wire pair of the Sensor s interconnecting cable. The Modline 5 senses an input and the overrides any rear panel or RS-485 settings of E-Slope or Match. Wiring connection and scaling information are in Section 4 Sensor Wiring, page EMIS Emissivity Adjustment for Brightness Sensors Modline 5 brightness sensors and one color operation of ratio sensors require Emissivity adjustment for accurate temperature measurement. The Emissivity value is set to the characteristics of the material being measured using the EMIS function. Ratio sensors that are using the Attenuation Alarm feature will need to set the sensor to a single color mode, set the correct emissivity for the target, then set the sensor back to 2 color mode (When using the Attenuation Alarm feature, you must set the emissivity and also the e-slope for the sensor) 1. Determine the Emissivity value of your target by referring to the instructions in Section 8 Applications Guide, page Select the proper Emissivity value, from the Tables in Section 8 Applications Guide, page 137 for the surface finish. 3. The adjustable range of the Emissivity is to See Section 2.3 Model Configuration and Required Selections, page 15 for Emissivity restrictions. If the material changes characteristics or you change materials, re-determine the Emissivity for the new material and adjust the Emissivity value. If you are viewing your target through a window, consider the effect of window transmission loss as described in Section 8 Applications Guide, page 137. Navigate from TEMP display with & to Head then use & to EMIS. Display Instructions Display and Limits EMIS Press ENT to view Emissivity Value. Use Up / Down Arrows to adjust. Press ENT to save and return to TEMP display to Remote Emissivity Current Input You may make remote analog adjustments of the Emissivity value by sending a scaled input of 4 to 20 madc. This signal is inputted using the Orange and Orange/White twisted wire pair of the Sensor s interconnecting cable. The Modline 5 senses an input and overrides any rear panel or RS-485 settings of Emissivity or Match. Wiring connection and scaling information are in Section 4 Sensor Wiring, page MTCH E-Slope or Emissivity Selection Based on Temperature Match The MTCH function of the Modline 5 Sensor provides for adjusting the E-Slope or Emissivity values 106 Rev. L4 12/2012 Modline 5
109 Operation by setting and matching the Sensor s temperature display to the known temperature of a process target. The Match temperature should be set with a Sensor Response Time of 100 milliseconds or faster. Peak Picker or Track and Hold must be Off. The Match function should be set with stable process temperatures. After setting the Match temperature, the response time, Peak Picker and Track and Hold can be set to the values required for process temperature measurement. Navigate from TEMP display with & to Head then use & to MTCH. Display Instructions Display and Limits MTCH While viewing process target, Press ENT to view Match temperature. Use Up / Down Arrows to adjust to the known target temperature. Emissivity or E-Slope, if within allowed limits, will be automatically adjusted for a matching TEMP display. During the adjustment, the Response Time should be set to 100 milliseconds, or faster, and Peak Picker or Track and Hold signal conditioning set to Off. If the resulting Emissivity or E-Slope is not within allowed limits, the Match value cannot be inputted and ERR will be seen on the display after pressing ENT. Return to EMIS or E-SLP to view resulting value if desired. Temperature in ºC or ºF XXXX The MATCH function will not operate during Sensor Alarms X107, X106, X105, X104, X103, X101 or a CAL (CHK). See Section 5.12 Out of Range Displays and Error Codes, page 112, for error code explanations SIGL Signal Conditioning Selection The Modline 5 Sensor can provide Peak Picking or Track and Hold Signal Conditioning. The SIGL function sets the signal condition to Peak Picker, Track and Hold or Off. Peak Picker signal conditioning is used to obtain the peak measured temperature value and ignore momentary decreases in measured temperature. This eliminates erratic measurements due to gaps in work pieces, bursts of smoke, or steam, or other intermittent interferences in the sight path of the Sensor. Signal conditioning affects all displays and outputs. Track and Hold signal conditioning is used to track process temperature when required and then hold the temperature measurement at some point in time as determined by the process requirements. This eliminates erratic measurements due to process measurement delays or other undesired measurement periods. Peak Picker and the Track and Hold signal conditioning functions are explained in Section 8 Applications Guide, page 137. Peak Picker PSEL Functions Peak Picker Signal Conditioning selection activates the PSEL Peak Function menu. This menu is used to adjust Peak Picker functions necessary for obtaining the peak measured temperature value. These functions must be adjusted to match the process for proper operation. External Switch Control of Track and Hold Operation The Modline 5 has provisions for a remote process controlled input switch be wired to the Violet and Violet/White twisted wire pair of the Sensor s interconnecting cable. If Track and Hold signal conditioning is selected, the switch input is required to change from Track temperature operation (switch open) to Hold mode (switch closed) as required in the process system. Modline 5 Rev. L4 12/
110 Operation Wiring and switch operation for the Track and Hold feature are described in Section 4 Sensor Wiring, page 62. Navigate from TEMP display with & to Head then use & to SIGL. Display Instructions Display and Limits SIGL Use Up / Down Arrows to select OFF / PEAK / TRAK Note: Use external control switch to operate Track and Hold modes. Adjust PSEL Parameters if Peak Picker selected. Use external control switch for remote Peak Picker reset and operation. Press ENT to save and return to TEMP display. OFF = No Signal Conditioning TRAK = Track and Hold PEAK = Peak Picker 5.10 PSEL Peak Picker Functions The PSEL Functions are for Peak Picker Operation. Refer to Section 8 Applications Guide, page 137 for a description of Peak Picker signal conditioning operation including these functions D.R. Decay Rate Function The Decay Rate range is 0.00 to F or 0.00 to C per second depending on Fahrenheit or Celsius units selection. The Decay Rate must be set to retain peak measured temperature value and ignore momentary decreases in measured temperature caused by process conditions. The goal is to eliminate erratic measurements due to gaps in work pieces, bursts of smoke, or steam, etc. in the sight path of the Sensor while allowing the peaked value to decay down to lower process temperature values as they occur. Sensor Firmware Version Operation Summary Original Sensors with firmware versions less than 1.02 have unit-less degree units that range 0.00 to for both F and C units selection. The instructions provided on the next page are for Sensors with firmware versions 1.02 and higher. DPM Digital Panel Meter Interface firmware version operation: For DPM Interfaces with firmware versions 1.2 used with Sensor firmware version less than Sensor set for C, DPM will read, but not enter values higher than 166. Sensor can be set to 300. Sensor set for F, DPM and Sensor are compatible. For DPM Interfaces with firmware versions 1.1 used with Sensor firmware 1.02 and higher: Sensor set for C, DPM will read or enter values to 300. Sensor can be set to maximum. Sensor set for F, DPM and Sensor are compatible RSET Manual Peak Picker Reset Performs a manual Peak Picker reset. The Peak Picker Reset clears the stored peak information. The Sensor begins to measure temperature in the Peak Picker mode again after a manual reset External Switch For Remote Peak Picker Reset The Modline 5 has provisions for a remote process controlled input switch to be wired to the Violet and Violet/White twisted wire pair of the Sensor s interconnecting cable. If Peak Picker signal conditioning is selected, the remote switch can enable or disable the Peaking action. With no switch 108 Rev. L4 12/2012 Modline 5
111 Operation or the switch maintained in the open position, Peaking action is enabled. With the switch closed, peaking action is disabled and the Sensor continuously indicates actual temperature variations as they occur. A momentary closure of the switch resets the Peak Picker function to the current temperature reading. The peaking action begins again when the switch returns to the open position. Wiring and switch operation for the Peak Picker are described in Section 4 Sensor Wiring, page AUTO Auto Peak Picker Reset With Peak Picker On, the Auto Peak Picker Reset function will cause a Reset when the measured temperature matches or is below the selected Reset Below temperature. As long as the measured and displayed temperature remains below the selected temperature, the Peak Picker remains in reset condition and the Sensor continuously measures and indicates temperature without any peaking picking action. This function is affected by the Response Time function. It is possible for a long response time to delay a Reset triggered by the Reset Below temperature even though the target temperature has decreased RBEL Reset Below Temperature Automatic Peak Picker Reset must be on for this function to appear in the menu. Sets the Reset Below Temperature that causes Automatic Peak Picker Reset with the Peak Picker On and Auto Peak Picker Reset On. When the target temperature matches or is below the selected value, Automatic Peak Picker Reset will take place and the Sensor indicates temperature without any peaking action DEL Peak Picker Delay Peak Picker signal conditioning may be delayed. The Peak Picker Delay time is selectable in the range of 0.01 to seconds. Its primary use is with the Auto Peak Picker Reset and Reset Below Temperature functions. The Peak Picker Delay function is used to delay the start of the peaking action for up to 10 seconds following the detection of the leading edge of a new target. See Section 8 Applications Guide, page 137 for a detailed explanation. It has limited operation when used with Peak Picker signal conditioning without the Auto Peak Picker Reset function. It will provide the selected delay after any Peak Picker Reset. The reset can be from the Sensor rear panel, a reset from a momentary closure of the Peak Picker Reset external switch or a reset from the RS485 PR command. Modline 5 Rev. L4 12/
112 Operation Navigate from TEMP display with & to Head then use & to PSEL, then use & to D.R. or RSET or AUTO or RBEL or DEL. Press ENT to save and return to TEMP display after each function. Display Instructions Display and Limits PSEL D.R. RSET AUTO RBEL DEL Use Up / Down Arrows to select D.R. or RSET or AUTO or RBEL or DEL Then press ENT to view, select and adjust Function. Instructions for Sensors with firmware versions 1.02 and higher. Press ENT to view and then use UP / Down Arrows to adjust Decay Rate will is in degrees per second depending on the measuring units selected. Press ENT to trigger Manual Peak Picker Reset. Display will automatically return to TEMP. Press ENT to view. Use Up / Down Arrows to select Auto Peak Picker Reset operation ON or OFF Press ENT to view. Use Up / Down Arrows to set Reset Below Temperature within Sensor s specified temperature Range. Press ENT to view. Use Up / Down Arrows to Select Off or set Peak Picker Signal Conditioning Delay in seconds. D.R. or RSET or AUTO or RBEL or DEL 0.00 to ( C Sensor) Or 0.00 to ( F Sensor) ON, OFF Numerical Value XXXX Temperature in ºC or ºF OFF or 0.01 to Laser Sighting Operation The Laser Sighting Option is specified at the time the Sensor is ordered and must be factory installed. A pushbutton labeled LASER is supplied on the rear panel to energize the laser. The pushbutton is located in the center of the rear panel in place of the visible sight. Press the LASER pushbutton once to energize the laser, press the pushbutton once again to de-energize the laser. A red LED located above the pushbutton is illuminated when the laser is energized. The Laser also can be operated remotely using a switch. See Section 5.8 COMM Setup of RS-485 Digital Communication Configuration, page 103 for selecting remote switch operation. See next page for operating instructions. The Laser will not energize during the CHK or the MATCH function. In addition, if the Laser is energized and a manual (CHK function) or automatic (HOUR function) system check or MATCH Function is initiated, the Laser will turn off. Refer to Section Laser Sight, page 24. for information on using the Laser to aim and focus the Sensor. 110 Rev. L4 12/2012 Modline 5
113 Operation Before turning on the Laser remotely with the DPM Digital Panel Meter Interface or other devices using RS 485 Communications, or a remote switch, insure there are no personnel in the path of the beam. Display Instructions Display and Limits Manual Pushbutton Normal Rear Panel Operation. See next page for Remote Switch Operation: Under safe operating conditions, Momentarily depress LASER pushbutton to energize the Class 2 Laser. Press pushbutton again to de-energize. Laser will automatically turn off after 20 minutes if not deenergized. LED above LASER Button Lights Remote Laser Operation (Sensor Firmware Versions 1.08 and Higher) Remote operation is selected from the COMMS LASR Menu. The operation for PANL, I IN and SWIT modes of operation are explained below. COMM Menu LASR Mode Selection PANL Operation Sensor Rear Panel LASER Switch Energizes and turns Laser Off. RS-485 LS Command (ModView, DPM, MSI) Energizes and turns Laser Off. Peak/Hold Switch (Remote SPST Switch Required) Not Enabled for Laser Operation. I IN Current Input (Remote SPST Switch Required) Not Enabled for Laser Operation. I IN Remote Current Input Operation Can de-energize Laser anytime. Can Energize Laser. Condition Set One applies. Can de-energize Laser anytime. Can Energize Laser. Condition Set One applies. Not Enabled for Laser Operation in I IN mode. 15 madc input current (Switch Closed) energizes Laser. Current disconnected (Switch open) deenergizes laser. Condition Set One applies SWIT Remote Pk/Hd Switch Operation Can de-energize Laser anytime. Can Energize Laser. Condition Set Two applies. Can de-energize Laser anytime. Can Energize Laser. Condition Set Two applies. PkHd Switch operates Laser. Condition Set Two applies. Not Enabled for Laser Operation in SWIT mode Laser I IN Operation When Laser I IN operation is selected, remote current input of Emissivity and E-Slope is not operational. The required SPST switch can be an actual toggle or a press and hold type switch that Modline 5 Rev. L4 12/
114 Operation would de-energize the laser when released. See Section 4.9 Connecting Device Cables to POI Box or Terminal Strip Plate, page 73 for resistor, DC Voltage selection and circuit wiring. I IN Operation - Condition Set One 1.A If Sensor is powered up with I IN current applied (remote switch closed), the Laser will not operate until the remote switch is opened and then closed again. The Laser will only operate with switch closed. 1.B When the Laser is energized by closing the remote switch, the laser can be de-energized with a RS-485 Command, the Rear Panel Laser Switch or by disconnecting I IN current (remote switch open). If none of these occur, the Laser de-energizes after the 20 minute time out period. 1.C If Laser has been de-energized by a RS485 Command, the Rear Panel Laser Switch or the 20 minute timeout period, the I-In current must be disconnected (switch open) and re-applied (switch closed) to energize the Laser with the remote switch. However, the laser can be activated with the Sensor Rear Panel Laser switch or RS485 command without opening and closing the switch. 1.D The Laser can be energized by the Rear Panel Laser Switch or a RS485 command only when the remote switch is closed and condition 1A has been satisfied. PkHd Switch Operation When Laser PkHd switch operation is selected, remote switch Reset of the peak picker, and, the Track and Hold function are not operational. The SPST switch can be an actual toggle or a press and hold type switch which would de-energize the laser when released. The Peak Picker can be reset at the Sensor Rear or with a RS-485 command. Condition Set Two 2.A If Sensor is powered up with the PkHd switch closed, the Laser will not operate until the switch is opened and then closed again. Laser will only operate with PkHd switch closed. 2.B When the Laser is energized with a PkHd switch closure, the laser can be de-energized with the Rear Panel Laser Switch, a RS-485 Command, or by opening the PkHd switch. If none of these occur, the Laser de-energizes after the 20 minute time out period. 2.C If the Laser has been de-energized by a RS485 Command, the Rear Panel Laser Switch or the 20 minute timeout period, the PkHd switch must be opened then closed to energize the Laser with the PkHd switch. However, the laser can be activated with the Rear Panel or RS485 command without opening and closing the switch. 2.D The Laser can be energized by the Rear Panel Laser Switch or a RS485 command only when the PkHd switch is closed and condition 2.A has been met. PkHd Switch wiring. The switch is wired directly across the PkHd Switch terminals on the POI Power Supply/Signal Interface Box or the TSP Terminal Strip Plate. See Section 4.9 Connecting Device Cables to POI Box or Terminal Strip Plate, page 73 for switch wiring Out of Range Displays and Error Codes The Modline 5 displays word messages on its rear panel display to indicate Sensor diagnostic results. Below are explanations of the reported measurement status and error codes. 112 Rev. L4 12/2012 Modline 5
115 Operation Measurement status displays for Out of Range and Invalid measurement conditions are defined as follows: LOW HIGH INV Conditions do not allow measurement because the infrared temperature signal is too low. The target temperature is too low for the range of the Sensor. Conditions do not allow measurement because the infrared temperature signal is too high. The target temperature is too high for the range of the Sensor. Measurement Conditions are invalid for two color ratio temperature measurement. When the Invalid Alarm (ialm) function is set to ON, this measurement condition becomes an alarm and triggers the Alarm relay and the ALARM word on the Sensor rear panel. If INV is the only Alarm, pressing the pushbuttons will show no other Error Codes. The above conditions may relate to improper installation or adjustment of Sensor Functions. Avoid reflections from surrounding hot objects, unresolved targets, and obstructions in the Sensor s optical path. True temperature measurement is dependent on correct setting of Emissivity or E-Slope. Use of Pick Picker or Track and Hold signal conditioning may be necessary to capture temperature signals because of process interferences. The Rear Panel ALARM indicator signals an error as been detected. Press Up Arrow to view Error Codes. Press Up Arrow multiple times to view all simultaneous Error Codes. Error Codes for Sensor diagnostic information are summarized as follows: X101 X102 X103 X104 X105 X106 X107 X108 X109 pinv Dirty Window Detection Out of calibration Detector block too hot Detector block too cold Internal Case temperature too high Internal Case temperature too low Sensor failure. FAIL may be seen on the Sensor TEMP display Analog Output Current loop malfunction Dirty Window Detection malfunction pinv is only displayed when the Invalid Alarm (ialm) function is set to ON and Peak Picker or Track and Hold is On. This condition becomes an alarm and triggers the Alarm relay and the ALARM word on the Sensor rear panel. Temperature displayed is Peak Picked or Hold Mode Temperature values from prior valid measurement conditions. Environmental conditions can cause Sensor errors. High or low ambient temperatures can cause Sensor case temperature too high or too low errors. Dirty lens conditions can be avoided using air purging. Modline 5 Rev. L4 12/
116 Digital Communications See Section 7 Maintenance, page 127 for possible causes of problems and troubleshooting. Investigate all alarms indicated by the ALARM word indicator. Temperature readings on rear panel display, at Analog Output or from RS-485 Communications may be inaccurate with Error Codes X101 through X109 alarms. Ratio Temperature measurement conditions are invalid with INV and pinv alarms Summary The initial setup procedure is complete and the Sensor should provide accurate display of the process temperature. Auxiliary equipment connected to outputs will respond to the measured temperature. 1. The system should measure process temperatures viewed by the Sensor. Response to changes in temperature will depend on the Response Time, Peak Picker or Track and Hold Signal Conditioning Functions. 2. During start-up routines, observe measured temperature closely to insure proper measurement. If necessary, fine-tune Sensor operating functions. Refer to Section 8 Applications Guide, page 137 for applications and measurement information. 3. Allow the proper amount of time for the display to settle when making measurements. Settling time depends on the Response Time selected. Response time also affects the analog outputs and when the sensor is used as input to a closed loop control system consideration should be given to the effects of response time. 4. Investigate Alarms and Error Codes to determine if there are installation problems or Sensor malfunctions. 5. The Sensor rear screw on protective window must be in place during temperature measurement to maintain the NEMA 4 (IP65) Sensor housing rating and protect the keyboard and internal parts from contamination. 6 Digital Communications 6.1 RS-485 Digital Communications Introduction The MODLINE 5 Sensor permits RS-485 digital signal interchange of ASCII coded information with a host computer, PLC (Programmable Logic Controller), or any other RS-485 device. The external device can obtain information from the Sensor and modify Sensor settings. Be thoroughly familiar with operation of the sensor as explained in Section 5 Operation, page 90 of this manual! The Yellow and Yellow/White twisted wire pair of the standard Sensor interconnecting cable carries the signal.see Section 4 Sensor Wiring, page 62 of this manual for wiring, termination and use of extension cables Basic Operation The RS-485 Digital Communications interface allows an external device to communicate with the 114 Rev. L4 12/2012 Modline 5
117 Digital Communications Sensor by sending messages it can understand. Any messages the Sensor sends back will also be in its own language. The messages are based on a list of commands described in this section. Any values included in the messages are in decimal and bit mapped values. Whenever there is a need to change a Sensor parameter or to obtain information from the Sensor, the external device must send a properly coded and formatted message. If there is any error, the Sensor will ignore the message. In turn, when the Sensor transmits information back to your external device, the response message will be in the same standard message format. The external device must be able to interpret the response message. Command Codes are the part of the message that request work (change values, etc.) to be done by the Sensor. Commands that request work are Write commands. The same codes used Read commands request the Sensor to report the status of the work. Command Codes are listed later in this section. All except one of the command codes can be used as Read commands to obtain the current status of functions and readings. Many commands are Write compatible and are used to change settings. Read request command messages sent from the external RS-485 device cause the Sensor to automatically send back a status message. For example, if the external device (host/plc) sends a read command to the Sensor to report the Emissivity value, the Sensor sends a response message containing the current Emissivity setting. Write command messages sent by an external device include value or other information. These messages will cause a change of Sensor parameters. The Sensor replies with a status message. Note: Writing new values into the unit will cause it to stop updating the temperature the temperature for up to 200 milliseconds. 6.2 Sensor Rear Panel Setup for RS-485 Communication The following Sensor RS-485 Communication attributes must be correctly selected at the Sensor Rear Panel for communications to take place. RS-485 Commands for these functions are not provided. The instructions are in manual Section 5 Operation, page 90 for these functions CLCK Communications Lock Communications Lock provides for the configuration of the Modline 5 RS-485 Communications. Communication can be configured to allow selection and adjustment of functions for Read and Write (R / W) operation or Read Only (R / O) operation. Read Only operation causes write commands sent to the Sensor to be turned into Read Commands. R / O operation does allow the RS485 AC Automatic Calibrate Command to initiate a CHK and the PR Peak Picker Reset Command to perform a reset ADDR Sets the Sensor Address The Unit Address is a one digit number or single letter code. It ranges from a single numeric 0 to 9 to and upper case A to Z. The Address factory default setting is 0 (zero) BRAT Baud Rate The Sensor Baud Rate must match that of the other RS-485 device. Four baud rates are supported: 9600, 19200, 38400, and bits of information per second. Modline 5 Rev. L4 12/
118 Digital Communications 6.3 Communication Protocol Communication is half-duplex, two wire. The Sensor does not support simultaneous transmit and receive. Four baud rates are supported: 9600, 19200, 38400, and bits of information per second. All characters are ASCII 7 bits, even parity, 1 stop. Commands have a response. Another command should not be sent until a response has been completely received. There is a 1-millisecond minimum delay between receipt of command and response. The maximum delay is less than 200 milliseconds Command Message Format All command messages have the same format: <Start Bit> <Sensor Address> <Channel Number> <Command Code> [<Value>] <Carriage Return> Example: #A0CCXXXXX<CR> Where: Start Bit = # Sensor Address = A Channel Number = 0 Command Code = CC Value = XXXXX Carriage return = <CR> Always the pound sign character. A single alphanumeric character address of the Sensor, 0 to 9, A to Z 0 (zero) is the factory-default setting. The wild card address of? is accepted by the MODLINE 5 regardless of its set address. Do not use the? address if more than one Sensor is connected. Is always the 0 (zero) character. This one-digit entry value is not used in the MODLINE 5. SET to 0 (zero) for future use. Is one of the two alpha character command codes from the list below. All the commands are detailed below. Is the value included with a Write message and reported in the Sensor reply. The range of acceptable input value is given for each command code. If the value is omitted, execution of the instruction will return the present value of the parameter involved. If a value is included, execution of the instruction will store the specified value to in the Sensor s non-volatile memory. All messages are concluded with ASCII code CR, Enter on computer keyboard. 6.4 Command Codes Introduction The Command Codes allow operation and setup of the Modline 5 Sensor similar to the Rear Panel pushbuttons. Refer to the manual section referenced for configuration and operation information as directed for each code. The Command Codes have been separated into four categories as follows: Engineering Functions Analog Output Functions Head Functions Measurement Conditions and Alarms If the command is fully recognized, the command will be echoed back as #A0CCXXXXX<CR>, where XXXXX will be the value sent if the command sent parameters that changed something, or the 116 Rev. L4 12/2012 Modline 5
119 Digital Communications current setting, if no parameters were sent. If the parameters sent are out of range or otherwise not allowed, the current setting will be returned. The message format must be correct for the sensor to reply. If the #A0 is followed by any number of characters and a carriage return character is not received, the unit will not respond at all. If at least a fragment of the command is received, but the command code is not recognized, a response of #a0cc?huh? will be returned. 6.5 Engineering Function Command Codes KL Keyboard Lock (Read / Write) Locks or unlocks the Sensor s rear panel keyboard. When the keyboard is locked, all functions work and can be viewed, but not changed, at the Sensor. The keyboard can also be locked and unlocked from the Sensor rear panel. RS-485 Write commands are not locked out with this command. Range: 0 or 1 (0 = Unlocked; 1 = locked) MD Model Number (Read Only) Returns the Model number of the Sensor. Value: An eight character Model Number is returned. UN Units Select (Read / Write) See Section 5.6 ENGR Setup of Engineering Functions, page 94 for important information when changing units. Sets the temperature units the Sensor uses for measurement and display. Range: 0 to 1 (0 = Fahrenheit) (1 = Celsius) UZ Unit Zero Scale (Read Only) Returns the Sensor s zero scale temperature as defined its Model Number. An F or C is put on the end as appropriate. UF Unit Full Scale (Read Only) Returns the unit s full-scale temperature as defined by its Model Number. An F or C is put on the end as appropriate. AC Auto and Immediate Calibration Initiate (Read / Write) For 52, 5G, and 5R models. See next paragraph for Models begging with 56. See Section 5.5 Warm-up and Initial Setup, page 93. Sets the number of hours between Systems Checks. A manual Check from the Sensor Keyboard or by RS-485 Communication will start a new time period. Continuous interval setting should be 8 hours or greater. A 168 hour, 1 week, (or greater) automatic interval and manually initiated checks are the recommendations that will provide minimal measurement interruption. Range: 0 to 9999, A zero value disables this function. Values between 1 to 9999 sets the time period in hours. A value of (FFFF16) causes an immediate Check to occur without changing the previously set time period value. AC Auto and Immediate Calibration Initiate (Read / Write) For Models begging with 56. Series 56 Models include a Self Calibration feature performed as part of the power on routine. Explanation of this feature is provided in Section 5.5 Warm-up and Initial Setup, page 93, under the explanations for sensor parameters: CHK - (Models Beginning with 56) and HOUR - (Models Beginning with 56). Range: 0 or 168, Modline 5 Rev. L4 12/
120 Digital Communications A zero value disables this function (a Manual Initiation must be performed at least every 168 hours). A value of 168 sets the time period between calibration checks to 168 hours (Factory setting) A value of (FFFF16) causes an immediate Calibration to occur without changing the previously set time period value. This is equivalent to a Manual Calibration at the Sensor Rear Panel. RP Relay Polarity (Read / Write) Sets the polarity of the alarm relay. Set to 1 for fail safe operation. Contacts are held open with power off or power on and in the brief warm-up state for either polarity. Range: 0 or 1 (0 = N.O; to 1 = N.C.) DT Dirty Window Detector Warning Level (Read / Write) This command is available only with the Dirty Window Detector option. This command is the same as the Sensor Rear Panel WRNL. OFF turns the dirty window detection function off. Course and Sensitive Warning Levels select a greater (CORS) or lesser (SENS) amount of Sensor window transmission loss required to trigger a dirty window alarm. Range: 0 to 2 Message Value: 0 = Dirty Window Detection Alarm Off 1 = Sensitive (SENS) 2 = Coarse (CORS) SW Switch Input Status (Read Only) Command Returns the Sensor s external switch status (Peak Picker reset and Hold mode select). Range: 0 or 1 (0 = closed; 1 = open) BT Report Isoblock Temperature (Read Only) Returns the infrared detector isoblock temperature in C. Typical Value Range: 0 to 65 RC Instrument Temperature (Read Only) Returns the unit s internal case temperature in F or C. Range: N/A Expected value is within the Range: 0 to 65 C. VR Firmware Version (Read Only) The VR command returns the Sensor s firmware version number in the format: VV.RR. VV is the major version number, RR is the revision number. Range: N/A TP Controller Type (Read Only) Reserved for future use. Always returns zero. Range: Not Applicable LS Laser Control Command is available with Laser sighting option only. Turns the sighting laser on or off. Note that the laser has an automatic timeout of twenty minutes. Range: 0 or 1 Values: Turns on the laser (1) or turns off the laser (0). The Laser will not energize during the System Check. Also, if the Laser is energized and a manual (CHK function) or automatic (HOUR function) system check is initiated, the Laser will turn off. 118 Rev. L4 12/2012 Modline 5
121 Digital Communications Observe and follow cautions below and operating instructions in Section 5.11 Laser Sighting Operation, page 110 of this Modline 5 Manual. Before turning on the Laser remotely with the DPM Digital Panel Meter Interface or other devices using RS 485 Communications, insure there are no personnel in the path of the beam. FT Features Matrix (Read Only) Returns the features that this unit supports. Note: When bits 1 and 2 are not set, Sensor is 52 Series Brightness Unit. Range: N/A Bit Values: Two color detector (R-series) 0x LASER pointer 0x Dirty window detector 0x G-series 0x Transfer Standard 0x Unit is chopped 0x Unit has TEC 0x Ignoring LASER, DWD and Transfer Standard: 5R-series = 1 52-series = 0 5G-series = 8 56-series = 96 (60Hex) 57-series = 32 (20Hex) SN Sensor Unit Serial Number (Read Only) Range: N/A Message Value: Returns the serial number string of the unit. RR Alarm Operation (Read / Write) Command is only available with Series 5R ratio units. When this is turned on, it also enables the Attenuation alarm. AT Attenuation Alarm Threshold (Read / Write) Set the percent attenuation alarm threshold. Any attenuation greater than this value will turn on the alarm and also turn on the dirty window LED on the back panel. Setting this to 95 will turn this Modline 5 Rev. L4 12/
122 Digital Communications alarm off since that is the invalid threshold. The relay response (see command RR) must be set on in order to enable this alarm 6.6 Analog Output Function Command Codes AO Analog Output Current Range (Read / Write) Sets the Analog Output Current loop range to either 0 to 20 ma or 4-20 ma Range: 0 or 1 (0 = 4 to 20 ma; 1 = 0 to 20 ma) AZ Analog Zero Scale (Read / Write) Analog Zero Scale command specifies the measured temperature that will produce the Analog Output Zero Scale current. See Section 5.7 AOUT Setup of Analog Signal Output Current Range and Temperature Scaling, page 101 about minimum spans and F / C operation. Message Value Range: Sensor s zero scale temperature to 10 F below its full scale temperature. The Sensor s selected measurement units, F or C, are ignored in the Write command. Sensor Reply Returns with an F or C to show which units are selected. AF Analog Full Scale (Read / Write) Analog Full Scale command specifies the measured temperature that will produce the Analog Output full scale current. See Section 5.7 AOUT Setup of Analog Signal Output Current Range and Temperature Scaling, page 101 about minimum spans and F / C operation. Message Value Range: Sensor s zero scale temperature + 10 to its full scale temperature. The Sensor selected measurement units, F or C, are ignored in the Write command. Sensor Reply Returns with an F or C to indicate which units are selected. AA - Analog Output Alarm (Read / Write) Sets the Analog Output current to a specified value when unit is in any of two alarm conditions. A Sensor failure (Error Code X107) or Dirty Window Detector circuit failure (Error Code X109) will trigger this alarm. Scaled Message Value Range: 0 to 240 Actual Range 0.0 ma to 24.0 ma AL Analog Output Low Temperature (Read / Write) This command is used to set the value of the current loop output as an alarm if the measured temperature is below the scaled or default temperature that produces Analog Zero Scale Output current. Scaled Message Value Range: 0 to 40 Actual Range is 0.0 ma to 4.0 ma for the 4 to 20 ma current output range. If the current loop is set for 0 to 20 ma operation, the AL command setting is overridden and the analog output always goes to 0 ma if below zero scale temperature. AH Analog Output High Temperature (Read / Write) This command is used to set the value of the current loop output as an alarm if the measured temperature is above the scaled or default temperature that produces Analog Full Scale Output current. Scaled Message Value Range: Actual Range: 20.0 ma to 24.0 ma 120 Rev. L4 12/2012 Modline 5
123 Digital Communications 6.7 Head Function Command Codes CL Select Mode of Ratio Sensor Operation (Read / Write) Command is for 5R ratio units only. The CL command selects One Color or Two Color operation for a Series 5R ratio Sensor. Message Value Range: 1 or 2 (1 selects single color brightness mode; 2 selects two color ratio mode). RT - Response Time (Read / Write) Sets the Sensor Response Time. Scaled Message Value Range: 0 to 6000 (Scaled value = actual value times 100 above Sensor minimum Response Time limit) Range for Series 52 or 5G Sensors: 0 (Minimum) to 6000 (60 Seconds) (Zero = somewhat less than.006 second; Zero = not valid for 5R, 56 Sensors) Range for Series 5R Sensors: 10 (.01 second) minimum to 6000 (60 Seconds) Range for Series 56 Sensors: 20 (.02 second) minimum to 6000 (60 Seconds) ES E-Slope (Read / Write) Command is for 5R ratio units only. Sets the E-Slope for Ratio Sensors operating in the 2 color ratio mode. Function is not active for single color mode. If the Sensor s remote scaled E-Slope input current is active, the Sensor returns that setting ignoring any ES Write command or Rear Panel keyboard entry. Scaled Message Value Range: 800 to 1200 (Scaled value = actual value times 1000) Actual Range:.8 to 1.2 EM Emissivity (Read / Write) Sets Emissivity for single color units or Ratio units in 1 color mode. If the Sensor s remote scaled Emissivity input current is active, Sensor returns that setting ignoring any EM write command or Rear Panel keyboard entry. Scaled Message Value Range 100 to 1000 (Scaled value = actual value times 1000) Actual Range:.01 to 1.0 MT Match Temperature (Read / Write) Alternative method of selecting the value for Emissivity or E-Slope. The Write Message Value is the known temperature of the target the Sensor is measuring. The unit will change Emissivity (single color units) or E-Slope (two-color ratio units) to a value to that produces a displayed temperature equivalent to the target temperature. The Sensor returns the required Emissivity, or E- Slope value, if the result is in range. If the unit is unable to match the temperature then the return value is ERR. The Match temperature should be set with a Sensor Response Time of 100 milliseconds or faster. Peak Picker or Track and Hold must be Off. The Match function should be set with stable process temperatures. After setting the Match temperature, the Response Time, Peak Picker and Track and Hold can be set to the values required for process temperature measurement. Write Message Range: Unit s zero scale to full scale temperature Reply Message Value: Emissivity or E-Slope value or ERR TT Temperature (Read Only) Returns the temperature the unit is reading in the current units. An F or C is put on the end as appropriate. The temperature resolution is 1 F or C. Message Value Range: From the low end to the high end of the Sensor temperature range. Some special readings are: Modline 5 Rev. L4 12/
124 Digital Communications (800016) Sensor Failure (810016) Unit not warmed up (820016) Invalid (830016) Temperature too low, below Sensors range (840016) Temperature too high, above Sensor range TO Temperature Only (Read Only) (Sensor firmware Versions 1.07 and higher) Returns the temperature the unit is reading in the current units. An F or C is put on the end as appropriate. The temperature resolution is 1 F or C. Message Value Range: This command only reports values that are within the Sensors temperature range. Actual reported values are from approximately three degrees below the low end of the Sensor temperature range to approximately three degrees above the high end of the Sensor temperature range. Values below zero scale or above full scale are not accurate and should not be used. There are no special readings to indicate that the temperature is out of range (too high or too low) or invalid. Use the ST Status command to sense the temperature TO Value is under range (below the sensor zero scale temperature) or the TO value is over range (above the full scale temperature) or Invalid for ratio measurements. SG Signal Conditioning Usage (Read Only) Turns Peak Picker or Track and Hold on and off. Only one can be turned on at time. Range: 0 to 2 Message Values: 0 Peak picker and track & hold are both off. 1 Peak picker on. 2 Track & Hold on. PR - Peak Picker Reset (Write Only) This function is used to reset the Peak Picker. It is a write only command and no value is given. By sending the PR Command, with or without a message value, a Peak Picker reset is performed. Message Value Range: Not Applicable Actual value: Always returns #A0PR<CR>, where A =the sensor DR Peak Picker (Read / Write) Sets the peak picker decay rate. Zero (0) sets the unit to never decay. Otherwise decay is in selected measurement units, F or C. See Section D.R. Decay Rate Function, page 108 for more information. For Sensors with firmware versions 1.02 and higher Scaled Message Value Range: 0 to ( F per second times 100) Scaled Message Value Range: 0 to ( C per second times 100) Actual Value:.01 to ( F per second), except 0 which = Off Actual Value:.01 to ( C per second), except 0 which = Off Sensor Firmware Version Operation Summary Original Sensors with firmware versions less than 1.02 have unit-less degree units that range 0.00 to for both F and C units selection. For those Sensors, the following operation applies. Sets the peak picker decay rate. Zero (0) sets the unit to never decay. Otherwise decay is in F or C per second. 122 Rev. L4 12/2012 Modline 5
125 Digital Communications Scaled Message Value Range: 0 to ( F or C per second times 100). PS Peak Picker Auto Reset (Read / Write) Selects Peak Picker Auto Reset operation Scaled Message Value Range: 0 to 2 Actual Value:.0 to 2: Zero (0) Sets Auto Reset to Off: 1sets it to On. (2 is reserved for future use). PK Peak Picker Reset Below Temperature (Read / Write) Sets the temperature below which the peak picker signal conditioning is in reset or direct reading mode. Sensor is measuring temperature without peaking action in this mode. Function is used with Auto Peak Picker Reset. Message Value Range: Unit s Zero Scale Temperature to Unit s Full Scale Temperature ( F or C) PD - Peak Delay (Read / Write) Sets the delay time before Peak Picker action starts. Message Value Range: 0 to 1000 Zero (0) turns off any delay. Above 0, this is a scaled value. (Scaled input above 0 = actual value times 100). Actual Delay Range in Seconds: to 10 seconds. 6.8 Measurement Condition and Alarm Command Codes Introduction This section identifies measurement and alarm status commands and defines the reported errors and measurement conditions. TI TS Temperature, Status, and Attenuation (Read Only) Returns the temperature the unit is reading, followed by a comma, then the current status (see the ST command for details), another comma, and then the current attenuation percent (expressed as a number from 0 to 100) Range: N/A TS TS Temperature and Status (Read Only) Returns the temperature the unit is reading followed by a comma, and then either a 0 (no alarm conditions), or a number with the same format as the ST Command. Range: measured temperature in degrees C or F and to ST - System Alarm and Measurement Condition Status (Read Only) The Sensor returns a message indicating the current measurement condition status and the status of alarms. Range: Not Applicable Values: Bit mapped values for alarm and measurement status. Value Condition Equivalent Display or Error Code 0 None to Report None 1 Out of calibration Same as Error Code X102 2 Signal invalid (may not be set in Peak Picker mode) Invalid 1 Same as INV on rear panel 4 Case temperature too low Same as Error Code X106 8 Case temperature too high Same as Error Code X105 Modline 5 Rev. L4 12/
126 Digital Communications 16 Detector block cold Same as Error Code X Detector block hot Same as Error Code X Current loop fault Same as Error Code X Dirty window detection Same as Error Code X Sensor failure Same as Error Code X107 or FAIL on rear panel display 512 DWD failure Same as Error Code X Signal invalid (Always set regardless of Peak Picker mode). Measured Signal too low for ratio measurement, Displayed Temperature is Peak Picked or Hold mode Temperature Invalid 2 Same as Error Code pinv on rear panel display when Alarm button pushed 2048 RS485 Communications Lock RS485 Communications Locked out, In read only 4096 Temperature reading under range Same as LOW on rear panel TEMP display 8192 Temperature reading over range Same as HIGH on rear panel TEMP display Laser pointer is on Same as Laser LED on Sensor rear panel Unit under Cal test Same as CAL on rear panel TEMP display 124 Rev. L4 12/2012 Modline 5
127 Digital Communications 6.9 Command Code Summary Code Command Description AA Analog alarm output R/W Analog Out AC Auto cal time period (in hours) Type Group Notes AF Analog full scale R/W Analog Out AH AL Analog output high temperature alarm Analog output low temperature alarm Sets the Analog Output to a specified value when unit is in any of two alarm conditions. (Error Codes X107, X109). R/W Eng. Sets the number of hours between Automatic Checks or performs immediate check. R/W R/W Analog Out Analog Out Analog Full Scale command specifies the measured temperature that will produce the Analog Output full scale current. Sets alarm condition at the Analog Output if the measured temperature is above the value for Analog Full Scale Output. Sets alarm condition at the Analog Output if the measured temperature is below the value for Analog Zero Scale Output. Sets the Analog Output Current loop range to either 0 to 4 ma or 4-20 ma. AO Analog output mode R/W Analog Out AT Attenuation R/W Eng. Set the percentage value for the attenuation alarm threshold. Alarm threshold AZ analog zero scale R/W Analog Sets the measured temperature that produces the Analog Output Out Zero Scale current. BT CL Report Isoblock temperature Set to 1 or 2 color mode R/O Eng. Returns the infrared detector isoblock environment temperature in C. R/W Head Selects One Color or Two Color operation for a Series 5r ratio Sensor. DR Peak picker decay rate R/W Head Sets the peak picker decay rate in F or C. Zero (0) sets the unit to never decay. DT dirty window threshold R/W Eng. Dirty Window Detector Sensitivity Warning Setting EM Emissivity R/W Head Sets Emissivity for single color or ratio units in one color mode ES E slope R/W Head Sets the E-Slope for Ratio Sensors in the 2 color ratio mode FT Features Matrix R/O Eng. Returns bit values for the features the Sensor supports. KL Keyboard lock R/W Eng Locks or unlocks the Sensor s rear panel keyboard. LS Laser Control R/W Eng Turns the sighting laser on or off. MD Model R/O Eng Returns the Model number of the Sensor. MT Match Temp Display R/W Head Writes temperature value to be displayed to match target. Read replies Emissivity or E-Slope value PD Peak delay R/W Head Sets the delay time before Peak Picker action starts. PK peak picker reset below R/W Head Sets the temperature at which Peak Picker action starts with Auto Peak Picker Reset Function PR Peak and reset write Head Write Only Command, Resets the Peak Picker PS Peak picker auto reset R/W Head Selects Peak Picker Auto Reset operation RC Case temperature R/O Eng Returns Sensor s internal Case temperature. RP Relay polarity R/W Eng Sets the polarity of the alarm relay. RR Alarm Operation R/W Eng When this is turned on, it also enables the attenuation alarm. RT Response time R/W Head Sets the Sensor Response Time. SG Signal Conditioning R/W Head Turns Peak Picker or Track and Hold on or off. SN Serial Number R/O Eng. Returns the serial number string of the unit. ST System alarm status R/O Alarm Sensor returns bit mapped values for alarms and the current measurement condition status. Modline 5 Rev. L4 12/
128 Digital Communications Code Command Type Group Notes Description SW Switch input status R/O Head Returns the Sensor s external Peak Picker reset and Hold mode select switch status. TI Temperature, status and attenuation R/O Head Returns the temperature, current status and the current attenuation percentage. TO Temperature Only R/O Head Returns the temperature the unit is reading. No alarm or special values are reported for over range and under range conditions. TP Controller type R/O Eng. Reserved for future use. Always returns 0. TS Temperature and Status R/O Alarm. Returns the temperature the unit is reading and the Presence of an alarm. TT Temperature R/O Head Returns the temperature the unit is reading in the current units (F or C) Special bit mapping messages for measurement status. UF Unit full scale R/O Eng. Returns unit s full-scale temperature as defined by Model No. UN Units select R/W Eng. Sets the units the Sensor uses for measurement (F or C). UZ Unit zero scale R/O Eng. Returns Sensor s zero scale temperature as defined Model No. VR Firmware version R/O Eng. Returns the Sensor s firmware version number 126 Rev. L4 12/2012 Modline 5
129 Maintenance 7 Maintenance 7.1 Routine Maintenance Maintenance Checklist The Modline 5 Sensor is a precision temperature measuring instrument built for rugged service and ease of operation. When installed and maintained with reasonable care, it will give you reliable service in a wide variety of applications. Routine Maintenance is essential for reliable, trouble-free operation. It consists of a thorough inspection at regular intervals to keep the instrument working efficiently and to head off problems before they occur. Most service problems are caused by incorrect function setup, improper Sensor sighting and focusing, dirty optics, and over heating of the sensor and other conditions that can be found and corrected by a maintenance program. The following checklist will help you develop a maintenance routine suitable for your installation: Perform Sensor Check (CHK) as instructed under Engineering functions menu for Sensor setup in Section 5 Operation, page 90. Check Sensor function settings. A record of the correct settings for process being measured should be made. Check Sensor for proper alignment and focus. Make sure there are no obstructions in the optical path between Sensor and target. Process viewing windows should be clean. Check Sensor lens and clean if necessary. Refer to cleaning instructions below. Make sure Sensor is not overheated. If water cooling and/or air purge accessories are used, make sure there is adequate flow of cooling water and clean, dry air. Check Sensor interconnecting cable for any signs of mechanical damage or overheating. Make sure all connections are secure. 7.2 Sensor Optics Cleaning Inspect the standard Sensor lens or the front window and mirror on the Sensor with the Dirty Window Detector option on a routine schedule. Clean these optics of any dust or residue that may have accumulated. If this requires removing the Sensor from its mounting, make sure you note the mounting alignment and lens focus position so you will be able to restore the Sensor to its correct operating position. Always verify focusing as instructed in Section 3 Sensor Installation, page 22. If the Sensor includes the Laser aiming option, see the Laser option cautions on Section 2.3 Model Configuration and Required Selections, page 15 and Section 5 Operation, page 90. Protect the Sensor interconnecting cable plug pins from liquids and dirt if disconnected from the Sensor. Clean the front surface of the lens, or window and mirror as often as necessary. The frequency of the lens cleaning will depend on the environment at the point of installation. Air purging will reduce the necessity of frequent cleaning in dusty, dirty areas. Modline 5 Rev. L4 12/

130 Maintenance Treat the Modline 5 Sensor optics with care. Scratches or harmful solvents can destroy the lens or the Dirty Window Detector window and mirror. Lenses may be slightly soluble in water and other liquids. Do not soak any lens in water or any other liquid for long periods of time. Sensor with DWD Mirror and Window Standard Sensor Lens Cleaning the Optics Figure 85: Sensor optics Clean the front surface of the Standard lens, or Sensor with DWD window and mirror as often as necessary. Use a soft dry cotton cloth or swab moistened with laboratory grade isopropyl alcohol. Wipe gently to remove residue. Inspect and re-wipe as necessary to remove any film Restoring the Sensor to Operation Always re-install the Sensor in its original position. Always verify focusing as instructed in section 3 Sensor Installation, page 22. Lock the lens by tightening the lens locking screw on the bottom of the unit with your fingers and thumb. Never use a tool. Place the rear protection window on the back of the Sensor and perform any operational checks that may be necessary to make sure the instrument is functioning properly. Rear Focusing Section Lens Lock Thumb Screw Do Not Use Tools Cable Connection, Match Red Dots Rear Protection Window Figure Rev. L4 12/2012 Modline 5
131 Maintenance For Modline 56 sensors: occasionally, a calibration flag that operates during the Sensor internal Calibrate test may move into the viewing area during shipment. If this occurs, the viewing area will be dark and appear obstructed. This flag will be positioned correctly when power is applied to the Sensor. The Modline 5 Sensor with Laser sighting option is a Class II Laser product. When restoring a Sensor with this option back to service, follow the Cautions outlined below and the operating instructions in Section 5.11 Laser Sighting Operation, page 110 of this manual. Before turning on the Laser remotely with the DPM Digital Panel Meter Interface or other devices using RS 485 Communications, insure there are no personnel in the path of the beam. 7.3 Servicing There are no user adjustable controls or serviceable parts within the Sensor Housing. Units must be returned to the factory for calibration and adjustments. Do not disassemble the unit! 7.4 Factory Calibration and Service Instruments are calibrated against precision laboratory standards and are "burned in" for before shipment to ensure accurate temperature measurements throughout the operating range. To preserve this accuracy, each instrument should be recalibrated periodically on a Blackbody standard. We recommend recalibration of this type on a yearly basis. There are the following methods of calibrating IRCON Modline 5 units: You can have your instruments calibrated at our Service Center. An available option is calibration traceable to the National Institute of Standards and Technology (NIST). Field Service Agreements geared to your requirements are also available. Options include periodic maintenance (with provisions for guaranteed emergency service rates) and field maintenance with emergency service and parts replacement. Using the Modview Calibration software (not available for M56). This software is for sale and allows you to calibrate the Modline 52, 5G, and 5R as long as the calibration does not require a change of more than 30% of the range. You basically need a black body and while the instrument is aimed at the black body you allow the software to set the calibration of the Modline 5 Rev. L4 12/
132 Maintenance instrument. You only do one set point with the software but you can make as many checks as you want. The fourth method is to use a sensor that is titled a transfer standard. This is a Modline 5, usually the same model as the customers equipment and it is specially calibrated at 10 specific points on the temperature scale of the instrument. A NIST certificate of calibration is furnished with the instrument. With the transfer standard you also get the Modview calibration software. You aim the transfer standard at the black body and read and record the temperature that is indicated on the transfer standard. By using the transfer standard you eliminate any potential errors that may have occurred in the black body such as a defective thermocouple or an inaccurate cavity. Next, you take the instrument to be calibrated and aim it at the black body and with the software install the corrected calibration temperature. Again it is a one point calibration but you can check as many points as you want to insure the best accuracy. 7.5 Measurement Condition Displays, Error Codes and Troubleshooting The Modline 5 displays word messages on its rear panel display to indicate Sensor diagnostic results. Below are explanations of the reported measurement status and error codes. Measurement status displays for Out of Range and Invalid measurement conditions are defined as follows LOW. HIGH INV Conditions do not allow measurement because the infrared temperature signal is too low. The target temperature is too low for the range of the Sensor. Conditions do not allow measurement because the infrared temperature signal is too high. The target temperature is too high for the range of the Sensor. Measurement Conditions are invalid for two color ratio temperature measurement. When the Invalid Alarm (ialm) function is set to ON, this measurement condition becomes an alarm and triggers the Alarm relay and the ALARM word on the Sensor rear panel. If INV is the only Alarm, pressing the pushbuttons will show no other Error Codes. The above conditions may relate to improper installation or adjustment of Sensor Functions. Avoid reflections from surrounding hot objects, unresolved targets, and obstructions in the Sensor s optical path. True temperature measurement is dependent on correct setting of Emissivity or E-Slope. Use of Pick Picker or Track and Hold signal conditioning may be necessary to capture temperature signals because of process interferences. The Rear Panel ALARM indicator signals an error as been detected. Press Up Arrow to view Error Codes. Press Up Arrow multiple times to view all simultaneous Error Codes. 130 Rev. L4 12/2012 Modline 5
133 Maintenance Error Codes for Sensor diagnostic information are summarized as follows: X101 X102 X103 X104 X105 X106 X107 X108 X109 pinv Dirty Window Detection (or attenuation alarm if using a 5R series with the Attenuation Alarm turned on) Out of calibration Detector block too hot Detector block too cold Sensor internal Case temperature too high Sensor internal case temperature too low Sensor failure: FAIL may be seen on the Sensor TEMP display Analog Output Current loop malfunction (open circuit) Dirty Window Detection malfunction pinv is only displayed when the Invalid Alarm (ialm) function is set to ON and Peak Picker or Track and Hold is On. This condition becomes an alarm and triggers the Alarm relay and the ALARM word on the Sensor rear panel. Temperature displayed is Peak Picked or Hold Mode Temperature values from prior valid measurement conditions. Environmental conditions can cause Sensor errors. High or low ambient temperatures can cause Sensor case temperature too high or too low errors. Dirty lens conditions can be avoided using air purging. Investigate all alarms indicated by the ALARM word indicator. Temperature readings on rear panel display, at Analog Output or from RS-485 Communications may be inaccurate with Error Codes X101 through X109 alarms. Ratio Temperature measurement conditions are invalid with INV and pinv alarms. Modline 5 Rev. L4 12/
134 Maintenance 7.6 Status Displays and Error Code Details Status Display The temperature display is LOW or HIGH Is the Emissivity or E-Slope setting correct? Is the field of view blocked? Are reflections or background energy causing high readings? For Sensor Series 5R Temperature Display is INV Note: ialm must be set to ON for this Alarm condition to be displayed on Sensor rear panel and for the Alarm Relay to operate. For Sensor Series 5R Alarm condition is pinv Note: ialm must be set to ON for this Alarm condition to be displayed on Sensor rear panel and the Alarm Relay operate. Error Code Details The display shows LOW when the measured temperature is below the Sensor Zero Scale Temperature by a few degrees. The display shows HIGH when the measured temperature is above the Sensor Full Scale value by a few degrees. The display remains LOW or HGH as long as the measured temperature is out-of-range. This is an Invalid Alarm display. The process measurement conditions are invalid. The infrared energy reaching the Sensor is too low to provide reliable temperature measurement. This is an Invalid Alarm with the Peak Picker On. It is displayed, if the infrared energy reaching the Sensor is too low to provide reliable temperature measurements. Displayed temperature readings are peaked values or hold values from Peak Picker or Track and Hold signal conditioning. 132 Rev. L4 12/2012 Modline 5
135 Maintenance Status Display Error Code X101 Dirty Window Detected Error Code X102 Out of calibration (M56) Do not Initiate a Calibration Check during warm-up. See Section 5.5 Warm-up and Initial Setup, page 93, for M52, 5G, and 5R models. Error Code X103 Detector block too hot Error Code X104 Detector block too cold Note: This Error Code is normal during Sensor warm-up. Warm-up typically lasts from just a few minutes to 15 minutes. Error Code X105 Case temperature too high Error Code Details Dirty front Sensor optics detected. Clean Sensor front window and mirror. This will only be seen on Sensors with the Dirty Window Detector Option Calibration check has sensed Sensor out of calibration condition Note: An out of calibration error may be encountered if the Sensor temperature is too high or too low. Do not calibrate when an Alarms for error codes X103, X104, X105, X106 exist. Caution: Any temperature readings at Analog Output or from RS- 485 Communications must be considered inaccurate Check Sensor Calibration on a Blackbody Standard Detector Temperature is too high. Check ambient temperature (55 C maximum) and Sensor internal case temperature using the RS485 RC Command or with a temperature measuring device such as a fine thermocouple. If these temperatures are okay and alarm continues Sensor may have a malfunction. Caution: Any temperature readings on rear panel display, at Analog Output or from RS-485 Communications may be inaccurate. Detector Temperature is too low Check ambient temperature (0 C minimum) and Sensor internal case temperature using the RS485 RC Command or with a temperature measuring device such as a thermocouple. If these temperatures are okay and alarm continue, check the 24VDC supply voltage. Sensor may have a long warm-up time if the voltage not within 5%. If the power supply is remotely installed, insure the voltage drop across power supply wires is not causing a low voltage level at the Sensor. Caution: Any temperature readings on rear panel display, at Analog Output or from RS-485 Communications may be inaccurate. Sensor case temperature is below is above specification. Check ambient temperature (55 C maximum) and Sensor internal case temperature using the RS485 RC Command or with a temperature measuring device such as a thermocouple. If these temperatures are okay and alarm continues Sensor may have a malfunction. Caution: Any temperature readings on rear panel display, at Analog Output or from RS-485 Communications may be inaccurate Modline 5 Rev. L4 12/
136 Maintenance Status Display Error Code X106 Case temperature too low Error Code X107 Sensor failure FAIL may be seen on the Sensor TEMP display. Error Code X108 Analog Output Current loop malfunction. Analog Output current not correct value Caution: Inaccurate temperature readings may be displayed or used by external devices connected to Analog Output. Error Code X109 Malfunction of Sensor Dirty Window Detection. Error Code Details Sensor case temperature is below is below specification. Check ambient temperature and Sensor internal case temperature using the RS485 RC Command or with a temperature measuring device such as a thermocouple. If these temperatures are okay and alarm continues Sensor may have a malfunction. Caution: Any temperature readings on rear panel display, at Analog Output or from RS-485 Communications may be inaccurate Serious problem with Sensor operation exists Caution: Any temperature readings at Analog Output or from RS- 485 Communications must be considered inaccurate. Replace Sensor Sensor has sensed external analog output current flow is not accurate. Note: this Error Code only will be seen for errors detected when output current is greater than 0 ma. Connected devices should have differential inputs; neither input terminal should be grounded. Check cables and external devices. See symptom number three in Troubleshooting Table below. If analog output is not used, place a jumper wire across the output terminals to prevent the X108 alarm from occurring. Dirty Window circuit operation malfunction. Replace Sensor 134 Rev. L4 12/2012 Modline 5
137 Maintenance Troubleshooting If troubles develop in the initial installation or after periods of normal operation, these troubleshooting suggestions may help to identify certain trouble symptoms and possibly correct the problem. If trouble persists, call or contact IRCON Technical Services for help. Symptom Symptom Number One: Completely inoperative No display of any kind. No RS-485 Communications No Analog Output Symptom Number Two: Incorrect Temperature Indications No temperature indication or incorrect temperature indication. (Target temperature known to be within system temperature range.) Under-range (LOW) or Over-range (HIGH) indication displayed. For Sensor Series 5R Ratio series instruments. Invalid (INV or pinv) indication displayed. Symptom Number Three: No Analog Output, or incorrect Output Accurate temperature displayed on rear panel. RS-485 Communications temperature output okay. Possible Cause / Corrective Action 1. Check 24 Vdc Sensor power supply 2. Check AC line voltage supply connections on power supply 3. Check any line fuse, switch or circuit breaker for power supply. 4. Inspect interconnecting cable and connections for damage. Replace Cable if problem found. 5. Replace Sensor. 1. Sensor warmed up. See Section 5.5 Warm-up and Initial Setup, page Check Sensor sighting and focusing. Is target resolved? 3. Check for obstruction in sight path. 4. Check for background interference (reflections) causing high temperature readings. 5. Check lens and clean if necessary. (If system includes window or mirror, check and clean.) 6. Check ambient temperature of Sensor. If water cooling is used, make sure coolant is flowing at recommended rate. 7. Check all control settings, particularly Emissivity or E-Slope for Series 8. Perform Calibration Check. (M56) 1. Check wiring between the analog output terminals and external devices. 2. Device inputs should be differential type and not grounded. 3. Make sure device is connected and adjusted correctly, and is compatible with Modline 5 specifications. 4. Check grounding of external devices. Improper grounding could prevent proper signals at external devices. 5. Check Analog output Zero and Full Scale Adjustment. 6. Check F / C measurement units selection of Sensor and external device to make sure they are compatible. 7. Series resistance of all devices and cable pairs on Analog Output should not exceed 600 Ohms. Modline 5 Rev. L4 12/
138 Maintenance Symptom Symptom Number Four Erratic temperature display and outputs. Target and measurement conditions unknown. Actual temperature variations may sensed. Symptom Number Five Erratic display and outputs. Target temperature and measurement conditions known to be stable No Invalid Measurement Condition Alarm Cannot adjust or select functions at the Sensor rear panel. RS-485 Communications problems Laser will not energize Peak Picker signal conditioning not functioning Peak Picker Delay not operating Can not adjust AOUT ZERO or FULL Scale Possible Cause / Corrective Action 1. Check for recurrent interruptions in sight path e.g. bursts of smoke or steam, moving equipment. 2. Use air purge to clear some obstructions, If using air purge check air flow and operation 3. Vary the Response Time to see if the symptom changes. 4. Use Peak Picker signal conditioning with suitable decay rate. 5. Use Track and Hold signal conditioning. 1. Check Sensor cable connections. Also, check the signal cable shield connection at the Grounded Strain Relief Fitting. 2. Check for proper grounding of all system components. 3. Check cable routing. Signal cables must not run in the same conduit as noisy power lines or power lines with transients. 4. Check ambient temperature of Sensor Add water cooling and/or heat shielding to Sensor, if necessary. 1. Check ialm function under Engineering Menu. 1. Check Panel Lock function in Engineering Menu. 1. Check Communications Lock setting in COMMS Menu. Selections are Read Only and Read / Write. 2. Check Baud Rate setting in COMMS Menu. 3. Check Address setting in COMMS Menu. 1. Laser will not energize when CAL function is operating or initiated 1. Check if the Auto Peak Picker Reset is On. If ON, evaluate the Reset Below Temperature settings. Peak Picker may be Auto reset with Reset Below temperature too low 1. Peak Picker Delay only operates after a Peak Picker Reset or after the first temperature indication displayed after an Invalid (INV) condition or below Sensor temperature range (LOW) condition. 2. Delay timing starts immediately after the reset or the Invalid or LOW condition. 1. Check both ZERO and FULL settings. Minimum 10 F span is required (or equivalent C span values) 136 Rev. L4 12/2012 Modline 5
139 Applications Guide 8 Applications Guide 8.1 Introduction This section offers guidelines to assure measurement accuracy and reliability. Although it is impossible to cover every application in detail, the general information provided can be adapted to most situations. If you run into other situations that may cause problems, consult the IRCON Applications Engineering Department. 8.2 Analog Outputs All Modline 5 Sensors provide an analog current signal output of 0 to 20 madc or 4 to 20 madc. The output range is selected using the Sensors rear panel AOUT and SOUT function menus or RS-485 Digital Communications command codes. This current output will drive remote current meters, recorders and other devices calibrated to read dc milliamps and scaled to convert the analog signals to temperature. Multiple devices (Loads) can be connected in a series current loop configuration. The maximum series resistance that can be connected in the loop is 600 Ohms. This maximum includes the resistance of all devices and cables. See Figure 87. The minus side of the Analog Output is connected to power supply common (See Section 4.12 RS-485 Multi-Drop Network Power Supply and System Wiring, page 82 of this manual about Sensor Grounding). Use instruments with ungrounded differential inputs. If instruments with grounded inputs are connected in the loop, the output may be inoperable or inaccurate. If the Analog output is not used, insert a jumper wire across the output terminals. This will prevent an Analog Loop malfunction (open circuit) Alarm (Error X108) from occurring. The current signal varies linearly with the measured temperature. There are several schemes for temperature scaling these outputs current. The standard scaling is when the output zero scale current and full scale current is scaled to equal the Sensor s zero scale and full temperatures. Alternate temperature scaling can be accomplished using the Sensor s AOUT Main Menu the ZERO and FULL functions. See Section 5 Operation, page 90 of this manual for instructions. The paragraphs and diagram below provide further explanation. The ZERO function sets a temperature to correspond to the selected Analog Output Current Range minimum value (0 or 4 ma). This temperature must be within the Sensor s specified temperature range and is limited to a maximum value 10 below the Sensor s specified full scale temperature. Minimum setting is the Sensors specified zero scale temperature. The FULL Sets a temperature to correspond to the Analog Output Current Range maximum value (20 ma). Temperature must be within the Sensor specified temperature range and is limited to a minimum value 10 above the Sensors specified zero scale temperature. Maximum setting is the Sensor s specified full scale temperature. Modline 5 Rev. L4 12/
140 Applications Guide SENSOR LOAD(S) 600 Ohm Maximum Current Loop Resistance) Figure 87: Analog Output Configuration Analog Output Range Scaling Example The Sensor temperature range example shown in Figure 88 is 500 degrees to 2500 degrees. The minimum analog output, at 0 or 4 milliamps as selected, can be set to equal the Sensor s 500 degree zero scale temperature or to an alternate value, such as the 1000 degrees illustrated in the figure. The maximum analog output, 20 milliamps, can be set to equal the Sensor s 2500 degree full scale temperature or to an alternate value, such as the 1800 degrees illustrated in the figure. When scaled to equal the Sensor s complete range, the analog current output corresponds to a 500 to 2500 degree range and a temperature span of 2000 degrees. With the alternate temperature scaling, the analog current output corresponds to a 1000 to 1800 degree range and a temperature span of 1000 degrees. A minimum 10 degree F (6 degree C) span between zero scale and full scale is required. Sensor temperature span = 2000 Scaled analog output zero scale Scaled analog output full scale Figure 88: Analog Output Scaling Measured Temperature Calculations An analog current signal output of 0 to 20 ma provides a full 20 ma current span. The 4 to 20 ma output provides a 16 ma current span. To convert the output current to temperature, you must know the current output span and corresponding temperature span to calculate the resultant temperature. 138 Rev. L4 12/2012 Modline 5
141 Applications Guide Zero current output (0 or 4 ma), as selected, equals the corresponding zero scale temperature. A 20 ma reading corresponds to the full scale temperature. Since the output current varies linearly with temperature, equal increments in current will provide equal increments in temperature between these range limits. Expressed as a formula for the 4-20 ma analog output is: TIND = ( ( (I 4) / 16) X (TF.S. TZ.S.)) + TZ.S. Expressed as a formula for the 0-20 ma analog output is: TIND = ( (I / 20) X (TF.S. TZ.S.) ) + TZ.S. Where I is the current loop output in milliamps, TF.S. is the corresponding full scale temperature and TZ.S. is the Zero Scale Temperature, Example: For a 4-20 ma analog output, with a 16 ma span, corresponding to the 500 to 2500 degree range and an output current of 8 ma: TIND = ( ( (8 4) / 16 ) X ( ) ) = 1000 degrees Example: For a 0-20 ma analog output, with a 20 ma span, corresponding to the 800 to 1800 degree range and an output current of 8 ma: TIND = ( (8 / 20 ) X ( ) ) = 1200 degrees Analog Output Operation Notes 1. The Analog Signal Output is affected by the selected Response Time Value and by any Peak Picker or Track and Hold signal conditioning selections. 2. Three Analog Output related alarm functions can be used to set the Analog Current Output to a specified value for certain conditions. A LO, A HI and FATL alarm functions will force the current output to specific values for Zero Scale, Full Scale and two alarm conditions (Sensor failure and Dirty Window Detector operation Failure). See Section 5 Operation, page 90 of this manual for setup instructions. 3. A 10 Volt d.c. full scale signal can be developed by shunting the analog current output with a precision 500 ohm resistor. See Section 4 Sensor Wiring, page 62 of this manual for more information. 8.3 Response Time Description Response Time is the length of time it takes for the displayed temperature, the analog current output signal, and digital output to reach approximately 95% of a step change in measured temperature. The Response Time in the Modline 5 Sensor has an adjustable range from 6.6 or 10 milliseconds minimum, depending on Model, to 60 seconds Maximum. See section 2 Product Description, page 13 of this manual for Response Time restrictions by Model. The Response time can be set using the HEAD menu RT function and RS-485 Digital Communications. If you find that process temperature variations or signal noise is interfering with your measurement or control system, increase the Response Time as required. Modline 5 Rev. L4 12/
142 Applications Guide Determining Response Time to Use The Response Time is factory set for the fastest response time allowed for its Model. You may wish to select a slower response time that is more suitable for the process. To follow temperature variations as they occur, select a fast response time. If you prefer to "filter out" temperature variations, select a slower response time. In most applications, the practical approach is to observe the temperature display or analog current output and adjust the response time for the most meaningful temperature information without distracting variations. Observe the temperature indications on a Temperature Display, or chart recorder. Figure 89 illustrates the general effects of response times as if plotted by a chart recorder. The combination of low target temperature and fast response time will cause unstable temperature indications. When measuring low target temperatures, adjust the Response Time slowly to obtain stable temperature readings. Measurements below 400 F (200 C) may require a response time of one second or more. A Response Time setting of 30 milliseconds usually provides good starting point for higher process temperatures. Fast Response Medium Response Slow Response Time Time Time Temperature Temperatur display and output signals follow temperature variations as fast as minimum response time of instrument. Temperature Rapid temperature variations are filtered out and system follows general trends in temperature, with small amounts of ripple. Figure 89: Effects of Response Time Temperature Sensor tracks slow variations in temperature ans effects of temperature spikes are eliminated. 140 Rev. L4 12/2012 Modline 5
143 Applications Guide 8.4 Emissivity Settings An ideal infrared radiator, called a blackbody, emits the maximum amount of infrared energy possible at a given temperature. It has an Emissivity (E) that equals 1.0. However, targets measured in processes are non-blackbodies. Their emissivity values are less than 1.0, which means they emit a fraction of the infrared energy a blackbody would emit at a given temperature. All Modline 5 Sensors are factory calibrated using blackbody standards. For accurate measurements, you must compensate for the difference between the emissivity of your target and that of a blackbody radiator. Modline 5 Series Sensors, except the Series 5R, are single color brightness thermometers. Brightness thermometers depend upon the intensity of the infrared radiation. Since most process targets have an emissivity of less than 1.0, setting the Emissivity value to match the emissivity of the target material is necessary. Series 5R Sensor use the two color ratio measurement described in Section 8.5 Ratio Sensors, page 148. Methods of determining emissivity are described below Using Emissivity Tables One way to determine an approximate Emissivity setting is to refer to a set of emissivity tables. Table 17, Table 18, Table 19 and Table 20 are provided for this purpose. Emissivity values in the tables are based on actual tests on samples of the materials. Because the emissivity of most materials changes with wavelength, a separate column of emissivity values is provided for each Sensor series. To use the tables, locate your target material and obtain a value from the column for the Sensor series you are using. Adjust the Emissivity value setting to this value. Most table values are in the form of ranges. This is because the details of an object s form and characteristics affect its reflectance (R) and transmittance (T). These factors in turn reduce the emissivity (E) value, as shown in the following general equation relating the three characteristics: E λ = 1 R λ T λ Figure 90 shows how a target s surface characteristics affect its reflective properties, hence its emissivity. It is assumed in the figure that each sample of Material A is thick enough to be completely opaque (T = 0). Notice that a cavity in an opaque object comes very close to having blackbody characteristics; E = 1 when both R = 0 and T = 0. From Figure 90, you can see why the lower value of a given range represents a flat, highly polished sample of the material. The upper value represents a sample of the material that has a flat surface that is as rough as might be expected when in its crude or unfinished form. Some entries in Table 19 and Table 20 are marked with asterisks (*) to signify that the range of values results from more than just the target's reflective characteristics. These materials, in their specified forms, are partially transparent to infrared radiation. In spectral regions where the materials transmit energy, the emissivity typically increases with target thickness. Follow the guidelines in the tables to estimate the emissivity of your target. Even a rough estimation can significantly improve the accuracy of your measurements over only using averaged values. Note that table entries having a single value represent targets in forms that are clearly specified. Modline 5 Rev. L4 12/
144 Applications Guide You may wish to read the IRCON publication Spectrum Reprint SR100 - Product Temperature Solutions Temperature Errors Caused by Changes in Emissivity Using Emissivity Thermocouple Test If your material is not listed in the table, or if you want to verify the emissivity value being used, you can test the emissivity of a target sample in the following lab setup. 1. Embed a thermocouple (30 or 36 gauge wire recommended) just under the surface to be viewed and heat the target to the desired temperature range. Allow the temperature indication from the thermocouple to stabilize. 2. Aim the thermometer sensor at the surface of the target sample (close to where the thermocouple is installed). Observe the temperature indication and adjust the Emissivity value setting so that this temperature indication matches the thermocouple reading. The value of the setting is the target emissivity Setting the Emissivity The Emissivity may be set at the Sensor Rear Panel using the HEAD Menu EMIS function or with the RS-485 EM Command. An indirect method of setting the Emissivity is to use the MATCH function or RS-485 MT Command. MATCH allows inputting a temperature value known to be the true target temperature. The Sensor then automatically adjusts the Emissivity so that the temperature display indicates the same temperature. Instructions for setup are found in Section 5 Operation, page 90 of this manual. A third way to adjust the Emissivity is to send a scaled input of 4 to 20 madc via the Orange and Orange/White twisted wire pair of the Sensor s interconnecting cable. The Modline 5 senses an input and overrides any other setting of Emissivity or Match. Wiring and scaling information is in Section 4 Sensor Wiring, page 62 of this manual Using Relative Readings True temperature readings are not always necessary. Relative temperature readings may suffice in applications where temperature variations, rather than precise temperature values, are of interest. It is not necessary to know the target's emissivity for relative temperatures. Meaningful relative temperatures can be obtained if (a) the Emissivity value setting is kept constant and (b) the target objects to be viewed are of similar form and composition. For relative readings, we suggest an Emissivity setting of Practical Limits on Emissivity While all MODLINE 5 instruments are capable of emissivity settings of to it is not always advisable to use the lower emissivity settings. Potential temperature measurement errors due to background reflections are aggravated by a combination of decreasing target emissivity and decreasing target temperature. Temperature indications may become "noisy" due to the higher amplification at low emissivty settings. For Series 56 and 5G Sensors it is recommended that the Emissivity setting be limited to 0.3 to 1.0 for the first 55 C (100 F) for all temperature ranges. 142 Rev. L4 12/2012 Modline 5
145 Applications Guide The more times reflected radiation bounces on a surface, the less reflective the target. This is because the surface absorbs more of the radiation at each bounce, leaving less and less radiation to be reflected away from the surface. Since targets that are less reflective have higher Emissivity, the rough surface and the cavity, illustrated in Figure 90, represent increasingly higher emissivity values even though they are made from the same material as the polished surface. It is best to measure targets with high emissivity values. High reflectance off or transmittance through the target introduces the possibility of measurement error due to background interference. Avoid reflections when measuring targets with Emissivity less than about Polished surface of material Highly Reflective Low Emissivity: 2. Rough surface of material A Highly Reflective Good Emissivity: Very poor Reflector Approaching blackbody condition Best Emissivity: 3. Cavity surface of material Figure 90: Surface Finish affects Emissivity Modline 5 Rev. L4 12/
146 Applications Guide Emissivity Values of Metals and Alloys (Flat, Unoxidized Surfaces) Emissivity ranges shown represent differences in surface finish: mirror quality finish to dull, mill finish. Values for low-emissivity entries can be significantly greater than shown if surfaces are even slightly contaminated. Material Emissivity Range by Sensor Series 52, 5R 5G 56 (One Color Mode) Alumel Aluminium Brass Bronze Chromel Chromium Cobalt Constantan Copper Gold Inconel Iron Iron, Cast Lead Molybdenum Monel Nichrome Nickel Platinum Silver Steel, Carbon Steel, Stainless Tantalum Titanium Tungsten Vanadium Zinc, molten Code 1 Table 17: Emissivity Values of Metals and Alloys 144 Rev. L4 12/2012 Modline 5
147 Applications Guide Emissivity Values of oxidized Metals and Alloys (Flat Surfaces) Emissivity ranges shown represent differences in surface finish: smooth finish to rough, grainy finish Oxide film assumed to be sufficiently thick to avoid thin film interference effects Material Emissivity Range by Sensor Series 52, 5R 5G 56 (One Color Mode) Alumel, oxidized Aluminium, anodized Brass, oxidized Bronze, oxidized Chromel, oxidized Chromium, oxidized Cobalt, oxidized Constantan, oxidized Copper, oxidized Inconel, oxidized Iron, oxidized Iron, Cast, oxidized Molybdenum, oxidized Monel, oxidized Nichrome, oxidized Nickel, oxidized Steel, Carbon, oxidized Steel, Stainless, oxidized Tantalum, oxidized Titanium, oxidized Code 2 Table 18: Emissivity Values of oxidized Metals and Alloys Modline 5 Rev. L4 12/
148 Applications Guide Emissivity Values of miscellaneous Materials (Bulk, Normal Form) Unless otherwise noted, these materials have no transmittance in their normal form. Emissivity ranges shown for opaque materials represent differences in surface finish: smooth, polished finish to rough, uneven finish. Emissivities of partially transparent materials (*) will also increase with sample thickness. Material Emissivity Range by Sensor Series 52, 5R (One Color Mode) 5G 56 Asphalt, Tar, Pitch Carbon, Graphite Cinders, Slag, Cinkers Coke Firebrick¹, ~2" thick¹ high purity alumina* < 0.20 < 0.20 < 0.20 high purity aluminum* silicate (Mullite)* < 0.20 < Foods, bulk (fruits, vegetables, oils, meats, bakery goods, etc.) Gallium Arsenide solid polished, 0.5 mmthick water Glass, commercial soda-lime¹ 0.05" thick* < 0.05 < > 4" thick Oil, animal or vegetable 0.040" Oil, mineral 0.040" Paints, oil or water base² on metal* on plastic or wood* Code 3 ¹ Highly variable. Values for low emissivity entries can be significantly greater than shown if even small amounts of impurities are present. ² Paints with metallic pigments may have much lower emissivities. Table 19: Emissivity Values of miscellaneous Materials 146 Rev. L4 12/2012 Modline 5
149 Applications Guide Material Emissivity Range by Sensor Series 52, 5R (One Color Mode) 5G 56 Plastics all 1/8" thick polyester film (mylar), " thick* ~ 0.10 polyethylene film, " thick* ~ 0.10 Rubber Salt Baths Silicon, solid polished 0.5 mm-thick wafer Silicon, molten ~ 0.30 ~ 0.30 Silicon, Carbide Textiles, Fabrics Carpet (cotton, wool, synthetic) Fabrics, close weave (cotton, wool, synthetic)*³ Leather Water, " film Wood Code 4 ³ Emissivity values may be significantly lower than shown for very sheer materials. 4 Note that objects with even a very thin coating of water have very high emissivities. Table 20: Emissivity Values of miscellaneous Materials (Continued) Modline 5 Rev. L4 12/
150 Applications Guide 8.5 Ratio Sensors Modline 5 Series 5R Sensors utilize a dual detector assembly that measures temperature by comparing infrared radiation levels in two wavelength bands (0.85 to 1.05 microns and a narrow band centered at 1.0 to 1.10 microns). They have the capability to measure temperature by comparing the relative infrared radiance at two different wavelengths and computing the ratio of the two. Temperature readings are based on the ratio of the two signals in these bands. See Section 3 Sensor Installation, page 22 of this manual for more information about signal reduction, resolving targets and other factors about using ratio sensors E-Slope Settings When using a Series 5R Sensor as a two color ratio Sensor you must properly select the E-slope value. An E-Slope adjustment is provided to allow you to calibrate the Sensor to measure the temperature of the target material accurately. Series 5R Sensors are commonly used for applications involving materials in one of two main classifications: 1. Greybody materials have an Emissivity that is the same at both detected wavelengths. 2. Materials with emissivities that are not the same at both detected wavelengths (a slope or variance in the emissivity at the two wavelengths exists). The first of these, the class of greybody materials, contains those materials that have emissivities that are the same at both detected wavelengths. The most common greybody materials are described below. When your target is made from any of these materials and are oxidized, set the E-Slope Control of the Sensor to a value of Materials which require an E-Slope setting of 1.0: Blackbody calibration standard. Cavities in any opaque, isothermal body. The following metals when worked in air are subject to oxidizing: Iron, Cobalt, Steel, Nickel, Stainless Steel. The second main classification is a family of metals with emissivity that exhibit a non-linearity (or slope) of approximately Materials which require an E-Slope setting of 1.6: Clean, smooth, unoxidized surfaces of the following metals: Iron, Molybdenum, Molten Grey Iron, Platinum, Cobalt, Rhodium, Nickel, Steel, Tungsten, Stainless Steel, Tantalum If the materials in your process do not fall into either of these categories, you will have to test your product to find the appropriate E-Slope setting. To do this, sight the instrument on a sample target having a temperature that you have accurately determined by some other means (such as a reliable thermocouple). For best accuracy, select a temperature near the center of the instrument's range, or better still, carry out the test at several points throughout its range. Adjust the E-Slope Setting until the indicated temperature matches the value you have previously determined. Set the E-Slope control to this value whenever measuring this type of target. If you use several tests, average the results and use the averaged value as your E-Slope setting. 148 Rev. L4 12/2012 Modline 5
151 Applications Guide Setting the E-Slope The E-Slope may be set at the Sensor Rear Panel using the HEAD Menu E SL function or remotely with the RS-485 ES Command. An indirect method of setting the Emissivity is to use the MATCH function or RS-485 MT Command. MATCH allows inputting a temperature value known to be the true target temperature. The Sensor then automatically adjusts the Emissivity so that the temperature display indicates the same temperature. Instructions for setup are found in Section 5 Operation, page 90 of this manual. A third way to adjust the Emissivity is to send a scaled input of 4 to 20 madc via the Orange and Orange/White twisted wire pair of the Sensor s interconnecting cable. The Modline 5 senses an input and overrides any other setting of Emissivity or Match. Wiring and scaling information is in Section 4 Sensor Wiring, page 62. of this manual. 8.6 Peak Picker Signal Conditioning Peak Picker signal conditioning is advisable for certain measurement situations. If the workpiece you are measuring is moving and is in the field of view for only a brief period of time. If a succession of small parts is to be viewed with variable spacing between them. If the temperature of a moving work-piece varies because of slag, oxides, etc. Using the Peak Picker allows measuring the highest temperature. If the line of sight between the instrument and the workpiece is momentarily or periodically interrupted, as by a moving piece of machinery or by bursts of steam or smoke. Figure 91 illustrates the Peak Picker action. The Peak Picker circuitry responds to the highest instantaneous value of temperature and holds this value even if the temperature source is interrupted by one of the conditions listed above. The indicated temperature (solid line) rises almost instantly, depending on the selected Response Time, to follow the peaks in actual temperature (dashed line). The indicated temperature decays at a rate determined by the setting of the Peak Picker Decay Rate. Figure 91 shows the effect of changing the decay rate. The Peak Picker action affects the Temperature Display, Analog Current Output and RS-485 responses to commands Turning Peak Picker On and Off The Peak Picker can be turned on and off by using the following: 1. The Sensor Rear Panel HEAD menu with the SIGL function. When the Peak Picker is selected, the PSEL function menu appears for setting of all the Peak Picker operating parameters. Operation of the SIGL, Peak Picker, PSEL, Decay Rate, Automatic Reset Below, Reset Below and Delay functions are explained in Section 5 Operation, page 90 of this manual. 2. Remotely using the RS-485 PK and related Commands. See Section 6 Digital Communications, page 114 of this manual. Modline 5 Rev. L4 12/
152 Applications Guide When the Peak Picker function is turned on by using 1 or 2 above, a remote switch, as explained below, can enable or disable the Peak Picking signal conditioning External Switch for Remote Peak Picker Operation The Modline 5 has a provision for a remote process controlled input switch to be wired to the Violet and Violet/White twisted wire pair of the Sensor s interconnecting cable. If Peak Picker signal conditioning is selected, the remote switch can enable or disable the Peaking action. With no switch or the switch in maintained in the open position Peaking action is enabled. With the switch closed, peaking action is disabled and the Sensor continuously indicates actual temperature variations as they occur. This can be called the Direct operating mode. A momentary closure of the switch, greater than 0.08 seconds, resets the Peak Picker function to the current temperature reading. The peaking action begins again when the switch returns to the open position. Wiring and switch operation for the Peak PIcker are described in Section 4 Sensor Wiring, page 62 of this manual. Temperature Interference in sight path Gap in workpiece Hot spot in workpiece Peak Picker Off Actual temperature shown as a solid line. Indicated temperature tracks changes in actual temperature, including interferences in sight path. Limited only by Response Time of Modline 5. Time Peak Picker On Fast Decay Temperature Temperature Time Peak Picker conditioning shown as a solid line. Use this setting to concentrate on temperature trends, and to reduce the effect of momentary interuptions or interference in the sight path. Peak Picker On Slow Decay Peak Picker conditioning shown as a solid line. Use this setting to concentrate on peak temperature and ignore gaps between workpieces or interference in the sight path, but still catch hot spots on a workpiece. Time Figure 91: Peak Picker Operation 150 Rev. L4 12/2012 Modline 5
153 Applications Guide Peak Picker Signal Conditioning Peak Picker signal conditioning takes place with the Peak Picker on. Temperature readings may be returned to instantaneous values at any time by setting the SIGL function to OFF. The system then follows actual temperature variations as they occur. Both Peak Picking signal conditioning and direct instantaneous temperature indication are affected by the selected Response Time Peak Picker Reset The Peak Picker signal conditioning can be reset by any of the following actions: Manual reset using the Sensor rear panel PSEL menu RSET function. Remote reset with a momentary switch closure across the Sensor s interconnecting cable Violet and Violet/White twisted wire pair. Automatic reset using the Auto Peak Picker Reset function with Reset Below Temperature selection. Remote reset with the RS 485 PS Command Peak Picker Decay Rate The Decay Rate is set to retain peak measured temperature value and ignore momentary decreases in measured temperature caused by process conditions. The goal is to eliminate erratic measurements due to gaps in work pieces, bursts of smoke, or steam, etc. in the sight path of the Sensor. The Decay Rate range is 0.00 to 300 degrees. The Decay Rate setting is unit-less. The units are defined by the selected Sensor measurement units, Fahrenheit or Celsius. The fastest decay rate is 300 degrees per second. The slowest decay rate is 0 degrees per second. This slowest decay, for practical purposes, can be considered as a Peak Hold with the highest peak measured temperature held until a Reset occurs. Select a Decay Rate that will yield the decay needed for meaningful process measurement. Refer to Figure Auto Peak Picker Reset with Reset Below An automatic reset is accomplished with the Auto Peak Reset and Reset Below functions. These functions are turned on with the Sensor rear panel PSEL menu AUTO and RBEL functions or the RS- 485 PS and PK Commands. Figure 92 illustrates Auto Peak Picker Reset. This reset action is triggered when the measured temperature goes below the selected Reset Below Temperature. When the measured temperature is below this temperature, the displayed temperature indication will be the measured temperature unaffected by the Peak Picker signal conditioning, subject to any Response Time selection. Modline 5 Rev. L4 12/
154 Applications Guide Target Temperature Signal Sensor Output Reset Below Temperature Time Figure 92: Automatic Peak Picker Reset When the measured temperature is above the selected Reset Below Temperature the displayed temperature will be the measured temperature with the Peak Picker signal conditioning action applied subject to the selected Response Time. The Auto Peak Picker Reset can effectively be used to turn ON the Peak Picker function when the target is in view and to turn it OFF when the target is out of view. The Reset Below temperature must be properly selected to provide the measurement conditions wanted. Too high of a selected temperature may cause the peaking action not to be activated if the target is cooler than the selected temperature. If the Reset Below temperature selected is too low Peak Picker action will continuously take place with higher background temperatures. Auto Reset can be affected by long response times. The selected Response Time should be fast enough to allow the selected Reset Below Temperature captured and be used to accomplish the reset Peak Picker Delay The Peak Picker Delay function is used to delay the start of the peaking action for up to 10 seconds following the detection of the leading edge of a new target. This function is turned on with the Sensor rear panel PSEL menu DEL function or the RS-485 PD Command. It operates independently of the Auto Reset and reset below functions. It has limited operation when used with Peak Picker signal conditioning without the Auto Peak Picker Reset function. It will provide the selected delay for the first hot target seen after any Peak Picker Reset. The reset can be from the Sensor rear panel, a reset from a momentary closure of the Peak Picker Reset external switch or a reset from the RS485 PR command The primary use of Peak Picker Delay is with the Auto Peak Picker Reset and Reset Below Temperature functions as explained below. The Peak Picker Delay time-out will be not begin until a target whose temperature is above the selected Reset Below Temperature comes into view and remains in view. Figure 93 shows the delay time in relation to the target temperature and the reset below temperature level. The Peak Picker action will begin after the selected delay time and will continue until the actual measured temperature 152 Rev. L4 12/2012 Modline 5
155 Applications Guide goes below the selected Reset Below temperature. The system will then return to direct temperature indication until a new target comes into view. The Decay Cycle will repeat as describe above. Delaying the start of the peaking action allows peaked temperature measurement of targets with hot leading edges and cooler middle temperatures without peaking on the hotter leading edge. The delay time selected determines at what position or point on the target peaking action begins. This function may be affected by a slow Response Time which could further delay the start of peaking action. Example: Before a moving work piece enters the target viewing area, the System may be sensing a measured temperature below the selected Reset Below temperature. As the target comes into view, the hotter temperature is sensed and the Peak Picker Delay time-out begins. When the delay is completed, the system will begin peaking action on the measured temperature until the work piece passes the Sensor. Peak Picker with Delay Time Sensor Output Signal Target Temperature Reset Below Temperature Delay Time Time Figure 93: Peak Picker Delay The Delay Time can be used with the Auto Reset turned off. In this case, the Delay will only begin after a reset occurs. See sub section Peak Picker Reset above for how to initiate a reset. 8.7 Track and Hold The Modline 5 includes a Track and Hold function that allows continuous temperature measurement in the Track mode and suspended measurement in the Hold mode with the last temperature reading held. Selection of the Track and Hold function is made with the Sensor rear panel SIGL menu and TRAK function or the RS-485 TS Command External Switch Control of Track and Hold The Modline 5 has provisions for a remote process controlled input switch be wired to the Violet and Violet/White twisted wire pair of the Sensor s interconnecting cable. If Track and Hold signal operation is selected, the switch input is required to change from Track temperature operation to Hold temperature mode as required in the process system. Figure 94 illustrates Track and Hold operation. The Sensor will be in the Track Mode with the switch open and in the Hold mode with the switch closed. The remote switch may be manually operated or it may be a contact on a timer, relay, or movement of a target or its timing in the process to close the remote switch. Modline 5 Rev. L4 12/
156 Applications Guide Track and Hold temperature readings are affected by the Response Time setting. Target Temperature Signal Sensor Output Hold Time Track Figure 94: Track and Hold Example: you may want to scan the surface of a moving workpiece and hold the temperature reading at middle point on the workpiece, while ignoring the readings at the beginning and the end of the workpiece. Another Example: the temperature tracking can be made to hold a temperature even after the temperature in the sighted area has dropped. It will hold the value without any decay until the switch is opened. Peak Picker and Track and Hold Signal conditioning cannot be simultaneously selected. Use of Peak Picker with zero or very low Decay rates and an external reset can accomplish similar results. 8.8 Avoiding Common Measurement Problems Viewing Angle Limitations Acute viewing angles can present the problem of reduced emissivity values, particularly if you are dealing with smooth target surfaces. Figure 95 shows the permissible angles (for all Sensor Series) when viewing smooth surfaced objects such as metals, glass or plastics. Angles up to 45 from the perpendicular usually will not appreciably affect the measurement, although the smaller the angle from the perpendicular the better. In general, angles greater than 45 should be avoided. An increase in reflectance occurs when smooth surfaces are viewed at large angles, and consequently the target emissivity decreases Background Interference Under ideal circumstances, the radiant energy being measured should be from the target only. This is why you must center the Cone of Vision on the target and make sure that its cross-section (spot size) is smaller than the target. That way the sensor can't "see" past the target into the background. Although the Sensor Models 5R have somewhat looser restrictions on filling the field of view, it is still affected by background interference if significant sources of background radiation are present. 154 Rev. L4 12/2012 Modline 5
157 Applications Guide Significant background radiation comes from comparable temperature or hotter objects in the target's surroundings. This background radiation may be reflected off, or transmitted through, the target adding to the radiant energy detected by the instrument related to the target temperature. This results in measured temperature error. For all Modline 5 Sensor Series, except the Series 5R, this extra radiation, if detected, causes a temperature indication that is higher than the target's true temperature. For Series 5R Sensors, background interference that is slightly cooler than the target results in temperature indications that are too low. When the background temperature is much lower than that of the target, however, the indicated temperature is unaffected. If the interfering background sources are hotter than the target, the indicated temperature is too high. There is no error in the indicated temperature, with a Series 5R Sensor, when the background temperature matches the target temperature. Sensor Lens Max = 45 Figure 95: Viewing Angle When the environment includes unfiltered background light or heat sources, select a viewing arrangement that minimizes these problems. In general, the higher the target's Emissivity, the less susceptible the measurement is to errors. Emissivity (E), Reflectance (R), and Transmission (T) are related as follows: E λ = 1 - T λ - R λ Maximum accuracy is possible when E = 1.0 (blackbody condition). In this condition, there is no reflection and no transmission of background energy to cause measurement errors. As emissivity decreases it is harder to get accurate readings because reflectance and/or transmittance become more pronounced. Use caution when attempting to measure materials with emissivity values known to be 0.2 or less Transmission Effects Target If the target has some transmission at the operating wavelength, it can act as a window for infrared emission from objects behind it (e.g. an oven wall or heating element). Such problems can sometimes be corrected by changing the viewing angle so that the background source is not directly behind the target, by selecting a different measurement point away from the background source, or by inserting a Modline 5 Rev. L4 12/
158 Applications Guide cooled shield behind the workpiece. See Figure 96 for examples. These considerations apply to all Sensor series. Problem: Sensor Lens sees radiation from heating element transmitted through workpiece. Solution: Change viewing angle, or measuring location, so heating element is not in field of view of sensor. Sensor Lens Workpiece Heating Element Problem: Sensor Lens sees radiation from hot furnace wall transmitted through workpiece. Solution: Install heat insulating shield between workpiece and furnace wall. Sensor Lens Workpiece Cooled Shield Furnace Wall Transmission Path Effects Figure 96: Solving Common Transmission Problems Materials in the transmission path may absorb infrared radiation, reducing the amount of radiant energy an instrument receives. This is less of a problem for Series 5R Ratio Sensors, as long as the radiance at both detected wavelengths is reduced equally. For any other Sensor Series, a poor transmission path causes the indicated temperature to be lower than the target's true temperature. These problems may be minimized by keeping the System's optical components clean, and by selecting a sight path for which the entire optical cone between the target and the instrument is free of solid objects, dust, smoke, and evaporates. Sight tubes, shown in Figure 97 can be used for this purpose. For information on the use of windows, refer to Section 8.10 Use of Windows, page Reflectance Effects If the target has some reflectance, it acts as a mirror and reflects infrared energy generated by other sources (e.g. a furnace wall or heating element). If the Sensor picks up the reflection, measurement errors will result. Reflectance depends on the target material and the condition of its surface. Flat, smooth surfaces tend to have larger reflectance values than roughened surfaces of the same material. Reflectance problems may be reduced by changing the viewing angle so that the reflection is not picked up by the Sensor, or by the use of sight tubes or some other form of shielding. (See Figure 97 examples.) These considerations apply to all Sensor Series. 156 Rev. L4 12/2012 Modline 5
159 Applications Guide Viewing at furnace exit Problem: Sensor Lens sees reflections of furnace roof or wall. Solution 1: Change viewing angle. Furnace Roof Sensor Lens Sensor Lens Workpiece Solution 2: Install shield to block reflection. Cooled Shield Sensor Lens Viewing through furnace roof or wall Problem: Sensor Lens sees reflections from hot of furnace roof. Solution: View through sight tube with tip spaced close to surface of workpiece. Sensor Lens Sight Tube Sensor Lens Furnace Workpiece Cautions: 1. I.D. of sight tube must be wider than Cone of Vision along entire length. (See Section 3) 2. Sight tube walls may radiate infrared if furnace atmosphere is very hot. May require cooled sight tube. Consult IRCON for recommendations. Figure 97: Solving Common Reflection Problems 8.9 Use of Mirrors In rare situations it may be difficult, if not impossible, to position the Sensor for a direct view of the desired target surface. You may then find it necessary to view the target indirectly by means of a mirror. Mirror material, surface area and alignment are critical in this application. In all cases the mirror must be a first surfaced (front surfaced) mirror, and ideally it should be a perfect reflector at the operating wavelength of the Sensor. A first surfaced, flat, aluminized or gold mirror may be used for all Sensor Series except Series 5R. This type of mirror is readily available from optical supply houses. For 5R Sensors, the mirror must be a front surfaced, gold coated mirror. (Aluminum coated mirrors show a small coloring effect in the Series 5R spectrum, causing the instrument to read low. This low reading error may be corrected by the E-Slope adjustment, but a gold mirror is preferred.). Modline 5 Rev. L4 12/
160 Applications Guide As indicated in Figure 98, the Cone of Vision extends from Sensor-to-mirror-to-target. The mirror effectively bends the cone but does not change its shape. There are two spot sizes to consider in Figure 98: spot size d1 at the mirror surface (distance D1) and spot size d2 at the target surface (distance D2). Mirror and target areas must be at least twice the cone diameter at their respective distances. The mirror must be positioned (and angled) so that the axis of the reflected target image coincides with the optical axis of the Sensor. You should be able to accomplish the alignment without difficulty by sighting through the viewing telescope. Be sure to lock the mirror firmly in position, and check the alignment on a regular basis. Also, inspect and clean the mirror (in manner recommended by the manufacturer) as part of your regular maintenance routine. If you have any trouble in obtaining an appropriate mirror or in erecting your system, please contact IRCON for recommendations. Target Cone of Vision Mirror Sensor Lens Figure 98: Effect of Using a Mirror on Optical Cone 8.10 Use of Windows To view an object in an inert atmosphere or vacuum chamber, you must use an infrared transmitting window. Selection of an appropriate window material will depend on the Sensor's spectral response. Some suggested window materials for various Modline 5 Sensor Series are listed in the Window Selection Guide Table 21. Available Windows (Specifications: Optical Grade, 1/8 inch thick, Polished to Plate Glass Finish) Series Pyrex #7740 Fused Quartz (G.E. #124 or eqiv.) Synthetic Sapphire Calcium Fluoride Cleartran (ZnS) 52, 5G Suitable T=0.92 Recommended T=0.94 Suitable T=0.85 Suitable T=0.94 Suitable T=0.94 5R No Recommended T=0.94 Suitable T=0.85 Suitable T=0.94 Suitable T= No Recommended T=0.94 Suitable T=0.85 Suitable T=0.94 Suitable T=0.94 Table 21: Window Suitability and Transmission Factor T The window material must be highly transparent in the Sensor's infrared spectral region. Yet, there is always some signal loss due to reflection or absorption when using a window. To compensate for this 158 Rev. L4 12/2012 Modline 5
161 Applications Guide loss, first multiply the emissivity of the target object by the window's transmission factor (T) shown in the Window Selection Guide. Then adjust the emissivity setting to this value. Example: Emissivity of object = 0.8 Transmission factor of window = 0.92 Emissivity setting = 0.8 X 0.92 = 0.74 The window specifications given at the top of the chart are suitable for most applications. However, high pressure or vacuum chamber applications may require windows that are thicker than 1/8" (3 mm). Be aware that transmission of thicker windows may be significantly degraded. It is good practice to use a window at least twice the diameter of the Cone of Vision at the point where the window is to be installed. Note that the dimensions of the Cone of Vision can be changed by focusing the optics. It is essential for all Sensor Series except Series 5R that you never allow any part of the Cone of Vision to be obstructed. Figure 99 illustrates the correct use of windows. Keep the window clean to prevent low temperature indications. Sight Hole Sensor Lens Cone of Vision Target Window Figure 99: Viewing a Target through a Sight Hole and Window Special Considerations for Ratio Units Because Modline Series 5R ratio Sensors compare the radiation detected at two separate wavelengths, the best windows for these units have the same transmission value at both wavelengths. All acceptable Series 5R windows specified in the Guide have this characteristic. No additional E Slope adjustment is required when these windows are used. Note that certain materials, which are transparent to the human eye, can cause serious measurement errors when with a 5R Ratio Sensor. For instance, it almost always causes problems if any of soda-lime plate glass, "PLEXIGLASTM", water, or "PYREXTM" glass lies between the Sensor and the target during a measurement. Similarly, if you need to reflect your target's radiation in order to measure it with a 5R Ratio Sensor, use a front surface gold mirror, not a mirror with an aluminum reflecting surface. The materials listed in the Guide are not all common optical materials and you may have some difficulty locating a source for windows. If you do, here are some suggestions. Modline 5 Rev. L4 12/
162 Applications Guide Adolph Meller Optics P.O. Box 6001 Providence, Rhode Island 02940, Karl Lambrecht Corp Lincoln Ave. Chicago, Illinois Janos Technology Inc. Route 35, Townshend Vermont 05353, Preventing Sensor Overheating The Modline 5 Sensor can be cooled with the WJA accessory presented in Section 3 Sensor Installation, page 22. Do not use a WA-3 accessory for cooling. Under extreme conditions, it may be necessary to provide insulation and reflective shielding for additional protection from high ambient temperatures and radiated heat using materials available at the installation site. Figure 100. shows one means of providing insulation protection. In this example, a Sensor is mounted at a sight hole cut into a furnace wall. The Sensor is protected from the atmosphere by a water cooling accessory and is insulated from the atmosphere near the wall by aluminum-backed insulation. A radiant heat shield can be any reflective metal shield in the path between the heat source and the Sensor, as in Figure 101. It should be close enough to the Sensor to block random reflected radiation, but with a space between it and the unit to allow air to circulate between them. Figure 100: Sensor Water or Air Cooling with Added Insulation Wrap 160 Rev. L4 12/2012 Modline 5
163 Applications Guide Sight Hole Heat Shield Hot Target Figure 101: Protection Using Reflective Heat Shield Modline 5 Rev. L4 12/

164 DPM Installation and Operation 9 DPM Installation and Operation 9.1 Introduction The IRCON Model DPM is an accessory to the Modline 5 Series of Infrared Thermometers. As a remote operator interface, the DPM provides complete setup of the Modline 5. It connects to the Sensor s RS-485 Digital Communications to interface with the Sensor. Read and Write commands are used to obtain and display temperature measurement values and Sensor status, including diagnostic Alarms. The DPM can also be used as a read only device by configuring the Sensor to accept read commands only. The DPM can be programmed to display stored Maximum and Minimum temperatures as well as the current temperature. With the optional Quad Relay Card, four setpoints can be used as temperature alarms. The DPM is an OEM product supplied by Red Lion Controls Using the DPM The following steps are necessary to use the DPM. Prepare and install the DPM as instructed in Section 9.2 DPM Installation, page 162. Be thoroughly familiar with the operation of Sensor as explained in Section 5 Operation, page 90 of this Modline 5 Manual. Follow the safety warnings, cautions and Instructions for safe Laser operation provided in this Modline 5 Manual. Install and wire the Modline 5 Sensor per the Instructions in Section 3 Sensor Installation, page 22 and Section 4 Sensor Wiring, page 62 of this Modline 5 Manual. Prepare the Sensor to communicate with the DPM per the instructions provided Section 9.3 Modline 5 Laser Sight Option, page 165. Program the DPM Quad Relay Setpoints and MAX and MIN features of the DPM if those features are being used. See the information provided under Full Programming in Section 9.14 Full Programming Mode, on page 175. Do a complete initial Sensor setup with the DPM. 9.2 DPM Installation Figure 102: DPM Meter Front 162 Rev. L4 12/2012 Modline 5

165 DPM Installation and Operation Finger tabs (both sides). Latches are just in front of tabs.) Figure 103: Rear Wiring Terminals DPM Pre-installation The DPM is delivered in a separate carton. Remove the DPM meter, its mounting clip and gasket, an F and C overlay with insert frame kit, and Red Lion Controls Bulletin No. PAX - B, or later release, from the carton. All items are needed, keep them all. The Red Lion Bulletin No. PAX - B contains installation and wiring information for the DPM. Refer to Sections 2 and 4 for Panel Installation and AC wiring instructions. The bulletin also contains safety information and lists CE and safety compliances F and C Units Overlay (Part Number /SBPAX03) Before installing and wiring the DPM, determine the measurement units to be used and install an F or C overlay behind the DPM Front Window as instructed below. Refer to the photographs above and those that follow. If an overlay is not used, the LED backlights will be visible. See Section 9.13 DPM Sensor Diagnostic Functions, page 174 to turn backlight off. Exposed line voltage exists on the circuit boards. Remove all power from the meter AND load circuits before accessing the unit to apply overlays or install relay cards. Circuit cards contain static sensitive components. Before handling cards, discharge static charges from your body by touching a grounded bare metal object. Ideally, handle cards at a static controlled clean workstation. Handle cards by the edges. Dirt, oil or other contaminants may contact the cards and adversely affect circuit operation. Remove the meter base from the case by firmly squeezing and pulling back on the side rear finger tabs. This should lower the latch below the case slot (which is located is located just in front of the finger tab). It is recommended to release the latch on one side, and then start the latch on the other side. Modline 5 Rev. L4 12/


166 DPM Installation and Operation Figure 104 Figure 105 Choose an F or C overlay and remove the opaque release paper from its adhesive side. Attach the overlay to the front of the white overlay frame insert. Align the overlay with the two very small pins on the front of the frame. Remove clear protective film from overlay. Insert the long pins on the frame into the matching holes on DPM display board. Before returning meter to its case, install optional Quad Relay Card if supplied. See instructions below. Slide the assembly back into its case. Be sure the rear cover fully latches into the case Quad Relay Card (Part Number PAXCDS20) If an optional Quad Relay Card has been purchased, the card is delivered as an accessory item in a separate carton. The relay card, a label for the meter case and Red Lion Bulletin PAXCDS-C, or later release, are in the carton. Read and follow all warnings, installation and operation instructions in the Red Lion Bulletin. Adhere the wiring label supplied with card to DPM case in the space provided beneath main label. A simplified initial Setpoint setup is found in Section 9.13 DPM Sensor Diagnostic Functions, page 174. The quad relays are intended for use as temperature alarms, not closed loop process control. Determine if use of the relays are adequate for the process requirements Panel Installation and Wiring Install the DPM as per all installation instructions in Red Lion Controls Bulletin No. PAX- B supplied. A cutout template and instruction are supplied in bulletin Section Sensor RS485 Connections: See Section 4 Sensor Wiring, page 62 for recommended computer cable type and shielding information. 164 Rev. L4 12/2012 Modline 5
167 DPM Installation and Operation DPM Terminal 12 to Modline 5 Sensor Cable Yellow wire DPM Terminal 13 to Sensor Cable Yellow/White. DPM Terminal 14 to Sensor Cable Red/White (power supply common direct wire connection to TSP Plate or POI Box. Do not use shortcut wiring route to any other point(s). User 1 Input Jumper The DPM is supplied with a jumper installed between the User 1 input terminals 7 and 8. Jumper can be replaced with a SPST switch if it is anticipated that full programming access is going to be required often. Ircon recommends that the simple jumper be used unless you intend to become thoroughly familiar with the DPM and use other features AC Power Wiring Reference Red Lion Bulletin No. PAXP Section 3.0 for AC power wiring. Follow all warnings and instructions. Quad Relay Connections If optional Quad Relay Card is installed, wire relays per Red Lion Controls Bulletin PAXCDS-C supplied with the Quad Relay Card. Follow all warnings and instructions Critical Process Safety Guideline When this instrument is being used in a critical process that could cause property damage and personal injury, the user should provide redundant device or system that will initiate a safe process shutdown in the event that this instrument should fail. The user should follow NEMA Safety Guidelines for the Application, Installation, and Maintenance of Solid State Control. A copy of the standard is reprinted in Appendix A. 9.3 Modline 5 Laser Sight Option The Modline 5 Laser Sighting Option can be turned on remotely using the Laser Function in the Engineering parameter section. Follow all cautions and instructions shown below and in Section 5.11 Laser Sighting Operation, page 110 of this Modline 5 manual. Before turning on the Laser remotely with the DPM Digital Panel Meter Interface or other devices using RS 485 Communications, insure there are no personnel in the path of the beam. Modline 5 Rev. L4 12/
168 DPM Installation and Operation 9.4 RS-485 Communication Setup The following Sensor RS-485 Communication parameters must be correctly selected at the Sensor Rear Panel for communications to take place. RS-485 Commands for these functions are not provided. The parameters cannot be remotely selected by the DPM. Instructions are in Section 5 Operation, page 90 for the following functions. If the Sensor is connected to the DPM, these parameters must be set while the DPM is in the DSP Display Mode CLCK Communications Lock Communications Lock provides for the configuration of the Modline 5 RS-485 Communications. Communication can be configured to allow selection and adjustment of functions with Read and Write (R / W) operation. Alternately, Read Only (R/O) operation does not allow Sensor to execute write commands. The Sensor must be set to (R / W) operation to use the DPM as a programming interface. The Sensor can be set to (R / O) operation to use the DPM as Read Only Device. R / O operation allows the CHK function to initiate a System Check and RSET to perform a Manual Peak Picker Reset as described in this Section ADDR Sets the Sensor Address The Unit Address is a one digit number or single letter code. It ranges from a single numeric 0 to 9 and upper case A to Z. The Address factory default setting is 0 (zero). It is recommended, but not necessary, that the address be set to 0. The DPM uses the (?) wildcard address that all Sensors recognize BRAT Baud Rate The Sensor Baud Rate must match that of the other RS-485 device. The DPM uses 9600 Baud. Four baud rates are supported by the Sensor (9600, 19200, 38400, and bits of information per second). Set the Sensor Baud Rate to DPM Operation Introduction Investigate all alarms indicated by the Flashing ALM indicator. Temperature readings on rear panel display, at Analog Output or from RS-485 Communications may be inaccurate with Error Code X101 through X109 Alarms. ALM indicator flashes only in Display Mode. 166 Rev. L4 12/2012 Modline 5

169 DPM Installation and Operation Flashing ALM indicates alarm condition. The ALM indicator flashes in Display Mode MAX and MIN temperatures available by programming Module 3 of DPM in Full Programming Mode Function Keys F and C Units Overlay Installed by User. Backlight LEDs programmed ON as default. Setpoint Annunciators with Optional Quad Relay Card. Setpoint values programmed in Quick Menu. Additional features available by programming Module 3 of DPM in Full Programming Mode. Figure 106: Temperature Display and Function Keys. 9.6 Display and Programming Flow Diagram Quad Relay Setpoint Temperature Alarms are only operational in the Display Mode. Temperature Display PAR Key Navigates from Temperature Display through Quick Programming Menus back to Display Access to Ircon Menus With F1 and F2 Keys Setpoint 1 Value Setpoint 2 Value Setpoint 3 Value Setpoint 4 Value ENTER F1 F2 Provides access to IRCON Menus Head Functions Engineering Functions Analog Output Functions Diagnostic Functions Back to Start of Access to IRCON Menus, Setpoints and Code Modline 5 Rev. L4 12/
170 DPM Installation and Operation 9.7 Sensor Setup with the DPM HEAD (Sensor Operating Functions List) EMIS (Set Emissivity for Brightness or 1 Color Sensor) E-SLP (Set E-Slope for 2 Color Ratio Sensor) R.T. (Set Response Time) SIGL (Signal Conditioning Peak Picker or Track/Hold) PSEL (Peak Picker Sub Function Settings) COLR (Set Ratio Unit for 2 Color or 1 Color Operation) MTCH (Match Known Temperature) SUB FUNCTION PSEL (Peak Picker Function Settings) D.R. (Decay Rate in F or C per Second) RSET (Manual Peak Picker Reset) AUTO (Auto Peak Picker Reset) RBEL (Reset Below Temperature) DEL (Peak Signal Conditioning Delay) ENGR (Engineering Functions List) LOCK (Sensor Rear Panel Lockout) MODL (Model Number Scroll) F/C ( F and C Selection) RELY (Alarm Relay Operation Setup) CHK (Initiate System Check) HOUR (Automatic System Check Setup) WRNL (Optional Dirty Window Detector Setup) LASER (Energize Laser) VER (Sensor Firmware Version) I ALM (Sets Ratio Invalid Measurement Condition as Alarm) AOUT (Analog Signal Output Current Range Selection and Temperature Scaling) SOUT (Select Analog Output Current Range) ZERO (Set Zero Scale Temperature) FULL (Set Full Scale Temperature) Fatl (Set Output Current for Sensor or DWD Error) A LO (Set Alarm Current Output for Temperature Below ZERO) A HI (Set Alarm Current Output for Temperature Above FULL) DIAG (Diagnostics List) Status (Alarms and Measurement Status) I Temp (Instrument Case Temperature) Switch (Switch Contact State) Emissivity or E Slope (Value Monitor) 168 Rev. L4 12/2012 Modline 5
171 DPM Installation and Operation 9.8 DPM Quick Programming Mode Quick Programming Two choices of programming are provided, Full and Quick Programming. The meter is supplied with a jumper inserted (or user switch installed) between terminals 7 and 8. This puts the DPM in the Quick Programming mode. This mode provides quick access to the Ircon parameter menus, Setpoint value inputs and ability to access additional meter programming by entering Code 222. Quick Programming is illustrated below. Full Programming is discussed in Section 9.13 DPM Sensor Diagnostic Functions, page Menu Navigation Programming pushbuttons are provided for programming and navigation. Instructions are provided for selecting and adjusting menus and parameters in each of the operating sections that follow. Press DSP (Display) for the Temperature Display at any time. Continually pressing PAR sequences through all the menus and back to Temperature Display Display Parameter Description Selections Navigation and Information Entry to IRCON Parameter Menus with F1 F2 OR Entry to Setpoint Value settings and DPM Menus with PAR Key Signifies choice of Ircon Parameters Menus DPM Setpoint and Entry Code Menus F1 F2 then PAR for Entry to HEAD F1 F2 then PAR for Entry to ENGR F1 F2 then PAR for Entry to AOUT (ANALOG OUT.) F1 F2 then PAR for Entry to DIAG (DIAGNOSTICS) OR Use PAR to select a Setpoint or Code or END Setpoint Values with F1/F2 Arrows Enter Setpoint 1 Value Enter Setpoint 2 Value Enter Setpoint 3 Value Enter Setpoint 4 Value Enter Code 222 to access meter set up programming menus Returns to Temperature Display (DSP) 9.9 DPM Temperature Display Mode Press DSP (Display) for the Temperature Display at any time. Press PAR to go to Quick Programming Model. Modline 5 Rev. L4 12/
172 DPM Installation and Operation Display Description Selections Navigation and Information No Sensor Communication Note: Quad Relays not held. Insure Sensor Baud Rate BRAT Set to 9600 Insure Sensor cable attached at both ends and powered. Valid temperature reading or special displays for Sensor and Measurement condition Numeric Reading Valid Temp Sensor Failure Invalid Reading (INV 1) Temperature Above Sensor Range Temperature Below Sensor Range Calibration in Progress (Quad Relays Held in Last State) 170 Rev. L4 12/2012 Modline 5
173 DPM Installation and Operation 9.10 Engineering Menu Press DSP (Display) for the Temperature Display at any time. Continually pressing PAR sequences through all the menus and back to entry start point. Menu Menu Use Par to read next Parameter. Press PAR again to go next parameter without changing the value. To Change a Value or Selection, use F1 F2, then Press PAR to enter and save Display Parameter Description Selections Navigation Sensor Rear Panel Keyboard Lock Locks Sensor rear panel Keyboard. Parameters can be viewed at Sensor, but not changed. LOCK THE KEYBOARD IF THE DPM IS THE ONLY INTERFACE THAT WILL SETUP SENSOR. Sensor Model Eight Characters (Read Only) A SR Model example shown. Measurement Units Selection Selects units to be used for display. Use matching units display overlay provided. See Figure 102 in this Section. See Section 5.6 ENGR Setup of Engineering Functions, page 94 of manual for further instructions. Relay Polarity Set the relay operation to correspond to proper and safe use of the contacts in the process system. Select N C. for closed relay operation with Sensor not in Alarm condition (open in alarm state). Select N.O. for closed relay operation with Sensor in Alarm condition (open when not in alarm condition). Normally closed operation is considered fail-safe operation. Invalid Measurement Condition Alarm ON selects Invalid Condition as ALARM to activate Alarm relay and rear panel ALARM display. OFF = Invalid is not alarm condition. System Check Initiates Sensor internal circuit and detector check. Do not initiate Check with active Alarm(s) for Error Codes X103, X104, X105, and X106. See Section 5.6 ENGR Setup of Engineering Functions, page 94. Checking Cal Displayed during check. (Read Only). Check Passed May be displayed after check. (Read Only). Check Failed May be displayed after Cal check. (Read Only). Check DPM Diagnostics Section for Alarm Status and Section 7 Maintenance, page 127. Time before next Auto CHK in Hours Models 52, 5G, and 5R Model 56 only 0 = OFF, no timed Automatic Check. Other Numerical value sets interval between Automatic Calibration checks. Important: See recommendations in section HOUR Automatic Calibration Check, page 99. Dirty Window Detector Setup Appears if Dirty window option installed. OFF turns, dirty window detection off. Coarse and Sensitive Warning Levels select a greater (CORS) or lesser (SENS) amount of Sensor window transmission loss to trigger alarm. Laser Energize See Safety Instructions in Sections 9.3. and Appears if Dirty window option installed. OFF turns, dirty window detection off. Coarse and Sensitive Warning Levels select a greater (CORS) or lesser (SENS) amount of Sensor window transmission loss to trigger alarm. Software Version Reports Sensor firmware version (Read Only). Modline 5 Rev. L4 12/

174 DPM Installation and Operation 9.11 Sensor Setup Head Menu Press DSP (Display) for the Temperature Display at any time. Continually pressing PAR sequences through all the menus and back to entry start point. Menu Menu Use Par to read next Parameter. Press PAR again to go next parameter without changing the value. To Change a Value or Selection, use F1 F2, then Press PAR to enter and save Display Parameter Description Selections Information Emissivity E-Slope Sets Emissivity for single color units or ratio sensors in one color mode. Sets the E-Slope for Ratio Sensors in the 2-color ratio mode. Response Time Signal Conditioning Sets the Sensor Response Time. Model 52 and 5G Sensors: Value 00.0 equals 6.6 milliseconds. Model 5R Sensors Minimum:.01 seconds Model 56 Sensors Minimum:.02 seconds Turns Peak Picker or Track and Hold Signal Conditioning on or off. Sub Menu PSEL and its functions only appear if Peak Picker Signal Conditioning is selected. Peak Selector Parameters Yes provides entry into sub-menu below. Peak Picker Decay Rate in degrees C or F. Press RST Key and F1 or F2 simultaneously to quickly change value Manual Peak Picker Reset (F) (C) Sets the peak picker decay rate in F or C. Zero (0) sets the unit to never decay. Caution: Sensors with firmware versions less than 1.02 have unit-less degrees that range 0.00 to for both F and C units. See Section D.R. Decay Rate Function, page 108. for more information. Resets Peak Picker Operation. Auto Peak Picker Reset Selects Peak Picker Auto Reset operation. Peak Picker Reset Below. Appears if Auto Peak Picker Reset is On Peak Delay Color Mode Match Match Sub-Menu The Response Time should be set to 100 milliseconds or faster, and Peak Picker or Track and Hold set to Off during adjustment. Sets the temperature above which Peak Picker action starts with Auto Peak Picker Reset Function On. Sets the Delay Time in seconds before Peak Picker action starts after a Reset or from zero scale. Zero (0) turns Delay Time to Off. Selects One Color (1) or Two Color (2) operation for a Series 5R ratio Sensor. Yes to Match known target temperature value to be displayed by Sensor. Sets temperature value to be displayed by Sensor to match known target temperature. If match requires an out of range E-slope or Emissivity, is displayed following the entry. 172 Rev. L4 12/2012 Modline 5
175 9.12 Sensor Setup Analog Output Functions DPM Installation and Operation Press DSP (Display) for the Temperature Display at any time. Continually pressing PAR sequences through all the menus and back to entry start point. Menu Use Par to read next Parameter. Press PAR again to go next parameter without changing the value. To Change a Value or Selection, use F1 F2, then Press PAR to enter and save Menu Display Parameter Description Selections Navigation Analog Output Range Sets Analog Output to 0 to 20 ma or 4 20 ma Analog Output Zero Scale (4 or 0 ma) equivalent temperature Analog Output Full Scale (20 ma) equivalent temperature Analog Output during Fatal Alarm Analog Output Low Temperature Analog Output High Temperature Minimum Sensor Temperature to Maximum Sensor Temperature minus 10 F or 10 C Minimum Zero to Full range must be 10 degrees. Example Shown for a 600 to 1400 F Range See note below about F and C conversions. Minimum Sensor Temperature +10 F or 10 C to Maximum Sensor Temperature. Minimum Zero to Full range must be 10 degrees. Example Shown for a 600 to 1400 F Range See note below about F and C conversions. Analog Current Output for Sensor Alarm Condition Analog Current Output for below Zero Temperature Condition. Will not appear for 0 20 ma output range Analog Current Output for above Full Scale Temperature Condition and adjustments are limited to a 10 F or 10 C when using the DPM. Sensors with firmware Versions 1.3 can have C units spans less than 10 because the Sensor first calculates in F and then converts to C. The equivalent C span is allowed but must be set at the Sensor. Spans more than 30 C (60 F) may be required to obtain acceptable results. Longer response times may be necessary for very narrow spans to smooth magnified temperature variations and noise. Modline 5 Rev. L4 12/
176 DPM Installation and Operation 9.13 DPM Sensor Diagnostic Functions Press DSP (Display) for the Temperature Display at any time. Continually pressing PAR sequences through all the menus and back to entry start point. Menu Menu Use Par to read next Parameter. Press PAR again to go next parameter without changing the value. To Change a Value or Selection, use F1 F2, then Press PAR to enter and save Display Parameter Description Readings Navigation and Information Status The Measurement Status and Alarms are multiplexed on the display, one at a time, in a repeating loop. The display update is set at a faster rate to speed up the viewing of all alarms. In the Display Mode: When an Alarm condition occurs, the ALM indictor on the DPM Meter Flashes. Alarms and equivalent Sensor Display Error Codes Out of Calibration Error; Same as Error Code X102 Signal Invalid 1; Same as Error Code (INV) Case Temp Low; Same as Error Code X106 Case Temp High; Same as Error Code X105 Detector Cold; Same as Error Code X104 Detector Hot; Same as Error Code X103 Current Loop Failure; Same as Error Code X108 Dirty Window Detected; Same as Error Code X101 Sensor Failure; Same as Error Code X107 DWD Failure; Same as Error Code X109 Signal Invalid 2; Same as Error Code (pinv) Measurement Condition Status No Alarm RS485 Lock; Sensor in Read Only Mode Under-range; Same as LOW on Sensor rear panel display Over-range; Same as HIGH on Sensor rear panel display Laser Pointer On; Same as LED lit on Sensor rear panel Calibration in Progress, Same as Cal on Sensor display Remote Emissivity or E-Slope input monitor Emissivity or E-Slope Values monitored as remotely inputed, a slow scan function. Instrument Internal Case Temperature to Instrument Temperature in selected units (C/F). Peak Picker Reset or Track and Hold Switch Status Indicates the remote input switch condition, open or closed. 174 Rev. L4 12/2012 Modline 5
177 9.14 Full Programming Mode DPM Installation and Operation Setpoints, MAX and MIN Displays, Overlay Backlight Reference the Red Lion Inc. PAX P Bulletin supplied with the meter for complete programming instructions for the DPM Full Programming Using the PAR Key, select Code and Enter 222, then Press PAR. The DPM meter is now in Full Programming Mode. Depressing PAR displays the meter menus indicated below. Only the modules, and the parameters appearing in the modules, are available to users. The DPM is a custom meter and several parameters are for dedicated use. Module 1 IRCON No (IRCON Programming also accessed in Quick Programming, replaces Signal Input Module) Module 2 User Input and Front Panel Function Key Parameters Module 3 Display and Program Lock-out Parameters Module 4 Secondary Function Parameters Module 5 Totalizer (Integrator Parameters) (Not available on the Ircon DPM) Module 6 Setpoint (Alarm) Parameters Module 7 Serial Communications Parameters (Baud must be set 9600, Data 8) Module 8 Analog Output Parameters (Not available on the Ircon DPM) Module 9 Factory Service Operations Quad Relay Card Setpoint Basic Setup and Operation The operation described is with the DPM in the Quick Programming Mode. Refer to the PAX Bulletin PAXCDS-C supplied with the Quad Relay Card for Setpoint operation variations with different setups. Refer to the PAXP Bulletin for Module 3 Setup in Section 6.3 Communication Protocol, page 116. Module 3 Display and Program Lock-out Parameters (3 - LOC) Do not change tot parameter. Set the following seven parameters. to Then to Then to Then to Then to Then to Then to (If using MAX or MIN temperature display or may require different setup.) Module 6 Setpoint (Alarm) Parameters (6 - SPt) Do not change parameters SP-n, HYS-n, ton-n, tof-n, rst-n, Stb-n. Set the following four parameters. To Program Setpoint 2: Then to Then to Then to Then to Then to Then to Repeat setup above for Setpoints 3 and 4. Modline 5 Rev. L4 12/
178 DPM Installation and Operation Setpoint temperature values are entered in the Quick Programming Mode. Par key must be pressed to enter values. This setup leaves all other parameters at the factory default values. These parameters should be reviewed and changed to match the process requirements using the PAX bulletins. Operation: Setpoint temperature values are inputted in the Quick Programming Mode using the PAR Key to quickly access and change them. Setpoint relay action occurs when displayed temperature is above the Setpoint value. Setpoint alarm annunciators on the DPM display also light. Output logic is normally open. Setpoints are only operational when the DPM is in the Display mode. The Setpoint relay outputs are held in their last state before leaving the display mode and entering any programming or diagnostic mode. Relays also held in their last state during Sensor CAL (Calibration in progress). Relay states will be in an unknown condition with a Sensor error MAX and MIN Temperature Display Basic Setup and Operation The operation described is with the DPM in the Quick Programming Mode. Refer to the PAX Bulletin supplied with the meter for MAX and MIN operation variations with different setups. This Setup displays captured MAX and MIN in the Quick Programming mode by pressing Display function key to choose MAX, MIN or Current Temperature Setup Module 2 User Input and Front Panel Function Key Parameters (2 - FNC) Do not change User 1 parameter leave at PLOC. Do not change ScF1 or ScF2, leave at NO. Set to Then to Then to Then to Then to Module 3 Display and Program Lock-out Parameters (3 - LOC) Set to Then to All other parameters remain at the factory default settings. Operation: Press Display (DSP) function key to choose MAX, MIN or current Temperature. The MAX and MIN temperatures have been captured since the last reset of these functions. The Front Panel F1 Key resets the MIN value to the current temperature reading on the display. The MIN temperature function continues from that point. The Front Panel F2 Key resets the MAX value to the current temperature reading on the display. The MAX temperature function continues from that point. The Front Panel RST Key resets both MAX and MIN values to the current temperature reading on the display. 176 Rev. L4 12/2012 Modline 5
179 DPM Installation and Operation Overlay Backlight The DPM is factory set for using an F or C units display overlay. If an overlay is not used, the backlight can be turned off in the Full Programming as follows. Module 4 Secondary Functions (4 - SEC) Only change the parameter. Change to Factory Default Restoration If for some reason the DPM settings have been changed and set to values that are now unknown, restoration to factory settings can be made. Access to Module 9 Factory Service Operations, is required. Refer to the Red Lion PAX B Bulletin for complete instructions. To access Factory Service from the Quick Programming Mode, display the parameter and enter Alternately, with the User 1 jumper between Terminals 7 and 8 removed, the unit is in Full Programming mode and access to all meter programming modules is immediately available. Remove the jumper only as an alternate to the Code 222 entry in the Quick Programming Mode. Select Module 9 Factory Service Operations. Go to Code. Enter. The meter will display reset and return the display to. This will overwrite all user settings to the factory settings. If removed, replace the jumper between terminals 7 and 8. Test the meter to make sure it is back in the correct mode of operation. Setpoint and MIN / MAX parameters need to be programmed again. Modline 5 Rev. L4 12/
180 Appendix A 10 Appendix A NEMA SAFETY GUIDELINES for the Application, Installation and Maintenance of Solid-State Control SECTION 1: DEFINITIONS (This section is classified as NEMA Standard ) Electrical Noise Unwanted electrical energy which has the possibility of producing undesirable effects in the control, its circuits, and system. Electrical Noise Immunity The extent to which the control is protected from a stated electrical noise. Off-State Current The current that flows in a solid state device in the off-state condition. Off-State Condition The conditions of a solid-state device where no control signal is applied. On-State Condition The condition of a solid-state device when conducting. Surge Current A current exceeding the steady state current for a short time duration, normally described by its peak amplitude and time duration. Transient Over-voltage The peak voltage in excess of steady state voltage for a short time during the transient conditions (e.g., resulting from the operations of a switching device). SECTION 2: GENERAL (Sections 2 through 5 are classified as Authorized Engineering Information ) Solid State and electro-mechanical controls can perform similar control functions, but there are certain unique characteristics of solid state controls which must be understood. In the application, installation and maintenance of solid state control, special consideration should be given to the characteristics described in 2.1 through Ambient Temperature Care should be taken not to exceed the ambient temperature range specified by the manufacturer. 2.2 Electrical Noise Performance of solid-state controls can be affected by electrical noise. In general, complete systems are designed with a degree of noise immunity. Noise immunity can be determined with tests such as described in Manufacturer recommended installation practices for reducing the effect of noise should be followed. 2.3 Off-State Current Solid-state controls generally exhibit a small amount of current flow when in the off-state condition. Precautions must be exercised to ensure proper circuit performance and personnel safety. The value of this current is available from the manufacturer. 178 Rev. L4 12/2012 Modline 5
181 Appendix A 2.4 Polarity Incorrect polarity of applied voltages may damage solid-state controls. The correct polarity of solidstate controls should be observed. 2.5 Rate of Rise Voltage or Current DV/DT or DI/DT) Solid-state controls can be affected by rapid changes of voltage or current if the rate of rise (DV/DT and/or DI/DT) is greater than the maximum permissible value specified by the manufacturer. 2.6 Surge Current Current of a value greater than that specified by the manufacturer can affect the solid-state control. Current limiting means may be required. 2.7 Transient Over-voltage Solid-state controls may be affected by transient over-voltages that are in excess of those specified by the manufacturer. Voltage limiting means should be considered and may be required. SECTION 3: APPLICATION GUIDELINES 3.1 General Application Precautions Circuit Considerations The consequences of some malfunctions such as those caused by shorted output devices, alteration, loss of memory, or failure of isolation within components or logic devices require that the user be concerned with the safety of personnel and the protection of the electronics. It is recommended that circuits which the user considers to be critical to personnel safety, such as end of travel circuits and emergency stop circuits, should directly control their appropriate functions through an electromechanical device independent of the solid-state logic. Such circuits should initiate the stop function through de-energization rather than energization of the control device. This provides a means of circuit control that is independent of system failure Power Up/Power Down Considerations Consideration should be given to system design so that unsafe operation does not occur under these conditions since solid state outputs may operate erratically for a short period of time after applying or removing power Redundancy and Monitoring When solid-state devices are being used to control operations which the user determines to be critical, it is strongly recommended that redundancy and some form of checking be included in the system. Monitoring circuits should check that actual machine or process operation is identical to controller commands; and in the event of failure in the machine, process, or the monitoring system, the monitoring circuits should initiate a safe shutdown sequence Over-current Protection To protect triacs and transistors from shorted loads, a closely matched short circuit protective device (SCPD) is often incorporated. These SCPD s should be replaced only with devices recommended by the manufacturer. Modline 5 Rev. L4 12/
182 Appendix A Over-voltage Protection To protect triacs, SCR s and transistors from over-voltages, it may be advisable to consider incorporating peak voltage clamping devices such as arrestors, zener diodes, or snubber networks in circuits incorporating these devices. 3.2 Circuit Isolation Requirements Separating Voltages Solid-state logic uses low level voltage (e.g., less than 32 volts dc) circuits. In contrast, the inputs and outputs are often high level (e.g., 120 volts ac) voltages. Proper design of the interface protects against an unwanted interaction between the low level and high level circuits; such an interaction can result in a failure of the low voltage circuitry. This is potentially dangerous. An input and output circuitry incorporating effective isolation techniques (which may include limiting impedance or Class 2 supplied circuitry) should be selected Isolation Techniques The most important function of isolation components is to separate high level circuits from low level circuits in order to protect against the transfer of a fault from one level to the other. Isolation transformers, pulse transformers, reed relays, or optical couplers are typical means to transmit low level logic signals to power devices in the high level circuit. Isolation impedance means also are used to transmit logic signals to power devices. 3.3 Special Application Considerations Converting Ladder Diagrams Converting a ladder diagram originally designed for electromechanical systems to one using solidstate control must account for the differences between electromechanical and solid state devices. Simply replacing each contact in the ladder diagram with a corresponding solid state contact will not always produce the desired logic functions or fault detection and response. For example, in electromechanical systems, a relay having a mechanically linked normally open (NO) and normally closed (NC) contact can be wired to check itself. Solid-state components do not have a mutually exclusive NO-NC arrangement. However, external circuitry can be employed to sample the input and contact state and compare to determine if the system is functioning properly Polarity and Phase Sequence Input power and control signals should be applied with polarity and phase sequence as specified by the manufacturer. Solid-state devices can be by the application of reverse polarity or incorrect phase sequence. 3.4 Planning Electrical Noise Rejection The low energy levels of solid-state controls may cause them to be vulnerable to electrical noise. This should be considered in the planning stages Assessing Electrical Environment Sources of noise are those pieces of equipment that have large, fast changing voltages or currents when they are energized or de-energized, such as motor starters, welding equipment, SCR type, adjustable speed devices, and other inductive devices. These devices, as well as the more common control relays and their associated wiring, all have the capability of inducing serious current and voltage transients on their respective power lines. It is these transients which nearby solid state controls must withstand and for which noise immunity should be provided. 180 Rev. L4 12/2012 Modline 5
183 Appendix A An examination of the proposed installation site of the solid-state control should identify equipment that could contaminate power lines. All power lines that will be tapped by the proposed solid state control should be examined for the presence, severity, and frequency of noise occurrences. If found, system plans should provide for the control of such noise Selecting Devices to Provide Noise Immunity Installation planning is not complete without examination of the noise immunity characteristics of the system devices under consideration. Results of tests to determine relative immunity to electrical noise may be required from the manufacturer. Two such standardized tests are the ANSI (C37.90a-1974) Surge Withstand Capability test and the NEMA (ICS ) noise test referred to as The Showering Arc Test. These are applied where direct connection of solid state control to other electromechanical control circuits is intended. Circuits involving analog regulating systems or high speed logic are generally more sensitive to electrical noise; therefore, isolation and separation of these circuits is more critical. Further information on electrical noise and evaluation of the severity of noise may be found in ANSI/IEEE Publication No Where severe power line transients are anticipated or noted, appropriate such as commercially available line filter, isolation transformers, or voltage limiting varistors, should be considered. All inductive components associated with the system should be examined for the need for noise suppression Design of Wiring for Maximum Protection Once the installation site and power conductors have been examined, the system wiring plans that will provide noise suppression should be considered. Conducted noise enters solid state control at the points where the control is connected to input lines, output lines, and power supply wires. Input circuits are the circuits most vulnerable to noise. Noise may be introduced capacitatively through wire-to-wire proximity or magnetically from nearby lines carrying large currents. In most installations, signal lines and power lines should be separate. Further, signal lines should be appropriately routed and shielded according to the manufacturer s recommendations. When planning a system layout, care must be given to appropriate grounding practice. Because design differences may call for different grounding, the control manufacturer s recommendations should be followed. 3.5 Countering the Effects of Off-State Current Off-State Current Solid-state components, such as triacs, transistors and thyristors inherently have in the off-state a small current flow called off-state current. Off-state current may also be contributed by devices used to protect these components, such as RC snubbers Off-State Current Precautions Off-state currents in a device in the off-state may present a hazard of electrical shock and the device should be disconnected from the power source before working on the circuit or load. Precautions should be taken to prevent the off-state current of an output device which is in the off-state from energizing an input device. 3.6 Avoiding Adverse Environmental Conditions Temperature Solid-state devices should only be operated within the temperature ranges specified by the manufacturer. Because such devices generate heat, care should be taken to see that the ambient temperature at the device does not exceed the temperature range specified by the manufacturer. Modline 5 Rev. L4 12/
184 Appendix A The main source of heat in a solid-state system is the energy dissipated in the power devices. Since the life of the equipment can be increase by reducing operating temperature, it is important to observe the manufacturer s maximum/minimum ambient temperature guidelines, where ambient refers to the temperature of the air providing the cooling. The solid-state equipment must be allowed to stabilize to within the manufacturer s recommended operating temperature range before energizing control functions. When evaluating a system design, other sources of heat in the enclosure which might raise the ambient temperature should not be overlooked. For example- power supplies, transformers, radiated heat, sunlight, furnaces, incandescent lamps, etc. should be evaluated. In instances where a system will have to exist in a very hot ambient environment, special cooling methods may have to be employed. Techniques that are employed include cooling fans (with adequate filtering), vortex coolers, heat exchanges and air conditioned rooms. Over-temperature sensors are recommended for systems where special cooling is employed. Use of air conditioning should include means for prevention of condensing moisture Contaminants Moisture, corrosive gases and liquids, and conductive dust can all have adverse effects on a system that is not adequately protected against atmospheric contaminants. If these contaminants collect on printed circuit boards, bridging between the conductors may result in malfunction of the circuit. This could lead to noisy, erratic control operation or at worst, a permanent malfunction. A thick coating of dust could also prevent adequate cooling on the board or heat sink, causing malfunction. A dust coating on heat sink reduces their thermal efficiency. Preventive measures include a specially conditioned room or a properly specified enclosure for the system Shock and Vibration Excessive shock or vibration may cause damage to solid-state equipment. Special mounting provisions may be required to minimize damage. 3.7 Safety Knowledge Leads to Safety Planning for an effective solid-state circuit requires enough knowledge to make basic decisions that will render the system safe as well as effective. Everyone who works with a solid-state control should be educated in its capabilities and limitations. This includes in-plant installers, operators, service personnel, and system designers. SECTION 4: APPLICATION GUIDELINES 4.1. Installation Proper installation and field wiring practices are of prime importance to the application of solid state controls. Proper wiring practice will minimize the influence of electrical noise which may cause malfunction of equipment. Users and installers should be familiar with installation and wiring instructions in addition to requirements of all applicable codes, laws and standards. The manufacturer of the device or component in question should be consulted whenever conditions arise that are not covered by the manufacturer s instructions. Electrical noise is a very important consideration in any installation of solid-state control. While wiring practices may vary from situation to situation, the following are basic to minimizing electrical noise: 182 Rev. L4 12/2012 Modline 5
185 Appendix A a). Sufficient physical separation should be maintained between electrical noise sources and sensitive equipment to assure that the noise will not cause malfunctioning or un intended actuation of the control. b). Physical separation should be maintained between sensitive signal wires and electrical power and control conductors. This separation can be accomplished by conduits, wiring trays or as otherwise recommended by the manufacturer. c). Twisted-pair wiring should be used in critical signal circuits and noise producing circuits to minimize magnetic interference. d). Shielded wire should be used to reduce the magnitude of the noise coupled into the low level signal circuit by electrostatic or magnetic coupling. e). Provisions of the 1984 National Electrical Code with respect to grounding should be followed. Additional grounding precautions may be required to minimize electrical noise. These precautions generally deal with ground loop current arising from multiple ground paths. The manufacturer s recommendations should be followed. 4.2 Enclosures (cooling and ventilating) Suitable enclosures and control of the maximum operating temperature, both of which are environmental variables, may be needed to prevent malfunction of solid-state control. Follow the manufacturer s recommendations for the selection of enclosures, ventilation, air filtering (if required, and ambient temperature. These recommendations may vary from installation to installation even within the same facility. 4.3 Special Handling of Electrostatic Sensitive Devices Some devices may be damaged by electrostatic charges. These devices are identified and should be handled in the special manner specified by the manufacturer. Plastic wrapping materials used to ship these devices may be conductive and should not be used as insulating material. 4.4 Compatibility of Devices with Applied Voltages and Frequencies Users and installers should verify that the applied voltage and frequency agree with the rated voltage and frequency specified by the manufacturer. Incorrect voltage or frequency may cause a malfunction or damage to the control. 4.5 Testing Precautions When testing solid state control, the procedures and recommendations set forth by the manufacturer. When applicable, instrumentation and test equipment should be electrically equivalent to that recommended by the manufacturer for the test procedure. Do not use a low impedance voltage tester. High voltage insulation tests and dielectric tests should never be used to test solid state devices. If high voltage insulation of field wiring is required, solid state devices should be disconnected. Ohm Modline 5 Rev. L4 12/
186 Appendix A meters should only be used when recommended by the manufacturer. Testing equipment should be grounded if it is not, special precautions should be taken. 4.6 Start-up Procedures Checks and tests prior to start-up and start-up procedures recommended by the manufacturer should be followed. SECTION 5: PREVENTIVE MAINTENANCE and REPAIR GUIDELINES 5.1 General A well planned and executed maintenance program is essential to the satisfactory operation of solid state electrical equipment. The kind and frequency of the maintenance operation will vary with the complexity of the equipment as well as with the nature of the operating conditions. The manufacturer s maintenance recommendations should be followed. Useful reference publications for setting up a maintenance program are NFPA 70B-1983 Maintenance of Electrical Equipment and NFPA 70E-1983 Electrical Safety Requirements for Employee Workplaces. 5.2 Preventive Maintenance The following factors should be considered when formulating a maintenance program. 1. Maintenance should be performed by qualified personnel familiar with the construction, operation and hazards involved with the control. 2. Maintenance should be performed with the control out of operation and disconnected from all sources of power. If maintenance must be performed while the control is energized, the safety related practices of NFPA 70E should be followed. 3. Care should be taken when servicing electrostatic sensitive components. The manufacturer s recommendations for these components should be followed. 4. Ventilation passages should be kept open. If the equipment depends upon auxiliary cooling, e.g., air, water, or oil, periodic inspection (with filter replacement when necessary) should be made of these systems. 5. The means employed for grounding or insulating the equipment from ground should be checked to assure its integrity (see 4.5). 6. Accumulations of dust and dirt on all parts, including semiconductor heat sinks, should be removed according to the manufacturer s instructions, if provided; otherwise, the manufacturer should be consulted. Care must be taken to avoid damaging any delicate components and to avoid displacing dust, dirt, or debris that permits it to enter or settle into parts of the control equipment. 7. Enclosures should be inspected for evidence of deterioration. Accumulated dust and dirt should be removed from the top of the enclosures before opening doors or removing covers. 8. Certain hazardous materials removed as part of maintenance or repair procedure (e.g., polychlorinated biphenyls (PCB) found in some liquid filled capacitors) must be disposed of as described in federal regulations. 184 Rev. L4 12/2012 Modline 5
187 Appendix A 5.3 Repair If equipment condition indicates repair or replacement, the manufacturer s instruction manual should be followed carefully. Diagnostic information within such a manual should be used to identify the probable source of the problem, and to formulate a repair plan. When solid-state equipment is repaired, it is important that any replacement part be in accordance with the recommendations of the equipment manufacturer. Care should be taken to avoid the use of parts which are no longer compatible with other changes in the equipment. Replacement parts should be inspected for deterioration due to shelf life and for signs of rework or wear that may involve factors critical to safety. After repair, follow proper start-up procedures. Take special precautions to protect personnel from hazards during start-up. 5.4 Safety Recommendations for Maintenance Personnel Qualified personnel familiar with the construction, operation and hazards involved, should do all maintenance work. The appropriate work practices of NFPA 70E should be followed. Modline 5 Rev. L4 12/
 Directive 2002/96/EC.")
188 Appendix B 11 Appendix B DISASSEMBLY INSTRUCTIONS FOR DISPOSAL AND RECYCLING: IRCON MODLINE 5 SERIES PRODUCT AND ACCESSORIES Following are the disassembly instructions for the IRCON Modline 5 Series product, including all optional accessories, in accordance to guidelines of the European Union Waste Electric and Electronic Equipment (WEEE) Directive 2002/96/EC. This product includes the following materials to be dispensed of properly: Aluminum Steel Plastic Printed Circuit Board Silicone Rubber POI box casing, WJ-5 water jacket, various accessories Sensor and Lens Housings, various screws and connectors Various components within sensor, DWD unit and POI box, cable coating Circuitry within sensor and DWD unit Cable coating Gaskets Fully Assembled View: Below is a photograph of a fully-assembled Ircon Modline 5 series sensor. Disassembly instructions for this product series are shown on the following pages. These instructions account for all Modline 5 models (and often-used accessories), as the variation between models affecting recycling is minimal. 1 POI Box 3 4 Modline 5 Sensor with DWD (Dirty Window Detector) Option Figure 107: Fully Assembled View 2 4 Modline 5 Sensor with Standard Lense 186 Rev. L4 12/2012 Modline 5
189 Appendix B DISASSEMBLY INSTRUCTIONS FOR DISPOSAL AND RECYCLING: IRCON MODLINE 5 SERIES PRODUCT AND ACCESSORIES Aluminum Figure 108: Modline 5 Sensor with WJ5 Cooling Jacket Accessory Steel Aluminum Steel Figure 109: Modline 5 Sensors with WJA Cooling Jacket (Left) and other Accessories (Right) Modline 5 Rev. L4 12/

 Disassembly")

190 Appendix B DISASSEMBLY INSTRUCTIONS FOR DISPOSAL AND RECYCLING: IRCON MODLINE 5 SERIES PRODUCT AND ACCESSORIES 1 Power Supply / Signal Interface Box (POI) Disassembly Instructions Aluminum Plastic Aluminum Steel Plastic Aluminum Aluminum 188 Rev. L4 12/2012 Modline 5


191 Appendix B DISASSEMBLY INSTRUCTIONS FOR DISPOSAL AND RECYCLING: IRCON MODLINE 5 SERIES PRODUCT AND ACCESSORIES 2 Removal of Modline 5 Sensor - Standard Lens Removal of Modline 5 Sensor Lens with DWD (Dirty Window Detector) Option Modline 5 Rev. L4 12/


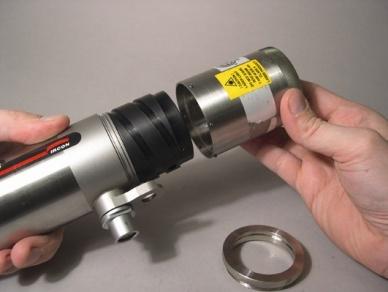


192 Appendix B DISASSEMBLY INSTRUCTIONS FOR DISPOSAL AND RECYCLING: IRCON MODLINE 5 SERIES PRODUCT AND ACCESSORIES 4 Disassembly of Sensor Body Rev. L4 12/2012 Modline 5
 Rubber (Gasket) Aluminum Rubber Modline 5 Rev.")
193 Appendix B DISASSEMBLY INSTRUCTIONS FOR DISPOSAL AND RECYCLING: IRCON MODLINE 5 SERIES PRODUCT AND ACCESSORIES 5 Fully Disassembled Sensor Aluminum Glass Rubber Glass Steel Steel Glass Steel Steel Glass (Lens) Rubber (Gasket) Aluminum Rubber Modline 5 Rev. L4 12/
Modline. 5 Stand Alone Temperature Sensor. You can bet your process on it!
 Modline 5 Stand Alone Temperature Sensor You can bet your process on it! Modline 5 Infrared Thermometer - you can bet your process on it! If reliable and accurate temperature measurement is imperative
Installation and Operations Manual
 Installation and Operations Manual H-IM-LLC February 2018 Part No. 25092501 Replaces H-IM-LLC (01/2014) Lead Lag Control System Table of Contents General Safety Information 2 Inspection 2 Warranty Statement
Series: MBC1-TC Mini Benchtop Temperature Controller
 User s Guide Series: MBC1-TC Mini Benchtop Temperature Controller Imagine Instruments LLC:: 4500 Williams Drive, Ste 212-318 :: Georgetown, TX 78633 :: p. 855.574.6243 e-mail: info@imagineinstruments.com
Model AD C AD RS-422 Distributor
 Model C AD RS-422 Distributor Installation and Operation Instructions Speed LT, Speed, Speed Ultra, Speed Optima, and Speed Optima LT The C Distributor is used to interface American Dynamics Switching
Mark 25 Ultrapure Water Conductivity Analyzer
 Martek Instruments, Inc. Mark 25 Ultrapure Water Conductivity Analyzer Instruction Manual WARRANTY POLICY Unless otherwise stated, MARTEK INSTRUMENTS, INC. warrants this equipment to be free from defects
Sentry LIQUID LEVEL GAUGE MODEL 200 or 200C OWNER MANUAL REV 1.7 SEPT08 PAGE 1 OF 12
 PAGE 1 OF 12 TABLE OF CONTENTS PAGE 1. SAFETY PRECAUTIONS 1.1. Electrical shock 3 2. APPLICATION 3 3. INSTALLATION 3.1. Mount indoor alarm display 3.2. Mount the outdoor junction box 3.3. Install interconnecting
Duct Mount. Installation Instructions
 Duct Mount Installation Instructions 00809-0600-4975 Legal Notice The Flame Detector described in this document is the property of Rosemount. No part of the hardware, software, or documentation may be
INSTRUCTION MANUAL P Heating and 1 Cooling
 REPLACEMENT COMPONENTS DIVISION CARRIER CORPORATION www.totaltouch.info Technical Support: 1-866-90TOUCH (1-866-908-6824) INSTRUCTION MANUAL P286-1200 2 Heating and 1 Cooling Physical Dimensions Case:
PodView Level Indicator LI40 Series Manual
 PodView Level Indicator LI40 Series Manual Flowline Inc. 10500 Humbolt Street Los Alamitos, CA 90720 Tel: (562) 598 3015 Fax: (562) 431 8507 www.flowline.com Rev A MN204260 1 of 16 INTRODUCTION / TABLE
Remote Relay Module (RRM)
") Remote Relay Module (RRM) Instruction Manual WARNING THIS MANUAL MUST BE CAREFULLY READ BY ALL INDIVIDUALS WHO HAVE OR WILL HAVE THE RESPONSIBILITY FOR INSTALLING, USING OR SERVICING THIS PRODUCT. Like
Remote Relay Module (RRM) Instruction Manual WARNING THIS MANUAL MUST BE CAREFULLY READ BY ALL INDIVIDUALS WHO HAVE OR WILL HAVE THE RESPONSIBILITY FOR INSTALLING, USING OR SERVICING THIS PRODUCT. Like
Models LBW-420-LEL (24 VDC powered) Ammonia Leak Detector
 Ammonia Leak Detector") Models LBW-420-LEL (24 VDC powered) Ammonia Leak Detector CAUTION & SYMBOL DEFINITIONS: CAUTION: Gives detailed description of different situations to avoid or not avoid for the proper operation of the
Models LBW-420-LEL (24 VDC powered) Ammonia Leak Detector CAUTION & SYMBOL DEFINITIONS: CAUTION: Gives detailed description of different situations to avoid or not avoid for the proper operation of the
WATCHMAN Model LBW-WATCHMAN Ammonia Leak Detector
 WATCHMAN Model LBW-WATCHMAN Ammonia Leak Detector IMPORTANT READ THIS FIRST....3 CAUTIONS... 3 AVOIDING NUISANCE ALARMS... 3 STANDARD FEATURES... 4 AVAILABLE OPTIONS... 4 PARTS DESCRIPTION... 5 FRONT PANEL
LV-5 Direct Contact Low Voltage Detector and LV-5/K01 Kit including LV-PT Tester, Holster and Available Accessories
 LV-5 Direct Contact Low Voltage Detector and LV-5/K01 Kit including LV-PT Tester, Holster and Available Accessories Operating & Instruction Manual 1475 Lakeside Drive Waukegan, Illinois 60085 U.S.A. 847.473.4980
Miniature Thermoelectric Cooler Controller MTCC-01 user's guide
 Miniature Thermoelectric Cooler Controller MTCC-01 user's guide 1 Table of Contents 1. Warranty... 3 2. MTCC-01-xxx overview... 4 2.1. MTCC-01-xxx specification... 4 2.2. TE cooled detector temperature
- User Brochure Programmable Thermostat 510
 - User Brochure Programmable Thermostat 510 U 510 09/09 Congratulations on the purchase of your tekmar programmable thermostat. This thermostat combines easy-to-use programming with advanced features to
6502B RF Distribution
 6502B RF Distribution User Guide Revision A - March 2004 Part Number 15247-201 Table of Contents Table of Contents About this User Guide Purpose...................................................... 1
Environmental Monitoring SmartSlot Card
 Environmental Monitoring SmartSlot Card AP9612TH Installation and Quick Start Manual Contents Introduction............................. 1 Overview 1 Product inventory 1 Safety notice 2 Your inspection
VS2000V Veterinary Vital Signs Monitor Operation Manual
 VS2000V Veterinary Vital Signs Monitor Operation Manual - English Version 1.0, July 2011 2011 UTECH Co., Ltd. All rights reserved. Table of Contents Table of Contents Warranty and Service Information...
ModSync Sequencing System Installation & Operation Manual. For use with Fulton Steam Boilers.
 ModSync Sequencing System Installation & Operation Manual For use with Fulton Steam Boilers. Revision 3.0 8/21/2008 - 2 - Table of Contents Introduction Page 4 Features Page 4 Sequence of Operation Page
Isolated Thermocouple Module
 User Manual for the HE693THM665, HE693THM666, HE693THM667, HE693THM668 Isolated Thermocouple Module Twelfth Edition 19 April 2004 PREFACE 19 APR 2004 PAGE 3 PREFACE This manual explains how to use the
Instruction Manual WARNING
 Controllers Instruction Manual WARNING THIS MANAUL MUST BE CAREFULLY READ BY ALL INDIVIDUALS WHO HAVE OR WILL HAVE THE RESPONSIBILITY FOR INSTALLING, USING OR SERVICING THIS PRODUCT. Like any piece of
AUTOMATION. Operator s Manual RST Series Web Enabled Input Module. Rev. A2, 1/12
 AUTOMATION P R O D U C T S GROUP, INC. Operator s Manual RST-5000 Series Web Enabled Input Module Rev. A2, 1/12 Tel: 1/888/525-7300 Fax: 1/435/753-7490 www.apgsensors.com E-mail: sales@apgsensors.com RST-5000
MODEL 8143 SIGNAL SELECTOR INSTALLATION AND OPERATION MANUAL
 MODEL 8143 SIGNAL SELECTOR INSTALLATION AND OPERATION MANUAL 95 Methodist Hill Drive Rochester, NY 14623 Phone: US +1.585.321.5800 Fax: US +1.585.321.5219 www.spectracomcorp.com Part Number 8143-5000-0050
Controllers. Instruction Manual WARNING
 Controllers Instruction Manual WARNING THIS MANUAL MUST BE CAREFULLY READ BY ALL INDIVIDUALS WHO HAVE OR WILL HAVE THE RESPONSIBILITY FOR INSTALLING, USING OR SERVICING THIS PRODUCT. Like any piece of
CD6102 / CD6102 OC / CD6102-2
 PreView Display CD6102 / CD6102 OC / CD6102-2 Operating Manual www.previewradar.com PATENTS Patented under one or more of the following U.S. Patents: 5345471, 5523760, 5457394, 5465094, 5512834, 5521600,
MODEL DPS1 Heated Dew Point Measuring System OPERATORS MANUAL
 MODEL DPS1 Heated Dew Point Measuring System OPERATORS MANUAL 19 Brigham Street Unit #8 Marlborough, MA USA 01752 Tel: (508) 263-5900 (800) 276-3729 Fax: (508) 486-9348 E-mail: h2o@edgetech.com www.edgetech.com
INSTRUCTION MANUAL TS21. 2 Heating and 1 Cooling
 INSTRUCTION MANUAL TS21 2 Heating and 1 Cooling WELCOME TO Flexible applications - Universal and easy to install in residential or commercial environments. Advanced features - Precision electronics provide
- User Brochure tekmarnet 4 Setpoint Control 161
 - User Brochure tekmarnet 4 Setpoint Control 161 U 161 08/07 Congratulations on the purchase of your tekmar setpoint control with communication. The setpoint control combines easy-to-use programming with
Infrared Thermometer
 572-2 Infrared Thermometer PN 4307046 March 2013, Rev. 1, 08/13 2013 Fluke Corporation. All rights reserved. Specifications are subject to change without notice. All product names are trademarks of their
Preamplifier Power Supply PPS-02 user's guide
 Preamplifier Power Supply PPS-02 user's guide 1 Table of contents 1. Warranty... 3 2. PPS-02 overview... 4 2.1. PPS-02 parameters... 4 2.2. Coding the symbol of the power supply...4 2.3. PPS-02 physical
Installation Manual. THM-0100 Setpoint Thermostat Version THM HBX Control Systems Inc.
 Installation Manual M-000 Setpoint Thermostat Version.04 M-000 HBX Control Systems Inc. TABLE OF CONTENTS Introduction Index Safety symbols and Warnings Index Receipt and Inspection Description Technical
Owner s Manual. PIR-1 IR Learner
 Owner s Manual PIR-1 IR Learner PIR-1 Owner s Manual 2010-2013 Universal Remote Control, Inc. The information in this owner s manual is copyright protected. No part of this manual may be copied or reproduced
RS Pro Infrared Temperature Sensor
 Instruction Manual RS Pro Infrared Temperature Sensor Stock Number: 161-8103 Introduction The RS Pro Infrared Temperature Sensor is a device for measuring the temperature of the surface of a solid or liquid
Compact Equipment Warranty Policy
 006 07.15 Compact Equipment Warranty Policy 07/2015 Table of Contents Preface Page 1 Distributor s Warranty Responsibilities Page 1 Standard Warranties Page 2 Warranty Coverage Page 2 Warranty Limitations
Appearance and sensing characteristic Specification (temperature range) Model 10 to 70 C ES1B. 2 mm 20 mm 40 mm 60 mm. 40 dia. 60 dia.
 Model 10 to 70 C ES1B. 2 mm 20 mm 40 mm 60 mm. 40 dia. 60 dia.") Infrared Thermosensor CSM DS_E_3_2 Achieve Low-cost Measurements with an Infrared Thermosensor. The has an electromotive output as high as that of a thermocouple, thus connecting directly to the thermocouple
Infrared Thermosensor CSM DS_E_3_2 Achieve Low-cost Measurements with an Infrared Thermosensor. The has an electromotive output as high as that of a thermocouple, thus connecting directly to the thermocouple
Dolphin 9900 Mobile Computer
 Dolphin 9900 Mobile Computer with Windows Mobile 6 Quick Start Guide Dolphin 9900 Quick Start Guide Out of the Box Verify that the box contains the following items: Dolphin 9900 mobile computer (the terminal)
SEC Signature Process Gas Analyzer
 SEC Signature Process Gas Analyzer Instruction and Operation Manual Sensor Electronics Corporation 5500 Lincoln Drive Minneapolis, Minnesota 55436 USA (952) 938-9486 Fax (952) 938-9617 email sensor@minn.net
MaxLite LED MICRO-T PANEL
 ` Installation Instructions General Safety Information To reduce the risk of death, personal injury or property damage from fire, electric shock, falling parts, cuts/abrasions, and other hazards read all
Filter Oven with Controller 101FRDC00-50 / 101FRDC00-CTRL
 Filter Oven with Controller 101FRDC00-50 / 101FRDC00-CTRL Andover Corporation 4 Commercial Drive Salem, New Hampshire 03079-2800 Tel: (603) 893-6888 US Toll Free: (888) 893-9992 Fax: (603) 893-6508 Email:
Sentry LIQUID LEVEL CONTROLLER MODEL 120 OPERATING MANUAL.
 Sentry LIQUID LEVEL CONTROLLER MODEL 120 OPERATING MANUAL www.aquaticsentry.com TABLE OF CONTENTS 1. SAFETY PRECAUTIONS... 3 2. APPLICATION... 3 2.1 HIGH AND LOW LEVEL ALARM 2.2 PUMP DOWN CONTROLLER 2.3
MaxLite LED VAPOR TIGHT LINEAR FIXTURES
 A cost effective LED Vapor Tight Fixture features a full length polycarbonate lens and a one-piece white glass reinforced polyester (GRP) body. Designed to meet or exceed seven to 10 foot-candles at 8
VX SERIES Wireless Thermostat with Occupancy Sensor
 VX SERIES Wireless Thermostat with Occupancy Sensor INSTRUCTION MANUAL Table of Contents Thermostat Installation... 7 Installing the Wireless Control Card...8 Mounting the thermostat to the wall...9 Thermostat
TFD-1 Installation & User s Guide
 TFD-1 Installation & User s Guide TABLE OF CONTENTS CHAPTER 1 - INTRODUCTION... 4 1.1 GENERAL...4 1.2 DESCRIPTION...4 CHAPTER 2 - INSTALLATION... 5 2.1 UNPACKING...5 2.2 MOUNTING...5 2.3 SWITCH SETTINGS...6
Users Manual. LAURUS Systems, Inc. - Ph: Fax:
 Users Manual LAURUS Systems, Inc. - Ph: 410-465-5558 - Fax: 410-465-5257 - www.laurussystems.com Introduction The rad-d is a security and inspection system that detects emissions from radioactive material.
Beacon 800 Gas Monitor Operator s Manual
 Beacon 800 Gas Monitor Operator s Manual Part Number: 71-0037RK Revision: F Released: 4/18/17 www.rkiinstruments.com Product Warranty RKI Instruments, Inc. warrants gas alarm equipment sold by us to be
User s Manual and Warranty Information for Counterweighted Chain Drive ThyssenKrupp Access
 II User s Manual and Warranty Information for Counterweighted Chain Drive ThyssenKrupp Access Part #2139703 Rev. G II Table of Contents Introduction...3 Elevator Overview...4 Description of Features...5-7
Falcon-II Next Generation, Air Quality Monitor CO2 & Temperature
 Critical Environment Technologies Canada Inc. Falcon-II Next Generation, Air Quality Monitor CO2 & Temperature OPERATION MANUAL REV: A JUNE-2-2008 #145, 7391 Vantage Way Delta, BC V4G 1M3 Canada Phone:
NLC C61 Air-Cooled Argon-ion Laser
 NLC C61 Air-Cooled Argon-ion Laser User s Manual Complete with Operating Instructions for the 9470 and 2270 Power Supply TABLE OF CONTENTS CHAPTER 1: INTRODUCTION 1 CHAPTER 2: LASER SAFETY 2 CENTER FOR
CLIMAGUARD Air-to-Air Outdoor Heat Exchangers INSTRUCTION MANUAL. Rev. H 2015 Pentair Equipment Protection P/N
 CLIMAGUARD Air-to-Air Outdoor Heat Exchangers TX23, TX33, TX38, TX52 Model INSTRUCTION MANUAL Rev. H 2015 Pentair Equipment Protection P/N 10-1008-221 87976519 TABLE OF CONTENTS RECEIVING THE HEAT EXCHANGER...3
INSTALLATION AND OPERATING INSTRUCTIONS FOR THE VEHICLE-MOUNTED RADIATION DETECTION SYSTEM
 INSTALLATION AND OPERATING INSTRUCTIONS FOR THE VEHICLE-MOUNTED RADIATION DETECTION SYSTEM D-tect Systems 11814 South Election Road, Suite 200 Draper, UT 84020 www.dtectsystems.com 1 Introduction The mini
FIRERAY 5000 range USER GUIDE
 FIRERAY 5000 range USER GUIDE 0044-003-04 IMPORTANT PLEASE NOTE: The beam path MUST be kept clear of obstructions at all times! Failure to comply may result in the Detector initiating a Fire or Fault signal.
BX Series. Installation, Operation, Maintenance Instructions & Spare Parts
 ISO 9001 BX Series Installation, Operation, Maintenance Instructions & Spare Parts WARNING WARNING. The BX convection heater is a heavy duty baseboard designed for use in industrial environments and is
TTSIM-1A. TraceTek Sensor Interface Module with Relay. Installation/Operation Instructions. Installation Items (not supplied) Tools Required.
 Tools Required.") TTSIM-1A TraceTek Sensor Interface Module with Relay Installation Items (not supplied) General Information Installation/Operation Instructions Please read these instructions and keep them in a safe place.
TTSIM-1A TraceTek Sensor Interface Module with Relay Installation Items (not supplied) General Information Installation/Operation Instructions Please read these instructions and keep them in a safe place.
Dual Point General Purpose Heat Trace Control TRACON MODEL GPT 230 Installation and Operation Manual
 We manage heat MANUAL Dual Point General Purpose Heat Trace Control TRACON MODEL GPT 230 Installation and Operation Manual 1850 N Sheridan Street South Bend, Indiana 46628 (574) 233-1202 or (800) 234-4239
- Data Brochure. This brochure is for Thermostats 510 and 511 (with sensor). The section on the 079 slab sensor installation is for the 511 only!
. The section on the 079 slab sensor installation is for the 511 only!") - Data Brochure Programmable Thermostat 510 and 511 D 510 02/12 Table of Contents Display / Keypad Operation... pg 1 Display Symbols... pg 2 General... pg 2-3 Sequence of Operation... pg 4 Installation
- Data Brochure Programmable Thermostat 510 and 511 D 510 02/12 Table of Contents Display / Keypad Operation... pg 1 Display Symbols... pg 2 General... pg 2-3 Sequence of Operation... pg 4 Installation
ERD97P21-U Receiver. Installation/ Operation Manual C939M-D (7/00)
") ERD97P21-U Receiver Installation/ Operation Manual C939M-D (7/00) Pelco 3500 Pelco Way, Clovis CA 93612-5699 USA Pelco Online @ http://www.pelco.com In North America and Canada: Tel (800) 289-9100 or FAX
ERD97P21-U Receiver Installation/ Operation Manual C939M-D (7/00) Pelco 3500 Pelco Way, Clovis CA 93612-5699 USA Pelco Online @ http://www.pelco.com In North America and Canada: Tel (800) 289-9100 or FAX
AV17 Series Switch-Tek Manual Direct and Remote Drum Mount Float Alarm 17 SEPT 08 Rev A
 AV17 Series Switch-Tek Manual Direct and Remote Drum Mount Float Alarm 17 SEPT 08 Flowline, Inc. 10500 Humbolt Street Los Alamitos, CA 90720 Tel: (562) 598-3015 Fax: (562) 431-8507 www.flowline.com 17
Infrared Thermometer. Getting Started
 572-2 Infrared Thermometer Getting Started PN 4307046 March 2013 2013 Fluke Corporation. All rights reserved. Specifications are subject to change without notice. All product names are trademarks of their
62 MAX/62 MAX + Infrared Thermometer
 62 MAX/62 MAX + Infrared Thermometer Users Manual PN 4060712 April 2012 Rev. 1, 11/12 2012 Fluke Corporation. All rights reserved. Printed in China. Specifications are subject to change without notice.
FAN COIL NON-PROGRAMMABLE DIGITAL THERMOSTAT
 OWNER'S MANUAL FAN COIL NON-PROGRAMMABLE DIGITAL THERMOSTAT P/N E055-71520301 P/N E055-71520304 72 74 C OOL AUTO HEAT 70 2- or 4-pipe configurable Dual or Single Setpoint Very easy to program Large, easy
GG-R REFRIGERANT SENSOR. Installation and Operation Manual
 GG-R REFRIGERANT SENSOR Installation and Operation Manual 2 GG-R Warning Use this product only in the manner described in this manual. If the equipment is used in a manner not specified by Calibration
CPS-1 USER S MANUAL AIR INLET / CURTAIN CONTROL
 CPS-1 USER S MANUAL AIR INLET / CURTAIN CONTROL temperature / static pressure DIFF Opn Clo ALARM HI F2 DELAY ALARM LO OPEN DELAY CLOSE ADJUST Varifan + CPS-1 CPS-1 Although the manufacturer has made every
TMC. Installation and Operation Manual TMC. Temperature and Pressure Monitoring for Heating and Cooling Applications. Temperature Monitoring Control
 Installation and Operation Manual Temperature and Pressure Monitoring for Heating and Cooling Applications Temperature Monitoring Control VALVE OPEN ALARM System= 128 o F Alarm At= 130 o F RESET /BACK
GG-2 2-CHANNEL GAS DETECTION CONTROL PANEL. Installation and Operation Manual
 GG-2 2-CHANNEL GAS DETECTION CONTROL PANEL Installation and Operation Manual 2 GG-2 Warning Use this product only in the manner described in this manual. If the equipment is used in a manner not specified
GASGUARDIAN Channel Controller OPERATING & INSTALLATION MANUAL
 GASGUARDIAN 2 3 2-Channel Controller OPERATING & INSTALLATION MANUAL GasGuardian 2 3 Operating and Installation Manual Table of Contents General description.... 3 Installation. 3 Locating the GasGuardian-2..
Model Number Structure
 Element Burnout Detector Accurate Detection of Element Burnout Regardless of Capacities Accurately detects a burned heater element or elements incorporated by a molding machine or packing machine and outputs
Installation & Operation Manual
 519_D Radiant Thermostat 519 03/13 Zoning Replaces: New Installation & Operation Manual Introduction The Radiant Thermostat 519 accurately controls the room and/or floor temperature for a hydronic heating
MST-1. Varifan USER S MANUAL MST-1 ADJUST. 9 per day HI F2. DIFF on off TIMER. reduc.
 USER S MANUAL ALARM HI F2 COOL / HEAT ALARM LO DIFF on off PERIOD TIMER L IMIT reduc. 9 per day 88 ADJUST Varifan + Although the manufacturer has made every effort to ensure the accuracy of the information
NLC 210 Air-Cooled Argon-ion Laser
 NLC 210 Air-Cooled Argon-ion Laser User s Manual Complete with Operating Instructions for the 9470 and 2270 Power Supply TABLE OF CONTENTS CHAPTER 1: INTRODUCTION 1 CHAPTER 2: LASER SAFETY 2 CENTER FOR
Operating Manual. Gasgard 100 Control System. Order No.: /00. MSAsafety.com
 Operating Manual Gasgard 100 Control System Order No.: 10153908/00 MSAsafety.com Warning! THIS MANUAL MT BE CAREFULLY READ BY ALL INDIVIDUALS WHO HAVE OR WILL HAVE THE RESPONSIBILITY FOR ING OR SERVICING
IMPORTANT. PLEASE NOTE: The infrared beam path MUST be kept clear of obstructions at all times!
 USER GUIDE English IMPORTANT PLEASE NOTE: The infrared beam path MUST be kept clear of obstructions at all times! Failure to comply may result in the Detector initiating a Fire or Fault signal. Contents
Instruction Manual. AcuRite Atlas. Indoor Display model 06061
 Instruction Manual AcuRite Atlas Indoor Display model 06061 How It Works AcuRite Atlas is an environmental monitoring station that delivers key information on current outdoor conditions in your exact location.
ELECTRONIC FAUCETS INSTRUCTION MANUAL. Toll Free: (800) Haul Road Wayne, NJ krowne.
 Haul Road Wayne, NJ krowne.") ELECTRONIC FAUCETS INSTRUCTION MANUAL 100 Haul Road Wayne, NJ 07470 Toll Free: (800) 631-0442 customerservice@krowne.com krowne.com Model 16-196 1 3 2 4 6 5 7 1. 2. 3. 4. 5. 6. 7. Aerator Sensor with Cable
ELECTRONIC FAUCETS INSTRUCTION MANUAL 100 Haul Road Wayne, NJ 07470 Toll Free: (800) 631-0442 customerservice@krowne.com krowne.com Model 16-196 1 3 2 4 6 5 7 1. 2. 3. 4. 5. 6. 7. Aerator Sensor with Cable
GASGUARD O 2. Oxygen Sensor OPERATING & INSTALLATION MANUAL
 GASGUARD O 2 Oxygen Sensor OPERATING & INSTALLATION MANUAL 2 Table of Contents General description. 4 Installation.. 4 Locating the sensor. 4 Installation guidelines 5 Wiring.. 6 Operation.. 7 Start-up...
GG-EM ENTRANCE MONITOR. Installation and Operation Manual
 GG-EM ENTRANCE MONITOR Installation and Operation Manual 2 GG-EM Warning Use this product only in the manner described in this manual. If the equipment is used in a manner not specified by Calibration
High Temperature InfraRed Thermometer with Laser Pointer
 User s Manual High Temperature InfraRed Thermometer with Laser Pointer MODEL 42545A Introduction Congratulations on your purchase of the Model 42545A IR Thermometer. The 42545A is capable of non-contact
100 Ft. LASER DISTANCE METER
 Model #050012 Component #692527 100 Ft. LASER DISTANCE METER THIS MANUAL CONTAINS IMPORTANT INFORMATION REGARDING SAFETY, OPERATION, MAINTENANCE AND STORAGE OF THIS PRODUCT. BEFORE USE, READ CAREFULLY
Silicone Rubber Heating Tape with Adjustable Thermostat Control (HSTAT Series) Instruction Manual
 Instruction Manual") Silicone Rubber Heating Tape with Adjustable Thermostat Control (HSTAT Series) Instruction Manual Read and understand this material before operating or servicing these heating tapes. Failure to understand
Silicone Rubber Heating Tape with Adjustable Thermostat Control (HSTAT Series) Instruction Manual Read and understand this material before operating or servicing these heating tapes. Failure to understand
Users Manual. Visit us at
 Users Manual 568 EX Infrared Thermometer 99 Washington Street Melrose, MA 02176 Phone 781-665-1400 Toll Free 1-800-517-8431 Visit us at www.testequipmentdepot.com PN 4326622 June 2013 2013 Fluke Corporation.
10810 W. LITTLE YORK RD., STE. 130 HOUSTON TX VOICE (713) FAX (713) web: IMPORTANT!!!
 FAX (713) web: IMPORTANT!!!") 10810 W. LITTLE YORK RD., STE. 130 HOUSTON TX 77041-4051 VOICE (713) 973-6905 FAX (713) 973-9352 web: www.twrlighting.com IMPORTANT!!! PLEASE TAKE THE TIME TO FILL OUT THIS FORM COMPLETELY. FILE IT IN
10810 W. LITTLE YORK RD., STE. 130 HOUSTON TX 77041-4051 VOICE (713) 973-6905 FAX (713) 973-9352 web: www.twrlighting.com IMPORTANT!!! PLEASE TAKE THE TIME TO FILL OUT THIS FORM COMPLETELY. FILE IT IN
3820, 3820i, 4820, 4820i
 3820, 3820i, 4820, 4820i Cordless Imaging Systems Quick Start Guide Note: Refer to your user s guide for information about cleaning your device. For localized language versions of this document, go to
Installation and Operation Manual. 445 Procedures Cart. Page 3. Page 5. Page 8. Page 10. Important Information Page 2. Installation.
 Important Information Page 2 Installation and Operation Manual 445 Procedures Cart Installation Page 3 Description Page 5 Components Overview Page 6 Controls & Indicators Page 7 Operation Page 8 HOT Operator
Model Gas Alarm Panel APPLICABILITY & EFFECTIVITY. This manual provides instructions for the following Sierra Monitor products:
 Model 2102 Gas Alarm Panel APPLICABILITY & EFFECTIVITY This manual provides instructions for the following Sierra Monitor products: Model Description 2102-00 Alarm Panel 2 Channel 2102-01 Alarm Panel 2
Pipe Freeze Protection Control SCFP-CO-F130 Installation and Operation Manual
 MANUAL Pipe Freeze Protection Control SCFP-CO-F130 Installation and Operation Manual Model FPT 130 Single Point Freeze Protection Heat Trace Control Table of Contents SCFP-CO-F130 Overview... 3 Installation...
Single Point Freeze Protection Heat Trace Control TRACON MODEL FPT 130 Installation and Operation Manual
 We manage heat MANUAL Single Point Freeze Protection Heat Trace Control TRACON MODEL FPT 130 Installation and Operation Manual 1850 N Sheridan Street South Bend, Indiana 46628 (574) 233-1202 or (800) 234-4239
Instruction Manual US PAT: 6,824,069 6,786,421. Models: CT03TS21 CTO3TS32 CTO3TS32H
 Instruction Manual US PAT: 6,824,069 6,786,421 Models: CT03TS21 CTO3TS32 CTO3TS32H www.climatouch.com AED Electronics Inc. 5758 Royalmount Avenue Montreal, Quebec,Canada H4P 1K5 Technical Support: 1-866-90TOUCH
Installation & Operation Manual
 Installation & Operation Manual Radiant Thermostat 519 519_D 06/16 Zoning Replaces: 03/13 Introduction The Radiant Thermostat 519 accurately controls the room and/or floor temperature for a hydronic heating
IFS Fiber Module Installation & Operation Instructions
 VAT7420 VAT7420-R3 VAT7430 VAT7430-HP VAT7450 VAT7450-R3 VAT7450-HP IFS Fiber Module Installation & Operation Instructions VAR7420 VAR7420-R3 VAR7430 VAR7430-R3 VAR7450 VAR7450-R3 P/N 1062829 REV B ISS
I/A Series 716C 1/16 DIN Temperature Controller
 Product Specifications I/A Series 716C 1/16 DIN Temperature Controller PSS 2C-1B5 A The Foxboro 716C is a powerful compact, 1/16 DIN, microprocessor-based temperature controller that offers a variety of
IFS Fiber Module Installation & Operation Instructions
 DT00 DT00-R DT0 DT0-R IFS Fiber Module Installation & Operation Instructions DR00 DR00-R DR00 DR00-R P/N 0 REV B ISS 0AUG DT00 CONTACT WHEN ON CHANNEL CONTACT TRANSMITTER ifs International Fiber Systems
WMWLB / WMWFM / WTWLB / WTWFM Series Hydronic Heating Unit
 January 2008 WMWLB / WMWFM / WTWLB / WTWFM Series Hydronic Heating Unit Installation Operation Maintenance The units are designed for permanent up flow, counter flow, or horizontal left or right airflow
Installation & Operation Manual
 Humidity & Temperature Sensor 086 Accessories 086_D 08/12 Replaces: New Installation & Operation Manual Introduction The Humidity & Temperature Sensor 086 can be connected to select tekmar thermostats
MODEL GPT-130 SINGLE POINT HEAT TRACE CONTROL THERMOSTAT
 TRACON MODEL GPT-130 SINGLE POINT HEAT TRACE CONTROL THERMOSTAT TABLE OF CONTENTS GPT 130 Overview... 2 Installation... 3 Power Source and Load Connection... 4 Temperature Sensor Installation... 5 Panel
Dual Laser InfraRed (IR) Thermometer
 Thermometer") User Manual Dual Laser InfraRed (IR) Thermometer MODEL 42512 Introduction Congratulations on your purchase of the Model 42512 IR Thermometer. This Infrared thermometer measures and displays non-contact
User Manual Dual Laser InfraRed (IR) Thermometer MODEL 42512 Introduction Congratulations on your purchase of the Model 42512 IR Thermometer. This Infrared thermometer measures and displays non-contact
Ion Endeavor Pump Controller Digital Level Control with Pump Alternation and High Water Alarm
 Ion Endeavor Controller Digital Level Control with Alternation Page 1 of 8 General Overview The Ion Endeavor is a pump controller that senses a water level of up to 72", has a configurable water level/pump
Ultrasonic Reflective Sensor
 Ultrasonic Reflective with an Adjustable Sensing Distance of 0.3 to 3 m Under Stable Operation without Background Interference Ensures a stable operating range with minimal side-lobe areas. Built-in unstable
USER MANUAL SAVE THESE INSTRUCTIONS
 USER MANUAL Model: PM50 SAVE THESE INSTRUCTIONS CAUTION Federal (USA) law restricts this device to sale by or on the order of a physician. 300 Held Drive Tel: (+001) 610-262-6090 Northampton, PA 18067
IFS Fiber Module Installation & Operation Instructions
 VT6010 VT6010-R3 VR6010 VR6010-R3 IFS Fiber Module Installation & Operation Instructions P/N 1062796 REV B ISS 01JUL11 4 BNC Cables (Input from cameras) VT6010A 4 CHANNEL VIDEO TRANSMITTER 1-2 - VIDEO
Power Pack Service Manual
 Power Pack Service Manual MMPP4301-EP MMPP4301 MMPP4301-WC MMPP4301-PKG MMPP4301-PKG-WC MMPP4302 MMPP4302-WC MMPP4302-PKG MMPP4302-PKG-WC MMPP4303-PKG MMPP4303-PKG-WC MMPP4303-PKG-3 MMPP4305-PKG MMPP4305-PKG-WC
Module de relais Relay Module. Manuel de l utilisateur 301RW. User Manual ERP /07
 Module de relais Relay Module Manuel de l utilisateur 301RW User Manual ERP 511397 02/07 Relay Module 301R User Manual ERP 511397 2/07 Notices and Trademarks Copyright by Honeywell International Inc.