Table of Contents. V.1704 Page 2
|
|
|
- Alan French
- 6 years ago
- Views:
Transcription

1
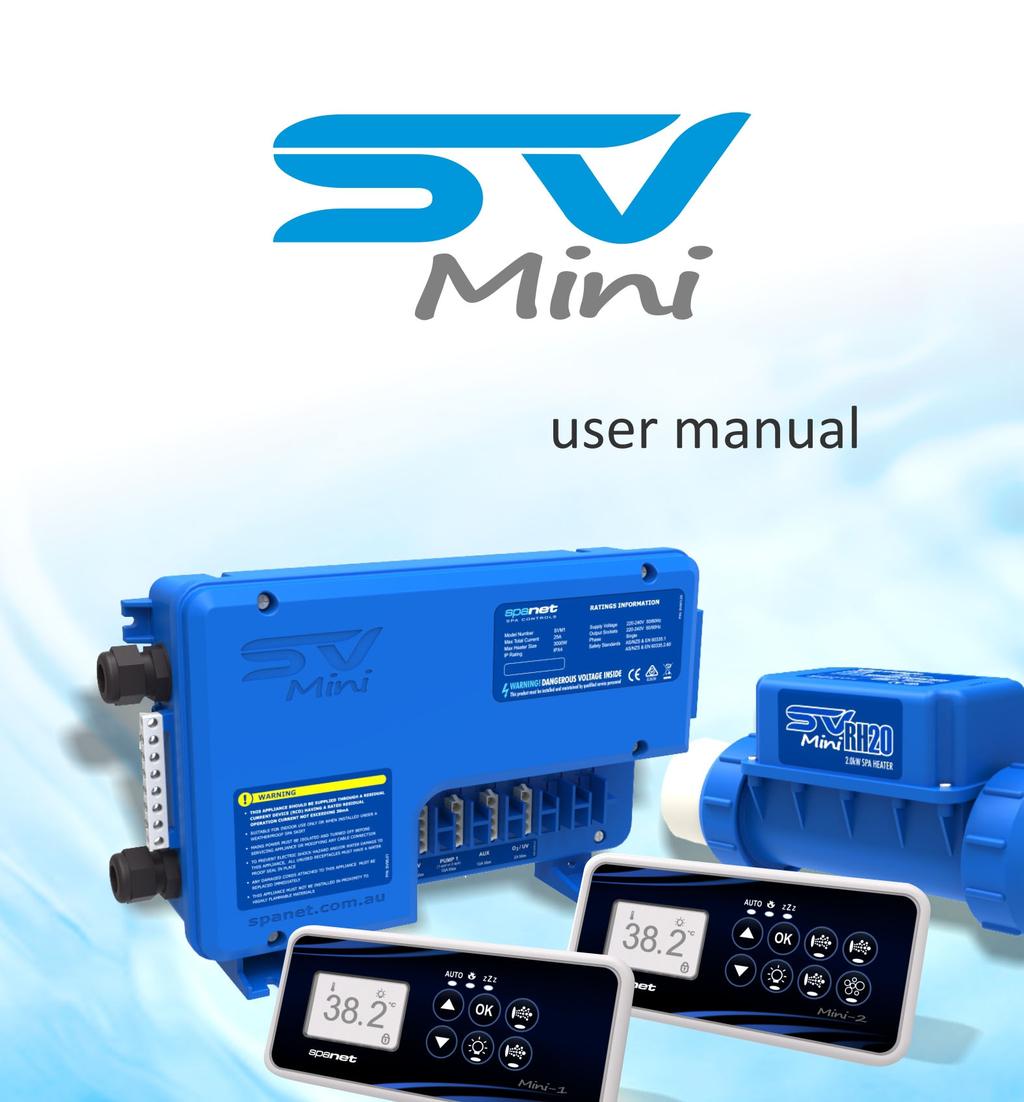
2 Table of Contents WARNINGS... 3 ELECTRICAL INSTALLATION... 4 Wiring Diagram (Mini 1)... 4 Wiring Diagram (Mini 2)... 5 DIP SWITCHES... 5 TOPSIDE PANELS... 6 SV Mini 1 Layout... 6 SV Mini 2 Layout... 6 LED Indicator Lights... 7 Display Modes... 7 SETTING THE DATE/TIME... 8 AUTOMATIC HEATING / FILTRATION... 9 Adjusting Set Temperature... 9 PUMP OPERATION SV Mini 1 Pump Buttons SV Mini 2 Pump Buttons BLOWER OPERATION Variable Speed Mode Ramping Mode LIGHT OPERATION Selecting Light Colour or Effect Mode KEYLOCK FUNCTION Full Lock Partial Lock AUTO DAILY SANITISE SETUP MENU FILT Filtration (total hours per day) SNZE Sleep Timer D.DIS Default Display WIFI WiFi Setup H.PMP Heat Pump Mode H.ELE Heat Pump + SV Element Boost HEATING CONTROL & PROTECTION Fast Heat Cycle Freeze Protection Defrost Cycle (heat pump models only) Overheat Protection ERROR CODES / TROUBLESHOOTING Contact Us V.1704 Page 2
3 WARNINGS Risk of electrical shock ALL ELECTRICAL CONNECTIONS MUST BE PERFORMED BY A LICENSED ELECTRICIAN AND MUST CONFIRM TO ALL NATIONAL, STATE AND LOCAL ELECTRICAL CODES IN EFFECT AT THE TIME OF INSTALLATION. The appliance should be supplied through a residual current device (RCD) having a rated residual operating current not exceeding 30mA. The appliance must be connected to a suitable rated and weather protected power supply. The supply line should be a dedicated power circuit and means for disconnection must be incorporated in the fixed wiring in accordance with your local wiring regulations. Means for disconnection from the supply mains should have a contact separation in all poles that provide full disconnection under over voltage Category III conditions. Earthed appliances must be permanently connected to fixed wiring (European models only). The appliance contains no serviceable parts. Do not attempt service of this control pack. Contact your dealer or authorised service agent for assistance. Turn the mains power OFF before servicing appliance or modifying any cable connection. Suitable for indoor use only or when installed under a weatherproof spa skirt. The appliance should be installed in an enclosure such that all electrical connections cannot be accessible to the user without the use of a tool. Low voltage or improper wiring may cause damage to this appliance. Read and follow all wiring instructions when connecting to power supply. If the supply cord is damaged it must be replaced by the manufacturer, its service agent, licensed electrician or similarly qualified persons in order to avoid a hazard. To prevent electric shock hazard and/or water damage to this appliance, all unused receptacles must have a water proof seal in place. Parts incorporating electrical components must be located or fixed so that they cannot fall into the bath or spa. Parts containing live parts, except parts supplied with safety extra-low voltage not exceeding 12V must be inaccessible to a person in the bath or spa. This appliance must NOT be installed in proximity to highly flammable materials. Water temperature in excess of 38 o C may cause hyperthermia (heat stress). It is the spa manufacturer's and/or installer's responsibility to select suitable loads and configure load shed settings (if required) to ensure the system does not exceed its rated maximum total load. It is the installer's responsibility to ensure the floor can support the expected load of the bath or spa and an adequate drainage system has to be provided to deal with overflow water. A whirlpool spa should incorporate a water filtration system where the required level of water purity can be achieved. An adequate drainage system must be provided if the equipment is to be installed in a pit. This appliance is not intended for use by persons (including children) with reduced physical, sensory or mental capabilities, or lack of experience and knowledge, unless they have been given supervision or instruction concerning use of the appliance by a person responsible for their safety. Children should be supervised to ensure that they do not play with the appliance. V.1704 Page 3
4 ELECTRICAL INSTALLATION All electrical connections must be performed by a licensed electrician and must confirm to all national, state and local electrical codes in effect at the time of installation. The appliance should be supplied through a residual current device (RCD) having a rated residual operating current not exceeding 30mA. The supply line should be a dedicated power circuit. The installer should consider the sum total load of all devices connected to the SV Mini controller when determining the size of the power circuit and install an appropriately sized circuit breaker to suit. Ensure circuit breaker is rated for motor start up currents. Maximum rated power circuit is 25A. Heater load shedding is set by default, so that the heater load sheds and turns off as soon as any device other than Pump 1 is switched on. The installer should consider this when determining the size of the power circuit required. Heater load shedding can be adjusted if desired. Electrical Specifications Model Max Current Input Voltage Phases Hz Heater Size Mini 1 / Mini 2 25A V AC 1 50/60 1.5kW / 2.0kW / 3.0kW Wiring Diagram (Mini 1) Output Ratings Model Outlet Max Current Output Voltage Hz Typical Accessory SV Mini 1 230V 10A V AC 50/60 Heat Pump / Stereo Pump 1 10A V AC 50/60 Circ / 2-spd or 1-spd Pump Aux 10A V AC 50/60 1-spd Pump / Air Blower 03/UV 2A V AC 50/60 Ozone / UV Sanitiser V.1704 Page 4

5 Wiring Diagram (Mini 2) Output Ratings Model Outlet Max Current Output Voltage Hz Typical Accessory SV Mini 2 230V 10A V AC 50/60 Heat Pump / Stereo Pump 1 10A V AC 50/60 Circ / 2-spd or 1-spd Pump Pump 2 10A V AC 50/60 1-spd Pump 03/UV 2A V AC 50/60 Ozone / UV Sanitiser Pump 3 10A V AC 50/60 1-spd Pump Blower 4.5A V AC 50/60 Air Blower DIP SWITCHES The dip switches determine the configuration of pumps connected to the SV Mini controllers. The installer must correctly configure the dip switches to match the pump(s) connected to the spa controller. The dip switch bank (illustrated below) has six individual switches. Switches set to the right of the switch bank (away from the numbers) are in the ON position. Switches set to the left of the switch bank (closest to the numbers) are in the OFF position. Refer to diagram below for dip switch settings: SW Setting OFF (left) ON (right) Notes 1 Not used Pump 1 Type Single Speed Two Speed Determines if P1 = 1spd/2spd 3 Pump 3 Fitted * Not Fitted Fitted Determines if P3 is connected 4 Not used Not used Not used - - * SV Mini 2 models only NOTE: The dip switches will already be set by your spa manufacturer during production and should not require adjusting. This information is for reference when installing a new control to an existing spa. V.1704 Page 5

6 TOPSIDE PANELS SV Mini 1 Layout 1. UP button 2. DOWN button 3. OK button 4. Light On/Off 5. Pump A 6. Auxilary 7. Auto mode LED 8. Heater on LED 9. Sleep Cycle LED SV Mini 2 Layout 1. UP button 2. DOWN button 3. OK button 4. Light On/Off 5. Pump A 6. Pump B 7. Pump C 8. Air Blower 9. Sleep Cycle LED 10. Heater on LED 11. Sleep Cycle LED V.1704 Page 6
7 LED Indicator Lights The topside panel function buttons (i.e. Pumps, Light, and Blower) feature a green LED light to clearly indicate whether the accessory is ON or OFF. The green LED will light up when the accessory is ON. In addition, the topside panels have three red indicator LEDs to advise the user the current status of the spa: AUTOMATIC MODE The AUTO LED indicator turns ON when the filtration pump is in automatic mode. In automatic mode the filtration pump will turn on / off as required to satisfy heating and filtration requirements. If the filtration pump is manually turned on or off the AUTO LED indicator turns OFF. The control will automatically return to AUTO mode after a 45 minute idle timeout period if not returned to AUTO mode by the spa user. HEATER ON The Heater LED indicator turns ON when the heater element is active. The heater is automatically controlled, it will turn ON and OFF as required (in conjunction with the filtration pump) to maintain the set water temperature. If the filtration pump is manually turned OFF the heater will NOT operate. NOTE: In some configurations, engaging high speed on a 2 speed pump or operating multiple pumps will cause the heater to load shed and turn OFF (even if heating is required) to keep the system within its rated power supply. SLEEP CYCLE ON The Sleep Cycle LED indicator turns ON when the spa control is within a designated sleep cycle (if set). During a sleep cycle, all automatic system operation will stop so that the spa is silent i.e. filtration and heating will not occur. Display Modes The SV Mini has three (3) x display modes. The spa user can scroll through the different displays by pressing a short single press of either the UP or DOWN button. Each display has a unique icon to indicate the current mode being viewed. As you scroll through each mode a brief title screen will be shown followed by the actual display mode (note change in icon). The available display modes are as follows: ICON TITLE DISPLAY W.TMP Water Temperature S.TMP Set Temperature NOTES: 1. The default display mode is (W.TMP) water temperature. 2. There is a 10 second inactivity timeout on all non-default displays. No button press for 10 secs display reverts to default. TIME Clock 3. If no icon is displayed the temp shown is from when the filter pump last ran. Once the filter pump next runs for 10 mins the temp will update and W.TMP icon will return. OTHER DISPLAY ICONS Filtration Cycle The spa is carrying out filtration Sanitise Cycle The spa is carrying out a sanitisation cycle Keypad Locked The keypad has been locked System Error A fault has been detected. The system has halted operation so that corrective action can be taken. Take note of scrolling error code and consult trouble shooting section of this manual. V.1704 Page 7
 limits => (7.")

8 SET DATE/TIME BEFORE USING THE SPA Vital control functions require the date & time to be set correctly. Be sure to accurately set the date and time before operating the spa. WATER CHEMISTRY MAINTENANCE It is your responsibility to regularly check and maintain the chemical water balance of the spa pool to ensure it remains within reasonable ph (acid/alkaline) limits => ( ph). Unbalanced water chemistry greatly accelerates corrosion and may lead to early product or component failure. Product or component failures caused as a result of poor water chemistry maintenance will NOT be covered by the SpaNET TM Product Warranty. We recommend you carry out a daily water chemistry test to correctly maintain the ph balance within reasonable limits. SETTING THE DATE/TIME Be sure to set the date and time before operating the spa. Vital functions such as filtration, sanitisation cycles and sleep timer settings depend on the time and date being set correctly. - Press a short single press of the DOWN button to change display to Time/Clock setting - Press the OK button to enter date/time adjustment - The settings appear in the following order: o o o o o o o Time Format (24 hr / 12 hr) Year (yyyy) Month (mm) Day (dd) Weekday (mon-sun) Hours (xx:oo) Minutes (oo:xx) - Press the UP or DOWN buttons to adjust each setting - Press the OK button to confirm each setting and skip to the next one - Once the minutes have been selected and confirmed the system will exit the date/time adjustment and the display will return to the default display mode NOTES: 1. Leap years are taken into account. 2. The system does not automatically adjust for daylight savings times. User must adjust manually. 3. The date/time clock has a capacitor backup which will hold the date/time even if mains power is turned off. The capacitor backup will last 8-12 hours. If power remains off for longer than this period the date/time may need to be set again. V.1704 Page 8
9 AUTOMATIC HEATING / FILTRATION The SV Mini spa controls have been designed with simplicity in mind. Their intelligent software constantly monitors the spa water, automatically controlling the heater and filtration pump to ensure the desired set water temperature is maintained and required level of daily filtration achieved. With set-and-forget technology, the spa user simply selects their desired water temperature (10 o C - 41 o C. Default = 38 o C) and thereafter the spa control will automatically heat to and maintain that selected water temperature. This is called demand heating - the filtration pump and heater will be activated when required to maintain the set water temperature. The time spent heating the pool and running the filtration pump under normal operation will be taken into account and where required the pump will run for additional periods every three hours to maintain the minimum level of daily filtration as set by the user. Dependant on the amount of normal spa use, set water temperature, minimum hours of filtration per day, climatic conditions and season being experienced, the spa control will engage the heater and / or filtration pump for differing periods of time, at differing times of day. The advanced software constantly monitors and recalculates after each heating / filtration cycle to ensure the correct daily filtration time is achieved and desired set water temperature is maintained. Unless adjusted the SV controller will automatically heat to and maintain the default temperature of 38 o C. The water temperature set point can be adjusted from 10 o C to 41 o C in steps of 0.2 o C increments. Adjusting Set Temperature - Press and hold the UP or DOWN button to begin set temperature adjustment - The display will show the (S.TMP) set temperature indicator icon, the main digits flash and temperature will begin adjusting - Press the UP or DOWN buttons to adjust the set temperature by 0.2 o C increments to your desired temperature - Press OK to confirm and save setting, or wait for the 10 second idle timeout. The main digits will stop flashing and display returns to default display mode NOTES: 1. During a heating cycle the SV Mini may raise the water temperature up to 0. 5 o C above set temperature point to provide an average water temperature of set point at most times. 2. If an optional heat pump is NOT fitted the spa controller has NO ability to cool the spa water. Lowering the set temperature point will NOT cause the water to cool. 3. If an optional heat pump IS fitted the spa water CAN be cooled as well as heated. Lowering the set temperature point will ensure the heat pump engages/disengages a cooling cycle (if required) to maintain the desired set water temperature so long as H.PMP mode is set to AUTO. 4. If the spa control has been in standby mode (idle) for some time and the set temperature point is adjusted, the filtration/circulation pump may run for up to ten (10) minutes to complete a mixing cycle before the heater / heat pump engages to heat or cool (heat pump only) the water. To skip this mixing cycle and begin heating/(cooling) immediately press the PUMP A button multiple times to toggle the filtration pump through ON/OFF/AUTO. Once AUTO is re-engaged the heater will activate immediately. V.1704 Page 9
10 PUMP OPERATION A designated filtration pump (pump 1) will automatically switch on and off as required to perform filtration and heating functions. All pump(s) will also operate for a short period during the daily sanitise cycle. In addition, the following manual pump controls are provided and will override automatic control. The pump buttons are located on the right-hand side of the topside panels. The functions of the pump buttons change depending on pump configuration, however the Pump-A button is used to control the filtration pump (pump 1). For every press of a pump button the screen will temporarily display the selected pump state: ON, OFF, LOW, HIGH or AUTO and then revert to the default display mode. Possible pump configurations & button sequences are referenced in the tables below: SV Mini 1 Pump Buttons SPA CONFIGURATION PUMP A BUTTON AUXILIARY BUTTON Pump 1 = 2 speed Aux = Not Fitted Pump 1 = 1 speed Aux = Not Fitted Pump 1 = 2 speed Aux = 1 speed or Blower Pump 1 = Circ or 1 speed Aux = 1 speed or Blower 2 speed pump: Low / High / Off / Auto 1 speed pump: On / Off / Auto 2 speed pump: Low / High / Off / Auto Circ pump or 1 speed pump: On / Off / Auto speed pump or Blower: On / Off 1 speed pump or Blower: On / Off SV Mini 2 Pump Buttons SPA CONFIGURATION PUMP A PUMP B PUMP C BLOWER Pump 1 = 2 speed Pump 2 = 1 speed Pump 3 = Not Fitted Blower = Fitted 2 speed pump: Low / High / Off / Auto 1 speed: On / Off - Vari / Ramp /Off Pump 1 = Circ or 1 spd Pump 2 = 1 speed Pump 3 = Not Fitted Blower = Fitted Circ pump or 1 spd: On / Off / Auto 1 speed: On / Off - Vari / Ramp /Off Pump 1 = Circ Pump 2 = 1 speed Pump 3 = 1 speed Blower = Not Fitted Circ pump: On / Off / Auto 1 speed: On / Off 1 speed: On / Off - Pump 1 = Circ Pump 2 = 1 speed Pump 3 = 1 speed Blower = Not Fitted Circ pump: On / Off / Auto 1 speed: On / Off 1 speed: On / Off Vari / Ramp /Off NOTES: 1. If left ON, pumps automatically turn OFF after a 30 minute time-out period from the last button press. 2. If pump 1 is operating and heater is ON and pump is to be switched OFF, the pump will turn off after a 5 second delay to allow the heater to cool down. 3. In some configurations, engaging high speed on a 2 speed pump or operating multiple pumps will cause the heater to load shed and turn OFF (even if heating is required) to keep the system within its available power supply. V.1704 Page 10
11 BLOWER OPERATION SV Mini 2 Models Only SV Mini 2 models feature a dedicated air blower power socket and button. The blower button is used to toggle the air blower ON/OFF and allow adjustment of the blower speed. The selected speed is saved and will be restored the next time the blower is turned on, for future on/off use. Two modes of operation are provided. Variable Speed Mode - Press the BLOWER button once to activate blower in variable speed mode - Display will flash VARI then present the blower speed (b.spd) adjustment menu - Press the UP or DOWN buttons to increase/decrease blower speed - Press the OK button to confirm or wait for 10 second idle time-out - Once running press the BLOWER button again to turn blower OFF Ramping Mode - Press the BLOWER button TWICE to activate blower in ramping mode - Display will flash RAMP and blower operates in a ramping speed manner - Once running press the BLOWER button again to turn blower OFF NOTES: 1. When blower is first turned ON it will always run at maximum speed for 3-4 seconds before changing to the last used speed. 2. If left ON, blower will automatically turn OFF after a 30 minute time-out period from the last button press. V.1704 Page 11

 on/off => light will display last used light mode. If no changes are required there is no need to do anything further.")

12 LIGHT OPERATION Multi-colour LED lighting effects The light button is used to toggle the spa light(s) ON / OFF and to access the light mode menus. The features that can be adjusted are the light colour, light effect mode, light effect transition speed, and light brightness. All light settings are saved and will be restored the next time the light is turned ON, for future ON / OFF use. Selecting Light Colour or Effect Mode Press the LIGHT button to turn light(s) on/off => light will display last used light mode. If no changes are required there is no need to do anything further. If however you wish to adjust the light settings refer below: Use the UP or DOWN buttons to toggle between the two light modes: TITLE MODE DESCRIPTION U.CLR User Colour Select from 7 possible colours FADE Fade Effect Fade transition through all colours User Colour Mode If user colour mode is selected press OK or wait 10 seconds for the display to show the current selected colour number. There are 7 colours to choose from (CL:00 CL:07). Use the UP or DOWN buttons to adjust the colour. Press OK to confirm and skip to the light brightness adjustment or wait for the 10 second inactivity time out. Fade Effect Mode If fade effect mode is selected press OK or wait 10 seconds for the display to show the light speed (L.SPD) adjustment screen where the speed of the fade transition between colours can be adjusted. Use the UP or DOWN buttons to increase or decrease the transition speed to your desired level. Press OK to confirm and skip to the light brightness adjustment or wait for the 10 second inactivity time out. Light Brightness Once light mode and colour or light speed has been selected the controller offers a light brightness adjustment. Use the UP or DOWN buttons to increase/decrease the light brightness to your desired level. Press OK to confirm or wait for the 10 second inactivity timeout. NOTES: 1. The light mode / user colour / light speed / light brightness adjustment screens are only displayed for 10 seconds each when the light(s) are first turned ON. If no adjustment is made the light(s) will run as per the last used settings, and the screen will time-out and revert to the default display mode. If you wish to adjust the light(s) settings once the light(s) have been running for a period of time, the light(s) must be turned OFF and back ON again to restore the light mode adjustment screens. 2. If left ON, the light(s) will automatically turn OFF after a 45 minute time out period from the last button press. V.1704 Page 12


13 KEYLOCK FUNCTION How to set full or partial keylock The keypad buttons can be locked to prevent accidental key presses or to limit access to certain controller functions. This feature is helpful where children are present or spa is used by many people. There are two types of keylock: Full Lock Partial Lock All buttons are disabled Allows use of pumps, blower and light but locks out settings and temperature adjustments Full Lock - Press and hold UP + DOWN + PUMP A until LOCK appears on the display - Once locked if any button is pressed the key stroke will be ignored and display will show LOCK - To unlock press and hold UP + DOWN + PUMP A Partial Lock - Press and hold UP + DOWN + PUMP B until LOCK appears on the display - Once locked only pumps, blower and light can be used. Other key strokes will be ignored and display will show LOCK - To unlock press and hold UP + DOWN + PUMP B AUTO DAILY SANITISE The controller will automatically run a 10 minute sanitise cycle every day at 9:00am. This sanitisation cycle runs the filtration pump and ozone/uv (if fitted) to filter the pool water to restore and refresh water quality. If pump 1 is a 2 speed pump the pump will run in high speed for the duration of the cycle. In addition at the start and end of the cycle the controller will sequentially run any additional accessories (auxiliary, pump2, pump3 or blower if fitted) for one minute each to purge the plumbing and clear any unfiltered water trapped in those accessory lines. NOTES: 1. If the controller is in a programmed sleep period at 9:00am it will wait until the sleep period ends before the daily sanitise cycle runs. 2. If the spa is in use prior to the 9:00am sanitise cycle start time the cycle is cancelled for the day. Spa in use = button has been pressed and spa has not had the 45 minute inactivity time out expire since the last button press. SETUP MENU The SV Mini controllers feature a setup menu which allows customisation of adjustable software settings. These settings do not need to be modified often and in most cases the default settings are all that is required, however if the spa owner wishes to customise any settings it is completed through the setup menu. - To access the setup menu press and hold the UP + DOWN buttons simultaneously until display shows FILT - Use the UP or DOWN buttons to navigate through setup menu items - Press the OK button to enter setting adjustment - Press the UP or DOWN buttons to adjust setting - Press the OK button to confirm and save the setting adjustment Refer table on the following page for details on setup menu items: V.1704 Page 13
14 Setup Menu List ITEM SETTING NOTES FILT Hours of filtration per day Adjustable from 1 to 24 hours SNZE Sleep Timer Menu 1.SNZ Sleep timer 1 [1.DAY] Days of week, [1.BGN] Begin Time, [1.END] End Time D.DIS Default display mode Water Temp (W.TMP) / Set Temp (S.TMP) / Clock (TIME) WIFI WiFi Setup Menu HOT Hot spot mode Activates hot spot mode for WiFi setup process INFR Infrastructure mode Force a disconnect/reconnect to WiFi server to refresh connection RSET Reset WiFi module Deletes all settings and prepares WiFi module for setup process H.PMP* Heat pump mode Auto (heat & cool) / Heat only / Cool only / Off (HP disabled) H.ELE* HP + element boost Off = heat pump only, electric heater disabled (default setting) On = heat pump + electric heater combined for heating * H.PMP and H.ELE setup menu items will only be visable if a SV Series heat pump is installed and connected to the SV Mini control. Notes: 1. The setup menu settings are stored in non-volatile memory (EEPROM) and are remembered when the mains power is turned OFF. No need to reprogram settings when power is restored. 2. A ten (10) second idle menu time out period exists. If a button press is not detected for 10 seconds the menu will time out and the screen will return to the default display mode. FILT Filtration (total hours per day) Automatic filtration is provided to ensure that the pool water is filtered for at least a minimum number of hours each day. Total daily runtime can be adjusted from 1-24 hours (default = 2 hours). Total filtration runtime is broken into smaller blocks which occur every three hours. All time spent running the pump under normal operation (manual use, heating, sanitise cycle) will be taken into account and where required the pump will run for additional periods throughout the day to maintain the minimum level of daily filtration as specified by the user. SNZE Sleep Timer The sleep timer is a very handy feature that enables the user to stop all spa activity and silence the spa during certain times of day or night. While the controller is sleeping NO automatic heating or filtration maintenance will occur, however the spa can still be operated by manual use without the need to adjust sleep time settings. The sleep timer setup consists of defining days of operation and begin time and end time of sleep period. Use the UP or DOWN button to adjust each setting within the sleep setup and press OK to confirm and skip to the next setting. Sleep timer settings are referenced in the table below: TITLE SETTING OPTIONS 1.DAY Selected days of operation Sat-Fri (7 days), Sat-Sun (weekend), Mon-Fri (weekdays), OFF 1.BGN Time sleep period begins Adjustable to any time 0:00 to 23:59 (Default = 22:00 PM) 1.END Time sleep period ends Adjustable to any time 0:00 to 23:59 (Default = 07:00 AM) Notes: 1. SV Mini is preset with a default sleep timer 7 days a week, begin 22:00 (10PM), end 07:00 (7AM) 2. Set 1.DAY=OFF to disable sleep timer 3. If spa in use at begin time of sleep period, spa will not sleep until 45 min inactivity timeout has elapsed V.1704 Page 14
15 D.DIS Default Display The user can adjust the default display mode to show their preferred selection of either: W.TMP (water temperature), S.TMP (set temperature) or TIME (current time and day). WIFI WiFi Setup This menu is only of use if the optional SpaNET SmartLINK or SmartSTREAM WiFi module has been installed and connected to the SV Mini. This menu has three commands that can be executed. Use the UP or DOWN buttons to select desired command and press the OK button to execute display will show WAIT whilst the WiFi module carries out the command. HOT INFR RSET Puts WiFi module in hot spot mode for initial app setup. Note: Once initial app setup has been completed if the HOT command is executed again all WiFi settings will be lost and the app setup process must be run again. Forces WiFi module to disconnect/reconnect from the SpaNET app server to refresh connection if spa is not automatically coming online once the app setup process has been completed. Deletes programmed settings from WiFi module and returns the module to its factory default state. Note: If this command is executed settings are lost and the app setup process must be run again. H.PMP Heat Pump Mode This setting is only visible if a SV Series heat pump is connected and defines heat pump operating mode. The available operating modes are as follows: AUTO Heat pump will heat and cool HEAT Heat pump will only heat (Default) COOL Heat pump will only cool OFF Heat pump disabled H.ELE Heat Pump + SV Element Boost This setting is only visible if a SV Series heat pump is connected and defines how the SV Mini electric heating element operates with a heat pump. By default, this setting is set to OFF which disables the electric heater using only the heat pump for heating. Set to ON to allow the electric element to run in conjunction with the heat pump to boost heating speed if the water temperature is 2 o C or more below set temperature point or the heat pump has been operating for more than 1 hour and set point has not been achieved. The H.ELE setting choices are: OFF ON SV element disabled (heat pump only) SV element + Heat Pump for heating HEATING CONTROL & PROTECTION Fast Heat Cycle / Freeze and Overheat Protection Fast Heat Cycle After initial mains power on the SV Mini will perform a fast heat up cycle that enables continuous demand heating regardless of programmed/default sleep timer. Once the set temperature has been reached the fast heat up cycle is cancelled and normal operation resumes and sleep timer is obeyed. The purpose of a fast heat up cycle is to help the spa reach set temperature as soon as possible after it has been powered up. For new spas or spas refilled with cold water it is desirable not to have sleep time delaying the time to takes for the spa to reach set temperature point. V.1704 Page 15
16 NOTES: 1. A fast heat up cycle is cancelled by manually forcing the filtration pump to OFF via the keypad 2. For new spas or when a spa has just been refilled it is common for spa users to test the operation of each pump when the power is first turned on. This process will cancel the fast heat up cycle. After completing testing of the spa functions remember to reset mains power if you wish to reactivate fast heat up cycle. Freeze Protection Freeze protection will be activated whenever the water temperature drops below 4 o C. It runs back to back 10 minute sanitise cycles and displays WARM on the LCD. It also runs each spa accessory (i.e. jet pumps and air blower) in sequence to run water through the pipe work whilst running the filtration pump and heater. During the WARM cycle the heater and heat pump (if fitted) will operate however heater load shedding may occur when accessory pumps are running depending on control and load shed settings. At the end of each 10 minute WARM cycle the water temperature is checked. If it is above 4 o C freeze protection stops and the controller returns to its prior state. If the temperature is not above 4 o C another cycle will run. Note: Freeze protection overrides the sleep timer if the water temperature drops below 4 o C and the controller is in a sleep period it will wake up. So even if high amounts of sleep time and a low set temperature point have been programmed, the SV Mini will always maintain the water temperature at least above 4 o C. Defrost Cycle (heat pump models only) During periods of low ambient temperatures defrost cycles may be required to prevent the heat pump s condenser from freezing. Ambient and condenser temperatures are constantly monitored and defrost cycles will be automatically activated if certain conditions are met. Defrost cycles run for a minimum of 3 minutes to a maximum of 10 minutes. Overheat Protection All SV controllers feature three forms of overheat protection: 1. If sensed water temperature within the heater unit exceeds safe working limits the heating element will be disabled and the controller will shut down and latch fault code (ER4 - Thermal Trip). Normal operation will not resume until heater element has cooled and mains power is reset 2. If sensed water temperature exceeds 42 o C filtration is stopped until the temperature falls below 42 o C to prevent heat rise from filtration pump operation 3. If sensed water temperature exceeds 45 o C the controller will shut down and latch fault code (Er5 - Pool too hot). Normal operation will not resume until mains power is reset V.1704 Page 16
17 ERROR CODES / TROUBLESHOOTING SV spa controllers feature self-diagnostics and scrolling error messages to quickly troubleshoot possible problems. Should the spa control encounter a problem the error code / message will scroll across the topside panel screen until the problem is resolved. If an error condition is experienced all spa functions are shut down and the spa should not be used until the error condition has been resolved. A list of error codes with descriptions of problems and possible solutions is detailed below for your reference. IMPORTANT NOTE For most error codes mains power to the spa control must be turned OFF and then back ON before the error condition will be cleared. Before attempting any troubleshooting always ensure mains power is isolated and turned OFF. Heartbeat LED All SV Mini spa packs feature a red flashing heartbeat LED light. The heartbeat LED is located on the main printed circuit board of the spa pack itself (spa pack enclosure cover needs to be removed). The heartbeat LED flashes to indicate the current health/status of the spa pack. When the spa pack is functioning correctly with no errors to report the heartbeat LED emits a single flash in a constant pulse much like a heartbeat (ON, OFF, ON, OFF). If the spa pack encounters a fault the heartbeat LED will begin flashing in sequence with the error code number being experienced (ie. ER2 = ON,ON; OFF ON,ON; OFF). If the keypad display is ever blank a spa user can still determine the health / status of the SV Mini controller by removing a panel from the spa skirt and checking the heartbeat LED on the front of the spa pack itself. ER-2 HEATER PLUG Problem: Cause: Solutions: No heater sensor communication Heater sensor communication problem. Sensor cable is not correctly connected to spa control or is damaged Turn mains power OFF, remove spa cabinet panel and SV Mini enclosure cover Check heater sensor cable is firmly plugged into spa control socket labelled HEATER Unplug and re-plug heater sensor cable to re-establish connection to spa control Check for damage to sensor lead, replace covers and test spa again Contact spa reseller if problem is not resolved ER-3 WATER PRIME Problem: Cause: Solutions: Water prime failed air detected in heater tube Airlock in pipe work, low water level, dirty filter cartridges Press Pump A button to retry water prime Check spa water level (refill if necessary) Remove filter cartridges and press Pump A button to retry prime Bleed airlock from pipe work by slightly loosening couplings on front of filtration pump Remove filter cartridges and flush water down pipe work with a hose ER-4 THERMAL TRIP Problem: Heater thermal trip activated. Heater has been active and has had insufficient water flow over the element. Low or no water flow has caused the heater temperature to exceed its maximum limits and the spa control has shut down operation to prevent any damage to the heater unit V.1704 Page 17
18 ER-4 THERMAL TRIP Cause: Solutions: Low water level, airlock in pipe work, closed shut-off valves, dirty filter cartridges, filtration pump failed or operation intermittent Turn mains power OFF and wait minutes for element to cool and thermal cut-out device to reset. Then turn power back ON Check spa water level (refill if necessary) Remove filters and clean as per manufacturer s recommendations or replace cartridges if required Check under spa cabinet to ensure all shut-off valves are in the OPEN position Bleed airlock from pipe work by slightly loosening couplings on front of filtration pump or by removing filters and flushing water down pipe work with a hose. Contact your spa reseller if problem persists ER-5 POOL TOO HOT Problem: Cause: Solutions: Pool over temperature. Temperature sensor reading 45 o C High ambient temperatures (especially in summer months) have caused water temperature to rise above set temp point, Excessive filtration time, Jet pumps have been operating for extended periods with the spa cover still on Turn mains power OFF, remove spa cover, allow spa to cool then turn power back ON Check daily filtration time (refer filtration section) and reduce daily filtration time if required Check spa cover is not resting on topside panel buttons causing jet pumps to start when cover is on. Use keylock function to lock keypad buttons when spa not in use. Contact your spa reseller if problem persists ER-6 12V OVERLOAD Problem: Cause: Solutions: 12V (port) current draw over 1A limit Total 12V current drawn by keypad(s), light(s), expansion ports and in pool temp sensor is excessive, 12V power supply is overloaded, too many LED light bulbs installed, faulty LED light Turn mains power OFF and restart spa to see if problem reoccurs Perform EPRM software reset to factory defaults Reduce number of LED lights connected to spa control Systematically unplug lights, keypads and expansion port loads from spa pack (one by one) to identify the faulty 12v device Contact your spa reseller if problem persists ER-8 CTRL FAULT HVS Problem: Cause: Solutions: Heater relay is on when it should be off Power surge, periods of low or high voltage, water on spa pack terminal block, relay fault Turn mains power OFF and back ON again to see if spa control recovers from ER8 fault Inspect under spa cabinet for evidence of water leaking onto spa control. If water present, turn mains power OFF and isolate, then resolve leak, dry up excess water, and allow spa control to dry out before restoring power. Contact your spa reseller if problem persists V.1704 Page 18
19 Contact Us Spa Net Pty Ltd Unit Railway Road North Mulgrave NSW 2756 Australia Phone: Fax: Technical Support & Service Accounts Department Sales Department service@spanet.com.au accounts@spanet.com.au sales@spanet.com.au V.1704 Page 19
SV SERIES USER MANUAL
 SV SERIES USER MANUAL TABLE OF CONTENTS SYSTEM OPERATING MANUAL Time/Date and Water Chemistry Warning... 3 SV Series Features Overview.. 4 SV2.T Overview... 5 SV3.T Overview... 6 SV4.T Overview... 7 Water
Table of Contents. V.1802 Page 2
 Table of Contents SAFETY WARNINGS FOR SPA PACK... 3 INTRODUCTION... 4 TOUCH PANEL LAYOUT... 4 Status Indicators... 5 Current Activity Scroll... 5 Light Sensor / Automatic Brightness... 5 Auto-Dim Screen...
Contents. Specifications. Description SV HP 55 SV HP 90. Specifications Warnings Introduction Overview... 4
 Contents Specifications Specifications... 1 Warnings... 2 Introduction... 3 Overview... 4 Installation Instructions... 5 Cable Connections... 6 Plumbing Diagram... 7 Electrical Wiring Diagram... 8 SV System
Spa Touch Control Panel with BP2100, BP6013 spa controllers. (Spa Owner s Manual insert)
") Spa Touch Control Panel with BP2100, BP6013 spa controllers. (Spa Owner s Manual insert) P.N. 7876C (export) February 12, 2015 For Spas equipped with BP2100, BP6013 controllers and Spa Touch panel. Spa
Spa Touch Control Panel with BP2100, BP6013 spa controllers. (Spa Owner s Manual insert) P.N. 7876C (export) February 12, 2015 For Spas equipped with BP2100, BP6013 controllers and Spa Touch panel. Spa
Spa Touch Control Panel with 2000, 2100 controllers. (Spa Owner s Manual insert)
") Spa Touch Control Panel with 2000, 2100 controllers (Spa Owner s Manual insert) P.N. 7876B February 11, 2015 For Spas equipped with BP2000, BP2100 controllers and Spa Touch panel. Spa Touch Control Panel
Spa Touch Control Panel with 2000, 2100 controllers (Spa Owner s Manual insert) P.N. 7876B February 11, 2015 For Spas equipped with BP2000, BP2100 controllers and Spa Touch panel. Spa Touch Control Panel
SV Series Spa Controls Installation & Technical Manual SV2 / SV2-VH / SV3 / SV3-VH / SV4-VH
 Installation & Technical Manual SV2 / SV2-VH / SV3 / SV3-VH / SV4-VH Table of Contents SYSTEM OVERVIEW Safety Warnings... 1 Specification Sheet... 2 Component Overview... 3 Spa Pack Dimensions... 4 SV2.T
spatouch Menued Control Panels
 spatouch Menued Control Panels Balboa Water Group BP Series Systems User Interface and Programming Reference The spatouch menued panel is compatible with all BP systems that already support the TP800 and/or
INSTRUCTION MANUAL. Blue Whale Spa Ltd, 11 Glaisdale Drive East Nottingham, NG8 4GU
 INSTRUCTION MANUAL MVP260 Control Reference Card Non-Circ Operation Initial Start-up When your spa is first actuated, it will go into Priming mode, indicated by Please see the M-7 Installation Instruction
Spas with 2 or 3 Pumps
 Topside Control Instructions for Spas with 2 or 3 Pumps 15bp501tp60102 1 Programming Menu Sequence 2 Powering on Your Spa After filling the spa through the filter assembly to the correct level remove the
TP600 and TP400 Control Panels
 TP600 and TP400 Control Panels Balboa Water Group Revolution Series User Interface and Programming Reference Simplified Menus System Model: BP1500 / BP1600 - Other BP-Series Systems as required. Software
Table of Contents. Product Image Table of Contents What is a Programmable Room Thermostat? Installation Procedure
 1 Model: 1 Table of Contents Product Image Table of Contents What is a Programmable Room Thermostat? Installation Procedure 1 2 3-4 5-6 Mode Select Pairing the ProTouch iq Hub Pairing the ProTouch iq What
INSTRUCTION MANUAL. Blue Whale Spa Ltd, 11 Glaisdale Drive East Nottingham, NG8 4GU
 INSTRUCTION MANUAL Balboa 500Z-Series Operation Guide Initial Start-up Your spa will enter Priming Mode ( ) when it is energized. During Priming Mode, press Jets button(s) repeatedly and be sure all pumps
TP800 and TP900 Series Control Panels
 TP800 and TP900 Series Control Panels Balboa Water Group User Interface and Programming Reference System Model: BP2500 / 2600 Software Version: 5.0 and later Panel Model: TP900 Series TP800 Series Software
DYGIZONE GJD910 Lighting Controller & Enunciator
 DYGIZONE GJD910 Lighting Controller & Enunciator MASTER WIRING IDENTIFICATION Power up to the DygiZone and you will see: All the LED s (red,yellow,green and blue buttons) will flash All the LCD icons will
SAT-3 Room Temperature Controller
 SAT-3 Room Temperature Controller USER S OPERATING INSTRUCTIONS Contents Introduction 5 Features Summary 5 Operation 7 On/Off 7 Room Temperature Adjustment 7 Operating Mode Selection 8 Fan Speed Selection
OWNER S MANUAL HIGH WALL INVERTER. (English) (BSHVD1S SERIES)
 (BSHVD1S SERIES)") OWNER S MANUAL HIGH WALL INVERTER (English) (BSHVD1S SERIES) IMPORTANT As with any product that has moving parts or is subject to wear and tear, it is VERY IMPORTANT that you maintain your air conditioner
OWNER S MANUAL HIGH WALL INVERTER (English) (BSHVD1S SERIES) IMPORTANT As with any product that has moving parts or is subject to wear and tear, it is VERY IMPORTANT that you maintain your air conditioner
Model: Available in: Sapphire Black and Glacier White. 1 Series
 Model: Available in: Sapphire Black and Glacier White 1 Series Table of Contents Product Image Table of Contents What is a Programmable Room Thermostat? Installation Procedure Mode Select Pairing the neohub
Model: 1 Series 12V. Available in: Sapphire Black and Glacier White
 Model: Available in: Sapphire Black and Glacier White 1 Series Table of Contents Product Image Table of Contents What is a Programmable Room Thermostat? Installation Procedure Mode Select Pairing the neohub
SP400P & SP601. User s Guide. Models: SP400P, Q400PAU-10, Q400PAU-15 SP601AU-15, SP601AU-15T Q601AU-20, SP601AU-20T Q601AU-30, SP601AU-30T
 8 Self-Diagnostic Error Codes The Spa Power controller has extensive self diagnostic capabilities. In the event of a problem it will indicate an error number according to the nature of the problem. The
Control Panel Operation (for additional information, please see the Special Operating Instructions for your specific hot tub)
") Control Panel Operation (for additional information, please see the Special Operating Instructions for your specific hot tub) TS702 Main Control Panel F2 PL F1 TL Pump 1 Pump 1 is a 2 speed pump. Pressing
Control Panel Operation (for additional information, please see the Special Operating Instructions for your specific hot tub) TS702 Main Control Panel F2 PL F1 TL Pump 1 Pump 1 is a 2 speed pump. Pressing
50110_HM-neoStat-2014_Layout 1 31/10/ :33 Page 1 neo
 neo Model: Available in : Sapphire Black and Glacier White 1 Wavin neo Table of Contents Product Image 1 Optional Features 19-22 Table of Contents 2 Re-calibrating the Thermostat 23 What is a Programmable
Xcelsior Spa Pool System
 Davey Repair or Replacement Guarantee In the unlikely event in Australia or New Zealand that this Davey product develops any malfunction within two years of the date of original purchase due to faulty
Installation Instructions / User s Manual TSTAT0406 and TSTAT0408
 997-060180-5 Installation Instructions / User s Manual TSTAT0406 and TSTAT0408 4 HEAT 2 COOL DUAL FUEL TSTAT0406 & TSTAT0408-4 WIRE CAPABLE THERMOSTAT (NAXA00201DB Daughter Board sold separately) LEFT
Lyric T6 & T6R Smart Thermostat
 Lyric T6 & T6R Smart Thermostat EN User Guide Lyric T6 Programmable Thermostat Lyric T6R Wireless Programmable Thermostat Lyric T6 & T6R Smart Thermostat Features Connects to the Internet so you can control
Instruction Guide: Thermostat Operation
 Instruction Guide: Elite Communicating Thermostats TPCM32U03*/TPCM32U04* (*GSR, GSM, TRN, AST) INSTRUCTION GUIDE: ELITE COMMUNICATING THERMOSTAT Thermostat Operation NOTE: These communicating thermostats
Table of Contents. Model: Series. Available in : Sapphire Black and Glacier White. Product Image. 20 Table of Contents.
 1 Model: Available in : Sapphire Black and Glacier White Table of Contents Product Image 1 Frost Protection 20 Table of Contents 2 Power ON/OFF 21 What is a Programmable Room Thermostat? Installation Procedure
INSTRUCTION MANUAL. Blue Whale Spa Ltd, 11 Glaisdale Drive East Nottingham, NG8 4GU
 INSTRUCTION MANUAL Balboa 500DZ-Series Operation Guide Initial Start-up Your spa will enter Priming Mode ( ) when it is energized. During Priming Mode, press Jets button(s) repeatedly and be sure all pumps
Model: Available in : Sapphire Black and Glacier White. 1 Series
 Model: Available in : Sapphire Black and Glacier White 1 Series Table of Contents Product Image 1 Frost Protection 20 Table of Contents 2 Power ON/OFF 21 What is a Programmable Room Thermostat? Installation
12V. Model: Available in : Sapphire Black and Glacier White. 2 Series
 Model: Available in : Sapphire Black and Glacier White 2 Series Table of Contents Product Image 1 Locking/Unlocking the neostat 19 Table of Contents 2 Frost Protection 20 What is a Programmable Room Thermostat?
Safety & Installation Instructions
 Model 8800 Universal Communicating Thermostat Safety & Installation Instructions READ AND SAVE THESE INSTRUCTIONS Table of contents Installation Installation location recommendations... 2 Thermostat mounting...
OWNER S MANUAL HIGH WALL INVERTER. (English) (MSHVD1S SERIES)
 (MSHVD1S SERIES)") OWNER S MANUAL HIGH WALL INVERTER (English) (MSHVD1S SERIES) IMPORTANT As with any product that has moving parts or is subject to wear and tear, it is VERY IMPORTANT that you maintain your air conditioner
OWNER S MANUAL HIGH WALL INVERTER (English) (MSHVD1S SERIES) IMPORTANT As with any product that has moving parts or is subject to wear and tear, it is VERY IMPORTANT that you maintain your air conditioner
15,000 BTU Portable Air Conditioner
 Instruction Manual 15,000 BTU Portable Air Conditioner Model: HYAC15 READ AND SAVE THESE INSTRUCTIONS Please read and follow the instructions in this user manual even if you feel you are familiar with
Model: Edge-HC. 1 edge-hc
 Model: Model: Edge-HC 1 edge-hc Table Of Contents Product Image Table of Contents Installation Procedure System Type LCD Display Power On/OFF Setting the Time & Date Mode Select Fan Speed Temperature Display
Safety / Kit Components 1
 Installation & Operation Manual Industrial Wall Control IWC0 (incorporating SmartHub and Fault Indicating features) Safety / Kit Components SAFETY Please read this manual carefully. Your failure to do
AUS. Devireg TM 535 Installation and user manual
 AUS Devireg TM 535 Installation and user manual 1 Congratulations with... your DEVI floor heating system Your property has been installed with a DEVI heating system. DEVI is Europe s leading floor heating
EL/GL Series - Mach 3 ML550 User Guide
 EL/GL Series - Mach 3 ML550 User Guide Heat Cool Warm Jets 1 Jets 2 Blower Light Mode Note regarding EL and GL systems: Mach 3 EL and GL systems function identically, but conform to different International
DAY/TIME Button: Selects hour, minute and day setting.
 CONTENTS MODEL 5400 USER MANUAL READ ALL INSTRUCTIONS BEFORE PROCEEDING For more information on energy savings, go to www.energystar.gov Premier Series Universal Auto Changeover Thermostat Up to 3 Heat
AQUATROL Zone Synchronizing Universal Injection/Mixing Boiler Reset Controls AQ252
 AQUATROL Zone Synchronizing Universal Injection/Mixing Boiler Reset Controls AQ252 USER OPERATION AND MAINTENANCE WARNING Risk of electrical shock. Can cause severe injury, property damage or death. Only
Owner s Manual. Part Number 33CSCPACHP-01
 Comfort Pro Programmable Commercial Thermostat Owner s Manual Part Number 33CSCPACHP-01 SAFETY CONSIDERATIONS Read and follow manufacturer instructions carefully. Follow all local electrical codes during
Smart Temp. Model
 Smart Temp Model 42-160 SINGLE STAGE PROGRAMMABLE THERMOSTAT 1 Heat / 1 Cool Single Stage Thermostat. 5+2 Programmable, Compatible with Gas Heat & Heat Pump System Installation and Operation Manual SPECIFICATIONS:--------------------------------------------------------------------------------
User s Manual ELITE PROGRAMMABLE THERMOSTAT WITH MENU DRIVEN DISPLAY
 User s Manual ELITE PROGRAMMABLE THERMOSTAT WITH MENU DRIVEN DISPLAY Customizable programming options for every day, weekdays, weekends, or individual days. Smart recovery gradually adjusts indoor temperatures
Table of Contents. Product Image 1 Locking/Unlocking the neoair 24 Table of Contents 2 Frost Protection 25 What is a Programmable Room Thermostat?
 Table of Contents Product Image 1 Locking/Unlocking the neoair 24 Table of Contents 2 Frost Protection 25 What is a Programmable Room Thermostat? 3-4 Power ON/OFF 26 Holiday Programming 27 Installation
OnCommand. Automation. Operation Manual ONCOM ONCOM-ACT ONCOM-RC ONCOM-ACT-RC ONCOM-POD2 ONCOM-ACT-POD2
 092442A RevC OnCommand Automation \ Operation Manual Contents Introduction...2 Operation...3 Troubleshooting...29 Warranty...34 ONCOM ONCOM-ACT ONCOM-RC ONCOM-ACT-RC ONCOM-POD2 ONCOM-ACT-POD2 Hayward Pool
ComfortSense 7500 Thermostat. User Guide
 ComfortSense 7500 Thermostat User Guide 507503-02 6/2018 Supersedes 5/2017 Table of Contents Features...2 Home Screen Temperature Indicator...3 Home Screen Information...3 Operating Mode Selection...6
HT-2 / 9600 Series Control Contents
 HT-2 / 9600 Series Control Contents Tools & Parts Tools Required Parts Required Error Messages 3 Flashing Dots Pressure or Flow Switch Not Activated Pressure or Flow Switch Activated Temperature Sensor
BP501G3 Tech Sheet. Part Number: Incoloy Incoloy Titanium. Custom Box Overlay Box Overlay Part Number N/A
 BP501G3 Tech Sheet Customer: Balboa Water Group Part Number: 56582 800 Incoloy 56583 825 Incoloy 56584 Titanium Custom Box Overlay Box Overlay Part Number N/A UL System Model: BP501-BP501G3-AU Software
Spectrolink Comfort Control. Home Owner's Manual Heating
 Spectrolink Comfort Control Home Owner's Manual Heating Heater identification and installation Model No: Serial No: Installation date: Installer: Installer phone No: This information is to be completed
Owner s Guide and. Gas Continuous Flow Water Heater 27L Gas Water Heater 874 & 872 Series, 627 Models
 Owner s Guide and Installation Instructions Gas Continuous Flow Water Heater 27L Gas Water Heater 874 & 872 Series, 627 Models This water heater must be installed and serviced by an authorised person.
SPA-QUIP LTD 3 BUTTON ELECTRONIC STANDARD SPA POOL CONTROLLER DEALER STAMP: DATE INSTALLED SERIAL NUMBER SOLD BY INSTALLED BY STARTUP TESTING
 DEALER STAMP: SPA-QUIP LTD DATE INSTALLED SERIAL NUMBER SOLD BY INSTALLED BY STARTUP TESTING 3 BUTTON ELECTRONIC STANDARD SPA POOL CONTROLLER Intui3butbk.99-PSE/NRC Contents 1...OPERATING INSTRUCTIONS:
PORTAPAC / DELTA HOT. Installation and Operation Manual. ! WARNING
 PORTAPAC / DELTA HOT Installation and Operation Manual! WARNING This equipment must be installed and serviced by a qualified technician. Improper installation can create electrical hazards which could
MAKING MODERN LIVING POSSIBLE. TP7001 Range Electronic 7 Day Programmable Room Thermostat. User Guide. Danfoss Heating
 MAKING MODERN LIVING POSSIBLE TP7001 Range Electronic 7 Day Programmable Room Thermostat Danfoss Heating User Guide TP7001 Electronic 7 Day Programmable Room Thermostat For a large print version of these
User instructions DHP-AT
 User instructions DHP-AT VUGFC202 If these instructions are not followed during installation and service, Danfoss A/S liability according to the applicable warranty is not binding. Danfoss A/S retains
Steamist Installation Guidelines
 Steamist Installation Guidelines The Heavy Commercial steam generator (HC-9 thru HC-18) comes from the factory assembled, carefully wired, and tested. Please read all instructions before installing or
User Guide. Color Touchscreen Programmable Residential Thermostat. ComfortSense Model: 13H /2015 Supersedes 7/2015
 User Guide Color Touchscreen Programmable Residential Thermostat ComfortSense 7500 Model: 13H14 507503-01 10/2015 Supersedes 7/2015 TABLE OF CONTENTS Features... 2 Temperature Dial Indicator... 3 Home
On initial power up the thermostat will guide you through set up procedure for the following:
 Operating Guide: for the Warmup 3iE Programmable Thermostat INTRODUCTION Your thermostat s default screen is the Home Screen. This screen displays important information such as the time, current floor
spatouch Icon Driven Control Panels
 spatouch Icon Driven Control Panels Balboa Water Group BP Series Systems User Interface and Programming Reference The spatouch Icon Driven panel is compatible with all BP systems that already support the
- Brochure D 542. Introduction. Features. tekmarnet 4 Thermostat /05. 5 Data Brochure Control settings wiring instructions
 - Brochure tekmarnet 4 Thermostat 542 D 542 06/05 1 Information Brochure Choose controls to match application Application Brochure Design your mechanical applications 2 3 Rough In Wiring Rough-in 4 Wiring
2017 Spa Touch Control Panel with 2000, 2100, 501, 6013 controllers (Spa Owner s Manual insert)
") 2017 Spa Touch Control Panel with 2000, 2100, 501, 6013 controllers (Spa Owner s Manual insert) P.N. 7876E July 2017 spatouch Icon Driven Control Panels Balboa Water Group BP Series Systems User Interface
2017 Spa Touch Control Panel with 2000, 2100, 501, 6013 controllers (Spa Owner s Manual insert) P.N. 7876E July 2017 spatouch Icon Driven Control Panels Balboa Water Group BP Series Systems User Interface
OWNER S MANUAL. Vintage Classic HEAT COOL models. Proudly Made in the USA
 OWNER S MANUAL Vintage Classic HEAT COOL models Proudly Made in the USA support@aquacomfort.com www.aquacomfort.com/service-and-support 888-475-7443 Manufacturing High Quality, High Efficiency Heat Pump
MCD User Manual
 6759 08/5 ALA MCD5-999 User WWW.COMFORTHEAT.COM.AU < Contents > Contents Menu Overview................ 3 Introduction.................. Startup Wizard /2.............. 5 Startup Wizard 2/2..............
VADA - Rain2Main Automatic Rainwater Controller
 PRODUCT OVERVIEW / APPLICATION The Vada Rain2Main is designed to select between stored rainwater (when available) and mains supply water, and send this water to your toilet cistern, washing machine, garden
User s Manual
 997-060180-4e User s Manual 8403-060 Menu Driven Display 1120-445 I. CONTROLLER OPERATION ADJUSTING TEMPERATURE (Temporary Override when in Programmable mode) 1. Before you can adjust the temperature,
1.1 Controller General Information
 1.1 Controller General Information The Aestiva S1000 controller is differential controller specifically designed for forced circulation solar system. It incorporates a microprocessor driven PCB board and
AVANT DGi. Thermal Electric Radiator. Operating and Installation Instructions. (Read these instructions carefully and retain for future reference)
") (v13. 20180906) MODE CONFIG. PROG. AVANT DGi Thermal Electric Radiator Operating and Installation Instructions (Read these instructions carefully and retain for future reference) Models: AVANT-DGi 350
(v13. 20180906) MODE CONFIG. PROG. AVANT DGi Thermal Electric Radiator Operating and Installation Instructions (Read these instructions carefully and retain for future reference) Models: AVANT-DGi 350
MSPA-MP METAPACK SERVICE MANUAL. Visual step-by-step guide to easily identify & correct technical problems! Gecko Electronics Inc.
 MSPA-MP METAPACK SERVICE MANUAL Gecko Electronics Inc. Visual step-by-step guide to easily identify & correct technical problems! Table of Contents Power & Ground Check Tools and Parts 3 Electrical Wiring
4 Wiring Brochure Wiring and
 - Brochure tekmarnet 4 Thermostat 544 D 544 06/05 1 Information Brochure Choose controls to match application Application Brochure Design your mechanical applications 2 3 Rough In Wiring Rough-in 4 Wiring
Application Manual Loop Water Controller
 Application Manual Loop Water Controller AM - LWC TABLE OF CONTENTS LIST OF FIGURES ii iii 1.0 SAFETY CONSIDERATION 1 1.1 Installation Recommendations 1 2.0 GENERAL DESCRIPTION 2 2.1 General Introduction
ML550, 551, 554 Panel Operation
 ML550, 551, 554 Panel Operation Please refer to the following User Guides for more detailed information: ML551/ML554 User Guide: P/N 40632-99 ML 550 User Guide: P/N 40569-99 Light Mode Warm Light Mode
Zip Autoboil Installation and Operating Instructions
 Zip Autoboil Installation and Operating Instructions 315052 Zip Autoboil 15 Litre White 313051 Zip Autoboil 15 Litre Stainless Steel 325052 Zip Autoboil 25 Litre White 325051 Zip Autoboil 25 Litre Stainless
The Professional s Choice
 CPF Series Models: CPF2100, CPF210, CPF310, CPF4100-3, CPF4100-6 & CPF6100 Auto-Fill Catering Water Boiler With Integrated Multi-Filter Installation And User Instructions The Professional s Choice INSTANTA
Peak Partners Web-Programmable Thermostat Homeowner s Manual. Look inside for a complete guide to the setup and operation of your new thermostat.
 Peak Partners Web-Programmable Thermostat Homeowner s Manual Look inside for a complete guide to the setup and operation of your new thermostat. Table of Contents Step 1: Getting Started...4-6 A. Thermostat
VIDEO CONTROLS LIMITED
 VIDEO CONTROLS LIMITED MAXCOM PRO SERIES TELEMETRY CONTROL SYSTEMS Operation Guide for use with MaxCom 3V, MaxCom 3VE, MaxCom 4V and MaxCom4VE Document Code number - CI431V2 Table of Contents Safety Instructions
RF Programmable Room Thermostat User Instructions
 ESRTP4RF RF Programmable Room Thermostat User Instructions Thank you for choosing ESi Controls. All our products are tested in the UK so we are confident this product will reach you in perfect condition
User Guide. Balboa Water Group
 User Guide Balboa Water Group The SpaTouch2 Contents Settings Screen 04 Utilities Screen 11 Panel, Demo, Fault, GFCI Test, Units Screen, Reminders, Cleanup Cycle, Language Getting Started 01 Fill it up!
- Data Brochure tekmarnet 4 Thermostat 542e
 - Data Brochure tekmarnet 4 Thermostat 542e D 542e 03/08 1 Information Brochure Choose controls to match application 2 Application Brochure Design your mechanical applications 3 Rough In Wiring Rough-in
Evolution Control. Zone Control Homeowner s Guide
 Evolution Control Zone Control Homeowner s Guide CONGRATULATIONS! Your decision to choose the Bryant Evolution Control puts you in a select group of homeowners who understand the value of precise comfort
Phone-A-Stat. MODEL Command Center With Thermostat Operation, Maintenance & Installation Manual. Introduction.
 Introduction The UL listed Phone-A-Stat (model # 7632 ) is designed and approved for the safe operation of remotely controlling four independent loads, such as a sprinkler system or a water heater via
INTRODUCTION Thank you for purchasing your new Comfort-Set 90 Series thermostat. Your new White-Rodgers Thermostat uses solid state microcomputer
 INTRODUCTI Thank you for purchasing your new Comfort-Set 90 Series thermostat. Your new White-Rodgers Thermostat uses solid state microcomputer technology to provide precise time/temperature control. This
INSTALLATION MANUAL. * If using remote sensors the thermostat must be hardwired. Need Help?
 INSTALLATION MANUAL This manual covers the following models: T955W Master Thermostat Base Module Thermostat Applications Guide Description Gas or Oil Heat Electric Furnace Heat Pump (No Aux. or Emergency
INSTALLATION AND USER MANUAL
 INSTALLATION AND USER MANUAL Thank you for choosing inverter heat pump. This manual provides you necessary information for optimal use and maintenance, please read it carefully and keep it for subsequent
USER MANUAL SILENT16 PORTABLE AIR CONDITIONER
 USER MANUAL SILENT16 PORTABLE AIR CONDITIONER Thank you for choosing electriq Please read this user manual before using this innovative Air Conditioner and keep it safe for future reference. Visit our
Operating Manual. Series Touchscreen Programmable Demand Control Thermostat. UtilityPRO TM
 Operating Manual UtilityPRO TM Series Touchscreen Programmable Demand Control Thermostat 85-3126 BE CAREFUL! Never use sharp instruments, such as a pencil or pen, to press touchscreen keys. To prevent
Elegance. SMT-700 User manual. Ver
 Elegance SMT-700 User manual Ver 3.0. 0807 Congratulations on the purchase of your new Thermostat! Your new air conditioning system thermostat has been built using the best components and design philosophy
Owners Manual PORTAPAC
 Portapac Inst/ Operation Owners Manual - Dimension : 279mm(H) X 210mm(W) = A4 size Code No: (63813896) 10/ 2005 Date: 05/ 10/ 2005 Owners Manual Waterco Limited ABN 62 002 070 733 This equipment must be
Equipment Booklet. Sousou SPA. for
 Equipment Booklet for Sousou SPA 2800 Richter Ave. Suite C, Oroville, CA 95965 z voice: (530)534-9910 fax: (530)534-9915 z email: sales@tiledspas.com z website: www.tiledspas.com 6/17/2016 Nespa Tiled
Owner s Manual AIR TO WATER HEAT PUMP. Hydro Unit HWS-804XWHM3-E HWS-804XWHT6-E HWS-804XWHT9-E HWS-1404XWHM3-E HWS-1404XWHT6-E HWS-1404XWHT9-E
 AIR TO WATER HEAT PUMP Hydro Unit Model name: HWS-804XWHM3-E HWS-804XWHT6-E HWS-804XWHT9-E HWS-1404XWHM3-E HWS-1404XWHT6-E HWS-1404XWHT9-E English Thank you very much for purchasing TOSHIBA Air to Water
Operating Instructions Model: PRT-RP Version 3. 05/11 Revision 2 Ref: PRTRP
 Operating Instructions Model: PRT-RP Version 3 05/11 Revision 2 Ref: PRTRP Contents Page What is a programmable thermostat? 2-4 Installation 5-6 Icons explained 6 Temperature Display 7 Setting the Clock
INSTALLATION AND USER MANUAL
 INSTALLATION AND USER MANUAL t Thank you for choosing Aqua inverter heat pump. This manual provides you necessary information for optimal use and maintenance, please read it carefully and keep it for subsequent
NX-148 LCD CODE PAD TABLE OF CONTENTS
 NX-148 LCD CODE PAD TABLE OF CONTENTS Glossary Of Terms... 4 Understanding The Lights... 5 Code Pad Functions Arming In The ON Mode... 6 Making The System Ready To Arm... 7 Using Quick Arm... 7 Arming
EFET 535. Installation Manual INT INT
 MAKING MODERN LIVING POSSIBLE EFET 535 Installation Manual Warning! This manual is only to be used by a professional installer to install and set up the thermostat properly. It is not intended for the
For Quick Set-Up go to Page 14
 Talking Thermostat Model VT3000 Guide SmartWay Solutions, Inc. US Patent 6,608,560 & 7,62,253 For Quick Set-Up go to Page 4 Model VT3000, a universal thermostat for use on most Gas or Electric, Conventional
AXI LED USER MANUAL (REV. 1.0)
") Security & Home Automation System AXI LED USER MANUAL (REV. 1.0) CONTENTS PREFACE FEATURES LED KEYPAD OUTLOOK 1.0 LIGHT INDICATION 1 2 4 6 CHAPTER 1: ALARM SYSTEM CONTROL 1.0 USING LED KEYPAD 1.0.1 ARMING
Security & Home Automation System AXI LED USER MANUAL (REV. 1.0) CONTENTS PREFACE FEATURES LED KEYPAD OUTLOOK 1.0 LIGHT INDICATION 1 2 4 6 CHAPTER 1: ALARM SYSTEM CONTROL 1.0 USING LED KEYPAD 1.0.1 ARMING
HEAT PUMP PROGRAMMABLE THERMOSTAT
 HEAT PUMP PROGRAMMABLE THERMOSTAT SA PM 3 COOL TEMP Form 44014-01 r010408 Model 43168 Owners Manual 1 Congratulations! Heat Pump Programmable Thermostat Model 43168 THERMOSTAT CONTROLS Switches & Buttons...15
INSTRUCTION GUIDE: COLOR TOUCHSCREEN COMMUNICATING THERMOSTAT Color Touchscreen Communicating with Humidity Control Thermostat TPCC32U01.
 Instruction Guide: INSTRUCTION GUIDE: COLOR TOUCHSCREEN COMMUNICATING THERMOSTAT Color Touchscreen Communicating with Humidity Control Thermostat TPCC32U01 Menu Press the Menu button. Color Touchscreen
TPOne-B. Electronic Programmable Room Thermostat. Installation Guide. Danfoss Heating
 TPOne-B Electronic Programmable Room Thermostat Danfoss Heating Installation Guide TPOne is an intelligent programmable heating control made easy. TPOne includes features which are designed to save energy.
(-)HC-TST213UNMS 5/1/1 Day 5/2 Day Non-Programmable. Yes
HC-TST213UNMS 5/1/1 Day 5/2 Day Non-Programmable. Yes") Save these instructions for future use! FAILURE TO READ AND FOLLOW ALL INSTRUCTIONS CAREFULLY BEFORE INSTALLING OR OPERATING THIS CONTROL COULD CAUSE PERSONAL INJURY AND/OR PROPERTY DAMAGE. Universal Thermostat
Save these instructions for future use! FAILURE TO READ AND FOLLOW ALL INSTRUCTIONS CAREFULLY BEFORE INSTALLING OR OPERATING THIS CONTROL COULD CAUSE PERSONAL INJURY AND/OR PROPERTY DAMAGE. Universal Thermostat
2018 thesimple, Inc.
 TM User Guide 2018 thesimple, Inc. Introduction The Simple thermostat supports supports 2 heating stages and 2 cooling stages for conventional systems, and 2 heating/cooling stages for heat pumps, with
ComfortSense 7500 Commercial Thermostat. User Guide
 ComfortSense 7500 Commercial Thermostat User Guide 507505-02 6/2018 Supersedes 5/2017 Table of Contents Features...2 Home Screen Temperature Indicator...2 Home Screen Information...3 Operating Mode Selection...5
IT801 Thermostat. User s Manual. The complete guide to the set up and operation of your new smart Wi-Fi thermostat.
 IT801 Thermostat User s Manual The complete guide to the set up and operation of your new smart Wi-Fi thermostat. The smart Wi-Fi thermostat system learns your comfort preferences, then finds opportunities
IMPORTANT SAFETY INFORMATION:
 08/53542/0 (AU/NZ) Issue 1 Owner s Manual Model BLF5051-AU/ PRISM 50" EN IMPORTANT SAFETY INFORMATION: Always read this manual first before attempting to install or use this fireplace. For your safety,