Centrifugal pump type WK
|
|
|
- Clarence Skinner
- 5 years ago
- Views:
Transcription


1 D Centrifugal pump type WK GB Operator s Manual B

2 EG-Konformitätserklärung Déclaration de conformité pour la CEE / EC-Declaration of Conformity / CEE-Certificado de Conformidad / Dichiarazione CE di conformità Hersteller / fabricant / manufacturer / fabricantee / fabrikant Schmalenberger GmbH+Co KG Strömungstechnologie Im Schelmen 9-11 Produkt / produit / product / producto / prodotto Kreiselpumpen / Pompes centrifuges / Circulating pumps / Bombas centrifugas / Pompe centrifughe Typ / modèle / model / modelo / tipo WK, WK-Vario Hiermit erklären wir, dass die spezifische Bauart in Übereinstimmung mit den folgenden Richtlinien hergestellt worden ist: Par la présente, nous declarons, que le type de est produit conforme aux dispositions des directives européenne sci après: We hereby declare that the specific type has been produced in accordance with the following standards: Por la presente les confirmamos que lo abajo especificado ha sido fabrico en conformidad con las siguientes normas: Si dichiara che il modello della è stato in conformità alle sequenti norme: EG - Richtlinien / Directives de la CEE / EEC Directives / Normativas de la CEE / Direttive CEE 2006/42/EG 2006/95/EG 2004/108/EG Zur sachgerechten Umsetzung der in der EG-Richtlinie genannten Sicherheits- und Gesundheitsanforderungen wurde(n) folgende Norm(en) herangezogen: Pour mettre en partique dans les règles de l'art les prescritions en matière de sécurité et de santé stipulées dans les Directives de la CEE, il a été tenu compte de la /des norme(s): For the relevant implementation of the safety and health requirements mentioned in the Directives, the following standard(s) must be required: Con el fin de realizar de forma adecuada las exigencias referentes a la seguridad y a la snidad mencionadas en las normativas de la CEE fuè(ron) consultada(s) la(s) siguiente(s) normativa(s): Per la verifica della Conformità di cui alle Direttive sopra menzionate, sono state consultate le seguenti, norme Armonizzate EN: Harmonisierte Normen / Normes harmonisées / Harmonised Standards / Normas armonizadas / Norme armonizzate EN ISO , EN ISO , EN , EN , EN 809, EN ISO Tübingen, den 21. Dezember Leiter Qualitätssicherung / Directeur d assurance de la qualité / Manager of quality assurance / Director del assegunamiento de qalidad / Direzione qualità / Tel. +49(0) Pumpe Typ WK
3 TABLE OF CONTENTS Table of Contents 1 General Information User Information Usage Instructions Other Applicable Documents Technical Data / Specification Data Sheet Safety Instructions General Information Signs and Symbols Responsibilities of the Operator Safety Instructions for Installation Safety Instructions for Connection and Commissioning Safety Instructions for Maintenance and Repair Description of the Device Transport, Storage and Assembly Transport and Storage Unpacking, Cleaning and Assembly Setting up and Connecting Electrical Connection Electrical Connection - General Electrical Connection - Pump Type WK Device Units Pump Kit Type WK Assembly Assembly - General Assembly of the Control Box (Type WK Only) Assembly of WK-Vario Flow Losses - Pipes and Elements Operating the Centrifugal Pump Initial Start-up Operation Notices of Incorrect Operation Shutdown Emptying the Pump Troubleshooting Maintenance / Repair General Information Maintenance / Inspection Repair Disassembly / Dismantling the Pump Appendix Decommissioning / Placing in Storage / Preservation Disposal Important Information Spare Parts List and Drawing Type WK Type WK-Vario Spare Parts List
4 1 General Information 1.1 User Information The Operator's Manual makes it easier to make full use of the device and its range of options. It contains important information for operating the centrifugal pump safely, properly and economically. Observing the instructions helps to avoid dangers, avoid repair costs and downtimes, and increase the reliability and service life of the centrifugal pump. The Operator's Manual does not take into consideration requirements for specific location. The operator is responsible for observing these requirements. The pump rating plate indicates the series and frame size, the most important operating data and the factory number. Please specify this information if you have questions, a subsequent order, or especially when ordering spare parts. 1.2 Proper Use The pump is intended exclusively for use in accordance with the original specification. It must only be operated with the values defined in the Technical Documentation regarding pumping medium, pumping flow, speed, density, pressure, temperature, motor power and all other data defined in the specification. Do not use the pump for any other type of application. Do not make any changes to the pump. This may result in additional risks and property damage, for which the manufacturer shall not be liable! The manufacturer must always be consulted regarding adjustments for a new intended use. We will be pleased to determine what adjustments would be required for the new intended use. Proper use also includes observing the Operator's Manual. Residual risk The centrifugal pump system is built according to the state of the art and recognised safety engineering rules. Nevertheless, danger to life and limb of the operator or third parties, or damage to other property may arise during use. The owner / operator must therefore take care to heed the safety instructions in this Operator's Manual. 1.3 Other Applicable Documents Each centrifugal pump has various documents which belong together with the Technical Documentation for the centrifugal pump. They are: The Operator's Manual for the centrifugal pump The Operator's Manual for the drive The Operator's Manual for the accessories listed in the specification Acceptance reports from TÜV, etc. Test run report / performance run report Assembly drawing (dimension sheet) Declaration of Conformity / Manufacturer s Declaration Specification with all information Not all the documents named above exist or are included in every case. Observe the information in the specification in this regard. 4
5 1.4 Technical Data / Specification The specification of the delivered centrifugal pump is the most important document for every Operator's Manual. It contains a summary of all factual and technical data for the centrifugal pump. It is the centrifugal pump's "birth certificate" and must be treated as such. The confirmation of order together with the delivery slip can be used as a replacement as proof of technical data. See data sheet 1.5 Data Sheet for the WK Pump Limit values of the pump Rated values of motor Type Q max P max Output Freque ncy Voltage Nominal current Speed Weight Sound level Pump connection Suction end Pressure end 1) Alternating current WK 6013/ WKN 6013/ WK 6013/2-1.5 WKN 6013/2-1.5 [m³/h] [bar] [kw] [Hz] [V] [A] [min -1 ] [kg] [db (A)] Y / / DN 65 / G 2½ DN 50 / G 2" Y / / DN 65 / G 2½ DN 50 / G 2" WK 6013/2-1.5 WS 1) DN 65 / G 2½ DN 50 / G 2" WKN 6013/2-1.5 WS 1) WK 6013/2-1.9 WKN 6013/ Y / / DN 65 / G 2½ DN 50 / G 2" WK 6013/2-1.9 WS 1) DN 65 / G 2½ DN 50 / G 2" WKN 6013/2-1.9 WS 1) WK 6013/2-3.0 WKN 6013/2-3.0 WK 6013/2-4.0 WKN 6013/ Y / / DN 65 / G 2½ DN 50 / G 2" Y / / DN 80 / G 3" DN 65 / G 2½ 5
6 2 Safety Instructions 2.1 General Information Make certain before commissioning that the operating personnel have read and understood the Operator's Manual. It is the owner rather than the operator who is responsible for safety! Make certain the safety requirements and laws for the use of pumps which apply to the operating company and/or country in which the system is operated are observed. All parts that come in contact with medium are resistant up to a salt content of 0.75% (4500 mg/l Cl ). If higher concentrations of salt are present, please contact the manufacturer. Use the pump only when it is in flawless condition technically and according to its intended purpose. Be conscious of safety and dangers and observe all the instructions of this Operator s Manual! Eliminate all malfunctions that could have a detrimental effect on safety immediately. 2.2 Signs and Symbols We warn you of sources of danger in this Operator's Manual through corresponding notices. The use of symbols is designed to direct your attention at these notices. Caution! Risk of injury! / Risk of damage! This symbol warns you of dangers due to mechanical effects. Caution! Danger of death! This symbol warns you of dangers due to electrical current. Notices placed directly on the pump, such as the arrow for direction of rotation, must always be observed and must be maintained in legible condition. 2.3 Responsibilities of the Operator The owner/operator must take care to ensure - that the Operator s Manual is always available for operating personnel - That the safety instructions in this Operator's Manual are observed 2.4 Safety Instructions for Installation The centrifugal pump is delivered without a contact safety device. The required contact safety device (for example when pumping hot liquids above 60 C) must be provided by the system manufacturer when the pump is installed in the system. If the pump is installed in a shaft, the shaft must have sufficient ventilation (motor cooling) and an adequate possibility for leakage water to flow off (at least DN 40). There must not be any conducting connection between the metallic components of the motor and a liquid. 2.5 Safety Instructions for Connection and Commissioning Electrical equipment must only be installed and serviced by qualified personnel in 6
7 accordance with VDE 0105 and IEC 364. Caution! Electrical shock! Turn off the mains power voltage before starting work! Protect against unauthorised switching on! The pump must only be operated with an FI circuit-breaker. The information on the nameplate and the conditions for electrical connection must match. Before turning on the pump or placing it in operation, make certain no one can be endangered by the pump starting up! the centrifugal pump must be stopped immediately if any abnormal electrical voltages, vibrations, temperatures, noises, leaks, or other faults occur. 2.6 Safety Instructions for Maintenance and Repair Only persons with training as a mechanic and corresponding knowledge are permitted to perform maintenance and repair work on the pump. If liquids are pumped that can cause effects detrimental to health in any way, suitable measures must be taken (rinsing, cleaning, washing) to bring the wetted surfaces of the pump to a condition to ensure handling does not entail any dangers. Tasks that are not described in this Operator's Manual are reserved for the manufacturer's service personnel. 2.7 Description of the Device The pump meets the requirements of VDE regulations. The electric motor and plastic pump through which water flows are electrically separated. The electric motor corresponds to protection type IP 54/55. The centrifugal pump overall corresponds to protection rating I. Potential danger zones of the centrifugal pump are: The suction connection (strong suction effect) The pressure connection (high discharge speed of objects that may have been sucked in) The pump housing (heating) 7
8 3 Transport, Storage and Assembly 3.1 Transport and Storage Transport Caution! Risk of injury! Use only suitable lifting equipment and load holding devices which are in perfect working order and have adequate loadbearing capacity! Never work or stand under suspended loads. Fig. 1 Example of slinging for lifting 8118 Centrifugal pumps must be transported lying down. The lifting lugs on the motor are only designed for the weight of the motor alone. A unit consisting of a motor and a pump must be attached on both the motor and pump sides. If necessary, the position of the centre of gravity is identified on the pump unit itself and on the packaging and the positions for inserting lifting equipment are marked Storage Temporary storage Even for temporary storage of short duration, store in a dry, well ventilated location free of vibration on wooden supports at a temperature that is as constant as possible. Unsuitable storage If storage conditions are unsuitable (for example high relative humidity), or if the pump will be in storage for longer than 6 weeks, the pump housing must be filled with oil (see chapter Preservation). Storage for extended duration If the storage time exceeds 2 years, the roller bearings in the motor must be regreased or completely replaced. Before initial commissioning and after an extended down time, or after installation of a new mechanical seal, always check for smooth operation (see chapter Recommissioning) Preservation The centrifugal pumps we deliver are provided with preservation according to the storage time specified by the manufacturer. This preservation must be removed before commissioning; see chapter Cleaning. If the pump will be taken out of operation for an extended time or if the storage time 8
9 originally planned before commissioning will be considerably exceeded, preservation should be performed as corrosion protection. The procedure to follow is described in detail in chapter 10.1 Decommissioning / Placing in Storage / Preservation. 3.2 Unpacking, Cleaning and Assembly Unpacking The centrifugal pump is secured on a pallet with bands for transport. For transport over extended distances it is packed in cases or crates. After the retaining bands are loosened, lift the centrifugal pump out of the packaging with auxiliary equipment (lifting tackle). Follow the instructions in chapter Transport Cleaning Various measures are provided for protection against transport damage or corrosion. Find out which ones have been selected for your centrifugal pump. 1. Cover plates on the connections 2. Shaft protection, for delivery without motor 3. Protective paint on bare metal parts Before set-up or installation of the centrifugal pump, these protective devices must be removed. No contamination can be allowed to remain inside the pump! Important: Depending on the pumping medium, the inside of the pump must be cleaned of oil residue. Use a cleaning agent to do this that will not damage the mechanical seal or the pump material. Make certain the pump is carefully dried after cleaning. Suitable cleaning agents include rectified spirits, Ritzol 155 or suds with a high alkaline content. If steam cleaners are used, allow the solvent to act first. If possible do not use steam cleaners. If you do, make certain not to damage the electric motor and bearings during use Assembly The centrifugal pump generally comes premounted and is therefore ready for delivery. In special cases the centrifugal pump is delivered without a drive motor. Connect the drive to the centrifugal pump before the pump is mounted in the system. Note: Check to ensure the centrifugal pump is running easily and freely before starting assembly Other external accessories such as air chambers, etc., that are not premounted on the centrifugal pump in the factory should not be connected until after the centrifugal pump is installed in the system or on the pump foundation. 9
10 3.3 Setting up and Connecting Before starting to set up, check the following: Is the machine / system / container connection prepared according to the dimensions of the dimension sheet / installation diagram? Do the concrete foundations have sufficient concrete strength (min. B 15) per DIN 1045? Is the concrete foundation hardened? Is the surface horizontal and even? Caution! Risk of injury - stability Pump with large drives that are installed vertically are top-heavy. These pumps must be secured against tipping during assembly or disassembly, for example by using retaining ropes Installation and Set-up of the Pump Except for the special design, pumps are always placed on a base plate with the pump or motor mount and fastened with bolts. For assembly on a foundation, the centrifugal pump must be aligned with a spirit level Connecting the Pipelines Caution! The centrifugal pump must never under any circumstances be used as a point for securing the pipeline. No forces or moments (for example caused by warping or heat expansion) from the pipelines may be allowed to affect the centrifugal pump. Pipes must be intercepted directly before the pump and connected with no tension. Their weight must not place any load on the pump. The alignment must be made very carefully, since it is the precondition for problem-free operation of the unit. Failure to observe these instructions shall cause all claims under the warranty to be voided. Caution! With hot, corrosive and toxic pumping media! If pipeline forces are exceeded, points with faulty seals may develop on the centrifugal pump itself or on the flanges, which may result in powerful ejection of pumping medium. For short pipelines, the nominal widths should at least match those of the pump connections. For longer pipelines, determine the most cost-effective nominal width from case to case. 10
11 Transition pieces to larger nominal widths should be designed with an expansion angle of about 8 to prevent increased pressure loss. The suction line rises continuously to the centrifugal pump. For drain, lay pipelines continuously falling to prevent air lock from forming. Depending on the type of system and pump, installation of backflow prevention valves and shut-off elements is recommended. Expansion of pipelines due to temperature must be countered by suitable measures. We recommend installing compensators directly between the pump and the pipeline. 4 Electrical Connection 4.1 Electrical Connection - General Connection tasks must only be performed by a certified installation electrician. Applicable DIN VDE requirementsmust be observed. Compare the existing mains power supply with the information on the factory plate of the motor and select a suitable circuit. We recommend using a motor protection device. Danger of explosion! If there is danger of explosion, a motor protection device must be installed! 4.2 Electrical Connection - Pump Type WK Connect the motor according to the circuit diagram in the terminal box or the "Delta connection" or "Star connection" image. Make certain: The mains power connection must only be made via a fixed connection. There must be no conducting connection from metal components of the motor to the water. The mains supply line must be equipped with a fault current circuit breaker (rated current error 30 ma) and an all-pole separator with a contact opening of 3 mm. Equipotential bonding with a cross-section of 10 mm² must be applied on the connection terminal so identified (on the motor mount or next to the terminal box). The pump must only be operated with the terminal box cover closed! 11
12 4.2.1 Connection Diagrams for Three-Phase Motors Fig. 2 Delta connection (low voltage) Fig. 3 Star connection Y (high voltage) Time Relay Setting For three-phase motors with star-delta connection, you must ensure that the switching points between star and delta follow one after the other in as little time as possible. Longer switching times will result in damage to the motor. Time delay setting for star-delta connection: < 3 sec Direction of Rotation Check The direction of rotation of the motor must match the direction indicated by the direction of rotation arrow on the spiral housing of the side channel compactor. Check by switching on and off in quick succession. If the direction of rotation is incorrect, reverse any two phases L1, L2 or L3 of the mains power supply line in the motor terminal box Auxiliary Equipment for Motor If special control devices are provided, for example in conjunction with use of the centrifugal pump in a technical system, the manufacturer's instructions for these control devices must always be observed. For additional information, see the Operator's Manual Pump Control (27122). 12
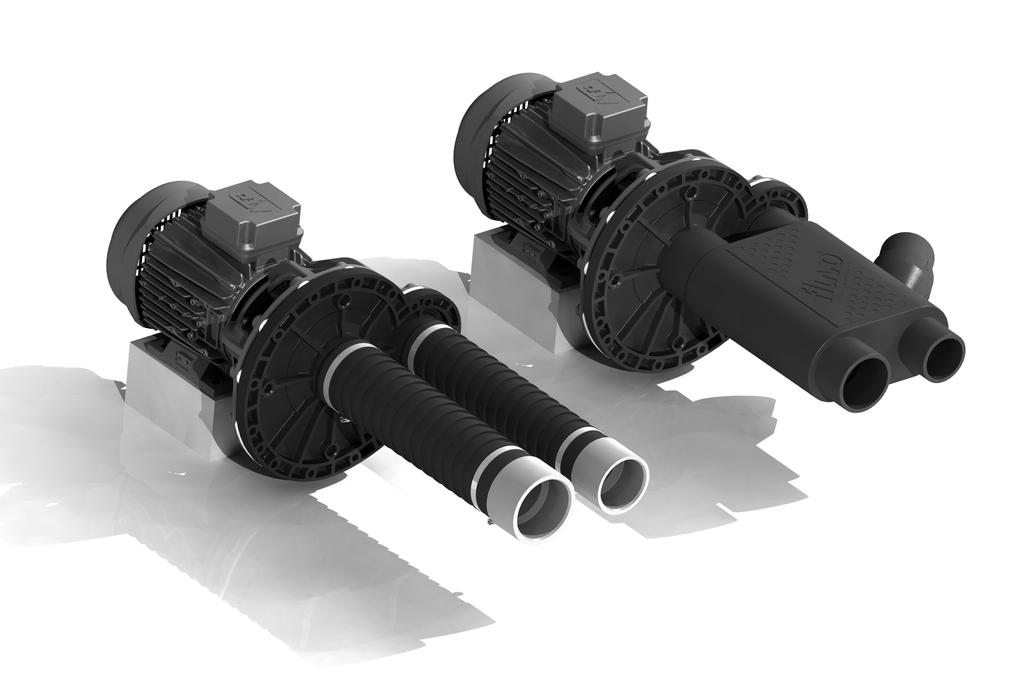
13 5 Device Units 5.1 Pump Kit Type WK The pump kit consists of: 1. Pump unit item 01* 2. Suction hose item 16** 3. Pressure hose item 13** 4. Switching tube ø 4 mm item 31** 5. Control box item 02** 6. Cable protection cover item K** * The item numbers correspond to the numbering in the spare parts list ** If included in the scope of delivery The pump kit is always the same regardless of the type of pool. Fig. 4 Pump kit 8127 The control box (02) must always be positioned above the water level of the pool! When setting up the pump, there must be sufficient ventilation (motor cooling) and an adequate possibility for leakage water to flow off! 13
14 6 Assembly 6.1 Assembly - General A A = min. 100 mm b = 160 mm I Insulation 44 Screw Fig Mount the base frame in the place provided for it. Fasten the base frame in place with 4 screws (44). Caution! The base frame should be fastened so that it is insulated against the floor and wall (I) to prevent transfer of external voltage. 6.2 Assembly of the Control Box K Protection cover 02 Control box 31 Switching tube Fig Mount the control box (02) as close as possible to the installation kit. Connect the switching tube (31) onto the nipple in the protection cover (K). Caution: Do not kink the switching tube and keep it as short as possible; maximum length 8 m. 14

15 6.3 Assembly of WK-Vario Combination with Massage Jets Zur hydro-massage > Rohr DN 50 Zur hydro-massage > Zur hydro-massage > Zur GSA Luftregler Ansaugung Wasserregler Fig. 7 WK Pumpe WKvario Combination with Water Curtain Rückschlagventil Zur Schwalldusche > Rohr DN 50 Zur GSA Luftregler Ansaugung Wasserregler Fig. 8 WK Pumpe WKvario 15


16 6.4 Flow Losses - Pipes and Elements Water, 48 m³/h; turbulent flow; roughness value: 0.1 mm Flow losses in the pipeline must be noted. Flow losses must be kept low in the components that are used. Sample flow values are listed in Fig. 9. Pipe, 30 m, PVC hard, DIN Pressure loss Flow speed DN bar m/s DN bar m/s DN bar m/s DN 80 Pressure loss Flow speed Knee piece bar m/s 90-degree elbow bar m/s DN 80 Pressure loss Flow speed Abrupt pipeline constriction 80 to 50 mm Edged run-in under angle bar m/s bar m/s Fig. 9 16
17 7 Operating the Centrifugal Pump 7.1 Initial Commissioning Make certain the following preconditions are met before initial commissioning of the pump: 1. The centrifugal pump is connected electrically with all protective devices in accordance with requirements. 2. The centrifugal pump is completely filled with pumping medium and is receiving supply. 3. All shut-off elements are open on the suction end and the pump as well as the suction line are emptied. Make certain: Dry running results in increased wear and damage to the pump! 4. Rotating parts of the centrifugal pump must be provided with a contact safety device. (In accordance with the accident prevention requirements (UVV) the pump may only be operated with a contact safety device.) 5. The shaft of the centrifugal pump has been tested to ensure it runs easily (observe the instructions in chapter Assembly). 6. The direction of motion has been checked Starting the Pump The pump must only be turned on with the pressure-end shut-off element half open and the suction-end shut-off element completely open! Do not open it until full speed is reached. Then slowly open it and adjust control to the operating point. 7.2 Operation Operation Monitoring In most cases the centrifugal pump is controlled from the central control unit of the entire system. Data associated with the design of the centrifugal pump and related to the intended purpose (see specification) must be observed as a precondition for problem-free functionality. It is especially important to observe the points listed below during manual operation of the pump: 1. Temperature of the pumping liquid The centrifugal pump must only be operated at water temperatures of t = 0 to +50 C. 2. Temperature of the motor cooling air The maximum temperature of the motor cooling air is 40 C. If higher temperatures occur (for example in a pump shaft), sufficient ventilation must be ensured. 3. Switching frequency To avoid large temperature increases in the motor and excessive load on the centrifugal pump, motor and bearings, one switching-on process per minute must not be exceeded. 17
18 4. Minimum quantity If the nature of the system includes the possibility of running against the shut-off element closed on the pressure end, a minimum flow of 2 m³/h with t = 0 to +50 C must be provided to exclude excessive heating up of the pump hydraulics (for example a bypass). 5. Density of the pumping liquid The power consumption of the pump varies proportionally to the density of the pumping medium. To avoid overload on the motor, the density must match the specification data of the pump. 7.3 Notices of Incorrect Operation Avoid damage to the centrifugal pump and make certain that: the pump always runs quietly and without vibration the pump does not run dry extended operation against a closed shut-off element is avoided to prevent the pumping medium from heating up. For the required minimum pumping quantity, see chapter Operation Monitoring. the maximum permissible room temperature of +40 C is not exceeded The ball bearing temperature does not exceed +50 C above room temperature, or in any case +90 C (measured on the outside of the motor housing) when the centrifugal pump is in operation the shut-off element is not closed in the supply line Chapter 8 Troubleshooting contains a table with the most frequent flow faults, their causes and recommendations for eliminating them. 7.4 Shutdown 1. Close the shut-off element in the pressure line. If a backflow prevention valve is installed in the pressure line, the shut-off element can remain open provided a counter pressure is present. 2. Turn off the motor. Make certain run-out is quiet. Depending on the system, when the heat source (if present) is turned off, the pump should have sufficient coast-down until the pumping medium temperature is reduced enough so that heat backup in the pump is avoided. 3. Close the shut-off element in the pressure line. Caution! Risk of damage! If there is danger of freezing and/or for extended periods of standstill, the pump must be emptied and/or protected against being emptied or freezing (auxiliary heating). 18
19 7.5 Emptying the Pump 07 O-ring 11 Plug screw To let the water out of the centrifugal pump, open the plug screw (11). Make certain all the water runs out! Empty the pipe system leading to the centrifugal pump as well. Then screw the plug screw (11) back in with a new O-ring (07). Fig Troubleshooting for Type WK Caution! If faults occur, turn off the centrifugal pump immediately! All repairs and interventions must be done in accordance with accident prevention requirements (UVV) and must be performed by qualified specialists. Malfunction Possible reason Remedy 1. Pump runs very loud and produces little output 2. Pump starts up slowly and only with difficulty 3. The fuses are blown immediately at power-up 4. Motor protection switch is triggered 5. The centrifugal pump cannot be turned on from the swimming pool 8135 Wrong direction of rotation for the motor Motor fan scrapes against the fan hood A current-conducting phase is missing Wrong fuses or fast acting fuses Reverse the polarity of the motor in the terminal box, thereby switching the direction of rotation Correctly secure the fan hood Check the supply lines and fuses Install delayed fuses with the correct amperage rating Wrong setting Set the correct current value +10% (see Data Sheet p. 5) - The switching tube is kinked - Fuses / power supply - Motor protection switch - Switching tube is too long - Water in the switching tube Check whether the pump can be switched from the control box. - Eliminate possible causes as explained in chapters 2.3 and 3. - Shorten the switching tube if possible and blow through it from the pool 6. Air valve has a leak Dirty During operation, unscrew the air valve and replace if necessary Note: The air valve must be positioned above the water level. For troubleshooting with type WKN, see the Pump Control Operator's Manual (27122) 19
20 9 Maintenance / Repair 9.1 General Information The operator must ensure that all inspection, maintenance and repair work on the pump are performed only by authorised and specially trained personnel. The operator must ensure that personnel is sufficiently informed through thorough study of the Operator's Manual. We recommend creating and following a maintenance plan. This will help you to avoid costly repairs and achieve problem-free and reliable operation of the pump. Only original spare parts may be used for repairs. This applies especially to the mechanical seal. When working on the motor, the instructions of the relevant motor manufacturer and instructions must be followed. Caution! Danger of death! Normally work on terminal boxes and on the machine control box must only be performed with the electrical connections unclamped. Secure the pump unit against being turned on unintentionally (isolate it). 9.2 Maintenance / Inspection The following information should be used to create a maintenance plan. It consists of minimum recommendations that must be adjusted and if necessary supplemented as required by local specific details of the actual installation site. Continuous checks Daily checks Check/replacement every 6 months Pumping data for the pump (pressure, quantity) Current consumption Pump running = quiet with no vibration Storage temperature Mechanical seal leakage Check if screws are tight Note: The mechanical seal must be inspected as part of a system overhaul after 8000 operating hours. If the mechanical seal is removed during the system overhaul, it must be replaced by a new one Lubrication and Change of Lubricant Pumps of type WK / WKN in standard design have bearings only in the drive motor. The bearings are designed to last for life and have permanent grease lubrication that cannot be relubricated. Faulty bearings must be replaced. 9.3 Repair General Information Servicing work must be performed on the centrifugal pump only after removal and in a suitable workshop. Observe all general instructions at the beginning of this chapter! These instructions will allow you to disassemble the pump and reassemble it properly with 20
21 the necessary new parts. Special instructions must be followed when installing a new mechanical seal. Other than this exception, jobs can be performed with standard workshop tools. Special tools are not required. After disassembly, clean all the individual parts of the centrifugal pump. Check the individual parts for wear and damage. Parts that are not in flawless condition must be reworked or replaced Preparations for Disassembly Before starting disassembly, the pump must be secured so that it cannot be turned on (isolated). Caution! Danger of death! Place a warning notice on the switch cabinet. If the system is in operation, inform the shift manager Disassembly / Removal of the Pump The pump must have reached ambient temperature. Disconnect the power supply. Close the fittings (suction and pressure-end) Empty the pump through the drain screws (11). Unclamp the motor. Disassemble any additional connections that are present. Loosen the pressure and suction connections. Loosen the pump from the base plate. Lift the pump completely 9.4 Disassembly / Dismantling the Pump Before beginning: Do not begin working until you have checked to ensure: that all necessary spare parts are present and they match the pump or the version of the pump you have, or that damaged parts which may still be discovered can be obtained in short order. that all tools and auxiliary equipment required for work are available. Note: Use only original spare parts for repairs! Observing these instructions is a precondition for problem-free operation of the pump and for honouring any warranty claims that may be submitted. Customer Service: Schmalenberger offers a 24-hour service for spare parts delivery! 10 Appendix 21
22 10.1 Decommissioning / Placing in Storage / Preservation Every pump leaves the factory in carefully mounted condition. If commissioning will not take place for an extended time after delivery, we recommend the following measures for storage of the pump Placing New Pumps in Storage If requested, new pumps have preservation protection according to the storage time specified by the customer when the pumps are ordered. If this time is significantly exceeded, the condition of the pumps must be check and they must be represerved if necessary Extended Decommissioning > 3 Months Pump remains installed To ensure the pump is always ready for operation and to prevent accumulation of residue from forming inside the pump and in the immediate area of the pump supply, the pump unit should undergo a functional run briefly (about 15 minutes) at regular monthly to quarterly intervals when it is shut down for extended times. As a precondition, the pump must be filled with sufficient liquid. Pump has been removed and placed in storage Empty the pump completely. To remove the pump, take the measures listed in chapter 9 Maintenance / Repair. Before the pump is placed in storage, it must be thoroughly cleaned and preserved. The pump must be preserved inside and out. For winter shutdown, remove the transmitter / radio signal housing and store it at room temperature Recommissioning after Being Placed in Storage Removal of preservation Before the pump that was in storage is installed, the preservation material with which it was coated and/or filled must be removed. To do this, follow the instructions in chapter Cleaning. After an extended storage time under preservation conditions, check elastomer parts (O-rings, mechanical seals) to ensure they have retained proper shape and elasticity. Brittle elastomer parts must be replaced. Elastomer parts made of EPDM must always be replaced. Recommissioning Reinstall the removed pump according to the process described in chapter 3.3 Setting up and Connecting. Immediately after work is complete, all safety and protective equipment must be put back in place and/or placed in operation again. Before recommissioning of the installed pump, the checks and maintenance measures described in chapter 9.2 Maintenance / Inspection must be performed. Before using the pump again, all the points listed in chapter 7.1 Initial Commissioning must be observed. 22
23 Special feature of mechanical seals: Note: Before initial commissioning and after an extended down time, or after installation of a new mechanical seal, always check for smooth operation. Due to adhesive forces, the slide ring and counter ring may cling together strongly. When this happens, the driving spring does not have sufficient traction to break the slide ring free. Then the shaft runs into the fixed seals and driving spring, which results in damage. Remove the fan hood and rotate the fan wheel in the direction of the arrow indicating direction of rotation. If you encounter resistance and the fan wheel springs back, the mechanical seal must be removed and the slide and counter rings must be carefully separated. Try not to rotate the shaft forcefully Disposal If you want to shut down the pump permanently and take it out of operation, observe local regulations for disposal of industrial waste Important Information Factory Repair 1. If you send the pump in to the manufacturer's plant for repairs or modifications, include exact information about the medium pumped by the pump (safety sheet). 2. Only completely emptied and cleaned pumps are accepted for repair Ordering Spare Parts When ordering spare parts, always specify the following important information: Pump number and type designation, alternatively the motor number Pumping medium Item number / name of the part from the spare parts list Material information from the specification or confirmation of order You will find the pump number on the nameplate, which is fastened onto the fan hood of the motor. The confirmation of order or motor number may also be helpful. This will help us deliver the right spare part for your pump! Customer Service: Schmalenberger offers a 24-hour service for spare parts delivery! Please visit our homepage at: Address of main office: Im Schelmen 9-11 Phone: +49 (0) D Tübingen Fax: +49 (0)
24 DRAWING 11.1 Drawing - Type WK WK
25 DRAWING 11.2 Drawing - Type WK-Vario WK-Vario
26 SPARE PARTS LIST 11.3 Spare parts list - type WK Item Order No. Name Pieces Comment AC motor kw, IEC 38, 230 V, 50 Hz Three-phase motor kw, IEC 38, 400/230 V, 50 Hz AC motor kw, IEC 38, 230 V, 50 Hz Three-phase motor kw, IEC 38, 400/230 V, 50 Hz Three-phase motor kw, IEC 38, 400/230 V, 50 Hz FB Three-phase motor kw, IEC 38, 690/400 V, 50 Hz Control box, AC kw, IEC 38, 230 V, 50 Hz Control box, three-phase current kw, IEC 38, 400 V, 50 Hz Control box, AC kw, IEC 38, 230 V, 50 Hz Control box, three-phase current kw, IEC 38, 400 V, 50 Hz Control box, three-phase current kw, IEC 38, 400 V, 50 Hz Control box, three-phase current kw, IEC 38, 400 V, 50 Hz 03 R47505 Spiral housing Mechanical seal Distance washer Impeller kw, ø Impeller kw, ø Impeller kw, ø Impeller kw, ø O-ring x Impeller screw kw Nut kw Seal Suction cover kw Suction cover kw Plug screw 2 G ¼ Hose unit DN kw Hose unit DN kw Hose unit DN kw Hose unit DN kw Transmitter 1 See Pump Control Operator's Manual BA Three-phase motor kw, IEC 38, 400/230 V, 50 Hz Three-phase motor kw, IEC 38, 400/230 V, 50 Hz Three-phase motor kw, IEC 38, 400/230 V, 50 Hz Three-phase motor kw, IEC 38, 400/230 V, 50 Hz Holding device Rawl plug 2 SD Hex. socket head cap screw 2 M 6x Hexagonal nut 15 M 8 26
27 SPARE PARTS LIST Item Order No. Name Pieces Comment Switching tube Antenna Adhesive strips Send button Face plate screw Adapter plate 1 only with 4 kw Screw x Distance washer 2 6.4x12x Mounting plate and holder Housing mono Distance washer x16x Pneumatic hose - Not included in the scope of delivery Pump Control Cable 1 Ready to plug in Fixing bracket incl. cable and antenna 1 10 m Hex. socket head cap screw 15 M 8x Spacing sleeve V-ring Clamp gasket Transmitter type mono complete 1 See Pump Control Operator's Manual BA
28 Phone: +49 (0) Strömungstechnologie Fax: +49 (0) Im Schelmen 9-11 Internet: ; All rights reserved Manual is subject to changes Type: Pump WK
Waste water ejection unit
 Waste water ejection unit Over ground box SWH 500/50-80 SWH 500/50-80 Operation manual Table of contents: Page Declaration of conformity... 3 1. General... 4 1.1 Introduction... 4 1.2 Enquiries and orders...
Operating Instructions
 Operating Instructions VCE2600D«««INDEX 001 TYROLIT No. 1099105912345678 de / dd.mm.yyyy19.04.2011 Congratulations! You have decided to purchase a tried and tested TYROLIT-Hydrostress unit and have thus
IDEAL IDEAL Modular conveyor belt system. Operating Instructions
 IDEAL 5009-1 IDEAL 5009-2 Modular conveyor belt system Operating Instructions 1 IDEAL 5009-1 IDEAL 5009-2 2 Table of contents 1. General... 4 1.1 Safety Instructions... 4 1.2 Application... 4 2. Installation...
Chemical Motor Pump Unit BN
 Operating & Maintenance Instructions BW 5 02 01 / 1 The operating instructions of the centrifugal pump and the accessories should be located close to the pump. These instructions should be read carefully
Cleaning unit for coolant. :_decftez`_>r_fr] Book No.: V2
![Cleaning unit for coolant. :_decftez`_>r_fr] Book No.: V2](/thumbs/90/104143238.jpg "Cleaning unit for coolant. :_decftez`_>r_fr] Book No.: V2") Cleaning unit for coolant :_decftez`_>r_fr] Book No.: 1271526-02 V2 Alfa Laval Separation AB Separator Manuals, dept. SKEL S-147 80 Tumba, Sweden Telephone: +46 8 53 06 50 00 Telefax: +46 8 53 03 10 40
Cleaning unit for coolant :_decftez`_>r_fr] Book No.: 1271526-02 V2 Alfa Laval Separation AB Separator Manuals, dept. SKEL S-147 80 Tumba, Sweden Telephone: +46 8 53 06 50 00 Telefax: +46 8 53 03 10 40
VADA - V80-H PRODUCT OVERVIEW CONSTRUCTION USAGE LIMITATIONS MOTOR WARRANTY
 PRODUCT OVERVIEW The VADA horizontal multistage centrifugal pumps combine the functional benefits of centrifugal pumps and the practical benefits of self priming pumps. They warrant high hydraulic and
V80-H Multistage Pump Instruction Manual
 V80-H Multistage Pump Instruction Manual PRODUCT OVERVIEW The VADA horizontal multistage centrifugal pumps combine the functional benefits of centrifugal pumps and the practical benefits of self priming
KITCHEN EXHAUST FAN GLEC-6 INSTALLATION AND MAINTENANCE
 KITCHEN EXHAUST FAN GLEC-6 INSTALLATION AND MAINTENANCE 2 GLEC-6 - Installation and maintenance CONTENTS 1 Important information... 3 2 Safety notes... 3 3 Technical description...4 4 Transport... 6 5
K Operating Instructions. Before first use of the unit read these operating instructions and act in accordance with them.
 K 1.100 Operating Instructions Before first use of the unit read these operating instructions and act in accordance with them. www.kaercher.com/register-and-win 59651430 (10/13) Contents General information..............
TTK 75 ECO OPERATING MANUAL DEHUMIDIFIER TRT-BA-TTK75ECO-TC-002-EN
 TTK 75 ECO EN OPERATING MANUAL DEHUMIDIFIER TRT-BA-TTK75ECO-TC-002-EN Table of contents Notes regarding the operating manual... 01 Information about the device... 02 Safety... 04 Transport...05 Start-up...05
HORIZONTAL MULTISTAGE CENTRIFUGAL PUMP
 HORIZONTAL MULTISTAGE CENTRIFUGAL PUMP WWPPCHLFT260 Instructions WWPPCHLFT260_Horizontal Multistage Centrifugal Pump_IB.indd 1 READ THIS MANUAL CAREFULL BEFORE INSTALL, START THE PUMP 1. Suction 2. Plug
Model: 1413 Model: 1418 Float-Controlled Condensate Trap, PN 100
 1 Safety instructions Model: 1413 Model: 1418 Float-Controlled Condensate Trap, PN 100 1.1 Proper use Any improper use, intervention in the design and deviation from the design data automatically lead
Operating Manual. Model: Float-Controlled Condensate Trap, PN Safety instructions. 2 General description and usage
 Model: 1090 1 Safety instructions Float-Controlled Condensate Trap, PN 16 1.1 Proper use Any improper use, intervention in the design and deviation from the design data automatically lead to termination
Pump assembly Instruction manual
 Instruction manual EN Version 2.0 /Release 06/2012 Table of content 1 Key background information...3 1.1 Limitation of liability...3 1.2 Responsibilities of the operator...3 1.3 Documentation...3 1.3.1
Installation and operating instructions. DK energy storage and DK energy buffer
 Installation and operating instructions DK energy storage and DK energy buffer Edition: 08-2015 1 Preliminary note With this DK energy storage / DK energy buffer you purchased a DK quality product. The
HKF 8180 Operating instructions
 Operating instructions EN Version 1.0en /Edition 05/2013 Contents 1 Important basic information... 3 1.1 Limitation of liability... 3 1.2 Operator's responsibilities... 3 1.3 Documentation... 3 1.3.1 Content
TDS 20 R / TDS 30 R / TDS 50 R
 TDS 20 R / TDS 30 R / TDS 50 R EN OPERATING MANUAL ELECTRICAL FAN HEATER TRT-BA-TDS20R-30R-50R-TC-001-EN Table of contents Notes regarding the operating manual... 1 Safety... 1 Information about the device...
Model: 1200 Model: 1200-G Model: 1200-N Float-Controlled Condensate Trap, PN 40
 1 Safety instructions Model: 1200 Model: 1200-G Model: 1200-N Float-Controlled Condensate Trap, PN 40 1.1 Proper use Any improper use, intervention in the design and deviation from the design data automatically
CENTRIFUGAL FAN IN SCROLL CASING. Helix S-Vent OPERATION MANUAL
 CENTRIFUGAL FAN IN SCROLL CASING Helix S-Vent EN OPERATION MANUAL Helix / S-Vent www.blaubergventilatoren.de CONTENTS CONTENTS 3 Introduction 3 Use 3 Delivery set 4 Technical data 10 Safety requirements
USER S MANUAL ATH WH220
 USER S MANUAL ATH WH220 INDEX INTRODUCTION... - 3 - General information s... - 3 - Description of pneumatic jack... - 4 - Operation of jack... - 5 - Technical data... - 6 - Dimension drawing... - 6 - INSTALLATION...
TTV 4500 / TTV 4500 HP / TTV 7000
 TTV 4500 / TTV 4500 HP / TTV 7000 EN OPERATING MANUAL AXIAL FAN TRT-BA-TTV4500-4500HP-7000-TC-003-EN Table of contents The current version of the operating manual can be found at: Notes regarding the operating
Operation Manual. Trash Water Pump ARTICLE Image similar
 Operation Manual Trash Water Pump ARTICLE 50781 Image similar Read and follow the operating instructions and safety information before using for the first time. Technical changes reserved! Due to further
TFV 900 OPERATING MANUAL RADIAL FAN TRT-BA-TFV900-TC-001-EN
 TFV 900 EN OPERATING MANUAL RADIAL FAN TRT-BA-TFV900-TC-001-EN Table of contents Notes regarding the operating manual... 1 Safety... 2 Information about the device... 3 Transport and storage... 4 Start-up...
Model: 1100 Float-Controlled Condensate Trap, PN 25
 1 Safety instructions Model: 1100 Float-Controlled Condensate Trap, PN 25 1.1 Proper use Any improper use, intervention in the design and deviation from the design data automatically lead to termination
STORAGE, ERECTION, OPERATION AND MAINTENANCE MANUAL FOR CENTRIFUGAL FANS MODEL - MXE
 ISO 9001 : 2000 STORAGE, ERECTION, OPERATION AND MAINTENANCE MANUAL FOR CENTRIFUGAL FANS MODEL - MXE CUSTOMER : 1 CONTENTS 1 SAFETY... 5 1.1 General... 6 1.2 Description of symbols and pictograms... 6
Operating Instructions
 Operating Instructions Varioset Standard After-sales service For after-sales service please contact the Veit representative in your country. GmbH & Co. Justus - von - Liebig - Str. 15 D - 86899 Landsberg
Operating Instructions
 Operating Instructions TEKA Cartmaster Type PF-W 1, PF-W 2 TEKA Absaug- und Entsorgungstechnologie GmbH Industriestraße 13 D-46342 Velen Postfach 1137 D-46334 Velen Tel.: +49 (0) 2863 9282-0 Fax: +49 (0)
CHATTANOOGA JUNIOR STAR
 L ' A R T E D E L V A P O R E CHATTANOOGA JUNIOR STAR 1. PREFACE Dear Client, We would like to congratulate you on your choice. With the goal of improving and continually updating production by always
SMHA Hatch High temperature fan HT-fan Installation and Maintenance
 High temperature fan HT-fan Installation and Maintenance 22.8.2012 Contents 1. Important information 2. Safety notes 3. Technical description 4. Transport 5. Mounting instructions 6. Commissioning 7. Maintenance
Instruction Manual. Alarm Unit For Low Gas Level # Read manual before use! Observe all safety information! Keep manual for future use!
 Mess-, Regel- und Überwachungsgeräte für Haustechnik, Industrie und Umweltschutz Lindenstraße 20 74363 Güglingen Telefon +49 7135-102-0 Service +49 7135-102-211 Telefax +49 7135-102-147 info@afriso.de
Operating Manual. Model: 1400 Model: 1400-N RIFOmat Float-Controlled Condensate Traps, PN Safety instructions. 2 General description and use
 1 Safety instructions 1.1 Proper use Model: 1400 Model: 1400-N RIFOmat Float-Controlled Condensate Traps, PN 100 Any improper use, intervention in the design and deviation from the design data automatically
OK, OKA, OKAF; ELD; ELDM; ELH; OKC; SC; SCA; SCAF; OK-LN; OKA-LN; OKAF-LN.
 INSTALLATION, OPERATION & SERVICE MANUAL FOR COOLER TYPES OK, OKA, OKAF; ELD; ELDM; ELH; OKC; SC; SCA; SCAF; OK-LN; OKA-LN; OKAF-LN. 1. Introduction This manual is a guide for the installation, maintenance
This label warns for risk of electrical shock when failing to observe.
 MANUAL horizontal centrifugal pumps MB series ic drive SB series mechanical seal 1. Introduction 2. Safety precautions 3. Receipt 4. Installation / Operation and Maintenance 4.1 Installation 4.2 Operation
Operating Instructions. Accessory Units Melitta Cafina XT Series. Melitta Professional Coffee Solutions
 Operating Instructions Accessory Units Melitta Cafina XT Series Melitta Professional Coffee Solutions Contents General... 4. Manufacturer information... 4.2 About these instructions... 4.3 Explanation
INSTRUCTIONS FOR INSTALLATION AND MAINTENANCE (GB)
") INSTRUCTIONS FOR INSTALLATION AND MAINTENANCE (GB) Pag. 1 Fig - Fig. - Abb.- Fig.- Fig.- Фиг.- Obr.- Fig.- Εικ. - Joonis - Kuva - Sl. -.ábra - Fig. -.att. - Afbeelding - Fig. - Rys.- Fig.- Fig. - Схема
INSTRUCTIONS FOR INSTALLATION AND MAINTENANCE (GB) Pag. 1 Fig - Fig. - Abb.- Fig.- Fig.- Фиг.- Obr.- Fig.- Εικ. - Joonis - Kuva - Sl. -.ábra - Fig. -.att. - Afbeelding - Fig. - Rys.- Fig.- Fig. - Схема
Panel Fan Series Operators Manual (Galvanized and Polymer)
") Panel Fan Series Operators Manual (Galvanized and Polymer) 52" Belt Drive, Galvanized Panel Fan with Three Wing Blade IMPORTANT: READ AND SAVE THESE INSTRUCTIONS Read all instructions carefully before
Panel Fan Series Operators Manual (Galvanized and Polymer) 52" Belt Drive, Galvanized Panel Fan with Three Wing Blade IMPORTANT: READ AND SAVE THESE INSTRUCTIONS Read all instructions carefully before
Montageanleitung RLO (Original) Mounting Instructions RLO (Translation of the original)
 Mounting Instructions RLO (Translation of the original)") Montageanleitung (Original) (Translation of the original) DE MA_ 1.0 06/2014 Taperlock Clamping-bush system _0 _1 Fixed hub Inlet nozzle with IMV 1. Revision index Revision Date MA_ 1.0 06/2014 2. Safety
Montageanleitung (Original) (Translation of the original) DE MA_ 1.0 06/2014 Taperlock Clamping-bush system _0 _1 Fixed hub Inlet nozzle with IMV 1. Revision index Revision Date MA_ 1.0 06/2014 2. Safety
Operating instructions
 ebm-papst Mulfingen GmbH & Co. KG Bachmühle D-74673 Mulfingen Phone +49 (0) 793-0 Fax +49 (0) 793-0 info@de.ebmpapst.com www.ebmpapst.com CONTENTS. SAFETY REGULATIONS AND NOTES. Levels of hazard warnings.
TIH 300 S / TIH 400 S / TIH 500 S / TIH 700 S / TIH 900 S / TIH 1100 S
 TIH 300 S / TIH 400 S / TIH 500 S / TIH 700 S / TIH 900 S / TIH 1100 S EN OPERATING MANUAL INFRARED HEATING PANEL TRT-BA-TIH300S-TIH400S-TIH500S-TIH700S-TIH900S-TIH1100S-TC-002-EN Table of contents Notes
English CNA-CNB. Centrifugal fans Installation and maintenance
 916505-0 English CNA-CNB Centrifugal fans Installation and maintenance 916505-0 GB Centrifugal fans types CNA, CNB, CNA-M and CNB-M installation and maintenance 1. Application 2. Handling 2.1 Marking 2.2
GLEB Kitchen exhaust fan
 GLEB Kitchen exhaust fan Installation and Maintenance??.1.2013 Contents 1. Important information 2. Safety notes 3. Technical description 4. Transport 5. Mounting instructions 6. Commissioning 7. Maintenance
User Manual. WR10-CP-LED 10 W Art.-No.: WR20-CP-LED 20 W Art.-No.: WR30-CP-LED 30 W Art.-No.
 GB IE User Manual WR10-CP-LED 10 W Art.-No.: 1 20 02 10020 WR20-CP-LED 20 W Art.-No.: 1 20 02 10022 WR30-CP-LED 30 W Art.-No.: 1 20 02 10024 WR10-CP-LED-BW 10 W Art.-No.: 1 20 02 10021 WR20-CP-LED-BW 20
NHS VERTICAL AGITATOR
 INSTALLATION, SERVICE AND MAINTENANCE INSTRUCTIONS NHS VERTICAL AGITATOR INOXPA, S.A. c/telers, 54 Aptdo. 174 E-17820 Banyoles Girona (Spain) Tel. : (34) 972-57 52 00 Fax. : (34) 972-57 55 02 Email: inoxpa@inoxpa.com
ESG Plus ESG Plus 2. Operating instructions with spare parts list. Tungsten Grinder. Machine-no.:
 Operating instructions with spare parts list Tungsten Grinder ESG Plus ESG Plus 2 Machine-no.: Translation of original operating instructions Code 790 052 774 EN All rights reserved, in particular the
QUICK PRIME INSTALLATION AND SERVICE MANUAL
 QUICK PRIME INSTALLATION AND SERVICE MANUAL NOTE! To the installer: Please make sure you provide this manual to the owner of the equip ment or to the responsible party who maintains the system. Part #
Illustration shows item no Z Original operating manual. Operating manual. BlueMobil eco. Item no: Z-3278
 Illustration shows item no Z-3278 Operating manual BlueMobil eco Item no: Z-3278 Original operating manual Important Copyright It is essential that you read this manual thoroughly before the initial operation
FSW300 Series Flow Switch
 . FSW300 Series Flow Switch - 2 - Series FSW300 Series FSW300 Table of contents page 0 About this operating manual... 4 1 Device description... 5 1.1 Intended use... 5 1.1.1 Reed contact - Switching of
PANEL FAN SERIES OPERATORS MANUAL (Galvanized and Polymer)
") PANEL FAN SERIES OPERATORS MANUAL (Galvanized and Polymer) Galvanized Panel Fan IMPORTANT: READ AND SAVE THESE INSTRUCTIONS Read all instructions carefully before attempting to assemble, install, operate
PANEL FAN SERIES OPERATORS MANUAL (Galvanized and Polymer) Galvanized Panel Fan IMPORTANT: READ AND SAVE THESE INSTRUCTIONS Read all instructions carefully before attempting to assemble, install, operate
Steam Trap BK 45 BK 45-U BK 45-LT BK 46
 Steam Trap BK 45 BK 45-U BK 45-LT BK 46 Original Installation Instructions 810437-08 Contents Foreword... 3 Availability... 3 Formatting features in the document... 3 Safety... 3 Use for the intended purpose...
Tornado Operations & Maintenance Manual
 TORNADO INDUSTRIES 7401 W. LAWRENCE AVENUE CHICAGO, IL 60706 (708) 867-5100 FAX (708) 867-6968 www.tornadovac.com Tornado Operations & Maintenance Manual MODEL NO. 99690 BD 22/14, 99720 BD 26/14 L9722
TTV 1500 / TTV 3000 OPERATING MANUAL CONVEYING FAN TRT-BA-TTV TC EN
 TTV 1500 / TTV 3000 EN OPERATING MANUAL CONVEYING FAN TRT-BA-TTV1500-3000-TC2016-26-004-EN Table of contents Notes regarding the operating manual... 2 You can download the current version of the operating
User Manual GV25 GV35 GV702. Company information: Original instructions GV12066 (1)
") User Manual Original instructions GV25 GV35 GV702 Company information: www.vipercleaning.eu info-eu@vipercleaning.com GV12066 (1) 2012-04-10 USER MANUAL ENGLISH TABLE OF CONTENTS Introduction... 4 Manual
User Manual Original instructions GV25 GV35 GV702 Company information: www.vipercleaning.eu info-eu@vipercleaning.com GV12066 (1) 2012-04-10 USER MANUAL ENGLISH TABLE OF CONTENTS Introduction... 4 Manual
Moisture inside the drum is due to final testing.
 Safety instructions Scope of delivery depending on model Moisture inside the drum is due to final testing. Removing the transport braces Water connection depending on model The washing machine is heavy
VETO CLEANER 500 FLUE GAS CLEANER
 As of serial number 3100 0001 VETO CLEANER 500 FLUE GAS CLEANER USER MANUAL SPARE PARTS LIST Manufacturer: ALA TALKKARI Veljekset Ala-Talkkari Oy FI-62130 HELLANMAA TEL. +358 6 433 6333 FAX +358 6 437
OWNERS GUIDE TO INSTALLATION AND OPERATION
 OWNERS GUIDE TO INSTALLATION AND OPERATION SPM SERIES HIGH POWER CENTRIFUGALS READ THESE INSTRUCTIONS CAREFULLY Read these installation instructions in detail before installing your pump. Be sure to check
Operating Instructions. Rotating Vacuum Filter Type VRF
 Operating Instructions Rotating Vacuum Filter Type VRF GB Rotating Vacuum Filter Type VRF Table of Contents 1 Description of machine and functions... 5 2 Danger and safety instructions... 6 2.1 General
Operating Instructions UniTech Perfect
 Operating Instructions UniTech Perfect Technische Daten Rated Voltage Power Consumption Max. flow rate Max. head height Cable Protection Dimensions Weight Perfect 5000 49W 5100 l/h 1,85m Perfect 7000 78W
Installation manual surface mounting plugs and socket outlets, panel mounting plugs and socket outlets QUICK-CONNECT (63 A)
") EN Installation manual surface mounting plugs and socket outlets, panel 60003506 Issue 04.2016 2016-04-01 Table of contents 1 About this manual 3 1.1 Structure of the warnings 3 1.2 Symbols used 4 1.3
EN Installation manual surface mounting plugs and socket outlets, panel 60003506 Issue 04.2016 2016-04-01 Table of contents 1 About this manual 3 1.1 Structure of the warnings 3 1.2 Symbols used 4 1.3
GRUNDFOS INSTRUCTIONS. Sololift2 C-3. Installation and operating instructions
 GRUNDFOS INSTRUCTIONS Sololift2 C-3 Installation and operating instructions English (US) English (US) Installation and operating instructions Original installation and operating instructions. CONTENTS
Flow switch. Operating Manual. English manual page Page 1 of 15 Fax:
 Operating Manual www.jlso-tec-trade.de Flow switch English manual page 1-15 Page 1 of 15 Flow switch Table of Contents Page 1 Device Description and Intended Use... 19 1.1 Flow switch version VH...X...
Pump WaterVISE, FloVISE
 General information It is important that this manual is read carefully by the user and the installer in order to ensure proper functioning and lifespan of the pump. Pahlen pumps are manufactured in accordance
OPERATING INSTRUCTIONS
 OPERATING INSTRUCTIONS Dust Extractor T12600 READ ALL INSTRUCTIONS BEFORE USING Dear Customer. Thank you for choosing Ermator as your supplier. Introduction We hope that the Ermator dust extractor will
Acquaer Ltd. H-4900, Fehérgyarmat, Szatmári út 11. CENTRIFUGAL PUMP Instruction Manual ACm60 / ACm75 / ACm150 / ACm150B2
 CENTRIFUGAL PUMP Instruction Manual ACm60 / ACm75 / ACm150 / ACm150B2 Congratulations on your purchase of a LEO Centrifugal Pump It is important that you read, fully understand and observe the following
Installation manual surface mounting plugs and socket outlets, panel mounting plugs and socket outlets with screw connection (16/32 A)
") EN Installation manual surface mounting plugs and socket outlets, panel 60003214 Issue 04.2016 2016-04-01 Table of contents 1 About this manual 3 1.1 Structure of the warnings 3 1.2 Symbols used 4 1.3
EN Installation manual surface mounting plugs and socket outlets, panel 60003214 Issue 04.2016 2016-04-01 Table of contents 1 About this manual 3 1.1 Structure of the warnings 3 1.2 Symbols used 4 1.3
Original Operating Instructions V-VTE
 Edition: 2.2.2012 BA 187-EN Original Operating Instructions V-VTE V-VTE 3 6 8 10 V-Serie V-Series Drehschieber Rotary Vane Table of contents Table of contents 1 Foreword...................................................................
Millo / Millo pro. Nr x000 / 1805-x000. Ideen für die Dentaltechnik A
 Millo / Millo pro Nr. 1804-x000 / 1805-x000 0609 21-6543 A Ideen für die Dentaltechnik 1 2 3 4 5 6 7 8 9 10 11 12 Millo / Millo pro No. 1804-x000 / 1805-x000 ENGLISH Content Introduction... 15 Symbols...
K 5.91 M. Operating Instructions. Before first use of the unit read these operating instructions and act in accordance with them
 K 5.91 M Operating Instructions Before first use of the unit read these operating instructions and act in accordance with them. 5.962-557.0 07/09 Contents General information 2 Safety instructions 3 Operation
1. Take the hoses and elbow out of the holders, depending on model. max. 100 cm. min. * cm
 Safety instructions The washing machine is heavy - take care when lifting. Caution: frozen hoses may rip/burst. Do not install the washing machine in areas exposed to frost or outdoors. The washing machine
Operating instructions
 Operating instructions (Translation of the original operating instructions) Type TEKA FILTERCUBE-MV TEKA Absaug- und Entsorgungstechnologie GmbH Industriestraße 13 D-46342 Velen Postfach 1137 D-46334 Velen
USER GUIDE. DRENA 2 - User Manual ELECTRICAL PANEL FOR 2 MOTORS - WASTE WATER -
 USER GUIDE DRENA 2 - User Manual ELECTRICAL PANEL FOR 2 MOTORS - WASTE WATER - II CONTENTS 1. SYMBOLS AND WARNINGS... 5 2. GENERAL INFORMATION... 6 3. WARNINGS... 7 4. GENERAL DESCRIPTION... 8 5. INSTALLATION...
Operating instructions Safety-monitoring module SRB 302X3. 1 About this document
 1 About this document Operating instructions... pages 1 to 6 Translation of the original operating instructions 1.1 Function This operating instructions manual provides all the information you need for
HSGM Heißschneide-Geräte
 Operating Instructions Heat cutting machine Model HSG-00 General information These Operating Instructions belong to this product. They contain important information about commissioning and operation. Important
Operating Instructions for Liquid Level Transducer Model : MM Series
 Operating Instructions for Liquid Level Transducer Model : MM Series 1 Contents 1 Contents... 2 2 Note... 3 3 Instrument Inspection... 3 4 Regulation Use... 4 5 Float designs... 4 6 Operating Principle...
SOUND-INSULATED FAN. Iso-K OPERATION MANUAL. Iso-K_v.1(2)-EN.indd :20:59
-EN.indd :20:59") SOUND-INSULATED FAN OPERATION MANUAL _v.1(2)-en.indd 1 10.08.2015 15:20:59 CONTENT Introduction 3 General 3 Safety rules 3 Transport and storage requirements 3 Manufacturer's warranty 3 Fan design 4 Delivery
SOUND-INSULATED FAN OPERATION MANUAL _v.1(2)-en.indd 1 10.08.2015 15:20:59 CONTENT Introduction 3 General 3 Safety rules 3 Transport and storage requirements 3 Manufacturer's warranty 3 Fan design 4 Delivery
K M. Operating Instructions. Before first use of the unit read these operating instructions and act in accordance with them
 K 2.900 M Operating Instructions Before first use of the unit read these operating instructions and act in accordance with them. 5.962-499.0 (01/09) Contents General information 2 Safety instructions 3
Panel Fan Series Operators Manual (Galvanized and Polymer)
") Panel Fan Series Operators Manual (Galvanized and Polymer) Galvanized Panel Fan with Three Wing Blade IMPORTANT: READ AND SAVE THESE INSTRUCTIONS Read all instructions carefully before attempting to assemble,
Panel Fan Series Operators Manual (Galvanized and Polymer) Galvanized Panel Fan with Three Wing Blade IMPORTANT: READ AND SAVE THESE INSTRUCTIONS Read all instructions carefully before attempting to assemble,
Tempest TP420/180 Electric Pressure Washer
 Please dispose of packaging for the product in a responsible manner. It is suitable for recycling. Help to protect the environment, take the packaging to the local amenity tip and place into the appropriate
Part No KEMPER Filter-Master XL
 Part No. 150 0492 KEMPER Filter-Master XL 1. Application and Mode of Operation.... 2 2. Safety Instructions......... 2 3. Placing into Operation...... 3 4. Operation Elements and Function... 3-4 5. Installation
Illustration shows item no Z Original operating manual. Operating manual. BlueMobil 60. Item no: Z-3285
 Operating manual BlueMobil 60 Item no: Z-3285 Original operating manual Illustration shows item no Z-3285 Important Copyright It is essential that you read this manual thoroughly before the initial operation
Operation and Maintenance Manual Sondex All-Welded Heat Exchangers (SAW)
") Operation and Maintenance Manual Sondex All-Welded Heat Exchangers (SAW) The contents of this publication are based on the latest information available and the materials that are used at the time of printing.
Operation and Maintenance Manual Sondex All-Welded Heat Exchangers (SAW) The contents of this publication are based on the latest information available and the materials that are used at the time of printing.
Friwa Compact. Operating instructions EN
 Operating instructions EN Version 1.1 / Edition 09/2013 Contents 1 Key background information... 3 1.1 Limitation of liability... 3 1.2 Responsibilities of the operator... 3 1.3 Documentation... 3 1.3.1
Technical Data. Name: ERIKA Automat fully automatic machine to divide and to round dough pieces of the same size
 AUTOMAT MANUAL 1 Technical Data Name: ERIKA Automat fully automatic machine to divide and to round dough pieces of the same size Type Divisions Dough Portions (in ounces) Plate Nos. 3 30 1.0 3.5 #35 4/40A
Original instructions. Operation Manual & Cautions
 Original instructions Operation Manual & Cautions Thank you for purchasing the Mistresa from Showa Denki. This manual explains the specifications for the [Mistresa units from CRN Series]. Please read the
s l it l on for Infrared Heaters
 Installation and Instruction Manual for Infrared Heaters Contents Safety and operating instructions... 3 Scope of supply... Installation instructions... 4 5 Initial operation... 10 Cleaning instructions...
Operating Instructions TSF 010. Power Failure Venting Unit PM BNE/L (0007)
") Operating Instructions TSF 010 Power Failure Venting Unit PM 800 032 BNE/L (0007) Index Page 1. Safety Instructions... 2 1.1. Pictogram Definitions... 2 2. Understanding The Power Failure Venting Unit...
Operating Instructions TSF 010 Power Failure Venting Unit PM 800 032 BNE/L (0007) Index Page 1. Safety Instructions... 2 1.1. Pictogram Definitions... 2 2. Understanding The Power Failure Venting Unit...
Instruction Manual Captive Air Level Control. Model NLP
 Instruction Manual Captive Air Level Control Model NLP 1. Contents Page 1. Contents...2 2. Note...3 3. Inspection of the instrument...3 4. Description...3 5. Operation...3 6. Mechanical Assembly...4 7.
USER S MANUAL. VCU/VCUN Series CENTRIFUGAL FAN IN SCROLL CASING
 USER S MANUAL VCU/ Series CENTRIFUGAL FAN IN SCROLL CASING 2 CONTENTS Introduction Use Delivery set Designation key Technical data Safety requirements Design and operating logic Mounting and set-up Connection
Operating instructions DULCO flex DFDa Peristaltic Pump
 Operating instructions DULCO flex DFDa Peristaltic Pump A0381 Please carefully read these operating instructions before use! Do not discard! The operator shall be liable for any damage caused by installation
LS Condensate Removal Pump Installation, Operation and Service Instructions
 Bell & Gossett Instruction Manual 6-71-075-115 LS Condensate Removal Pump Installation, Operation and Service Instructions INSTALLER: PLEASE LEAVE THIS MANUAL FOR THE OWNER S USE. WARNING: This safety
PV3000S Professional Pond Vacuum
 PV3000S Professional Pond Vacuum INSTRUCTION MANUAL PV3000S Professional Pond Vacuum PV3000S POWER CONSUMPTION POWER SUPPLY NOMINAL CURRENT POWER CABLE LENGTH MAX PUMPING CAPACITY MAX PUMPING HEAD AUTOMATIC
IDE 20 / IDE 30 / IDE 50 IDE 60 / IDE 80
 IDE 20 / IDE 30 / IDE 50 IDE 60 / IDE 80 EN OPERATING MANUAL OIL HEATER TRT-BA-IDE20-30-50-60-80-TC-001-EN Table of contents Information on the use of this manual... 1 Scope of delivery... 1 General safety...
K 3.99 M. Operating Instructions. Before first use of the unit Please read these Operating Instructions and act in accordance with them /08
 K 3.99 M Operating Instructions Before first use of the unit Please read these Operating Instructions and act in accordance with them 59630920 12/08 2 Dear Customer, Please read and comply with these original
MULTISTAGE ELECTRIC PUMPS
 MULTISTAGE ELECTRIC PUMPS Introduction: BOMBA ELIAS has developed various series of multistage pumps to cover different needs, from those of an individual house to those of large installations such as
K M. Operating Instructions. Before first use of the unit read these operating instructions and act in accordance with them
 K 5.140 M Operating Instructions Before first use of the unit read these operating instructions and act in accordance with them. 5.963-147.0 (01/09) Dear Customer, Please read and comply with these original
OPERATING INSTRUCTIONS
 OPERATING INSTRUCTIONS Dust Extractor S13 READ ALL INSTRUCTIONS BEFORE USING Introduction Dear Customer, Thank you for choosing Ermator as your supplier. We hope that the Ermator S13 dust extractor will
ACN SMOKE INSTALLATION AND MAINTENANCE
 NovAx ACN SMOKE INSTALLATION AND MAINTENANCE 918149-0 English 918149-0 GB Installation and maintenance NovAx smoke exhaust fan type ACN smoke 1. Application 2. Handling 2.1 Marking 2.2 Weight 2.3 Transport
Installation manual plugs and connectors QUICK-CONNECT (63 A)
") EN Installation manual plugs and connectors QUICK-CONNECT (63 A) 60003217 Issue 04.2016 2016-04-01 Table of contents 1 About this manual 3 1.1 Structure of the warnings 3 1.2 Symbols used 4 1.3 Signal
EN Installation manual plugs and connectors QUICK-CONNECT (63 A) 60003217 Issue 04.2016 2016-04-01 Table of contents 1 About this manual 3 1.1 Structure of the warnings 3 1.2 Symbols used 4 1.3 Signal
AirUnit. Installation instructions. mfh systems modern floor heating. Decentralised domestic ventilation
 mfh systems modern floor heating AirUnit Decentralised domestic ventilation Installation instructions List of contents, Installation instructions Page 1. General information... 03 2. Function / planning
Installer manual AG-AA10. Air/air heat pump IHB GB AG-AA10-30 AG-AA10-40/50
 -30 Installer manual Air/air heat pump -40/50 IHB GB 1516-1 331554 Table of Contents 1 Important information 2 5 Installation 7 Safety information 2 Model combinations 7 Read before starting the installation
Removing shipping locks
 y Safety instructions Scope of delivery Moisture in the drum is due to end inspection. Removing shipping locks Water connection l The washing machine is heavy - lift with caution. Frozen hoses can tear/burst.