SYRINGE PUMP OPERATING MANUAL
|
|
|
- Norman Stafford
- 6 years ago
- Views:
Transcription
1 0120 SYRINGE PUMP OPERATING MANUAL 1
2 INTRODUCTION / FEATURES Thank you for purchasing our SP-8800 Syringe Pump. In order to use this pump correctly and safely, read this manual carefully before operating SP-8800 Syringe Pump. If you have any questions as you are reading through this manual, call the local authorized dealer in your country. Retain this manual together with the unit for future reference. This SP-8800 Syringe Pump is intended for the infusion of chemicals such as vasopressor drugs, depressor drugs, anti-coagulants, anesthetic drugs, anti-cancer drugs, oxytocic, nutrition, drug for chemotherapy medication and blood infusion at ICU, CCU, NICU, or operation room. This device is designed for high flow-rate accuracy and ease of handle in the infusion of solutions with the equipped audio-visual alarms and state-of-the-art sensors. Features Self testing Every time the unit is turned on, self testing is proceeded. Automatic syringe detection Detect syringe size automatically. (10, 20, 30, 50ml ) Shortcut key Syringe brand set, Occlusion set, Buzzer level set K.V.O.(Keep Vein Open) When the delivery volume has been reached, flow rate turns into K.V.O. rate (adjustable from 0.1ml/h to 10ml/h) automatically. Keypad lock function Keypad is locked with or without password depends on its using condition. Infusion setup Flow rate/ Delivery volume/ Infusion time Retain memory Last setting value is retained. Infusion remaining time display Alarm repeat function Open system Calibration up to 10 syringe brands in a single unit. Buzzer level 3steps Occlusion level 9steps (3.8psi~19.3psi) Purge rate Adjustable (0.1~1200ml/h) Bolus rate ON/OFF, Adjustable (0.1~1200ml/h, 0.1~1000ml) Anti bolus Reduce significantly bolus after occlusion release. (ON/OFF) History call back Call back last 10 infusion data. Dosage mode(body weight mode) Automatically calculate and set a proper flow rate when dose rate, body weight, drug mass and solution volume are entered. Unit setup for Dosage mode ml/h, mg/kg/h, mg/kg/min, μg / kg/h, μg / kg/min Nurse call Each unit can be connected with nurse call system (DC 24V, 0.5A) (Option) Profile function Program infusion condition (flow rate, delivery volume, delivery time) differently for every hour, up to 24hours. (Option) Central system Connect with main PC for monitoring (Option) 1
3 CONTENT INTRODUCTION / FEATURES 1 1. DESCRIPTION OF SYRINGE PUMP Front View 5~6 1-2.Rear View Side View Syringe View Components 8 2. PRIOR TO PUMP USE Explanation of Symbols Warnings Precautions Cleaning & Sanitation Storage Maintenance & Repair OPERATION Initial setup Syringe installation Setup flow rate (ml/h) Setup delivery volume (ml) Confirm total infused volume (Σml/CLEAR) Setup delivery time (hours) Insert the needle into the patient Start infusion Infusion completion Stop infusion [POWER] button Battery remain Error alarm Adoptor operation Battery operation Nurse call function (Option) Keypad lock 22 2
4 CONTENT 4. SYSTEM SETUP Buzzer level setup (Short-cut key) Occlusion level setup Syringe selection Infusion set Display Config SPECIAL FUNCTIONS Dosage History Profile (Option spec) Drug label (Option spec) Unit setup Pro. Mode TROUBLE SHOOTING ALARM 37~40 SPECIFICATIONS 41 SYMBOLS 42 WARRANTY 43~44 3
5 1. DESCRIPTION OF PUMP 1-1.Front View 1-2.Rear View 1-3.Side View 1-4.Syringe View 1-5.Components 4
6 1. DESCRIPTION OF PUMP 1-1. FRONT VIEW 5
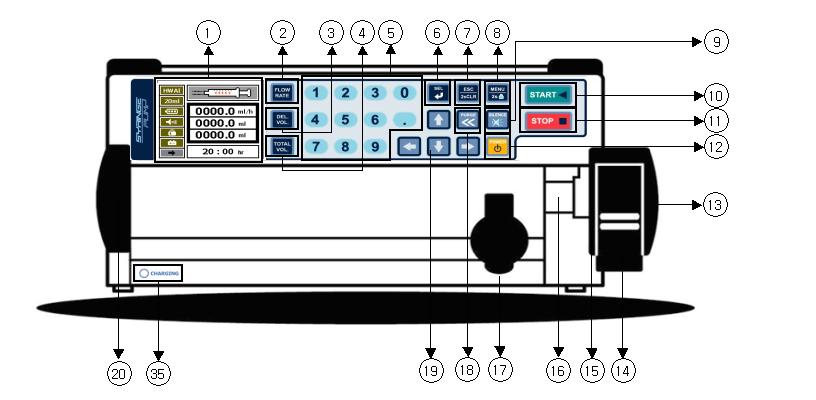
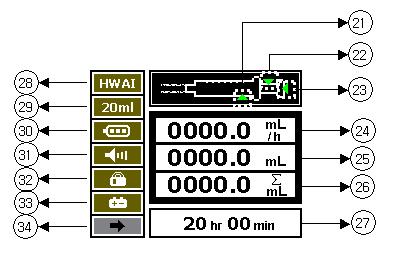
7 1. DESCRIPTION OF PUMP 1 LCD : Display operating state. 2 FLOW RATE : Set up and adjust Flow rate( ml /h) 3 DEL. VOL : Set up and adjust Delivery volume( ml ) 4 TOTAL VOL : Display total infuseion volume( ml ) 5 NUMERICAL BUTTONS 6 SEL : Save setup value / Set up infusion time. 7 ESC/2sCLR : Move to previous state/ Delete setup value by press the button for 2seconds 8 MENU/2s : Move to MENU mode/ Lock keypad by press the button for 2seconds 9 SILENCE :Hold alarm sound for 2minutes when alarm goes off. After 2minutes, alarm foes off again. 10 START 11 STOP 12 POWER : Press for 2seconds to turn on or off the unit. 13 SLIDER : Push the plunger of the syringe to infuse. 14 HANDLE LEVER 15 SLIDER CLUTCH 16 SLIT 17 CLAMP 18 PURGE - STANDBY mode : Remove air bubble in IV tube line. - During infusion : BOLUS function, Bolus can be set in system menu mode. 19 DIRECTION BUTTONS 20 Line Guide : Fix extension tube. 21 Clamp State 22 Slider Clutch State : When Slider Clutch does not fix the Push Button of syringe, blinked in red. 23 Handle Lever State : When Clutch is opened(handle Lever is up), blinked in red. 24 Display FLOW RATE 25 Display DEL VOLUME 26 Display TOTAL VOLUME 27 Display INFUSION TIME 28 Display Syringe BRAND 29 Syringe Size : 10ml, 20ml, 30ml, 50ml 30 Display state of battery 밧데리상태표시 31 Display state of BUZZER level 32 Display state of lock : Lock / Unlock 33 Power supply : AC / BATTERY 34 BATTERY REMAIN : Display remaining battery operating time. Battery remaining time can be very different depends on battery condition. 35 CHARGING : ( Fully charged : Green / Charging : Orange) 6
 2Nurse Call Connector")

8 1. DESCRIPTION OF PUMP 1-2. REAR VIEW Communication Connector (RS232 Connector) 2Nurse Call Connector (Nurse Call Connector): Connect alarm terminal cord installed in the ward. 3Pole Clamp 4Handle 5Adaptor Connector 6AC Power Supply Connector 1-3. SIDE VIEW 1 1 Coupler : Joins two syringe pumps when one syringe pump is laid on another syringe pump 7

9 1. DESCRIPTION OF PUMP 1-4. SYRINGE Barrel Finger-grips Plunger 1-5. COMPONENT AC power cord 8
10 2. PRIOR TO PUMP USE 2-1.Explanation of Symbols 2-2.Warnings 2-3.Precautions 2-4.Cleaning & Sanitation 2-5.Storage 2-6.Maintenance & Repair 9
11 2. PRIOR TO PUMP USE 2-1. EXPLANATION OF SYMBOLS Warning is used to indicate the presence of a hazard which can cause severe personal injury, death or substantial property damage if the warning is ignored. Caution is used to indicate the presence of a hazard which will cause minor personal injury or property damage if the warning is ignored. Note is used to notify the user of installation, operation or maintenance information which is important but not hazard-related WARNINGS If used in the vicinity of the surgical operation equipment which generates a high frequency current such as mobile (cellular) phone, radio, or defibrillator, the pump may malfunction since electrical interference. Please carefully check for any sources of electrical interference in the vicinity before use. Before using the pump, make sure that the manufacturer of the syringe to be used is the same as the one specified for this pump. If it is not matched, the flow rate accuracy and alarm system cannot be guaranteed. In order to change the syringe manufacturer, please contact your local authorized dealer. When using the pump concurrently with the surgical operation equipment, please note the following: - Do not use the pump together with any surgical operation equipment that generates high noise level. - Be sure that the pump is kept a sufficient distance from the surgical operation equipment. - The pump and such device should not be powered from the same outlet. - Check and confirm the normal operation of the pump periodically. In case of malfunction, immediately turn off the power and remove the infusion set from the patient s skin. After this action, please contact your local authorized dealer. Avoid using the pump in presence of flammable gases and flammable anaesthetic mixture with air, oxygen or nitrousoxide. The use of any mobile (cellular) phone near the pump is not allowed since the high frequency noise during the conversation could cause malfunction of the pump. The use of the pump in MRI rooms such as high-pressure rooms or places where high electromagnetic radiation is generated is not allowed. In case of using new brand of syringe other than suggested by AMPall, new brand of syringe must be calibrated by AMPall or local authorization. If not, new syringe may cuase problem on infusion accuracy and alarm state. Please contact your local authorized dealer if you wish to use syringe that are not supported. This pump does not detect over-infusion or under-infusion. Please check infusion state with patient regularly. Make sure about correct syringe installation, drug may flow backward if syringe is installed incorrect way. Eliminating a needle from the patient to prevent a release-bolus is required when the tube line got an occulsion. 10
12 2. PRIOR TO PUMP USE The pump does not detect damage to the infusion tube such as a leak in the tube or a rupture in the filter due to pressure exertion. Therefore, regularly check for any damage to the infusion line during infusion. When the flow is obstructed due to kinking of the tube or clogging of the needle or filter, it can increase pressure in the infusion tube and cause the tube to be inflated with the solution. Complete removal of the obstruction will allow the solution to be delivered to the patient. If the flow is obstructed, take appropriate actions. The syringe is disposable. Therefore, the used syringe should not be reused. Never modify the pump by yourself. The pump is connected to the AC power outlet to be operated. If there is no available AC power outlet, pump can be operated with only its internal battery. (Alternatively, the pump may be operated by DC power). The spill of the solution on the AC power inlet may cause a short circuit. Make sure that there is any damage with the pump and components. In case of the unit and components that were shocked, do not use them even if visible damages are not observed. Please contact your local authorized dealer. In case of malfunction, do not try to take the unit apart or attempt to repair by yourself. Please contact your local authorized dealer immediately. If the user does not comply with these warnings, AMPall does not take liable and the warranty does not apply PRECAUTIONS The pump does not detect about correct infusion state with blood vessel on patient. Please check the puncture site and monitor the patient s condition carefully. Fix the pump securely to a pole stand and check its stability. If the pump is dropped or given a hard shock, do not use it. Please contact your local authorized dealer. The pump must be used in accordance with this instruction manual by trained medical personnel. When alarm sounds, please take corrective actions. Do not apply a strong force or damage to the clamp or slider. If the user does not comply with these warnings, the company is not responsible for its result and the warranty is not applied CLEANING & SANITATION Before cleaning the pump, make sure to power off the pump and disconnect the AC power cord. Do not immerse the pump in water. Do not immerse the pump in any liquid nor allow any liquid to leak into the pump. Do not use alcohol, thinner, benzene, ammonia, acetone or any other organic solvents. Do not sterilize the pump. 11
13 2. PRIOR TO PUMP USE < Casing > When the pump casing is stained, use a gauze cloth or similar, moistened with cold or tepid water and let it dry, especially the AC power inlet before use. Clean AC power inlet, Adoptor connectorm Slider Slider hook, Clamp, Slit and Clutch regularly. In case of disassemble Clutch or Clamp for cleaning, contact local authorization. Do not use a drier to dry casing parts STROAGE Avoid the following environment for storage and transport for SP-8800 Syringe Pump. - Where the unit is exposed to dirt or heavy dust. - Where the unit is exposed to salty atmosphere. - Where the unit is exposed to severe vibration or corrosive GAS. - Where the unit is exposed to rough handling. - Where the unit is exposed to direct sunlight or UV light. - Where the unit is exposed to water. - Where the unit is exposed to extreme temperature and humidity. The optimum storage conditions for the unit - Temperature is between -10 ~ Humidity is between 10% ~ 95% 2-6. MAINTENANCE & REPAIR If any irregularity and failure are detected, stop operation of the pump immediately and contact your local authorized dealer to repair or replace by supplying the details of the situation. Never try to disassemble or repair by yourself because it could cause further serious failure. Make sure that there is not any damage with the pump and components. In case that the unit and components were shocked, do not use them even if visible damages are not observed. Please contact your local authorized dealer. Contact your local authorized dealer for periodical inspection of the pump for safety and longer product life. Operate the pump with the internal battery once a month to check its performance because the internal battery is subject to aging. If the operation time is getting short after it is normally recharged, contact your local authorized dealer to replace with a new battery. Please be sure that your local authorized dealer checks it annually. Please recharge the internal battery fully for more than 6 hours by connecting the pump to an AC power outlet before the pump is used for the first time or after a long interval. If the battery is low, the pump may stop running if there is no way to connect the pump to an AC power outlet. 12
14 3. OPERATION 3-1.Initial setup 3-2.Syringe instollation 3-3.Setup flow rate (ml/h) 3-4.Setup delivery volume (ml) 3-5.Confirm total infused volume (Σml/CLEAR) 3-6.Setup delivery time (hours) 3-7.Insert the needle into the patient 3-8.Start infusion 3-9.Infusion completion 3-10.Stop infusion 3-11.[POWER] button 3-12.Battery remain 3-13.Error alarm 3-14.Adoptor operation 3-15.Battery operation 3-16.Nurse call function (Option) 3-17.Keypad lock 13

15 3. OPERATION 3-1. INITIAL SETUP ATTACHING THE PUMP TO THE IV POLE STAND Fix the pump securely on a pole stand, using the pole clamp on the back of the pump CONNECT AC POWER Insert AC power cord to the AC power inlet on the back side of the pump and connect the power cord to AC power outlet. Charging lamp will be on in red or green depends on its battery charging state. ( Fully charged : Green / Charging : Orange) After turn on the unit, - LCD displays on the left side of LCD when it connected with AC power. - LCD displays connected with adoptor, and connected with battery for power supply. Alternatively, the pump may be operated by DC power. When AC power is connected, the internal battery is automatically being recharged TURN ON THE UNIT Press [POWER] button for 2 seconds to turn on the unit. - LCD, FND and LED state lamp turn on with confirming sound and SELF TESTING is proceeded for 3seconds. - LCD divides left side and right side as below pircture. Left side displays setup conditions, and right side displays operating state. * Power supply - : AC power : Adoptor : Battery - Syringe brand is displayed on the left side of LCD. Please confirm syringe brand, if it is the one you are going to use with the unit. Syringe brand Syringe size Battery state Buzer level Lock / Unlock Power supply Remaning battery operating time [SETUP CONDITION] State of syringe instllation FLOW RATE DEL VOL TOTAL VOL Delivery time [OPERATING CONDITION] Please contact a local authorized dealer or agency when you have problem with the unit. 14
![3. OPERATION 3-1-4 TURN OFF THE UNIT Press [POWER] button for 2 seconds on STAND BY mode to turn off the unit. - The unit is turned off after 2seconds with confirming sound and logo in LCD.](/docs-images/78/76922068/images/16-0.jpg "- The unit is not turned off in MENU mode. 3-2. SYRINGE INSTALLATION 1. Push up the handle lever and pull at the slider to the right. 2. Pull at the clamp and turn it to the left.(open the clamp.) 3.")
16 3. OPERATION TURN OFF THE UNIT Press [POWER] button for 2 seconds on STAND BY mode to turn off the unit. - The unit is turned off after 2seconds with confirming sound and logo in LCD. - The unit is not turned off in MENU mode SYRINGE INSTALLATION 1. Push up the handle lever and pull at the slider to the right. 2. Pull at the clamp and turn it to the left.(open the clamp.) 3. Install syringe filled with solution and connected with infusion tube. Fix infusion tube into the slit. 4. Pull at the clamp and turn up to close the clamp and check the syringe is fitted correctly. If the syringe is not properly placed in the slit, the flow rate accuracy and alarm system are not guaranteed. 5. After infusion tube is placed in Line Guide, push the slider slowly until it hits push-button of the syringe. When the slider hits the push-button, slider hook automatically gets down to fix the syringe. When the syringe is set in the pump, [SYRIGNE SIZE] LED lights on according to the size of syringe. 6. Press and hold [PURGE] button until a drop of solution at the end of the infusion set appears to remove air bubble in the infusion tube. Syringe Size 10ml 20ml 30ml 50ml Initial Purge Rate 300ml/h 400ml/h 500ml/h 1200ml/h The priming volume is added to the volume delivered. Refer to page 25 to set up purge rate. 15
17 3. OPERATION 3-3. SETUP FLOW RATE(ml/h) 1. Press [FLOW RATE] button to get into FLOW RATE setup mode as below picture. State of menu Previous setup value Flow rate (ml/h) [SETUP FLOW RATE] Flow rate setup range 2. Input desired value for FLOW RATE(ml/h) with numerical buttons and press [SEL] button to save it. Display turns into previous display automatically. 3. Press [ESC/2s CLR] button for 2seconds to delete complete value, press button to delete previous digit only. 4. When setup value exceeds the range, RANGE OVER will come up and maximum value is saved automatically. Make sure setup value before start. Syringe size 10ml 20ml 30ml 50ml Flow Rate 0.1ml/h ~ 300ml/h (0.1ml/h increasement) 0.1ml/h ~ 400ml/h (0.1ml/h ncreasement) 0.1ml/h ~ 500ml/h (0.1ml/h ncreasement) 0.1ml/h ~ 1200ml/h (0ml/h~999.9ml/h with 0.1ml/h creasement) (1000ml/h~1200ml/h with 1ml/hncreasement) The flow rate cannot be changed during the infusion. Druing flow rate setup, if press [STOP] button for more than 2seconds, the value will be reset as The pump does not start when the flow rate is setup at 0 ml/h. The message NO SET will come up on the LCD. 16
![3. OPERATION 3-4. SETUP DELIVERY VOLUME(ml) 1. Press [DEL.VOL] button to get into DELIVERY VOLUME setup mode as below picture.](/docs-images/78/76922068/images/18-0.jpg "State of menu Previous setup value Delivery volume(ml) Delivery volume setup range [SETUP DELIVERY VOLUME] 2. Delivery volume range is from 0.1 to 1000.0ml with 0.1ml increasement. 3.")
18 3. OPERATION 3-4. SETUP DELIVERY VOLUME(ml) 1. Press [DEL.VOL] button to get into DELIVERY VOLUME setup mode as below picture. State of menu Previous setup value Delivery volume(ml) Delivery volume setup range [SETUP DELIVERY VOLUME] 2. Delivery volume range is from 0.1 to ml with 0.1ml increasement. 3. Press [ESC/2s CLR] button for 2seconds to delete complete value, press button to delete previous digit only. If delivery volume is set with 0ml, it is considered as maximum value, 1000ml and operates delivery volume with 1000ml. (When remaining time is exceeded 99hours, infusion remaining time is not displayed.) During infusion state, delivery setup is not available. Setup is available only STAND BY mode CONFIRM TOTAL INFUSED VOLUME (Σ ml /CLEAR) Total volume(σml /CLEAR) shows the delivered volume so far. Press TOTAL VOL button. Delete total infused volume by press [ESC / 2sCLR] button for 2seconds. State of menu Previous value Total infused volume(ml) [TOTAL INFUSED VOLUME] 17
19 3. OPERATION 3-6. SETUP DELIVERY TIME(hour) Press [SEL] button, DELIVERY TIME on the botton of LCD is blinked. Set up delivery time with numerical buttons and save it with [SEL] button. Third value is calculated and displayed automatically when two setup values are entered among FLOW RATE, DELIVERY VOLUME, DELIVERY TIME. Please make sure about total infused volume when you setup infusion by time, previous total infused volume is included if it is not deleted. DELIVERY TIME range : 1min~99hour 59min 3-7. INSERT THE NEEDLE INTO THE PATIENT Insert the needle into the patient. Alarm does not go off when needle comes off the vein, resulting in an out-of-the-vein infusion. Therefore, regularly check the puncture site and monitor the patient s condition carefully START INFUSION Before operating the pump, make sure to check the flow rate, delivery volume and the condition of infusion tube again. 1. Press [START] button to start infusion. 2. During infusion, is blinked in order. INFUSING and DELIVERY TIME blinked by turns on the bottom line. [INFUSING DISPLAY] 18


20 3. OPERATION 3-9. INFUSION COMPLETION 1. When delivery volume is reached, flow rate turns into K.V.O. rate to avoid occlusion of infusion by coagulation. 2. The unit turns into K.V.O. rate automatically, and LCD shows CAUTION FINISH K.V.O as below picture with alarm sound. [K.V.O. RATE] 3. Press [STOP] button to stop K.V.O. rate. LCD display turns into initial display. K.O.V. rate is adjustable, please make sure K.V.O. rate before start infusion. Otherwise over infusion may be cuased. Over infusion may be cuased by user s setup condition, manufacturer does not take any responsibility on the problem. 4. When drug in the syringe is left about 3~4cc, NEAR EMPTY alarm goes off with alarm sound depends on setup flow rate. OCC alarm indicator is blinked in red. [NEAR EMPTY] 5. When the syringe is empty, WARNING SYRINGE OCCLUSION alarm goes off with alarm sound and OCC alarm indicator is on red.. [SYRINGE OCCLUSION] 6. Press [STOP] button to stop. LCD display turns into initial display. 19
![3. OPERATION 3-10. STOP INFUSION Press [STOP] button to stop infusion during the operation. Before restart infusion, FLOW RATE, DELIVERY VOLUME and infusion tube should be confirmed.](/docs-images/78/76922068/images/21-1.jpg "After confirming the condition, press [START] button to start infusion. Alam goes off if do not restart in 2minutes after stop infusion temporally. 3-11.")
21 3. OPERATION STOP INFUSION Press [STOP] button to stop infusion during the operation. Before restart infusion, FLOW RATE, DELIVERY VOLUME and infusion tube should be confirmed. After confirming the condition, press [START] button to start infusion. Alam goes off if do not restart in 2minutes after stop infusion temporally [POWER] BUTTON Power is turned on and off by press [POWER] button. During infusion, [POWER] button does not function. Press [STOP] button first to stop infusion, then press [POWER] button to turn off the unit. Reset Total volume as 0 when restart infusion with new infusion condition BATTERY REMAIN Press button in initial mode, display turns into number 3 picture and display the remaining battery operating time. 1 2 Remainning battery operating time Remainning battery operating time is different as its infusion setup condition and battery condition. Check about battery condition and operating condition with you refer to BATTERY REMAIN. Charging LED on the front should be green when you refer to BATTERY REMAIN. 20
22 3. OPERATION ERROR ALARM When alarm goes off with error, press [SILENCE] button to hold alarm sound for 2seconds then settle the problem. Otherwise, alarm sound goes off again ADOPTOR OPERATION This unit can be operated with adoptor DC 24V 1A, DV 12V 1A. Connect adoptor code (Cod No.: 05LN51 *) to inner adoptor connector and press [POWER] botton. comes up in right side of LCD BATTERY OPERATION This unit operatse with AC power supply and built in rechargeable battery. When AC power supply is disconnected, the unit turns into battery operating mode automatically. Battery is charged when AC power supply is connected when ever it is on or off. Battery operating time is about 2hours. New rechargeable battery should be charged more than 6hours. Battery state displays on LCD as its remain state. With battery state, if there is no AC power supply connected, the unit will be off with alarm sound and stop operation. Battery state should be checked every 6month to inspect battery life. Battery capacity may be different depends on its using condition such as fully charing and fully discharge cycle. For safety of longer battery operating time, battery should be fully charged one a month. If the unit has been kept without using it for more than 1months, or it is first time to use the unit, try to charge the built in battery for more than 6hours NURSE CALL FUNCTION (OPTION) Connect nurse call connector on the back side of the unit and NURSE CALL SYSTEM builted in a hospital with nurse call cord. When alarm goes off, error message shows up in LCD, alarm signals are transferred to NURSE CALL SYSTEM every 5 second. Nurse call code number: 06LA548 * 21
23 3. OPERATION KEYPAD LOCK Lock keypad by pressing MENU/2s button. Keypad lock can be done with password so user can control keypad lock. Under Keypad LOCK, all key do not function. Refer to page 28 for setup KEYPAD LOCK.. 22
24 4. SYSTEM SETUP 4-1. Buzzer level setup (Short-cut key) 4-2. Occlusion level setup (Short-cut key) 4-3. Syringe selection 4-4. Infusion setup 4-5. Display 4-6. Config. 23
![4. SYSTEM SETUP 4. SYSTEM SETUP Press MENU button to get into Menu mode and select SYSTEM SETUP with [SEL] button. SYSTEM SETUP MENU 1. BUZZER 2. OCCLUSION 3. BRAND SET 4. INFUSION 5. DISPLAY 6.](/docs-images/78/76922068/images/25-1.jpg "CONFIG Menu move buttons Total menu number It you do not press any button for 10seconds, LCD turns back to previous display with alarm sound. Press [ESC / 2sCLR] button to go back previous display.")
25 4. SYSTEM SETUP 4. SYSTEM SETUP Press MENU button to get into Menu mode and select SYSTEM SETUP with [SEL] button. SYSTEM SETUP MENU 1. BUZZER 2. OCCLUSION 3. BRAND SET 4. INFUSION 5. DISPLAY 6. CONFIG Menu move buttons Total menu number It you do not press any button for 10seconds, LCD turns back to previous display with alarm sound. Press [ESC / 2sCLR] button to go back previous display. And press [SEL] button to save BUZZ. LEVEL SETUP(SHORT-CUT KEY) Get into BUZZ. LEVEL mode, select manu in order to MENU SYSTEM SETUP BUZZER.. Adjust buzzer level with UP, DOWN buttons. There are three levels, HIGH, MIDDLE and LOW. Select and save with [SEL] button. After save buzzer level display turns into previous mode. Initial BUZZ. LEVEL HIGH Short-cut key for buzzer level : Press + [1] button in initial display. 24
26 4. SYSTEM SETUP 4-2. OCC. LEVEL SETUP (SHORT-CUT KEY) Get into OCC. LEVEL mode, select manu in order to MENU SYSTEM SETUP OCCLUSION OCCLUSION is adjusted with UP, DOWN buttons, it is from LEVEL 1 to LEVEL 9. Press [SEL] button to select and save. After select and save it, it turns into previous menu. H : 800±200mmHg (106.7±26.7 kpa) or 1.09±0.27 kgf / cm2 M : 500±100mmHg (66.7±13.3 kpa) or 0.68±0.14 kgf / cm2 L : 300±100mmHg (40.0±13.3 kpa) or 0.41±0.14 kgf / cm2 Initial set is LEVEL 5 Short-cut key for occlusion level : Press + [2] button in initial display SYRINGE SELECTION Get into BRAND SET menu in order to MENU SYSTEM SETUP BRAND SET. Syringe should be calibrated by supplier, select the syringe brand will use with UP, DOWN button. Select and save the syringe brand with [SEL] button. After select and save it, it turns into previous menu. 25
27 4. SYSTEM SETUP Here is the list of basic calibration syringe brands. (Calibrated syringe brand may be different depends on local authorizaed dealer.) NO Brand Manufacturer 1 B - D Backton 2 MEDI Medihut 3 KOVA Korean Vaccine 4 SHIN Shinchang 5 HWAJ Hwajin 6 SUNG Sungshin Initial setup is B-D. If you want to use other syringe brand beside the list, please contact our local authorization dealer to get confirm about calibration. Un calibrated syringe may occur error or accuracy problem. Please make sure the syringe brand you are using is calibrated and approved by local authorized dealer or manufacturer. Manufacturer or local authorized dealer do not cover the result from using syringe brand which is not calibrated or approved by manufacturer or local authorized dealer. Short-cut key for syringe brand : Press + [3] button in initial display INFUSION SET There are PURGE SETUP, BOLUS SETUP, KVO SETUP in INFUSION SET menu. 26
. Purge volume is included in total infused volume. Purge is working only STAND BY mode. When Purge rate is less then floow rate, Purge rate works as setup flow rate.")
28 4. SYSTEM SETUP PURGE SET UP PURGE is setup from 0.1~1200ml/h. Previous setup PURGE ( ml /h) Range If PURGE rate is not setup, beep sould will come out and infusion will not start. Purge: To remove air in tube(line). Purge volume is included in total infused volume. Purge is working only STAND BY mode. When Purge rate is less then floow rate, Purge rate works as setup flow rate BOLUS SET There are BOLUS FLOWRATE, BOLUS D.VOLUME for BOLUS SET menu. BOLUS: Infuse sure amount of solution or drug by sure infusion speed. - BOLUS FLOWRATE SET : Setup flow rate of BOLUS with numerial buttons. Save desired value with [SEL] button. Press [ESC / 2sCLR] buttons for 2seconds to delete the total value and press digit in order. to delete previous Press [ESC / 2sCLR] button to move previous menu. Previous setup BOLUS F/R ( ml /h) BOLUS VOL( ml ) Range 27
29 4. SYSTEM SETUP - BOLUS VOLUME : Setup total amount of BOLUS. Save desired value with [SEL] button. Press [ESC / 2sCLR] buttons for 2seconds to delete the total value and press to delete previous digit in order. BOLUS ON/OFF : Get into the menu in order to MENU SYSTEM SETUP 6.CONFLG BOLUS ON/OFF. You can select BOLUS ON/OFF. ( Refer to page 29 for setup). ( Initial setup is BOLUS OFF mode.) BOLUS and PURGE button is same one. It functions differently as its mode as blow. BOLUS function : Only during the infusion Please make about BOLUS ON/OFF. When you do not use BOLUS function, please setup BOLUS OFF so it does not function. And make sure when you use BOLUS function about tis setup condition(flow rate, delivery volume) before use it K.V.O. SETUP Setup K.V.O. (Keep Vein Open) rate from 0.1~10.0ml /h. K.V.O. (Keep Vein Open): When the delivery volume has been reached, flow rate turns into K.V.O. rate (adjustable from 0.1ml/h to 10.0ml/h) automatically to avoid clog by blood coagulation. Make sure K.V.O rate setup before use it to avoid excess infusion during K.V.O. function. Manufacturer does not cover the result from K.V.O. setup failure by user. So please make sure about K.V.O. setup condition before start infusion.. 28
30 4. SYSTEM SETUP 4-5. DISPLAY There are TIME SETUP, B.LIGHT TIME, B.LIGHT BRIGHT for DISPLAY menu TIME SETUP Get into TIME SET menu in order to MENU SYSTEM SETUP DISPLAY TIME SETUP. Move with,,, buttons and input with numerical buttons for time setup. Press [SEL] button to select and save time set. There is no extra delet button because you can move with,,, buttons at any point. Once time setup, the unit keeps time whenevery it turns on or off LCD BACK LIGHT TIME Get into B.LIGHT TIME menu in order to MENU SYSTEM SETUP DISPLAY B.LIGHT TIME. There are 4modes for LCD black light mode. -ON : Always LCD black light on. -30SEC : Turns off after 30seconds. - 60SEC : Turns off after 60seconds. -90SEC : Turns off after 90seconds. Move with, buttons and press [SEL] button to select and save the mode. After select and save it, it turns into previous menu. Initial set is ON. 29


31 4. SYSTEM SETUP LCD BLACK LIGHT BRIGHT Get into BLIGHT BRIGHT menu in order to MENU SYSTEM SETUP DISPLAY B.LIGHT BRIGHT. There are brightness levels from LEVEL 1 to LEVEL 9. As level number is up, LCD goes brighter. Adjust it with, buttons and press [SEL] button to select and save it. Initial set is LEVEL CONFIG There are KEY LOCK P/W, BOLUS ON/OFF and ANTI-BOLUS for CONFIG menu. Problems from incorrect setup by user, are charged on user. It does not cover by manufacturer KEY LOCK P/W Get into KEYLOCK P/W menu in order to MENU SYSTEM SETUP CONFIG KEYLOCK P/W. Move with, buttons, select and save with [SEL] button. 30
32 4. SYSTEM SETUP BOLUS ON/OFF Get into BOLUS INFUSE menu in order to MENU SYSTEM SETUP CONFIG BOLUS ON/OFF. Move with, buttons, select and save with [SEL] button. Initial setup is OFF. (KEY LOCK P/W, BOLUS INFUSE ) ANTI BOLUS ON/OFF Get into ANTI BOLUS INFUSE menu in order to MENU SYSTEM SETUP CONFIG ANTI BOLUS. ANTI BOLUS : Reduce significantly bolus after occlusion release. O Move with, buttons, select and save with [SEL] button. Initial setup is OFF. [KEY LOCK P/W], [BOLUS INFUSE], [ANTI BOLUS] 31


 5-4.")
33 5. SPECIAL FUNCTIONS 5-1.Dosage 5-2.History 5-3.Profile (Option spec) 5-4.Drug label 5-5.Unit setup 5-6.Pro. mode 32
![5. SPECIAL FUNCTION 5. SEPCIAL FUNCTION Press MENU button to getinto Menu mode and select SPEICAL FUNCTION with [SEL] button. SPEICAL FUNCTION MENU 1. DOSAGE 2. HISTORY 3. PROFILE (OPTION SPEC) 4.](/docs-images/78/76922068/images/34-0.jpg "DRUG.LABEL (OPTION SPEC) 5. UNIT SETUP 6. PRO.MODE Contact local authorized dealer for OPTION SEPC. 5-1.")

34 5. SPECIAL FUNCTION 5. SEPCIAL FUNCTION Press MENU button to getinto Menu mode and select SPEICAL FUNCTION with [SEL] button. SPEICAL FUNCTION MENU 1. DOSAGE 2. HISTORY 3. PROFILE (OPTION SPEC) 4. DRUG.LABEL (OPTION SPEC) 5. UNIT SETUP 6. PRO.MODE Contact local authorized dealer for OPTION SEPC. 5-1.DOSAGE DOSAGE SETUP Press buttons in order to MENU SPECIAL FUNCTION DOSAGE and there come up DOSE RATE on the LCD. DOSEGE : Automatically calculate and set the proper flow rate when the dose rate, body weight, drug mass and solution volume are entered. After input each parameter, press [SEL] button. Each mode is comfirmed and turns into next parameter automatically. Please refer to picture No. 1 to 4. After setup complete parameter, it turns into picture No. 5 automatically and display complete information for each parameter value. Each paramet, you can delet or change the value with [ESC / 2sCLR] or,,, buttons. Press [ESC / 2sCLR] button to back previous mode As soon as finish input each parameter value, complete data is displayed as picture No. 5. Select YES to confirm the data for DOSAGE mode, it turns into STANDBY mode with confirm sound. Flow rate and Delivery volume are displayed on FND automatically. Press [START] button to start. If you select NO on the picture No. 5, it goes back DOSE RATE mode automatically to setup each parameter again. 33
 0.1 ~ 999.9mg (0.1mg increment) * Change unit for DOSE RATE : Unit can be changed page 36 UNIT SET DOSE RATE 1. μg / kg / min 2. μg / kg / hour 3. mg / kg / hour 4.")
![mg / kg / min Each parameter value should be more than 0. DOSAGE Mode Flow rate (ml/h) = [{Dose rate( μg /kg/min.) * Body weight(kg) * Solution volume(ml)} / {Drug volume(mg) * 1000}]* 60 5-2.](/docs-images/78/76922068/images/35-1.jpg "HISTORY 5-2-1. Check HISTORY Get into HISTORY VIEW menu in order to MENU SPECIAL FUNCTION HISTORY.")
35 5. SPECIAL FUNCTION 5 * Range for each parameter Dose rate Body weight Solution volume Drug volume 0.01 ~ 99.99μg / kg /min. (0.01μg/ kg /min. increment) 0.1 ~ 300.0kg (0.1kg increment) 0.1 ~ 999.9ml (0.1ml increment) 0.1 ~ 999.9mg (0.1mg increment) * Change unit for DOSE RATE : Unit can be changed page 36 UNIT SET DOSE RATE 1. μg / kg / min 2. μg / kg / hour 3. mg / kg / hour 4. mg / kg / min Each parameter value should be more than 0. DOSAGE Mode Flow rate (ml/h) = [{Dose rate( μg /kg/min.) * Body weight(kg) * Solution volume(ml)} / {Drug volume(mg) * 1000}]* HISTORY Check HISTORY Get into HISTORY VIEW menu in order to MENU SPECIAL FUNCTION HISTORY. HISTORY : Display last 10 infusion datas, infusion starting time, infusion completing time, FLOW RATE, INFUSED VOLUME. 34
![5. SPECIAL FUNCTION Move with,,, buttons and press [SEL] button to see detail information for each data. HISTORY DATA : Last 10 infusion datas only. 5-3.](/docs-images/78/76922068/images/36-0.jpg "PROFILE (OPTION SPEC) Get into PROFILE SET menu in order to MENU SPECIAL FUNCTION PROFILE. 5-3-1. PROFILE LOAD PROFILE LOAD : Call back the previous setup data.")
36 5. SPECIAL FUNCTION Move with,,, buttons and press [SEL] button to see detail information for each data. HISTORY DATA : Last 10 infusion datas only. 5-3.PROFILE (OPTION SPEC) Get into PROFILE SET menu in order to MENU SPECIAL FUNCTION PROFILE PROFILE LOAD PROFILE LOAD : Call back the previous setup data. When you select this mode, there is YES or NO selection mode to start same profile. Select YES to start same profile with previous setup. The unit turns into STAND BY mode. Press [START] button to start PROFILE, the unit start PROFILE mode with displaying PROFILE on LCD. Select NO to setup new PROFILE. Duringe PROFILE function, you can not setup Flow rate, Delivery volume. To stop PROFILE function, make sure PROFILE LOAD setup as NO PROFILE SETUP PROFILE : Program infusion condition(flow rate, delivery volume, delivery time) differently for every hour, up to 24hours. (Option). Select PROFILE SET UP and press [SEL] button to get into below picture mode. Press [SEL] button to setup time for each profile, input each time with numerical buttons. Press [SEL] button to save each time and infusion setup(flow rate, Delivery volume). Setup profile data up to 24hours in order to same process. Press [START] button to save. 35

37 5. SPECIAL FUNCTION Time setup increment is hour only (not by minute). Maximum profile time is 24hour and 24 kinds of infusion setup available. Presetup is OFF. Problem occurred by user setup is charged on user. Manufactuer does not cover the problem occurred by incorrect setup or use by user DRUG LABEL (OPTION SPEC) This unit does not include DRUG LABEL function UNIT SETUP Get into UNIT SET menu in order to MENU SPECIAL FUNCTION UNIT SETUP. This is change the unit on DOSAGE RATE mode. Move with,,, buttons to select the unit and press [SEL] button to save it. Initial setup is μg / kg / min. 5-6.PRO.MODE Contact local agency or local authorized dealer for this mode. 36
38 6. TROUBLE SHOOTING 37
39 TROUBLE SHOOTING - ALARM Take the following actions if any trouble occurs. When the troubles could not be solved with the following actions, Please contact your local authorized dealer immediately. Whenever alarm sounds, the pump stops infusion. That is, alarm sounds only in error situation during infusion. Symptom Cause Action Pump cannot be switched on. AC or DC power cord is not inserted properly Internal battery has deteriorated The voltage of the internal battery is low Check the AC or DC power cord connection. Never connect both AC and DC power to the pump at the same time Stop the operation of the pump and replace with a new battery through your local authorized dealer. Recharge the battery fully for more than 24 hours by connecting the pump to an AC power outlet. Because of an industrial waste, used Ni-MH battery must be returned to AMPall or distributor. [OCCLUSION] LED The infusion line is kinked or 1. Turn the alarm off by pressing [SILENCE] button. flashes and alarm sounds. [FINISH] LCD display and alarm sounds [NEAR EMPTY] LED flashes and alarm sounds. twisted When infusion is restarted, the alarm sounds again, and the pump stops The syringe is completely empty The syringe is nearly empty (Finishing injection in 5 minutes before, the flash light and warning sound occurring) 2. Check the infusion line and take a corrective action like untwisting or replacing with a new one to solve the problem of occlusion 3. Press [STOP] button to show STAND-BY on the LCD. 4. Restart infusion by pressing [START] button. The system is in trouble. Turn the alarm off by pressing [SILENCE] button. Please contact your local authorized dealer. 1. Turn the alarm off by pressing [SILENCE] button. 2. To continue the infusion, replace the syringe with a new one. 3. Press [STOP] button to show STAND-BY on the LCD. 4. Restart infusion by pressing [START] button. 1. Press [STOP] button to stop infusion. 2. To continue the infusion, replace with the new syringe filled with solution. 3. Restart infusion by pressing [START] button. 38
40 TROUBLE SHOOTING - ALARM Symptom Cause Action [SLIDER HOOK] LED flashes and alarm sounds [CLAMP] LED flashes and alarm sounds [CLUTCH] LED flashes and alarm sounds BATT-LOW on the LCD and alarm sounds KEEP-VEIN on the LCD and alarm sounds When [PURGE] button is pressed, the alarm sounds. Slider Hook does not fix Push- Button of syringe Clamp does not fix Barrel of syringe Clutch is not properly engaged The voltage of internal battery is low In the operation, the total volume delivered reaches the delivery limit The total volume delivered exceeds the delivery limit The syringe is not set properly Even when the syringe is set again, purging does not occur 1. Turn the alarm off by pressing [SILENCE] button. 2. Make Slider Hook fix Push-Button of syringe. 3. Press [STOP] button to show STAND-BY on the LCD. 4. If re-infusion is needed, restart infusion by pressing [START] button. 1. Turn the alarm off by pressing [SILENCE] button. 2. Pull the clamp, turn it to the left up to 90 and put the finger grips of syringe into the slit. 3. Press [STOP] button to show STAND-BY on the LCD. 4. If re-infusion is needed, restart infusion by pressing [START] button. 1. Turn the alarm off by pressing [SILENCE] button. 2. Make the clutch engaged properly. 3. Press [STOP] button to show STAND-BY on the LCD. 4. If re-infusion is needed, restart infusion by pressing [START] button. 1. Press [STOP] button to stop infusion. 2. Recharge the battery fully for 24 hours by connecting the pump to an AC power outlet. 3. Restart infusion by pressing [START] button. Stop K.V.O. rate by pressing [STOP] button Stop K.V.O. rate by pressing [STOP] button When infusion is newly needed, set the delivery volume again or clear the total volume delivered. Set the syringe correctly. The system is in trouble. Please contact your local authorized dealer ERROR is on the LCD The system is in trouble Please contact your local authorized dealer 39
41 TROUBLE SHOOTING - ALARM Symptom Cause Action Even when [START] button is pressed, the alarm sounds, and the pump does not start. [SYRINGE SIZE] LED and [CLAMP] LED flash The accuracy of flow rate is questionable. The operation hour by battery is too short after recharging the battery Battery is not recharged even when it is connected to AC power outlet. Battery is not recharged even when it is connected to DC power outlet. The value of flow rate, delivery limit, dose rate, body weight, drug volume, or solution volume is not set correctly Clutch is not properly engaged The syringe is not set properly The low voltage of the internal battery The syringe, which is used, may be different from the one specified in the pump in terms of manufacturer When infusion is restarted, the alarm sounds again, and the pump stops The syringe, which is used, may be different from the one specified in the pump in terms of manufacturer Otherwise, the system is suspected to be in trouble Internal battery has deteriorated Otherwise, the system is suspected to be in trouble AC power cord is not inserted properly AC power cord has deteriorated Otherwise, the system is suspected to be in trouble DC power cord is not inserted properly DC power cord has deteriorated Otherwise, the system is suspected to be in trouble Confirm the values that were set. Engage the clutch correctly. Set the syringe correctly. Recharge the battery fully for more than 24 hours by connecting the pump to an AC power outlet. Make sure that the syringe, which is used, is the same as the one specified in the pump in terms of manufacturer. To use the syringe of different manufacturer, please contact your local authorized dealer. The system is in trouble. 1. Turn the alarm off by pressing [SILENCE] button. 2. Turn off the power. 3. Please contact your local authorized dealer for repair Make sure that the syringe, which is used, is the same as the one specified in the pump in terms of manufacturer. To use the syringe of different manufacturer, please contact your local authorized dealer. Please contact your local authorized dealer for repair. Stop the operation of the pump and replace with a new battery through your local authorized dealer. Please contact your local authorized dealer for repair. Check the AC power cord connection. Replace with a new AC power cord. Please contact your local authorized dealer for repair. Check the DC power cord connection. Replace with a new DC power cord. Please contact your local authorized dealer for repair. 40
42 SPECIFICATION DELIVERY PERFORMANCE Syringe 10ml: 0~300ml/h FLOW RATE RANGE Syringe 20ml: 0~400ml/h Syringe 30ml: 0~500ml/h Syringe 50ml: 0~1200ml/h VOLUME LIMIT PURGE RATE K.V.O. RATE ACCURACY WITH APPROVED SYRINGES ALARM 0.1~1000ml ( 0.1ml steps) 0.1~1200ml/h (Adjustable) 0.1~10ml/h ( Adjustable) Mechanical accuracy: ±1% Accuracy including syringe: ±3% OCCLUSION, NEAR EMPTY, LOW BATTERY, K.V.O. RATE, CLUTCH OPEN, SLIDER HOOK OPEN, CLAMP OPEN, FEATURES REPEAT ALARM, STAND BY CLASSIFICATIONS OCCLUSION DETECTION PRESSURE NURSE CALL ClassⅠ, CF, IPX2 1.3kgf / cm2 DC12V, 1A KEYPAD LOCK, SHORT-CUT KEY, HISTORY CALL-BACK, RETAIN MEMORY, REMAINNING TIME, OPEN SYSTEM, PURGE, BOLUS, K.V.O., BUZZER VOLUME / OCCLUSION PRESSURE CONTROL, DOSAGE MODE, NURSE CALL(OPTION), DRUG LABEL(OPTION), PROFILE(OPRION), CENTRALL SYSTEM(OPTION) OTHER PARAMETERS POWER REQUIREMENTS / CONSUMPTION AC110 / 230V, 50 / 60Hz or DC9.6V, DC24V 1A / 40VA DIMENSIONS (W D H) WEIGHT BATTERY / OPERATION / CHARGING BATTERY LIFE OPERATION CONDITIONS STORAGE CONDITIONS (mm) Approximately 2kg Ni-MH9.6V/2 hours / 6 hours 1.5~2 years 5~40, 30~90% RH (no condensation) -20~45, 10~95% RH (no condensation) WARRANTY PERIOD 1 year Specifications and design are subject to change for improvement without prior notice 41
43 SYMBOL Meaning Symbol Do not reuse this device Please read this instructions for use: Sterilized by Ethylene Oxide: Manufacture Date Lot number: Expiration Date (Use by date) Device Serial Number Waterproof level DC Type CF Equipment (Protection against electrical shock) Protection from heat and sunlight AC 42
44 AMPall warrants that the product shall be free from defects in workmanship and materials for the warranty period. The warranty is void if failure of the product has resulted from accident, alteration, abuse or misapplication to include unauthorized opening of the product. Under the warranty, AMPall shall repair or replace at its option and expense any products found defective by the customer during the warranty period and returned to an authorized AMPall representative. Return of the repaired or replaced product to the customer s original location shall be at the expense of AMPall unless AMPall determines that the products are not defective within the terms of the warranty. In such case the customer shall pay AMPall all costs of handling, transportation and labor. This warranty is in lieu of all other warranties whether expressed or implied. Manufactuer; AMPall Co.,Ltd. 3F, Annex Hankook Junja Hyeopdong B/D Gasan-Dong KumChean-Gu, Seoul TEL: ~41 FAX: ampall@ampall.com EC Representative : Dong Bang AcuPrime Gater Lane Palace Gate, EXETER EX1 1JL,UK TEL: FAX:
45 Warranty Card Thank you for your purchasing for AMPall product. The warranty period of SP-8800 is valid from the purchasing date. Please notice the purchasing date on the warranty card and keep this Warranty Card with the device all the time to get full customer service. Product Name Model Name Syringe Pump SP-8800 Manufacturing Date Warranty Period 1 year Purchasing Date / / (year/ month/ date) Customer Retailer Name: Add.: Name: Add.: Tel.: Tel.: Repairing Record Date Contents of Repair Confirmation Please show this Warranty Card when you request repairing service. 3F. Annex Hankook Junja Hyeopdong B/D, , Gasan-Dong, Kumcheon-Gu, Seoul, Korea TEL : ~41 / FAX : ampall@ampall.com / Website: 44
Syringe Pump. User Manual
 Syringe Pump User Manual Specifications Length Height Width Weight Waterproof Rating Battery 30 cm 13 cm 12.5 cm 1.8 kg IPX3 Rechargeable Li Polymer 7.4 V 1900 mah 6 Hour Battery Life Running 3 Hours When
DS User Manual
 MEDIFUSIONR DS-3000 User Manual DAIWHA Copyright 2010, DAIWHA Corporation. All rights reserved. Manual No: DW-DS3000-OP-KR (Rev 0.5) Contents 1. Precautions... 5 1.1 Overview... 5 1.2 Warnings... 5 1.3
 Syringe Pump Caddo 15B Learning Material Ver. 1.1 An ISO 9001:2008 company 94, Electronic Complex, Pardesipura Indore - 452 010 India Tel: +91-731 4211100 Fax: +91-731-2555643 e mail: info@scientech.bz
 Infusion Pump Caddo 16B Learning Material Ver. 1.1 An ISO 9001:2008 company 94, Electronic Complex, Pardesipura Indore - 452 010 India Tel: +91-731 4211100 Fax: +91-731-2555643 e mail: info@scientech.bz
Proven Quality Made in Germany
 Proven Quality Made in Germany Original Perfusor and Infusomat Quality products by B. Braun Automated Infusion Systems B. Braun Melsungen AG Hospital Care 34209 Melsungen Germany Tel. +49 5661 71-0 www.bbraun.com
ANGELUS (Ver 2.03) Patient Monitoring System
 Patient Monitoring System") ANGELUS (Ver 2.03) Patient Monitoring System CONTENT Contents of Manual 1 Meaning of Symbols used in this manual 2 Section 1. GENERAL 3 1.1 Introduction 4 1.2 Composition of unit 8 1.3 Panel Description
ANGELUS (Ver 2.03) Patient Monitoring System CONTENT Contents of Manual 1 Meaning of Symbols used in this manual 2 Section 1. GENERAL 3 1.1 Introduction 4 1.2 Composition of unit 8 1.3 Panel Description
M E D I C A L D E V I C E S
 Intuitive Generation M E D I C A L D E V I C E S Follow your intuition... Ease of use allows more time for your patients To meet the demands of a changing clinical environment, Injectomat Agilia has been
Alaris Syringe Module v9
 Cool Gray 7U Text- PMS 294U + QUICK REFERENCE GUIDE Operator Precautions: To ensure proper operation of the Alaris System (formerly known as Medley System ), user must be familiar with related features,
Original Perfusor & Infusomat
 Original Perfusor & Infusomat Your solution for every application System capable, user-friendly, reliable. fm system workstations The entire spectrum of fluid management One system for all requirements
Alaris Syringe Module v9
 Cool Gray 7 U Text - PMS 294U QUICK REFERENCE GUIDE WARNINGS: To ensure proper operation of the Alaris System, you must be familiar with related features, disposables, administration sets, set-up, and
Administration of AMBISOME Using the GemStar Pump
 1 1-800-862-2731 Administration of AMBISOME Using the GemStar Pump Drug Name: Volume and Rate: Schedule: FLUSHING: Dextrose Ambisome Dextrose Heparin KEY POINTS: 1. Always wash your hands with an antibacterial
CONTENTS. III. OPERATING INSTRUCTIONS... pg 7 LOADING DISPOSABLE SET (Figure 4)... pg 9. IV. INDICATORS AND ALARMS... pg 10
... pg 9. IV. INDICATORS AND ALARMS... pg 10") OPERATOR S MANUAL CONTENTS I. INTRODUCTION... pg 2 FRONT HOUSING PARTS LOCATION (Figure 1)... pg 4 REAR HOUSING PARTS LOCATION (Figure 2)... pg 5 II. CONTROL PANEL... pg 6 KEYPAD (Figure 3)... pg 6 III.
OPERATOR S MANUAL CONTENTS I. INTRODUCTION... pg 2 FRONT HOUSING PARTS LOCATION (Figure 1)... pg 4 REAR HOUSING PARTS LOCATION (Figure 2)... pg 5 II. CONTROL PANEL... pg 6 KEYPAD (Figure 3)... pg 6 III.
Operator s Manual DigiPump LP8 Infusion Pump - Digicare Biomedical Technology Inc CONTENTS. A. About this manual...2
 Operator s Manual DigiPump LP8 Infusion Pump - Digicare Biomedical Technology Inc Introduction CONTENTS A. About this manual...2 B. Manufacturer s Responsibility....2 C. Warranty.. 2 D. Unpacking and Accessories.2
Table of Contents. English
 OM-E0799E 000 English Thank you for purchasing VIVA ace Motor Kit. Please read this Operation Manual and the VIVA ace Basic Set Operation Manual carefully before use for operating instructions and care
Enteral Pump Instructions for Use To Assemble When the low
 Enteral Pump Instructions for Use Before initial use on battery power and after extended storage periods, the pump must be plugged into an AC power source for a minimum of 12 hours (pump may be operated
SN-50 Serial Syringe Pump User Manual. Version: 2.6
 SN-50 Serial Syringe Pump User Manual Version: 2.6 1 Sino Medical-Device Technology Co., Ltd. Statement: The information contained in this user manual is based upon the experience and knowledge acquired
Portable Oxygen Monitor OX-07. (Type B) <No Gas alarm type> Operating Manual
 <No Gas alarm type> Operating Manual") PT0E-0922 Portable Oxygen Monitor OX-07 (Type B) Operating Manual Request for the Customers Read and understand this operating manual before using this gas monitor. Use it in accordance
PT0E-0922 Portable Oxygen Monitor OX-07 (Type B) Operating Manual Request for the Customers Read and understand this operating manual before using this gas monitor. Use it in accordance
Description of the CADD-Prizm VIP Pump
 Basic Operations General Description and Basic Operations Section 1 Description of the CADD-Prizm VIP Pump The Deltec CADD-Prizm ambulatory drug delivery pump provides measured drug therapy to patients
User Manual. Non-contact Infrared Thermometer.
 User Manual Non-contact Infrared Thermometer www.paryvara.com info@paryvara.com Introduction Thank you for purchasing this Non-contact Infrared Thermometer. Please read the User Manual carefully to ensure
E1000 Portable gas detector
 E1000 Portable gas detector Operation manual Ver:HWWM161229CG Read this manual carefully before using the device Table of Contents SAFETY INFORMATION... - 1-1. BRIEF INTRODUCTION... - 3-2. MAIN FUNCTION
TPCA TM PATIENT CONTROLLED ANALGESIA SYRINGE PUMP
 TPCA TM PATIENT CONTROLLED ANALGESIA SYRINGE PUMP The TPCA Ambulatory Patient Controlled (PCA) Syringe Pump with Lockbox has a library of protocols offering MediGuard ; a Dose Error Reduction System (DERS)
MODEL OX-07 Type A INSTRUCTION MANUAL FOR RIKEN PORTABLE OXYGEN MONITOR PT0E-0860
 INSTRUCTION MANUAL FOR RIKEN PORTABLE OXYGEN MONITOR MODEL OX-07 Type A Safety Precautions Read and understand the instructions in this manual before operating this detector. Keep manual accessible all
IMR EX610. Portable Gas Detector. Operation Manual
 IMR EX610 Portable Gas Detector Operation Manual IMR Environmental Equipment, Inc. 3634 Central Ave. St. Petersburg, FL 33711 Phone: 727-328-2818 email: info@imrusa.com Read this manual carefully before
LGR Dehumidifier Owner s Manual
 LGR Dehumidifier Owner s Manual 115v Model: DH 075 ORG Please read this owner s manual before operating and keep safe for future reference GENERAL INFORMATION Thank you for choosing our LGR Dehumidifier
HIn3550 Magnetic Field Monitor User's Manual
 HIn3550 Magnetic Field Monitor User's Manual Copyright 1993 by Holaday Industries, Inc. Manual #600053 10/97 $12.50 Revision Record Manual #600053 HIn3550 Magnetic Field Monitor Revision Description Date
DEHUMIDIFIER MODELS: SD-31E / SD-41E / SD-61E / SD-71E INSTRUCTION MANUAL
 DEHUMIDIFIER MODELS: SD-31E / SD-41E / SD-61E / SD-71E INSTRUCTION MANUAL Please read these instructions thoroughly and keep it in a safe place for future reference. CONTENTS SAFETY PRECAUTUIONS... 2 ELECTRICAL
Instruction Manual. Portable Air Conditioner
 Instruction Manual Portable Air Conditioner Model: WA-9010E It is important that you read these instructions before using your portable air conditioner and we strongly recommend that you keep them in a
MODEL: SP12C7. (Portable 4 gas detector) Operating Manual
 Operating Manual") MODEL: SP12C7 (Portable 4 gas detector) Operating Manual Guarantee and Repair Senko Co., Ltd. guarantees the products of SP series for 24 months from the shipping date and repairs or replaces the defected
MODEL: SP12C7 (Portable 4 gas detector) Operating Manual Guarantee and Repair Senko Co., Ltd. guarantees the products of SP series for 24 months from the shipping date and repairs or replaces the defected
USER MANUAL. Safety Precautions. Unit Specifications and Features. Operating Instructions. Installation Instructions.
 Safety Precautions Unit Specifications and Features Operating Instructions Installation Instructions Care and Cleaning Troubleshooting Tips USER MANUAL Dehumidifier TDDP7011ES2 Warning notices: Before
V Series Infusion Pump User Manual. Version 0.2
 V Series Infusion Pump User Manual Version 0.2 Declarations: Sino Medical-Device Technology Co., Ltd The information contained in this manual is based on the experiences and knowledge acquired by Sino
Tempco Part Number PCT30006 Temperature Control Enclosure with Relay Output for Tote Tank Heating Applications
 Instruction Manual Tempco Part Number PCT30006 Temperature Control Enclosure with Relay Output for Tote Tank Heating Applications Manual PCT30006, Revision 9/20/2016 The PCT30006 control enclosure incorporates
Sapphire TM. Bring Home The Future Of Infusion Care. Ambulatory Infusion System. > Intuitive, easy-to-use touch screen design
 Sapphire TM Ambulatory Infusion System Bring Home The Future Of Infusion Care > Intuitive, easy-to-use touch screen design > Rugged, durable construction for home care infusion needs > Engineered to provide
K Specifications. Max. Water Volume
 K 2.75 High Pressure Washer Operator Manual Overview... 2 Precautions... 2-4 Assembly Instructions... 4 Operating Instructions... 5 Using the Accessories... 6 Working with Detergents... 7 Shut Down and
Clinician Information
 Clinician Information CADD-Prizm VIP Ambulatory Infusion Pump Model 6100 and 6101 This booklet provides guidelines for the use, care and maintenance of the CADD-Prizm VIP Ambulatory Infusion Pump. The
INFUSION PUMP J1060MN OPERATOR MANUAL
 INFUSION PUMP J1060MN OPERATOR MANUAL Please read this manual completely prior to using the device! Version: V1.1 Table of contents Chapter 1 Safety Precautions...- 3 - Chapter 2 Introduction...- 5-2.1
Warmette Blanket Cabinet Warmette Dual Cabinet. User Manual
 Warmette Blanket Cabinet Warmette Dual Cabinet User Manual Natus and Warmette are registered trademarks of Natus Medical Incorporated. 2013 Natus Medical Incorporated. All rights reserved. This manual
Anti-Decubitus Air Alternating Pressure Mattress System Operation Manual
 Anti-Decubitus Air Alternating Pressure Mattress System Operation Manual Suzric Enterprise Co., Ltd. www.suzric.com Congratulations and thank you for purchasing this anti-decubitus mattress system. PLEASE
WET & DRY GARAGE VAC 20L CAPACITY WATT 1.5M MOTOR TANK STEEL HOSE KP702 ON BOARD ACCESSORY STORAGE SUCTION STAINLESS
 WET & DRY GARAGE VAC 20L CAPACITY 1.5M SUCTION HOSE STAINLESS STEEL TANK ON BOARD ACCESSORY STORAGE 1250 WATT MOTOR KP702 Table of Contents 20L WET & DRY GARAGE VAC Know Your Product...1 Vacuum Safety
K Specifications. Max. Water Volume
 K 2.35 High Pressure Washer Operator Manual Overview... 2 Precautions... 2-4 Assembly Instructions... 4 Operating Instructions... 5 Using the Accessories... 6 Working with Detergents... 7 Shut Down and
MD-MINI Dry Bath. Instruction Manual
 MD-MINI Dry Bath Instruction Manual Catalog No. MD-MINI www.majorsci.com service@majorsci.com Version 01B Revision on: 2013.07.15 Packing list MD-MINI: 1x MD-MINI Dry Bath 1x MD-MINI Lid 1x Power Cord
Directions for Use. Alaris System. Alaris Products. Supports Guardrails Suite MX (v8) August RATE (ml/h) RATE (ml/h) CHANNEL SELECT PAUSE
 August RATE (ml/h) RATE (ml/h) CHANNEL SELECT PAUSE") SILENCE Directions for Use Alaris System Supports Guardrails Suite MX (v8) August 2005 ALARM MONITOR STANDBY ALARM INFUSE STANDBY ALARM INFUSE STANDBY %SpO 2 RATE (ml/h) RATE (ml/h) PULSE (BPM) OPTIONS
SILENCE Directions for Use Alaris System Supports Guardrails Suite MX (v8) August 2005 ALARM MONITOR STANDBY ALARM INFUSE STANDBY ALARM INFUSE STANDBY %SpO 2 RATE (ml/h) RATE (ml/h) PULSE (BPM) OPTIONS
Perfusor fm. Instructions for Use. Software PFAE
 Perfusor fm Instructions for Use 0123 Software PFAE 1 Patient safety Attention: Consult accompanying documents! Read Instructions for Use prior to Use. Application only under regularly supervision by specially
Interscan Corporation. Instruction Manual Series Compact Portable Analyzer
 Interscan Corporation Instruction Manual 4000 Series Compact Portable Analyzer 1 2 INTERSCAN CORPORATION Simplified 4000 SERIES MANUAL TABLE OF CONTENTS SECTION TITLE PAGE 1.0 Equipment Description 4 2.0
CRISTAL Built-in Dish Sterilizer Instruction Manual
 CRISTAL Built-in Dish Sterilizer Instruction Manual Model No.: D36DSS Version Number: 01 Revision Date: September 2014 Dear user: Thank you for your purchase of CRISTAL built-in dish sterilizer! Please
Instruction Manual. Self-Leveling Rotary Laser Level Model Nos and
 Self-Leveling Rotary Laser Level Model Nos. 40-6515 and 40-6516 Instruction Manual Congratulations on your choice of this Self-Leveling Rotary Laser Level. We suggest you read this instruction manual thoroughly
INSTRUCTION MANUAL FOR RIKEN PORTABLE TOXIC GAS MONITOR
 INSTRUCTION MANUAL FOR RIKEN PORTABLE TOXIC GAS MONITOR Special Cautions Please read this instruction manual before any operation. * This instrument is not designed for the explosion proof. * Avoid hard
Warning: 230V / 1ph / 50Hz V / 3ph / 50Hz. Remarks: Make sure that you have enough power. (See page 15 Cable table)
") 1 2 Warning: - Do not place your hand or any other objects into the air outlet and fan. It could damage the heat pump and cause injuries; - In case of any abnormality with the heat pump, cut off the power
1 2 Warning: - Do not place your hand or any other objects into the air outlet and fan. It could damage the heat pump and cause injuries; - In case of any abnormality with the heat pump, cut off the power
Dehumidifier. Instruction Manual. Model DH-320/A
 Dehumidifier Instruction Manual Model DH-320/A CONTENTS Safety Warnings 2 Operation consideration 5 Construction & controls 6 Function selection 8 Preparation for use 10 Operation 12 Maintenance 14 Continuous
Section. 3: CADD Pump. Updated: June 20, Section Author(s): sstafford & jhval
: sstafford & jhval") Section 3: CADD Pump Updated: June 20, 2012 Section Author(s): sstafford & jhval Section 3: CADD Pump 2 Section 3: CADD Pump Field Guide Section Contents CADD Prizm Diagram... 5 CADD Pump Quick Reference...
Section 3: CADD Pump Updated: June 20, 2012 Section Author(s): sstafford & jhval Section 3: CADD Pump 2 Section 3: CADD Pump Field Guide Section Contents CADD Prizm Diagram... 5 CADD Pump Quick Reference...
Portable Oxygen Monitor OX-07. (Type A) Operating Manual
 Operating Manual") PT0E-0863 Portable Oxygen Monitor OX-07 (Type A) Operating Manual Request for the Customers Read and understand this operating manual before using this gas monitor. Use it in accordance with this operating
PT0E-0863 Portable Oxygen Monitor OX-07 (Type A) Operating Manual Request for the Customers Read and understand this operating manual before using this gas monitor. Use it in accordance with this operating
End-Tidal CO2 User Guide CAPNO3 T NIBP. SpO2. Ver Charmcare Co., Ltd.
 End-Tidal CO2 User Guide CAPNO3 T NIBP EtCO2 ECG SpO2 Ver 2.00 Charmcare Co., Ltd. -1- Table of Contents Indications for use statement 4 Warranty 4 Battery Replacement 4 Contact Us 5 Definition of Terms
IMR IX176 Portable Gas Detector User Manual
 IMR Portable Gas Detector User Manual Read this manual carefully before using this device. (727) 328-2818 / (800) RING-IMR Fax: (727) 328-2826 www.imrusa.com Ver. 1.0A4 CONTENTS SERVICE GUIDELINES... 3
Table of Contents. kangaroo 924. English. General Information... Operating Procedures... Battery... Beginning Administration...
 Table of Contents English SECTION I General Information... SECTION II Operating Procedures... Battery... Beginning Administration... SECTION III Alarms... SECTION IV Cleaning... Important User Information...
REFRACTION TABLE HRT-7000
 1 User Manual REFRACTION TABLE HRT-7000 HUVITZ REFRACTION TABLE HRT-7000 2 Notice This product might cause a malfunction due to the electromagnetic waves of the cell phones, walkie-talkie, and wireless
SX-300 SX-500 SX-700
 OPERATOR'S MANUAL AUTOCLAVE SX-300 SX-500 SX-700 Before starting operation, read this manual thoroughly for a complete understanding of the autoclave and its correct operation. Carefully store this operation
Alaris Syringe module FAQs
 Alaris Syringe module FAQs 1. Is this the first syringe pump from CareFusion? No, Alaris products from CareFusion have a longstanding tradition of building syringe infusion pumps, going back almost 20
Handling or using the product improperly and in disregard of the instructions with this mark might result in serious bodily injury or death.
 Please Read: Safety Precautions DC AC In order to ensure that this product is used safely, be sure that you read and understand the following precautions fully and use the product only as directed. Be
Instruction Manual for FORMALDEHYDE GAS DETECTOR MODEL FP-30/FP-40
 Instruction Manual for FORMALDEHYDE GAS DETECTOR MODEL FP-30/FP-40 This instrument is sold and serviced by RKI Instruments, Union City, CA For questions, parts, or service please contact RKI at (800) 754-5165.
ISHIDA CO., LTD. Do not carry out installation, operation, service or maintenance until thoroughly understanding the contents of this manual.
 Do not carry out installation, operation, service or maintenance until thoroughly understanding the contents of this manual. Keep this manual available at all times for installation, operation, service,
Hand Dryer Installation & User Manual
 Hand Dryer Installation & User Manual Please read instructions in conjunction with the illustrations Please save these instructions. Safety & Guidance notes Important:- Read all these instructions before
Directions for Use Alaris System (with PC Unit, Model 8000)
") ALARM Directions for Use Alaris System (with PC Unit, Model 8000) Supports Guardrails Suite MX with Guardrails Point-Of-Care software and v9 Operating System software. February 2007 ALARM MONITOR STANDBY
ALARM Directions for Use Alaris System (with PC Unit, Model 8000) Supports Guardrails Suite MX with Guardrails Point-Of-Care software and v9 Operating System software. February 2007 ALARM MONITOR STANDBY
CF1400 DO NOT RETURN PRODUCT TO PLACE OF PURCHASE. IF YOU HAVE ANY QUESTIONS, CALL OUR TOLL FREE HOTLINE:
 CF1400 DO NOT RETURN PRODUCT TO PLACE OF PURCHASE. IF YOU HAVE ANY QUESTIONS, CALL OUR TOLL FREE HOTLINE: 1-866-902-9690 8:00 am to 5:00 pm, C.S.T., Monday - Friday www.forcetoolsusa.com TABLE OF CONTENTS
SOME NOTIONS ON HUMIDITY
 SOME NOTIONS ON HUMIDITY Air always contains a certain amount of water in the form of vapour. This determines the level of humidity in an atmosphere. The capacity of the air to hold water vapour increases
DLC Instruction Manual. Light Curing Machine MODEL. Table of Contents
 Light Curing Machine Table of Contents Precautions for Electrical >>>>>>>>>>> 1 Equipment in Use Precautions >>>>>>>>>>>>>>>>>>>> 2 Recommended Procedure when >>>>> 4 Opening Product Packaging Part Names
EVAPORATIVE COOLER W
 EVAPORATIVE COOLER 972-1003-W USER MANUAL INTRODUCTION READ AND SAVE THESE INSTRUTIONS! 1 Thanks for your support and choice of our unique tower fan, in order to help you use the product more conveniently,
INSTALLATION. and INSTRUCTION MANUAL. for QUALITY AIR BREATHING SYSTEMS. Model ABM - 715
 INSTALLATION and INSTRUCTION MANUAL for QUALITY AIR BREATHING SYSTEMS Model ABM - 715 M A R T E C H S E R V I C E S C O M P A N Y P.O. Box 7079 OFFICE: 800-831-1525 Mazeppa, MN 55956 Fax : (507)843-4953
Fingerprint door lock S210. Zhejiang SFG Technology Co., Ltd.
 USER MANUAL Fingerprint door lock S210 Zhejiang SFG Technology Co., Ltd. No. 741 Moganshan Road, Hangzhou, China 310011 Tel: +86 (0)571 88032199 Email: zwlock@zjsfg.com Website: www.zjsfg.com 1 Disclaimer
MODEL 23 AND 23-1 ELECTRONIC PERSONAL DOSIMETER. August 2017
 MODEL 23 AND 23-1 ELECTRONIC PERSONAL DOSIMETER August 2017 MODEL 23 AND 23-1 ELECTRONIC PERSONAL DOSIMETER August 2017 ii STATEMENT OF WARRANTY Ludlum Measurements, Inc. warrants the products covered
Tempco PCT-3000 Series Temperature Control Console with Relay Output for Heating or Cooling Applications
 Instruction Manual Tempco PCT-3000 Series Temperature Control Console with Relay Output for Heating or Cooling Applications Manual PCT-3000 Revision 9/2014 The PCT-3000 series control console incorporates
SpotOn Temperature Monitoring System. SpotOn. Temperature Monitoring System. Model 370 Installation and Service Manual
 3 SpotOn Temperature Monitoring System Model 370 Installation and Service Manual Please forward to the Biomedical Engineering Department 3M SpotOn Temperature Monitoring System Revision History Revision
Tissue-Tek TEC Plus Cryo Console OPERATING MANUAL
 Tissue-Tek TEC Plus Cryo Console OPERATING MANUAL Sakura Finetek Japan Co., Ltd., Tokyo 103-0023, Japan Sakura Finetek U.S.A., Inc., Torrance, CA 90501, USA Sakura Finetek Europe B.V., Zoeterwoude, Netherlands
Read this Safety Guide first.
 LCD Projector User's Manual - Safety Guide Thank you for purchasing this projector. About The Symbols Read this Safety Guide first. Before using, read the user manuals for this projector to ensure correct
IMAGE PRESS & IMAGE PORCELAIN OVEN. 120V, 50/60 Hz Models and 230V, 50/60 Hz Models. Operator s Manual
 IMAGE PRESS & IMAGE PORCELAIN OVEN 120V, 50/60 Hz Models and 230V, 50/60 Hz Models Operator s Manual TABLE OF CONTENTS Congratulations.. 3 Warranty. 3 Safety Notice. 4 Electrical Safety Notes.. 5 Knowledge
WARM LINE. IV Fluid Warmer. Product Code: J1448. JORGENSEN LABORATORIES PHONE FAX
 WARM LINE IV Fluid Warmer Product Code: J1448 JORGENSEN LABORATORIES PHONE 800-525-5614 FAX 970-663-5042 info@jorvet.com Warm Line IV Fluid Warmer Portable and light weight Only warms IV fluids not transfusion
User Instruction Manual
 Read Entire Manual before Operating Device User Instruction Manual PLEASE NOTE: It is important that the user read the entire manual before operating this device. USER ASSISTANCE INFORMATION: If you have
MODEL 7000 SUCTION UNIT
 MODEL 7000 SUCTION UNIT OPERATOR S MANUAL Caution Federal law restricts this device to sale by or on order of a physician, or any other practitioner licensed by the law of the State in which he practices
15,000 BTU Portable Air Conditioner
 Instruction Manual 15,000 BTU Portable Air Conditioner Model: HYAC15 READ AND SAVE THESE INSTRUCTIONS Please read and follow the instructions in this user manual even if you feel you are familiar with
Infrared Moisture Determination Balance FD-610. Operating Manual
 Infrared Moisture Determination Balance FD-610 Operating Manual Infrared Moisture Determination Balance Safety Notes Improper use of the infrared moisture tester in violation of the following safety notes
Koolbreeze. Portable Air-conditioner User s Manual. For Model : CLIMATEASY 14 P14HCP. Downloaded from manuals search engine
 Koolbreeze Portable Air-conditioner User s Manual For Model : CLIMATEASY 14 P14HCP Table of Contents 1. Installation.. 2 2. General Safety Reqirements.. 4 3. Product safety.... 5 4. Safety Awareness....
Model K 520 M Part No
 Model K 520 M Part No. 1.069-680.0 High Pressure Washer Operator Manual Overview... 2 Precautions... 2-4 Assembly Instructions... 4 Operating Instructions... 5 Using the Accessories... 6 Working with Detergents...
DEHUMIDIFIER with BUILT-IN PUMP
 To Buy: Contact Sylvane at 800-934-9194 or visit www.sylvane.com For Product Support: Contact Sunpentown at 1-800-330-0388 DEHUMIDIFIER with BUILT-IN PUMP MODELS: SD-52PE / SD-72PE INSTRUCTION MANUAL Please
NEXXOS INVERTER USER MANUAL
 NEXXOS INVERTER USER MANUAL NIN412C2V32 NIN415C2V32 NIN520C2V32 NIN725C2V32 INVERTER MINI SPLIT SYSTEM WARNING The information contained in the manual is intended for use by a qualified service technician
Bosch Split-Type Ductless Air Conditioner / Heat Pump
 Bosch Split-Type Ductless Air Conditioner / Heat Pump Climate 5000 AA Series User Manual 2 Bosch Split Type Ductless Air Conditioner / Heat Pump User Manual Data subject to change 01.2017 Bosch Thermotechnology
Mark 25 Ultrapure Water Conductivity Analyzer
 Martek Instruments, Inc. Mark 25 Ultrapure Water Conductivity Analyzer Instruction Manual WARRANTY POLICY Unless otherwise stated, MARTEK INSTRUMENTS, INC. warrants this equipment to be free from defects
THROUGH-WALL AIR-TO-AIR HEAT PUMP AND AIR CONDITIONER. Instruction Manual. Model AMB-12H
 THROUGH-WALL AIR-TO-AIR HEAT PUMP AND AIR CONDITIONER Instruction Manual Model AMB-12H PLEASE READ THIS INSTRUCTION MANUAL CAREFULLY BEFORE USING THIS UNIT. Table of Contents 1. SAFETY WARNINGS 2 2. CONSTRUCTION...
User Instruction Manual
 Sapphire Series 1100 and 1100 EC Mattress Replacement System Read Entire Manual before Operating Device OI-S1100600 Uncontrolled Document Rev. 3.0-10/05/2009 ECO092309A User Instruction Manual Sapphire
Macurco Single-Gas XL Series Monitor, CM-1XL Carbon Monoxide (CO), HS-1XL Hydrogen Sulfide (H2S) User Instructions
, HS-1XL Hydrogen Sulfide (H2S) User Instructions") Macurco Single-Gas XL Series Monitor, CM-1XL Carbon Monoxide (CO), HS-1XL Hydrogen Sulfide (H2S) User Instructions Important: Keep these User Instructions for reference 2 TABLE OF CONTENTS GENERAL SAFETY
Macurco Single-Gas XL Series Monitor, CM-1XL Carbon Monoxide (CO), HS-1XL Hydrogen Sulfide (H2S) User Instructions Important: Keep these User Instructions for reference 2 TABLE OF CONTENTS GENERAL SAFETY
HOBOT. HOBOT-168 Glass Cleaning Robot User s Manual
 HOBOT HOBOT-168 Glass Cleaning Robot User s Manual Copyright Copyright 2012 by HOBOT Technology Inc. All rights reserved. No part of this publication may be reproduced, transmitted, transcribed, stored
SAD Light Pad. Product Code: DL Unit Description
 SAD Light Pad Product Code: DL08127 Unit Description 1. Light screen 2. On/off button 3. Stand hole 4. Stand 5. Socket for appliance plug 6. Stand storage cavity Technical specification Dimensions (WHD)
DUCTED AIR CONDITIONER. Owner s Manual. KD Series KD24. Kaden Owner s Manual 1
 DUCTED AIR CONDITIONER Owner s Manual KD Series KD24 Kaden Owner s Manual 1 Table of Contents 1. Safety Precautions 4 2. Indoor Unit Parts and Major Functions 6 3. Care and Maintenance 8 4. Troubleshooting
English 1 AIR ALTERNATING PRESSURE MATTRESS REPLACEMENT SYSTEM
 Congratulations and thank you for purchasing this Carilex anti-decubitus mattress system. PLEASE READ THIS OPERATION MANUAL CAREFULLY BEFORE SETTING UP AND USING THE DEVICE. Pay special attention to the
USER MANUAL. Version: 1.0. ROBE Show Lighting s.r.o. Czech Republic
 USER MANUAL Version: 1.0 ROBE Show Lighting s.r.o. Czech Republic www.robe.cz Table of contents 1.Introduction 4 2.Cautions 4 3. Unpacking & Inspection 5 4. Setup 5 5. Operation 5 5.1.Control Module Operation
Buzzer Unit. TAN-5000 Series. Operating Manual
 PT1E-1040 Buzzer Unit TAN-5000 Series Operating Manual Request for the Customers Read and understand this operating manual before using the buzzer unit. Use the buzzer unit in accordance with the operating
Mobile Air Conditioner Use and Care Manual. Part Number: 048-GM-48265
 Mobile Air Conditioner Use and Care Manual Part Number: 048-GM-48265 Thank you very much for selecting this new model of Portable Air Conditioner, please read this Use and Care Manual carefully before
Owner s Manual CS
 Owner s Manual IMPORTANT NOTE: Read this manual carefully before installing or operating your new air conditioning unit. Make sure to save this manual for future reference. CS78421-548-754 Table of Contents
GT-1D. Residential/Tenant Station OPERATION MANUAL
 GT-1D Residential/Tenant Station SERVICE MANUAL OPERATION MANUAL Table of Contents PRECAUTIONS...2 1 NAMES AND FUNCTIONS...2 2 OPERATION 2-1 Answering a call...3 2-2 Calling from the doorbell button...3
User Instruction Manual
 Read Entire Manual before Operating Device User Instruction Manual PLEASE NOTE: It is important that the user read the entire manual before operating this device. Table of Contents Page Symbol Definitions...
OPERATING INSTRUCTIONS AND MAINTENANCE MANUAL
 OPERATING INSTRUCTIONS AND MAINTENANCE MANUAL S-SCORT II Model 15006 SSCOR, INC. 11064 Randall Street Sun Valley, CA 91352 USA Telephone +1-818-504-4054 800-434-5211 Fax +1-818-504-6032 www.sscor.com Email:
USER S MANUAL. Profile. MOBILE CALL GSM Alarm System
 MOBILE CALL GSM Alarm System USER S MANUAL System disarmed 00/00/00 00:00 ARM STAY CALL 1 2 3 4 5 6 7 8 9 Power Set Signal Alarm SOS ESC 0 ENTER Profile For a better understanding of this product, please
USE & CARE INSTRUCTIONS
 USE & CARE INSTRUCTIONS InvisiClean Aura Air Purifier (Model IC-5018) with Pre-filter, Activated Charcoal, True HEPA, UV-C Light, and Ionizer READ AND SAVE THESE INSTRUCTIONS WARNINGS Failure to comply