Virtu 60 and 80 series. Coffee machine
|
|
|
- Muriel Blankenship
- 6 years ago
- Views:
Transcription
 184 496767 www.dejongduke.nl Fax: +31 (0) 184 416059 support@dejongduke.")
1 Virtu 60 and 80 series Coffee machine Users manual Model: Virtu 60 and 80 Machine type: 9CND Revision B, English Reference: 5DUCNK20 Your supplier is: The manufacturer of the machine is: De Jong Duke Postbus AD SLIEDRECHT The Netherlands Telephone +31 (0) Fax: +31 (0)
2 Copyright 2010, J.M. de Jong Duke automatenfabriek b.v. All rights reserved. Although this user manual has been put together with the utmost care, J.M. de Jong Duke automatenfabriek b.v. accepts no liability for inaccuracies or omissions. No liability is accepted for the consequences arising from operation of the equipment in accordance with the information contained in these instructions. J.M. de Jong Duke automatenfabriek b.v. reserves the right to alter specifications at any time and without prior notification to the purchaser. Preface This user s manual is valid for the machine supplied by the manufacturer, including the options installed by the manufacturer. The manufacturer accepts no liability for any damage resulting from incorrect or improper use of the machine, or resulting from modifications that have not been authorised by the manufacturer. This manual gives instructions on the operation and maintenance of the machine. Moreover, it gives solutions to simple malfunctions that may occur. The instructions in some paragraphs are meant only for persons who are trained in the operation and maintenance of the machine. Besides this manual, a technical manual is also available. This technical manual gives directions for solving machine malfunctions and repairing the machine. For instructions on the installation of the machine, a separate installation manual is available. Always use original parts from the manufacturer when the machine needs to be repaired. Carefully read this instruction manual before you operate the machine. Keep this manual in a safe place for possible later reference. Only properly trained personnel may carry out repairs, install the machines or transport the machines. The manual cannot be regarded as a replacement for training and instruction, but must be seen as an addition to the training, and as a reference work. 2
3 CONTENTS 1 SAFETY SAFETY AND WARNINGS STANDARDS AND NORMS SAFETY RISKS DESCRIPTION OF THE MACHINE GENERAL THE FRONT OF THE MACHINE OVERVIEW OF THE MACHINE INTERIOR TYPE PLATE TECHNICAL SPECIFICATIONS BEFORE USAGE INSTALLATION OPERATION SITE PUTTING THE MACHINE OUT OF ORDER OPERATION OPERATIING THE MACHINE IN FREE VEND MODE OPERATING THE MACHINE IN PAY MODE JUG DISPENSING MAINTENANCE AND FILLING DAILY MAINTENANCE WEEKLY MAINTENANCE MONTHLY MAINTENANCE PLACE SAFETY KEY CLEANING CYCLE FOR COEX BREWER FILL UP CANISTERS REMOVAL OF THE BREWER INSTALL THE BREWER ASSEMBLING AND DISASSEMBLING THE MIXER FAILURE AND ERROR MESSAGES
4 1 Safety 1.1 Safety and warnings Keep this manual near the machine so the manual is immediately available. Do not use aggressive cleaning products or abrasives to clean (parts of) the machine. The water connection must conform to local regulations. Clean the machine with fresh hygienic water. The water system (boiler, pipes, etc.) may contain hot water, be careful! Do not shake the machine while in use. Do not use water in or near the machine unless the instructions contain explicit directions to the contrary. Do not use a damaged machine. If in doubt, contact your supplier first. Damaged water connection tubes may only be repaired by trained personnel. If a fault occurs, disconnect the machine from the electrical and water supplies. Do not lean on the door when open. Do not use an extension cord. Use the machine only in areas where trained personnel can monitor the operation. 1.2 Standards and norms The machine is build according to CE norms The machine complies with the following standards: Machine standard: 89/392/EEG EMC standard: 89/336/EEG, The machine complies with the following norms: EN 292: safety of machines. UL and cul 751: norm vending machines (only if sign is on type plate) 1.3 Safety risks The important safety risks by using this machine: - Hot drinks are dispensed from the machine; take care to avoid scalding yourself. - If cups or jugs are not correctly placed, the machine will spill liquid down the front. - The outlet of the machine may occasionally drip hot liquid even when the machine is not in use. 4


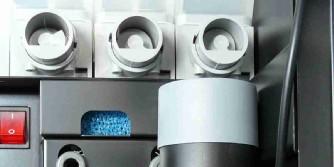
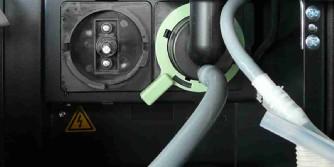
5 2 Description of the machine 2.1 General The Machine is a compact semi-automatic machine for the preparation and vending of hot drinks. Your supplier can adjust the taste and sizes of the drinks. 2.2 The front of the machine The machine can be operated using the operating panel on the door. By pushing one of the selection buttons on the screen, a product choice can be made. Before you make a choice, a cup must first be placed under the tap. 2.3 Overview of the machine interior 1. Lid 2. Instant canisters 3. Coffee bean canister 4. Door lock 5. Waste bucket 6. External drip tray 7. Drip tray under brewer 8. Dispensing nozzles 9. CoEx brewer system 10. Mixing bowl 11. Fresh brew coffee canister 12. Base cabinet

6 2.4 Type plate The type plate is mounted on the inside of the machine, at the top left. The following data are on the type plate: Name of manufacturer Serial number Type/model specification Date of construction Water connection 1.1 Technical specifications Dimensions: height width depth 795 mm 370 mm 530 mm Weight (empty): +/- 55 kg Electricity: Mains supply: 230 Volt AC +/- 10% Frequency: 50 Hz +/- 2% Max. capacity: 2,9 kw Water pressure: Minimum: Maximum: Water connection: Sound pressure: Ambient temperature in use: Ambient temperature in storage: 90 kpa (0,9 bar) 600 kpa (6,0 bar) ¾ BSP connection < 70 db(a) +5 C to +40 C +10 C to +50 C 6
7 3 Before usage 1.1. Installation Installation, transportation and adjustment of the machine is specialized work. Only properly trained service personnel should carry this out. For instructions about transportation, unpacking and installation of the machine, see the technical manual Operation site These machines may only be used indoors, in a hygienic dry room, with a temperature between 5 and 40 degrees Celsius. Place the machine on a flat, stable surface Putting the machine out of order If the machine will not be used for a long period of time (for example during the weekend,) it is recommended to turn off the water supply and the electricity (pulling the plug from the socket is sufficient). This will prevent unnecessary use of energy. 7


8 4 Operation 4.1 Operatiing the machine in free vend mode 1. Place a cup under the outlet on the cup stand. All consumptions are dosed in the center of the cup stand except the hot chilled water. 2. Select your desired drink. 3. Follow the instructions on the screen. 4. After pressing the start button, the machine prepares your drink and dispenses it into the cup. 5. Your drink is ready after the beep and the message ready is on the screen. 4.2 Operating the machine in pay mode In pay mode, first insert the required money and continue with step 1 of the free vend operation. 4.3 Jug dispensing 1. Remove the cup stand and place a jug under the outlet. 2. Press the jug button. 3. Select the drink and jug size. 4. Press the start button. 5. The machine dispenses the selected drink into the jug. 6. Your drink is ready after the beep and the message ready is on the screen. 8


9 5 Maintenance and filling 5.1 Daily maintenance Failing to perform the daily maintenance negatively affects the quality of the products and can lead to malfunctioning of the machine. 1. Open the door of the machine. 2. Install the safety key (see paragraph: install safety key) Flush mixers and brewer 3. Place a jug underneath the nozzle to collect the hot water. 4. Press the rinse daily button on the screen. Hot water from the boiler flows through the CoEx-brewer and mixers. 5. Repeat step 4 until clean water comes out of the machine. Empty waste bucket and drip tray 6. Remove the drip tray, the cup stand, and the grid. 7. Remove the drip tray under the brewer. 8. Rinse the drip trays, cup stand, and grid in warm water. 9. Remove the wastebucket. 10. Empty the bucket and rinse it in warm water. Check if there are still enough ingredients in the canisters. If necessary fill up the canisters, following instructions in paragraph Fill up canisters. Clean the outside of the machine 11. Clean the outside of the machine with a soft damp cloth. 12. Install the drip trays, grid and cup stand. 13. Close the door of the machine, and leave the service mode. Empty waste bucket and drip trays: 9
10 5.2 Weekly maintenance Failing to perform the weekly maintenance negatively affects the quality of the products and can lead to malfunctioning of the machine. 1. Open the door of the machine. Clean the mixing system 2. Remove the mixing system according to paragraph Disassembling the mixing bowl. 3. Rinse out all loose parts of the mixing system in warm water. 4. Clean the parts of the mixing system that remain in the machine with a wet brush. 5. Mount the mixing system according to paragraph Assembling the mixing bowl. Make sure that the parts are dry before you mount them. Check if there are still enough ingredients in the canisters. If necessary fill up the canisters, following instructions in paragraph Fill up canisters. Clean brewer 6. Place a jug underneath the nozzle to collect the hot water. 7. Install the safety key. 8. Press the Weekly cleaning cycle brewer button on the screen. 9. Follow the instructions in the screen: a. Place tablet in brewer b. Close door or place service key c. Place 1 liter jug under outlet d. Be careful: hot water flows out e. Press button to run cleaning cycle 10. Hot water from the boiler is flowing through the CoEx-brewer. See paragraph cleaning cycle for CoEx brewer for detailed information. Empty waste bucket and drip tray 14. Remove the drip tray, the cup stand and the grid. 15. Remove the drip tray under the brewer. 16. Rinse the drip trays, cup stand and grid in warm water. 17. Remove the wastebucket 18. Empty the bucket and rinse it in warm water. Clean the outside of the machine 19. Clean the outside of the machine with a soft damp cloth. 20. Install the drip trays, grid and cup stand. 21. Close the door of the machine, and leave the service mode. 10
11 5.3 Monthly maintenance Failing to perform the monthly maintenance work negatively affects the quality of the products and can lead to malfunctioning of the machine. Apart from the weekly maintenance, the following tasks have to be performed monthly to ensure the machine operates correctly and optimal quality of the beverages. Cleaning the canister with water 1. Remove the canister from the machine. 2. Remove the lid from the canister. 3. Empty the canister. 4. Rinse out the canister with warm water until all product residues are removed. 5. Dry the canister very thoroughly on the inside and outside. If you fill the canister while it is not completely dry, the product may form lumps, which makes the system not usable anymore. 6. Fill the canister and place it back in the machine according to the procedure in paragraph Fill up canisters. Cleaning the CoEx brewer with water 1. Remove the CoEx Brewer from the machine according to the procedure in paragraph Remove the brewer. 2. Rinse the brewer with warm water. 3. Place the CoEx back according to the procedure in paragraph Install the brewer. 11


12 5.4 Place safety key Insert the safety key and turn a quarter turn clockwise: The machine is now powered up. Parts in the machine can move automatically and hot water can flow out. Be careful! 12

13 5.5 Cleaning cycle for CoEx brewer Run the cleaning cycle for the CoEx brewer weekly using the CoEx cleaning tablet. 1. Open the door of the machine. 2. Press the weekly cleaning cycle button and follow the instructions on the screen: a. Place cleaning tablet in brewer. b. Place service key. c. Place a jug under the brewer outlet. d. Press button to start. 3. The cleaning cycle is started and takes ± 5 minutes. Wait till the cycle is finished. 4. Close the door and run a test consumption to test the machine. Not cleaning the brewer can cause the machine to malfunction! Note: Failure to clean the brewer weekly with the cleaning tablet delivered by the manufacturer will void the warranty on related parts. 13
14 5.6 Fill up canisters Do not fill up the canisters further than necessary for one or two days. This will keep the products fresh. Make sure that the canisters remain filled with a layer of at least 4- cm of product. Only use products that are recommended by the supplier of the machine. Filling the canisters must be done outside the machine. To facilitate taking out the canisters, the topside of the machine can be flipped up (after opening the door). Perform the following procedure to fill a canister: 1. Turn the nozzle of the canisters upwards. 2. Slightly lift up the canister at the front, until the positioning ridge comes out of the hole. 3. Pull the canister towards the front and take it out of the machine. 4. Fill the canister with the product indicated on the canister. Place the lid back on the canister. 14
15 5. Place the canister back in the machine. Make sure the drive at the back of the canister fits well on the motor drive. 6. Push the canister at the front over the positioning ridge. 7. Turn the nozzle of the canister downwards. Check the position of the nozzle of the canister. It must be positioned correctly above the brewer or mixing bowl. 15
16 Fill up bean canister (if applicable) 1. Press green locking knob to unlock the canister door. 2. Pull the green locking handle towards you to unlock the canister. 3. Pull the canister upwards. 4. Fill the canister with fresh coffee beans. 16


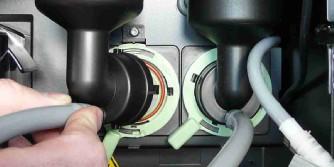
17 5.7 Removal of the brewer Removal of the brewer is necessary for performing maintenance. Only properly trained personnel may work on the brewer itself. Instructions for performing work on the brewer are described in the technical manual. Carry out the following procedure for removal of the brewer: 1. Open the door of the machine. 2. Remove the outlet pipe from the brewer. 3. Push the green handle upwards and pull the brewer out off the machine at the same time. A B C 4. Ready. 17


18 5.8 Install the brewer Carry out the following procedure to replace the brewer: 1. Place the brewer in the bracket. 2. Push the brewer firmly in the machine till you hear click and the green handle is turned downwards in its home position. Make sure that the green handle is in the down position. When the brewer isn t installed correctly, the brewer can jump out of the fitting during a cycle. 3. Place the tubes. 4. Check the function of the brewer by making a test drink. Place a cup under the outlet. 18


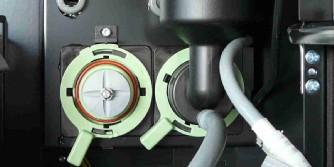
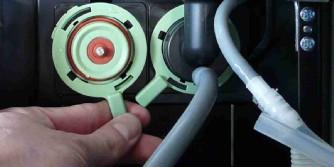
19 5.9 Assembling and disassembling the mixer Disassembling the mixing system: 1. Remove outlet pipes from the mixers. 2. Turn the bayonet catch counterclockwise (approx. 10º). 3. Remove the mixer house. 4. Pull the mixer parts towards you. 19


20 5. Pull the whipper blade towards you. 6. Turn the base plate counterclockwise and pull it towards you. 7. Ready 20


21 Assembling the mixing system: 1. Install the base plate. 2. Install the whipper blade. Be sure that the arrow is at the flat side of the ax. 3. Install the mixer house. 4. Turn the bayonet catch clockwise. 21
22 5. Install the outlet pipes on the mixers. 6. Ready. 22
23 6 Failure and error messages Always check whether an error message is shown on the display. If no error message is shown and the machine does not work correctly, you may find the possible cause and solution in the following table. For failures not mentioned in this manual, contact the service engineer. Rinse brewer with tablet The weekly cleaning cycle is required. Run the cleaning cycle and the message will disappear. Brewer not in home position The brewer is not installed correctly. Remove and replace the brewer following the procedure. Communication error Consult the service engineer. Cleaning Error Cleaning cycle did not finish. Run the cleaning cycle again and finish it correctly. Door open Close door or install service key to run the machine. Drip tray full Empty the drip tray in front of machine and under the brewer make sure the probes are dry. Enough water? The brewer screens are dirty. Run the weekly cleaning cycle with a cleaning tablet. Empty waste bucket Empty the waste bucket. Filling boiler Wait until boiler is filled. If message is still shown after 10 minutes, consult the service engineer. Grinder blocked Grinder is blocked and needs to be cleaned out. Heating boiler 1 or WAIT, Heating boiler 2 Wait until boiler is heated. If message is still shown after 10 minutes, consult the service engineer. Install waste bucket Install the waste bucket in the machine. Mixer blocked Clean the mixing bowl. No water connected No water detected for more then 30 seconds. Open and close the machine door for restart. 23
24 Place cup in center or Place cup right Cup needs to be installed on the grid before the start button is available. Water filter installed? Consult the service engineer. Replace water filter Consult the service engineer. Shortcut temp.sensor Consult the service engineer. Startup problem Open and close the machine door for restart. If message shows again, consult the service engineer. Temp. sensor disconnected Consult the service engineer. Temp. boiler to high Consult the service engineer Water level to low Consult the service engineer 24
25 Notes: 25
Virtu 40 series. Coffee machine
 Virtu 40 series Coffee machine Users manual Model: Virtu 40 Machine type: 9FEC Revision B, English Reference: 5DUFEK20 Your supplier is: The manufacturer of the machine is: De Jong Duke Postbus 190 3360
Coffee Machine Zia series
 Coffee Machine CoEx Brewer - Freshbrew EN Picture: Filename: Zia-6000_9CND_UserManual_5DUCNP20a_EN_v01-02.docx Disclaimer Manufacturer: Although this user manual has been put together with the utmost care,
Coffee Machine Zia series
 Coffee Machine CoEx Brewer - Bean to Cup User Manual User Manual EN Picture: Zia 8.000 Serie Filename: Zia-8000_9CND_UserManual_5DUCNP20b_EN_v01-01.docx Disclaimer Manufacturer: Although this user manual
Coffee Machine Siro Touch 600 series
 Coffee Machine Siro Touch 600 series CoEx brewer - Freshbrew Picture: Filename: SiroTouch-600_9CND_UserManual_5DUCNH20b_EN_v01-01.docx Disclaimer Manufacturer: Although this user manual has been put together
Coffee Machine Zia series
 Coffee Machine Uni brewer - Filterfresh User Manual User Manual EN Picture: Filename: Zia-2000_9FND_UserManual_5DUFNP20a_EN_v01-01.docx Disclaimer Manufacturer: Although this user manual has been put together
Coffee Machine Siro Touch 1400 series
 Coffee Machine Siro Touch 1400 series Uni brewer Bean to Filter Picture: Filename: SiroTouch-1400_9FEC_UserManual_5DUFEH20b_EN_v01-01.docx Disclaimer Manufacturer: Although this user manual has been put
Coffee Machine Siro Touch 1200 series
 Coffee Machine Siro Touch 1200 series Uni brewer - Bean to Filter Picture: Filename: SiroTouch-1200_9FND_UserManual_5DUFNH20b_EN_v01-02.docx Disclaimer Manufacturer: Although this user manual has been
Coffee Machine Siro Touch 800 series
 Coffee Machine Siro Touch 800 series CoEx Brewer - Bean to Cup User Manual Picture: Filename: SiroTouch-800_9CND_UserManual_5DUCNH20_EN_v01-20.docx Disclaimer Manufacturer: Although this user manual has
CQUBE EVO OPERATION MANUAL EVO_OM_VKI_EN. Part No.: _06
 EVO_OM_VKI_EN Part No.: 1764212_06 CQUBE EVO OPERATION MANUAL CONTENTS GENERAL INFORMATION...3 Introduction... 3 Warnings... 3 Precautions... 4 Intended use... 4 Hazard intensity levels... 4 Facts & weight...
OPERATING INSTRUCTIONS. Cafitesse
 OPERATING INSTRUCTIONS Cafitesse 2000 75508300 02.2004 Contents CONTENTS Introduction... 4 Safety Instructions... 5 Technical Data... 6 Vending Machine Components... 8 Machine front... 8 Operating panel...
Cafitesse Excellence Compact
 Cafitesse Excellence Compact USER MANUAL ENGLISH (US) Cafitesse Excellence Compact Operator Manual Safety 2 Part overview description 4 Technical data 6 Machine start up & storage 7 Hygiene and pack handling
Hot Chocolate Dispenser
 Hot Chocolate Dispenser Instruction manual Model: CN219-A AU Telephone Helpline: 1300225960 Safety Tips Position on a flat, stable surface. A service agent/qualified technician should carry out installation
One-Touch Dispense. Multi-temp selections. 208 F For tea, coffee, instant noodle. 194 F Keep warm around 194 F. 176 F Keep warm around 176 F.
 Instruction Manual Automatic Dispensing Hot Water Pot with Multi-temperature Function Automatic Dispensing One-Touch Dispense FEATURES Reboil Function 5 Temperature Settings Image Of SP-5016 208 F For
MOD. 605 E. Made in Italy INSTRUCTION MANUAL
 MOD. 605 E Made in Italy INSTRUCTION MANUAL General information Caution. The manufacturer accepts no liability for damage caused by: Use which is improper or which does not conform to that which is intended;
This manual was originally written in English. All other languages in this document are a translation of the English source text.
 gebruiksaanwijzing user manual betriebsanleitung mode d emploi Copyright 2012 nimo No part of this document may be reproduced and/or made public in print, microfilm, electronic media or any other form
Cafitesse Compact Excellence USER MANUAL ENGLISH HENRI
 Cafitesse Compact Excellence USER MANUAL ENGLISH HENRI Cafitesse Excellence Compact Operator Manual Safety 2 Part overview description 4 Technical data 6 Machine start up & storage 7 Hygiene and pack handling
AICOK. Single Cup Coffee Maker CM-801. User Manual - HOUSEHOLD USE ONLY -
 AICOK Single Cup Coffee Maker CM-801 User Manual - HOUSEHOLD USE ONLY - Aicok Coffee Maker User Manual Thank you for purchasing the Aicok Coffee Maker Product that is designed to provide consistent brewing
gebruiksaanwijzing brugsanvisning user manual brukerhåndbok betriebsanleitung användarhandböck mode d emploi käyttöohjekirja
 2.0 gebruiksaanwijzing user manual betriebsanleitung mode d emploi brugsanvisning brukerhåndbok användarhandböck käyttöohjekirja English Copyright 2015 nimo No part of this document may be reproduced and/or
B 353 COFFEE BREWING MACHINES MACHINES A CAFE KAFFEEBRUEHMASCHINEN KOFFIEZETAPPARATEN
 Chiller A B C1 C2 C3 C4 C D E L H G F J M I K N Fig. 1 Principal components and Control organs E=154 W=78 115 572 755 200 35 482 415 245 E/W = 61 Fig. 2 Dimensions Bravilor Bonamat GB Operating instructions
Installation and Setup
 NFORMATION NO: 007 Self Fill Lavazza Colibri with changegiver Congratulations on choosing to drink great coffee using the unique Lavazza pod vending system. The machine is easy to use. Follow the simple
SHB 4450WH. EN Hand Blender. Copyright 2017, Fast ČR, a.s.
 SHB 4450WH EN Hand Blender - 1 - EN Hand Blender Important safety instructions READ CAREFULLY AND STORE FOR FUTURE USE. This appliance may be used by persons with physical or mental impairments or by inexperienced
Instruction Manual Machine P/N: # & #
 Instruction Manual Machine P/N: 1000830# & 1000831# 1 CONTENTS 1. INFORMATION...3 1. Introduction...3 2. Safety...3 3. Warning Notes...3 4. Contact...4 5. Electrical Installation Procedure...4 6. Plumbing
MIX Boiler & Font Range Service Manual
 MIX Boiler & Font Range Service Manual 1000870# 1000871# 1000875# 1000880# 1000887# 1000878 1000879 2300268 www.marcobeveragesystems.com Ireland Tel: +353 (1) 295 2674 UK Tel: +44 (0207) 2744577 Service
FILLING & CLEANING GUIDE
 FILLING & CLEANING GUIDE 2017 VENDORS EXCHANGE INTERNATIONAL, INC. Dear Valued Customer, Thank you for purchasing the Wittenborg 9100. This manual outlines filling and cleaning steps to keep your machine
CL & PSL50 SERIES ES12B, ES13, FTB14 OPERATION MANUAL. Spengler_Global_TT_OM_EN. Part No.: _04
 CL & PSL50 SERIES OPERATION MANUAL CL22 ES12B, ES13, FTB14 Spengler_Global_TT_OM_EN Part No.: 10036654_04 CONTENTS CONTENTS...2 INTRODUCTION...4 BEFORE INITIAL START-UP...5 Introduction...5 Precautions...5
OC Series - Automatic coffee machines. OLC1 Lucia High performance liquid coffee dispenser. Users Handbook - 1 -
 OLC1 Lucia High performance liquid coffee dispenser Users Handbook - 1 - Every effort has been made to ensure that the information contained in this manual is up to date and correct. However, the author,
MILK FROTHER INSTRUCTIONS FOR USE
 MILK FROTHER MODEL: HM250A INSTRUCTIONS FOR USE SAFETY WARNINGS - After removing the packaging, check that the appliance is intact. If in doubt do not use the appliance and contact your sales agent. -
COVER MODEL# GDK240 DIGITAL KETTLE. PHOTO OF PRODUCT
 COVER DIGITAL KETTLE MODEL# GDK240 www.gourmia.com PHOTO OF PRODUCT 2016 Gourmia www.gourmia.com The Steelstone Group Brooklyn, NY Welcome to the Convenience of Electric Kettles from Gourmia! All rights
WC600 Integrated Dishwasher Installation, Use and Maintenance
 WC600 Integrated Dishwasher Installation, Use and Maintenance Customer Care Department The Group Ltd. Harby Road Langar Nottinghamshire NG13 9HY T : 01949 862 012 F : 01949 862 003 E : customer.care@cda.eu
USER INSTRUCTION MANUAL. Autofill Water Boiler
 USER INSTRUCTION MANUAL Autofill Water Boiler GH187 GC719 (FILTERED PRODUCT) Buffalo Warranty 1 Year Parts 1 Year Labour 083347300-03/06/14 Introduction Thank you for purchasing this Buffalo appliance.
Juicer User's manual
 Juicer User's manual EN SJE 1055SS SJE 1056RD SJE 1057BK Prior to using this appliance, please read the user's manual thoroughly, even in cases where you have previously familiarised yourself with the
USER MANUAL HD SERIES. WARNING Read the instructions before using the machine. EN (Original Instruction) / 1704 HD5.
 / 1704 HD5.") USER MANUAL SERIES 5 5 Square Read the instructions before using the machine. EN (Original Instruction) 9123930 / 1704 KEEP THIS USER MANUAL FOR FUTURE USE 2017 Fri-Jado BV, Etten-Leur, The Netherlands.
USER MANUAL SERIES 5 5 Square Read the instructions before using the machine. EN (Original Instruction) 9123930 / 1704 KEEP THIS USER MANUAL FOR FUTURE USE 2017 Fri-Jado BV, Etten-Leur, The Netherlands.
SJE 5050SS. EN Juicer. Copyright 2017, Fast ČR, a.s.
 SJE 5050SS EN Juicer - 1 - EN Juicer Important Safety Instructions READ CAREFULLY AND STORE FOR FUTURE USE. This appliance may be used by persons with physical or mental impairments or by inexperienced
3. To protect against electric shock, do not immerse cord, plugs, or machine in water or other liquid.
 1 IMPORTANT SAFEGUARDS When using electrical appliances, basic safety precautions should always be followed to reduce the risk of fire, electric shock, and/or injury to persons, including the following:
SERVICE MANUAL. Ecoboiler Model range: T20 ( ) T30 ( )
 T30 ( )") SERVICE MANUAL Ecoboiler Model range: T20 (1000662) T30 (1000663) Marco Beverage Systems Ltd. 63d Heather Road, Sandyford Industrial Estate, Dublin 18, Republic of Ireland Ireland Tel: (01) 295 2674 Ireland
SERVICE MANUAL Ecoboiler Model range: T20 (1000662) T30 (1000663) Marco Beverage Systems Ltd. 63d Heather Road, Sandyford Industrial Estate, Dublin 18, Republic of Ireland Ireland Tel: (01) 295 2674 Ireland
CONTENT PAGE INFORMATION INSTALLATION BREWER SETUP BREWING CLEANING KEY BREWER GRINDER MANUAL MODE DILUTION GRINDER MODE PACKS MODE
 1900097 1JET6 TWIN CONTENT PAGE INFORMATION 3 INSTALLATION 6 BREWER GRINDER 6 7 BREWER SETUP 11 BREWING 12 MANUAL MODE DILUTION GRINDER MODE PACKS MODE 12 14 15 17 CLEANING 19 KEY READ OPERATORS MANUAL
MODEL NO RUSSELL HOBBS APOLLO 1.8L DIGITAL FILTER COFFEE MAKER
 INSTRUCTIONS AND WARRANTY MODEL NO. 18593 RUSSELL HOBBS APOLLO 1.8L DIGITAL FILTER COFFEE MAKER Congratulations on purchasing our Russell Hobbs Apollo 1.8L Digital Filter Coffee Maker. Each unit is manufactured
AQUARIUS 45 MARINE SERVICE MANUAL
 AQUARIUS 45 MARINE SERVICE MANUAL CONTENTS: PAGE 1. INTRODUCTION 3 2. SAFETY INSTRUCTIONS 4 3. BASIC INSTRUCTIONS 5 3.1. Installation Details 5 3.2. Operating the Boiler for the First Time 6 3.3. Troubleshooting
RC411 Operator Manual
 RC411 Operator Manual Page 1 of 14 FOREWORD 1. Read the instructions contained in the enclosed booklet carefully, because it contains important information on installation, operation and maintenance safety.
Instructions for set-up, use and cleaning
 Nice job reading the instruction manual cover-to-cover! Here are a few extra tips to keep you & your Formula Pro Advanced happy. Push the drip tray firmly against the base to make sure it fits securely.
Contents Safety instructions...3
 Contents Safety instructions...3 Machines Overview...7 Start-up...8 Preparing beverages...9 Programming cup capacity...10 Cleaning the machine every day (after the last time you use it)...11 Optional:
MANUAL FOR USE AND MAINTENANCE LSC Rev Ed. 11/2011
 ANTI STILI...UNA PASSIONE espresso coffee machines MANUAL FOR USE AND MAINTENANCE LSC 022 - Rev. 00 - Ed. 11/2011 WEEE espresso coffee machines Disposal of the equipment by the users within the European
Ecoboiler T20 & T30 SERVICE MANUAL. Marco Beverage Systems Ltd. 63d Heather Road, Sandyford Industrial Estate, Dublin 18, Republic of Ireland
 Ecoboiler T20 & T30 SERVICE MANUAL Marco Beverage Systems Ltd. 63d Heather Road, Sandyford Industrial Estate, Dublin 18, Republic of Ireland Ireland Tel: (01) 295 2674 Ireland Fax: (01) 295 3715 UK Tel:
FLAVIA CREATION C500 User Guide
 FLAVIA CREATION C500 User Guide www.marsdrinks.com CONTENTS Page Safety & Installation Guidelines... 1-2 Brewer Layout... 3 Setting up your Brewer... 4-5 Selecting Cups to Use... 6 The FLAVIA CREATION
INSTRUCTION MANUAL MIXER GRINDER
 INSTRUCTION MANUAL MIXER GRINDER Model: SB-138 Read this booklet thoroughly before using and save it for future reference IMPORTANT SAFEGUARDS Before using the SBOSE electrical appliance, the following
User Manual. Dishwasher ZDM17301SA ZDM17301WA
 EN User Manual Dishwasher ZDM17301SA ZDM17301WA Contents Safety information 2 Safety instructions 3 Product description 4 Control panel 5 Programmes 6 Daily Use 7 Hints and tips 10 Care and cleaning 11
Water Boiler. Instruction manual. Model: GL346-A/GL347-A/GL348-A/GL349-A
 Water Boiler Instruction manual Model: GL346-A/GL347-A/GL348-A/GL349-A AU Telephone Helpline: 1300225960 Safety Tips Position on a flat, stable surface. A service agent/qualified technician should carry
4 liter Solo and 8 liter Combi
 4 liter Solo and 8 liter Combi User and installation guide for the water heater 2 ENGLISH The HotSpot boiling water tap With the purchase of the HotSpot boiling water tap you can be sure that you have
Electric steam steriliser
 Table of Contents Introduction... 2 Safety instructions and important notes.... 3 Description.... 6 Preparing for sterilisation.... 7 Operation.... 7 Cleaning the appliance and removal of limescale deposits...
AUTOMATIC ICE-CUBE MAKER
 AUTOMATIC ICE-CUBE MAKER INSTRUCTIONS AND WARNINGS 24478 ed. 11-2007 It is strictly forbidden to reproduce this instruction manual or any part thereof. Dear Customer, Congratulations on having chosen
Marco Beverage Systems Ltd. INSTRUCTIONS FOR MODEL Revision 9 th Mar Uber Boiler
 Marco Beverage Systems Ltd. INSTRUCTIONS FOR MODEL Revision 9 th Mar 2010 Uber Boiler P/N: 1000680 Uber Boiler 6L 2.8kW P/N: 1000681 Uber Boiler 2L 2.8kW MARCO is an ISO9001:2000 Registered Company. Water
FOOD PROCESSOR USER MANUAL EIQFPPREM. Thank you for choosing electriq. Please read this user manual before using this Food Processor and keep
 FOOD PROCESSOR USER MANUAL EIQFPPREM Thank you for choosing electriq. Please read this user manual before using this Food Processor and keep it safe for future reference. Visit our page www.electriq.co.uk
2 in 1 steam and blend
 2 in 1 and blend IMPORTANT CARE & USE INFORMATION. READ THIS INFORMATION BEFORE USE SAFETY PRECAUTIONS WARNING! This appliance is designed for domestic use only, and must be used in accordance to these
EN Glass Jug Blender
 SBL 4870WH EN Glass Jug Blender - 1 - EN Glass Jug Blender Important safety instructions READ CAREFULLY AND STORE FOR FUTURE USE. This appliance may be used by persons with physical or mental impairments
INSTRUCTIONS AND WARRANTY
 INSTRUCTIONS AND WARRANTY MODEL: SB400E SALTON 450W STAINLESS STEEL GLASS JUG BLENDER Congratulations on purchasing our Salton 450W Stainless Steel Glass Jug Blender. Each unit is manufactured to ensure
Glass and Dishwashers 402/452/502. (original instructions) (incl. Australian /502) Starting from Serial No.:
 (incl. Australian /502) Starting from Serial No.:") Glass and Dishwashers ECOMAX 402/452/502 (incl. Australian 452-90/502) INSTALLATION AND OPERATION INSTRUCTIONS (original instructions) Starting from Serial No.: 8663 4000 REV. 05.10.2015 EN IMPORTANT NOTES
Glass and Dishwashers ECOMAX 402/452/502 (incl. Australian 452-90/502) INSTALLATION AND OPERATION INSTRUCTIONS (original instructions) Starting from Serial No.: 8663 4000 REV. 05.10.2015 EN IMPORTANT NOTES
Operating Instructions. Melitta Cafina XT6. Melitta Professional Coffee Solutions
 Operating Instructions Melitta Cafina XT6 Melitta Professional Coffee Solutions Table of contents General... 4. Manufacturer information... 4.2 About these instructions... 4.3 Description... 4 2 Safety...
AUTOMATIC MODULAR ICE-CUBE MAKER WITH VERTICAL EVAPORATOR SYSTEM
 AUTOMATIC MODULAR ICE-CUBE MAKER WITH VERTICAL EVAPORATOR SYSTEM INSTRUCTIONS AND WARNINGS 24481 ed. 11-2007 It is strictly forbidden to reproduce this instruction manual or any part thereof. Dear
Water Distillation System Instruction Manual Nutriteam TC-501
 Water Distillation System Instruction Manual Nutriteam TC-501 Thank you for purchasing the Nutriteam TC-501 Water Distillation System. It will provide your household with freshly made, ultra clean, great
MW401 Integrated Dishwasher
 MW401 Integrated Dishwasher Manual for Installation, Use and Maintenance Customer Care Department The Group Ltd. Harby Road Langar Nottinghamshire NG13 9HY T : 01949 862 012 F : 01949 862 003 E : service@cda.eu
Operating Instructions. Accessory Units Melitta Cafina XT Series. Melitta Professional Coffee Solutions
 Operating Instructions Accessory Units Melitta Cafina XT Series Melitta Professional Coffee Solutions Contents General... 4. Manufacturer information... 4.2 About these instructions... 4.3 Explanation
Premium Coffee Maker With Integrated Grinder
 Premium Coffee Maker With Integrated Grinder Pour la version française veuillez consulter notre site de web www.andrewjamesworldwide.com Die deutsche Version finden Sie auf unsere Webseite www.andrewjamesworldwide.com
Mix Boiler & Font Range ( #, #, #, , )
") Mix Boiler & Font Range (1000870#, 1000871#, 1000880#, 1000878, 1000879) Service Manual Marco Beverage Systems Ltd. 63d Heather Road, Sandyford Industrial Estate, Dublin 18, Republic of Ireland Ireland
Mix Boiler & Font Range (1000870#, 1000871#, 1000880#, 1000878, 1000879) Service Manual Marco Beverage Systems Ltd. 63d Heather Road, Sandyford Industrial Estate, Dublin 18, Republic of Ireland Ireland
User and Installation Instructions. Electric Auto-Fill Water Boilers EB3F, EB4F, EB6F, EB6TF IS339 ECN3539
 User and Installation Instructions Electric Auto-Fill Water Boilers EB3F, EB4F, EB6F, EB6TF IS339 ECN3539 Dear Customer Thank you for purchasing this Lincat product. With correct use and careful maintenance
3. Before switching the equipment on, make sure that the model plate data conforms to that of the electrical and water distribution network.
 Manuale di istruzione per lavastoviglie Notice d utilisation pour lave-vaisselle Gebrauchsanweisung für Geschirrspüler Instruction manual for dishwashers Manual de instrucciones para lavavajillas LF315
2
 Rice Cooker HD4760 2 3 1 4 ENGLISH 6 15 HD4760 6 ENGLISH General description (fig. 1) A Outer lid B Detachable inner lid C Steam vent D Rice cooker handle E Scoop holder F Mounting bracket of scoop holder
CADDY 5 UL OPERATOR S MANUAL
 CADDY 5 UL CADDY ENGLISH 10 UL OPERATOR S MANUAL CADDY 1 TECHNICAL CHARACTERISTICS Read electrical ratings written on the data plate under the individual units. The serial number of the unit is preceded
User and Installation Instructions. Wall Mounted Water Boiler WMB3F/B and WMB3F/W IS435 ECN3461
 User and Installation Instructions Wall Mounted Water Boiler WMB3F/B and WMB3F/W IS435 ECN3461 Dear Customer Thank you for purchasing this Lincat product. With correct use and careful maintenance as described
Glass and Dishwashers. BarAid 500/800. Installation and. Starting from Serial No.:
 Glass and Dishwashers BarAid 500/800 Installation and operation Instructions Starting from Serial No.: 8652 0001 REV. 19.01.2009 1617-A-01-09 Content Page 1 Important Notes... 4 2 Installation... 5 2.1
Operator s Manual. Frozen Beverage Granita Machines
 Thank you for purchasing this Vollrath equipment. Before operating the equipment, read and familiarize yourself with the following operating and safety instructions. SAVE THESE INSTRUCTIONS FOR FUTURE
ITALIANO KUBOX ESPAÑOL FRANÇAIS DEUTSCH ENGLISH ROMÂNĂ
 PORTUGUÊS Nederlands DEUTSCH ITALIANO FRANÇAIS ESPAÑOL 1 ROMÂNĂ 1 2 9 3 8 5c 4 7 5a 5 6 5b Fig. 1 Fig. 2 Fig. 3 Fig. 4 Fig. 5 Fig. 6 Fig. 7 Fig. 8 Fig. 9 KUBOX 2-1S01 Read these instructions carefully
Instruction Manual Model: PLA0375 Rocket Blender IMPORTANT SAFETY INSTRUCTIONS READ CAREFULLY AND KEEP FOR FUTURE REFERENCE
 Instruction Manual Model: PLA0375 Rocket Blender IMPORTANT SAFETY INSTRUCTIONS READ CAREFULLY AND KEEP FOR FUTURE REFERENCE Carefully read this manual before using this appliance. Ensure that you know
OPERATING INSTRUCTIONS B
 OPERATING INSTRUCTIONS B-95 0.2003 Contents CONTENTS Introduction... 2 Safety instructions... 2 Technical data... 4 Dispenser components... 5 Dispenser components / front... 5 Service panel components...
SSJ 4050NP. EN Slow Juicer. Copyright 2017, Fast ČR, a.s
 SSJ 4050NP EN Slow Juicer - 1 - EN Slow Juicer Important Safety Instructions READ CAREFULLY AND STORE FOR FUTURE USE. This appliance may be used by persons with physical or mental impairments or by inexperienced
User Instruction Book. for INDESIT. Dishwasher. Model: DI 6
 User Instruction Book for INDESIT Dishwasher Model:. DI 6 Safety Is a Good Habit to Get Into NOTICE Carefully read the instructions contained in this manual, as they provide important information which
MODULAR AUTOMATIC GRANULAR ICE FLAKER
 MODULAR AUTOMATIC GRANULAR ICE FLAKER INSTRUCTIONS AND WARNINGS 24479 rev. 03 It is strictly forbidden to reproduce this instruction manual or any part thereof. Dear Customer, Congratulations on having
Marco Beverage Systems Ltd.
 Marco Beverage Systems Ltd. INSTRUCTIONS FOR MODELS ECOSMART PB10, ECOSMART PB10 Hi Deck ECOSMART T10 (P/N: 1000677#, 1000678#, 1000674#) Water pressure : 5-50 psi (min.-max.)35-345 kpa (min.-max.) Marco
COVER MODEL# GDK L DIGITAL KETTLE. PHOTO OF PRODUCT
 COVER MODEL# GDK340 1.8L DIGITAL KETTLE www.gourmia.com PHOTO OF PRODUCT 2016 Gourmia www.gourmia.com The Steelstone Group Brooklyn, NY Welcome to Convenience of Electric Kettles from Gourmia! All rights
Coffee wakes up the world. Betriebsanleitung User Manual. Filter Kaffeemaschine Filter coffee machine. Deutsch English 150 F
 Coffee wakes up the world Betriebsanleitung User Manual Filter Kaffeemaschine Filter coffee machine 150 F Deutsch English 00.00.000 Typenreihe/Model Series 6415 Bestell-Nr./Order number 33 4040 0000 Ausgabe/Edition
7a Fig.1. Fig.3. Fig.2. Fig.4 M0S U01
 7a 7 5 4 2 8 3 1 10 6 9 11 Fig.1 1 2 3 Fig.2 1 2 Fig.3 Fig.4 M0S10908 1U01 @ESPRESSO PRECAUTIONS KEEP THESE INSTRUCTIONS Read these instructions for use carefully before using the appliance. Any use which
PRE INSTALLATION PROCEDURES
 PRE INSTALLATION PROCEDURES DANGER! ELECTRICAL SHOCK HAZARD. Only qualified personnel who have read and understand this entire manual should attempt to install, or service this WL250 Water Treatment System,
INDEX. Granita Machine. Operation a nd Instruction Manual
 INDEX Index 2 Unpacking 3 Positioning the machine 3 Familiarizing yourself with the Controls 4 Cleaning and Sanitizing instructions 5 Part ONE. Disassembly and Cleaning of Dispenser 5 Part TWO. Re-assemble
INSTRUCTIONS FOR USE. To make the most of your new oven, read the user's instructions carefully and keep them on hand for consultation in the future.
 INSTRUCTIONS FOR USE INSTALLATION...4 SAFEGUARDING THE ENVIRONMENT... 7 IMPORTANT NOTES... 7 BEFORE USING THE OVEN... 8 OVEN ACCESSORIES... 9 CARE AND MAINTENANCE... 10 TROUBLESHOOTING GUIDE... 12 AFTER
Single cup Brewer User Manual
 Single cup Brewer User Manual Model: AC-507K Please read all instruc ons carefully before opera ng the appliance and keep for future reference Congratulations The Single -Serve Coffeemaker has been designed
USER S MANUAL. Bottom-Load Water Cooler MODEL NO. CLBL420
 R USER S MANUAL Bottom-Load Water Cooler MODEL NO. CLBL420 Thank you for purchasing a Lago water cooler. Please read this user s manual thoroughly for using the water coolers safely and appropriately.
Operation Manual. Customer Service Technical Support
 Operation Manual Customer Service 800.567.2951 Technical Support 888.854.0207 VKI Publication #100283-001 November 25, 2016 Eccellenza Pod Operation Manual Carefully read this instruction manual before
4L Instant Water Boiler Instructions for Use
 Power Details: 220-240Va.c. 50Hz-60Hz 2200-2600W Capacity: 4.0L Accessories: 2 Water aid trays Water Filters are not included and can be purchased separately Item Code 10747 IMPORTANT NOTES FOR YOUR INSTANT
wc431 Slimline Integrated Dishwasher Manual for Installation, Use and Maintenance
 wc431 Slimline Integrated Dishwasher Manual for Installation, Use and Maintenance Contents Contents... 2 Important... 3 Important Notes... 4 Recommendations... 5 Before First Use... 5 Control Panel...
10-SPEED BLENDER. Instruction Manual. Model: CBL V/60Hz / 400W
 10-SPEED BLENDER Instruction Manual Model: CBL-1048 120V/60Hz / 400W IMPORTANT SAFEGUARDS PLEASE READ CAREFULLY ALL INSTRUCTIONS BEFORE USING YOUR 10-SPEED BLENDER This product is intended for use in blending
PC71 American Style Fridge Freezer
 PC71 American Style Fridge Freezer Installation, Use and Maintenance Customer Care Department The Group Ltd. Harby Road Langar Nottinghamshire NG13 9HY T : 01949 862 012 F : 01949 862 003 E : customer.care@cda.eu
INSTRUCTIONS AND WARRANTY
 INSTRUCTIONS AND WARRANTY MODEL NO. 21500-56 AURA 600W 6-IN-1 HAND BLENDER Congratulations on purchasing our Russell Hobbs Aura 600W 6-in-1 Hand Blender. Each unit is manufactured to ensure safety and
User Guide. Please read this instruction manual before using your water dispenser. BOTTLED WATER DISPENSER MODEL BAE1SHSK C
 User Guide Please read this instruction manual before using your water dispenser. R BOTTLED WATER DISPENSER MODEL BAE1SHSK 506334C TABLE OF CONTENTS IMPORTANT SAFEGUARDS pg 3 GROUNDING INSTRUCTIONS pg
Masticating Slow Juicer
 Masticating Slow Juicer User's manual EN SSJ 4041BK SSJ 4042RD SSJ 4043WH Prior to using this appliance, please read the user's manual thoroughly, even in cases where you have previously familiarised yourself
INSTRUCTIONS AND WARRANTY
 INSTRUCTIONS AND WARRANTY MODEL NO. SFP600 SALTON FOOD PROCESSOR Congratulations on purchasing our Salton Food Processor. Each unit is manufactured to ensure safety and reliability. Before using this appliance
A few simple steps to ensure perfect water, every time.
 A few simple steps to ensure perfect water, every time. Use and Care Guide MODELS: A4BLWTRCLR Registration Please visit the website below to register your new water cooler within the first 30 days of purchase.
User Manual. 2 & 3 Bowl Juice Dispenser. Please read and keep these instructions. Indoor use only. 1
 2 & 3 Bowl Juice Dispenser Models: RBD-32, RBD-33 Please read and keep these instructions. Indoor use only WWW.AvantcoEquipment.com 1 Index General information... 3 Parts overview and technical data...
Contents. Safety instructions...4. Machines Overview...8. Start-up...9. Preparing beverages Programming cup capacity...11
 2 Safety instructions...4 Contents Machines Overview...8 Start-up...9 Preparing beverages...10 Programming cup capacity...11 Cleaning the machine (daily/monthly)...12 Descaling the machine - monthly...14
INSTRUCTIONS AND WARRANTY
 INSTRUCTIONS AND WARRANTY MODEL NO. 19005-56 AURA 750W FOOD PROCESSOR Congratulations on purchasing our Russell Hobbs Aura 750W Food Processor. Each unit has been manufactured to ensure safety, reliability
USER MANUAL. Blender - Grinder. Congratulations on the purchase of your new Kitchenpro by Maxim, Blender-Grinder.
 USER MANUAL Blender - Grinder MODEL NO: GB270 Congratulations on the purchase of your new Kitchenpro by Maxim, Blender-Grinder. Maxim recommends safety first. Please read this user instruction manual carefully
PRE INSTALLATION PROCEDURES
 PRE INSTALLATION PROCEDURES DANGER! ELECTRICAL SHOCK HAZARD. Only qualified personnel who have read and understand this entire manual should attempt to install, or service this unit, failure to do so could