Tempest Hot Air Drying System. Installation Instructions. Ryobi 522/522HX/524/524HX/582/662. X /98 Rev-B
|
|
|
- Betty Candace Mitchell
- 5 years ago
- Views:
Transcription
1 Tempest Hot Air Drying System Installation Instructions Ryobi 522/522HX/524/524HX/582/662 X /98 Rev-B
2 GENERAL INFORMATION ATTENTION TEMPEST DRYER OWNER! Accel Graphic Systems provides parts and service through its authorized distributors and dealers. Therefore, all requests for parts and service should be directed to your local dealer. The philosophy of Accel Graphic Systems is to continually improve all of its products. Written notices of changes and improvements are sent to Accel Graphic Systems' Dealers. If the operating characteristics or the appearance of your product differs from those described in this manual, please contact your local Accel Graphic Systems Dealer for updated information and assistance. Always update your equipment when improvements are made available, especially those related to safety. YOUR AUTHORIZED TEMPEST DEALER IS: THE SERIAL NUMBER OF YOUR TEMPEST HOT AIR DRYING SYSTEM IS: CONTROL BOX FAN UNIT TECHNICAL ASSISTANCE For technical assistance during the installation, please contact: ACCEL GRAPHIC SYSTEMS Indian Trail Dallas, TX PHONE (972) FAX (800) WEB SITE 2
3 GENERAL INFORMATION ELECTRICAL REQUIREMENTS 220 VAC 50/60 HZ 30 AMP DEDICATED LINE NEMA L630R RECEPTACLE IMPORTANT INFORMATION SAFETY INFORMATION The use of heat to accelerate drying may require more frequent lubrication and/or use of a high temperature lubricant in the delivery of the press. Please consult your press manufacturer for specific recommendations. The Tempest Dryer contains high voltage and hot surfaces. Never attempt to service or work on the unit unless the power is shut off and the unit is cool. Visually inspect the thermistors (triangular shaped objects arranged in a honeycombed pattern on the underside of the unit) weekly. If a thermistor is damaged or cracked, do not operate the dryer. Contact Accel immediately for a replacement part. The fans should be turned on and set at the lowest speed ("0" on the dial when running just spray powder and no heat. This prevents spray powder from accumulating in the thermistors and housings. TERMINOLOGY OPS = Operator's Side NOPS = Non Operator's Side 3
4 GENERAL INFORMATION HOT AIR VS INFRARED: WHAT MAKES TEMPEST WORK Although the technology behind the Tempest dryer was significant enough to be awarded the GATF Intertech Award it is by no means new. In fact, thermistors have been in use for many years. They were originally used in motors and other devices as a heat controller and later used in refrigeration to turn compressors on and off. It is only in the last 10 years or so that thermistors have been used as a heater. Heat is generated by the thermistor because of the difficulty of electricity travelling through it when it is a conductor. The thermistor acts as a conductor until it reaches its set temperature and then it becomes a resistor. A thermistor is basically a coated semiconductor designed to switch from a conductor to a resistor at an established temperature. When a current is applied to the thermistor it initially uses a large amount of electricity and heats up very quickly until it reaches its maximum set temperature. At this point it should not use any more electricity. However, air that is passed through the holes in the thermistor causes it to cool. This activates the thermistor to start using more power again so is can get back to its set temperature. The thermistor is constantly regenerating itself to stay at a constant temperature. This process is called autostabilization. Thermistors are also the key element that makes the Tempest dryer safe. Because the set temperature of the thermistor is lower than the flash point of paper, you can place even the most easily burned substrate such as tissue paper, on top of the thermistor element without causing a fire. The tissue won't even char, let alone ignite. If you were to do the same with an IR element, a fire could be started in a matter of seconds. This is particularly important if a jam occurs in the delivery. 4 The objective of any drying system is to raise the pile temperature to accelerate the drying of the ink. However, heating the paper too much can aggravate problems such as blocking, setoff, mottle, loss of gloss, and loss of halftone definition. Too much heat can also cause the paper to shrink which can cause register problems in multiple pass work. The Tempest dryer can keep the pile at a lower temperature than IR and still effectively set the ink film.
5 GENERAL INFORMATION IR dryers use very high temperatures and a fixed amount of electricity. The heat generated from an IR dryer can cause premature wear of press parts. Because the thermistors used in the Tempest dryer use lower temperatures the chance of premature wear is reduced. HOW DRYING IS ACCOMPLISHED WITH TEMPEST Tempest "sets" the surface of the ink to prevent set-off from one sheet to another and to minimize the use of powder. Tempest accelerates the final drying of oil based inks by raising the temperature of the delivery stack. KEY FACTORS TO REMEMBER ABOUT DRYERS FOR SMALL OFFSET PRESSES. Do not expect a dryer to "instantly" dry the ink. Only UV inks and coating dry instantly. The technology and hazards of such systems make them cost prohibitive on small offset presses. Some jobs may require spray powder. Because dryers for small offset presses do not dry ink instantly, powder will be required from time to time. However, you should expect to see a significant decrease in the amount of powder needed on a regular basis. Drying time is dependent upon the press speed, paper stock, ink coverage, type of ink etc. Do not expect a dryer to accelerate the drying of rubber based inks. These inks dry by absorption into the stock and heat does not accelerate this process. 5

6 6
7 INSTALLATION 1 Disconnect the power to the press before beginning the installation. Remove all delivery guards brackets and hinges. Remove the press guard directly above the delivery. Remove the NOPS delivery side cover and NOPS lower press cover. 2 Locate the rectangular tie bar (right subject arrow) in the delivery that the blow down bar and spray bar attach to. 3 Install the two piece OPS mounting bracket (stamped O ) by loosely (do not tighten) clamping it to the tie bar using the provided cap head bolts (left diagram). FOR RYOBI 522HX and 524HX MODELS: Turn the top bracket upside down as shown in the right diagram. 7
8 8
9 INSTALLATION 4 Repeat step 2 with the NOPS mounting bracket (stamped N ). 5 Set the dryer on the mounting brackets with the cable on the NOPS. Feed the cables thorough the same hole in the NOPS press frame that the blow down and powder spray hoses come through. Using the provided zip-ties, secure the cable to the tie bar. NOTE: On 662 model presses, there is not a hole in the press frame for the cable to go through. Route the cable between the lower chain rail and press frame and out of the delivery. Use zip-ties to secure the cable away from any moving parts in the delivery. 6 Secure the dryer to the mounting brackets with the provided bolts, lockwashers and washers. 9
10 10
11 INSTALLATION 7 Reposition the brackets on the tie bar as necessary to center the dryer between the press frames. Tighten the bolts clamping the brackets to the tie bar once the unit is positioned correctly. 8 While slowly rotating the press check to make sure the dryer is clear of all moving parts in the press. 9 Using the provided M5 screws, attach the shield to the tie bar as shown in diagram. The notch in the corner of the shield goes on the NOPS to clear the microswitch. NOTE: Shield not supplied for 662 model presses since they come with a drip tray as standard. On newer 522, 524 and 582 presses this drip tray is also standard and does not require the installation of the provided shield. 11
12 12
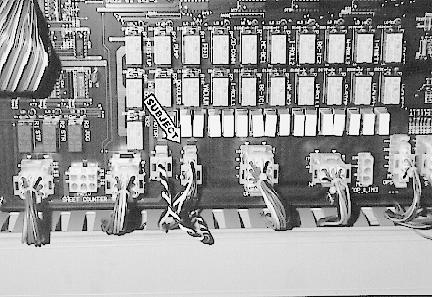
13 INSTALLATION 10 Remove the plastic guard in the end of the delivery and replaces it with the provided exhaust assembly (see left diagram). For Ryobi 522HX and 524HX model presses, attach the exhaust fans directly to the slotted guard on the end of the delivery as shown in the right diagram. 11 Using the chart below as a guide, attach the provided T-tap connectors to the correct pair of wires from the feed-off connector (subject arrow, 522 & 582 only). This connector is in the electrical box below the main control panel. PRESS CONNECTOR WIRE NO'S PIN NO'S 522 MC13 5 & S1 3 & 4 522HX MC24 12 & S1 1 & 2 524/524HX MC7 5 & S1 1 & MC13 5 & S1 3 & MC6 5 & S1 1 & 4 12 Find a suitable location for the main Tempest electrical box on the NOPS of the press. Route the exhaust fan cable into the delivery and connect it to the exhaust fans installed in a previous step. Route the impression signal cable through the press into the press electrical cabinet on the OPS. Connect the cable to the T-tap splice connectors installed in the previous step. 13
14 14
15 INSTALLATION 13 Remove the cover from the main Tempest electrical box and insert the dryer cable through the strain relief on the bottom of the box. Remove the twelve position connector (only six positions are numbered) from the board and insert the wires into the connector by matching the numbered tags on the wires to the matching position on the connector. Secure the ground wire to the stud on the inside of the box. Replace the connector on the board and tighten the strain relief. Replace the cover on the box. 14 Mount the Tempest remote control unit where it is convenient for the operator. The magnetic strip on the back of the remote will hold it on the press side cover. 15 Use the provided tie wraps to secure any loose cables. Replace all guards and covers removed from the press. Make sure that they are properly adjusted before operating the press. THE TEMPEST DRYER IS NOW READY FOR OPERATION. 15
16 OPERATION & MAINTENANCE HOW DRYING IS ACCELERATED WITH TEMPEST Tempest creates a two step drying process when used with oil base inks. These steps are: 1. Skinning the surface of the ink with the initial blast of hot air to prevent set off. 2. Accelerating the final drying process approximately 20 degrees over the cold stack temperature in the feeder. Heat accelerates the drying process, called oxidation and reduction, of oil based inks. HOW TEMPEST WORKS In general, dryers, including infrared, do not work well with rubber or acrylic based inks. These inks should be avoided when maximum results are desired. 1. When voltage is applied to the thermistors (triangular shaped objects arranged in a honeycomb pattern), the thermistors begin to heat. (Thermistors are coated semiconductors.) 2. Thermistors heat to a predetermined temperature, in this case about 400 F, and remain at that temperature. This is known as autostabilization. 3. The fans blow air down towards and through the thermistors, creating a flow of hot air to the sheet. 4. Drying of the ink occurs in the two step process as described above. No dryer totally eliminates the need for spray powder. There may be some jobs, for example a heavy solid on a high gloss sheet, where powder is required. Overall, Tempest should reduce your spray powder usage significantly, leaving you with a better printed product and cleaner working environment. TEMPEST OPERATION NORMAL OPERATION Pressing the HEAT switch will illuminate both the green and yellow LEDs on the remote control unit. The green LED indicates that the fans (both dryer and exhaust fans if so equipped) are running while the yellow LED indicates that the dryer is armed and the heat will come on automatically when the press goes on impression. When the press does go on impression, the red LED will illuminate indicating that the heat is on. Pressing the heat button again will disarm the heat mode but the fans will continue to run. To turn the unit OFF press the FAN switch at any time. FAN ONLY OPERATION To operate only the fans, press the FAN switch. The green LED will illuminate and the fans will come on (both the dryer and exhaust fans if so equipped). The heat mode of the dryer is not armed and will not come on with impression. To turn the fans OFF press the FAN switch again. 16 FAN SPEED CONTROL To adjust the fan to a higher setting, press the up arrow on the remote control unit. To decrease the fan speed press the down arrow on the remote. The fans will automatically go to the minimum speed setting for a few seconds when the press goes on impression and then they return to the previous setting. This reduction in fan speed allows the dryer to heat up more quickly.
17 OPERATION & MAINTENANCE INITIAL SETTINGS Try running Tempest with the fan speed at "4" with the switch on "HEAT." After about 1" of paper stacked in the delivery, insert the thermometer into the center of the stack. Allow the thermometer to stabilize. Pile temperature should be approximately 20 degrees over initial paper temperature for optimum drying. If the temperature is below that, decrease the fan speed slightly. If the temperature is above that, increase the fan speed slightly. FACTORS THAT EFFECT DRYING 1. Speed of the press. 2. Amount of ink coverage and color. 3. Type of stock being printed. 4. Initial temperature of paper. In time and with practice you will learn which settings are best for your particular shop. KEYS TO REMEMBER 1. The Tempest takes about 12 sheets to come up to full power. The dryer remains on as long as paper is being fed. It does not cycle like an infrared dryer. 2. Pile temperature should be approximately 20 degrees over initial paper temperature for optimum drying. 3. Use of spray powder only when absolutely necessary. A little spray powder goes a long way. Use it sparingly. 4. Inspect the Tempest weekly. MAINTENANCE 1. Inspect the dryer weekly. If the thermistors are cracked or have been damaged, do not operate the dryer. Call Accel immediately. 2. Never squirt cleaning solvents, water or any other liquids into the dryer. This may damage electrical components. 3. Any spray powder that accumulates in the dryer should be vacuumed out, not blown out. 4. Make sure all heat shields and guards are in place before operating the dryer or printing press. 17
18 18
19 19
20 20
21 21
22 22
23 23
24 24
25 25
26 26
27 27
28 28
29 29
30 30
31 31
32 32
33 33
34 34
35 35
36
37 11103 Indian Trail, Dallas, TX Phone , Fax Web Site
Tempest Hot Air Drying System. Installation Instructions. Sakurai 258II. X / Rev-B
 Tempest Hot Air Drying System Installation Instructions Sakurai 258II X88-57 10/98 2656 Rev-B GENERAL INFORMATION ATTENTION TEMPEST DRYER OWNER! Accel Graphic Systems provides parts and service through
Tempest Hot Air Drying System. Installation Instructions. Hamada RS/VS34II X /98
 Tempest Hot Air Drying System Installation Instructions Hamada RS/VS34II X88-120 1/98 GENERAL INFORMATION ATTENTION TEMPEST DRYER OWNER! Accel Graphic Systems provides parts and service through its authorized
Tempest Hot Air Drying System. Installation Instructions. Ryobi X /98 Rev-C
 Tempest Hot Air Drying System Installation Instructions Ryobi 3304 X88-99 5/98 Rev-C GENERAL INFORMATION ATTENTION TEMPEST DRYER OWNER! Accel Graphic Systems provides parts and service through its authorized
Tempest /PowderPro. Installation Instructions. Heidelberg QM46DI X /98
 Tempest /PowderPro Installation Instructions Heidelberg QM46DI X88-126 8/98 POWDERPRO GENERAL INFORMATION ATTENTION POWDERPRO OWNER! Accel Graphic Systems provides parts and service through its authorized
Altra Series Dampener
 Crestline TM Altra Series Dampener Installation Instructions Heidelberg MO X88-66 10/97 Rev-A GENERAL INFORMATION ATTENTION CRESTLINE ALTRA SERIES TM DAMPENER OWNER! Accel Graphic Systems provides parts
Crestline Dampening System
 Crestline Dampening System Installation Instructions Hamada 500, 600, 700, E-47, SU47 Series Parent Press X88-25 01/2001 Rev-C 2593 GENERAL INFORMATION ATTENTION CRESTLINE DAMPENER OWNER! Accel Graphic
ASTRO ENVELOPE FEEDER AMC FOR HEIDELBERG PRINTMASTER INSTALLATION AND OPERATING INSTRUCTIONS
 ASTRO ENVELOPE FEEDER AMC-2000-17 FOR HEIDELBERG PRINTMASTER INSTALLATION AND OPERATING INSTRUCTIONS INTRODUCTION Thank you for purchasing the Astro Envelope Feeder. It is fast, efficient, reliable, and
XPS-ProDry User s Guide Dryer Base
 XPS-ProDry User s Guide XPS-ProDry User s Guide Dryer Base For Use with Inkjet Imaging Systems Manual Part#: M-3120 Revision: August 2005 XPS-ProDry User s Guide Written by Frank Mauri & John Brand Published
TA-12. Tabbing System USER'S GUIDE
 TA-12 Tabbing System USER'S GUIDE SAFETY PRECAUTIONS THIS EQUIPMENT PRESENTS NO PROBLEM WHEN USED PROPERLY. HOWEVER, CERTAIN SAFETY RULES SHOULD BE OBSERVED WHEN OPERATING THE TA12 TABBER. BEFORE USING
Installation instructions for condenser tumble dryer DOMESTIC. Dear Customer,
 Dear Customer, Read these instructions carefully and completely before you install the machine. The installation should be carried out by a qualified person who is familiar with all local codes and ordinances
Parts and Service Manual
 Section II Parts and Service Manual (70241A) CLARKE TECHNOLOGY Operator's Manual - MINI MAX Page -29- Frame and Front Cover Assembly Drawing 2/01 Page -30- CLARKE TECHNOLOGY Operator's Manual -MINI MAX
EASY FEED LITE FRICTION FEEDER OPERATOR MANUAL. Rev
 EASY FEED LITE FRICTION FEEDER OPERATOR MANUAL Rev 02-04-13 SAFETY PRECAUTIONS THIS EQUIPMENT PRESENTS NO PROBLEM WHEN USED PROPERLY. OBSERVE THE FOLLOWING SAFETY RULES WHEN OPERATING THE RENA EASY FEED
1217A Operating Instructions
 1217A Operating Instructions Reversible Motor Friction Fed Conveyor Stacker Easy Disassembly Adjustable Folds Counter Available MADE IN USA SPECIFICATIONS Paper Weight.28 Lbs. Bond, 90Lbs. Cover, 135Lbs.
FD Heavy Duty Feeder for FD 280 Tabbing System
 FD 280-10 Heavy Duty Feeder for FD 280 Tabbing System Operator Manual 8/2011 First Edition TABLE OF CONTENTS 1. INTRODUCTION... 1 1.1 Feeder Description... 1 1.2 Items Included... 1 1.3 Operating Manual
Safety. Rinse Kit for Multi-Pro 1200 and 1250 Turf Sprayers Model No Safety and Instructional Decals. Installation Instructions
 Rinse Kit for Multi-Pro 1200 and 1250 Turf Sprayers Model No. 106-4842 Form No. 3353-529 Rev B Installation Instructions Note: Determine the left and right sides of the machine from the normal operating
690 and Power Fishing Systems
 INSTRUCTION MANUAL 690 and 690-22 Power Fishing Systems Includes Serial Number AAR 3800 and higher (120 volt model) Includes Serial Number AAT 00500 and higher (220 volt model) Read and understand all
TB-390 Conveyor Stacker
 TB-390 Conveyor Stacker OPERATIONS MANUAL Revised: 7-30-14 RENA Systems Inc. would like to Thank You for investing in our quality built products. Please record the following information for future reference:
WIDE AREA VACUUM MODEL PF2030 WARNING: OPERATOR MUST READ AND UNDERSTAND THIS MANUAL COMPLETELY BEFORE OPERATING THIS EQUIPMENT.
 OPERATOR S MANUAL & PARTS LIST WIDE AREA VACUUM MODEL PF2030 WARNING: OPERATOR MUST READ AND UNDERSTAND THIS MANUAL COMPLETELY BEFORE OPERATING THIS EQUIPMENT. Tacony, Inc., All rights reserved Save These
TA-12/HT12 Tabber. OPERATING GUIDE Revised:
 TA-12/HT12 Tabber OPERATING GUIDE Revised: 2-27-13 Neopost USA would like to Thank You for investing in our quality built products. Please record the following information for future reference: Model:
TOP AND CABINET PARTS For Model: WFW9151YW00 (White)
") TOP AND CABINET PARTS AUTOMATIC WASHER 7 11 Printed in U.S.A. (drd) (psw) 1 Part No. Rev. A TOP AND CABINET PARTS 1 Literature Parts W10408696 Installation Instructions W10432633 Use & Care Guide W10385295
TOP AND CABINET PARTS AUTOMATIC WASHER 7 11 Printed in U.S.A. (drd) (psw) 1 Part No. Rev. A TOP AND CABINET PARTS 1 Literature Parts W10408696 Installation Instructions W10432633 Use & Care Guide W10385295
Liberty-Classic. Operator s Manual
 Liberty-Classic Operator s Manual Pure & Secure LLC 4120 NW 44th Lincoln, NE 68524 Phone: 402-467-9300 Fax: 402-467-9393 2006, Pure & Secure LLC. All Right Reserved Table of Contents Important Safety
Refrigerator BRFB1920SS BRFB1900FBI BRFB1920FBI
 Refrigerator BRFB1920SS BRFB1900FBI BRFB1920FBI Table of Contents Symbols and Their Meanings... 3 Product weight... 5 Load bearing capacity of the doors... 5 Climate class... 5 Product Information:...
READ AND SAVE THESE INSTRUCTIONS
 READ AND SAVE THESE INSTRUCTIONS WARNING TO REDUCE THE RISK OF FIRE, ELECTRIC SHOCK, OR INJURY TO PERSONS, OBSERVE THE FOLLOWING: 1. Use this unit only in the manner intended by the manufacturer. If you
Panel Fan Series Operators Manual (Galvanized and Polymer)
") Panel Fan Series Operators Manual (Galvanized and Polymer) 52" Belt Drive, Galvanized Panel Fan with Three Wing Blade IMPORTANT: READ AND SAVE THESE INSTRUCTIONS Read all instructions carefully before
Panel Fan Series Operators Manual (Galvanized and Polymer) 52" Belt Drive, Galvanized Panel Fan with Three Wing Blade IMPORTANT: READ AND SAVE THESE INSTRUCTIONS Read all instructions carefully before
KF-250 Knife Folding Machine
 KF-250 Knife Folding Machine Serial Number Date Page left blank intentionally 2 Table of Contents INTRODUCTION... 5 PREFACE... 5 SPECIFICATIONS... 5 ELECTRICAL SPECIFICATIONS... 6 SAFETY PROCEDURES...
Installation & Service Manual
 Installation & Service Manual N7DNHPL, NHDHPL, NHDHPM HIGH PERFORMANCE EXT. HEIGHT MULTI-SHELF MERCHANDISER Medium Temperature Self Serve Display Cases This manual has been designed to be used in conjunction
Bench Series Ovens Models 21 / 31 / 51 Operating Manual
 Heat cycle HEATER SWITCH RECIRC. FAN Quincy Lab, Inc. Bench Series Ovens Models 21 / 31 / 51 Operating Manual Standard Contents (1) Bench Series Oven (2) Adjustable chrome wire shelf (4) Shelf brackets
RCM-77. Instruction Manual. G-Series Cooler. U.S. Patent No. 8,215,125 RECHARGE COLD MERCHANDISER
 G-Series Cooler RECHARGE COLD MERCHANDISER U.S. Patent No. 8,215,125 Instruction Manual FOR YOUR FUTURE REFERENCE This easy-to-use manual will guide you in getting the best use of your cooler. Remember
V Refrigeration Module
 5800 230V Refrigeration Module Removal and Replacement Instruction Sheet 60-4702-062 Revision F, January 25, 2016 These instructions cover the 4700 and 5800 230V refrigerator module replacement. Before
User s Manual. For the SHORE POWER CONNECTION MONITOR MODEL 9151
 User s Manual For the SHORE POWER CONNECTION MONITOR MODEL 9151 Table of Contents: Product Description... 3 Installation... 4 Optional Remote Alarm Installation... 7 Operator Test... 8 Alarms... 9 Figures...
REV: 000. Mercury Compact Series
 REV: 000 Mercury Compact Series Table of Contents Introduction 2 Standard Operating Guide 2 Features & Specs 2 External Layout 3-8 Internal Layout 9-12 Wiring Diagram 13 F.A.Q. 14-22 Comprehensive Parts
HX18 Heater. Read all instructions before using the heater. Contents
 HX18 18kW Heater Read all instructions before using the heater Contents 1) Components... 3 Total Assembly... 3 2) Specifications... 4 3) Receiving... 4 4) Safety... 5 a) Grounding Block... 6 b) Power connections...
Owner s Guide and Installation Manual
 For Your Records and Warranty Assistance For reference, also attach your receipt or a copy of your receipt to the manual. Model Name Type 8 Models Owner s Guide and Installation Manual Model No. Catalog
KIT NOTICE. These instructions are for replacing the three existing thermostats with a single new solid-state thermostat.
 KIT 06401-004-22-16 5 1 2 NOTICE 3 (3 PLC'S) These instructions are for replacing the three existing thermostats with a single new solid-state thermostat. 4 PREPARATION PARTS INCLUDED 6 1 7 5 8 2 4 (4
COMMERCIAL AUTOMATIC WASHER
 COMMERCIAL AUTOMATIC WASHER MODEL NO.(S) MHN30PDAWW0 10 10 Printed in U.S.A. (drd) (eeb) c 2010 WHIRLPOOL CORPORATION Part No. Rev. A TOP AND CABINET PARTS 2 TOP AND CABINET PARTS 1 Literature Parts W10353871
PANEL FAN SERIES OPERATORS MANUAL (Galvanized and Polymer)
") PANEL FAN SERIES OPERATORS MANUAL (Galvanized and Polymer) Galvanized Panel Fan IMPORTANT: READ AND SAVE THESE INSTRUCTIONS Read all instructions carefully before attempting to assemble, install, operate
PANEL FAN SERIES OPERATORS MANUAL (Galvanized and Polymer) Galvanized Panel Fan IMPORTANT: READ AND SAVE THESE INSTRUCTIONS Read all instructions carefully before attempting to assemble, install, operate
CIRRUS AIRPLANE MAINTENANCE MANUAL
 COOLING 1. DESCRIPTION On aircraft serials 183 and subsequent, an optional air condition system is available. This section contains the maintenance practices pertinent to this system. Cabin ventilation
Panel Fan Series Operators Manual (Galvanized and Polymer)
") Panel Fan Series Operators Manual (Galvanized and Polymer) Galvanized Panel Fan with Three Wing Blade IMPORTANT: READ AND SAVE THESE INSTRUCTIONS Read all instructions carefully before attempting to assemble,
Panel Fan Series Operators Manual (Galvanized and Polymer) Galvanized Panel Fan with Three Wing Blade IMPORTANT: READ AND SAVE THESE INSTRUCTIONS Read all instructions carefully before attempting to assemble,
INTELLI-VAC 14 INTELLI-VAC 18
 INTELLI-VAC 14 INTELLI-VAC 18 INTRODUCTION OPERATING & MAINTENANCE INSTRUCTIONS This operator s book has important information for the use and safe operation of this machine. Read this book carefully before
BK17 Heater. Read all instructions before using the heater. Contents
 Read all instructions before using the heater Contents 1) Components... 3 Total Assembly... 3 2) Specifications... 4 a) Power Specifications... 4 3) Receiving... 4 4) Safety... 5 a) Power connections...
INSTALLATION INSTRUCTION for ceiling fan
 INSTALLATION INSTRUCTION for ceiling fan F8203 Installation & Operating Instructions for the Parrotuncle Owner s Installation,Manual Motor is core parts of the fan and the most expensive in all the components.
SIMPLICITY MODEL LVPB7200
 SIMPLICITY MODEL 7200 LVPB7200 BODY GROUP 7200 BODY GROUP 7200 Key Part No Description Key Part No Description 1 7.8-PLAIN Simplicity 7000 Paper Bag 29 D625-0231 Suction Inlet Complete 2 B221-0213 Dust
KIT NOTICE. These instructions are for replacing the two existing thermostats with a single new solid-state thermostat.
 KIT 06401-004-22-16 5 1 2 NOTICE 3 (3 PLC'S) These instructions are for replacing the two existing thermostats with a single new solid-state thermostat. 4 PREPARATION PARTS INCLUDED 6 1 7 5 8 2 4 (4 PLC'S)
G-6c/GCG-6c. Instruction Manual. G-Series Cooler. Manual is for the following models: G-6-C23EB GCG-6-C23EB, G-6-CB23EB, GCG-6-CB23EB BEVERAGE COOLER
 G-Series Cooler G-6c/GCG-6c BEVERAGE COOLER Manual is for the following models: G-6-C23EB GCG-6-C23EB, G-6-CB23EB, GCG-6-CB23EB Instruction Manual Manual is for the following models: G-6-C23EB GCG-6-C23EB,
Viking Installation Guide
 Viking Installation Guide Viking Range Corporation 111 Front Street Greenwood, Mississippi 38930 USA (662) 455-1200 For product information, call 1-888-VIKING1 (845-4641) or visit the Viking Web site at
HEDMAN DI-50. Endorser Instructions. Hedman DI-50 Operators Guide
 HEDMAN DI-50 Endorser Instructions Hedman DI-50 Operators Guide 25-0132-20 TABLE OF CONTENTS 1. INTRODUCTION...1 1.1 DI-50 Description...1 1.2 Items Included...1 1.3 Safety Terms...2 1.4 Safety Precautions...3
CAUTION: DO NOT OPERATE MACHINE UNTIL YOU HAVE READ ALL SECTIONS OF THIS INSTRUCTION MANUAL
 KING COBRA 310 120V INFORMATION & OPERATING INSTRUCTIONS U. S. PRODUCTS CAUTION: DO NOT OPERATE MACHINE UNTIL YOU HAVE READ ALL SECTIONS OF THIS INSTRUCTION MANUAL 56041963 IMPROPER USE OF THE MACHINE
2 PREPARE THE OPENING
 Installation Instructions 27 & 30 Electric Built-In Wall Ovens Questions? Call 1.800.GE.CARES (1.800.432.2737) or visit www.geappliances.com In Canada, call 1.800.561.3344 or visit www.geappliances.ca
SHORT WAVE INFRARED PANEL DRYER
 INSTRUCTIONS FOR: SHORT WAVE INFRARED PANEL DRYER MODEL: IR3000 Thank you for purchasing a Sealey product. Manufactured to a high standard this product will, if used according to these instructions and
ASTRO FF14 FRICTION FEEDER SERVICE MANUAL
 ASTRO FF14 FRICTION FEEDER SERVICE MANUAL Astro Machine Corp. 630 Lively Blvd. Elk Grove Village, IL 60007 Phone: (847) 364-6363 Fax: (847) 364-9898 www.astromachine.com SAFETY PRECAUTIONS THIS EQUIPMENT
INSTALLATION MANUAL. Split-type Air Conditioner (Cooling and Heating) Outdoor Unit UQB09JJWC UQB12JJWC. Indoor Unit AQB09JJWC AQB12JJWC
 Outdoor Unit UQB09JJWC UQB12JJWC. Indoor Unit AQB09JJWC AQB12JJWC") AQB09JJ6WC_IM_E_2585 2006.4.17 4:26 PM Page 17 INSTALLATION MANUAL Indoor Unit AQB09JJWC AQB12JJWC Outdoor Unit UQB09JJWC UQB12JJWC ENGLISH FRANÇAIS ESPAÑOL Split-type Air Conditioner (Cooling and Heating)
AQB09JJ6WC_IM_E_2585 2006.4.17 4:26 PM Page 17 INSTALLATION MANUAL Indoor Unit AQB09JJWC AQB12JJWC Outdoor Unit UQB09JJWC UQB12JJWC ENGLISH FRANÇAIS ESPAÑOL Split-type Air Conditioner (Cooling and Heating)
GS-1. Instruction Manual. G-Series Cooler. Manual is for the following models: GS-1-N14NF GS-1-N14NG GS-1-N14NI COUNTERTOP COOLER
 G-Series Cooler GS-1 COUNTERTOP COOLER Manual is for the following models: GS-1-N14NF GS-1-N14NG GS-1-N14NI Instruction Manual Manual is for the following models: GS-1-N14NF GS-1-N14NG GS-1-N14NI Instruction
ICS PACIFIC. Installation Instructions & User Manual. G135L Medical Refrigerator
 ICS PACIFIC G135L Medical Refrigerator Installation Instructions & User Manual 31 Healey Road, Dandenong South, Victoria, 3175, Australia P.O. Box 4140, Dandenong South BC, Victoria, 3164, Australia E-
Read this entire manual before operation begins.
 Read this entire manual before operation begins. Record below the following information which is located on the serial number data plate. Serial No. Model No. Date of Installation Contents Important Information........
Service Manual. ETL Blast Chiller Series
 Service Manual ETL Blast Chiller Series September, 2012 2 Customer Service: (800) 333-5653, www.thermalrite.com Safety Precautions THIS MANUAL HAS BEEN PREPARED FOR PERSONNEL QUALIFIED TO INSTALL, MAINTAIN
MDG78 Parts Manual. Phase 8. For Internal Use Only RETAIN THESE INSTRUCTIONS IN A SAFE PLACE FOR FUTURE REFERENCE
 MDG78 Parts Manual Phase 8 For Internal Use Only RETAIN THESE INSTRUCTIONS IN A SAFE PLACE FOR FUTURE REFERENCE Maytag Benton Harbor, MI 1-800-662-3587 Part No. 450662-1 Retain This Manual In A Safe Place
THERMOSTAT RETROFIT INSTRUCTIONS
 With these instructions: You will remove the two existing thermostats from the dishmachine and will replace with a single new solid-state thermostat. TOOLS REQUIRED: Adjustable Wrench Philips Screwdriver
CABINET PARTS For Model: JS42CXFXDB00 (Etched Aluminum)
") CABINET PARTS 42" BUILT IN REFRIGERATOR 1 08 Litho In U.S.A. (mat) 1 Part No. Rev. A CABINET PARTS 1 Literature Parts W10151251 Use & Care Guide W10164079 Energy Guide W10159831 Service & Wiring Sheet
CABINET PARTS 42" BUILT IN REFRIGERATOR 1 08 Litho In U.S.A. (mat) 1 Part No. Rev. A CABINET PARTS 1 Literature Parts W10151251 Use & Care Guide W10164079 Energy Guide W10159831 Service & Wiring Sheet
Installation and Operation Manual For Hunter Ceiling Fans
 Installation and Operation Manual For Hunter Ceiling Fans 1 2 CONGRATULATIONS! Your new Hunter ceiling fan is an addition to your home or office that will provide comfort and performance for many years.
Syclone Amalgam Separator Installation and operating guide
 Installation and Operating Guide Syclone Amalgam Separator Installation and operating guide For your safety, please read all instructions prior to installing, operating and servicing the Syclone Amalgam
Owner s Guide and Installation Manual
 For Your Records and Warranty Assistance For reference, also attach your receipt or a copy of your receipt to the manual. Model Name Type 2 Models Owner s Guide and Installation Manual Model No. Date Purchased
AUTOMATIC WASHER HORIZONTAL AXIS. Product Type
 REPAIR PARTS LIST Model No.(s) 110.47761800 AUTOMATIC WASHER HORIZONTAL AXIS In U.S.A., To Call Toll Free For Parts: 1 800 366 PART (1 800 366 7278) For Service: 1 800 4 MY HOME (1 800 469 4663) In Canada,
Whirlpool AUTOMATIC ICE CUBE MAKER. User s Instructions & Care and Cleaning Guide MODELS CH E-5R CHS-5R CHE-7R CHS-7R. Part No.
 Whirlpool AUTOMATIC ICE CUBE MAKER User s Instructions & Care and Cleaning Guide MODELS CH E-5R CHS-5R CHE-7R CHS-7R Part No. 585102 Rev. A General Information When the desired thickness is reached, the
Operating instructions Page 14. Refrigerator Read the operating instructions before switching on for the first time
 Operating instructions Page 14 Refrigerator Read the operating instructions before switching on for the first time 7084 309-00 LKUv Disposal notes The appliance contains reusable materials and should be
Page 1 of 18. Part# /5/2013
 Part# 1002655-06 8/5/2013 This manual contains important information concerning the installation and operation of the gun washers listed above. Read manual thoroughly and keep for future reference INSTRUCTIONS
9420* & * Coin Operated Models C* Commercial Models. Product Information. Important Safety Instructions
 Models - 9420* & 9420-1* Coin Operated Models 9420-1C* Commercial Models Page 2 Page 3 Page 4 Page 5-7 Page 8-12 Page 12-13 Page 14 Page 14-15 Page 16-21 Page 22-24 Product Information Specifications Important
CABINET PARTS For Model: EF42DBSS02 (Stainless Steel)
") CABINET PARTS 42" BUILT IN REFRIGERATOR 3 11 Litho In U.S.A. (jdc) (psw) 1 Part No. Rev. A CABINET PARTS 1 Literature Parts W10159566 Use & Care Guide W10205631 Energy Guide W10180103 Service & Wiring
CABINET PARTS 42" BUILT IN REFRIGERATOR 3 11 Litho In U.S.A. (jdc) (psw) 1 Part No. Rev. A CABINET PARTS 1 Literature Parts W10159566 Use & Care Guide W10205631 Energy Guide W10180103 Service & Wiring
CABINET PARTS For Model: KSSC42QVS03 (Stainless Steel)
") CABINET PARTS 42" BUILT IN REFRIGERATOR 2 12 Litho In U.S.A. (wlc)(bay) 1 Part No. Rev. A CABINET PARTS 1 Literature Parts W10303989 Use & Care Guide W10205643 Energy Guide W10159832 Service & Wiring Sheet
CABINET PARTS 42" BUILT IN REFRIGERATOR 2 12 Litho In U.S.A. (wlc)(bay) 1 Part No. Rev. A CABINET PARTS 1 Literature Parts W10303989 Use & Care Guide W10205643 Energy Guide W10159832 Service & Wiring Sheet
Compact Refrigerator. Hoffman Estates, IL Model: cu. ft. Capacity. Installation. This Manual!
 Compact Refrigerator Model: 62912 9.5 cu. ft. Capacity Read This Manual! It will tell you how to operate and care for your refrigerator. It also offers tips on how to get the best and lowest cost performance.
XC-18. NOTE: *Machine shown without Lift-Up Safety Guard. This guard is included with machine. Machine should not be operated without this guard.
 XC-18 NOTE: *Machine shown without Lift-Up Safety Guard. This guard is included with machine. Machine should not be operated without this guard. EXTREMA MACHINERY COMPANY, INC. PO BOX 1450, ALBANY, LOUISIANA
TECHNICAL MANUAL TRAY DRYER
 TECHNICAL MANUAL FOR TRAY DRYER MODEL TD321-3 TRAYDRYER MODEL: TD 321-3 Table of Contents Part 1 - Technical Information * Introduction * Catalogue Cut-sheet and Installation Drawing * Warranty Part 2
CABINET PARTS For Model: KSSS48QJX00 (Stainless Steel)
") CABINET PARTS 48" BUILT IN REFRIGERATOR 10 02 Litho In U.S.A. (mek) 1 Part No. 1 LITERATURE PARTS LIT2209249 Use & Care Guide LIT2006651 Energy Label LIT2006748 Service & Wiring Sheet LIT628370 Modular
CABINET PARTS 48" BUILT IN REFRIGERATOR 10 02 Litho In U.S.A. (mek) 1 Part No. 1 LITERATURE PARTS LIT2209249 Use & Care Guide LIT2006651 Energy Label LIT2006748 Service & Wiring Sheet LIT628370 Modular
TOP AND CABINET PARTS
 TOP AND CABINET PARTS AUTOMATIC WASHER 3 10 Printed in U.S.A. (drd) (psw) 1 Part No. Rev. A TOP AND CABINET PARTS 1 Literature Parts W10157503 Use & Care Guide W10177425 Tech Sheet W10157501 Energy Guide
Snapshot. User Manual. Use on Dimmer Outdoor Use Sound Activated DMX Master/Slave Voltage Switch Replaceable Fuse User Serviceable Duty Cycle
 Snapshot Use on Dimmer Outdoor Use Sound Activated DMX Master/Slave Voltage Switch Replaceable Fuse User Serviceable Duty Cycle User Manual 5200 NW 108th Avenue, Sunrise, FL 33351 U.S.A. (800) 762-1084
SuperKlean Washdown Products
 DURAREEL DR8 & DR8S INSTALLATION AND MAINTENANCE INSTRUCTIONS **DO NOT THROW AWAY AFTER INSTALLATION** **SAVE AND DISPLAY PROMINENTLY WHERE THIS EQUIPMENT IS USED** GENERAL WARNINGS High pressure and hot
Bob-White Systems: AUTOMATED BOTTLE FILLER
 Bob-White Systems: AUTOMATED BOTTLE FILLER PRODUCT CAPPER MANUAL General Safety Rules WARNING: READ ALL INSTRUCTIONS. Failure to follow the safety rules listed below and other basic safety precautions
INSTALLATION GUIDE Fryer Module
 INSTALLATION GUIDE Fryer Module Contents Wolf Fryer Module............................ 3 Fryer Module Specifications..................... 4 Fryer Module Installation....................... 8 Service Information...........................
3.5 GALLON PARTS WASHER
 3.5 GALLON PARTS WASHER Assembly and Operating Instructions 3491 Mission Oaks Blvd., Camarillo, CA 93011 Visit our Web site at http://www.harborfreight.com Copyright 1997 by Harbor Freight Tools. All rights
ELECTRIC DRYER INSTALLATION INSTRUCTIONS
 ELECTRIC DRYER INSTALLATION INSTRUCTIONS Table of Contents DRYER SAFETY... 2 INSTALLATION REQUIREMENTS... 3 Tools and Parts... 3 LOCATION REQUIREMENTS... 4 ELECTRICAL REQUIREMENTS... 6 INSTALL LEVELING
GETZ MANUFACTURING PART NO.: MODEL: SV1 100 PR VACUFILL SYSTEM (Revised 6/7/05)
") GETZ MANUFACTURING PART NO.: 58616 MODEL: SV1 100 PR VACUFILL SYSTEM (Revised 6/7/05) GETZ SV1-100-PR VACU-FILL SYSTEM TABLE OF CONTENTS PAGE # 1... GETZ SV1-100-PR VACU-FILL SYSTEM 2... PARTS LIST 3...
GETZ MANUFACTURING PART NO.: 58616 MODEL: SV1 100 PR VACUFILL SYSTEM (Revised 6/7/05) GETZ SV1-100-PR VACU-FILL SYSTEM TABLE OF CONTENTS PAGE # 1... GETZ SV1-100-PR VACU-FILL SYSTEM 2... PARTS LIST 3...
ELECTRIC DRYER INSTALLATION INSTRUCTIONS
 ELECTRIC DRYER INSTALLATION INSTRUCTIONS Table of Contents DRYER SAFETY... 2 INSTALLATION REQUIREMENTS... 3 Tools and Parts... 3 LOCATION REQUIREMENTS... 4 ELECTRICAL REQUIREMENTS... 5 INSTALL LEVELING
1217A OPERATING INSTRUCTIONS # 4
 1217A OPERATING INSTRUCTIONS # 4 # 1 # 5 # 3 Thank you for your purchase of the Martin Yale Ind., model 1217A Autofolder. With proper maintenance your unit is designed to provide you with years of trouble-free
Installation. Built-in Full Height Wine Cellar VCWB301
 Installation Built-in Full Height Wine Cellar VCWB301 Table of Contents Warnings & Important Information _ 3 Dimensions _ 5 Specifications _ 6 Cutout Dimensions 7 Cabinet Information _ 8 Cabinet Information
User s Manual. TIGER S EYE E-Series Mark V Jockey. TIGERFLOW Systems, Inc Mint Way Dallas, Texas
 User s Manual TIGER S EYE E-Series Mark V Jockey TIGERFLOW Systems, Inc. 4034 Mint Way Dallas, Texas 75237 214-337-8780 www.tigerflow.com TABLE OF CONTENTS Introduction... 4 Sequence of Operation... 5
INSTALLATION GUIDE Steamer Module
 INSTALLATION GUIDE Steamer Module Contents Wolf Steamer Module.......................... 3 Steamer Module Specifications.................. 4 Steamer Module Installation..................... 8 Service Information...........................
COMMERCIAL GAS AND ELECTRIC STACKED WASHER/ DRYER INSTALLATION INSTRUCTIONS
 COMMERCIAL GAS AND ELECTRIC STACKED WASHER/ DRYER INSTALLATION INSTRUCTIONS MODELS MLG19PD, MLE19PD The installation, including a proper exhaust system, is the responsibility of the owner. LEAVE THESE
Installation Instructions. For the 18 Built-In Dishwasher and Front Color Panels
 Installation Instructions For the 18 Built-In Dishwasher and Front Color Panels Printed in USA 154232102 Before You Begin DO NOT INSTALL DISHWASHER UNTIL YOU HAVE READ ALL INSTRUCTIONS. FOR YOUR SAFETY,
FOOD WARMING/MERCHANDISING CABINET MODEL 737/737HH
 FOOD WARMING/MERCHANDISING CABINET MODEL 737/737HH This unique compact warmer utilizes heated, circulating air to maintain food at proper temperatures for extended periods of time. It has the capability
User s Manual and Operating Instructions
 User s Manual and Operating Instructions Model Numbers: PT-18W-DDF-A, PT-20F-DDF-A, PT-20S-DDF, PT-24O-DDF, PT-24-DDF, PT-24-DDF-F, PT-30-DDF, PT-30P-DDF-A, PT-30P-DDF-AF READ AND SAVE THESE INSTRUCTIONS
Installation Instructions
 Installation Instructions Built-In Dishwasher If you have questions, call 800-944-9400(US),800-245-8352(Canada)or visit our website at: www.frigidaire.com BEFORE YOU BEGIN Read these instructions completely
Service and Parts Manual. NO LONGER IN PRODUCTION Some service parts may not be available for this product- Examination.
 thru 30-00 -0 Examination Table Serial Number Prefixes: GJ, GK, GL, JE, JF, JG JH, KV, KW, KX, KZ, LC & V Service and Parts Manual NO LONGER IN PRODUCTION Some service parts may not be available for this
WASHER/DRYER CONTROL PANEL PARTS
 WASHER/DRYER CONTROL PANEL PARTS WASHER/DRYER LAUNDRY SYSTEM 1 Literature Parts W10356098 Installation Instructions W10343071 Guide, Use & Care W10364010 Wiring Diagram W10343084 Energy Guide 2 3390688
Installation and Operation Manual For Hunter Ceiling Fans /16/2004
 Installation and Operation Manual For Hunter Ceiling Fans 1 2 CONGRATULATIONS! Your new Hunter ceiling fan is an addition to your home or office that will provide comfort and performance for many years.
WAILEA OWNER S MANUAL
 WAILEA OWNER S MANUAL The blades in each pack are matched for equal weight to assure smooth fan operation. If more than one fan is being installed, be careful not to mix blades from different cartons.
Flood Pumper Plus. Water Transfer Machine. Operator and Parts Manual. Model No.: Rev. 00 (11-99)
") Flood Pumper Plus Water Transfer Machine Model No.: 607841 Operator and Parts Manual NOBLES 12875 RANSOM STREET HOLLAND MI 49424 U.S.A. CUSTOMER SERVICE: 1-800-365-6625 FAX: 1 800 678 4240 608468 Rev.
Flood Pumper Plus Water Transfer Machine Model No.: 607841 Operator and Parts Manual NOBLES 12875 RANSOM STREET HOLLAND MI 49424 U.S.A. CUSTOMER SERVICE: 1-800-365-6625 FAX: 1 800 678 4240 608468 Rev.
JOHN DEERE GATOR HPX/XUV 2 PASSENGER HEATER INSTALLATION INSTRUCTIONS (p/n: 9PH20S30)
") P. 1 of 12 JOHN DEERE GATOR HPX/XUV 2 PASSENGER HEATER INSTALLATION INSTRUCTIONS (p/n: 9PH20S30) Item: Qty: Description: 1 2 1 x 1 x 5/8 Tee Fitting 2 2 Plastic Snap-in Hose Grommet 3 4 1-1/2" Hose Clamps
P. 1 of 12 JOHN DEERE GATOR HPX/XUV 2 PASSENGER HEATER INSTALLATION INSTRUCTIONS (p/n: 9PH20S30) Item: Qty: Description: 1 2 1 x 1 x 5/8 Tee Fitting 2 2 Plastic Snap-in Hose Grommet 3 4 1-1/2" Hose Clamps
Dissolved Oxygen Sensors
 Instruction Sheet PN 51A-HxDO/rev.E July 2005 Models Hx438 and Gx448 Dissolved Oxygen Sensors For additional information, please refer to the Instruction Manuals CD shipped with this product, or visit
Parts List. Modular Crescent Cuber. Models KM-901MAJ KM-901MWJ KM-901MRJ/3. hoshizakiamerica.com
 Parts List Modular Crescent Cuber Models KM-901MAJ KM-901MWJ KM-901MRJ/3 hoshizakiamerica.com Number: 71391 Issued: 10-23-2017 Revised: 6-8-2018 CONTENTS Auxiliary Codes... 3 Note About Ordering Parts...
Can Am Commander 1000 Radiator Relocation Installation Instructions
 Can Am Commander 1000 Radiator Relocation Installation Instructions What comes with the kit 2 CNC Machined Aluminum mounting brackets 2 pcs M6 x 1.0 x 60mm long SHCS 2 pcs M6 x 1.0 x75mm long SHCS 4 pc
owner s manual & parts list
 AVIATOR owner s manual & parts list This equipment is intended for commercial use only. 3009AF 3009AF-W 1753 Blake Avenue Los Angeles, CA 90031 (800) 338-EDIC Or (323) 660-1635 Fax (323) 667-0144 BEFORE