MAGNETIC DOOR CONTACT MAGNETINIS DURŲ KONTAKTAS EWD1
|
|
|
- Daisy Caldwell
- 5 years ago
- Views:
Transcription


1 MAGNETIC DOOR CONTACT MAGNETINIS DURŲ KONTAKTAS EWD1
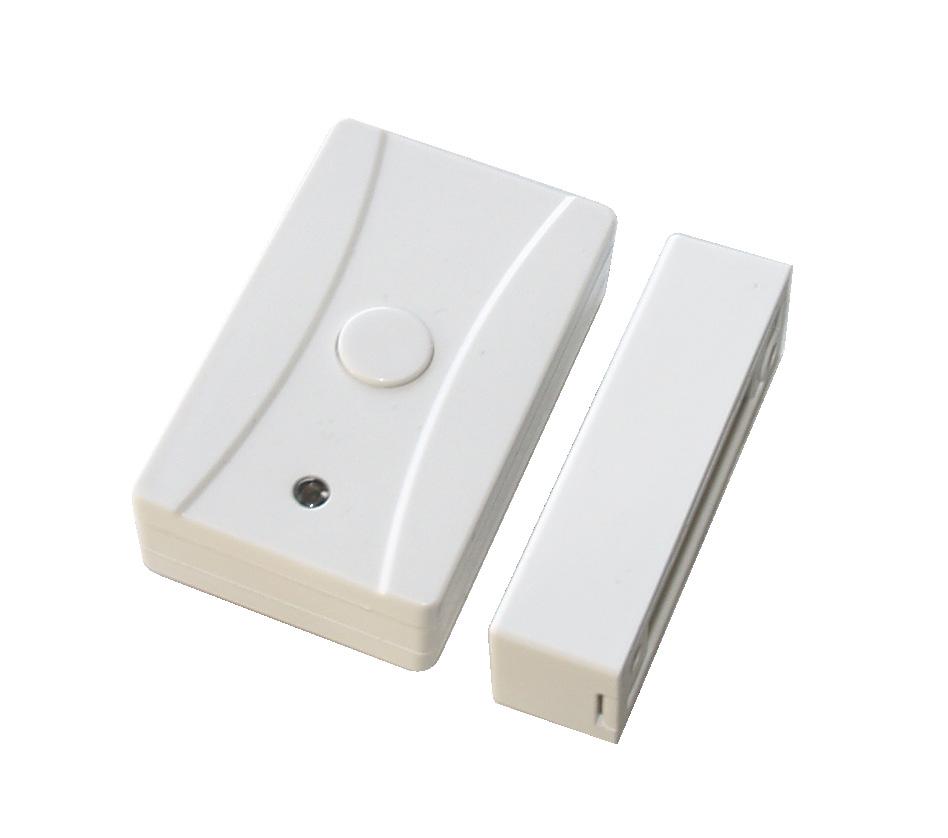
2 Magnetic door contact with panic button EWD1 is a wireless device with magnetic contact which are used to secure doors, windows or any other opening parts and operating with ELDES wireless security systems. Users have to bind it to the central device of security system (by sending a corresponding command via SMS message or using software ELDES Configuration Tool ). When EWD1 is connected to the system, two wireless zones are added. First wireless zone is used to monitor the magnetic contacts and the second wireless zone is for managing the panic button. By default panic button zone is configured as Silent zone and in case of violation, system will cause an alarm to administrator numbers or/and to monitoring station without turning the siren on. It is possible to connect up to 16 wireless devices to the central security system at a time. Maximum distance for wireless connection is 150 meters (in open areas). 1. Device Installation 1. Open EWD1 case and insert the battery. + 3V CR Fig. No Magnetic door contact consists of two parts: a magnet and a sensor. Sensor components are: a mounting part and the sensor. Magnet components are: a mounting part and the cover. 2.1 Fix the sensor mounting part with two screws on the door or window jamb. 2.2 Fix the magnet mounting part with two screws next to the sensor mounting part on door or window frame. How to fix the magnetic door contact correctly see Fig. No. 2. The distance between the magnet and the door contact must be no larger than 20 mm. MAX 20 mm Fig. No The sensor should be attached to the fixed sensors mounting part. When attaching sensor pay attention to the tamper (micro switch) - it must be pressed. 2.4 The magnet cover should be attached to the fixed magnet mounting part. NOTE: it is not recommend to fix the magnetic door contact other ways than with screws, e.g. with duck tape. The incorrect ways of fixing magnetic door contact see Fig. No. 2. Fig. No. 3 2
3 3. Bind the device to central monitoring station. Use a software ELDES Configuration Tool or send corresponding SMS messages. Please read software Help section or central system installation manual for more information. Software "ELDES Configuration Tool" and installation manual can be downloaded for free in website The system automatically informs about successful/unsuccessful bound device. If attempt to bind is unsuccessful, try to move the door contact EWD1 closer to central monitoring station and bind anew. 4. EWD1 magnetic door contact is ready to use. 2. Technical Specifications Package content 1. EWD1 door contac...qty Magnet...qty CR2032 3V Lithium battery...qty User manual...qty Screws...qty. 4 Electrical and Mechanical Characteristics Battery type CR2032 3V Lithium Number of batteries 1 Battery operation time ~18 months* Radio transmitter-receiver frequency 868 Mhz Range of Operating Temperatures ºC Door contact dimensions 60x37x18mm Magnet dimensions 60x17x16mm Radio communication range 30 meters in premises; 150 meters in open areas Compatible with security systems ELDES Wireless * This operation time might vary in difference conditions. Changing the battery Only CR2032 3V Lithium batteries should be used. Install only new, good quality and not expired batteries. In order to replace old battery with a new one, remove front cover of the magnetic door contact (see chapter 1), carefully remove the device PCB and remove old battery. Then insert the new CR2032 3V Lithium battery. ATTENTION: The battery must be removed if device is not in use. ATTENTION: In order to avoid fire or explosion hazards, the system must be used only with approved battery. Special care must be taken when connecting positive and negative battery terminals. Dispose old batteries only into special collection sites. Do not charge, disassemble, heat or incinerate old batteries. USER MANUAL EWD1 V1.0 3
4 MAGNET FRONT SIDE BACK SIDE + 1. BATTERY 2. LED 3. PANIC button 4. RESET button 5. PINS for firmware updates 6. TAMPER Fig. No Restoring default parameters 1. Remove the battery. 2. Press and hold RESET button. 3. Add removed battery. 4. Hold RESET button till LED indicator starts fast several times blinking. 3. Configuration using software "ELDES Configuration Tool" Software ELDES Configuration Tool is used to work directly with central device of the security system, which can be connected to the computer via USB port. This software simplifies system configuration process by allowing to use PC in the process. Using this software, user can: 1. To bind new magnetic door contacts EWD1 to central monitoring station; 2. To remove or replace old magnetic door contacts with new ones; 3. To configure settings of all added to the system magnetic door contact; 4. To configure security system settings. Software ELDES Configuration Tool is a freeware and can be downloaded from website 4. Configuration command SMS Messages ATTENTION: send command SMS messages to the number used by the central device of the security system. All SMS messages should start with the main 4-digit user password (in the examples provided XXXX marking is used). Underscore symbol _ is used to represent space symbol Binding Modules to the Security System ATTENTION: before sending SMS message check whether magnetic door contact EWD1 has the battery inserted. If it hasn't, binding to the central security system will be unsuccessful. Binding of magnetic door contact EWD1 to the central device of security system station is performed by indicating module identification numbers: XXXX_SET:ID set:
5 Here ID1 means magnetic door contact identification number. This identification number can be found on the back of the device. The system automatically provides two security zones to the connected door contact. The system informs about this via SMS message, for example, ID1:Z14:ID1Z15 - here instead of ID1 will be identification number of the module that you want to connect, Z14 and Z15 the numbers of free zones provided by the system. You can bind more than one magnetic door contact at a time. In such a case separate identification numbers by ; symbol, for example: XXXX SET:ID1;ID2;... ;ID Settings of Activated Zones After activating magnetic door contacts EWD1 each of them is automatically given zones numbers and set to the default settings Adjusting Alarm Text Alarm text of a particular zone is adjusted by sending the following SMS message: XXXX_Z2:TEXT 1111 Z5: Doors opened Here instead of Text enter the required alarm text consisting of up to 24 characters and instead of Z2 indicate the number of the corresponding zone. You receive this alarm text by SMS message when a corresponding zone is triggered. To change alarm text of more than one zone separate entries by ; symbol, for example: XXXX Z2:Text2;Z3:Text Enabling/Disabling Zones You can choose which zones, after activating the alarm in the whole system, will be enabled or disabled. By initial factory default parameters all activated zones are enabled. Any zone can be enabled by sending SMS message with the following format*: XXXX_Z1:ON;Z2:ON;Z3:ON Any secured zone can be disabled by sending SMS message with the following format*: XXXX_Z1:OFF;Z2:OFF;Z3:OFF 1111 Z2: ON * Indicate as many zones as you want to change their statuses separating entries by ; symbol, as shown in the examples provided Requesting system status information To find out the alarm texts and statuses of activated zones, send the following SMS message: XXXX_STATUS 1111 STA TUS You will receive system response via SMS message, for example: Z1:ON/OFF:Zone1; Z2:ON/OFF:Zone2; C1:ON/OFF:Controller1; C2:ON/OFF:Controller2 This information SMS message indicates all wireless ELDES devices connected to the system and their current parameters. ATTENTION: System informs about all active zones. If there are many active zones, the system informs about all of them in several SMS messages Requesting number of available slots to connect wireless devices To find out the number of available slots to connect wireless devices to the central device of security system send the following SMS message: XXXX_STATUS_FREE NOTE: maximum number of wireless devices that can be connected to the central device of the security system station is 16 units. USER MANUAL EWD1 V1.0 5
6 4.5. Changing magnetic door contact EWD1 To change an old magnetic door contact EWD1 with a new one send the following SMS message: XXXX_REP:ID<ID rep: < Here instead of ID indicate identification number (ID) of the old magnetic door contact EWD1. Identification number of the new magnetic door contact EWD1 is indicated instead of ID5 marking. The new magnetic door contact is provided with the same zone number with all previous settings valid for the old one Deleting magnetic door contact EWD1 To delete magnetic door contact EWD1 from the security system send the following SMS message: XXXX_DEL:ID 1111 del: Here instead of ID indicate identification number (ID) of the magnetic door contact EWD1 want to delete. Removed from the system zones can be used to connect other wireless devices. 6
7 5. Additional Information Limited Liability The buyer must agree that the system will reduce the risk of fire, theft, burglary or other dangers but does not guarantee against such events. ELDES UAB will not take any responsibility regarding personal or property or revenue loss while using the system. ELDES UAB liability according to local laws does not exceed value of the purchased system. ELDES UAB is not affiliated with any of the cellular providers therefore is not responsible for the quality of cellular service. Manufacturer Warranty The system carries a 24-month warranty by the manufacturer ELDES UAB. Warranty period starts from the day the system has been purchased by the end user. The warranty is valid only if the system has been used as intended, following all guidelines listed in the manual and within specified operating conditions. Receipt must be kept as a proof of purchase date. The warranty is voided if the system has been exposed to mechanical impact, chemicals, high humidity, fluids, corrosive and hazardous environment or other force majeure factors. Safety instructions Please read and follow these safety guidelines in order to maintain safety of operators and people around: Don t use the system where it can be interfere with other devices and cause any potential danger. Don t use the system with medical devices. Don t use the system in hazardous environment. Don t expose the system to high humidity, chemical environment or mechanical impacts. Don t attempt to personally repair the system. Any system repairs must be done only by qualified, safety aware personnel. The WEEE (Waste Electrical and Electronic Equipment) marking on this product (see right) or its documentation indicates that the product must not be disposed of together with household waste. To prevent possible harm to human health and/or the environment, the product must be disposed on in an approved and environmentally safe recycling process. For further information on how to dispose of this product correctly, contact the system supplier, or the local authority responsible for waste disposal in your area. Copyright ELDES UAB, All rights reserved It is not allowed to copy and distribute information in this document or pass to a third party without advanced written authorization by ELDES UAB ELSDES UAB reserves the right to update or modify this document and/or related products without a warning. Hereby, ELDES UAB declares that this EWD1 magnetic door contact is in compliance with the essential requirements and other relevant provisions of Directive 1999/5/EC. The declaration of conformity may be consulted at USER MANUAL EWD1 V1.0 7
8 Magnetinis durų kontaktas EWD1 - tai belaidis įrenginys su magnetiniu kontaktu, skirtas saugoti duris, langus ir kitas atsidarančius mechanizmus ir dirbantis su ELDES belaidėmis apsaugos sistemomis. Vartotojams tereikia aktyvuoti ryšį su centrine apsaugos sistema (SMS žinute arba su programine įranga). Prijungus EWD1 magnetinį durų kontaktą, sistema prideda dvi belaides zonas. Pirmoji zona stebi magnetinį kontaktą, o antroji skirta panikos mygtuko valdymui. Pagal nutylėjimą panikos mygtuko zonos tipas nustatytas į Silent, todėl suveikimo atveju sistema praneš įvestiems administratoriams ir/ar apsaugos pultui, tačiau neįjungs sirenos. Vienu metu prie centrinės apsaugos sistemos gali būti prijungta iki 16 belaidžių įrenginių. Belaidžiai įrenginiai nuo centrinės apsaugos sistemos gali būti išdėstyti ne didesniu kaip 150 m. atstumu. 1. Įrenginio instaliacija 1. Atidaroma EWD1 dėžutė bei įstatoma baterija. + 3V CR Pav. Nr Magnetinis durų kontaktas susideda iš dviejų dalių: magneto ir jutiklio. Jutiklio sudedamosios dalys: tvirtinimo dalis ir jutiklis. Magneto sudedamosios dalys: tvirtinimo dalis ir dangtelis. 2.1 Jutiklio tvirtinimo dalis dviem varžtais prisukama prie durų ar lango staktos. 2.2 Magneto tvirtinimo dalis dviem varžtais prisukama prie durų ar lango varčios. Teisingas tvirtinimo dalių išdėstymas pateiktas Pav. 2. Atstumas tarp magneto ir durų kontakto turi būti ne didesnis nei 20mm. MAX 20 mm Pav. Nr Į pritvirtintą jutiklio tvirtinimo dalį įstatomas jutiklis. Užfiksuojant jutiklį, atkreipti dėmesį į tamperį (mygtuką su spyruokliuojančiu kontaktu) jis turi būti nuspaustas. 2.4 Ant pritvirtintos magneto tvirtinimo dalies uždedamas magneto dangtelis. PASTABA: nerekomenduojama durų kontakto montuoti kitomis priemonėmis, tokiomis, kaip lipni juosta ir t.t. Pav. Nr. 2 pateikti neteisingi magnetinio durų kontakto montavimo būdai Pav. Nr. 3 8
9 3. Aktyvuojamas ryšys su centrine apsaugos sistema. Tai galima greitai ir patogiai atlikti programine įranga ELDES Configuration Tool arba SMS žinutėmis. Plačiau skaitykite programinės įrangos Help skyrelyje arba centrinės sistemos instaliacijos vadove. Šį instaliacijos vadovą bei ELDES Configuration Tool programą galima nemokamai parsisiųsti puslapyje Sistema automatiškai informuoja apie sėkmingą/nesėkmingą daviklio aktyvavimą. Jei sistema informavo apie nesėkmingą daviklio aktyvavimą, bandykite jį aktyvuoti iš naujo, perkeliant arčiau centrinio apsaugos sistemos įrenginio. 4. EWD1 magnetinis durų kontaktas paruoštas darbui. 2. Techninė specifikacija Pakuotės sudėtis 1. EWD1 durų kontaktas...1 vnt. 2. Magnetas vnt. 3. CR2032 3V Lithium baterija...1 vnt. 4. Vartotojo vadovas...1 vnt. 5. Varžtai...4 vnt. Elektrinės ir mechaninės charakteristikos Baterijos tipas CR2032 3V Lithium Baterijų skaičius 1 Baterijų veikimo trukmė ~18 mėnesių* Duomenų perdavimo dažnis 868 Mhz Darbinis temperatūrų diapazonas ºC Durų kontakto matmenys 60x37x18mm Magneto matmenys 60x17x16mm Maksimalus belaidžio ryšio palaikomas atstumas Iki 30m. patalpose; iki 150m. atvirose vietose Suderinamas su apsaugos sistemomis ELDES Wireless sistemomis * Šis laikotarpis gali skirtis priklausomai nuo naudojimo sąlygų. Maitinimo baterijos keitimas Įrenginio maitinimui naudojama tik CR2032 3V ličio baterija. Naudoti galima tik naujas, kokybiškas ir nepasibaigusio galiojimo baterijas. Norint pakeisti išsikrovusią bateriją nauja, nuimkite įrenginio korpuso priekinę dalį (žiūrėti 1 skyrių), atsargiai išimkite spausdintinę plokštę ir išimkite senąją bateriją. Atitinkamai įstatykite naują CR2032 3V ličio bateriją. DĖMESIO: Nenaudojant įrenginio baterija turi būti išimta. DĖMESIO: Būtina įsidėmėti, kad naudojant netinkamo tipo baterijas, galima sukelti gaisrą ar sprogimą. Draudžiama sumaišyti vietomis ar užtrumpinti baterijos polius. Senas baterijas išmeskite tik tam skirtose vietose. Senas baterijas negalima krauti, ardyti, kaitinti ar deginti. VARTOTOJO VADOVAS ELDES EWD1 V1.0 9
10 MAGNET FRONT SIDE BACK SIDE + 1. Baterija 2. LED 3. Panikos mygtukas 4. RESET mygtukas 5. Programinės įrangos atnaujinimo jungtis 6. Tamperis Pav. Nr Pradinių parametrų atstatymas 1. Išimama baterija ir palaukiama 20s. kol sistema pilnai išsijungs. 2. Paspaudžiamas ir laikomas įspaustas RESET mygtukas. 3. Įstatoma išimta baterija. 4. Įspaustas RESET mygtukas laikomas tol, kol kelis kartus gretai sumirksi LED indikatorius. 3. Programinės įrangos naudojimas Programinė įranga ELDES Configuration Tool skirta tiesiogiai prisijungti prie centrinio apsaugos sistemos įrenginio, kuris prie kompiuterio jungiamas USB laidu. Tai supaprastina sistemos konfigūravimo procesą atliekant visus konfigūravimo veiksmus kompiuteriu. Su šia programine įranga vartotojas gali: 1. Prie naudojamos centrinės apsaugos sistemos pririšti (aktyvuoti ryšį) naujus magnetinius durų kontaktus EWD1; 2. Pašalinti ar pakeisti esamus magnetinius durų kontaktus EWD1 naujais; 3. Konfigūruoti prijungtų prie sistemos magnetinių durų kontaktų EWD1 nustatymus; 4. Realiu laiku stebėti magnetinių durų kontaktų EWD1 zonų būsenas; 5. Konfigūruoti visus apsaugos sistemos nustatymus ir parametrus. Programinę įrangą ELDES Configuration Tool galite nemokamai atsisiųsti iš interneto svetainės 4. Komandinės SMS žinutės DĖMESIO: Komandinės SMS žinutės siunčiamos bendruoju apsaugos sistemos telefono numeriu. Visos SMS žinutės pradedamos pagrindiniu vartotojo 4 skaitmenų slaptažodžiu (pateiktuose pavyzdžiuose naudojamas XXXX žymėjimas). Apatinis brūkšnys _ visur reiškia tarpelį, t.y. rašant SMS žinutę vietoj šio brūkšnio turi būti daromas vieno simbolio tarpelis Įrenginių pririšimas prie centrinės apsaugos sistemos DĖMESIO: Prieš siunčiant komandinę SMS žinutę, įsitikinkite, kad magnetiniame durų kontakte EWD1 yra įdėta baterija. Kitu atveju pririšimas prie centrinės apsaugos sistemos bus nesėkmingas. Magnetinių durų kontaktų pririšimas prie centrinės apsaugos sistemos vykdomas nurodant jų identifikacijos numerius: XXXX_SET:ID set:
11 Čia ID1 magnetinio durų kontakto identifikacijos numeris. Šis identifikacijos numeris užrašytas įrenginio galinėje pusėje. Pririštiems magnetiniams durų kontaktams EWD1 sistema automatiškai išskiria dvi laisvas apsaugos zonas. Apie tai sistema informuoja SMS žinute, pvz.: ID1:Z14:ID1:Z15 - čia vietoje ID1 įrašomas norimos prijungti sirenos identifikacijos numeris, Z14 ir Z15 atitinkamai išskirti laisvų zonų numeriai. Vienu metu galima pririšti ir daugiau nei vieną magnetinį durų kontaktą EWD1. Tokiu atveju, komandinėje SMS žinutėje identifikacijos numeriai atskiriami ; simboliu, pvz.: XXXX SET:ID1;ID2;... ;ID Aktyvuotų zonų ir valdiklių nustatymai Aktyvavus magnetinį durų kontaktą EWD1, kiekvienam jų automatiškai suteikiami du zonų numeriai su pradiniais nustatymais Aliarmo teksto koregavimas Tam tikros zonos aliarmo tekstas keičiamas siunčiant atitinkamą SMS žinutę: XXXX_Z2:TEKSTAS 1111 Z5: suveike durys Čia vietoje Tekstas įvedamas iki 24 simbolių norimas aliarmo tekstas, o vietoje Z2 nurodomas atitinkamas zonos numeris. Šis aliarmo tekstas bus gaunamas SMS žinute, suveikus atitinkamai zonai. Norint pakeisti daugiau nei vienos apsaugos zonos aliarmo tekstą, įrašai atskiriami ; simboliu, pvz.: XXXX Z2:Tekstas2;Z3:Tekstas Zonų įjungimas/išjungimas Galima pasirinkti kurias apsaugos zonas, aktyvavus apsaugą visoje sistemoje, laikyti įjungtas ar išjungtas. Pagal pradinius gamintojo parametrus, visos aktyvuotos zonos yra įjungtos. Bet kurią saugomą zoną galima įjungti siunčiant SMS žinutę formatu*: XXXX_Z1:ON;Z2:ON;Z3:ON Bet kurią saugomą zoną galima išjungti siunčiant SMS žinutę formatu*: XXXX_Z1:OFF;Z2:OFF;Z3:OFF 1111 Z2: ON * Nurodoma tiek zonų, kiek jų būsenų norima pakeisti, įrašai atskiriami ; simboliu Sistemos aktyvuotų zonų parametrai Norint sužinoti sistemos aktyvių zonų aliarmų tekstus bei būsenas, siunčiama SMS žinutė: XXXX_STATUS 1111 STA TUS Sistemos atsakymas gaunamas SMS žinute, pvz.: Z1:ON/OFF:Zone1; Z2:ON/OFF:Zone2; C1:ON/ OFF:Controller1; C2:ON/OFF:Controller2; Pastarąja informacine SMS žinute nurodomi visi prijungti prie sistemos belaidžiai ELDES įrenginiai ir esami jų parametrai. DĖMESIO: ELDES apsaugos sistema praneša apie visas aktyvias zonas. Jeigu aktyvių zonų yra daug, apie visas jas informuojama keliomis SMS žinutėmis Laisvų kanalų skaičiaus užklausimas Norint sužinoti kiek dar galima prie centrinės apsaugos sistemos prijungti belaidžių įrenginių, siunčiama SMS žinutė: XXXX_STATUS_FREE PASTABA: Maksimalus belaidžių įrenginių skaičius, kuriuos galima prijungti prie centrinės apsaugos sistemos, yra 16 vnt. VARTOTOJO VADOVAS ELDES EWD1 V1.0 11
12 4.5. Magnetinių durų kontaktų EWD1 keitimas Norint pakeisti seną magnetinį durų kontaktą EWD1 nauju, siunčiama SMS žinutė: XXXX_REP:ID<ID rep: < Čia vietoje ID nurodoma senojo magnetinių durų kontaktų EWD1 identifikacijos numeris ID, o naujojo vietoje ID5 žymėjimo. Sistema automatiškai suteikia buvusius senojo magnetinio durų kontakto EWD1 nustatymus naujajam Sirenos pašalinimas Norint pašalinti magnetinį durų kontaktą EWD1 iš apsaugos sistemos, siunčiama SMS žinutė: XXXX_DEL:ID Čia vietoje ID nurodomas magnetinio durų kontakto EWD1, kurį norima panaikinti, identifikacijos ID numeris. Iš sistemos pašalintos zonos gali būti naudojamos kitiems belaidžiams įrenginiams prijungti del:
13 5. Papildoma informacija Atsakomybės ribojimas Pirkėjas sutinka, kad sistema sumažina gaisro, plėšimo, vagystės ar kitą riziką, tačiau tai nėra draudimas ar garantija, kad paminėti veiksniai neįvyks, bei nebus asmenų sužeidimų, ar turto praradimo, ar sunaikinimo atvejų. ELDES UAB neprisiima jokios atsakomybės už tiesioginę ar netiesioginę žalą ar nuostolius, taip pat negautas pajamas, naudojantis sistema. ELDES UAB atsakomybė, kiek tai leidžia galiojantys įstatymai, neviršija produkto įsigijimo kainos. Korinio ryšio paslaugas teikiantys GSM operatoriai nėra susiję su ELDES UAB bendrove. Todėl bendrovė neprisiima jokios atsakomybės už tinklo paslaugas, jo aprėptį bei funkcionavimą. Garantinis laikotarpis ELDES UAB suteikia įsigytam produktui 24 mėn. Garantiją. Garantinis laikotarpis pradedamas skaičiuoti nuo produkto pardavimo pirmam galutiniam vartotojui datos. Garantija taikoma tik jei sistema buvo naudota pagal paskirtį, laikantis visų vartotojo vadovo instrukcijų, bei techninėje specifikacijoje nustatytų sąlygų ir maksimalių leistinų reikšmių. Pardavimo data laikoma čekio, sąskaitos ar kito pardavimo dokumento data. Garantija taikoma tik kartu su paminėtais dokumentais pateikus užpildytą garantinį taloną. Garantija netaikoma jei sistema buvo paveikta mechaniškai, cheminių medžiagų, drėgmės, korozijos, skysčių, ekstremalių aplinkos veiksnių ar kitokių force majeure aplinkybių. Saugos informacija Kad užtikrinti jūsų ir aplinkinių saugumą prašome perskaityti šias taisykles bei laikytis visų vartotojo vadove esančių montavimo instrukcijų ir nurodymų: Nenaudokite sistemos ten, kur ji gali sukelti trikdžius ar pavojų. Nemontuokite sistemos prie medicininės aparatūros ar prietaisų, jei to reikalauja jų instrukcijos. Nenaudokite sistemos sprogiose vietose. Sistema nėra atspari drėgmei, cheminei aplinkai, bei mechaniniams poveikiams. Neremontuokite sistemos patys. Pagal WEEE direktyvą, perbrauktos šiukšlių dėžės su ratais ženklas reiškia, kad nebetinkamą naudoti gaminį Europos Sąjungoje reikia atiduoti perdirbti atskirai nuo kitų šiukšlių. Copyright UAB ELDES, Visos teisės saugomos Draudžiama kopijuoti, kaupti ar perduoti tretiesiems asmenims, šiame dokumente esančią informaciją, ar bet kokią dokumento dalį be išankstinio raštiško UAB ELDES sutikimo. UAB ELDES pasilieka teisę be išankstinio įspėjimo tobulinti ar keisti bet kuriuos dokumente paminėtus gaminius, taip pat patį dokumentą. UAB ELDES deklaruoja, kad magnetinis durų kontaktas EWD1 atitinka esminius reikalavimus ir kitas 1999/5/EC direktyvos nuostatas. Jos atitikties deklaraciją galima rasti šiame tinklalapyje: VARTOTOJO VADOVAS ELDES EWD1 V1.0 13
14 Made in Lithuania. Pagaminta Lietuvoje.
INDOOR WIRELESS SIREN BELAIDĖ VIDAUS SIRENA EWS1
 INDOOR WIRELESS SIREN BELAIDĖ VIDAUS SIRENA EWS1 Indoor wireless sirens EWS1 are wireless devices with integrated siren speakers which are used for operating ELDES wireless security systems. Users have
OUTDOOR WIRELESS SIREN BELAIDĖ LAUKO SIRENA EWS2
 OUTDOOR WIRELESS SIREN BELAIDĖ LAUKO SIRENA EWS2 Outdoor wireless siren EWS2 is external power supplied siren with integrated wireless module EW1. This wireless module EW1 connects to ELDES wireless security
PIR SENSOR PIR DAVIKLIAI EWP1
 PIR SENSOR PIR DAVIKLIAI EWP1 PIR sensors EWP1 are wireless devices with integrated motion detectors that are used for operating ELDES wireless security systems. These sensors allow expanding security
WIRELESS ZONE & PGM OUTPUT EXPANSION MODULE BELAIDIS ZONŲ IR PGM IŠĖJIMŲ IŠPLĖTIMO MODULIS EW1
 WIRELESS ZONE & PGM OUTPUT EXPANSION MODULE BELAIDIS ZONŲ IR PGM IŠĖJIMŲ IŠPLĖTIMO MODULIS EW1 Wireless expansion module EW1 is a wireless device with 2 zones and 2 PGM outputs. This expansion module connects
WIRELESS INDOOR SIREN BELAIDĖ VIDAUS SIRENA EWS1
 WIRELESS INDOOR SIREN BELAIDĖ VIDAUS SIRENA EWS1 EWS1 is a wireless device with built-in siren speaker and operates with ELDES wireless alarm systems. EWS1 has to be bind to the alarm system by sending
WIRELESS KEY-FOB BELAIDIS PULTELIS EWK1
 WIRELESS KEY-FOB BELAIDIS PULTELIS EWK1 User Manual v1.1 Compatible with: ESIM264 v7.09.02 and up + EWT1 v16.14 and up. EPIR v05.03.01 and up + EWT2 v16.14 and up. ESIM364. For more details, please refer
Wireless Zone & PGM Output Expansion Module Belaidis zonų ir PGM išėjimų išplėtimo modulis EW1B
 Wireless Zone & PGM Output Expansion Module Belaidis zonų ir PGM išėjimų išplėtimo modulis EW1B Wireless expansion module EW1B is a wireless device with 2 zones and 2 PGM outputs. This expansion module
EW1B. Wireless Zone & PGM Output Expansion Module Belaidis zonų ir PGM išėjimų išplėtimo modulis
 Тел: +7 495 7907870 Моб: +7 965 4429948 Skype: Discoverytelecom Mail: info@discoverytelecom.ru www.discoverytelecom.ru Wireless Zone & PGM Output Expansion Module Belaidis zonų ir PGM išėjimų išplėtimo
EKB3W WIRELESS LED KEYPAD
 EKB3W WIRELESS LED KEYPAD User manual v1.6 Compatible with: ESIM364 all versions. EPIR v05.06.02 and up + EWT2 v16.17 and up. EPIR2 all versions. EPIR3 all versions. Main features: Alarm system arming
Тел: Моб: Skype: Discoverytelecom Mail: EWK2 EWK2A WIRELESS KEYFOB
 Тел: +7 495 7907870 Моб: +7 965 4429948 Skype: Discoverytelecom Mail: info@discoverytelecom.ru www.discoverytelecom.ru A WIRELESS KEYFOB User Manual v1.1 Compatible with: ESIM264 v7.14.00 and up + EWT1
EWS3 WIRELESS INDOOR SIREN
 EWS3 WIRELESS INDOOR SIREN User manual v1.2 Compatible with: ESIM264 v7.14.07 and up. ESIM364 v02.06.09 and up.. ESIM384 all versions. EPIR2 v01.01.12 and up. EPIR3 all versions. PITBULL ALARM all versions.
EWP2WIRELESS MOTION DETECTOR
 EN EWP2WIRELESS MOTION DETECTOR User manual v1.2 Compatible with: ESIM364 v02.08.00 and up. EPIR3 v1.2.0 and up EPIR2 v01.03.02 and up Main features: Built-in dual element passive infrared (PIR) sensor.
1. CONTENTS OF PACK 2. TECHNICAL SPECIFICATIONS ... User Manual v1.1. Compatible with: ESIM264 v and up. ESIM364 all versions
 EKB2 LCD KEYPAD User Manual v1.1 Compatible with: ESIM264 v7.09.02 and up. ESIM364 all versions Main features: Alarm system arming & disarming; STAY-arming & disarming; parameter configuration; PGM output
EWR2 WIRELESS SIGNAL REPEATER
 SIGNAL REPEATER User manual v1.0 Compatible with: ESIM364 Ver.02.07.11 and up EPIR3 Ver.01.01.00 and up EWP1 Ver.16 and up EKB3W Ver.8 and up EW1 Ver.33 and up EWS1 Ver.16 and up EWD1 Ver.19 and up EWK1
1. Package content. User Manual v1.3
 LED KEYPAD EKB3 User Manual v1.3 Compatible with: ESIM264 v07.14.02 and up. ESIM364 v02.06.01 and up. Main features: Alarm system arming & disarming; Stay mode activation & deactivation; System parameter
COMMUNICATOR ET08 / ET081
 COMMUNICATOR ET08 / ET081 User Manual v1.2 Safety instructions Please read and follow these safety guidelines in order to maintain safety of operators and people around: GSM communicator ET08 / ET081 (further
Any additional devices linked to the system ET08 (computer, sensors, relays etc.) must be approved by LST EN standard.
 must be approved by LST EN standard.") COMMUNICATOR ET08 User Manual v1.0 Safety instructions Please read and follow these safety guidelines in order to maintain safety of operators and people around: GSM communicator (gateway) ET08 (further
COMMUNICATOR ET08 User Manual v1.0 Safety instructions Please read and follow these safety guidelines in order to maintain safety of operators and people around: GSM communicator (gateway) ET08 (further
EP364 USER MANUAL ALARM AND MANAGEMENT SYSTEM
 EP364 USER MANUAL ALARM AND MANAGEMENT SYSTEM User Manual v1.0 Safety instructions Please read and follow these safety guidelines in order to maintain safety of operators and people around: DO NOT use
EWF1 EWF1CO WIRELESS SMOKE DETECTOR WIRELESS SMOKE & CO DETECTOR
 EN EWF1 EWF1CO WIRELESS SMOKE DETECTOR WIRELESS SMOKE & CO DETECTOR User manual v1.2 EWF1 compatible with: ESIM264 v7.11.30 and up + EWT1 16.14 and up. ESIM364 v02.04.01 and up. ESIM384 all versions. EPIR2
PITBULL ALARM PRO. GSM apsaugos sistema
 LT PITBULL ALARM PRO GSM apsaugos sistema Turinys Techninės specifikacijos...4 Apsaugos sistemos PITBULL ALARM PRO komponentai...5 1. TRUMPAS 7 ŽINGSNIŲ PASIRENGIMO VADOVAS...6 APŽVALGA...6 2. GREITO PALEIDIMO
External Wireless Sounder
 External Wireless Sounder WL S50 Installation and Programming Instructions 2 Wireless Sounder Instructions Table of Contents Introduction... 4 Operational Functions... 4 Alarm / Tamper Indication...4 Low
Mobeye CM2410 GSM fire alarm communicator
 PORTAL USER MANUAL Mobeye CM2410 GSM fire alarm communicator Accessory for Ei Electronics fire detector SW version 5.n Incl. CM2400 Attention! Very important This user manual contains important guidelines
75 Atspaudas/Offprint Patrauklios kaimo aplinkos išsaugojimas ir formavimas Sargeliai: Kruenta ISBN
 Should the Greed of Man Come before the Need of Nature? Mark Selby As a native Englishman, and having lived in Lithuania for nearly 5 years, I have come to love this beautiful country. The diversity of
GSM RFID VOICE Alarm System
 GSM RFID VOICE Alarm System User s Manual For a better understanding of this product, please read this user manual thoroughly before using it. CONTENTS [Function Instruction] [Control Panel] Control Panel
USER MANUAL Mobeye ThermoGuard CM2200
 USER MANUAL Mobeye ThermoGuard CM2200 SW version 1.n Attention! Very important This user manual contains important guidelines for the installation and usage of the Mobeye device as described in this manual.
GSM ALARM AND MANAGEMENT SYSTEM ESIM264 COMPLIES WITH EN GRADE 2, CLASS II REQUIREMENTS
 GSM ALARM AND MANAGEMENT SYSTEM ESIM264 COMPLIES WITH EN 50131-1 GRADE 2, CLASS II REQUIREMENTS CONTENTS 1. General Information... 8 1.1 Functionality... 8 1.2 Compatible Device Overview... 8 1.3 Default
External Wireless Sounder
 External Wireless Sounder Model: WL RWS401 Installation and Programming Instructions Table of Contents Introduction... 3 Operational Functions... 3 Alarm / Tamper Indication... 3 Low Battery Indication...
JA-63 Profi User manual
 JA-63 Profi User manual Contents: 1 Limited warranty... 2 2 Indicators... 3 3 Controlling the system... 4 3.1 Arming... 5 3.2 Disarming... 6 3.3 Panic Alarm... 6 3.4 To stop ALARM... 6 3.5 Home arming...
Ontech GSM 9040/50. Reference Manual English -1 -
 Ontech GSM 9040/50 Reference Manual English -1 - Content Welcome... 5 This manual... 5 Text styles... 5 Support... 5 Disclaimer... 5 Overview... 6 Accessories... 6 External temperature sensor 9901... 7
MyNice Welcome to your Nice World. The intelligent solution for the integrated management of the alarm system and of the home s automations.
 MyNice Welcome to your Nice World The intelligent solution for the integrated management of the alarm system and of the home s automations. Home page Wi-Fi and GSM status and connected users System name
ATS1235 Advanced Wireless DGP on 868 MHz AM Installation Sheet
 ATS1235 Advanced Wireless DGP on 868 MHz AM Installation Sheet EN 1 2 1 3 2 4 1 5 12V 6 2 0V D+ D- CON3 7 CON1 ON 3 1 2 3 4 1234 8 3 4 1 0 ON 1 2 3 4 METAL METAL Address 1 1 0 ON 1 2 3 4 Address 2 2011
3 User s settings. 3.3 Internal clock setting
 2.9 Subsystem arming In a large building a sub control panel can be enrolled to the JA-63. The subsystem reports all alarms and failures to the main system. The installer can program if the systems will
 www.eraeverywhere.com ERA Home Security Straight Road, Short Heath, Willenhall, West Midlands, WV12 5RA email: alarms @ eraeverywhere.com Customer Helpline: 0345 257 2500 Vault_V1.0_3616 IMPORTANT Table
Alarm System SECURE AS 302
 Alarm System SECURE AS 302 Operating Manual SECURE Light app now available! Table of Contents Before You Start.................................. 4 User Information....................................4
Wireless Keypad GKP-S8M
 Wireless Keypad GKP-S8M User manual Contents Congratulations on your purchase of this Honeywell wireless keypad. To make the best out of your equipment we advise you to read this manual carefully. This
Wolf Guard Touch Keypad GSM Wireless alarm system User s Manual
 Wolf Guard Touch Keypad GSM Wireless alarm system User s Manual Page 1 Warning Do not remove the front or back cover of the unit and keep it intact. There are no parts inside this unit that can be repaired
MOBILE CALL GSM Alarm System User s Manual
 MOBILE CALL GSM Alarm System User s Manual Profile For a better understanding of this product, please read this user manual thoroughly before using it. Contents Function Introduction (3) Alarm Host Diagram
Profile. For a better understanding of this product, please read this user manual thoroughly before using it.
 Intelligent GSM Auto-Dial Alarm System User s Manual Profile For a better understanding of this product, please read this user manual thoroughly before using it. Contents Function Introduction (3) Alarm
1126 Series Ceiling Mount PIR Motion Detector
 Installation Sheet 1126 Series Ceiling Mount PIR Motion Detector Description The 1126 Series PIR (Passive Infrared) Motion Detectors are a compact wireless PIR. The 1126 Series offer 360, Wide Angle, or
User s guide Personal radio trigger Erik 9100
 User s guide Personal radio trigger Erik 9100 Version 2.0 R4 Important information All systems using radio and telecommunication are subject to interference beyond the user s control. Products from Doro
Other trade names mentioned in this document may be registered trademarks or trademarks of respective product manufacturers or vendor products.
 Attention! Read this user manual carefully. Representative of the company installing the alarm system will explain which security module SP231 functions needs to be activated to ensure proper security
PORTAL USER MANUAL. Mobeye WaterGuard-FS. Float sensor CM2300FS. SW version 5.n
 SW version 5.n PORTAL USER MANUAL Mobeye WaterGuard-FS Float sensor CM2300FS Attention! Very important This user manual contains important guidelines for the installation and usage of the Mobeye device
WIRELESS 868 MHz TEMPERATURE STATION Instruction Manual
 WIRELESS 868 MHz TEMPERATURE STATION Instruction Manual INTRODUCTION: Congratulations on purchasing this temperature station with wireless 868 MHz transmission of outdoor temperature and display of indoor
QUICK USER GUIDE. Alarm Control Panel
 Alarm Control Panel Firmware version 2.10 QUICK USER GUIDE The full version of User Manual and other manuals are available on CD included in the control panel delivery set or on the website www.satel.eu
Preface. Thank you for purchasing our GSM Security Alarm System ( The System )! The System will keep your home and property safe around the clock.
! The System will keep your home and property safe around the clock.") Preface Thank you for purchasing our GSM Security Alarm System ( The System )! The System will keep your home and property safe around the clock. The GSM Security Alarm ( The Alarm ) adopts the most advanced
Preface Thank you for purchasing our GSM Security Alarm System ( The System )! The System will keep your home and property safe around the clock. The GSM Security Alarm ( The Alarm ) adopts the most advanced
Intelligent Wireless GSM Alarm System
 Intelligent Wireless GSM Alarm System 00M2K User s Manual Profile For a better understanding of this product, please read this user manual thoroughly before using it. Contents [Function Instruction] [Alarm
ET082 GSM/GPRS COMMUNICATOR
 ET082 GSM/GPRS COMMUNICATOR User Manual v2.2 Valid for ET082 v01.14.00 and up; hardware version: ET082-30 and up. SAFETY INSTRUCTIONS Please read and follow these safety guidelines to safeguard yourself
ET083 2G/3G COMMUNICATOR
 ET083 2G/3G COMMUNICATOR EN User Manual v1.0 Valid for ET083 v01.00.00 and up SAFETY INSTRUCTIONS Please read and follow these safety guidelines to safeguard yourself and others: 2G/3G communicator ET083
V1.0. Smart Home Alarm System. User Manual. APP download via QR Code scanning. Please read the manual carefully before using.
 V1.0 Smart Home Alarm System User Manual APP download via QR Code scanning Please read the manual carefully before using. Content FUNCTION PROFILE 2 THE SCHEMATIC GRAPH OF HOST 3 PROCESS OF BOOTING 6 OPERATION
System. For a better understanding of this product, please read this user manual thoroughly before using it.
 GSM Alarm System User s Manual For a better understanding of this product, please read this user manual thoroughly before using it. Chapter 1. Features Chapter 2. Control Panel Introduction Chapter 3.
ABOUT THIS DOCUMENT AND THE DOCUMENT STRUCTURE WE USE
 ABOUT THIS DOCUMENT AND THE DOCUMENT STRUCTURE WE USE isocket Smart Relay is a complex Smart House system which is installed in the fuse cabinet (electric cabinet) in the house. We therefore assume that
MANUAL. FLOWMETER MFlow EX
 MANUAL FLOWMETER MFlow EX By JETI model s.r.o 26. 3. 2014 CONTENTS 1 1. INTRODUCTION... 3 2. DECSRIPTION... 3 3. COMMUNICATION OF THE MFLOW SENSOR... 4 4. MFLOW MENU... 5 5. INSTALATION... 7 6. FIRMWARE
PRODUCT CATALOGUE. Cape Town 18 Darter Road Blue Water Estate Kommetjie. Gauteng 245 Louis Botha Avenue Orchards Johannesburg
 PRODUCT CATALOGUE Cape Town 18 Darter Road Blue Water Estate Kommetjie Luke Fowles - 076 161 8124 luke@providenttech.co.za Frank Fowles - 082 445 1541 frank@providenttech.co.za www.providenttech.co.za
BURGLAR ALARM PANEL BS-468
 BURGLAR ALARM PANEL BS-468 Contents 1. Description... 3 2. Instructions for the user... 4 2.1Basic operations... 4 Complete system.... 4 Split system.... 4 2.2 Armed system indication... 5 2.3 Advanced
Fitting instructions
 Fitting instructions Ver. 02_English 02. 11. 2017 CONTENT 1 INTRODUCTION... 3 2 FITTING THE PATRIOT EU... 3 2.1 Electronic diagram... 3 2.2 Fitting instructions... 4 2.3 Final placement... 4 2.4 Alarm
S3 Sim Secual Alarm system with GSM transmitter
 S3 Sim Secual Alarm system with GSM transmitter www.etiger.com Features Control Panel Layout (Back) - ARM CPU + Auror CPU - GSM frequency: 850 / 900 / 1800 / 1900 MHz, suits all phones - Supports up to
1. Introduction. 2. Product overview
 1. Introduction The AG400011 GSM Alarm panel is a control panel that is compatible with other H-net security devices from Everspring, such as wireless sensors, remote keyfobs, tags, and keypad. With this
Instructions manual. By-alarm. By-alarm Manager software
 Instructions manual By-alarm By-alarm Manager software Index 1. Procedure for the complete programming of the By-alarm system 5 Operations to be carried out prior to the programming with By-Alarm Manager
Ion Gateway Cellular Gateway and Wireless Sensors
 Page 1 of 9 Account & Network Setup If this is your first time using the Ion Gateway online system site you will need to create a new account. If you have already created an account you can skip to the
Instruction Manual Contact Sensor
 Instruction Manual Contact Sensor Model Name:NAS-DS01Z Brand:NEO Coolcam Thank you for your support Please read the instruction manual carefully before operating Please keep the instruction manual after
ALARM CONTROL UNIT CPX200NW
 ALARM CONTROL UNIT CPX200NW User manual Version of the manual: v1.5 Date of issue: 2015.04.08 Firmware version: 1.1.1 GPRS transmitter configurator version: 1.3.45.23 DECLARATION OF COMPLIANCE We, EBS
D3D Wi-Fi GSM Smart Alarm System -User Manual
 D3D Wi-Fi GSM Smart Alarm System -User Manual D3D Wi-Fi / GSM Smart Alarm system (Model : D10). Please read all instructions carefully & follow steps for easy home installation. 1 P a g e D3D Wi-Fi / GSM
D-TECT 3 IP. GJD260 IP Motion Detector
 D-TECT 3 IP GJD260 IP Motion Detector PACKAGE CONTENTS 1 x D-TECT 3 IP 1 x Drilling template for fixing holes 3 x 31.75mm wall plugs 3 x 31.75mm screws 2 x Spare sliding curtains 2 x Tamper feet 1 x Tamper
LevelSET S GSM Functionalities Instructions for Commissioning and Use
 Labkotec Oy Myllyhaantie 6 FI-33960 Pirkkala, Finland Tel: +358 29 006 260 Fax: +358 29 006 1260 22.10.2010 Internet: www.labkotec.fi LevelSET S GSM Functionalities Instructions for Commissioning and Use
PITBULL ALARM. GSM Alarm System
 PITBULL ALARM GSM Alarm System Contents Technical Specifications...4 Components of the PITBULL ALARM security system...5 1. 7-STEP START GUIDE...6 OVERVIEW...6 2. QUICK START GUIDE...10 2.1. How and where
WIRELESS OUTDOOR DUAL TECHNOLOGY MOTION DETECTOR AOD-200
 aod-200_en 05/16 WIRELESS OUTDOOR DUAL TECHNOLOGY MOTION DETECTOR AOD-200 SATEL sp. z o.o. ul. Budowlanych 66 80-298 Gdańsk POLAND tel. +48 58 320 94 00 www.satel.eu Firmware version 1.0 WARNING The device
Version 1.03 January-2002 USER S MANUAL
 Version 1.03 January-2002 1 USER S MANUAL 2 Version 1.03 January-2002 System Details CUSTOMER:...... PHONE:... FAX:... INSTALLED BY:...... PHONE:... FAX:... MAINTENANCE & SERVICE:...... PHONE:... FAX:...
GSM Alarm System. User s Manual. Profile. MOBILE CALL GSM Alarm System
 MOBILE CALL GSM Alarm System GSM Alarm System System disarmed 11/26/2013 User s Manual Profile For a better understanding of this product, please read this user manual thoroughly before using it. CONTENTS
Operating Instruction
 Operating Instruction For the version: Pool Safety System VE201503 1 Copyright Deep Blue AG, 2015 Patent pending PCT/EP2009/007105 Germany 10 2008 050 558.7 2 1 Explanation of Symbols and Safety Notes
NEW GENERATION WIRELESS ALARM SYSTEMS
 GENERATION WIRELESS ALARM SYSTEMS PERFECT SOLUTIONS FOR SECURING YOUR PROPERTY 2018 2 We are Lithuanian technology company that has been developing professional home security solutions for over 12 years
1. User features of the GSM dialer
 1. User features of the GSM dialer The JA60GSM dialer offers many useful features described in detail below. The installer should properly demonstrate the use of the system to the user after installation
GSM SMS Controller GSM SMS Alarm Unit S130 S140 S150. User Manual
 Remote switching machines with a SMS text from your mobile phone! Remote Monitoring your assets in the worldwide by your mobile Phone! GSM SMS Controller GSM SMS Alarm Unit S130 S140 S150 User Manual Ver
DET-RWATER Flood Detector Installation Guide
 DET-RWATER Flood Detector Installation Guide Fig 1 1 2 3 4 5 Fig 2 Page 2 2 SUPER DISABLE ALARM ON DRY DISABLE TAMP SENSOR ENABLE VIEW STATE Fig 3 Page 3 1mm Fig 4 Page 4 1. Introduction The DET-RWATER
USER S MANUAL. Profile. MOBILE CALL GSM Alarm System
 MOBILE CALL GSM Alarm System USER S MANUAL System disarmed 00/00/00 00:00 ARM STAY CALL 1 2 3 4 5 6 7 8 9 Power Set Signal Alarm SOS ESC 0 ENTER Profile For a better understanding of this product, please
Contents Description... 3 AZOR kit contents... 4 Installation... 7 Control Settings System extension Other information...
 MLO51205-1 - Contents Description... 3 AZOR kit contents... 4 AZ-10K GSM control unit... 4 AZ-10D RFID tag reader... 5 AZ-10M door-opening detector... 5 AZ-10P motion detector... 6 Installation... 7 Door-opening
your silent and loyal servant
 Easy installation, simple programming! your silent and loyal servant The GD-04 is a GSM remote controller-sensor. It sends SMSes, calls - switches on/off and guards. DAViD cannot speak but is understood
EZY SWITCH. SMS-IRR-4 System Monitor Installation Manual
 EZY SWITCH SMS-IRR-4 System Monitor Installation Manual Table of Contents COMMANDS Getting Started Setting Up Initial User 7 Adding a User 8 Removing a User 8 Adding an Administrator 8 Removing the Administrator
Elderly Care Alarm System
 Introduction 24/7 Peace of mind for your family The GSM Elderly Care Alarm System is a new released smart solution for take care of senior, aged, elder or disabled people on their daily life. Big LED display
ALMDT-2000 INFRARED MOTION SENSOR
 SECURITY PLUS-LINE ALMDT-2000 USER MANUAL MULTI LANGUAGE Item 71114 Version 1.0 Visit www.trust.com for the latest instructions ALMDT-2000 INFRARED MOTION SENSOR 1 2 Red LED indicator DEL SET DEL SET 3
User Manual Doc.Ref : JA-KNX-UM. JA-KNX Jablotron KNX Interface ELAUSYS JA-KNX. KNX Interface for Jablotron alarm system.
 Page : 1 of 17. ELAUSYS JA-KNX KNX Interface for Jablotron alarm system User Manual Document history Version. Date Author Comment 1.00 24-JUN-2017 NDE First issue 1.01 14-NOV-2017 NDE Support for user
600 Range Dialer Installation Manual. Version 1.0
 600 Range Dialer Installation Manual Version 1.0 The information contained is supplied without liability for any errors or omissions. No part may be reproduced or used except as authorised by contract
MGC Dock User s Manual
 Operator s Manual Contents Warnings Statements/Avertisseement... 3 READ FIRST BEFORE OPERATION... 3 Basic Operation... 4 Clip Dock Components... 4 LEDs... 4 Operation... 5 Turning the Clip Dock On and
Basic solution for small installations based on JA-100K
 Basic solution for small installations based on JA-100K TABLE OF CONTENTS 1 1. INTRODUCTION 3 2. OPERATING THE JABLOTRON 100 SYSTEM 3 2.1 Keypad code authorization 5 2.2 Using the system keypad 6 2.2.1
Ref. 1067/024 Ref. 1067/032A Ref. 1067/052A
 DS1067-062C Mod. 1067 LBT20063 REMOTE CONTROLLABLE ALARM CONTROL PANELS Ref. 1067/024 Ref. 1067/032A Ref. 1067/052A USER MANUAL TABLE OF CONTENTS INTRODUCTION... 6 1 CONTROL DEVICES... 7 1.1 1067/022 keypad
GSM WIRELESS ALARM SYSTEM Model: GSM-0308W
 GSM WIRELESS ALARM SYSTEM Model: GSM-0308W Table of Contents Application..... 3 Instructions. 4 Installation Diagram....5 Device Design... 5 Technical Parameter....6 Setup Instruction.6 1 Administrator
Advisor Advanced User Guide
 Advisor Advanced User Guide P/N 1068996 (EN) REV G ISS 28AUG15 Copyright Trademarks and patents Manufacturer Version Certification 2015 UTC Fire & Security Americas Corporation, Inc. All rights reserved.
GLOBAL. InstallatIon & operation manual
 InstallatIon & operation manual INDEX 1. INTRODUCTION... 5 2. FEATURES AND FUNCTIONS 2.1 Reporting Options... 2.2 Interfaces... 2.3 Programming... 2.4 Indicators and Controls...... 6 6 6 6 6 3. INSTALLATION...
CG500SKE SKYEYE GATEWAY USER MANUAL VERSION OCTOBER Disclaimers and Copyright
 CG500SKE SKYEYE GATEWAY USER MANUAL CG500SKE SkyEYE Gateway VERSION 1.2 26 OCTOBER 2014 Disclaimers and Copyright Nothing contained in this publication is to be construed as granting any right, by implication
INSTALLATION AND USER MANUAL SG2. GSM+WiFi. Alarm Security System
 INSTALLATION AND USER MANUAL GSM+WiFi Alarm Security System SG2 SIM Features - 16-bit high speed processor, reliable capability - 100% wireless D.I.Y. - Built-in 1,000,000 RF codes - Supports 10 remote
HELPY CONTROLLER QUICK GUIDE
 Alarm system for elevators compliant with the European Standard EN 81-28:2018 HELPY CONTROLLER QUICK GUIDE 05/04/2019 DESCRIPTION Autodialer specifically designed for installation on elevator controller.
IP & SMS Alarm Communicator
 Models: WGSMSC You deserve to feel safe, secure & protected IP & SMS Alarm Communicator Quick Start Guide Thank you for purchasing a Watchguard IP & SMS Alarm Communicator This Quick Start Guide covers
Remote switching machines with a SMS text from your mobile phone! Remote Monitoring your assets in the worldwide by your mobile Phone!
 Remote switching machines with a SMS text from your mobile phone! Remote Monitoring your assets in the worldwide by your mobile Phone! GSM SMS Controller DCS-130 User Manual Ver 1.20 Date Issued: 14-9-2010
X64 Wireless Training
 X64 Wireless Training IDS Contents 1 Contents Features 3 Wireless Hardware 4 IDS & Duevi integration PCB 5 LED operation 5 Wireless Device Hardware setup 6 Location 260 7 LED Keypad Instructions 7 Adding
TYDOM 315. * _Rev.2* GSM domotics transmitter. 1. Presentation
 TYDOM 5 GSM domotics transmitter ) Présentation. Presentation Delta Dore hereby declares that the equipment complies with the essential requirements and other relevant provisions of the R&TTE Directive
Q3200 Smart Home Alarm. Kit Content and Installation Guide
 Q3200 Smart Home Alarm Kit Content and Installation Guide Table of Contents 1. Introduction 1 2. Installation 4 3. Troubleshooting & Factory Reset 7 4. Specifications 9 Information and illustrations are
Сontrol panel Contact GSM-9N
 Сontrol panel Contact GSM-9N Data sheet Device identification number 2 1. General Information The Contact GSM-9N control panel (hereinafter referred to as the device) is designed for setting up security
1125 PIR Motion Detector
 Tamper Survey LED INSTALLATION SHEET 1125 PIR Motion Detector Description The 1125 PIR (Passive Infrared) Motion Detector is a wireless, low current sensor for use with the 1100D Wireless Receiver. Using
ALARM CONTROL UNIT CPX220NWB
 ALARM CONTROL UNIT CPX220NWB User manual Version of the manual: v1.1 Date of issue: 2016.10.21 Firmware version: 2.6.2 GPRS transmitter configurator version: 1.3.64.3 OSM server version: 1.3.60.4 DECLARATION
Register the Gateway via PC. Package Content. Gateway Installation. 1 x Gateway 1 x Voice Siren 1 x IP Camera*
 Package Content 1 x Gateway 1 x Voice Siren 1 x IP Camera* Register the Gateway via PC Create a new account at www.elro-smartalarm.com 1. Click on Create a new account 1 x PIR Motion 1 x Magnetic 1 x Remote
ALKCT-2000 ARM/DISARM REMOTE CONTROL
 SECURITY PLUS-LINE ALKCT-2000 USER MANUAL MULTI LANGUAGE Item 71115 Version 1.0 Visit www.trust.com for the latest instructions ALKCT-2000 ARM/DISARM REMOTE CONTROL 1 2 Red LED indicator 3 4 Short press