INSTALLATION INSTRUCTIONS KYMCO 500I, 700I SE
|
|
|
- Kory Foster
- 5 years ago
- Views:
Transcription
1 INSTALLATION INSTRUCTIONS KYMCO 500I, 700I SE.


2 TOOLS NEEDED Not included Ratchet handle Socket beg 13 mm Hex key 5 and 6mm (0,51 in) 2 Metric wrench 13mm Screwdriver philips Utility knife Isolating tape clear OR black
 Uninstall the original seats from the UTV, and install seats back by second holes (in red circles).")
3 PREPARATION FOR INSTALLATION: Uninstall all additional systems from the roller cages (work lights, rear mirrors, drink holders etc.) Uninstall the original seats from the UTV, and install seats back by second holes (in red circles). This change will move the seats about 1 inch closer to driving-wheel 3

4 CAB PREVIEW 4

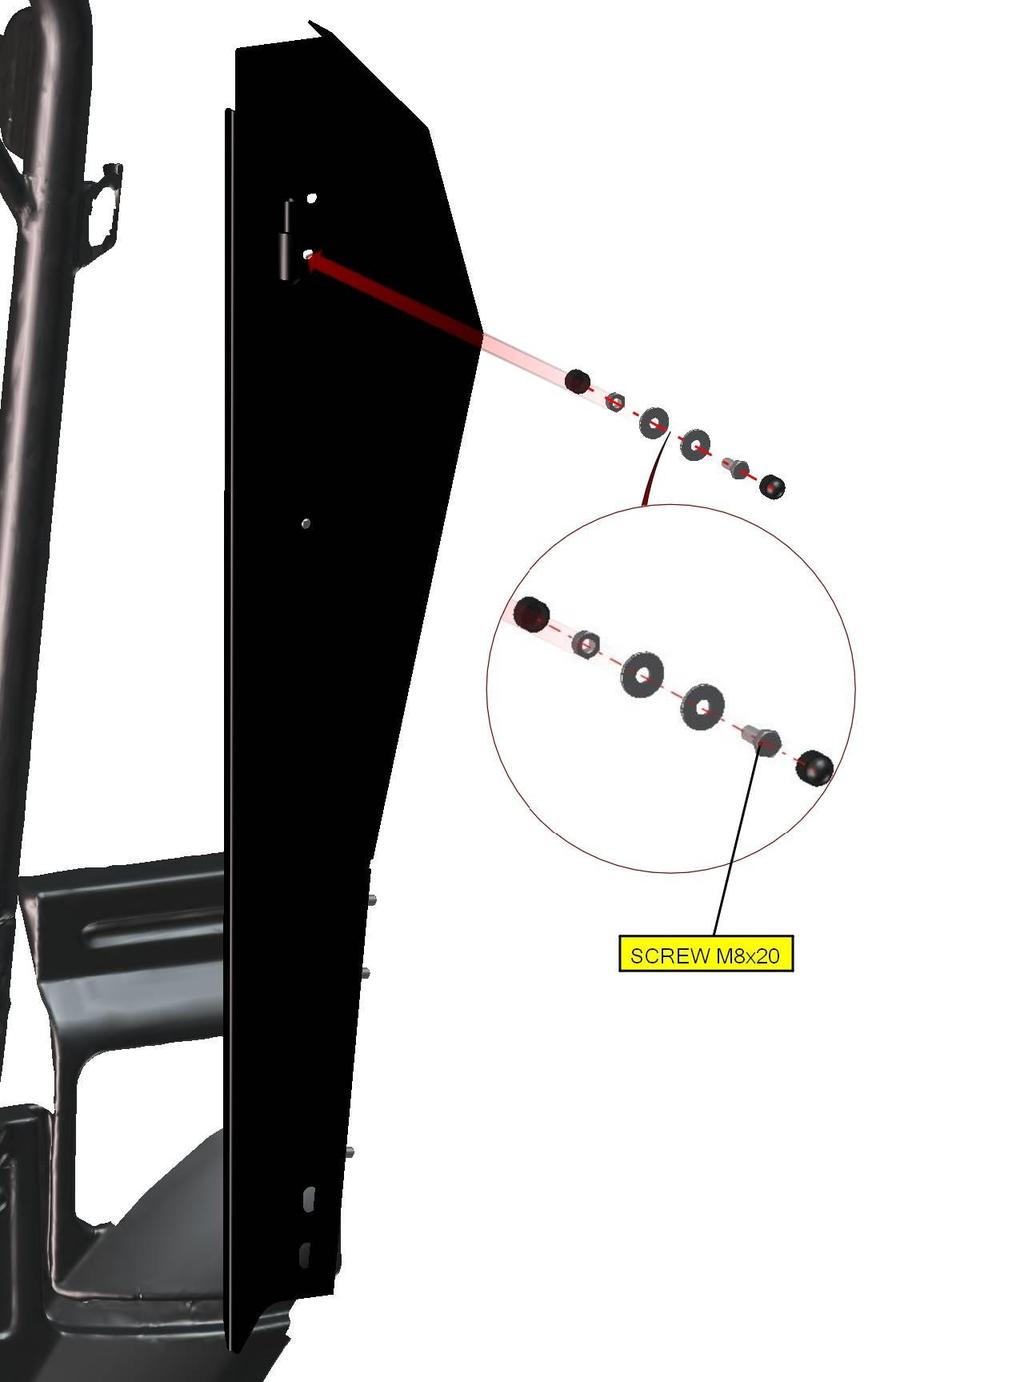
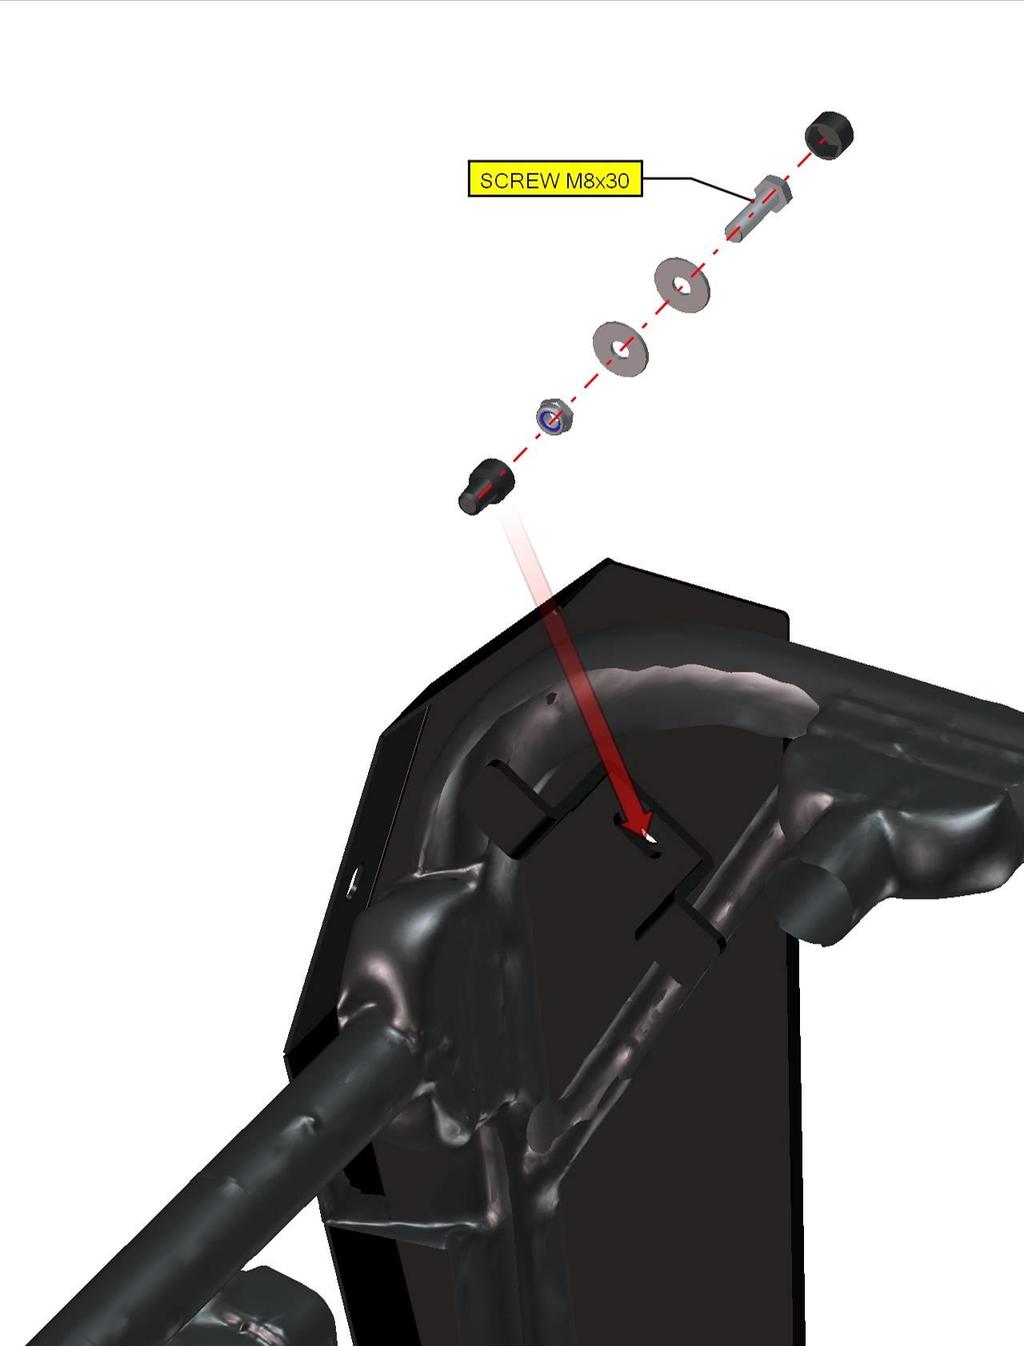
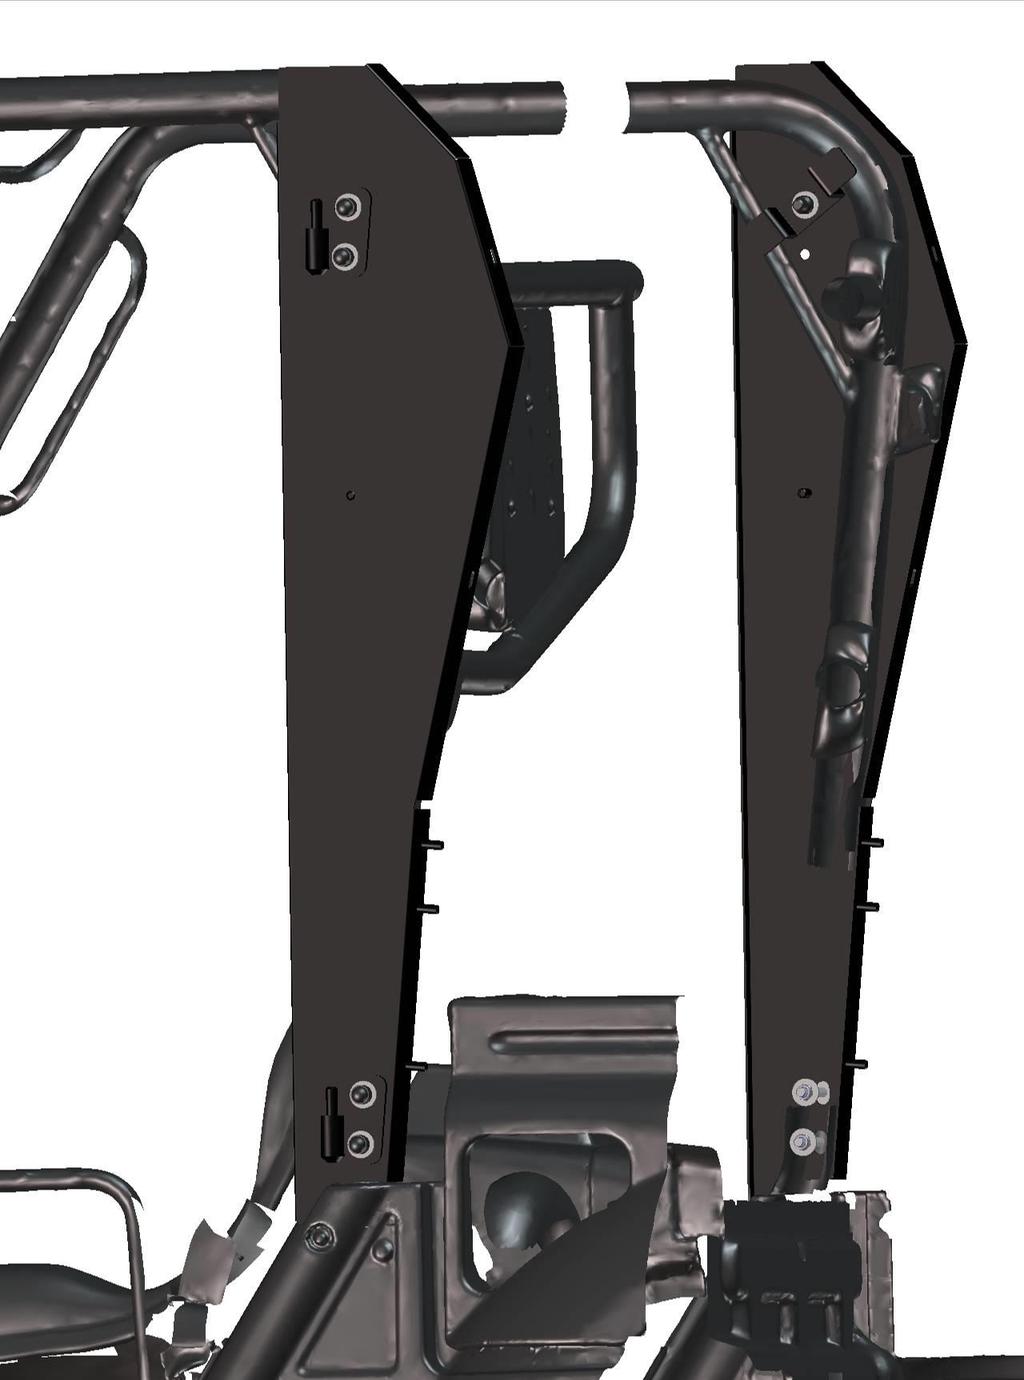
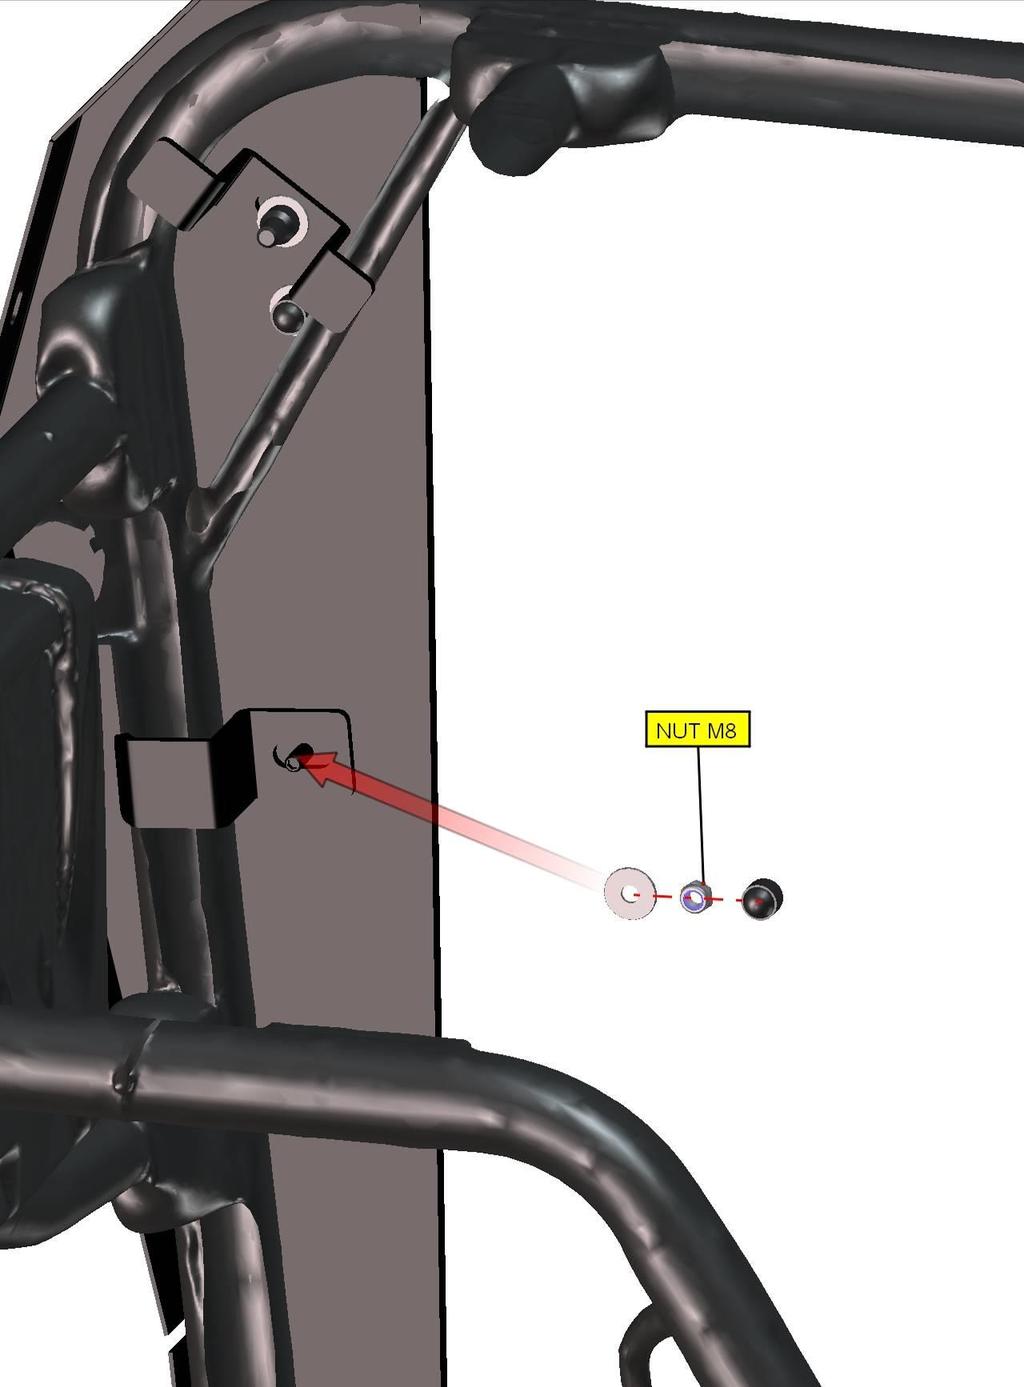
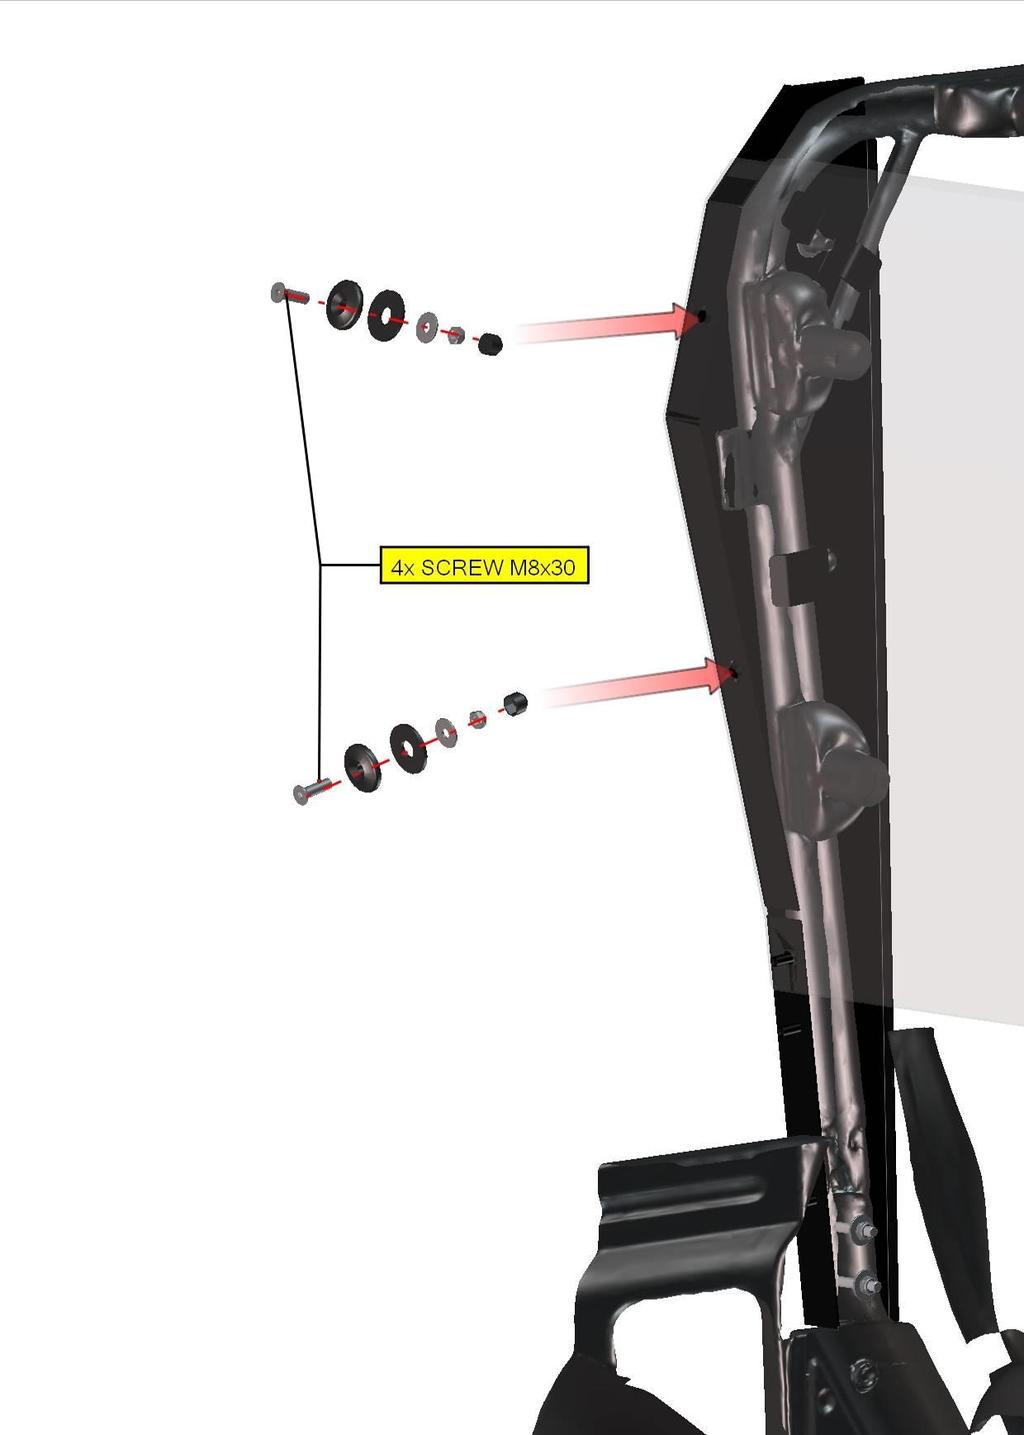
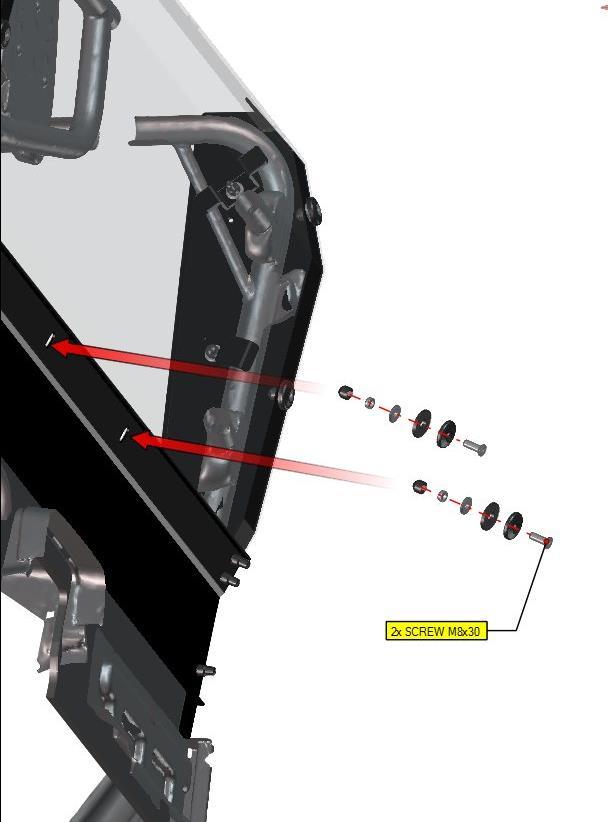
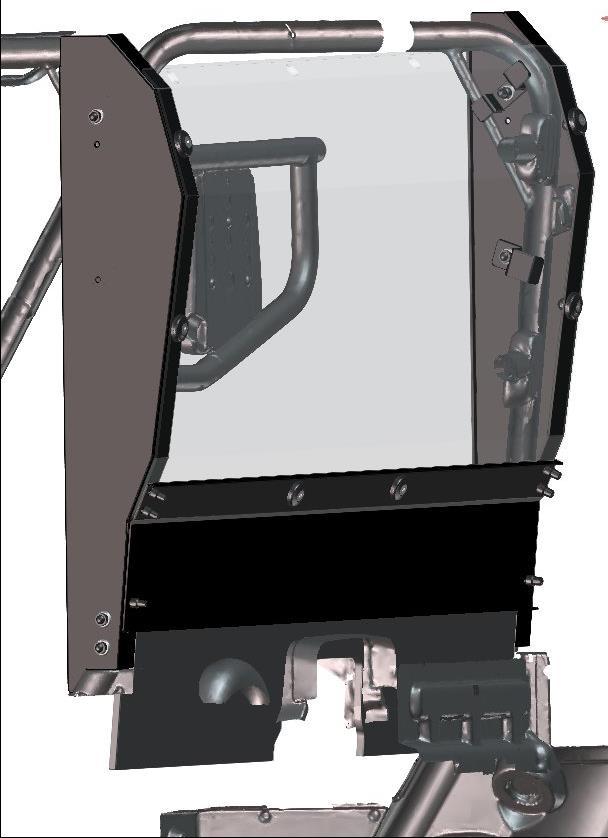
5 DOOR BASE (LEFT + RIGHT) 5
6 6

7 7

8 8

9 9

10 10
11 11
12 12
13 13
14 14

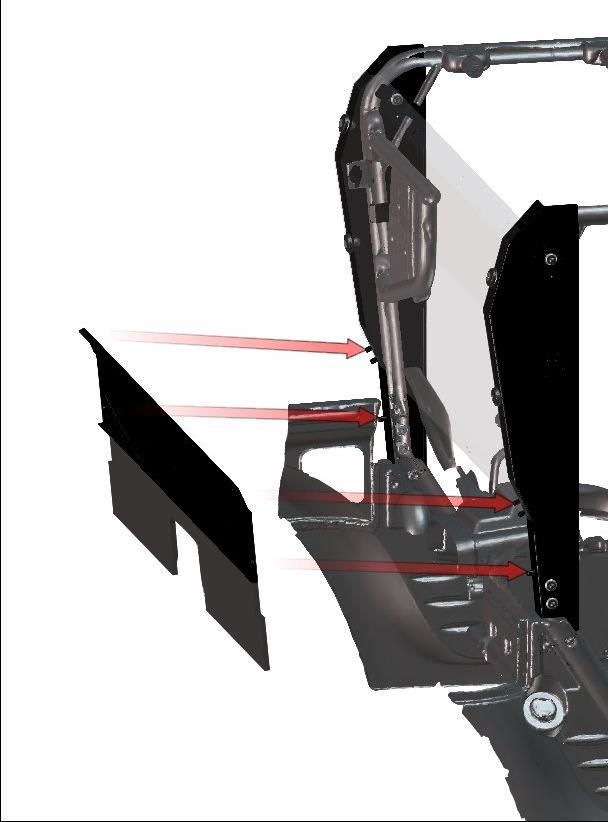
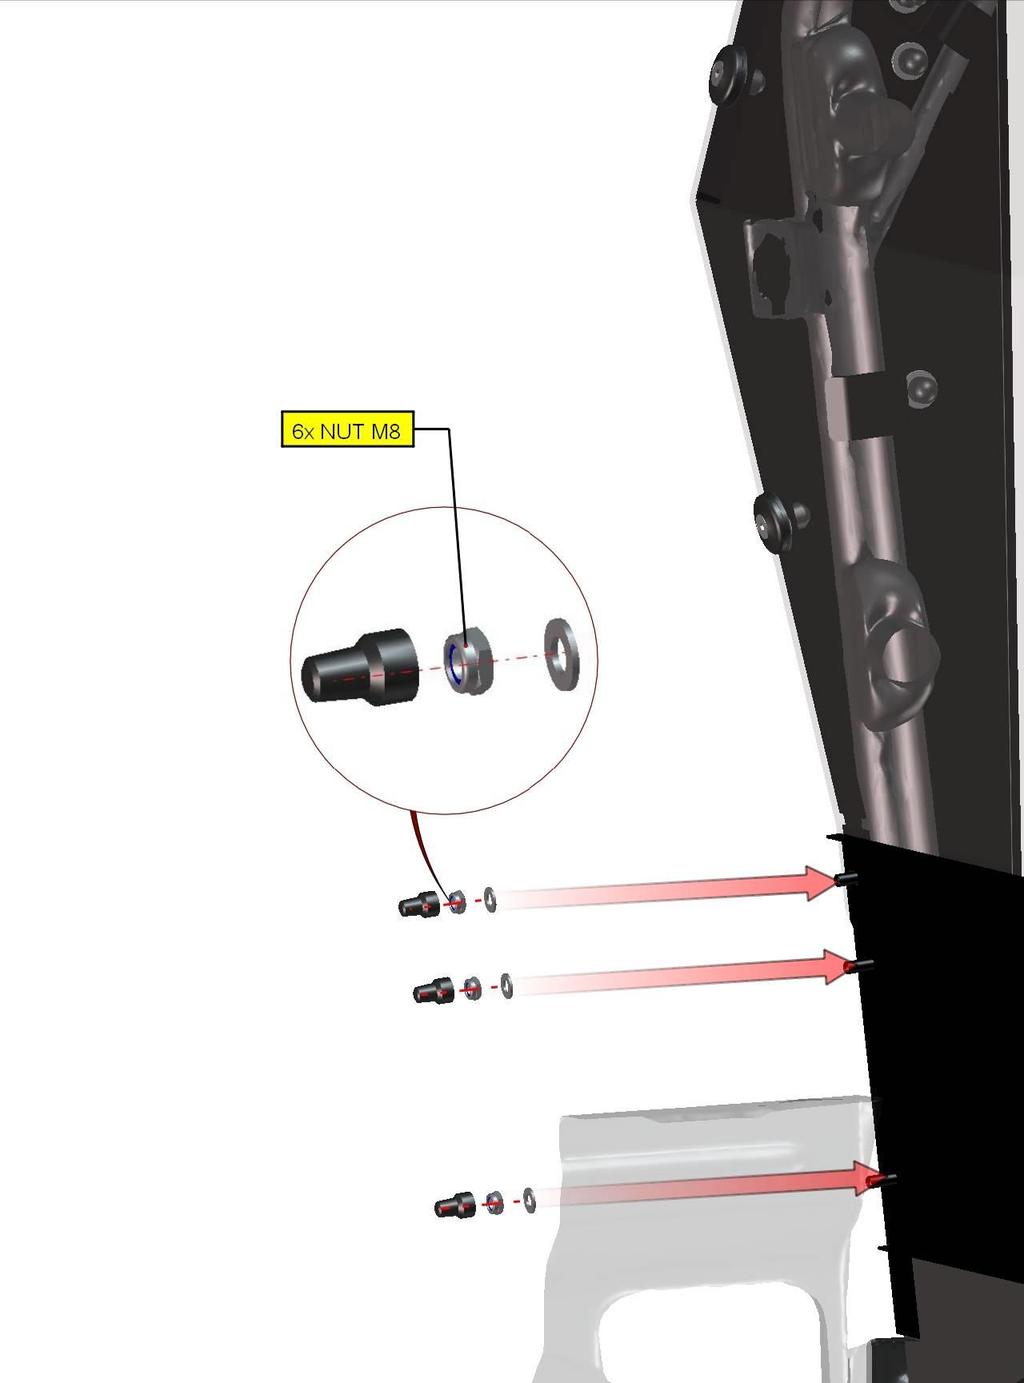
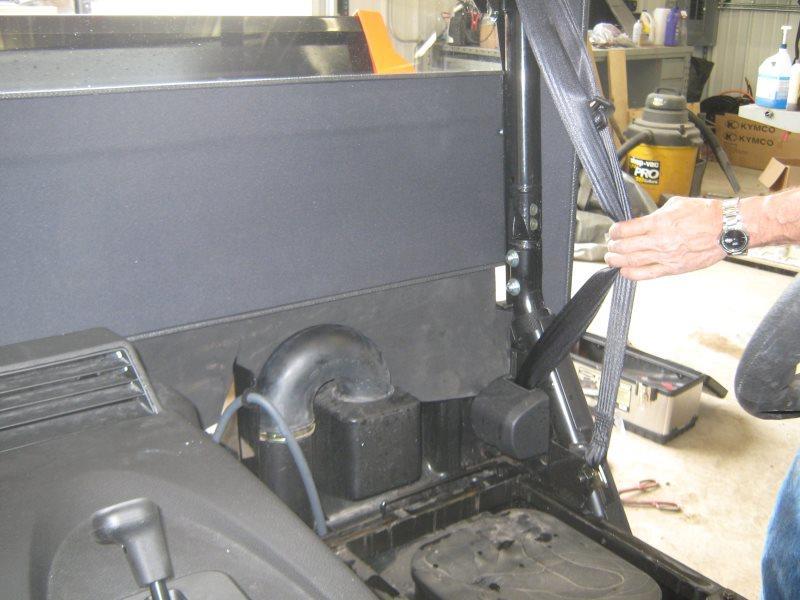
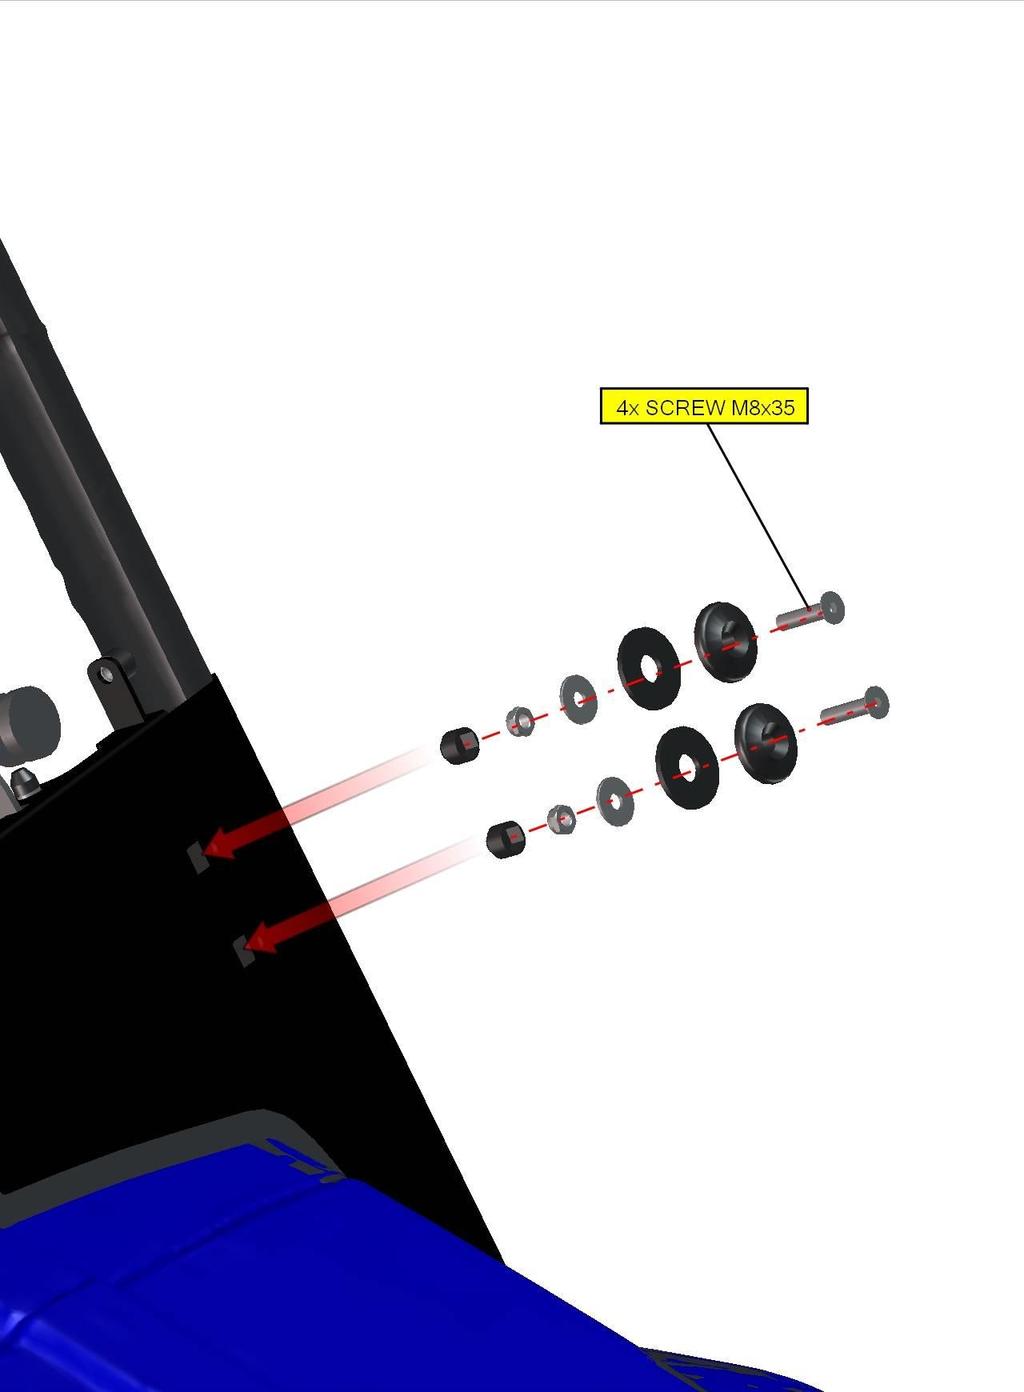
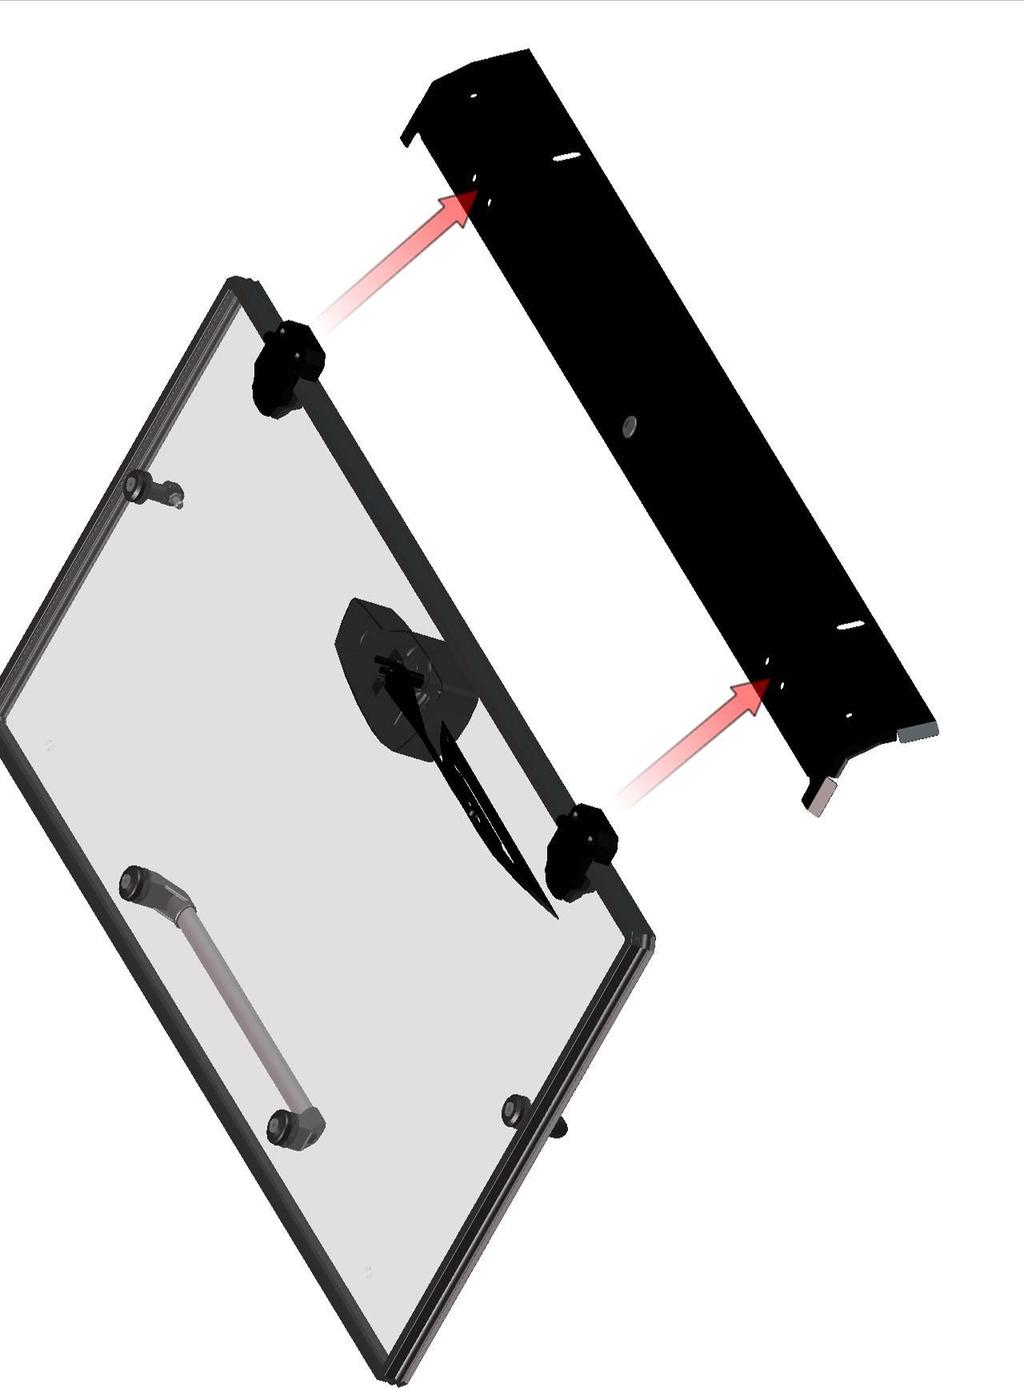
15 REAR PANEL 15
16 16
17 17
18 18
19 19
20 20
21 21

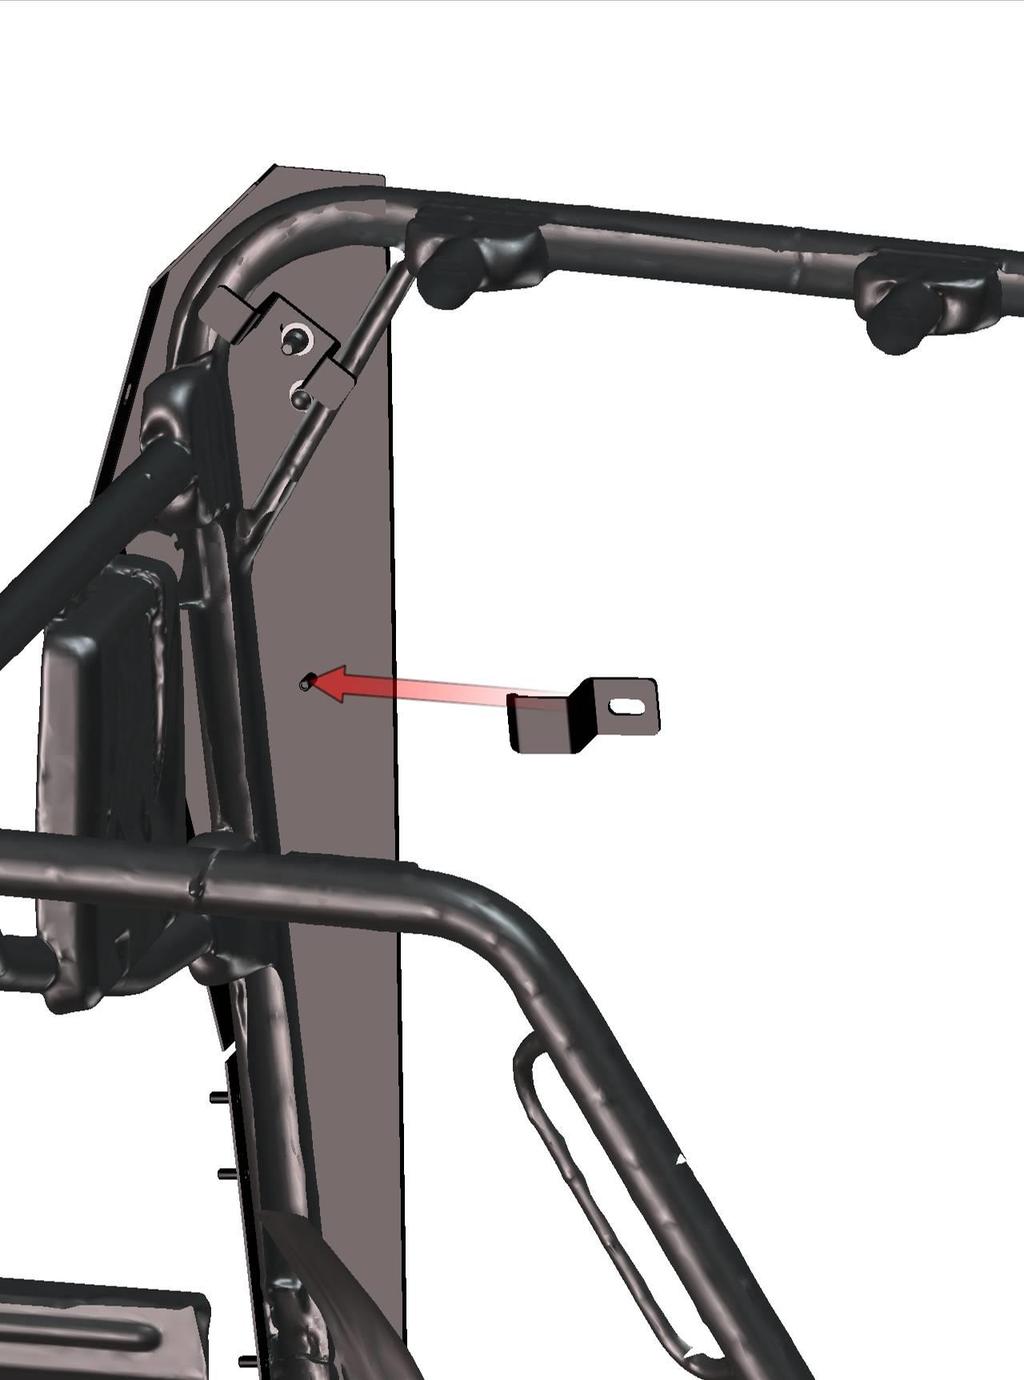
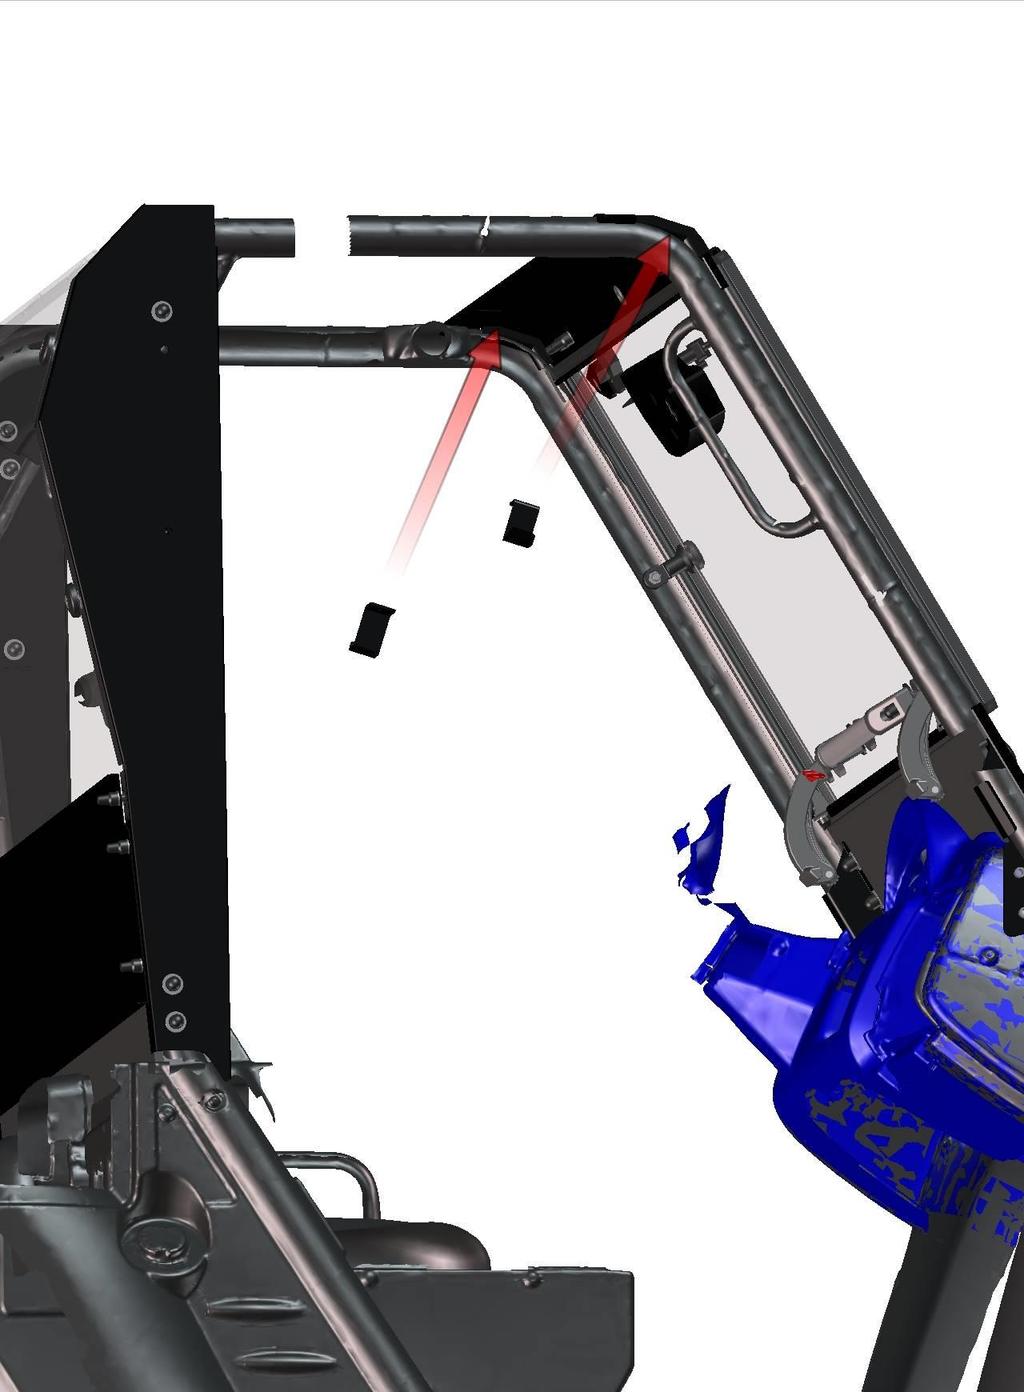
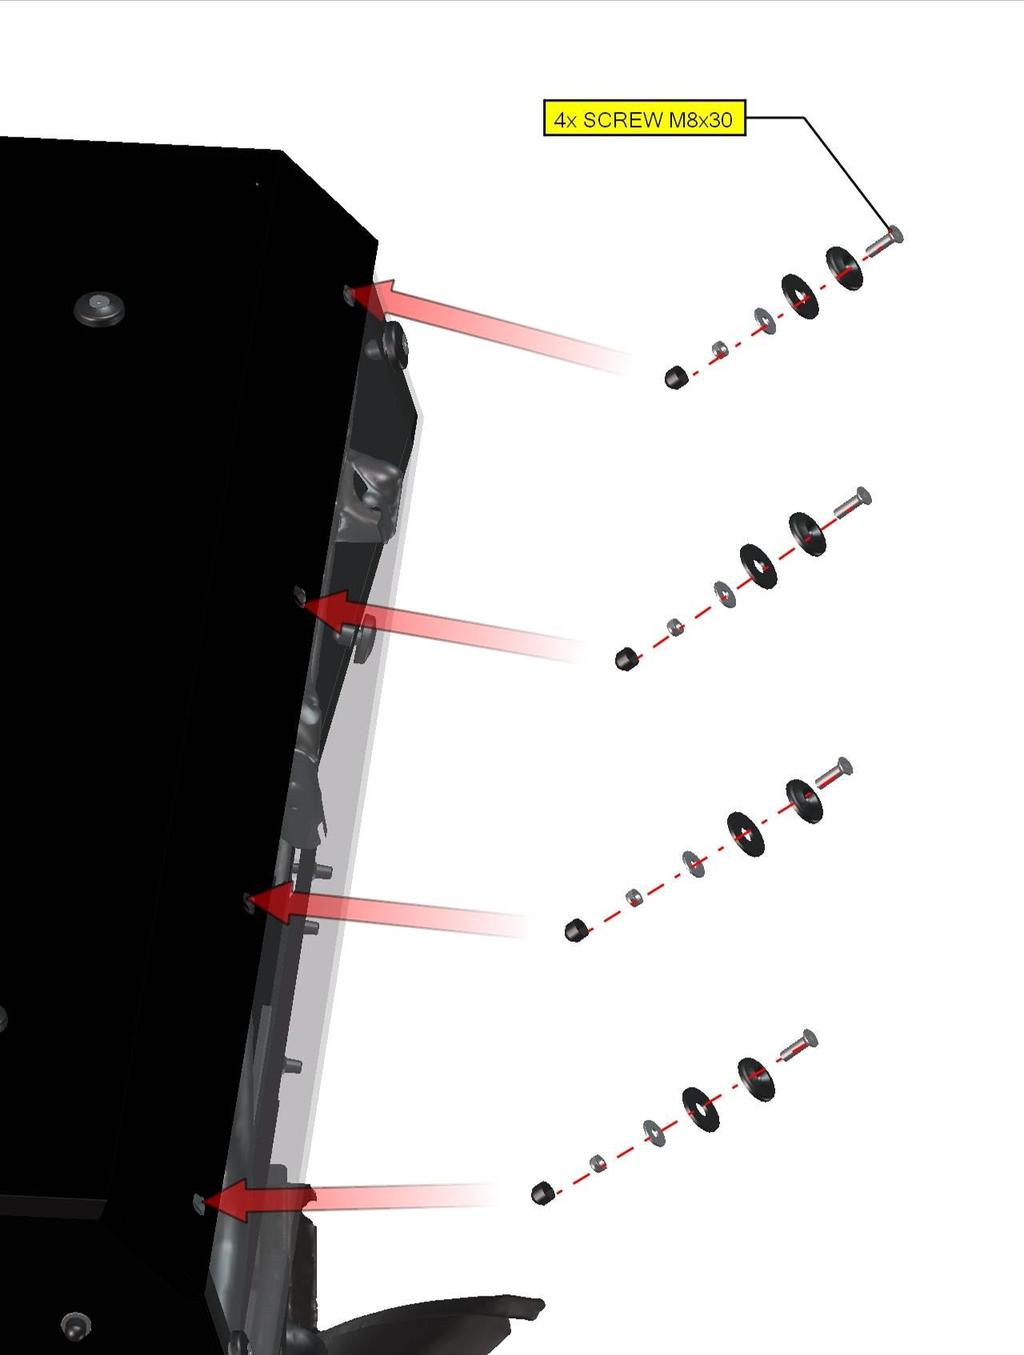
22 FRONT PANEL Use the left door stop holder and left front ledge holder(on picture) on left side of the UTV s roller cage. YOU CAN T MAKE MISTAKE BETWEEN LEFT AND RIGHT PARTS, IF YOU MAKE MISTAKE, YOU ARE GOING TO HAVE BIG PROBLEM WITH DOOR STOP ADJUSTING 22

23 23

24 24
25 25

26 26
27 27

28 28

29 29
30 30

31 31
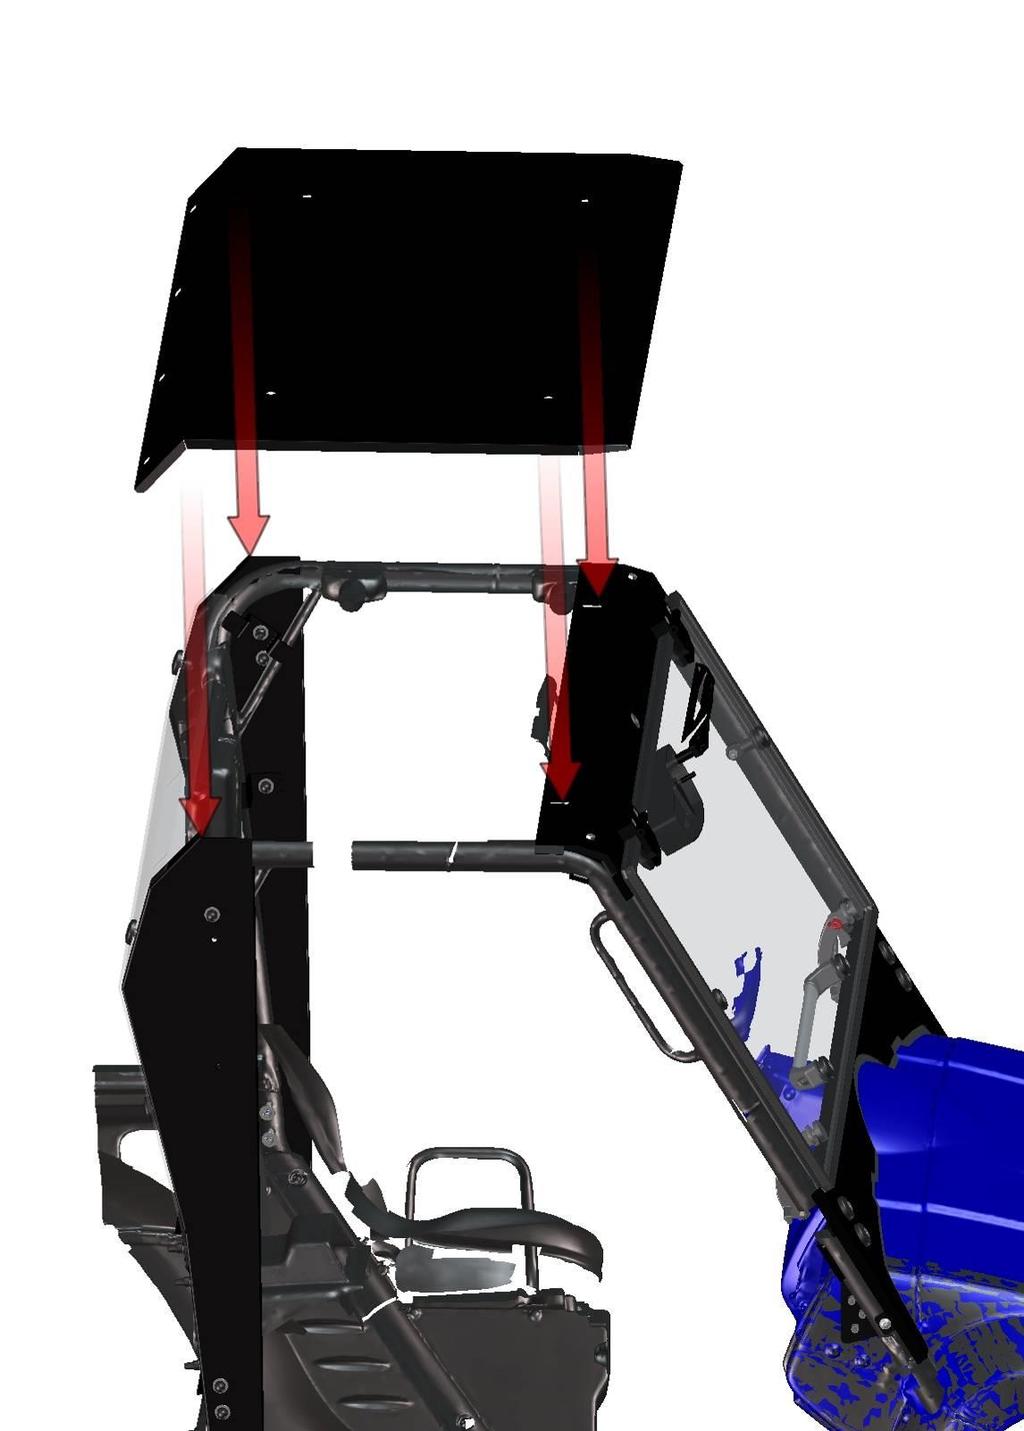
32 ROOF 32
33 33

34 34
35 35

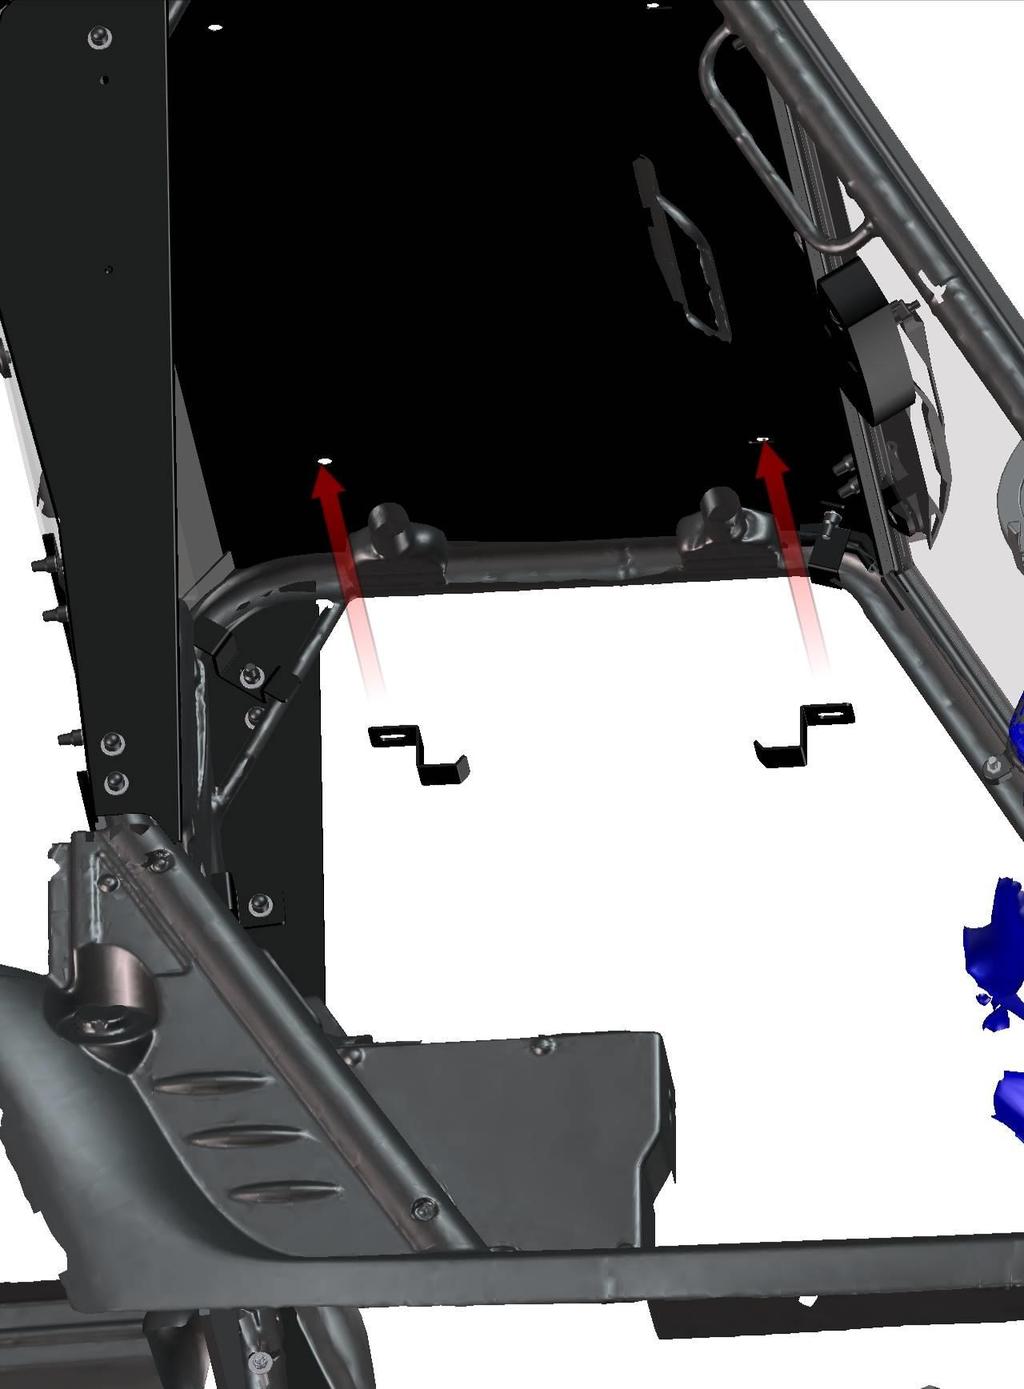
36 FRONT PANEL 36
37 37

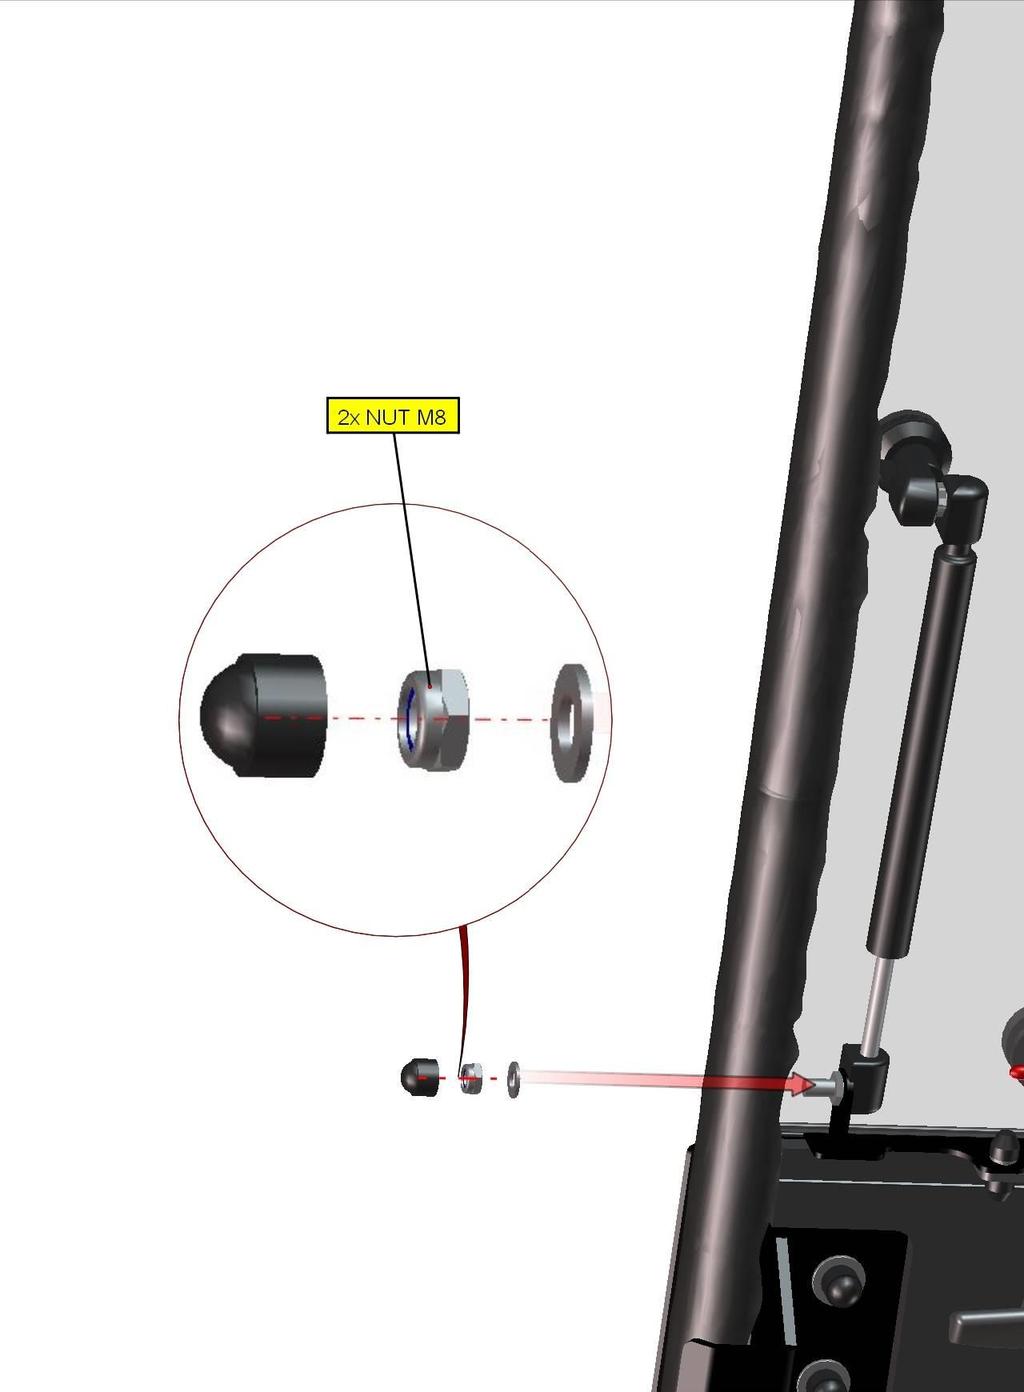
38 It s necessary to install the gas springs in same position like on picture. 38

39 39
40 40

41 LEFT DOOR + RIGHT DOOR 41

42 42

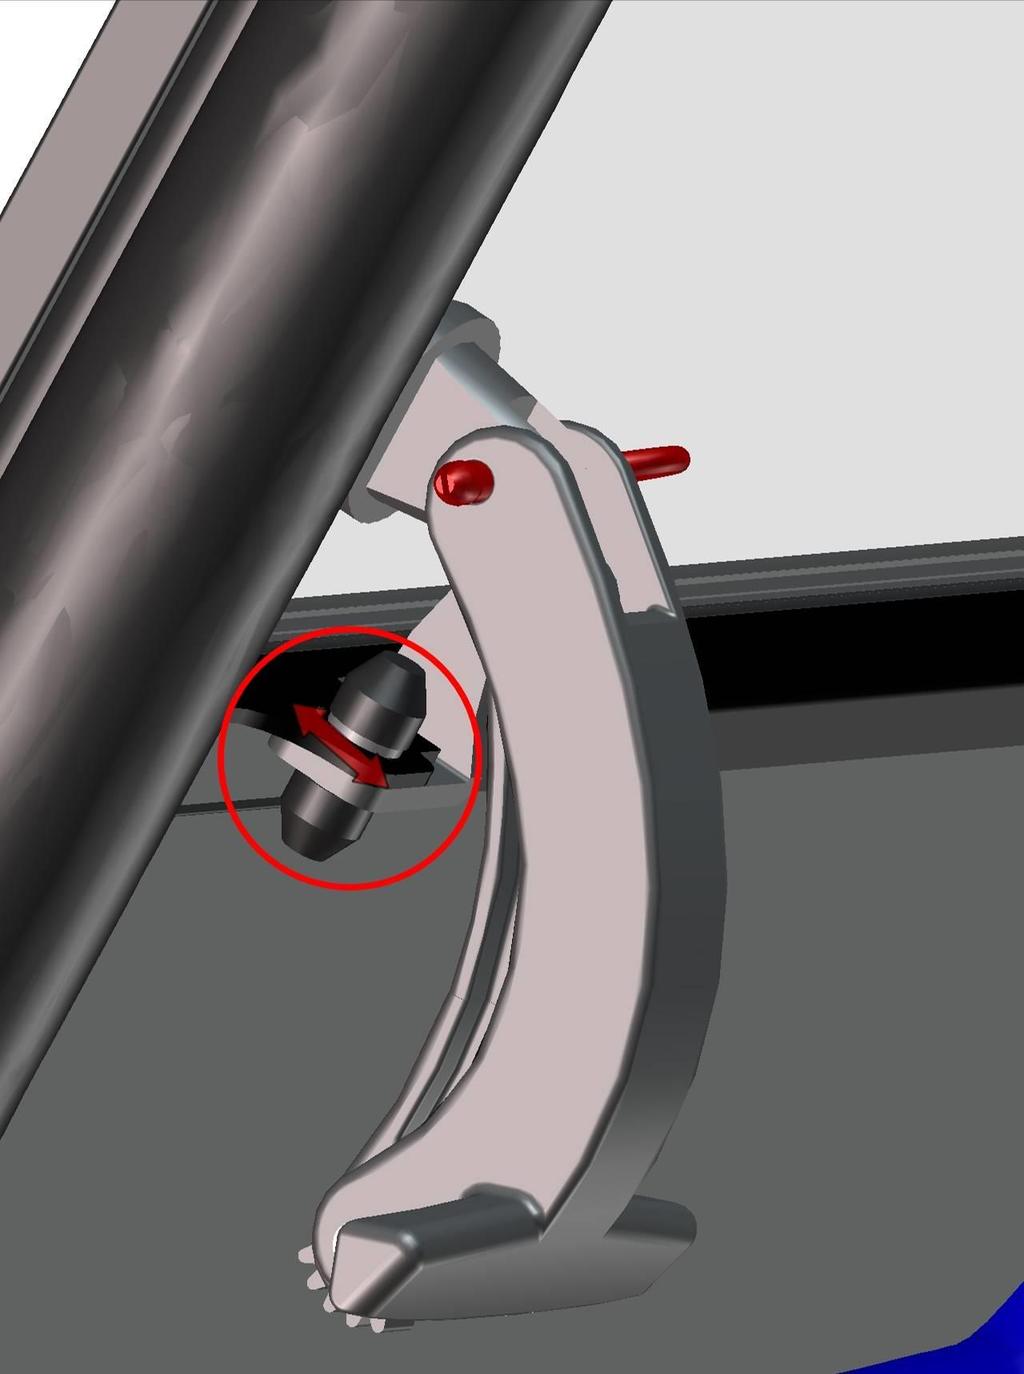
43 If you close the door slowly and adjust the door stop correctly, you can hear 2 clear metalic click. 43

44 44

45 45 See next page.
46 46

47 47


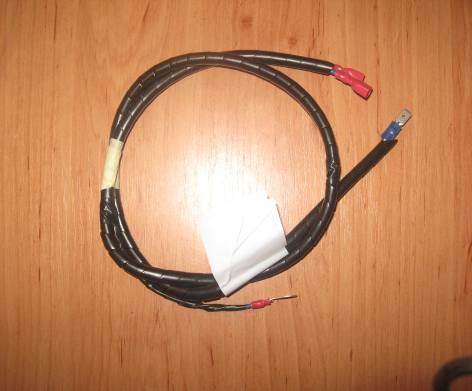
48 ELECTROINSTALLATION WIPER/WASHER Parts needed Included Washer tube Switch wiper/washer/off Harness and washer tank 48
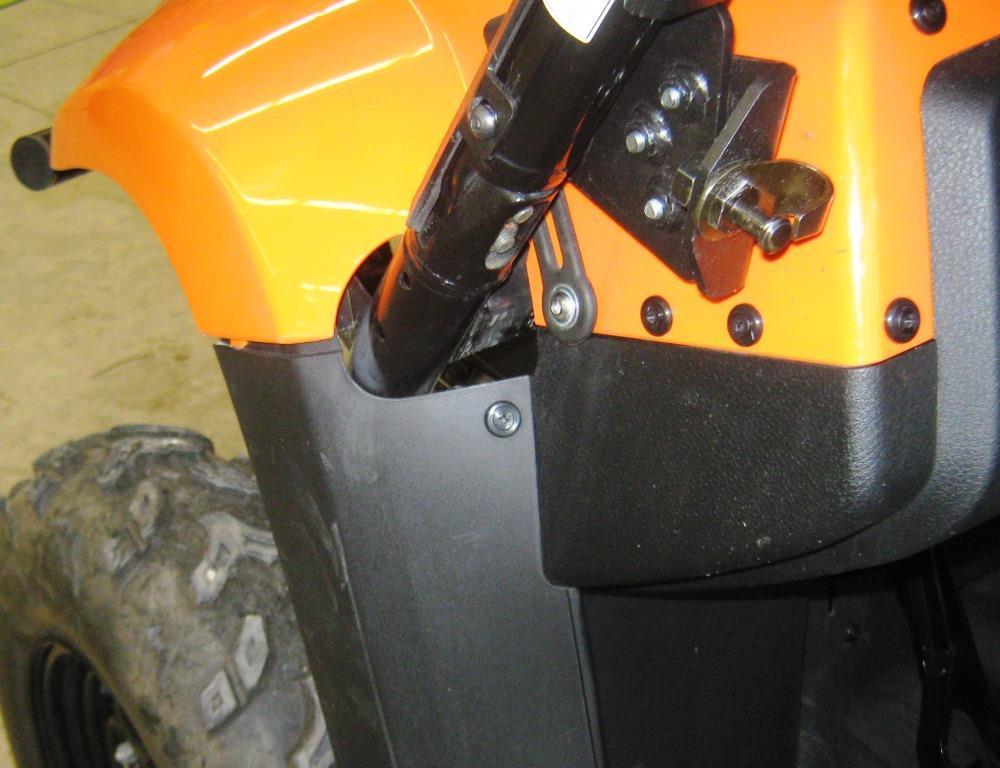
49 Install the washer tank by washer tank holder and by screw, washers and nut (included) to best position near front left wheel. HERE OR HERE 49


50 Lead the harness branch No.:1 from the dashboard to the front wiper motor around the right roller cage. You may have to drill hole to the dashboard for the harness branch. Fix the harness branch to the roller cage by included plastic tightening straps. 50 Connect the harness branch No.:1 with the wiper motor and stretch the washer hose through the bushing.


51 Connect the washer hose from the harness with the washer hose from wiper arm by included tube. Run the harness branch No.: 2 under the dashboard. Find the best place for the switch (be carefull for metal reinforcement under the dashboard). Cut the rectangle hole for the switch and connect the harness branch No.: 2 with the switch. 51 Press the swith into the dashboard.
52 Connect (earth) the harness branch No.: 4 with the UTV metal body by original screw. Find the UTV s main electification and find the original cable where is 12V+ after you turn on the main UTV s switch. Connect the harness branch No.: 3 with the original cable from previous step. You may be have to use different connectors instead of the connectors in the end of harness branch No.:3. Fill the washer liquide into the washer tank before first usage. Isolate the washer motor connection by isolating tape very good. 52

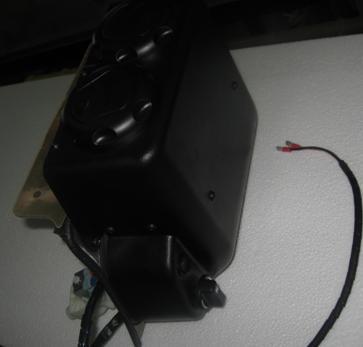


53 ELECTROINSTALLATION HEATER Harness heater holder Heater tightening strap Tube screw rivets 53 Air vent valve water pump Heater is designed to be inside the glove box at the dashboard.


 in 10 inch distance of the glove box.")
54 Drill holes (red circle) into the glove box wall and run the heater hoses from the glove box to the engine cooler (under front dashboard). Connect the heater hoses with the heater assembly. Install the air vent valve onto the hose (without the electric valve) in 10 inch distance of the glove box. Don t insert the heater assembly into the glow box now! 54


55 Connect the harness branch No.: 1 with the heater harness. KYMCO 500I, 700I SE Install the heater hose with air vent valve into the cooling hose by correct Y coupling near front cooler. 55


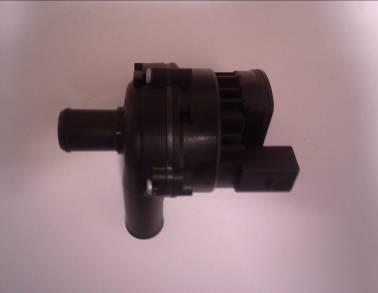
56 Install the heater hose with the electric valve into the cooling hose by correct Y coupling near front cooler. Install the water pump into the hose with the el. valve and tighten straps hard. You can fix the pump by included plastic tapes or by metal tape. 56

57 Run the pump harness from the pump to the el. valve. Connect the pump harness with the el. valve in accordance with the picture. Connect (earth) the harness branch No.: 3 with the UTV metal body by original screw. Find the UTV s main electification and find the original cable where is 12V+ after you turn on the main UTV s switch. Connect the harness branch No.: 2 with the original cable from previous step. You may be have to use different connectors instead of the connectors in the end of harness branch No.: Before the first turning on the hot water heater it is necessary to check the tightness of the cooling circuit of the hot water heater. 2. Add about 1,5 liter (or more) cooling liquid to the cooling circuit. 3. Turn UTV s engine on and open the air vent valve. 4. Turn heater on and wait for the maximum temperature. Move heater down and turn that down to run the air out from heater. When the cooling liquid starts to leak from the air vent valve close the valve. Turn off heater and add more cooling liquid to the cooling circuit if need it. After you perfectly bleed the air out of the UTV s engine cooling system and heater system, you can insert the heater into the glove box and fix the heater holder by the plastic rivet screws. SEE NEXT PAGES

58 Important notice: In cab units where you are installing the glove compartment heater provided in the standard DFK Cab Kit, it is important to check the coolant level regularly at least 4-5 times during the first several days of operation and fill as necessary until the coolant level has stabilized. The heater will draw and retain coolant, sometimes at the expense of coolant to the engine. This can cause engine overheating if not managed properly. Heater assembly installed. 58
INSTALLATION INSTRUCTIONS JOHN DEERE XUV 625I
 INSTALLATION INSTRUCTIONS JOHN DEERE. SAFETY INSTRUCTIONS Warning: Failure to heed all safety and operating instructions and warnings regarding use of this product can result in serious bodily injury.
INSTALLATION INSTRUCTIONS HONDA PIONEER (2014)
") INSTALLATION INSTRUCTIONS. SAFETY INSTRUCTIONS Warning: Failure to heed all safety and operating instructions and warnings regarding use of this product can result in serious bodily injury. READ PROPERLY
INSTALLATION INSTRUCTIONS. SAFETY INSTRUCTIONS Warning: Failure to heed all safety and operating instructions and warnings regarding use of this product can result in serious bodily injury. READ PROPERLY
INSTALLATION INSTRUCTIONS
 INSTALLATION INSTRUCTIONS POLARIS RANGER In case of facing any problems, please dial +420 572 520 063, 9 or email at dfk@dfk.cz. SAFETY INSTRUCTIONS Warning: Failure to heed all safety and operating instructions
INSTALLATION INSTRUCTIONS POLARIS RANGER 800 XP
 INSTALLATION INSTRUCTIONS POLARIS RANGER 4x4 6x6. In case of facing any problems, please dial +420 572 520 063, 9 or email at dfk@dfk.cz SAFETY INSTRUCTIONS Warning: Failure to heed all safety and operating
INSTALLATION INSTRUCTIONS POLARIS GENERAL 1000 EPS
 INSTALLATION INSTRUCTIONS POLARIS. SAFETY INSTRUCTIONS Warning: Failure to heed all safety and operating instructions and warnings regarding use of this product can result in serious bodily injury. READ
INSTALLATION INSTRUCTIONS POLARIS RANGER 400 H.O.
 INSTALLATION INSTRUCTIONS POLARIS RANGER 400 H.O.. SAFETY INSTRUCTIONS Warning: Failure to heed all safety and operating instructions and warnings regarding use of this product can result in serious bodily
INSTALLATION & OWNER S MANUAL
 Rev. A, p. 1 of 8 INSTALLATION & OWNER S MANUAL HONDA PIONEER 700-2 AND 700-4 HEATER INSTALLATION p/n: 9PH20S64 The contents of this envelope are the property of the owner. Be sure to leave with the owner
DOOR SET INSTALLATION INSTRUCTIONS POLARIS RANGER 900XP
 DOOR SET INSTALLATION INSTRUCTIONS POLARIS RANGER 900XP. SAFETY INSTRUCTIONS POLARIS RANGER 900XP DOOR SET Warning: Failure to heed all safety and operating instructions and warnings regarding use of this
INSTALLATION INSTRUCTIONS
 INSTALLATION INSTRUCTIONS Accessory Application Publications No. ENGINE BLOCK P/N 08T44-SVB-100 2011 CIVIC 4-DOOR Si All 44405 Issue Date AUG 2010 PARTS LIST Engine block heater Aluminum washer Heater
JOHN DEERE GATOR HPX/XUV 2 PASSENGER HEATER INSTALLATION INSTRUCTIONS (p/n: 9PH20S30)
") P. 1 of 12 JOHN DEERE GATOR HPX/XUV 2 PASSENGER HEATER INSTALLATION INSTRUCTIONS (p/n: 9PH20S30) Item: Qty: Description: 1 2 1 x 1 x 5/8 Tee Fitting 2 2 Plastic Snap-in Hose Grommet 3 4 1-1/2" Hose Clamps
P. 1 of 12 JOHN DEERE GATOR HPX/XUV 2 PASSENGER HEATER INSTALLATION INSTRUCTIONS (p/n: 9PH20S30) Item: Qty: Description: 1 2 1 x 1 x 5/8 Tee Fitting 2 2 Plastic Snap-in Hose Grommet 3 4 1-1/2" Hose Clamps
KIT CONTENTS Ref Qty Part Description Part Number
 CAB HEATER KIT P/N 2879967 APPLICATION RANGER 570 AND RANGER 570 CREW BEFORE YOU BEGIN Read these instructions thoroughly and make sure all parts and tools are accounted for. Please retain these installation
INSTALLATION INSTRUCTIONS
 INSTALLATION INSTRUCTIONS Accessory ENGINE BLOCK (L4) P/N 08T44-TA0-100 Application 2011 ACCORD 2- AND 4-DOOR Publications No. AII 43997 Issue Date AUG 2010 PARTS LIST Engine block heater 5 White wire
INSTALLATION INSTRUCTIONS
 INSTALLATION INSTRUCTIONS Accessory Application Publication No. HEATER KIT P/N 0SE01-HL3-102 (SXS700M2/M4) P/N 0SE01-HL3-103 (SXS700M2D/M4D) SXS700M2/M2D/M4/M4D MII 14607-15172 Issue Date REVISED: June
INSTALLATION INSTRUCTIONS
 INSTALLATION INSTRUCTIONS Accessory Application Publications No. AII 30320 ENGINE BLOCK 2006 CIVIC HYBRID P/N 08T44-SVB-100 Issue Date SEP 2005 PARTS LIST Engine block heater Aluminium washer Heater harness
INSTALLATION INSTRUCTIONS
 Accessory Application Publication No. INSTALLATION INSTRUCTIONS HEATER KIT P/N 0SE01-HL3-101 SXS700M4/M2 Honda Dealer: Please give a copy of these instructions to your customer. PARTS LIST REPAIR KIT (P/N
INSTALLATION INSTRUCTIONS
 INSTALLATION INSTRUCTIONS Accessory Application Publications No. ENGINE BLOCK P/N 08T44-SNA-101 2010 CIVIC 2 AND 4 DOOR (EXCEPT GX) AII 42477 Issue Date SEP 2009 PARTS LIST Engine block heater Aluminum
INSTALLATION INSTRUCTIONS
 INSTALLATION INSTRUCTIONS Accessory ENGINE BLOCK V6 P/N 08T44-SNA-101 Application 2008 ACCORD 2- AND 4-DOOR Publications No. AII 36800-38336 Issue Date NOV 2007 PARTS LIST ENGINE BLOCK Engine block heater
INSTALLATION INSTRUCTIONS
 INSTALLATION INSTRUCTIONS Accessory Application Publications No. ENGINE BLOCK P/N 08T44-SNA-100 2007 CIVIC 2 AND 4-DOOR (DX, LX, EX) AII 33542 Issue Date AUG 2006 PARTS LIST Engine block heater Aluminum
Chilipepper CP8000. Installation Instructions READ BEFORE INSTALLING:
 Chilipepper CP8000 Installation Instructions READ BEFORE INSTALLING: * The Chilipepper is not designed to be connected with rigid piping like copper or galvanized pipes. *Flexible hoses MUST be used. *
INSTALLATION INSTRUCTIONS
 INSTALLATION INSTRUCTIONS Accessory Application Publications No. ENGINE BLOCK P/N 08T44-SNA-100 2007 MDX BII 32728 Issue Date OCT 2006 PARTS LIST Engine block heater Aluminum washer Heater harness Protective
INSTALLATION INSTRUCTIONS
 INSTALLATION INSTRUCTIONS Accessory Application Publications No. ENGINE BLOCK P/N 08T44-SNA-100 2008 MDX BII 37679 Issue Date AUG 2007 PARTS LIST Engine block heater Aluminum washer Heater harness Protective
INSTALLATION INSTRUCTIONS
 INSTALLATION INSTRUCTIONS Accessory Application Publications No. AII 41826 ENGINE BLOCK P/N 08T44-SNA-101 2010 ODYSSEY Issue Date JUNE 2009 PARTS LIST Engine block heater Aluminum washer NOTE Always use
Heater for BRP Commander. Caution: Before using this product, read this manual and follow all safety instructions. Owner s Manual
 Owner s Manual Model: Can Am Commander Heater for BRP Commander Caution: Before using this product, read this manual and follow all safety instructions. Safety Instructions Kit Contents Tool Requirement
INSTALLATION INSTRUCTIONS
 INSTALLATION INSTRUCTIONS Accessory ENGINE BLOCK Application 2010 INSIGHT Publications No. AII 40879 Issue Date MARCH 2009 PARTS LIST Engine Block Heater Kit P/N 08T44-SNA-101 Engine block heater Engine
ARIN THERMOSTATIC SHOWER SYSTEM
 ARIN THERMOSTATIC SHOWER SYSTEM INSTALLATION INSTRUCTIONS Before installing, read entire shower system installation instructions. Observe all local building and safety codes. For the following installation
INSTALLATION INSTRUCTIONS
 INSTALLATION INSTRUCTIONS Accessory ENGINE BLOCK Application 2014 INSIGHT Publications No. AII 50650 Issue Date OCT 2013 PARTS LIST Engine Block Heater Kit P/N 08T44-SNA-101 Engine block heater Engine
KITCHEN FAUCET COS-KF222C
 KITCHEN FAUCET COS-KF222C USER S MANUAL & INSTALLATION GUIDE Thank You Thank you for your purchase. We know that you have many brands and products to choose from and we are honored to know that you have
Heater with Air Conditioning. E-Series Ford Aeromaster
 Service Guide Heater with Air Conditioning E-Series Ford Aeromaster Contents Blower Motor...2 Plenum Removal...3 Control Module...6 Servo Motors...8 Coolant Valve and Servo Motor...8 Evaporator Recirculation
Revision B Printed Fall Elston Manufacturing HC Heater Owners Manual
 Revision B Printed Fall 2007 Elston Manufacturing HC Heater Owners Manual Table of Contents Important Safety Information... ii 1) Description of Heater... 1 General information about your heater including
INSTALLATION INSTRUCTIONS
 INSTALLATION INSTRUCTIONS Accessory Application Publications No. ENGINE BLOCK ELEMENT AII 24284 Issue Date DEC 2002 PARTS LIST Engine block heater Aluminum washer Heater harness Protective cap 20 Long
TOOLS REQUIRED: Crimping tool A/C Recovery Unit Wrench set up to 1 ¼ 4 Hole saw
 INSTALL INSTRUCTIONS PT-A-401 HVAC UNIT for 2003-2018 CHEVROLET/GMC VAN (For 2007 ALL WHITE Prisoner Transport Inserts ONLY) Not Recommended for diesel engine application because of lack of space needed
TT /97 WARNING WARNING WARNING INSTALLATION INSTRUCTIONS
 TT-116 2/97 INSTALLATION INSTRUCTIONS Original Issue Date: 2/97 Model: 900/1000 kw Market: Industrial Subject: Block Heater Kits PA-28648, PA-28648-SD The block heater kit heats engine coolant, making
CABS/BLADES/ SPREADERS/ACCESSORIES
 JOHN DEERE 3000 SERIES (4200/4300/4400) (4210/4310/4410) (3120/3320/3520/3720) JOHN DEERE 4000 SERIES (4500/4600/4700) (4510/4610/4710) (4120/4320/4520/4720) OPTIONAL AUXILIARY HEATER INSTALLATION (p/n
specializing in AIR CONDITIONING, PARTS AND SYSTEMS for your classic hi l PERFECT FIT SERIES IN-DASH HEAT/ COOL/ DEFROST FORD TRUCK
 specializing in AIR CONDITIONING, PARTS AND SYSTEMS for your classic hi l PERFECT FIT SERIES IN-DASH HEAT/ COOL/ DEFROST 1967-72 FORD TRUCK CONTROL & OPERATING INSTRUCTIONS The controls on your new Perfect
Handshower, Hose & Handshower Accessories
 P24443, P24445, P24446, P24452, P24453, P24456 1 of 6 INSTALLATION INSTRUCTIONS Thank You For Choosing KALLISTA We appreciate your commitment to KALLISTA quality products. Please take a moment to review
PRELIMINARY INSTALLATION. Operation & Service Manual. Carrier Transicold Europe 03/09/07 Viento - Installation/Rev- #1/56
 INSTALLATION Carrier Transicold Europe 03/09/07 Viento - Installation/Rev- #1/56 INSTALLATION Table of content Introduction...4 Preparation before installation...5 Vehicle partition... 6 Box preparation...7
3. DISCONNECT AIR CONDITIONING TUBE ASSY SST HINT: Disconnect in the same way as the cooler refrigerant suction hose No.1.
 5517 550JD04 OVERHAUL COMPONENT: See page 5515 1. DISCHARGE REFRIGERANT FROM REFRIGERATION SYSTEM (See page 5511) SST 0711058060 (0711758080, 0711758090, 0711778050, 0711788060, 0711788070, 0711788080)
Installation Instructions
 Installation Instructions For Fully Integrated NoFrost Combined Refrigerator-Freezers HC 2060/2061 7082 485-00 Important PLEASE READ AND FOLLOW THESE INSTRUCTIONS These instructions contain Warning and
Installation Instructions
 Installation Instructions For Fully Integrated NoFrost Combined Refrigerator-Freezers HC 2062 HCB 2062 HC/HCB 20 7082 373-00 Important PLEASE READ AND FOLLOW THESE INSTRUCTIONS These instructions contain
PERFECT FIT SERIES IN-DASH HEAT/ COOL/ DEFROST CHEVROLET NOVA
 specializing in AIR CONDITIONING, PARTS AND SYSTEMS for your classic PERFECT FIT SERIES IN-DASH HEAT/ COOL/ DEFROST 1966-67 CHEVROLET NOVA CONTROL & OPERATING INSTRUCTIONS The controls on your new Perfect
PERFECT FIT SERIES IN-DASH HEAT/ COOL/ DEFROST CHEVROLET CHEVELLE/ EL CAMINO NOTE: INSTRUCTIONS DEPICT CHEVELLE
 specializing in AIR CONDITIONING, PARTS AND SYSTEMS for your classic vehicle PERFECT FIT SERIES IN-DASH HEAT/ COOL/ DEFROST 1964-65 CHEVROLET CHEVELLE/ EL CAMINO NOTE: INSTRUCTIONS DEPICT CHEVELLE CONTROL
INSTALLATION INSTRUCTIONS
 INSTALLATION INSTRUCTIONS Accessory ENGINE BLOCK P/N 08T44-SNA-101 Application 2011 ACCORD CROSSTOUR Publications No. AII 44661 Issue Date SEP 2010 PARTS LIST Engine Block Heater Kit Engine block heater
SIMPLICITY MODEL LVPB7200
 SIMPLICITY MODEL 7200 LVPB7200 BODY GROUP 7200 BODY GROUP 7200 Key Part No Description Key Part No Description 1 7.8-PLAIN Simplicity 7000 Paper Bag 29 D625-0231 Suction Inlet Complete 2 B221-0213 Dust
BMW E36 Thermostat Removal And Coolant Flush
 BMW E36 Thermostat Removal And Coolant Flush Disclaimer: The cooling system is critical to the proper operation of your car. Failure to properly install all of the components of the cooling system could
INSTALLATION INSTRUCTIONS
 INSTALLATION INSTRUCTIONS Accessory ENGINE BLOCK Application 2012 FIT Publications No. AII 45993 Issue Date AUG 2011 PARTS LIST Engine Block Heater kit P/N 08T44-SNA-101 Engine Block Heater Bracket kit
INSTALLATION INSTRUCTIONS
 INSTALLATION The 2SD04700124 Smoke Detector Kit contains the parts and hardware to mount the smoke detector in the following applications: A. Supply Air Stream (Blower Compartment) B. Return Air Stream
Installation Instructions
 Installation Instructions For Free Standing NoFrost Combined Refrigerator-Freezers CS 1660 7082 653-00 PLEASE READ AND FOLLOW THESE INSTRUCTIONS These instructions contain Warning and Caution statements.
Hanson LED C e i l i n g F a n
 Hanson LED C e i l i n g F a n model no. 052-8398-2 Toll-free 1-866-827-4985 IMPORTANT: For your safety please read and understand this manual before installing or operating this product. OWNER S MANUAL
Installation Instructions
 Dear customer! Thank you for choosing this quality product from ASKO. We hope it will meet your expectations and fulfil your needs for many years to come. Scandinavian design combines clean lines, everyday
Installation and use of Strong Central Vacuum Cleaning System
 Installation and use of Strong Central Vacuum Cleaning System System type 7,5kW 7,5kW-FC 11kW www.strong.fi System units and parts ** Pre-separator Main Filter Motor Extra pre-separator *** (Only for some
Installation Instructions Part No , Part No Part No
 Torsion-Flex Motor mount for PSC motors and Rigid-Mount for ECM motors Replacement Kit Cancels: New Installation Instructions Part No. 327752-401, Part No. 327753-401 Part No. 327754-401 IIK-310A-45-11
24. Exhaust Fan. 2. ½ NPT Brass nut. 1. Brass Elbow. 4. Speaker. 6. Rain Shower head. 5. White LED Light. 16. Flex Drain Assembly
 1. Brass Elbow 2. ½ NPT Brass nut 4. Speaker 5. White LED Light 6. Rain Shower head 12. Steamer Cleaning Port 13. Massage Jet 14. Foldable Seat 16. Flex Drain Assembly 22. Door Handles 24. Exhaust Fan
INSTALLATION INSTRUCTION
 INSTALLATION INSTRUCTION Thermostatic Mixer Shower System NOTICE The instruction manual includes part lists, installation instructions, usage of thermostatic and suitable inlet system. Make sure the installation
6. Cooling System XCITING 400i. This chapter covers the location and servicing of the cooling system components for the KYMCO XCITING 400i.
 6. Cooling System XCITING 400i Cooling System This chapter covers the location and servicing of the cooling system components for the KYMCO XCITING 400i. Coolant... 6-3~6-11 Radiator... 6-12~6-23 Thermostat...
PERFECT FIT SERIES IN-DASH HEAT/ COOL/ DEFROST MUSTANG
 specializing in AIR CONDITIONING, PARTS AND SYSTEMS for your classic vehicle PERFECT FIT SERIES IN-DASH HEAT/ COOL/ DEFROST 1965-66 MUSTANG CONTROL & OPERATING INSTRUCTIONS The controls on your new Perfect
INSTALL INSTRUCTIONS KK-S-HVAC SPRINTER VAN REAR HVAC SYSTEM
 INSTALL INSTRUCTIONS KK-S-HVAC-2 2007-2014 SPRINTER VAN REAR HVAC SYSTEM TOOLS REQUIRED: Aeroquip (#FT1357) Pliers A/C Refrigerant Charging machine Refrigerant Hose Cutter Open-end wrench set (up to 1
Can Am Commander 1000 Radiator Relocation Installation Instructions
 Can Am Commander 1000 Radiator Relocation Installation Instructions What comes with the kit 2 CNC Machined Aluminum mounting brackets 2 pcs M6 x 1.0 x 60mm long SHCS 2 pcs M6 x 1.0 x75mm long SHCS 4 pc
INSTALLATION INSTRUCTIONS
 INSTALLATION INSTRUCTIONS Accessory ENGINE BLOCK P/N 08T44-SNA-101 Application Publications No. 2013 ACCORD AII 13006 2- AND 4-DOOR (EXCEPT 2- Issue Date DOOR V6) AUG 2012 PARTS LIST Engine block heater
Service Parts for models UF424 and UN324
 Service Parts for models UF and UN This is the illustrated parts list for Scotsman ice maker models UF and UF. They were manufactured as either air or water cooled models, plus the air cooled models were
56" Instruction Manual REMOTE CONTROL CEILING FAN WITH LIGHT RCF-LE800-5BL SAFETY GUIDELINES AND INSTALLATION PROCEDURES
 56" REMOTE CONTROL CEILING FAN WITH LIGHT Instruction Manual SAFETY GUIDELINES AND INSTALLATION PROCEDURES RCF-LE800-5BL WHAT YOU HAVE Please checkout following parts after opening the box: PARTS QUANTITY.DOWNROD
INSTALLATION INSTRUCTIONS
 INSTALLATION INSTRUCTIONS BUILT-IN BOTTOM MOUNT REFRIGERATOR/FREEZER DBRTGK72SS-GRILLE KIT (FOR designer SERIES ONLY) VIKING RANGE CORPORATION 111 Front Street Greenwood, Mississippi (MS) 38930 USA (662)
USSC LLC 4 ONE LLC FIELD MODIFICATION INSTRUCTIONS
 and Retrofit of G2E Quick Release Cushion Upholstery 1 OF 32 A 1.0 PURPOSE: To replace both Back and Cushion Upholstery on the G2E seats. 2.0 Tools Required: 2.1 1/2 Socket and Wrench 2.2 5/8 Socket 2.3
THE WIDTH AND HEIGHT OF THE LIGHT HOLE IN THE WINDOW WING IS MEASURED IN THE FOLLOWING WAY:
 V-LITE ROOF BLIND 1. MEASUREMENT OF THE WINDOW: Take measurements as indicated in the picture. Measurements are taken at the top of the frame of the window wing, not at the glazed area. The minimum depth
Warning Do not attempt to install A/C units unless you are experienced with servicing A/C systems! Wire Cutter / Crimper Socket set
 INSTALLATION INSTRUCTIONS PT-A-405 Rear HVAC System for 2014-2018 RAM PROMASTER with OEM rear AC/Heat Prep Package Fittings For Installation with Havis Prisoner Transport Insert Warning Do not attempt
READY RACK HOSE WASHER
 READY RACK HOSE WASHER DIMENSIONS OF THE HOSE WASHER: HEIGHT: 40 WIDTH: 24 LENGTH: 46 WEIGHT: 510 lbs. SHIP WEIGHT: 620 lbs. SHIP SIZE: 60 x 36 x 54 Operator s Manual Installation/Operation/Maintenance/Parts
BlueHeat Coolant Heater
 BlueHeat Coolant Heater Dodge Ram 500 / 3500 003 / 004-5. Liter Gasoline 003 / 006-5.9 Liter Diesel 00 6. Liter Diesel Installation Instructions DOC P/N 500068B KIT P/N 5000498C PRELIMINARY INFORMATION
INSTALLATION INSTRUCTIONS
 INSTALLATION INSTRUCTIONS BUILT-IN BOTTOM MOUNT REFRIGERATOR/FREEZER BRTGK72SS-GRILLE KIT (FOR PROFESSIONAL SERIES ONLY) VIKING RANGE CORPORATION 111 Front Street Greenwood, Mississippi (MS) 38930 USA
GENERAL FITTING GUIDE THERMOSTATIC BAR SHOWER MIXER with RIGID RISER KIT
 GENERAL FITTING GUIDE THERMOSTATIC BAR SHOWER MIXER with RIGID RISER KIT GUARANTEE & AFTERCARE When installing or using tools, extra care must be taken to avoid damaging the finish or fitting. To maintain
PERFECT FIT IN-DASH HEAT/ COOL/ DEFROST FORD PICKUP
 specializing in AIR CONDITIONING, PARTS AND SYSTEMS for your classic vehicle PERFECT FIT IN-DASH HEAT/ COOL/ DEFROST 1960-66 FORD PICKUP CONTROL & OPERATING INSTRUCTIONS The controls on your new Perfect
Hakki Pilke Raven spare parts manual
 1 ENGLISH Hakki Pilke Raven spare parts manual Valimotie 1, FI-85800 Haapajärvi, FINLAND Tel. +358 8 772 7300, Fax +358 8 772 732 info@maaselankone.fi, www.maaselankone.fi 2 Table of contents 1 Upper section
Chilipepper CP9000. Installation Instructions READ BEFORE INSTALLING:
 Chilipepper CP9000 Installation Instructions READ BEFORE INSTALLING: * The Chilipepper is not designed to be connected with rigid piping like copper or galvanized pipes. *Flexible hoses MUST be used. *
SIDE BY SIDE REFRIGERATOR MODELS: WRS325SDHW00 (White) WRS325SDHB00 (Black) WRS325SDHV00 (Black Stainless) WRS325SDHZ00 (Stainless Steel)
 WRS325SDHB00 (Black) WRS325SDHV00 (Black Stainless) WRS325SDHZ00 (Stainless Steel)") SIDE BY SIDE REFRIGERATOR MODELS: WRS325SDHW00 (White) WRS325SDHB00 (Black) WRS325SDHV00 (Black Stainless) WRS325SDHZ00 (Stainless Steel) 03/21/2018 2018 Whirlpool Corporation Part No. W11157383 Rev. B
SIDE BY SIDE REFRIGERATOR MODELS: WRS325SDHW00 (White) WRS325SDHB00 (Black) WRS325SDHV00 (Black Stainless) WRS325SDHZ00 (Stainless Steel) 03/21/2018 2018 Whirlpool Corporation Part No. W11157383 Rev. B
BUILT-IN DISHWASHER INSTALLATION INSTRUCTIONS
 BUILT-IN DISHWASHER INSTALLATION INSTRUCTIONS PLEASE READ COMPLETE INSTRUCTIONS BEFORE YOU BEGIN LEAVE INSTALLATION INSTRUCTIONS AND USER'S GUIDE WITH OWNER ALL ELECTRIC WIRING AND PLUMBING MUST BE DONE
Heat Exchanger Block Replacement Instructions
 Series 1-4 Gas-fired water boiler Heat Exchanger Block Replacement Instructions Ultra-80 S1-4 Heat Exchanger Block Replacement Kit, Part No. 383-500-773 Ultra-105 S1-4 Heat Exchanger Block Replacement
OptiSoft Softeners Simple Install Steps 1-17
 OptiSoft Softeners Simple Install Steps 1-17 (models OS-10, OS-13, OS-20 & OS-29) Refer to Installation, Operation & Maintenance Manual for More Details v Installation Requirements Installation must conform
SC250X FLOOR GRINDER OPERATIONS MANUAL
 Unit 4/1 Rocklea Drive Port Melbourne Vic 3207 1300 109 108 www.traxxcp.com.au SC250X FLOOR GRINDER OPERATIONS MANUAL The contents of this Operations Manual are the copyright of the publisher and may not
Installation. Leveling
 Your refrigerator was packed carefully for shipment. Remove and discard shelf packaging and tape. Do not remove the serial plate. Location Do not install refrigerator near oven, radiator or other heat
CABINET PARTS For Model: IST (White)
") CABINET PARTS REFRIGERATOR 7 07 Litho In U.S.A. (rrm) 1 Part No. Rev.A CABINET PARTS 1 Literature Parts W10145175 Service & Wiring Sheet 2316213 Use & Care Guide 2328575 Energy Guide Following May Be Purchased
CABINET PARTS REFRIGERATOR 7 07 Litho In U.S.A. (rrm) 1 Part No. Rev.A CABINET PARTS 1 Literature Parts W10145175 Service & Wiring Sheet 2316213 Use & Care Guide 2328575 Energy Guide Following May Be Purchased
Shower Thermostatic Mixer Fitting Instructions
 Shower Thermostatic Mixer Fitting Instructions Thank you for selecting this product. We have taken great care to ensure that this product reaches you in perfect condition. However should any parts be damaged
2000 Lincoln Town Car V8-4.6L VIN W Copyright 2013, ALLDATA Page Remove the screws and the RH cowl vent screen.
 2000 Lincoln Town Car V8-4.6L VIN W Copyright 2013, ALLDATA 10.52 Page 1 Evaporator Case: Service and Repair REMOVAL 1. Disconnect the battery ground cable. 2. Perform the Refrigerant Discharging and Recovery
INTRODUCTION. NOTE: Read the entire instruction manual before starting the installation. FIRE, EXPLOSION, ELECTRICAL SHOCK HAZARD
 Installation Instructions NOTE: Read the entire instruction manual before starting the installation. SAFETY CONSIDERATIONS Improper installation, adjustment, alteration, service, maintenance, or use can
Sunstruck Installation Manual
 Sunstruck Installation Manual Sunstruck comes in two crates, the smaller one contains the main base with computer and monitors The larger contains the display panels Tools needed: 3 people Philips screwdriver
Fast Fix Kenmore Model 100 Clutch Replacement
 Fast Fix Kenmore Model 100 Clutch Replacement Replace your worn or broken transmission clutch on the Kenmore Model 110 washing machine. Written By: Jonathan Beach ifixit CC BY-NC-SA www.ifixit.com Page
SERVICE MANUAL FOR MODEL RM-10
 SERVICE MANUAL FOR MODEL RM-10 REQUIRED TOOLS CORDLESS DRILL COPPER CUTTING TUBE 1/2 OPEN WRENCH SOLDERING IRON SCREWDRIVER SET WITH 9/32 SOCKET VISE GRIP PIERCING VALVE PRECISION FLAT BLADE SLOTTED SCREWDRIVER
TOP MOUNT REFRIGERATOR MODELS: WRT106TFDW01 (White) WRT106TFDB01 (Black) WRT106TFDT01 (Biscuit)
 WRT106TFDB01 (Black) WRT106TFDT01 (Biscuit)") TOP MOUNT REFRIGERATOR MODELS: WRT106TFDW01 (White) WRT106TFDB01 (Black) WRT106TFDT01 (Biscuit) 05/21/2015 2015 Whirlpool Corporation Part W10806768 Rev. A CABINET PARTS 05/21/2015 2 Part W10806768 Rev.
TOP MOUNT REFRIGERATOR MODELS: WRT106TFDW01 (White) WRT106TFDB01 (Black) WRT106TFDT01 (Biscuit) 05/21/2015 2015 Whirlpool Corporation Part W10806768 Rev. A CABINET PARTS 05/21/2015 2 Part W10806768 Rev.
SERVICE MANUAL FOR MODEL RM-49
 SERVICE MANUAL FOR MODEL RM-49 REQUIRED TOOLS CORDLESS DRILL DRIVE CUTTING TUBING OPEN WRENCH OF 1/2 RATCHET WITH SOCKET OF 7/16 SCREWDRIVER SET WITH SOCKET OF 9/32 VISE GRIP PIERCING VALVE WATCHER SLOTTED
Pink Magnetic Elliptical Bike
 Pink Magnetic Elliptical Bike Model No. P8300 IMPORTANT! PLEASE READ THIS MANUAL CAREFULLY BEFORE USING THE BIKE. For Customer Service, please contact: support@sunnyhealthfitness.com IMPORTANT SAFETY INFORMATION
SERVICE MANUAL. Freestanding cooker 500 and 600 / Range Gas- gas Electric CFSGSV14 CFSGWH14 CFSESV14 CFSEWH14
 Freestanding cooker 500 and 600 / Range 2013 Gas- gas Electric CFSGSV14 CFSGWH14 CFSESV14 CFSEWH14 SERVICE MANUAL 2 Door assembly Removing the door assembly 1. Lift the lock of the left and right door
GE Monogram. Installation. Instructions. Stainless Steel Bottom Mount Built-In Refrigerators. Models ZICS36N RH ZICS36N LH
 GE Monogram Installation Instructions Stainless Steel Bottom Mount Built-In Refrigerators Models ZICS36N RH ZICS36N LH Before you begin - Read these instructions completely and carefully. IMPORTANT - Save
This site is based on a but applies to all 1971-on Saab 99 and Saab 900.
 by Mark Jeter updated: December 8, 2004 originally web-published June 27, 2001 This document shows how the original waterpump in a Saab "B" engine can be eliminated and replaced with a reliable, efficient
ICE MAKER Use & Care Guide. Table of Contents... 2
 ICE MAKER Use & Care Guide Table of Contents... 2 2217247 ICE MAKER SAFETY...2 ICE MAKER INSTALLATION...3 Unpacking...3 Location Requirements...3 Electrical Requirements...3 Leveling...4 Water Supply Connection...4
SERVICE MANUAL FOR MODEL RM-26
 SERVICE MANUAL FOR MODEL RM-26 REQUIRED TOOLS CORDLESS DRILL DRIVE CUTTING TUBING OPEN WRENCH OF 1/2 RATCHET WITH SOCKET OF 7/16 SCREWDRIVER SET WITH SOCKET OF 9/32 VISE GRIP PIERCING VALVE WATCHER SLOTTED
Installation and Operating Instructions
 Installation and Operating Instructions WaterQuick Pro II Advanced - Hot Water Circulation Pump WaterQuick Pro II Advanced Step 1. Choose the appropriate place to install the pump and Flow Monitor: WaterQuick
Installation Instructions. For the 18 Built-In Dishwasher and Front Color Panels
 Installation Instructions For the 18 Built-In Dishwasher and Front Color Panels Printed in USA 154232102 Before You Begin DO NOT INSTALL DISHWASHER UNTIL YOU HAVE READ ALL INSTRUCTIONS. FOR YOUR SAFETY,
Installation Instructions
 Installation Instructions Outdoor Installation Kit Models AD250 & AW250 Part No. 24097 Qualifications for installation of the kit: You must be able to read and understand all instructions provided with
Spare Parts List. Universal Utensil Washer FV V / 460V / 60HZ 3P / MIKE 2
 Spare Parts List Universal Utensil Washer FV 0. 0-0V / 60V / 60HZ P / MIKE Updated: --00 FV 0. Contents: 0.6 Wash Pump 0. Final Rinse System Lateral 0.6 Final Rinse System 0. Wash System 0. Solenoid Valve
Send Via: Direct Fax: Feedback ID: Additional Request: Action: MISSING To: DAN GRIMWOOD
 3:56:54 PM ALLDATA Library Research Services Send Via: EMAIL Direct Fax: 800-684-4241 Feedback ID: 1397777 Additional Request: N Action: MISSING To: DAN GRIMWOOD Product: ATTN: DAN GRIMWOOD Email: jettadan@yahoo.com
Product Support Bulletin
 MODEL: SUBJECT: CONVENTIONAL, W/ C7 CAT ENGINE WEBASTO TSL-17 HEATER Body DATE: APRIL 13, 2004 INDEX: 6 PAGE: 1 OF 16 Before you start this procedure, perform Freightliner Service Bulletin #20-7 first.
Kawasaki Teryx Firestorm Heater Kit Instructions.
 Please read all instructions before beginning installation. When working on cooling systems always allow vehicles to cool to avoid being burned or scalded by hot coolant. Always disconnect vehicle s negative
LaceyTM. Instruction Manual. Includes our new CoolTouch TM 6 Speed DC Control System Looks permanent, but goes wherever you go! U.S.
 LaceyTM A Kichler Décor ceiling fan Designed to coordinate with a popular Kichler Lighting collection. Includes our new CoolTouch TM 6 Speed DC Control System Looks permanent, but goes wherever you go!