2010 Prius Dash Speaker (squawker) Upgrade
|
|
|
- Reynard Hodge
- 5 years ago
- Views:
Transcription
1 2010 Prius Dash Speaker (squawker) Upgrade Author: spiderman Date: Monday, March 21, 2011
2 Disclaimer Use this document and its contents at your own risk. Forward I want to thank all those members on PriusChat that forged ahead and upgraded their dash speakers and those that provided technical information that made this modification possible. The model II (two) is really lacking in the high frequencies, which is why this modification was needed in my opinion. I suspect this is also the case with the JBL models, as their dash speaker looks essentially the same. By using a 2-way replacement I not only increased the high frequency range up also the volume in the front. In my case that helped to balance the volume from my sub-woofer installed in the trunk. It also goes a long way in overcoming the road noise. Before you begin Since you will be working around air bags, it is HIGHLY recommended that you disconnect the negative (-) terminal of your 12-volt battery during this process. Refer to the owner s manual for more information. Keep in mind that all your Fuel Economy statistics and trip information in the MFD will be lost when the battery is disconnected. The dash materials are very soft and easy to scratch. Using some painters-tape around the seams of the parts may help to reduce scratches. Overall it took a weekend to complete this modification. Much of the time was spent contemplating my next move and gathering information. With these instructions I would say it would take a person about four to five hours. Parts 1. Speakers. I used the 3 ½, 2-way Pioneer model TS-A878. These speakers are rated at 15W / 60W, ,000Hz with 88db sensitivity. These were the only speakers I search up with the frequency and power handling that I wanted. They are very well built. During the writing of this document, it was pointed out that these speakers are no longer
. 4. X-acto knife. Upgrading The first step is to remove the A-Pillar trim pieces (WARNING: airbags present behind these pieces).")
3 in production. Hopefully Pioneer will produce a similar speaker in the future. 2. I used a small length of bell-wire in my installation (optional). Tools 1. Soldering iron. 2. Electrical tape. 3. Rotary Tool (Dremel). 4. X-acto knife. Upgrading The first step is to remove the A-Pillar trim pieces (WARNING: airbags present behind these pieces). This is described pretty well in the Toyota Technical documents available on-line. There is also a vent piece (below the little triangular window) and finally the speaker grill. All

4 these pieces were fastened securely and took quite a firm tug to remove them. With the grills removed, use a 10mm socket to loosen the bolts holding the speakers in the dash.
 that you")
5 Pull the speakers and disconnect the wiring. The connector has a keeper (on one side) that you depress to release.

6 Test fit your speakers. If yours are like mine, you will need to trim the holes in the dash to accommodate the new speakers. A sharp X-acto knife worked great for trimming, as the ecoplastic is very soft. There was a tab on the driver s side that had to be completely removed. Also I completely trimmed the underside lip completely around the hole. You want to make sure that the speaker is centered in the hole and you can do this by placing the grill over the speaker (do not completely install) and shine a light though the windshield to see where the speaker is positioned.


7 With the speaker is in position, drill hole(s) if necessary. I was able to use one existing hole but had to drill a new one at the top. Drill in the sense I had to use a stubby screwdriver and a selftapping screw because the windshield obstructs access. * Be sure not to obstruct the slots where the grill attaches.

8 The speaker grills had to be modified. There is a lip that comes down from the bottom side that contacted the new speakers. I used a Dremel to trim this plastic off flush with the grill. In the picture below the grill at the right has been trimmed, the left not.

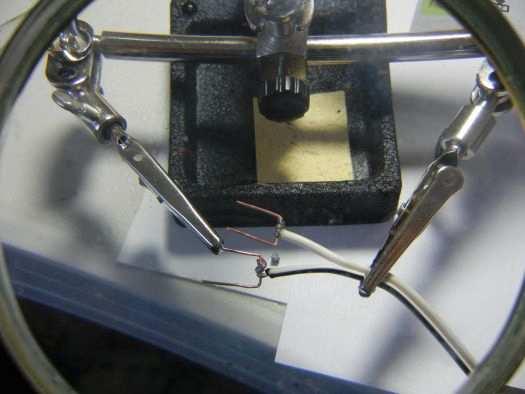
9 Since the existing speaker was wired in parallel with the woofer you will notice the connector has four wires. The new speakers contain their own crossover, I simply bridged the two sets of wires and tapped into that for the dash speakers. Mainly I wanted to keep from modifying the car s wiring harness, but you could also tap the wires before the connector, either way. For the left side, bridge the Pink (+) to each other and Violet (-) to each other. The right side, bridge the Light Green (+) to each other and the Blue (-) to each other. I used electrical tape to cover the bride wiring: one piece through the middle (over the top of the connector) and one strip around the middle of the connector. * It maybe possible to reuse the male connector on the OEM speaker for this connection.
10

11 With the speakers connected and fastened in place I tested by reconnecting the power. If you are using the same speakers I did, be careful not to screw them down too hard as the speaker housing is a plastic composite and subject to cracking under pressure.

12 * At this point I might suggest adding a gasket between the speaker and the grill that will be covering it. The original speakers had this. I didn t really think of this until afterwards but it might help prevent cross-contamination from the other speaker as they share the same air space. Since these are drivers, it might also be prudent to isolate the air space under the speakers as well. If the speakers are working properly (this includes the front woofers in the door), refit the grills. Make sure the grills are not obstructing or contacting the speakers. Replace the remaining air duct and the A-Pillar trim pieces. Final word For a total of $42 and about 6 hours of my time this was a worthwhile modification to me. It greatly enhanced the frequency range of the music and helped balance the sub woofer.
13 Blessing if you proceed with the upgrade! Please let me know if you find any errors in this document and also let me know what you think of modification (either way). Thanks!
Gen III Model II dash speaker (squawker) upgrade. by XS650
 upgrade. by XS650") Gen III Model II dash speaker (squawker) upgrade by XS650 19 June 2011 I previously upgraded my four door speakers to Pioneer TS-A1673R speakers with Dynamat Extreme in the doors. That made a very significant
Gen III Model II dash speaker (squawker) upgrade by XS650 19 June 2011 I previously upgraded my four door speakers to Pioneer TS-A1673R speakers with Dynamat Extreme in the doors. That made a very significant
Speaker Installation Guide
 In This Guide: Installing car speakers often requires removal of door, dash or rear window shelf interior panels to access the speaker mounting points. Component speakers require the additional steps of
SC430 Front Door Speaker Replacement
 SC430 Front Door Speaker Replacement Take off the door using the great instructions that have been posted in this forum. (I ve also attached a copy of that PDF to this post.) When the door is all unscrewed
Flipper Fidelity FF SPK CX CV Coax Speaker Installation Instructions ( )
") Flipper Fidelity FF SPK CX CV Coax Speaker Installation Instructions (03 05 2019) Thank you for purchasing the Flipper Fidelity speaker kit for a Stern Pinball machine. Your kit includes the following:
Flipper Fidelity FF SPK CX CV Coax Speaker Installation Instructions (03 05 2019) Thank you for purchasing the Flipper Fidelity speaker kit for a Stern Pinball machine. Your kit includes the following:
Fixing my Fisher and Paykel Fridge Active Smart Fridge/Freezer Model E440T
 Fixing my Fisher and Paykel Fridge Active Smart Fridge/Freezer Model E440T ** DISCLAIMER ** I am not a fridge technician, an electrician or a representative of Fisher and Paykel. I am an average Australian
Subwoofer Installation Guide
 Difficulty Level: Moderate Tools and Supplies Needed: verage Installation Time: 2-3 Hours In This Guide: Subwoofer installation requires you to disassemble parts of the trunk or cargo area, mount the subwoofer
SAAB 99 Series H Type Engine. Installation Guide Silicone Cooling System Hoses. Classic Silicone Hoses
 SAAB 99 Series 1981 1984 H Type Engine Installation Guide Silicone Cooling System Hoses Classic Silicone Hoses http://www.classicsiliconehoses.com/ Disclaimer This document is for reference purposes only.
INTEGRATION PLUG&PLAY TOYOTA
 INTEGRATION PLUG&PLAY TOYOTA /Manuel d'utilisation English page 3 Franc;:a1s page 9 TOYOTA PLUG&PLAY INTEGRATION Thank you for choosing Integration component kits and for sharing our passion for the..
Flipper Fidelity FF STN 8 WM Speaker Installation Instructions(03/14/16)
") Flipper Fidelity FF STN 8 WM Speaker Installation Instructions(03/14/16) Thank you for purchasing the Flipper Fidelity speaker kit for a Stern Pinball machine. This system fits all Whitestar and Sam machines.
Flipper Fidelity FF STN 8 WM Speaker Installation Instructions(03/14/16) Thank you for purchasing the Flipper Fidelity speaker kit for a Stern Pinball machine. This system fits all Whitestar and Sam machines.
Safety Message to Installers of Federal Signal Siren Speakers
 Mounting Instructions for the Rumbler 82831072 Low Frequency Speaker 2562414D REV. D 312 Safety Message to Installers of Federal Signal Siren Speakers People s lives depend on your proper installation
 Register your product and get support at www.philips.com/welcome CSP550 CSP650 CSP652 User manual 2 Contents 1 Important 4 Safety 4 Notice 4 English 2 Your car stereo speakers 5 Introduction 5 What s in
Installation Instructions Component Systems Professional Line
 Installation Instructions Component Systems Professional Line CS - 210 P 3 2-way component system 80 watts art. no. 231495 CS - 230 P 3 2-way component system 100 watts art. no. 231496 CS - 265 P 3 2-way
JOHN DEERE GATOR HPX/XUV 2 PASSENGER HEATER INSTALLATION INSTRUCTIONS (p/n: 9PH20S30)
") P. 1 of 12 JOHN DEERE GATOR HPX/XUV 2 PASSENGER HEATER INSTALLATION INSTRUCTIONS (p/n: 9PH20S30) Item: Qty: Description: 1 2 1 x 1 x 5/8 Tee Fitting 2 2 Plastic Snap-in Hose Grommet 3 4 1-1/2" Hose Clamps
P. 1 of 12 JOHN DEERE GATOR HPX/XUV 2 PASSENGER HEATER INSTALLATION INSTRUCTIONS (p/n: 9PH20S30) Item: Qty: Description: 1 2 1 x 1 x 5/8 Tee Fitting 2 2 Plastic Snap-in Hose Grommet 3 4 1-1/2" Hose Clamps
GX-A604/GX-A602/GX-A3001
 GX-A604/GX-A602/GX-A3001 power amplifi er OWNER'S MANUAL INTRODUCTION THANK YOU for purchasing a JBL GX-series amplifier. So we can better serve you should you require warranty service, please retain your
SERVICE MANUAL FOR MODEL RM-10
 SERVICE MANUAL FOR MODEL RM-10 REQUIRED TOOLS CORDLESS DRILL COPPER CUTTING TUBE 1/2 OPEN WRENCH SOLDERING IRON SCREWDRIVER SET WITH 9/32 SOCKET VISE GRIP PIERCING VALVE PRECISION FLAT BLADE SLOTTED SCREWDRIVER
Stage 1 Audio Upgrade (BMW Speakers) Installation Instructions for BMW 5 Series, E60 Sedan Logic 7
 Installation Instructions for BMW 5 Series, E60 Sedan Logic 7") Stage 1 Audio Upgrade (BMW Speakers) Installation Instructions for 2008-2009 BMW 5 Series, E60 Sedan Logic 7 Tools Required: Metric Socket Set Panel Removal Tool Torx T20 screwdriver Small, Straight Pick
Stage 1 Audio Upgrade (BMW Speakers) Installation Instructions for 2008-2009 BMW 5 Series, E60 Sedan Logic 7 Tools Required: Metric Socket Set Panel Removal Tool Torx T20 screwdriver Small, Straight Pick
Installation Instructions
 Installation Instructions Page 1 of 8 August 2006 Accessories, Alarm Ver 2.0 Accessory Development These Installation Instructions supersede all previous versions. SUBJECT ALARM KIT WITH MDD - P/N 65 73
PAL-80, PAL-65, PAL-45 Precision Architectural Loudspeakers
 O W N E R ' S M A N U A L PAL-80, PAL-65, PAL-45 Precision Architectural Loudspeakers www.parasound.com 1 Introduction Congratulations on your purchase of this Precision Architectural Loudspeaker system
Flipper Fidelity FF STN 10 WM Flippin Fantastic Big Ten Inch Stern Speaker Installation Instructions(03/14/16)
") Flipper Fidelity FF STN 10 WM Flippin Fantastic Big Ten Inch Stern Speaker Installation Instructions(03/14/16) Thank you for purchasing the Flipper Fidelity speaker kit for a Stern Pinball machine. This
Flipper Fidelity FF STN 10 WM Flippin Fantastic Big Ten Inch Stern Speaker Installation Instructions(03/14/16) Thank you for purchasing the Flipper Fidelity speaker kit for a Stern Pinball machine. This
Combining Old and New Systems in Existing Buildings and Other Retrofit Tales. By Paul Jewett CFAA Technician Number 11
 Combining Old and New Systems in Existing Buildings and Other Retrofit Tales By Paul Jewett CFAA Technician Number 11 Combining Old and New Systems in Existing Buildings and Other Retrofit Tales Disclaimer
Kawasaki Teryx Firestorm Heater Kit Instructions.
 Please read all instructions before beginning installation. When working on cooling systems always allow vehicles to cool to avoid being burned or scalded by hot coolant. Always disconnect vehicle s negative
XTZ BERYLLIUM CONVERSION
 XTZ BERYLLIUM CONVERSION Congratulations on your beryllium kit purchase! You got a couple of joyful hours ahead of you, The conversion demands patience and sleight of hand, however in return you will get
PERFECT FIT SERIES IN-DASH HEAT/ COOL/ DEFROST MUSTANG
 specializing in AIR CONDITIONING, PARTS AND SYSTEMS for your classic vehicle PERFECT FIT SERIES IN-DASH HEAT/ COOL/ DEFROST 1965-66 MUSTANG CONTROL & OPERATING INSTRUCTIONS The controls on your new Perfect
Safety Message to Installers of Federal Signal Siren Speakers
 Model RB-CRG11 Mounting Bracket Kit for the Rumbler Speaker in the 2011 and Newer Dodge Charger 2562629B REV. B 312 Safety Message to Installers of Federal Signal Siren Speakers People s lives depend on
Installation Instructions. For the 18 Built-In Dishwasher and Front Color Panels
 Installation Instructions For the 18 Built-In Dishwasher and Front Color Panels Printed in USA 154232102 Before You Begin DO NOT INSTALL DISHWASHER UNTIL YOU HAVE READ ALL INSTRUCTIONS. FOR YOUR SAFETY,
F SERIES SPEAKER SYSTEM
 INSTRUCTION MANUAL F SERIES SPEAKER SYSTEM F-160G/F-160W (Low impedance) F-160GM/F-160WM (High impedance) F-160WP (High impedance/outdoor use) F-240G/F-240W (Low impedance) F-240GM/F-240WM (High impedance)
INSTALLATION INSTRUCTIONS
 INSTALLATION INSTRUCTIONS Accessory ENGINE BLOCK P/N 08T44-SNA-101 Application 2011 ACCORD CROSSTOUR Publications No. AII 44661 Issue Date SEP 2010 PARTS LIST Engine Block Heater Kit Engine block heater
Flipper Fidelity Stern FF-STN-SPK-8-W Speaker Installation Instructions
 Flipper Fidelity Stern FF-STN-SPK-8-W Speaker Installation Instructions Thank you for purchasing the Flipper Fidelity speaker kit for a Stern Pinball machine. Your kit includes the following: (1) 8 Woofer
OWNER S MANUAL MUSICA SERIES DISTRIBUTED AUDIO CUSTOM SPEAKERS MTX.COM
 OWNER S MANUAL MUSICA SERIES DISTRIBUTED AUDIO CUSTOM SPEAKERS Thank you for choosing MTX MUSICA Series speakers for your home audio system. Properly installed and operated, these speakers will provide
Custom Series In-Wall and In-Ceiling Loudspeakers
 O W N E R ' S M A N U A L Custom Series In-Wall and In-Ceiling Loudspeakers Congratulations on your purchase of Custom Series In-Wall loudspeaker system and thank you for your selection of Parasound. Custom
PAL-245 Precision Architectural Loudspeakers
 O W N E R ' S M A N U A L PAL-245 Precision Architectural Loudspeakers www.parasound.com 1 Introduction Congratulations on your purchase of your PAL-245 Precision Architectural Loudspeaker system and thank
Redneck Air Conditioner
 Redneck Air Conditioner I have been somewhat successful in gleaning information from multiple sources and have put together a portable 12 volt and ice powered air conditioner. In an effort to give back,
Imperial Electric Fires
 Imperial Electric Fires GB IE MODELS: Flamescape II Curvascape II manual & remote. Installation and User Instructions PLEASE READ THESE INSTRUCTIONS CAREFULLY AND RETAIN FOR FUTURE REFERENCE This electric
Flipper Fidelity Williams / Bally WPC 95 Installation Instructions
 Flipper Fidelity Williams / Bally WPC 95 Installation Instructions Thank you for purchasing the Flipper Fidelity speaker kit for a Williams / Bally WPC 95 Pinball machine. Your system should include the
PAL-265 Precision Architectural Loudspeakers
 O W N E R ' S M A N U A L PAL-265 Precision Architectural Loudspeakers www.parasound.com 1 PA L-265 Precision Architectural Loudspeakers Owner s Manual 2 www.parasound.com Owner s Manual PA L-265 Precision
Chapter 3 Cooling, heating and ventilation systems
 3 1 Chapter 3 Cooling, heating and ventilation systems Contents Antifreeze mixture..............................see Chapter 1 Cooling fan assembly - testing, removal and refitting.............8 Cooling
specializing in AIR CONDITIONING, PARTS AND SYSTEMS for your classic hi l PERFECT FIT SERIES IN-DASH HEAT/ COOL/ DEFROST FORD TRUCK
 specializing in AIR CONDITIONING, PARTS AND SYSTEMS for your classic hi l PERFECT FIT SERIES IN-DASH HEAT/ COOL/ DEFROST 1967-72 FORD TRUCK CONTROL & OPERATING INSTRUCTIONS The controls on your new Perfect
ST. KITTS CEILING FAN
 ITEM #0845047 ST. KITTS CEILING FAN MODEL #40829 Questions, problems or missing parts? Before returning this item to your retailer, call our customer service department at 1-800-643-0067, Monday - Thursday,
PERFECT FIT IN-DASH HEAT/ COOL/ DEFROST FORD PICKUP
 specializing in AIR CONDITIONING, PARTS AND SYSTEMS for your classic vehicle PERFECT FIT IN-DASH HEAT/ COOL/ DEFROST 1960-66 FORD PICKUP CONTROL & OPERATING INSTRUCTIONS The controls on your new Perfect
PERFECT FIT IN-DASH HEAT/ COOL/ DEFROST PLYMOUTH BELVEDERE
 PERFECT FIT IN-DASH HEAT/ COOL/ DEFROST 1966-67 PLYMOUTH BELVEDERE CONTROL & OPERATING INSTRUCTIONS The controls on your new Perfect Fit system. Offers complete comfort capabilities in virtually every
SERVICE MANUAL FOR MODEL RM-26
 SERVICE MANUAL FOR MODEL RM-26 REQUIRED TOOLS CORDLESS DRILL DRIVE CUTTING TUBING OPEN WRENCH OF 1/2 RATCHET WITH SOCKET OF 7/16 SCREWDRIVER SET WITH SOCKET OF 9/32 VISE GRIP PIERCING VALVE WATCHER SLOTTED
INSTALLATION INSTRUCTIONS
 INSTALLATION INSTRUCTIONS Accessory ENGINE BLOCK P/N 08T44-SNA-101 Application Publications No. 2013 ACCORD AII 13006 2- AND 4-DOOR (EXCEPT 2- Issue Date DOOR V6) AUG 2012 PARTS LIST Engine block heater
User s Manual WS-69TB30 / WS-69TB36 (22 ) WS-69TB42 / WS-69TB48 (22 ) WS-69TS30 / WS-69TS36 (18 ) WS-69TS42 / WS-69TS48 (18 )
 WS-69TB42 / WS-69TB48 (22 ) WS-69TS30 / WS-69TS36 (18 ) WS-69TS42 / WS-69TS48 (18 )") www.windsterhood.com User s Manual LINER SERIES WS-69TB30 / WS-69TB36 (22 ) WS-69TB42 / WS-69TB48 (22 ) WS-69TS30 / WS-69TS36 (18 ) WS-69TS42 / WS-69TS48 (18 ) NOTE: PLEASE INSPECT HOOD IMMEDIATELY UPON
www.windsterhood.com User s Manual LINER SERIES WS-69TB30 / WS-69TB36 (22 ) WS-69TB42 / WS-69TB48 (22 ) WS-69TS30 / WS-69TS36 (18 ) WS-69TS42 / WS-69TS48 (18 ) NOTE: PLEASE INSPECT HOOD IMMEDIATELY UPON
REMOTE CONTROL CAR ALARM SYSTEM
 REMOTE CONTROL CAR ALARM SYSTEM Email: technicalsupport@stadiumcp.co.uk SPARKRITE SR90 REMOTE CAR ALARM SYSTEM INTRODUCTION The Sparkrite SR90 advanced remote control alarm system incorporates the latest
500, 600, 700, IC-27 Dual Installation Heater
 TALL HEATER CONTENTS 2 Two-Hole Steel Center Molding Assembly Dual Unit-Heater Assembly 6 Screws, #8-32 x /2 Self Tapping /2'' Heyco Bushing 50/60 Y-Harness INSTALLATION ON 700TALL OR IC-27 SERIES Clear
Product Support Bulletin
 MODEL: SUBJECT: CONVENTIONAL, W/ C7 CAT ENGINE WEBASTO TSL-17 HEATER Body DATE: APRIL 13, 2004 INDEX: 6 PAGE: 1 OF 16 Before you start this procedure, perform Freightliner Service Bulletin #20-7 first.
CARSON MANUFACTURING CO., INC NORTH RURAL STREET INDIANAPOLIS, IN (888) TECHNICAL BULLETIN
 TECHNICAL BULLETIN") Carson MANUFACTURING COMPANY, INC. CARSON MANUFACTURING CO., INC. 5451 NORTH RURAL STREET INDIANAPOLIS, IN 46220 (888) 577 6877 www.carsonsirens.com TECHNICAL BULLETIN RADIO MAN SIREN PA VOL SA400 WAIL
Carson MANUFACTURING COMPANY, INC. CARSON MANUFACTURING CO., INC. 5451 NORTH RURAL STREET INDIANAPOLIS, IN 46220 (888) 577 6877 www.carsonsirens.com TECHNICAL BULLETIN RADIO MAN SIREN PA VOL SA400 WAIL
Refrigerator Kit. k Four (4) washers k Two (2) strike cover machine screws k Four (4) housing cover screws k Eight (8) sheet metal mounting screws
 washers k Two (2) strike cover machine screws k Four (4) housing cover screws k Eight (8) sheet metal mounting screws") Below are instructions for upgrading a refrigerator kit to the new latch. Contact CompX Security Products at 864.297.6655 with any questions or for additional help. Included in this kit are (shown left
Below are instructions for upgrading a refrigerator kit to the new latch. Contact CompX Security Products at 864.297.6655 with any questions or for additional help. Included in this kit are (shown left
BUILT-IN DISHWASHER INSTALLATION INSTRUCTIONS
 BUILT-IN DISHWASHER INSTALLATION INSTRUCTIONS PLEASE READ COMPLETE INSTRUCTIONS BEFORE YOU BEGIN LEAVE INSTALLATION INSTRUCTIONS AND USER'S GUIDE WITH OWNER ALL ELECTRIC WIRING AND PLUMBING MUST BE DONE
Be sure the siren amplifier and speaker(s) in your installation have compatible wattage ratings.
 in your installation have compatible wattage ratings.") Model RB-CAP11 Mounting Kit for the Rumbler Speaker in a 2011 and Newer Chevy Caprice 2562648A REV. A 1011 Safety Message to Installers of Siren Speakers People s lives depend on your proper installation
Model RB-CAP11 Mounting Kit for the Rumbler Speaker in a 2011 and Newer Chevy Caprice 2562648A REV. A 1011 Safety Message to Installers of Siren Speakers People s lives depend on your proper installation
WaterVue Bluetooth Bathroom Music System
 WaterVue Bluetooth Bathroom Music System User Manual Quick reference guide 1. Important safety instruction............................................ 2 2. Ceiling speaker / in-wall speaker.......................................
PERFECT FIT SERIES IN-DASH HEAT/ COOL/ DEFROST CHEVROLET CHEVELLE/ EL CAMINO NOTE: INSTRUCTIONS DEPICT CHEVELLE
 specializing in AIR CONDITIONING, PARTS AND SYSTEMS for your classic vehicle PERFECT FIT SERIES IN-DASH HEAT/ COOL/ DEFROST 1964-65 CHEVROLET CHEVELLE/ EL CAMINO NOTE: INSTRUCTIONS DEPICT CHEVELLE CONTROL
Electronic Siren System Installation, Maintenance, and Service Manual
 Electronic Siren System Installation, Maintenance, and Service Manual 255406B REV. B 312 Printed in U.S.A. blank page Contents Chapter 1 Safety Messages for Installers and Operators...5 Safety Messages
Heater for BRP Commander. Caution: Before using this product, read this manual and follow all safety instructions. Owner s Manual
 Owner s Manual Model: Can Am Commander Heater for BRP Commander Caution: Before using this product, read this manual and follow all safety instructions. Safety Instructions Kit Contents Tool Requirement
KRAMER ELECTRONICS LTD. USER MANUAL MODEL: SPK-W611 Multipurpose Speakers. P/N: Rev 2
 KRAMER ELECTRONICS LTD. USER MANUAL MODEL: SPK-W611 Multipurpose Speakers P/N: 2900-300116 Rev 2 Contents 1 Introduction 1 2 Getting Started 2 2.1 Achieving the Best Performance 2 3 Overview 3 3.1 Defining
218 Trademark Dr Buda Texas STL Apex 150 Watt Siren Operation Manual and Instructions
 STL Apex 150 Watt Siren Operation Manual and Instructions Congratulations, you are the owner of a STL Apex 150 Watt Siren! Your siren is equipped with the latest technology and features at the best value
Aquapeutics GENERAL INSTALLATION GUIDE. Toll Free Customer Service line 1 (800)
") Aquapeutics GENERAL INSTALLATION GUIDE Toll Free Customer Service line 1 (800) 290-6812 Thank you for choosing an Aquapeutics product. Please read the following guide in its entirety before assembling
Aquapeutics GENERAL INSTALLATION GUIDE Toll Free Customer Service line 1 (800) 290-6812 Thank you for choosing an Aquapeutics product. Please read the following guide in its entirety before assembling
82. Siphon all gas out of the tank. 83. Disconnect the fuel filler and vent tube with a Phillips screwdriver.
 Chapter 5 - Gas Tank Removal, Cleaning, Sealing (Video Clip 5) 81. Gas tank removal and cleaning and sealing was completed using the Eastwood Gas Tank Sealer Kit. Other items required included (Purchase
Coaxial Speaker System OWNER S MANUAL
 Coaxial Speaker System OWNER S MANUAL 1 Coaxial Speaker System INTRO- DUCTION AND REGISTRATION Congratulations on your purchase of the Soundstream EXACT5.2 Coaxial Speaker System. You now own one of the
Final Design Statement
 Final Design Statement Transducer Theory 2/17/11 Eben Mannes ! After much research and revising of goals I have arrived at a plan for my speakers. This speaker design exhibits qualities of simplicity and
THE COMMISIONER TM 200 WATT ELECTRONIC SIREN & PA SYSTEM Model 4200
 THE COMMISIONER TM 200 WATT ELECTRONIC SIREN & PA SYSTEM Model 4200 Your purchase of a Wolo electronic siren, THE COMMISIONER, is the perfect choice for reliable service. THE COMMISIONER is manufactured
Amber In-wall & In-ceiling Speakers. P/Ns 24431, 24432, 24433, 24434, User's Manual
 Amber In-wall & In-ceiling Speakers P/Ns 24431, 24432, 24433, 24434, 24435 User's Manual CONTENTS SAFETY WARNINGS AND GUIDELINES... 3 INTRODUCTION... 4 FEATURES... 4 CUSTOMER SERVICE... 4 PACKAGE CONTENTS...
PackardInfo.com. HOW TO: Rebuild a Trico Mag Nu Matic Vacuum Washer Pump. Introduction
 Introduction So here hopefully ends the saga of my Trico Mag Nu Matic washer pump. I found the pump at the 2009 Packards International swap meet for $35. I thought I had the deal of a lifetime as it looked
STUDIO SERIES L226W, L226C, L228C, LS326W, LS326C, LS328C OWNER S GUIDE
 STUDIO SERIES L226W, L226C, L228C, LS326W, LS326C, LS328C OWNER S GUIDE THANK YOU FOR CHOOSING JBL, INC. For more than 60 years, JBL, Inc. has been involved in every aspect of music and film recording
TECHNICAL INSTRUCTIONS
 TID-0137_0A TECHNICAL INSTRUCTIONS AM Series Boiler Heat Exchanger Maintenance & Replacement For all models of AM Series Boilers, Including: Boilers: AM 399B AM 500B AM 750B AM 1000B Water Heaters: AM
Component Speaker System OWNER'S MANUAL
 Component Speaker System OWNER'S MANUAL Component Speaker System INTRODUCTION AND REGISTRATION Congratulations on your purchase of the Soundstream EXC Component Speaker System. You now own one of the finest
GE Monogram. Installation. Instructions. Component Cooktop System. Models ZEW145V ZGW124EN3 ZGW125EN3 ZEW155N ZEW166Y ZEW176Y
 GE Monogram Installation Instructions Component Cooktop System Models ZEW145V ZGW124EN3 ZGW125EN3 ZEW155N ZEW166Y ZEW176Y Before you begin Read these instructions completely and carefully. IMPORTANT: Save
Installation Instructions
 Installation Instructions For the 18" Built-In Dishwasher Sears, Roebuck and Co. Sears Canada, Inc. Hoffman Estates, IL 60179 U.S.A. Toronto, Ontario, Canada M5B 2B8 154435201 Before You Begin DO NOT INSTALL
TOUCHDOWN 48 CEILING FAN
 TOUCHDOWN 48 CEILING FAN MODEL #50205 Español p. 20 Questions, problems, missing parts? Before returning to your retailer, call our customer service department at 1-877-361-3883, Monday - Thursday, 8 am
General System Layout Sketch
 General System Layout Sketch EZ-37 Solar Panels PV panel Glycol Fill Valve Expansion Tank ` 1 Introduction This document describes how to install a Heliatos GH type solar water heating system. These systems
STUDIO SERIES LS360C OWNER S GUIDE
 STUDIO SERIES LS360C OWNER S GUIDE THANK YOU FOR CHOOSING JBL For more than 60 years, JBL has been involved in every aspect of music and film recording and reproduction, from live performances to the recordings
Installation Manual Mopar Engine Compartment Upgrade Kit
 Installation Manual 64-75 Mopar Engine Compartment Upgrade Kit Congratulations... You have just purchased the highest quality, best performing A/C system upgrade ever designed for your Classic Vehicle.
INSTALLATION INSTRUCTIONS ELECTRIC DRYER
 INSTALLATION INSTRUCTIONS ELECTRIC DRYER Table of Contents... 2 IMPORTANT: Save for local electrical inspector s use. 3397627C DRYER SAFETY... 2 INSTALLATION INSTRUCTIONS... 4 Tools and Parts... 4 Location
Table of Contents. Notes... 27
 Table of Contents Parts needed:... 2 Telestart T91 kit - VW Part No. ZDK054356.... 2 Overhead Timer - VW Part No. 7L6 919 044 S... 6 Heater Core for stationary heater - VW Part No. 7L6 819 953 F... 7 Parking
Installation Guide for Stern SPIKE 2 Speaker Light Kits
 Installation Guide for Stern SPIKE 2 Speaker Light Kits Cover Page / Table of Contents: Warning...02 Before You Begin...02 Tools Needed...03 Installation...04 Wire Connections...08 Remote Usage and DIY
BI-AMPING THE ACOUSTIC ENERGY 120 SPEAKERS
 BI-AMPING THE ACOUSTIC ENERGY 120 SPEAKERS Introduction As Rod Elliott explains eloquently, bi-amping is a highly benificial way to drive speakers. Although nothing new, real bi-amping is still not the
RECON Strobe Install. Here I Will Explain How To Install RECON s 90 Watt Strobe Kit. You Should Have:
 RECON Strobe Install Here I Will Explain How To Install RECON s 90 Watt Strobe Kit *Now, There Are Many Ways of Installing Them, Including Wiring Methods, Wiring Connectors, And Other Variables - In This
SERVICE MANUAL FOR MODEL RM-49
 SERVICE MANUAL FOR MODEL RM-49 REQUIRED TOOLS CORDLESS DRILL DRIVE CUTTING TUBING OPEN WRENCH OF 1/2 RATCHET WITH SOCKET OF 7/16 SCREWDRIVER SET WITH SOCKET OF 9/32 VISE GRIP PIERCING VALVE WATCHER SLOTTED
Tankless Water Heater Seminar DISCLAIMER
 Tankless Water Heater Seminar DISCLAIMER DISCLAIMER: Information presented by GMC Motorhomes International is intended only to communicate thoughts, ideas, opinions and procedures to and from GMC Motorhome
HEATING. Additional heating
 161 61 Additional heating OPERATING PRINCIPLE The vehicle with a G9T engine is fitted with an additional heating system as an option in some countries (Germany, Nordic countries...). This comprises an
PAL-380 Precision Architectural Loudspeakers
 O W N E R ' S M A N U A L PAL-380 Precision Architectural Loudspeakers www.parasound.com 1 Introduction Congratulations on your purchase of your PAL-380 Precision Architectural Loudspeaker system and thank
O W N E R ' S M A N U A L
 O W N E R ' S M A N U A L www.parasound.com 1 Introduction Congratulations on your purchase of the Outsiders Series Loudspeaker system and thank you for choosing Parasound. Your new Outsiders were developed
CARSON MANUFACTURING CO., INC NORTH RURAL STREET INDIANAPOLIS, IN (888) TECHNICAL BULLETIN
 TECHNICAL BULLETIN") Carson MANUFACTURING COMPANY, INC. CARSON MANUFACTURING CO., INC. 5451 NORTH RURAL STREET INDIANAPOLIS, IN 46220 (888) 577 6877 www.carsonsirens.com TECHNICAL BULLETIN MAN WAIL OFF ON PA VOL SA400 YELP
Carson MANUFACTURING COMPANY, INC. CARSON MANUFACTURING CO., INC. 5451 NORTH RURAL STREET INDIANAPOLIS, IN 46220 (888) 577 6877 www.carsonsirens.com TECHNICAL BULLETIN MAN WAIL OFF ON PA VOL SA400 YELP
Water Distiller Service Manual
 Water Distiller Service Manual Water Distiller Service Manual L70478WT 2008 Regal Ware, Inc. Table of Contents RECOMMENDED TOOLS... 2 GENERAL INSPECTION...3 BOILING CHAMBER TROUBLESHOOTING & REPAIRS Description...
PPI PPI PPI SERVICE PPI PPI PPI PPI PPI PPI CAUTION! PPI
 Thank you for choosing PPI audio epuipment. Now, HANG ON! PPI products are engineered and manufactured to deliver a wild ride of performance, sound quality, and reliability. This PPI product reflects our
This guide will be posted in several chunks so please don't post till im done, cheers.
 vx220.org.uk > General Discussion > VX220 Discussion Radiator Replacement Guide Options SteveA Jan 10 2007, 00:47 Post #1 This guide will be posted in several chunks so please don't post till im done,
3MNLR72XXD Series Fan. Owner s Guide and Installation Manual. UL Model NO. : 3MNLR72
 Owner s Guide and Installation Manual 3MNLR72XXD Series Fan UL Model NO. : 3MNLR72 Attach sales receipt to this card and retain as your proof of purchase DATE OF PURCHASE: MODEL NUMBER: RETAILER NAME:
Table of Contents. What to Expect with. Mounting Options. Tools Needed. Wall Control
 Table of Contents www.casablancafanco.com What to Expect with Your Installation Congratulations on purchasing your new Casablanca ceiling fan! It will provide comfort and performance in your home or office
Aria Polypropylene In-wall & In-ceiling Speakers. P/Ns 18586, 18587, 18588, 18589, User's Manual
 Aria Polypropylene In-wall & In-ceiling Speakers P/Ns 18586, 18587, 18588, 18589, 18590 User's Manual CONTENTS SAFETY WARNINGS AND GUIDELINES... 3 INTRODUCTION... 4 FEATURES... 4 CUSTOMER SERVICE... 4
HOME CINEMA SPEAKER PACKAGE
 HOME CINEMA SPEAKER PACKAGE CONTENTS CONSUMER PRECAUTIONS... 2 UNPACKING...3 SETTING UP THE SPEAKERS... 4 CONNECTIONS TO THE RECEIVER... 6 SPEAKER PLACEMENT... 7 SPECIFICATIONS...Back cover OWNER S MANUAL
Operating Instructions Pigeon - Clay target launcher
 Operating Instructions Pigeon - Clay target launcher Specifications: Single column 50 target hopper. Throwing distance: 60 yards Weight: 25kg / 55 lbs Length: 1200mm / 47 Width: 560mm / 22 Height: 960mm
Introduction Page 2. Specifications Page 3. Dimensions Page 4. Included Parts and Accessories Page 6. Tweeter Installation Page 8
 Index Introduction Page 2 Specifications Page 3 Dimensions Page 4 Included Parts and Accessories Page 6 Tweeter Installation Page 8 Axis Mount / Phase Plug Installation Page 0 SPZ50 Woofer Installation
e Bath Fan with Light User s Guide
 e Bath Fan with Light User s Guide abfl125rok Item Stock Number(s): BFL125ROK IMPORTANT INSTRUCTIONS - OPERATING MANUAL READ AND SAVE THESE INSTRUCTIONS READ CAREFULLY BEFORE ATTEMPTING TO ASSEMBLE, INSTALL,
Application Guide OE692-FD OE652-FD OE69C-FD OE65C-FD FORD & LINCOLN O.E.M. PLUG & PLAY
 OE692-FD OE652-FD OE69C-FD OE65C-FD FORD & LINCOLN O.E.M. PLUG & PLAY Application Guide Please read through this manual to familiarize yourself with your new speakers. Should your PowerBass Autosound speaker
Alpha In-Wall Speaker 10-Inch Carbon Fiber 300W Subwoofer
 Alpha In-Wall Speaker 10-Inch Carbon Fiber 300W Subwoofer P/N 30487 User's Manual CONTENTS SAFETY WARNINGS AND GUIDELINES... 3 INTRODUCTION... 4 FEATURES... 4 CUSTOMER SERVICE... 4 PACKAGE CONTENTS...
INSTALLATION INSTRUCTIONS
 Accessory Application Publication No. INSTALLATION INSTRUCTIONS HEATER KIT P/N 0SE01-HL3-101 SXS700M4/M2 Honda Dealer: Please give a copy of these instructions to your customer. PARTS LIST REPAIR KIT (P/N
Installing and operating your Cabinet Cooling System, with Digital Thermostat
 NOTE: These instructions are for a standard system, since it is not possible to make separate instructions for every custom system. If you have requested a custom system, please be aware of the differences
DISHWASHER. Models DW2432 and DW2432SS. Installation Manual. Write Serial Number (on inner door of unit) here:
 here:") DISHWASHER Models DW2432 and DW2432SS Installation Manual Write Serial Number (on inner door of unit) here: Felix Storch, Inc. Summit Appliance Division 770 Garrison Avenue Bronx, New York 10474 www.summitappliance.com
DISHWASHER Models DW2432 and DW2432SS Installation Manual Write Serial Number (on inner door of unit) here: Felix Storch, Inc. Summit Appliance Division 770 Garrison Avenue Bronx, New York 10474 www.summitappliance.com
AMC. Owner s Manual. Sub 12
 AMC Owner s Manual Sub 12 SPECIFICATIONS Frequency Range (±2 db): Driver Complement: Dimensions: Installation Environment: Weight: 20 Hz to 80Hz One 12 Cast frame woofer in a front-vented enclosure Enclosure:
POWER SHOWERS Models 4500M 5002M 4500T 5002T
 II POWER SHOWERS Models 4500M 5002M 4500T 5002T Performance Shower Products CUSTOMER SERVICE HELPLINE: 01883 730339 CONTENTS PLEASE READ THESE INSTRUCTIONS CAREFULLY: This booklet covers all models in