Table of Contents. Notes... 27
|
|
|
- Prosper McDowell
- 6 years ago
- Views:
Transcription
1 Table of Contents Parts needed:... 2 Telestart T91 kit - VW Part No. ZDK Overhead Timer - VW Part No. 7L S... 6 Heater Core for stationary heater - VW Part No. 7L F... 7 Parking heater options Parking heater controlled via Telestart remote Parking heater controlled via overhead timer Parking heater controlled via both Telestart remote and overhead timer Installation of Telestart T91 Remote Kit Replacing the overhead compass module with the timer Replacing the Auxiliary Heater Electronics Coding Parking heater controlled via Telestart remote Parking heater controlled via overhead timer Parking heater controlled via both Telestart remote and overhead timer Notes... 27
 as well as in-cabin control and timer.")
2 Do It Yourself instruction on how to convert the built-in auxiliary heater found in US spec Touareg V10 TDI models to a parking heater. Instructions here include the installation of the remote control kit (Telestart T91) as well as in-cabin control and timer. Instructions are provided without any warranty and are to be used at your own risk. Parts needed: Telestart T91 kit - VW Part No. ZDK Picture 1 - Box with the kit inside Picture 2 - Telestart module with mounting hardware and 1A fuse


3 Picture 3 - Telestart module close-up Picture 4 - Remote fob


4 Picture 5 - Telestart module harness brown cable is ground, red cable goes to fuse box and yellow cable connect with the extension going to PIN1 on the aux. heater control harness Picture 6 - Telestart antenna


5 Picture 7 - Extension yellow cable one side goes to PIN1 of aux. heater harness the other side connects to yellow cable from Telestart module harness (shown in Picture 5)

6 Picture 8 - Telestart module side view antenna connector on the left and male connector for the harness on the right Overhead Timer - VW Part No. 7L S There are part# variations depending on the interior color. These apply to MY L S 5J6 - crystal grey 7L S 7G8 - beige 7L S 7H7 - sunshine beige MY2007 has one more color in the list 7L S 28U latte macchiato (brown) Picture 9 Front


7 Picture 10 Back Heater Core for stationary heater - VW Part No. 7L F

8 NOTE: It appears there are two different variations of the Webasto heater additional heater (Part# 7L ) and stationary heater (Part#7L ). The difference between these two is in the heater electronics. Below ETKA screenshot shows the part numbers for each of these: Some US V10 TDIs (it appears MY 2004 ones) came with the correct (stationary) heater from the factory and newer US V10 models came with the incorrect (additional) heater. The best way to determine which variation of the heater you have is to hook up a VAG-COM and check the part # of address 18 (Aux. Heater). Here are sample readings from both additional and stationary heaters taken with VAG-COM: Additional heater: Address 18: Aux. Heat Labels: None Part No: 7L D Component: Standheizung E1MAC Coding: Shop #: WSC VCID: 336EABB52B47 Stationary heater: Address 18: Aux. Heat Labels: None Part No: 7L G Component: Standheizung E1MAC Coding: Shop #: WSC VCID: 3A CD9 Picture 10 Heater core comes with the electronics

9 Picture 11 Top view
10 Parking heater options Depending on your preference there are a few options on how to control the parking heater via Telestart remote, via overhead timer, via both Telestart remote and overhead timer, and also a GSM phone, which will not be detailed in this document. Parking heater controlled via Telestart remote This allows you to operate the heater via a 2- button remote fob. You can start,stop the heater, switch between heating/cooling modes, change run time. This option requires the following: Telestart T91 Remote Kit as mentioned in the Parts needed section above. Parking heater controlled via overhead timer This allows you to operate the heater via the overhead compass module within the cabin. This does not provide remote control capabilities but allows you to program the heater to start on a scheduled time. It also allows you to switch between heating/cooling mode, change run time, start/stop the heater manually. This option requires the following: Overhead timer as mentioned in the Parts needed section above Heater core for stationary heater (Part# 7L ) as mentioned in the Parts needed section above. Make sure to read the NOTE section there carefully as there are two variations of the Webasto heaters that come in the Touareg. Parking heater controlled via both Telestart remote and overhead timer This option is a combination of the two above. If you chose to have both the remote control and timer features mentioned above you will need the following: Telestart T91 Remote Kit as mentioned in the Parts needed section above. Overhead timer as mentioned in the Parts needed section above Heater core for stationary heater (Part# 7L ) as mentioned in the Parts needed section above. Make sure to read the NOTE section there carefully as there are two variations of the Webasto heaters that come in the Touareg. Installation of Telestart T91 Remote Kit

11 Start by removing the front left wheel and then remove the wheel well to expose the Webasto heater. Picture 12 Webasto heater under driver s side front fender Unplug the Aux. Heater power and control harnesses. These go into plugs 1 and 2 (left to right) on Picture 11.

12 Picture 13 Control and power cables plugged on top of the heater. Take the control harness and detach the cover of the harness and pull it up as shown in Picture 14. There are two pins on both side of the cover that need to


13 be pushed before the cover will slide up. PIN1 is the very left whole with the blue cap on the front row. The green lock slides to the right before the pin1 yellow cable is installed. Picture 14 Harness cover pulled up Picture 15 Top view of the pin layout with pin1 cap removed and yellow cable ready to be installed


14 Run the pin1 cable along the cable feeds and through to the inside of the engine compartment. I used the opening next to air filter box and the ground charging pin. Picture 16 Picture 17

15 I then run the cable behind the firewall using the corner opening under the rubber seal of the hood. Picture 18 I then removed the fuse cover and the plastic covering the wiper arms to expose the rubber plug behind the firewall where I poked a hole to run the pin1 cable inside the cabin. I poked a small hole in order to ensure that no watter would go inside the cabin through it. You can seal this with silicone if you want to but in my case the hole was tight enough to keep water out. I taped the end of the wire to a metal skewer and fished the wire inside. I had previously lubricated the skewer and wire to make it easier. Once the wire was inside I removed the skewer.


16 Picture 19 skewer and wire through the hole Picture 20 another view


17 Picture 21 another view with skewer Picture 22 After wiper arm and fuse cover replaced


18 Then it was time to move inside the car and to the fuse box. In order to expose the fuse box I remove the wood trim and the left cover as shown in picture 23 below. There are 2 screws that hold the fusebox to the frame which I removed to gain flexibility. The fusebox back cover also had to be removed as shown in picture 24 Picture 23 left fusebox side with plastics and covers removed Picture 24 red arrow shows the fusebox back cover
 which also had a power source already available. As I had no room for error with only one cable I first ensured that slot 20 was hot even after locking the car.")
19 I then run the red power cable from the T91 kit to the fuse box. The instructions that came with the kit specified that fuse 30 is to be used but in my case slot 30 was already in use. I located an empty slot (slot 20) which also had a power source already available. As I had no room for error with only one cable I first ensured that slot 20 was hot even after locking the car. This is required if you want the T91 to function at all times. I then plugged the red wire to slot 20 permanently Picture 25 fusebox slot 20 with red T91 wire on top I then plugged the 1A fuse that came with the kit in slot 20 and mounted the T91 module. I used the top fusebox screw to both mount the module and ground it. This is shown in picture 26. I also used zip ties to organize the T91 wires. Where you mount the antenna is up to you I chose to install mine above rear view mirror hidden under the headliner. It comes with mounting tape but I chose not to glue it. I then run the antenna wire to the driver s side and down behind the door column (make sure the wire does not obstruct the curtain airbag).

20 Picture 26 T91 module mounted and wires connected

21 Replace all plastic covers and wood trim in reverse order. The T91 kit comes with user manual in english. You can follow the instructions provided there to pair the remote control with the module. Replacing the overhead compass module with the timer Replacing the module is straight forward the connector and wiring are the same for both the old and the new modules. Start by sliding a calling card or similar in the back of the module to depress the clips and pull down as show in picture 27 below. You can use the new module to note the location of the clips and get a better idea. Picture 27 Prop open the back side of the module by sliding in a plastic card or similar.

22 Picture 28 View from the back Picture 29 Pull the red locking clip and unplug the module

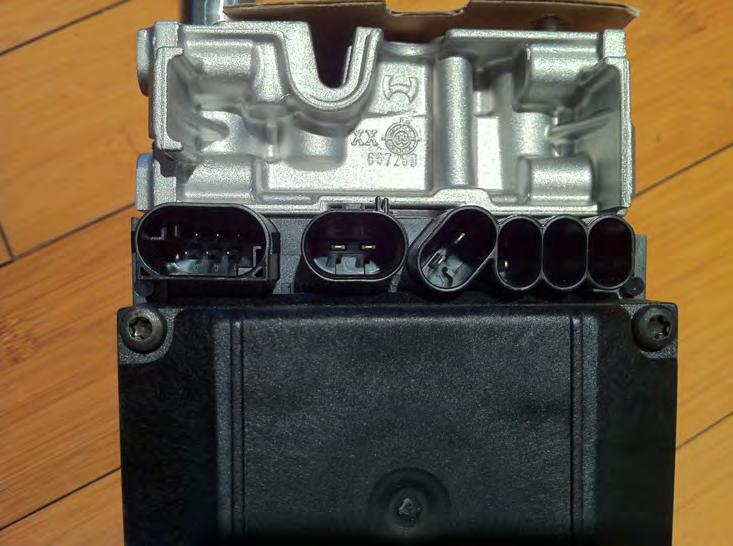
23 Replacing the Auxiliary Heater Electronics This assumes that the front left wheel and wheel well have already been removed. First let s disassemble the new heater core and take the electronics out. Start by removing the 4 torx screws that hold the cover. You may need to use a flat screwdriver to pry the cover from the electronics board. Do NOT pull both the electronics board and cover at the same time. Picture 30 top of the heater with cover removed. Electronics board is fixed with one torx screw as noted

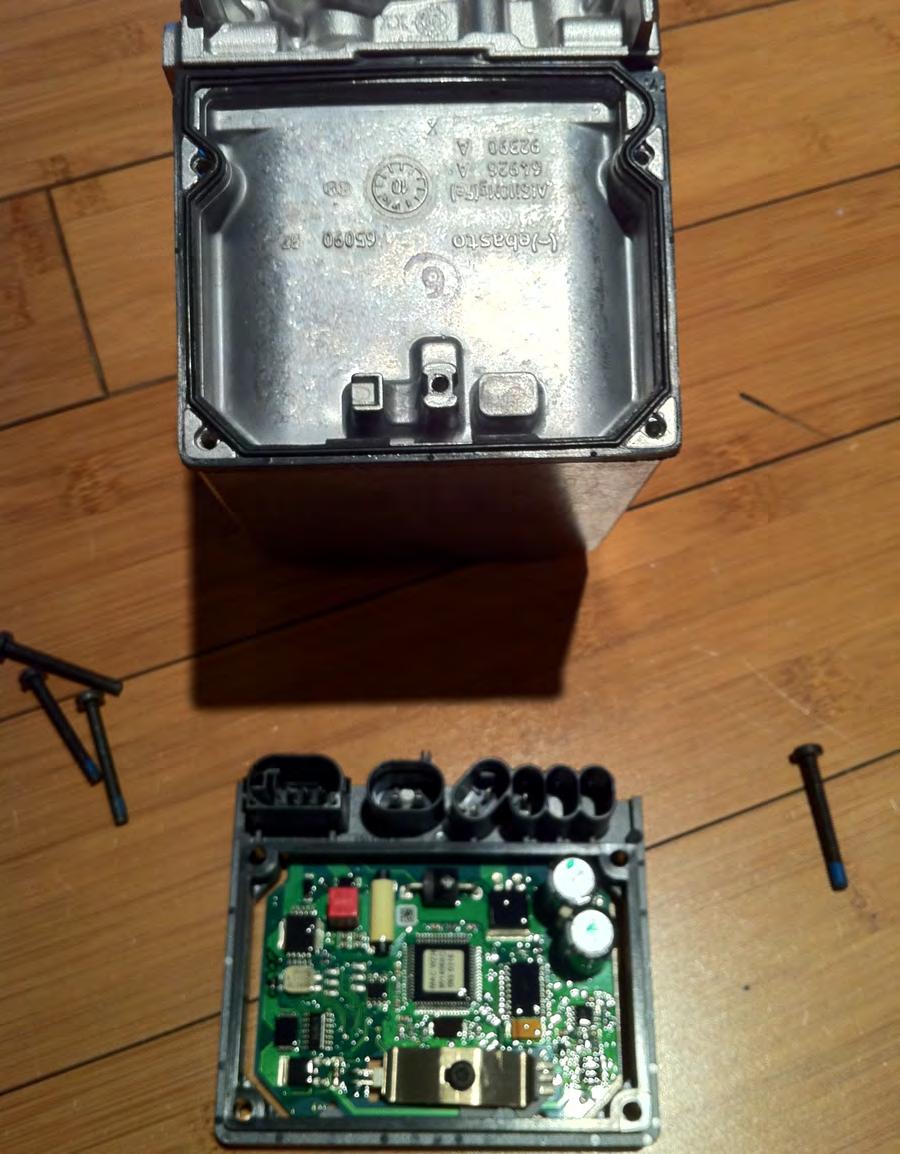
24 Picture 31 shows the cover and the electronics detached from the heater core. Picture 31
25
 shown in picture 32 below.")
26 Apply the same steps to remove the electronics board from the old heater. I decided to loosen up the mounting bracket of the Webasto under the fender for easier access. You will also have to disconnect harnesses 3 and 4 (left to right) shown in picture 32 below. Note that harness 5 on the old electronics board has a jumper the new board has slot 5 inactive and does not need the jumper. You can do this by lifting the front end up and sliding the electronics board out slightly and then unplugging the harnesses. Space might be tight so be patient. Picture 32 The replaced old circuit board with jumper in slot 5
27 Coding Parking heater controlled via Telestart remote If you went with this option there is no coding required. Leave the coding value for Address 18(Aux. Heater) as is. Parking heater controlled via overhead timer If you went with this option ensure that Address 18(Aux. Heater) coding is as shown below. If your V10 came with the stationary heater (Part# 7L ) the default factory coding will be If you leave this value the Webasto will not respond to the commands from the overhead timer. Address 18: Aux. Heat Labels: None Part No: 7L G Component: Standheizung E1MAC Coding: Shop #: WSC VCID: 3A CD9 You will also need to make sure Address 18(Aux. Heater) -> Adaptation -> Channel 004 value reads 0. This disables the supervision of the coolant circulation valve (N279). The North American V10s do not have this installed from the factory. Leaving the value to 1 will cause the Webasto to throw error codes. Parking heater controlled via both Telestart remote and overhead timer Coding requirements for this option are identical to the Parking heater controlled via overhead timer ones above. Notes It has been observed that if you have the Telestart T91 remote with the additional heater (part# 7L ) you will need to awaken the car to make the Webasto listen to the Webasto key fob start command and fire up properly. Unlocking and locking the car with the regular key fob can achieve this awakening. The procedures and steps described above have not been confirmed to work on a 2008 V10 (T2).
28 I tried to make this document as detailed as needed but if you need clarification on anything send me a message my user in clubtouareg.com is.v10tdi and V10TDI on vwvortex.com
This site is based on a but applies to all 1971-on Saab 99 and Saab 900.
 by Mark Jeter updated: December 8, 2004 originally web-published June 27, 2001 This document shows how the original waterpump in a Saab "B" engine can be eliminated and replaced with a reliable, efficient
JOHN DEERE GATOR HPX/XUV 2 PASSENGER HEATER INSTALLATION INSTRUCTIONS (p/n: 9PH20S30)
") P. 1 of 12 JOHN DEERE GATOR HPX/XUV 2 PASSENGER HEATER INSTALLATION INSTRUCTIONS (p/n: 9PH20S30) Item: Qty: Description: 1 2 1 x 1 x 5/8 Tee Fitting 2 2 Plastic Snap-in Hose Grommet 3 4 1-1/2" Hose Clamps
P. 1 of 12 JOHN DEERE GATOR HPX/XUV 2 PASSENGER HEATER INSTALLATION INSTRUCTIONS (p/n: 9PH20S30) Item: Qty: Description: 1 2 1 x 1 x 5/8 Tee Fitting 2 2 Plastic Snap-in Hose Grommet 3 4 1-1/2" Hose Clamps
Stage 1 Audio Upgrade (BMW Speakers) Installation Instructions for BMW 5 Series, E60 Sedan Logic 7
 Installation Instructions for BMW 5 Series, E60 Sedan Logic 7") Stage 1 Audio Upgrade (BMW Speakers) Installation Instructions for 2008-2009 BMW 5 Series, E60 Sedan Logic 7 Tools Required: Metric Socket Set Panel Removal Tool Torx T20 screwdriver Small, Straight Pick
Stage 1 Audio Upgrade (BMW Speakers) Installation Instructions for 2008-2009 BMW 5 Series, E60 Sedan Logic 7 Tools Required: Metric Socket Set Panel Removal Tool Torx T20 screwdriver Small, Straight Pick
PERFECT FIT SERIES IN-DASH HEAT/ COOL/ DEFROST MUSTANG
 specializing in AIR CONDITIONING, PARTS AND SYSTEMS for your classic vehicle PERFECT FIT SERIES IN-DASH HEAT/ COOL/ DEFROST 1965-66 MUSTANG CONTROL & OPERATING INSTRUCTIONS The controls on your new Perfect
PERFECT FIT IN-DASH HEAT/ COOL/ DEFROST 1968 CHEVROLET IMPALA
 specializing in AIR CONDITIONING, PARTS AND SYSTEMS for your classic vehicle PERFECT FIT IN-DASH HEAT/ COOL/ DEFROST 1968 CHEVROLET IMPALA CONTROL & OPERATING INSTRUCTIONS The controls on your new Perfect
PERFECT FIT IN-DASH HEAT/ COOL/ DEFROST FORD PICKUP
 specializing in AIR CONDITIONING, PARTS AND SYSTEMS for your classic vehicle PERFECT FIT IN-DASH HEAT/ COOL/ DEFROST 1960-66 FORD PICKUP CONTROL & OPERATING INSTRUCTIONS The controls on your new Perfect
Heater for BRP Commander. Caution: Before using this product, read this manual and follow all safety instructions. Owner s Manual
 Owner s Manual Model: Can Am Commander Heater for BRP Commander Caution: Before using this product, read this manual and follow all safety instructions. Safety Instructions Kit Contents Tool Requirement
MOUNTING INSTRUCTIONS
 A-12093 JDX 2014 HEATER KIT With Gas Engine Connection Fittings 2014 and Newer ROPS Cabs A-12098 (Kit A-12092, Diesel Engine Connection Fittings are sold separately for diesel models) 12VDC, 2-Speed, 15,000
PERFECT FIT SERIES IN-DASH HEAT/ COOL/ DEFROST CHEVROLET NOVA
 specializing in AIR CONDITIONING, PARTS AND SYSTEMS for your classic PERFECT FIT SERIES IN-DASH HEAT/ COOL/ DEFROST 1966-67 CHEVROLET NOVA CONTROL & OPERATING INSTRUCTIONS The controls on your new Perfect
PERFECT FIT IN-DASH HEAT/ COOL/ DEFROST PLYMOUTH BELVEDERE
 PERFECT FIT IN-DASH HEAT/ COOL/ DEFROST 1966-67 PLYMOUTH BELVEDERE CONTROL & OPERATING INSTRUCTIONS The controls on your new Perfect Fit system. Offers complete comfort capabilities in virtually every
specializing in AIR CONDITIONING, PARTS AND SYSTEMS for your classic hi l PERFECT FIT SERIES IN-DASH HEAT/ COOL/ DEFROST FORD TRUCK
 specializing in AIR CONDITIONING, PARTS AND SYSTEMS for your classic hi l PERFECT FIT SERIES IN-DASH HEAT/ COOL/ DEFROST 1967-72 FORD TRUCK CONTROL & OPERATING INSTRUCTIONS The controls on your new Perfect
PERFECT FIT SERIES IN-DASH HEAT/ COOL/ DEFROST CHEVROLET CHEVELLE/ EL CAMINO NOTE: INSTRUCTIONS DEPICT CHEVELLE
 specializing in AIR CONDITIONING, PARTS AND SYSTEMS for your classic vehicle PERFECT FIT SERIES IN-DASH HEAT/ COOL/ DEFROST 1964-65 CHEVROLET CHEVELLE/ EL CAMINO NOTE: INSTRUCTIONS DEPICT CHEVELLE CONTROL
RECON Strobe Install. Here I Will Explain How To Install RECON s 90 Watt Strobe Kit. You Should Have:
 RECON Strobe Install Here I Will Explain How To Install RECON s 90 Watt Strobe Kit *Now, There Are Many Ways of Installing Them, Including Wiring Methods, Wiring Connectors, And Other Variables - In This
Product Support Bulletin
 MODEL: SUBJECT: CONVENTIONAL, W/ C7 CAT ENGINE WEBASTO TSL-17 HEATER Body DATE: APRIL 13, 2004 INDEX: 6 PAGE: 1 OF 16 Before you start this procedure, perform Freightliner Service Bulletin #20-7 first.
INSTALLATION INSTRUCTIONS PT-A HEAT/AC STANDARD KIT FORD E-SERIES VANS
 INSTALLATION INSTRUCTIONS PT-A-402 - HEAT/AC STANDARD KIT 2007-2014 FORD E-SERIES VANS with Gas engine (To be used with 2007 and newer Prisoner Transport Inserts ONLY) Warning do not attempt to install
How to reduce ChiliCube noise level by
 How to reduce ChiliCube noise level by replacing fans Description for how to replace noisy fans which come with the ChiliCube with 3-speed fans which are quieter even on high, and allow speed selection.
REMOTE CONTROL CAR ALARM SYSTEM
 REMOTE CONTROL CAR ALARM SYSTEM Email: technicalsupport@stadiumcp.co.uk SPARKRITE SR90 REMOTE CAR ALARM SYSTEM INTRODUCTION The Sparkrite SR90 advanced remote control alarm system incorporates the latest
Can Am Commander 1000 Radiator Relocation Installation Instructions
 Can Am Commander 1000 Radiator Relocation Installation Instructions What comes with the kit 2 CNC Machined Aluminum mounting brackets 2 pcs M6 x 1.0 x 60mm long SHCS 2 pcs M6 x 1.0 x75mm long SHCS 4 pc
Installation Instructions
 Installation Instructions Page 1 of 8 August 2006 Accessories, Alarm Ver 2.0 Accessory Development These Installation Instructions supersede all previous versions. SUBJECT ALARM KIT WITH MDD - P/N 65 73
4100U City and Relay Cards Installation Instructions
 4100U City and Relay Cards Installation Instructions Introduction This publication describes the installation procedure for the following: 4100-6031/6032 City Circuit Cards 4100-6033 Alarm Relay Card Inspecting
Attach the drain tube through the hole.
 HEATER ONLY AND FACTORY A/C CARS Reinstall the centre bezel using original hardware. Check for the seal around the centre louver as to not block the air. HEATER CARS A/C CARS The drivers side ball louver
Installation Instructions for Med Touch Master Alarms - Wireless
 Installation Instructions for Med Touch Master Alarms - Wireless Master Alarm Panel Local Sending Master Alarm Panel - Master Alarm Panel - Repeater Page 1 of 7 Common Master Alarm Back Box Assembly Assembling
Warning Do not attempt to install A/C units unless you are experienced with servicing A/C systems! Wire Cutter / Crimper Socket set
 INSTALLATION INSTRUCTIONS PT-A-405 Rear HVAC System for 2014-2018 RAM PROMASTER with OEM rear AC/Heat Prep Package Fittings For Installation with Havis Prisoner Transport Insert Warning Do not attempt
shine TM Manual User guide and installation instructions The global leader in door opening solutions
 shine TM Manual User guide and installation instructions The global leader in door opening solutions Important notes Product features Product not designed for external use. Do not use a tool to force the
Heater with Air Conditioning. E-Series Ford Aeromaster
 Service Guide Heater with Air Conditioning E-Series Ford Aeromaster Contents Blower Motor...2 Plenum Removal...3 Control Module...6 Servo Motors...8 Coolant Valve and Servo Motor...8 Evaporator Recirculation
HEAT/ COOL/ DEFROST FORD THUNDERBIRD
 specializing in AIR CONDITIONING, PARTS AND SYSTEMS for your classic vehicle PERFECT FIT IN-DASH HEAT/ COOL/ DEFROST 1964-66 FORD THUNDERBIRD CONTROL & OPERATING INSTRUCTIONS The controls on your new Perfect
PERFECT FIT IN-DASH HEAT/ COOL/ DEFROST EARLY 1955 CHEVROLET PICKUP
 specializing in AIR CONDITIONING, PARTS AND SYSTEMS for your classic vehicle PERFECT FIT IN-DASH HEAT/ COOL/ DEFROST 1947 - EARLY 1955 CHEVROLET PICKUP CONTROL & OPERATING INSTRUCTIONS The controls on
INSTALLATION INSTRUCTIONS
 INSTALLATION INSTRUCTIONS Accessory Application Publications No. AII 30320 ENGINE BLOCK 2006 CIVIC HYBRID P/N 08T44-SVB-100 Issue Date SEP 2005 PARTS LIST Engine block heater Aluminium washer Heater harness
Hanson LED C e i l i n g F a n
 Hanson LED C e i l i n g F a n model no. 052-8398-2 Toll-free 1-866-827-4985 IMPORTANT: For your safety please read and understand this manual before installing or operating this product. OWNER S MANUAL
Wiring the DCI using a Modifry Products Plug-n-Play Harness
 Wired DCI-3 Installation & Operation The DCI does NOT work like the factory dash controls so review the Operation section before using it. Installing a DCI requires the same skills and tools as installing
OWNER S MANUAL ELECTRIC FLAT PANEL FIREPLACE. AC V 60Hz. Model# : /60 - Built-in & Wall Mounted Electric Fireplace WARNING CAUTION
 ELECTRIC FLAT PANEL FIREPLACE Model# :80017 OWNER S MANUAL 50/60 - Built-in & Wall Mounted Electric Fireplace AC 110-120V 60Hz WARNING Read and understand this entire owner s manual, including all safety
HT-2 / 9600 Series Control Contents
 HT-2 / 9600 Series Control Contents Tools & Parts Tools Required Parts Required Error Messages 3 Flashing Dots Pressure or Flow Switch Not Activated Pressure or Flow Switch Activated Temperature Sensor
DISMANTELING DASH ON AE82 TO REPLACE HEATER CORE Know your enemy:
 DISMANTELING DASH ON AE82 TO REPLACE HEATER CORE Know your enemy: 1. First open the glove box. Unscrew the screw inside (1) then the screw at the bottom of the speaker cover. Give the cover a pull and
Original BMW Accessories. Installation Instructions.
 Original BMW Accessories. Installation Instructions. Alarm Retrofit Kit BMW Series Sedan (E 46/4) BMW Series Coupe (E 46/) Vehicle must have alarm pre-wiring, which is 00% option for US spec vehicles.
Speaker Installation Guide
 In This Guide: Installing car speakers often requires removal of door, dash or rear window shelf interior panels to access the speaker mounting points. Component speakers require the additional steps of
INSTALLATION INSTRUCTIONS
 INSTALLATION INSTRUCTIONS Accessory Application Publication No. HEATER KIT P/N 0SE01-HL3-102 (SXS700M2/M4) P/N 0SE01-HL3-103 (SXS700M2D/M4D) SXS700M2/M2D/M4/M4D MII 14607-15172 Issue Date REVISED: June
Wi-Fi Thermostat. Sensi TM INSTALLATION GUIDE. Models: 1F86U-42WF, UP500W Version: October Emerson Electric Co. All rights reserved.
 Sensi TM Wi-Fi Thermostat INSTALLATION GUIDE Models: 1F86U-42WF, UP500W Version: October 2017 2017 Emerson Electric Co. All rights reserved. CONTENTS Installation guide Downloading the Sensi app 3 Creating
CoolTouch TM control system
 READ AND SAVE THESE INSTRUCTIONS CoolTouch TM control system 3R200, 3R400, 3W500 U.S. Patent Pending CAUTION: This control system was designed to operate and work with a specific Kichler Ceiling Fan ONLY.
How to modify Volvo Alarm Siren after it has given Message: Alarm system Service Required Ver. 1.2
 How to modify Volvo Alarm Siren after it has given Message: Alarm system Service Required Ver. 1.2 We will show how to modify the Alarm Siren Unit without using Battery. If you are not sure or do not know
TECHNICAL INSTRUCTIONS
 TID-0137_0A TECHNICAL INSTRUCTIONS AM Series Boiler Heat Exchanger Maintenance & Replacement For all models of AM Series Boilers, Including: Boilers: AM 399B AM 500B AM 750B AM 1000B Water Heaters: AM
EVAPORATIVE AIR COOLER SERVICE MANUAL
 EVAPORATIVE AIR COOLER SERVICE MANUAL CAUTION: Before servicing the unit, read the Safety Precautions in this manual. Only for authorized service. MODEL NO.: CL30XC & CHL30XC (INDOOR USE ONLY) CONTENT
INSTALLATION INSTRUCTIONS
 Accessory Application Publication No. INSTALLATION INSTRUCTIONS HEATER KIT P/N 0SE01-HL3-101 SXS700M4/M2 Honda Dealer: Please give a copy of these instructions to your customer. PARTS LIST REPAIR KIT (P/N
TOOLS REQUIRED: Crimping tool A/C Recovery Unit Wrench set up to 1 ¼ 4 Hole saw
 INSTALL INSTRUCTIONS PT-A-401 HVAC UNIT for 2003-2018 CHEVROLET/GMC VAN (For 2007 ALL WHITE Prisoner Transport Inserts ONLY) Not Recommended for diesel engine application because of lack of space needed
500, 600, 700, IC-27 Dual Installation Heater
 TALL HEATER CONTENTS 2 Two-Hole Steel Center Molding Assembly Dual Unit-Heater Assembly 6 Screws, #8-32 x /2 Self Tapping /2'' Heyco Bushing 50/60 Y-Harness INSTALLATION ON 700TALL OR IC-27 SERIES Clear
Camaro A/C Install Instructions
 1967-1968 Camaro A/C Install Instructions This kit is designed for the 1967-1968 non A/C equipped Camaro. This kit can be used with or without Astro vents Step One Remove the following factory components:
A HEATER KIT With Diesel Engine Connection Fittings
 A-12142 HEATER KIT With Diesel Engine Connection Fittings Figure 1 (General Layout and Parts I.D.) Page 1 of 6 Read these instructions and identify all components. Please retain these instructions for
IMPORTANT SAFETY INFORMATION
 Service Manual Model BSL33 UL Part Number 6905280100 IMPORTANT SAETY INORMATION: Always read this manual first before attempting to service this fireplace. or your safety, always comply with all warnings
KIT NOTICE. These instructions are for replacing the three existing thermostats with a single new solid-state thermostat.
 KIT 06401-004-22-16 5 1 2 NOTICE 3 (3 PLC'S) These instructions are for replacing the three existing thermostats with a single new solid-state thermostat. 4 PREPARATION PARTS INCLUDED 6 1 7 5 8 2 4 (4
CEILING FAN OWNER'S MANUAL
 CEILING FAN OWNER'S MANUAL READ AND SAVE THESE INSTRUCTIONS MODEL: 52-854-5RV-234 52-854-5RV-CH 52-854-5RV- FAN RATING AC 120V. 60Hz CUL LISTED MODEL : AG-962MC 1. TOOLS AND MATERIALS REQUIRED Philips
Indicates incorrect room temperature. No second stage or AUX heating. Emergency heat does not turn on
 Troubleshooting Poor Temperature Regulation This page lists problems that may affect the temperature performance of your LUX thermostat with suggested resolutions. For more detailed information please
ChicagoTM. Instruction Manual. Includes our new CoolTouch TM Control System Looks permanent, but goes wherever you go! U.S.
 Includes our new CoolTouch TM Control System Looks permanent, but goes wherever you go! U.S. Patent Pending ChicagoTM A Kichler Decor ceiling fan Kichler Lighting 7711 East Pleasant Valley Road P.O. Box
Kenmore Elite HE3 Washing Machine central control unit Replacement
 Kenmore Elite HE3 Washing Machine central control unit Replacement replacing the CCU on a Kenmore Elite HE3 washer Written By: kasten39828 ifixit CC BY-NC-SA www.ifixit.com Page 1 of 9 TOOLS: Torx bits
ELECTRIC FLAT PANEL FIREPLACE HEATER. Model# : BG-36B BG-45B BG-50B BG-60B BG-72B BG-100B OWNER S MANUAL
 ELECTRIC FLAT PANEL FIREPLACE HEATER Model# : BG-36B BG-45B BG-50B BG-60B BG-72B BG-100B OWNER S MANUAL 36"/45"/50"/60"/72"/100" LED Wall Mounted Or Built-in Electric Fireplace AC 110-120V 60Hz 1500W WARNING
Installation Instructions
 Installation Instructions Page 1 of 10 January 2009 Audio, Alarm Ver 4.0 Accessory Development These installation instructions supersede all previous versions. SUBJECT ALARM RETROFIT - P/N 65 73 0 427
WARNING. Tighten strain relief screws to secure cable. Make sure screw heads are facing up when tightening conduit nut.
 WARNING Electrical Shock Hazard Electrically ground dishwasher. Connect ground wire to green ground connector in terminal box. Do not use an extension cord. Failure to follow these instructions can result
INSTALLATION INSTRUCTIONS
 INSTALLATION INSTRUCTIONS Accessory Application Publications No. ENGINE BLOCK P/N 08T44-SVB-100 2011 CIVIC 4-DOOR Si All 44405 Issue Date AUG 2010 PARTS LIST Engine block heater Aluminum washer Heater
imac Intel 27" EMC 2429 AirPort Card Replacement
 imac Intel 27" EMC 2429 AirPort Card Replacement Replace the AirPort card in an imac Intel EMC 2429. Escrito por: Phillip Takahashi ifixit CC BY-NC-SA es.ifixit.com Página 1 de 12 INTRODUCCIÓN Use this
SERVICE MANUAL DISHWASHERS DIVA ACCESSIBILITY DISHWASHERS
 SERVICE MANUAL DISHWASHERS DIVA ELECTROLUX HOME PRODUCTS S.p.A. Publication no. Spares Operations Italy Corso Lino Zanussi,30 I - 33080 PORCIA /PN (ITALY) 599 38 70-09 Fax +39 0434 394096 EN DISHWASHERS
Cautions and Warnings. Introduction 4009 NAC POWER EXTENDER
 Cautions and Warnings DO NOT INSTALL ANY SIMPLEX PRODUCT THAT APPEARS DAMAGED. Upon unpacking your Simplex product, inspect the contents of the carton for shipping damage. If damage is apparent, immediately
Instructions: Changing Existing Downrod to Longer Downrod (sold separately)
") FOR MODEL WITH REMOTE RECEIVER INSIDE CANOPY Disassemble Canopy and Remove Downrod from Canopy 1 Remove the cotter pin and clevis pin from the downrod. canopy To remove canopy, I) loosen (but do not remove)
FOR MODEL WITH REMOTE RECEIVER INSIDE CANOPY Disassemble Canopy and Remove Downrod from Canopy 1 Remove the cotter pin and clevis pin from the downrod. canopy To remove canopy, I) loosen (but do not remove)
Please read this manual before using the machine. Please keep this manual within easy reach for quick reference.
 INSTRUCTION MANUAL Please read this manual before using the machine. Please keep this manual within easy reach for quick reference. SINGLE NEEDLE DIRECT DRIVE STRAIGHT LOCK STITCHER WITH THREAD TRIMMER
Products documentation (REVISION DATE: 03/10/2011) OMFP6010 (60cm PIROLITIC OVEN)
 OMFP6010 (60cm PIROLITIC OVEN)") Products documentation (REVISION DATE: 03/10/2011) OMFP6010 (60cm PIROLITIC OVEN) Ovens Service Manual Models OMFP6010 CONTENTS This document has been published to be used for service only. The contents
Products documentation (REVISION DATE: 03/10/2011) OMFP6010 (60cm PIROLITIC OVEN) Ovens Service Manual Models OMFP6010 CONTENTS This document has been published to be used for service only. The contents
INSTALLATION MANUAL FOR MODELS: TERAZZA, TRACCIO, MILANO, CERRATO
 INSTALLATION MANUAL FOR MODELS: TERAZZA, TRACCIO, MILANO, CERRATO TABLE OF CONTENTS ROOM SPECIFICATIONS ELECTRICAL SPECIFICATIONS PLUMBING SPECIFICATIONS TECHNICAL SPECIFICATIONS INTRODUCTION ASSEMBLY
SWIMMING POOL HEAT PUMP Owners Manual
 SWIMMING POOL HEAT PUMP Owners Manual This manual refers to the 5.6kW 9.5kW and 12.5kW models only. The heat pump unit is sold with a 2 year warranty on all components. Please contact your supplying dealer
ImPress IRONING STATION
 CONSUMER SERVICES TECHNICAL EDUCATION GROUP PRESENTS L-73 ImPress IRONING STATION Model LFB2611L JOB AID Part No. 8178203 FORWARD This Whirlpool Job Aid, ImPress Ironing Station, (Part No. 8178203), provides
INSTALLATION MANUAL FOR MODELS: SOVANNA, BREZZA, TERRACINA, VENADO
 INSTALLATION MANUAL FOR MODELS: SOVANNA, BREZZA, TERRACINA, VENADO 1 STRADA, TERCERA, SEDONA, MARVIN STEAM SHOWERS SPECIFICATION SHEET 87.8 30 24 SOVANNA, VENADO, BREZZA, TERRACINA STEAM SHOWER UNIT DIMENSIONS
Fast Fix Kenmore Model 100 Clutch Replacement
 Fast Fix Kenmore Model 100 Clutch Replacement Replace your worn or broken transmission clutch on the Kenmore Model 110 washing machine. Written By: Jonathan Beach ifixit CC BY-NC-SA www.ifixit.com Page
Installation Instructions
 PAGE 1 Installation Instructions Important information about your new a/c system. Please read the following directions prior to installing this a/c system. PN: CK6772-1CHPU 1967-1972 Chevy PU A/C Kit Contact
N54 Silicone Intake install tips
 N54 Silicone Intake install tips Thank you for your purchase of the VTT BMW N54 Silicone Intake set! First thing to do when you open your box is to make sure all parts are in their respective bags and
Installation Instructions
 Installation Instructions Blower Packages For Gas Furnaces KCBBA00TG KCBBA00TG NOTE: Read the entire instruction manual before starting the installation. INTRODUCTION When upgrading a Coleman, Intertherm,
DISHWASHER. Models DW2432 and DW2432SS. Installation Manual. Write Serial Number (on inner door of unit) here:
 here:") DISHWASHER Models DW2432 and DW2432SS Installation Manual Write Serial Number (on inner door of unit) here: Felix Storch, Inc. Summit Appliance Division 770 Garrison Avenue Bronx, New York 10474 www.summitappliance.com
DISHWASHER Models DW2432 and DW2432SS Installation Manual Write Serial Number (on inner door of unit) here: Felix Storch, Inc. Summit Appliance Division 770 Garrison Avenue Bronx, New York 10474 www.summitappliance.com
INSTALLATION AND OPERATION MANUAL
 F OR I NGROUND P OOLS INSTALLATION AND OPERATION MANUAL How Solar Pool Heating Works Why SunHeater TM Works Best Using your pool pump, water is automatically pumped through the solar collectors. The water
2010 Prius Dash Speaker (squawker) Upgrade
 Upgrade") 2010 Prius Dash Speaker (squawker) Upgrade Author: spiderman Date: Monday, March 21, 2011 Disclaimer Use this document and its contents at your own risk. Forward I want to thank all those members on PriusChat
2010 Prius Dash Speaker (squawker) Upgrade Author: spiderman Date: Monday, March 21, 2011 Disclaimer Use this document and its contents at your own risk. Forward I want to thank all those members on PriusChat
2000 Crown Victoria/Grand Marquis Workshop Manual
 SECTION 412-02: Heating and Ventilation 2000 Crown Victoria/Grand Marquis Workshop Manual REMOVAL AND INSTALLATION Procedure revision date: 06/21/1999 Evaporator Core Housing Removal 1. Disconnect the
Orrin. Instruction Manual. Includes our new CoolTouch TM Control System Looks permanent, but goes wherever you go! U.S.
 Includes our new CoolTouch TM Control System Looks permanent, but goes wherever you go! U.S. Patent Pending Orrin A Kichler Select ceiling fan Kichler Lighting 7711 East Pleasant Valley Road P.O. Box 318010
Full Size Canister Service Manual Riccar Models 1700 / 1800 Power Nozzles RPB-100 / RPB-220 / RPB-224 / RPB-250
 Full Size Canister Service Manual Riccar Models 1700 / 1800 Power Nozzles RPB-100 / RPB-220 / RPB-224 / RPB-250 Table of Contents I. General Full Size Canister Issues...2 A. Full Bag Indicator...2 1. General
WAILEA OWNER S MANUAL
 WAILEA OWNER S MANUAL The blades in each pack are matched for equal weight to assure smooth fan operation. If more than one fan is being installed, be careful not to mix blades from different cartons.
Powers TM Controls Accessories for Installing TH 192, TH 194 or Free Energy Band TH 193 HC Room Thermostats
 Powers TM Controls Accessories for Installing TH 192, TH 194 or Free Energy Band TH 193 HC Room Thermostats Technical Bulletin Document No. 155-244P25 TB 237 Rev. 2, December, 2001 Purpose This technical
BlueHeat Coolant Heater
 BlueHeat Coolant Heater Dodge Ram 500 / 3500 003 / 004-5. Liter Gasoline 003 / 006-5.9 Liter Diesel 00 6. Liter Diesel Installation Instructions DOC P/N 500068B KIT P/N 5000498C PRELIMINARY INFORMATION
ELECTRIC POSITION for electric heat, then confirm with Fan Test below.
 Troubleshooting Poor Temperature Regulation This page lists problems that may affect the temperature performance of your LUX thermostat with suggested resolutions. For more detailed information please
ARIN THERMOSTATIC SHOWER SYSTEM
 ARIN THERMOSTATIC SHOWER SYSTEM INSTALLATION INSTRUCTIONS Before installing, read entire shower system installation instructions. Observe all local building and safety codes. For the following installation
Heating and ventilation system,
 Page 1 of 24 87-151 Heating and ventilation system, servicing Instrument panel air outlets and air guide ducts CAUTION! Before working on the electrical system: Obtain security code for anti-theft radio.
INFORMATION ONLY READ AND SAVE THESE INSTRUCTIONS SAFETY FIRST
 This information guide will help you with converting the electronics on the Comfort- Touch to Advan-Touch technology. Within this guide you will find step by step instruction on how to convert the fan,
Installation Manual Mopar Engine Compartment Upgrade Kit
 Installation Manual 64-75 Mopar Engine Compartment Upgrade Kit Congratulations... You have just purchased the highest quality, best performing A/C system upgrade ever designed for your Classic Vehicle.
Camarillo 52 Ceiling Fan
 Owner s Manual Camarillo 52 Ceiling Fan Part # 269263, 269259, 269287 Model # 32091, 32092, 32087 Exclusively Distributed by: HD Supply Facilities Maintenance, Ltd. Atlanta, GA 30339 2017 Made in China
Important information. Government Regulations and Safety information. Your Warranty. Replacement remote controls
 Congratulations Congratulations on the purchase of your state-of-the-art security and remote start system. Reading this Owner s Guide prior to using your system will help maximize the use of your system
STEP BY STEP INSTALLATION INSTRUCTIONS. Vertical Honeycomb Shades
 STEP BY STEP INSTALLATION INSTRUCTIONS Vertical Honeycomb Shades Everything You Need A Smooth Set-Up We want you to love your new window coverings and that includes having a smooth installation experience.
X64 Wireless Training
 X64 Wireless Training IDS Contents 1 Contents Features 3 Wireless Hardware 4 IDS & Duevi integration PCB 5 LED operation 5 Wireless Device Hardware setup 6 Location 260 7 LED Keypad Instructions 7 Adding
What you get Welcome to the best generation of security with remote start. Your system contains everything you need.
 Congratulations Congratulations on the purchase of your state-of-the-art remote start and security system. Reading this Owner s Guide prior to using your system will help maximize the use of your system
KIT NOTICE. These instructions are for replacing the two existing thermostats with a single new solid-state thermostat.
 KIT 06401-004-22-16 5 1 2 NOTICE 3 (3 PLC'S) These instructions are for replacing the two existing thermostats with a single new solid-state thermostat. 4 PREPARATION PARTS INCLUDED 6 1 7 5 8 2 4 (4 PLC'S)
Select. Sutter PlaceTM. Instruction Manual. A Kichler Select ceiling fan
 Sutter PlaceTM A Kichler ceiling fan Kichler Lighting 7711 East Pleasant Valley Road P.O. Box 318010 Cleveland, Ohio 44131-8010 Customer Service 866.558.5706 8:30 AM to 5:00 PM EST, Monday - Friday Instruction
BENTEL SECURITY reserves the right to modify the technical features of this product without prior notice.
 BENTEL SECURITY reserves the right to modify the technical features of this product without prior notice. via Florida Z.I. Valtesino - 63013 GROTTAMMARE (AP) - ITALY Installation and Quick guide: DUAL
Service Manual Q MODEL DISPENSER Q160/290/300
 Q MODEL DISPENSER Q160/290/300 Service Manual Thank you for selecting a Manitowoc Dispenser, the dependability leader in ice making equipment and related products. With proper care and maintenance, your
Oreck Edge - Upright Tune-Up & Service Guide 02/26/2010
 The Oreck Manufacturing Company Oreck Edge - Upright Tune-Up & Service Guide 02/26/2010 Compiled by Clark DeNoble 1 Table of Contents Electrical Page 3 Tune-Up Evaluate Page 4 Clean Page 4 Replace Page
CABINET PARTS For Models: ET21DKXDW02, ET21DKXDN02, ET21DKXDB02 (White) (Almond) (Black)
 (Almond) (Black)") CABINET PARTS REFRIGERATOR 10 95 Litho In U.S.A. (Cre) 1 Part No. CABINET PARTS 1 Cabinet (Not A Serviceable Part) 2 2174690 Hinge (Top) 3 2166108 Roller Front (2) 4 489426 Screw 5 489385 Clamp, Tube (Water
CABINET PARTS REFRIGERATOR 10 95 Litho In U.S.A. (Cre) 1 Part No. CABINET PARTS 1 Cabinet (Not A Serviceable Part) 2 2174690 Hinge (Top) 3 2166108 Roller Front (2) 4 489426 Screw 5 489385 Clamp, Tube (Water
TOP MOUNT REFRIGERATOR MODELS: WRT106TFDW01 (White) WRT106TFDB01 (Black) WRT106TFDT01 (Biscuit)
 WRT106TFDB01 (Black) WRT106TFDT01 (Biscuit)") TOP MOUNT REFRIGERATOR MODELS: WRT106TFDW01 (White) WRT106TFDB01 (Black) WRT106TFDT01 (Biscuit) 05/21/2015 2015 Whirlpool Corporation Part W10806768 Rev. A CABINET PARTS 05/21/2015 2 Part W10806768 Rev.
TOP MOUNT REFRIGERATOR MODELS: WRT106TFDW01 (White) WRT106TFDB01 (Black) WRT106TFDT01 (Biscuit) 05/21/2015 2015 Whirlpool Corporation Part W10806768 Rev. A CABINET PARTS 05/21/2015 2 Part W10806768 Rev.
Hatteras BayTM. Patio. Instruction Manual. Includes our new CoolTouch TM Control System Looks permanent, but goes wherever you go! U.S.
 Hatteras BayTM Patio A Kichler Décor ceiling fan Designed to coordinate with a popular Kichler Lighting collection. Includes our new CoolTouch TM Control System Looks permanent, but goes wherever you go!
VIDEO CONTROLS LIMITED
 VIDEO CONTROLS LIMITED MAXCOM PRO SERIES TELEMETRY CONTROL SYSTEMS Operation Guide for use with MaxCom 3V, MaxCom 3VE, MaxCom 4V and MaxCom4VE Document Code number - CI431V2 Table of Contents Safety Instructions
Ceiling Fan Installation Instructions
 Owner s Manual Ceiling Fan Installation Instructions For 5GIR54XXD Series Fans READ AND SAVE THESE INSTRUCTIONS Total fan weigh with light 1. 2. 3. 4. 5. 6. 7. 8. 9. 10. 11. 12. 13. 14. 15. Installation
GPS Vehicle Tracker (GPS+GSM+SMS/GPRS) User Manual (V1.0)
 User Manual (V1.0)") GPS Vehicle Tracker (GPS+GSM+SMS/GPRS) User Manual (V1.0) Please read the installation guide before use, in order to get the correct installation and quick operation. Please note that specification and
GPS Vehicle Tracker (GPS+GSM+SMS/GPRS) User Manual (V1.0) Please read the installation guide before use, in order to get the correct installation and quick operation. Please note that specification and