Installation and Operating Instructions
|
|
|
- Valerie Cameron
- 5 years ago
- Views:
Transcription

1 THE PERFECT BALANCE OF FUNCTION AND STYLE LAUNDRY - DISHWASHING - COOKING - COOLING Instaation and Operating Instructions Freestanding Washing Machine MW6100P RPM - 6kg Load Pease read these instructions carefuy before attempting to insta or use this appiance. We recommend that you keep these instructions in a safe pace for future reference.
2 Wecome Thank you for choosing this Montpeier Washing Machine. Our Washers have been designed to provide you with the best combination of stye, reiabiity and performance to give you years of troube-free use. You may be famiiar with a simiar product, but pease take time to read these instructions carefuy before instaing or using your Washing Machine to ensure you get the most from your purchase. We recommend that you keep this manua in a safe pace for future reference. Your Washing Machine is covered by a comprehensive two year Parts & Labour Guarantee. In the unikey event that you experience a probem with your Washer, you can rest assured that you are fuy protected against the cost of repairs for the first 24 months. Pease note that any caim must be accompanied by the mode reference number, seria number and proof of purchase. YEAR GUARANTEE PARTS & LABOUR ACROSS ALL OUR MODELS To activate your guarantee, you wi need your product seria number. This can be found on the rear of the machine. There are two ways to register your Guarantee: Onine: Visit the Support page on our website and compete the onine Product Registration form. By Post: Simpy detach and fi in the form provided, attach a stamp and send it in the post. Don t forget to incude your e-mai address so that we can send confirmation through to you. Note: We are unabe to take registrations over the phone.
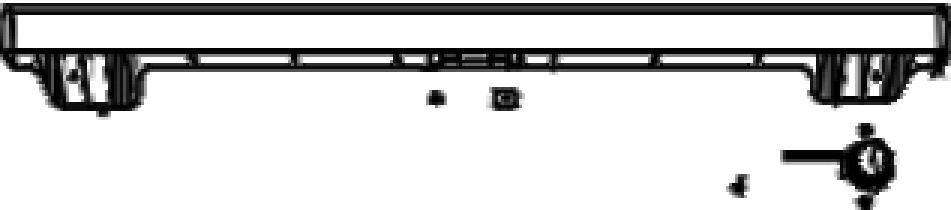


3 Description of the Appiance Contro Pane Top Lid Detergent Drawer Door Pump Fiter Cover Transit Bot Water Inet Vave Discharging Hose Power Cabe Transit Bot Transit Bot Transit Bot BEFORE OPERATING YOUR WASHING MACHINE YOU MUST REMOVE THE TRANSIT BOLTS. FAILURE TO DO SO WILL INVALIDATE YOUR GUARANTEE.
4 CONTENTS: Section 1: Safety Instructions -Correct Usage -Genera Warnings -Safety Warnings Section 2: Instaation -Removing Transit Bots -Adjusting the Feet -Eectrica Connection -Water Inet Hose Connection -Water Discharge Connection Section 3: Technica Specifications Section 4: Contro Pane -Contro Pane -Detergent Drawer -Program Knob Section 5: Washing your Laundry -Preiminary Preparation of Laundry -Putting Laundry in the Machine -Adding Detergent to the Machine -Operating your Machine -Auxiiary Functions -Chid Lock -Canceing a Program -Finishing a Program Section 6: Maintenance and Ceaning -Water Inet Fiters -Pump Fiters -Detergent Draw Section 7: Troubeshooting Section 8: Faut Codes 1 2 3/ / / / /24/25 26 Section 9: Program Tabe 27/28 Here For You - Service Contact Detais: 29
5 Section 1. Safety Advice 1.1 Correct Usage Read the user instruction manua. Your machine is designed to be used domesticay. Commercia use wi cause your warranty to be invaid. Keep pets away from your machine. Pease check the packaging of your machine is in good order before instaation, and the outer surface of the machine after the package is opened. Do not operate damaged machines. Have your machine instaed ony by a quaified person. Any interference to your machine by anyone other than a quaified person wi invaidate your warranty. The appiance in not intended for use by peope (incuding chidren) with reduced physica, sensory or menta capabiities, or ack of experience and knowedge uness they have been given supervision or instruction concerning use of the appiance by a person responsibe for their safety. Chidren shoud be supervised to ensure that they do not pay with the appiance. Use your machine ony for aundry that has been specified as suitabe for washing by the manufacturer. Before operating the washing machine, remove the 4 transit bots and rubber spacers from the back of the machine. If the bots are not removed, it wi cause heavy vibration, noise and product mafunction (invaidating the guarantee). - Your machine is not covered under warranty for fauts caused by any kind of externa factors (pesticides, fire, etc.). - Pease do not throw away this user manua: keep it for future reference as it contains fu operating instructions as we as the seria number of your machine. You wi need this shoud you wish to book a service ca. Note: Specifications may vary depending on the product purchased. 1


6 1.2 Genera Warnings - The ambient temperature for your machine s idea operation is 15-25ºC. - Frozen hoses can tear and expode. In regions where temperature is beow zero, ambient temperature might endanger the safe operation of the eectronic circuit board. - Pease ensure that the cothes put into your machine do not contain any foreign objects (nais, needes, coins, ighters, matches, cips, etc.) in pockets. These objects can damage your machine. It is recommended that the first washing operation is carried out on a 90º Cotton program but without aundry and using ½ the dose of detergent in the 2nd compartment of the detergent drawer. - If a detergent or softener is exposed to air for any time, residue may be caused, be sure ony put your detergent or softener in the detergent drawer at the beginning of every wash. - It is advised that you unpug your machine and cose the water inet tap if you do not intend to use the machine for a proonged period of time. Aso, eaving the door of your appiance open wi prevent the formation of bad odours due to humidity. - Some water might be eft in your machine after factory trias and tests conducted due to Quaity Contro procedures. This is norma and wi not damage your machine. - Remember the packaging materias of your machine may be dangerous for chidren. Keep the packaging materias in a pace where chidren cannot reach them and dispose of them appropriatey. - Keep any sma parts away from the reach of chidren and babies. - Use Pre-wash programs ony for very dirty aundry. - Never open the detergent compartment when the appiance is running. - In case of any breakdown, unpug the appiance first and then turn the water inet off. Do not attempt repair by yoursef, aways contact the authorised service agent hep ine. - The amount of aundry you put in your washing machine shoud not exceed the maximum amount indicated. - Never force the door to open when the machine is running. - Do not wash cothes covered in four or other powders in your machine as it wi cause damage. - Pease adhere to detergent/fabric conditioner manufacturer s advice regarding the use of fabric conditioner or simiar products. - Set up your machine in a pace where its door can be competey opened. - Set up your machine in a position where it can be fuy ventiated and has constant air circuation. 2
7 1.3 Safety Warnings You must take note of these warnings, as this can protect you and your famiy. DANGER OF GETTING BURNT! Do not touch the discharge hose or water during the discharge process as the appiance can reach high temperatures during operation. RISK DUE TO ELECTRICAL CURRENT! Do not use muti-sockets on an extension ead. Do not pug in damaged pugs. Never pu the cabe when unpugging - aways grip the pug itsef. Do not pug-in or remove the pug with wet hands. Never touch the machine with wet hands or feet. If the mains cabe becomes damaged it must be repaced by an authorised eectrician or service agent. DANGER OF FIRE! Do not keep fammabe iquids near your machine. The suphur content of paint removers might cause corrosion. For this reason, never use paint-removing materias in your machine. Never use products that contain sovent materia in your machine. Remove a objects from the pockets of your aundry (needes, papercips, ighters, matches, etc.) before pacing it in your machine. 3
8 1.3 Safety Warnings (continued) FALL AND INJURY HAZARD! Do not cimb on your machine. The top id of your machine may break and you might get injured. Tidy the hose, cabe and packaging of your machine during instaation, to avoid tripping or faing over. Do not turn your machine upside down or on its side. Do not ift your machine by hoding it from extruding parts (detergent drawer, door). These parts might break and cause you to get injured. There s the risk of tripping and injury if the materias ike hoses and cabes are not propery stored after your machine is instaed. Machine must be carried by 2 peope. CHILD SAFETY! Do not eave chidren unattended near the machine. Chidren might ock themseves inside. Door gass and surface may get hot whie your machine operates, and as a resut, touching the machine might damage the skin, especiay that of chidren. Keep packaging materia away from chidren. Danger may occur if detergent or ceaning materias are consumed, and eyes or the skin might be irritated if contact is made. Keep the ceaning materias away from the reach of chidren. 4


9 Section 2. Instaation 2.1 Removing transit bots Before operating the washing machine, remove the 4 transit bots and rubber spacers from the back of the machine. If the bots are not removed, it wi cause heavy vibration, noise and product mafunction, (invaidating the guarantee). X4 4 For this reason, transit bots shoud be oosened by being rotated countercockwise using an appropriate wrench. X4 Transit bots are removed by puing out. X4 Fit the pastic transit bot caps (in the accessories bag) into the hoes eft by the remova of the transit bots. The transit bots shoud be stored to be used in case of future transportation. NOTE: You must remove the transit bots of your machine before first use. Fauts occurring to the machine if operated with transit bots fitted wi be out of scope of warranty. 5


10 2.2 Adjusting the feet Do not insta your machine on a carpet or anything that wi prevent ventiation under the base. To ensure sient and vibration-free operating of your machine, it shoud be sited on a non-sippy firm foor. You can adjust the eve of your machine by the adjustabe feet. Loosen the pastic adjustment nut. Adjust the feet upwards or downward by rotating them. X4 After maintaining the eve, compress the pastic adjustment nut upwards again. Note: The machine must be eve. Never put cardboard, wood or other materias under your machine if you are trying to eve any distortion in the foor. When ceaning the foor, on which your machine stands, be carefu not to disturb the baance of the machine. 6


11 2.3 Instaation (Eectrica Connection) Your washing machine is set to V and 50Hz. The mains cord of your washing machine is equipped with a specific earthed pug. This pug shoud aways be inserted to an earthed socket of 13 amps. The rating of the fuse shoud be 13 amps. NOTE: Operating your machine beow the recommended votage wi cause the ife cyce of your appiance to be reduced and its performance to be restricted. 7
 based on its specifications.")
.")


.")
12 2.4 Instaation (Water Inet Hose Connection) Your machine may have either a singe inet (cod) or doube water inets (cod/hot) based on its specifications. A white-capped hose shoud be connected to the cod water inet and a red-capped hose to a hot water inet (appicabe for machines with doube water inets). To eiminate water eakages in the connection points, 1 or 2 nuts are provided in the hose package (appicabe for machines with doube water inets). Fit these nuts to the ends of new water inet hoses on the tap end of the hose. Connect the new water inet hoses to a 3/4, threaded inet pipe. 3/4 10 mm Connect the white-ebow end of the water inet hoses to the white fitered water inet vave on the rear side of the machine and the red-ebow end to the red-fitered one (appicabe for machines with doube water inets). Tighten pastic parts of the junctions using your hand. If you are unsure of this process get the work done by a quaified pumber. Fow of water with pressure of Mpa wi aow your machine to operate more efficienty. (0,1 Mpa pressure means that more than 8 itres of water wi fow per minute). Ensure that the new water inet hoses are not bent, broken, crushed or the wrong size. If your machine has a hot water connection, the temperature of the water inet shoud be maximum 70 Degrees Centigrade. NOTE: Use ony the new water inet hose suppied with your machine whie making water inet hose connections. Never use od, used or damaged water inet hoses. 8
")


13 2.5 Instaation (Water Discharge Connection) The end of the water discharge hose can be fitted to a specific outet pipe. Never attempt to extend the water discharge hose by joining two pieces of hose. Do not put the discharge hose of your machine into a bucket or sink. Make sure that the water discharge hose does not bend, bucke, become squashed or stretched. Pease note: The water drain hose shoud be mounted at a height of minimum 60cm, and maximum of 100cm from the ground. ~95cm ~145cm ~140cm ~95cm 95 cm? 150 cm? 0 max.100cm 9
14 Section 3. Technica Specification Operating votage / frequency (V/Hz) ( )V~/50Hz Tota current (A) 13 Water pressure Maximum:1 Mpa Minimum:0.1 Mpa Tota power(w) 2100 Maximum dry aundry capacity (kg) 6 Spinning revoution (rev/min) 1000 Program number 15 Dimensions (HeightxWidthxDepth)(mm) 845x597x497 10


 (DIAGRAM-2) Detergents may form a")


 Lift the front of the drawer,")
 Wash with an od toothbrush and")


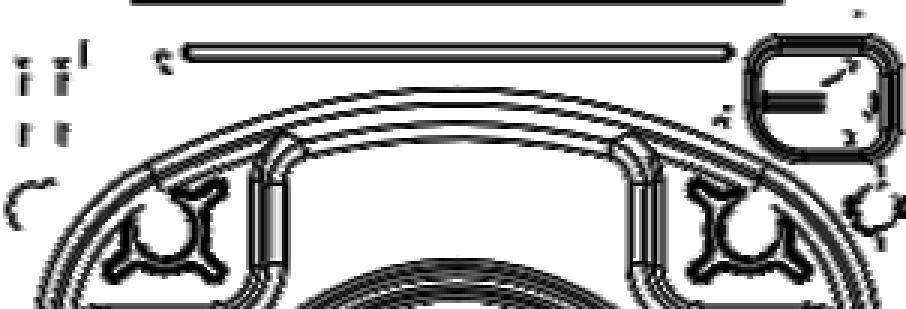
15 Section 4. The Contro Pane Start/Pause Light Function Indicator Lights Program Ready Light Start/Pause Button Program End Light Function Buttons Detergent Drawer Program Knob (DIAGRAM-1) (DIAGRAM-2) Detergents may form a sediment in your detergent drawer or in the housing of the detergent drawer over time. To cean, pu out the detergent drawer from time to time as shown and wash thoroughy. Pu the detergent drawer out as far as possibe. (Diagram 1) Lift the front of the drawer, continue to pu unti the drawer is pued out. (Diagram 2) Wash with an od toothbrush and water. After drying the detergent drawer put it back in the housing in the reverse manner used to remove it. Liquid Detergent Apparatus Main wash detergent compartment Softener Compartment Pre-wash detergent compartment (*) Specifications may vary depending on the product purchased. 11

.")


16 4.1 Contro Pane continued. Main wash detergent compartment: In this compartment, use ony detergent (iquid or powder). Limescae remover can be used. Fabric conditioner, starch, detergent compartment: You may use fabric softener for your aundry (recommended amount and type by the manufacturer). Sometimes the fabric conditioners you use for your aundry may remain in this compartment. The reason for this is that the conditioner is not viscous. To prevent this situation, more viscous iquid softeners are recommended to be used or the softener coud be thinned and then used. Pre-wash detergent compartment: This compartment must ony be used when the pre-wash feature is seected. The Pre-wash feature is recommended for very dirty aundry. Seect the program you wish to use with the program knob. Set the program seection operation by rotating the program knob in either direction. Ensure that the program knob is exacty on the program you want to use. (*) Specifications may vary depending on the product. 12


, their temperatures (cod, 30º, 40º, 60º, 90º) and degree of")


17 Section 5. Washing your Laundry 5.1 Preiminary Preparation of Laundry Laundry has product abes on them that state their specifications. Wash or dry your aundry according to the specifications on the product abe. Separate your aundry according to their types (cotton, synthetic, sensitive, woo etc), their temperatures (cod, 30º, 40º, 60º, 90º) and degree of contamination (sighty stained, stained, highy stained). Never wash your cooured and white aundry together. Wash your cooured aundry separatey in the first washing as coours may run. Ensure that there are no metaic materias in your aundry or in pockets. CAUTION: Fauts that emerge due to foreign objects in the machine wi not be incuded in the scope of warranty. Zip up and button up cothes. Remove the metaic or pastic hooks from curtains. Turn items such as pants, knitwear, t-shirt and sweat shirts inside out. Pace socks, handkerchiefs and suchike sma aundry in a washing net. 13
18 5.1 Preiminary Preparation of Laundry continued. Whitening No whitening Norma wash Ironing temperature maximum 150 C Ironing temperature maximum 200 C No ironing Dry ceaning No dry ceaning Leave fat Hang when wet Dry by hanging Do Not Tumbe Dry F Dry ceaning in gas oi, pure acoho and R113 is aowed P Perchoroethyene R11, R13, Petroeum A Perchorinethyene 14


19 5.2 Putting Laundry in the Machine Open the door of your machine. Spread your aundry in your machine. NOTE: Maximum oading capacity may vary based on the aundry type you wi wash, degree of contamination and the program you have chosen. Do not exceed maximum dry oading capacity indicated in the program tabe for washing programs. Put each item of aundry in separatey. Ensure that no aundry is stuck between the cabinet and rubber sea when cosing the door of your machine. cick Push the door of your machine unti you hear the ocking sound. Cose the door of your machine propery, otherwise the machine wi not start. 15

 softeners can cog the compartment and prevent the fow of the softener. You can use iquid detergents in a programs.")
20 5.3 Adding detergent to the machine The amount of detergent put into the machine wi depend on the foowing criteria: Ony use detergents produced specificay for automatic washing machines. The amount of detergent to be used for your aundry is printed on the detergent packet. The higher the degree of hardness of the water the more detergent you need to use. Put the fabric softener into the softener compartment of the detergent drawer. Do not exceed the MAX eve. Softeners with high density (thick) wi need to be thinned before being put into the drawer. High-density (thick) softeners can cog the compartment and prevent the fow of the softener. You can use iquid detergents in a programs. For this, fit the iquid detergent eve pate found in the accessories bag or the iquid detergent apparatus (*) into the 2nd compartment of the detergent drawer and set the amount of iquid detergent according to the eves on this pate. Remember to remove the iquid detergent pate. 5.4 Operating your machine Pug your machine in. Open the water tap. Open the machine door. Spread your aundry eveny in the machine. To cose, push the door unti you hear the ocking sound. Seecting a program Seect the appropriate program for your aundry from the program tabe. (*) Specifications may vary depending on the product purchased. 16


21 5.5 Auxiiary Functions Before starting the program, you can optionay seect an auxiiary function. Press the button of the auxiiary ufunction you woud ike to seect. If the auxiiary function symbo is dispayed on the eectronic dispay, the auxiiary function you have seected wi be activated. If the auxiiary function symbo on the eectronic dispay binks, the auxiiary function you have seected wi not be activated. Reason for non-activation: The auxiiary function you want to use in the washing program you have seected is not appicabe. Your machine is too far into its current wash program to activate the auxiiary function you woud ike to seect. It is not compatibe with an auxiiary function you have seected previousy. Haf-oad detection system Your machine features a haf-oad detection system. This shoud be used when the amount of aundry to be washed is approximatey haf or ess than the maximum capacity of the machine. This function wi save time, water consumption and energy. 17


22 5.5 Auxiiary Functions continued. Function Buttons 1- No Spin This program is recommended for use with your sensitive cothes for which no spinning is needed. 2- Prewash This function starts an additiona wash operation for heaviy soied aundry. When using this function you must put detergent into the pre-wash compartment of the detergent drawer. If you forget to use an additiona function and your machine starts to wash, you can sti activate the additiona function button. If the indicator ight is on, the additiona function wi be activated. If the indicator ight is not on, the additiona function wi not be activated. Start / Pause Button Used to start a seected program or pause WARNING! You wi need to turn the program knob to O(off) position before seecting the program or changing a continuing program. 18


23 5.6 Chid Lock Chid Lock The chid ock is used in order to protect the washing cyce from the effects of unwanted button activations during the cyce. The chid ock is activated by pressing the first and third button on the contro pane at the same time for more than 2 seconds. When the chid ock is activated, LEDs on the function buttons wi bink. In order to deactivate the chid ock, the same buttons (1st and 3rd) shoud be pressed again for more than 3 seconds. The deactivation of the chid ock is shown by the binking of LED on the start/pause button. 5.7 Canceing a program If you wish to cance any program running: 1. Switch the program knob to 0" position. 2. Your machine wi stop the washing operation and the program wi be canceed. 3. To drain the water accumuated in the machine switch the program knob to any program. 4. Your machine wi perform the necessary discharge operation and cance the program. 5. You can then run your machine by seecting a new program. 5.8 Finishing a program Your machine wi automaticay stop when the program seected ends. The program end ight wi come on. Turn the program knob to O(off) position. The door wi unock in approximatey two minutes from the program end. You can open the door by puing the hande of the door. After you unoad your cothes eave the door open to dry the interior of the drum. Switch off your machine. Program End Light Pease Note: If the power goes off and on again after a whie at any stage of the washing program, your machine wi continue the program from the point where it was interrupted. This is not harmfu for your machine. 19


24 Section 6. Maintenance and Ceaning Unpug your machine before starting the maintenance and ceaning of your machine. Turn the water off before starting the maintenance and ceaning of your machine. CAUTION: Your machine s parts might be damaged if ceaners with sovents are used. Do not use ceaning materias containing sovents. Water Inet Fiters On the tap side of your machine s water inet hose and at the ends of water inet vaves, there are fiters to prevent the entry of dirt and foreign materias in the water to the machine. If the machine is unabe to receive sufficient water athough the water tap is opened, these fiters shoud be ceaned. Remove the water inet hose. Remove the fiters found on the water inet vaves by using pincers and wash thoroughy using a brush. Cean the fiters of the water inet hoses ocated on the tap side by washing thoroughy using a brush. After you cean the fiters, re-fit them in the reverse manner to which they were removed. CAUTION: Fiters of water inet vaves may be cogged due to a contaminated tap or ack of maintenance. Broken seas wi cause water to eak into your machine continuousy. Any breakdown that arises due to these reasons are out of the scope of warranty. 20


25 6.1 Maintenance and Ceaning continued. Pump Fiters The pump fiter system proongs the ife of your pump, which is used to drain the dirty water. It prevents int entering the pump. Ceaning the pump fiter every 2-3 months is recommended. To cean your pump fiter: Open the kickpate cover, by puing the hande. Before opening the fiter cover, pace a suitabe container in front of the fiter cover to prevent spiage of water that remains in the pump. Loosen the fiter cover by rotating it counter cockwise and drain the water. Remove any foreign materias from the fiter. Check the rotation of the pump manuay. After you have ceaned the pump, re-fit the fiter cover by rotating cockwise. Put the kickpate cover back in pace. Do not forget that if you do not fit the fiter cover correcty, it wi eak water. WARNING! As water in the pump may be hot, wait unti it coos down. (*) Specifications may vary depending on the product purchased. 21


26 6.1 Maintenance and Ceaning continued. Detergent Drawer Your detergents may deposit residue in the detergent drawer and housing of the detergent drawer over time. To cean the residue formed, disassembe the detergent drawer periodicay. It is recommended that you cean your detergent drawer every 2 months. To remove the detergent drawer: Pu out the detergent drawer unti it is fuy withdrawn. Keep puing whist depressing the section shown beow in the detergent drawer and then remove the detergent drawer. Fush it by using water and a brush. Coect any residue in the housing of the detergent drawer without dropping them inside the machine. Re-assembe the detergent drawer after drying it using a towe or dry coth. DO NOT WASH YOUR DETERGENT DRAWER IN A DISHWASHER Fush Stopper Disassembe the detergent drawer. Disassembe the fush stopper and cean out any softener residues competey. Refit the fush stopper after ceaning it. Check that it is fitted propery. Body Cean the outer body of your machine with warm water and a nonfammabe ceaning agent that wi not abrade the body of your machine. After rinsing with some water, dry it using a soft and dry coth. Drum Do not eave metaic objects such as needes, paper cips, coins etc. in your machine. These objects ead to formation of rust stains in the drum. To cean any rust stains, use a non-chorine ceaning agent and foow the instructions of manufacturers of the ceaning agent. Never use wire woo or simiar hard objects for ceaning rust stains. 22

27 Section 7. Troubeshooting Any repairs required to your machine shoud be carried out by our authorised service agents. If your machine requires a repair or if you cannot remove the faut by the hep of the information provided as foows: Unpug your machine. Turn the water tap off. FAULT POSSIBLE CAUSE TROUBLE-SHOOTING Your machine does not start. It is not pugged in. Fuse Bown Eectricity cut-off. Start/Pause button not pressed. Program dia at stop position. The machine door is not competey cosed. Pug it in. Repace the fuses. Check mains power. Press the Start/Pause button. Switch the program to the desired position. Cose the machine door. Your machine does not take in water. Water tap is turned off. Turn your tap on. Water inet hose may be Check water inet hose twisted. Water inet hose cogged. Vave inet fiter cogged. The machine door not competey cosed. and untwist. Cean water inet hose fiters. (*) Cean the vave inet fiters. (*) Cose the machine door. Your machine does not discharge water. Outet hose cogged or twisted. Pump fiter cogged. Laundry setted in the machine uneveny. Check the outet hose, then either cean or untwist. Cean the pump fiter. (*) Spread your aundry in the machine eveny. (*) See the chapter regarding maintenance and ceaning of your machine 23
 Remove the transit bots on your machine. (**) Transit bots fitted for transportation have not been Smaer disassembed.")
28 7.1 Troubeshooting continued. FAULT POSSIBLE CAUSE TROUBLE-SHOOTING Your machine vibrates. The feet of your machine have not been adjusted correcty. Adjust the feet on your machine and make sure it is eve. (**) Remove the transit bots on your machine. (**) Transit bots fitted for transportation have not been Smaer disassembed. amount of aundry in This wi not stop operation the appiance. of the machine. Your machine is overoaded Do not put in more aundry with aundry or aundry is setted than the recommended uneveny. amount and sette it eveny. Excessive foam is formed in the detergent drawer. Unsatisfactor y washing resut Excessive amount of detergent used. Wrong detergent used. The soiing of your aundry does not match the program chosen. Amount of detergent used was insufficient. The maximum aundry capacity of your machine has been exceeded. Press on the start/pause button to eiminate foam formation, mix a spoon of softener with haf a itre of water and pour the mixture into the detergent drawer. After 5-10 minutes, press on start/pause button again. In your next wash, adjust the detergent dose accordingy. Use detergents produced ony for automatic washing machines in your machine. Seect the program appropriate for the soiing of your aundry. (See program tabe) Adjust the amount of detergent based on the amount and contamination degree of your aundry. Load your machine with an amount of aundry which wi not exceed the maximum aundry capacity. (**) See the chapter regarding instaation of your machine. 24


29 7.1 Troubeshooting continued. FAULT POSSIBLE CAUSE TROUBLE-SHOOTING Unsatisfactory washing resut. Water being hard. (contaminated, ime water etc.) Laundry is distributed in your machine uneveny. Adjust the amount of detergent based on the instruction of the detergent manufacturer. Spread your aundry in the machine propery. As soon as the machine is oaded with water, water discharges. The end of the water outet hose is too ow for the machine. Set the water outet hose at appropriate height. (**) No water appears the drum during washing. in No faut. Water is in the unseen part of the drum. Laundry has detergent residues on them. Non-dissoving partices of some detergents may stick to your aundry as white spots. Perform an extra rinsing by setting your machine to Rinsing program, or cean the spots with a brush once dry. Grey spots appear on aundry. The reason for such spots may be oi, cream or ointment. Appy the maximum amount of detergent instructed by the detergent manufacturer in the next washing operation. Spinning operation is not performed or runs ate. No faut. Out of baance oad contro system has been activated. Out of baance oad contro system wi try to spread your aundry correcty. Spinning operation wi begin after your aundry is spread. Pace the aundry in the machine in a baanced fashion next time. IMPORTANT! If you are unabe to correct a faut after checking the reevant section above, or if you are sti in doubt, pease ca the Repairtech Service Hepine on Pease note if you ca out an engineer when one of the above fauts arises, or to repair a faut that has arisen due to incorrect use, you may have to bear the cost of the ca out and repair, even if the product is sti within the guarantee period. (**) See the chapter regarding instaation of your machine. 25
30 Section 8. Automatic Faut Warnings Your machine is equipped with systems that are capabe of both taking necessary precautions and warning you in case of any breakdown by means of continuous sef-checking during washing operations. Faiure Code Faiure Indicator Probabe Faiure Process to be foowed E01 The start/pause ight binks. The door is not shut propery. Shut the door propery so that you hear the cick. If the probem persists, turn off the machine, unpug, and contact the Repairtech Hepine. Err 02 The program ready ight binks The water eve in your machine is beow the heater. The pressure of your water suppy may be ow or the water may be switched off. Turn the tap on fuy. Water may be off, check it. If the probem sti continues, your machine wi automaticay stop after a whie. Unpug your machine, turn off the tap and contact the Repairtech Hepine. Err 03 The start/pause ight and program read ight binks. The pump has faied or the pump fiter is obstructed. Cean the pump fiter. If the probem persists, contact the Repairtech Hepine. (*) Err 04 The program end ight binks. Communication error. Shut down your machine and unpug. Turn off your tap and contact the Repairtech Hepine. (*) See the chapter regarding maintenance and ceaning of your machine. 26


31 Section 9. Washing Program NOTE: Program duration might change according to the amount of aundry, tap water, ambient temperature and seected additiona functions. 27
 40 Maximum dry aundry amount (kg) Detergent compartment 2 Program duration 65 Sighty dirty, synthetic or synthetic mixture textie.")
 Laundry type / Descriptions 2 70 Sighty dirty, cotton, cooured, synthetic or synthetic mixture sensitive aundry.")
 Laundry type / Descriptions Sighty dirty, synthetic or synthetic mi x- ture sensitive aundry. Washed withou t Laundry type / heating the tap water.")
32 9.1 Washing Program continued. SYNTHETIC 40 Washing temperature( C) 40 Maximum dry aundry amount (kg) Detergent compartment 2 Program duration 65 Sighty dirty, synthetic or synthetic mixture textie. Laundry type / Descriptions Nyon socks, bouse 3 DELICATE 30 Washing temperature( C) 30 Maximum dry aundry amount (kg) Detergent compartment 2 Program duration (Min.) Laundry type / Descriptions 2 70 Sighty dirty, cotton, cooured, synthetic or synthetic mixture sensitive aundry. Sik mixture, shirt, bouse, poyester, poiamid, mixture textie A woo aundry SYNTHETIC COLD Washing temperature( C) - Maximum dry aundry amount (kg) Detergent compartment 2 Program duration 72 3 Maximum dry aundry amount (kg) Laundry type / Descriptions Sighty dirty, synthetic or synthetic mi x- ture sensitive aundry. Washed withou t Laundry type / heating the tap water. Descriptions Nyon socks, bouse Detergent compartment 2 Program duration (Min.) 73 2 Dirty, hand and machine to wash woo aundry. A woo aundry NOTE: Program duration might change according to the amount of aundry, tap water, ambient temperature and seected additiona functions. 28
33 Here For You After-saes assistance If you continue to experience probems with your Washing Machine, pease ca the Montpeier customer service hepine on: Pease have a your product detais avaiabe, incuding the mode number, seria number, date of purchase, and your retaier s detais before registering a faut. The service ca cannot progress without this information. Your 2 year Manufacturer s guarantee THIS DOES NOT AFFECT YOUR STATUTORY RIGHTS. Your new Montpeier appiance carries a free guarantee which protects you against the cost of repairs during the first 24 months from date of purchase provided that: Any caim is accompanied by evidence of the mode reference, mode seria number and proof of purchase, such as a Saes Receipt, showing that the appiance was purchased within the 24 months prior to the date of caim. What is not covered under the Guarantee Any appiance not correcty instaed and operated in accordance with the manufacturer s instructions. Any appiance that is used for anything other than domestic purposes. Any defect caused by accident, misuse, unauthorised modification or inexpert repair. Cost of Ca-out where a faut cannot be found with the appiance. Cost of Ca-out for work covering routine maintenance, such as, but not excusivey, ceaning of fiters or defrosting. Cost of Ca-out for work required to correct the aignment of doors foowing door reversa procedures carried out by you. Use of the appiance by anyone other than the Househoder. Use in any commercia environment. Consumabe items, such as, but not excusivey, fuses in pugs, bubs and breakabe items which require routine repacement. Repair costs incurred that have not been authorised by Repairtech and/or carried out by a non-approved Repairtech engineer. Here For You YOUR GUARANTEE IS VALID ONLY IN THE UK. To register your appiance simpy compete the card in your appiance pack and return it with a stamp affixed or aternativey you can register onine at SERVICE HELP-LINE Shoud your appiance deveop a faut, pease ca the Montpeier customer service hepine on: Pease remember to have a your product detais avaiabe, incuding the mode number, seria number, date of purchase and your retaier s detais before registering a faut. Your service ca cannot progress without this information. 29
34 Montpeier Domestic Appiances Ltd. Unit 1, Tewkesbury Retai Park, Northway Lane, Tewkesbury, Goucestershire GL20 8JU The symbo on the product or on its packaging indicates that this product may not be treated as househod waste. Instead it sha be handed over to the appicabe coection point for the recycing of eectrica and eectronic equipment. By ensuring this product is disposed of correcty, you wi hep prevent potentia negative consequences for the environment and human heath, which coud otherwise be caused by inappropriate waste handing of this product. For more detaied information about recycing of this product, pease contact your oca city office, your househod waste disposa service or the shop where you purchased the product.
Installation and Operating Instructions. Fully Electronic Automatic Washing Machine. (Model shown for indicative purposes only)
") Installation and Operating Instructions Model: MON-MW7012P Fully Electronic Automatic Washing Machine (Model shown for indicative purposes only) Please read these instructions carefully before attempting
Installation and Operating Instructions Model: MON-MW7012P Fully Electronic Automatic Washing Machine (Model shown for indicative purposes only) Please read these instructions carefully before attempting
. Ev d & AUTOMATIC WASHER
 c. Ev d & AUTOMATIC WASHER Design 2000 Large Capacity Mode LA61OOXS eezers, Refrrgerator-Freezers, Ice Makers, Dishwashers. Buit-In Ovens and Surface Units, Ranges, Microwave Ovens, Trash Compactors, Room
Turbosteam iron steam/spray/steam boost
 RN40697MUK Rev4_Instruction Book 08/12/2011 10:36 Page 1 Upon registration with Morphy Richards (UK & ROI ony) Register onine for your 3 year guarantee. See back of this instruction book for detais. (UK
Electrorad Digi-Line. Installation, Operating & Instruction Manual. After Sales Service:
 ELECTRORAD UK LTD Unit 1, Cayton Park, Cayton Wood Rise, West Park, Leeds, LS16 6RF T: 0844 479 0055, info@eectrorad.co.uk, www.eectrorad.co.uk Eectrorad Digi-Line Instaation, Operating & Instruction Manua
INSTRUCTION MANUAL AND WARRANTY
 Brezza Tabetop Air Circuator with Adjustabe Osciation Mode No: OZF2 INSTRUCTION MANUAL AND WARRANTY Copyright 2011, Ozeri Important Safety Instructions Thank you for purchasing the Ozeri Tabetop Air Circuator.
UseAndCare. T&f1 HOme Appliances 01. A Note To You. Important Safety Instructions. Parts And Features. Using Your. Refrigerator. Caring For Your 15
 T&f1 HOme Appiances 01 4a UseAndCare A Note To You 2 (r( u- Before Important Safety Instructions Parts And Features - _ Using Your Refrigerator 3 4 5 Using Your Refrigerator 7 Caring For Your Refrigerator
ComfiGrip iron steam/spray/shot/press
 RN40854 MUK Rev3_Instruction Book 11/10/2011 11:08 Page 1 Upon registration with Morphy Richards (UK & ROI ony) Register onine for your 3 year guarantee. See back of this instruction book for detais. (UK
ELECTRIC UNDERFLOOR HEATING
 MYSON MYSON MYSON Eastern Avenue, Team Vaey, Gateshead, Tyne & Wear NE11 0PG, UK T: 0845 402 3434, F: 0191 491 7568, saes@myson.co.uk, www.myson.co.uk ELECTRIC UNDERFLOOR HEATING INSTALLATION MANUAL PLEASE
REFRIGERATOR-FREEZER 8ET17NK 3ET16NK. Use And Care Guide. ~qq
 NO-FROST REFRIGERATOR-FREEZER 8ET17NK 3ET16NK B Use And Care Guide ~qq A Note To You 2 Important Instructions Safety 3 Parts And Features 4 Before Using Your Refrigerator 5 Using Your Refrigerator 7 Caring
UseAndCare. -. wh H 01. nawtouua*naur~- I Call our Comumw Aubtmnca Center with quwiion* cf ccmmonb. AIR CONDITIONERS
 -. wh H 01 nawtouua*naur~- UseAndCare AIR CONDITIONERS L A Note to You... 2 Ar Conditioner Safety....3 Parts and Features....4 Operating Your Air Conditioner... 5 Starting your air conditioner... 5 Using
Use & Care Guide. SELF-CLEANINGAS RANGE SF370PEW (Shown) SF365BEW. Stop time w Clean indicator light. Oven vent \ Burner grates
 SF365BEW. Stop time w Clean indicator light. Oven vent \ Burner grates") Use & Care Guide CfxWminute timer Stop time w Cean indicator ight II - Oven vent \ Burner grates SUrfaCe burner and oven contros Anti-tip bracket Literature pat (not shown) sea Sef-cianing oven Ove: burner
Use & Care Guide CfxWminute timer Stop time w Cean indicator ight II - Oven vent \ Burner grates SUrfaCe burner and oven contros Anti-tip bracket Literature pat (not shown) sea Sef-cianing oven Ove: burner
Air conditioner. User manual AC MNNDKH
 Air conditioner User manua AC MNNDKH Thank you for purchasing this Samsung air conditioner. Before operating this unit, pease read this user manua carefuy and retain it for future reference. Contents Safety
Undercounter Dishwasher
 IMPORTANT: Read and save these instructions. IMPORTANT: Instaer: Leave Instaation Instructions with the homeowner. Homeowner: Keep Instaation Instructions for future reference, Save Instaation Instructions
Thermo shaker PHMP/ PHMP-4
 Thermo shaker PHMP/ PHMP-4 For versions V.5GW (PHMP) V.3GW (PHMP-4) Contents 1 Safety...3 2 Genera Information...5 3 Getting Started...6 4 Operation of PHMP/PHMP-4...7 5 Specifications...9 6 Guarantee
MYSON ELECTRIC UNDERFLOOR HEATING. INSTALLATION MANUAL. heatingthroughinnovation. APRIL 2013
 MYSON ELECTRIC UNDERFLOOR HEATING. INSTALLATION MANUAL APRIL 2013 Important: Pease read carefuy on receipt of product and keep in a safe pace. heatingthroughinnovation. Contents 1.0 Genera Information
INDIA S MOST POWER SAVING INVERTER AC
 INDIA S MOST POWER SAVING INVERTER AC 31 32 IDU ODU MODEL NOMENCLATURE GSC 12 GIG 5 DGOG GSC 18 GIG 5 DGOG GSC 18 FIXH 5 GGPG GSC 12 FIXH 7 GGPG GIC 12 BAH 8 GGQG GIC 24 BAH 5 GWQG GIC 18 LAH 5 GWQG GSC
UseAndCare COMPACT TWO SPEED AUTOMATIC. A Note to You... 2 Washer Safety... 3 Parts and Features... 4 Operating Your Washer... 8
 UseAndCare A Note to You... 2 Washer Safety... 3 Parts and Features... 4 Operating Your Washer... 8 Starting your washer..... 8 Stopping/restarting your washer... 10 Seecting a cyce and time... 10 Using
UseAndCare ONE SPEED AUTOMATIC
 UseAndCare A Note to You... 2 Washer Safety... 3 Parts and Features... 4 Operating Your Washer... 5 Starting your washer... 5 Stopping/restarting your washer... 5 Seecting a cyce and time... 6 Using Rinse
UseAndCare I 301 Call our Consumer Assistance Center with questions or comments. 22 TO 25 NO-FROST TOP FREEZER REFRIGERATOR
 UseAndCare Tabe of Contents (compete).................. 2 A Note to You................ 2 Refrigerator Safety....... 3 Parts and Features....... 4 Before Using Your Refrigerator... 5 Using Your Refrigerator...................
UseAndCare. /z/95. l Call us with questions or comments. NO-FROST REFRIGERATOR-FREEZER ET1 4CKXE ET1 4NKXE
 UseAndCare A Note To You................ 2 Refrigerator Safety........ 3 Parts And Features........ 4 Before Using Your Refrigerator... 6 Using Your Refrigerator....................9 Caring For Your Refrigerator...
Clean and simple waste water removal
 The cean and simpe way to remove waste water. Wastefo products provide a simpe soution for waste water remova in a variety of environments. Cean and simpe waste water remova cean and simpe waste water
UseAndCare. Tikll I 301 Call us with questions or comments. MODEL RF354BXD
 Tik 01 Home Appiances 4a HOWTOMAKEAHOMEiJ$ UseAndCare Tabe of Contents (compete)................... 2 A Note to You................. 3 Range Safety............... 4-6 Getting to Know Your Range... 7 Using
UseAndCare. l Call our Consumer Assistance Center with questlons or comments. 18 TO 20 NO-FROST TOP FREEZER REFRIGERATOR
 Y?bf 4a Home Appiances o@ UseAndCare Tabe of Contents (compete).................. 2 A Note to You................ 2 Refrigerator Safety....... 3 Parts and Features....... 4 Before Using Your Refrigerator...
~ UseAndCare. ANoteToYou 2. Understandng safety 3 Gettin To Know Your vi ask/dryer 6. Operating Your Washer 7. E2- Dw~ 12
 -. 9-01~ UseAndCare ANoteToYou 2 Understandng safety 3 Gettin To Know Your vi ask/dryer 6 Operating Your Washer 7 - E2- Dw~ 12 ieg Your 14 Caring For Your Washer/Dryer 19 Laundry Tips 23 If You Need. iezz=or
UseAndCare. lq l 301 Call our Consumer Assistance Center with questions or comments.
 HOW TO MPXE A HOME RUN. - UseAndCare PART NO. 9831699 5/95 A Note to You................. 2 Dryer Safety................ 3-4 Parts and Features........ 5 Operating Your Dryer...6 Before starting your dryer...
UseAndCare TWO SPEED AUTOMATIC
 UseAndCare A Note to You... 2 Washer Safety... 3 Parts and Features....4 Operating Your Washer..... 5 Caring for Your Washer..... 12 Laundry Tips... 13 Removing Stains... 17 Troubeshooting....20 Requesting
NO-FROST REFRIGERATOR-FREEZERS Ell8DK Ell8RK
 Ice cube Levking roers (not shown) Bake grie X NO-FROST REFRIGERATOR-FREEZERS E8DK E8RK Contents Important Safety Instructions... Before Using Your Refrigerator... Using Your Refrigerator.... Setting the
AND GAS DRYERS. A Note To You 2. Understanding Safety 3. Knowin Your Dryetis B eatures 5. Operating Your Dryer 6. Laundry lips 19
 A Note To You 2 Understanding Safety 3 Knowin Your Dryetis B eatures 5 Operating Your Dryer 6 ghrg For Your 15 Laundry ips 19!EiiCftkZ Or Service 25 Warranty 28 1-800~44-ROPER Ca us with questions or comments.
l SEE INSTALLATION w 1 INSTRUCTIONS. Our Consumer Assistance Center number, I 301, is toll-free, 24 hours a day.
 UseAhdCare A Note To You 2 Important Safety Instructions 3 Parts And Features 6 Using Your Range 7 Caring for Your If You Need Warranty 24 1-800-253-1301 Ca us with questions or comments. STANDARD-CLEANING
UseAndCam. A Note To You. Understanding Washer Safety. Knowing Your Washer s Features. 0 aehyrng Your d. Other Features.
 UseAndCam A Note To You Understanding Washer Safety Knowing Your Washer s Features 0 aehyrng Your d Other Features Laundry Tips If You Need Assistance Or Service Warranty 2 3 4 5 10 11 21 24 1-800-253-1301
UseAndCare. Whifl 01 d HOme Appliances. A Note To You 2. Important Safety Instructions 3. Parts And Features 4. Before Using Your Refrigerator 5
 -/ Whif 01 d HOme Appiances UseAndCare A Note To You 2 Important Safety Instructions 3 Parts And Features 4 Before Using Your Refrigerator 5 Using Your Refrigerator 7 Caring For Your Refrigerator 23 Food
Thermo shaker PHMP/ PHMP-4
 Thermo shaker PHMP/ PHMP-4 For version V.2GW Contents 1 Safety...3 2 Genera Information...5 3 Getting Started...6 4 Operation of PHMP/PHMP-4...7 5 Specifications...9 6 Guarantee and service...10 Version
c P UseAndCare I ROPER Call us with questions or comments. J3ome Appliances
 J3ome Appiances UseAndCare c P A Note to You..... 2 Dryer Safety....3-4 Parts and Features... 5 Operating Your Dryer... 6 Before starting your dryer...6 Starting your dryer... 6 Stopping/restarting your
Operating Manual. Model Coolant Exchanger
 Operating Manua Mode 75700 Cooant Exchanger Mode 75700 Cooant Exchanger SAFETY DEFINITIONS: Foow a WARNING, CAUTION, IMPORTANT, and NOTE messages in this manua. These messages are defined as foows: WARNING
UseAndCare. TLidl Call our Consumer Assistance Center with questions or comments.
 TLid 01 Home Appiances 2 UseAndCare Tabe of Contents (compete).................. 2 A Note to You................ 2 Refrigerator Safety....... 3 Parts and Features....... 4 Before Using Your Refrigerator...................
Underc Dishwasher. IMPORTANT: Read and save these instryctions. 8
 MPORTANT: Read and save these instryctions. 8 MPORTANT: nstaer: Leave nstaation nstructions with the homeowner. Homeowner: Keep nstaation nstructions for future reference. Save nstaation nstructions for
UseAndCare I 301 Call uo with questions or comments. TWO SPEED AUTOMATIC WASHER WITH HAND WASHABLES CYCLE PART NO.
 UseAndCare A Note to You... 2 Washer Safety... 3 Parts and Features... 4 Operating Your Washer... 5 Starting your washer... 5 Stopping/restarting your washer... 6 Seecting a cyce and time...7 Using Rinse
UseAndCare I 301 NO-FROST REFRIGERATOR-FREEZER
 UseAndCare Tabe of Contents....2 (compete) A Note to You....2 Refrigerator Safety... 3 Parts and Features... 4 Before Using Your Refrigerator....5 Using Your Refrigerator... 8 Attaching the optiona ice
A Note To You 2. Understanding Safely 3. Knowin Your Dryer s F eatures 5. Operating Your Dryer 6. Laundry Tips 16. E2tE 22.
 Home Appiances UseAndCare A Note To You 2 Understanding Safey 3 Knowin Your Dryer s F eatures 5 Operating Your Dryer 6 piirg For Your 12 Laundry Tips 16 If Yy Need E2tE 22 Warranty 24 MOO-b&ROPER Ca us
NO-FROST REFRIGERATOR-FREEZER. Use And Care Guide l!i7-96
 NO-FROST REFRIGERATOR-FREEZER 2182955 Use And Care Guide!i7-96 Tabe of Contents A Note to You......2 Refrigerator Safety... 3 Parts and Features... 4 Before Using Your Refrigerator... 6 Ceaning your refrigerator...
UseAndCare. A Note to You 2. Parts and Features 6. Using Your Range 7. Using the Setf- Cleaning Cycle 20. Warranty
 UseAndCare A Note to You 2 Parts and Features 6 Using Your Range 7 Using the Setf- Ceaning Cyce 20 Warranty 32 1-800-253-1301 Ca us with questions or comments. SELF-CLEANING ELECTRIC RANGE MODELS RF3600XY
a guide to watering your garden
 a guide to watering your garden The diagram beow shows how the amount of water in a garden is constanty changing. A pant draws a its water from the soi so you have to make sure that there is enough water
A Note To You 2. Understanding Safety 3. g!tpng Your 6. Laundry Tips 23. If Y?u Need EZZ r 29. Warranty 32
 - A Note To You 2 Understanding Safety 3 Knowin Dry&s Your! eatures 5 g!tpng Your 6 G&g For Your 18 Laundry Tips 23 If Y?u Need EZZ r 29 Warranty 32 1-800-253-1301 Ca us with questiom or comments. AUTOMATIC
UseAndCare. VL#l 01. A Note To You 2. Important Safety Instructions 3. Parts And Features 4. Before Using Your Refrigerator 5
 VL# 01 Home Appiances 4a UseAndCare A Note To You 2 Important Safety Instructions 3 Parts And Features 4 Before Using Your Refrigerator 5 Using Your Refrigerator 7 I Caring For Your Refrigerator 23 Food
9. ENERGY PERFORMANCE ASSESSMENT OF HVAC SYSTEMS
 9. ENERGY PERFORMANCE ASSESSMENT OF HVAC SYSTEMS Basics Refrigeration is the remova of heat from a materia or space, so that it's temperature is ower than that of it's surroundings. When refrigerant absorbs
Operator s Manual COUNTERTOP CONVECTION OVEN ENGLISH. Item Model Description Shelves
 ENGLISH COUNTERTOP CONVECTION OVEN Item Mode escription Sheves (Incuded) Watts Amps Votage Pug 40703 COA7002 Haf-size 3 1,500 12.5 120 5-15P 40701 COA8004 Haf-size 4 2,520 11 230 6-15P 40702 COA8005 Fu-size
Undercounter Dishwasher
 MPORTANT: Read and save these instructions. MPORTANT: nstaer: Leave nstaation nstructions with the homeowner, Homeowner: Keep nstaation nstructions for future reference. Save nstaation nstructions for
UseAndCare. A Note To You. Understanding Washer Safety. Knowing Your Wash&s Features 4. kg Your. Other Features 10.
 -. mm o * UseAndCare A Note To You Understanding Washer Safety 2 3 Knowing Your Wash&s Features 4 kg Your ii=- asher 5 Other Features 10 Laundry Tips 12 If You Need 2ztEceor 22 Warranty 24 I 1-800-253-1301
UseAndCare. Important Safety Instructions 3. Parts And Features 6. Using Your Range 7. Catin For. If You Need gf!!j!z 23
 UseAndCare A Note To You 2 Important Safety Instructions 3 Parts And Features 6 Using Your Range 7 Catin For Your I! ange 17 If You Need gf!!j!z 23 Warranty 28 1-80~44-ROPER Ca us with questions or comments.
I Call ua with que6tion6 or comm6nb. TWO SPEED AUTOMATIC
 Part No. 3353550 A Note to You................ 2 Washer Safety............... 3 Parts and Features....... 4 Operating Your Washer........................... 5 Caring for Your Washer...........................
WASHING MACHINE L510W
 WASHING MACHINE L510W CONTENTS 4 CHAPTER-1: BEFORE USING THE APPLIANCE Correct Usage 6-7 General warnings 8-9-10-11 Safety warnings 12-13-14-15-16-17 Packaging and Environment 18 Savings Information
STANDARD-CLEANING ELECTRIC RANGE
 A Note To You 2 3 PartsAndFeatues 6 Using Your Range 7 Carin For Your A nge 21 H You Need gf!f!-?g 27 Warranty 32-800-44-ROPER cdwwidqmdon8wcommants. STANDARD-CLEANING ELECTRIC RANGE MODEL FEP350Y A Note
DC Disconnect with remote control and arc fault detection PVREM-...-AF1
 DC Disconnect with remote contro and arc faut detection PVRE-...-1 Description The powerfu DC Disconnect PVRE-...-1 on a hybrid basis aows disconnection of the DC side of a photovotaic system in proximity
Installation and Operating Instructions
 THE PERFECT BALANCE OF FUNCTION AND STYLE LAUNDRY - DISHWASHING - COOKING - COOLING Installation and Operating Instructions Built In Ceramic Hob - 15min Timer CER30T15/CER60T15-30cm/60cm Please read these
30 and 36 m Sealed Burner
 IMPORTANT: Read and save these instructions. IMPORTANT: Instaer: Leave Instaation Instructions with the homeowner. Homeowner: Keep Instaation Instructions for future reference. Save Instaation Instructions
ELECTRONIC GAS AND ELECTRIC DRYERS. A Note To You 2. Understanding Safety 3. Knowing Your Drye& Features. Using Your Options/Features
 A Note To You 2 Understanding Safety 3 Knowing Your Drye& Features 5 ifeying Your 6 Using Your Options/Features Cating For Your Dryer Laundry Tips If You Need (yp!~ 13 15 20 26 Warranty 28 1-800-253-1301
BLACK-GLASS. :rowave Ovens, Trash Compactors. Room Au Conditroners. Oehumidlllers. Automatic Washers, Clothes Dryers. Freezers, Refrigerator-Freeze1
 BLACK-GLASS COOKTOP Mode RC86OOXP :rowave Ovens, Trash Compactors. Room Au Conditroners. Oehumiders. Automatic Washers, Cothes Dryers. Freezers, Refrigerator-Freeze1 Contents Before You Use Your Cooktop...
Small is beautiful and useful anywhere... Electric "Point of Use" Water Heaters "Open-Outlet" for single outlet "Unvented" for one or more outlets
 S T I E B E L E L T R O N WATER HEATING Sma is beautifu and usefu anywhere... Eectric "Point of Use" Water Heaters "Open-Outet" for singe outet "Unvented" for one or more outets Sma is beautifu - Point
Instructions for Installation and Use 50cm Free Standing Electric Cooker
 Instructions for Instaation and Use 50cm Free Standing Eectric Cooker C50ELB C50ELK C50ELW C50ELS C50ELX To the Instaer Before instaation fi in the product detais on the back cover this book. The information
Washing Machine Instruction Manual
 Washing Machine Instruction Manual INSTRUCTION MANUAL DWDMV1011 CONTENTS Page BEFORE USING THE APPLIANCE...3 OVERVIEW OF YOUR DEVICE...17 INSTALLATION OF THE MACHINE...20 INTRODUCTION OF CONTROL PANEL...29
UseAndCare I ROPER NO-FROST REFRIGERATOR-FREEZER. Table Of Contents... 2
 UseAndCare E P Tabe Of Contents.......... 2 A Note To You................ 2 Refrigerator Safety........ 3 Parts And Features........ 4 Before Using Your Refrigerator........... 6 Using Your Refrigerator....................
SELF-CLEANING DESIGNERSTYLE ELECTRIC SET-IN RANGE
 A Note To You 2 Important Safety Instructions 3 Parts And Features 6 Using Your Range 7 ci?cing Cyde 28 Carin For Your R ange 32 If You Need i!e?zceor 37 Warranty 4-o 1-800-253-1301 Ca us with questions
SKYSTAR water cassette Main components:
 Innovative and fascinating design, six different modes, high contro fexibiity, ease of maintenance: the new SKYSTR water cassette is the resut of significant technica and design research focused on providing
User manual. Washing Machine ZWP 581 ZWQ 5102 ZWQ 5103 ZWQ 5122
 EN User manual Washing Machine ZWP 58 ZWQ 502 ZWQ 503 ZWQ 522 Contents Safety information 2 Product description _ 3 How to run a wash cycle? 4 Daily use _ 5 Washing programmes 6 Care and cleaning 8 Safety
Installation and Operating Instructions
 THE PERFECT BALANCE OF FUNCTION AND STYLE LAUNDRY - DISHWASHING - COOKING - COOLING Installation and Operating Instructions Freestanding ing Machine MW6201P -6kg - 1200rpm White Please read these instructions
UseAndCare. TKYl or 9 lkwtomakeahoml~ I 301 Call us with questlons or comments. MICROWAVE OVEN MODELS MT7076XD Ml7078XD
 TKY or 9 KwToMAKEAHoML~ UseAndCare Tabe of Contents (compete)....2 A Note to You... 3 Microwave Oven Safety... 4 Instaation Instructions... 9 Getting to Know Your Microwave Oven... 11 Using Your Microwave
Our home standard. Your home is where our heart is...
 Our home standard. Your home is where our heart is... What is the Onward Home Standard? Our tenants have heped us to write our Home Standard so that you know what to expect when we ook after and improve
Useful tips to keep you safe and save you money
 Usefu tips to keep you safe and save you money ELECTRICITY Experts from eectricity, gas and water companies team up to share tips, knowedge, info and advice... Utiity Networks February 2018 If you woud
Fire Alarm Panel - User Manual
 CONTENTS Page No. INTRODUCTION SYSTEM DESIGN AND PLAN GENERAL FEATURES MECHANICAL CONSTRUCTION INSTALLATION AND COMMISSIONING INSTALLATION COMMISSIONING OPERATION POWER CONDITION ZONE LOOP CONDITION KEY
WASHING MACHINE. User Manual W1249CF2S - W1249CF2B - W1249CF2W. Service Helpline:
 EN User Manual WASHING MACHINE User Manual W1249CF2S - W1249CF2B - W1249CF2W Service Helpline: 0333 577 7238 CONTENTS 2 CHAPTER-1: BEFORE USING THE APPLIANCE Correct Usage 4-5 General warnings 6-7-8-9
MANUAL DE INSTALACIÓN
 MANUAL DE INSTALACIÓN Spit Duct Air Conditioner Digita Scro and DC Inverter Commercia Air-conditioner The Digita Scro and DC Inverter share the same indoor units. Thank you very much for purchasing our
UseAndCare. A Note To You 2. yg~~ ~af61 3. Parts And Features 4. Before Using Your Refrigerator 6. Using Your Refrigerator 8.
 UseAndCare A Note To You 2 yg~~ ~af61 3 Parts And Features 4 Before Using Your Refrigerator 6 Using Your Refrigerator 8 ~agg~oiw 16 Food Storage Guide 20 H You Need. ~~~~ 22 Warranty 24 1-800-253-I 301
WASHING MACHINE INSTRUCTION MANUAL
 WM105V WM105VB WM105VS WASHING MACHINE INSTRUCTION MANUAL Please read this instruction manual carefully before you use this product CONTENTS SECTION 1: BEFORE USE Safety warnings Recommendations SECTION
Double Door - Dual Zone Wine Cooler
 THE PERFECT BALANCE OF FUNCTION, STYLE AND RELIABILITY LAUNDRY - DISHWASHING - COOKING - COOLING Installation and Operating Manual Double Door - Dual Zone Wine Cooler WS38SDDX Stainless Steel Please read
Spray Etching Device
 Spray Etching Device Spay Etching Device1 (for singe-side etching) Spray Etching Device 2 Item no.: 141070 0000 (for doube-side etching) Item no.: 141071 0000 The spray etching devices extend the range
User manual. Washing machine ZWQ 6120 ZWQ 6100
 EN User manual Washing machine ZWQ 6120 ZWQ 6100 Product description 1 1. The control panel 2. Lid handle 3. Adjustable levelling feet 2 3 The control panel 1 2 3 4 5 6 1. Programme selector 2. Pushbuttons
montpellier Installation and Operating Instructions MODELS: MR90GOK, MR90GOX, RMC90GOK & RMC90GOC 90cm Range Cooker Gas
 montpellier Installation and Operating Instructions MODELS: MR90GOK, MR90GOX, RMC90GOK & RMC90GOC 90cm Range Cooker Gas (Picture indicative of model supplied) Please read these instructions carefully before
Service Helpline:
 Service Helpline: 0333 577 7238 CONTENTS IMPORTANT SAFETY WARNINGS 4 BEFORE USING YOUR MACHINE 7 PACKAGING and the ENVIRONMENT 17 SAVINGS INFORMATION 18 OVERVIEW OF THE APPLIANCE 19 SETTING UP THE MACHINE
50cm Free Standing Electric Cooker. Instructions for installation and use KD3C1/G KD3C11/G
 50cm Free Standing Eectric Cooker Instructions for instaation and use KD3C1/G KD3C11/G Contents Introduction 3 Instaation 4 Safety Information 6 Features 8 Contro Pane 9 Ceramic Hob 10 Use of hotpates
User Manual WASHING MACHINE EWF 1075 VT
 EN User Manual WASHING MACHINE User Manual EWF 1075 VT 2 3 CONTENTS 4 CHAPTER-1: BEFORE USING THE APPLIANCE Correct Usage 6-7 General warnings 8-9-10-11 Safety warnings 12-13-14-15-16-17 Packaging and
UseAndCare. A Note To You 2. pw~i~~few. F artsandfeatures 4. Warranty ROPER Call us with questions 01 comments.
 UseAndCare A Note To You 2 pw~i~~few 3 F artsandfeatures 4 6 15 18 19 22 Warranty 24 1-800-44-ROPER Ca us with questions 01 comments. UNDERCOUNTER DISHWASHERS WUIOOO, MODEL SERIES WU3000 AND WU4000, WU5750
User manual. Washing machine ZWQ 590 SO ZWQ 585 SO ZWQ 580 SO ZWQ 575 SO ZWQ 570 SO
 EN User manual Washing machine ZWQ 590 SO ZWQ 585 SO ZWQ 580 SO ZWQ 575 SO ZWQ 570 SO Product description 1 The control panel 2 Lid handle 3 Filter access cover 4 Adjustable levelling feet Control panel
WASHING MACHINE INSTRUCTION MANUAL
 WM126V WM126VS WM 126VB WASHING MACHINE INSTRUCTION MANUAL Please read this instruction manual carefully before you use this product CONTENTS SECTION 1: BEFORE USE Safety warnings Recommendations SECTION
List of Contents Air Top 2000 NOTE
 List of Contents Air Top 2000 Technica changes in this issue of the manua compared with its previous issue are identified with a vertica change bar on the efthand side of coumns. Air Top 2000 List of Contents
User Manual WASHING MACHINE HWS60-12F2S
 EN User Manual WASHING MACHINE User Manual HWS60-12F2S 2 3 CONTENTS 4 CHAPTER-1: BEFORE USING THE APPLIANCE Correct Usage 6-7 General warnings 8-9-10-11 Safety warnings 12-13-14-15-16-17 Packaging and
GB User manual. Washing machine ZWQ 5130
 GB User manual 2 Washing machine ZWQ 5100 ZWQ 5101 ZWQ 5130 Product description 1 1. The control panel 2. Lid handle 3. Adjustable levelling feet 2 3 The control panel 1 2 3 4 5 6 1. Programme selector
Appliances. Home. ipx. Use & Care Guide. Ice cube. Crispers Leveling rollers (not shown) Bake grille. NO-FROST REFRIGERATOR-FREEZERS *ETl8DK *ET18RK
 Bake grille. NO-FROST REFRIGERATOR-FREEZERS *ETl8DK *ET18RK") Xf Home ipx Appiances Of Use & Care Guide Ice cube Crispers Leveing roers (not shown) Bake grie X NO-FROST REFRIGERATOR-FREEZERS *ET8DK *ET18RK Contents Important Safety Instructions... Before Using Your
Xf Home ipx Appiances Of Use & Care Guide Ice cube Crispers Leveing roers (not shown) Bake grie X NO-FROST REFRIGERATOR-FREEZERS *ET8DK *ET18RK Contents Important Safety Instructions... Before Using Your
36 Electric Modular Downdraft Cooktop
 MPORTANT: Read and save these instructions. MPORTANT: nstaer: Leave nstaation nstructions with the Homeowner. Homeowner: Keep nstaation nstructions for future reference. Save nstaation nstructtons for
User Manual WASHING MACHINE HW50-10F1
 EN User Manual WASHING MACHINE User Manual HW50-10F1 CONTENTS 4 CHAPTER-1: BEFORE USING THE APPLIANCE Correct Usage 6-7 General warnings 8-9-10-11 Safety warnings 12-13-14-15-16-17 Packaging and Environment
ANCILLARY DEVICES. Contents. Fire System Document Box. EN54-4 Approved Power Supply Units. Transformer Rectifier 24v Door Retainer Power Supply Units
 ANCILLARY DEVICES Contents Fire System Document Box EN54-4 Approved Power Suppy Units Transformer Rectifier 24v Door Retainer Power Suppy Units Door Hoders Fire System Document Box The new fire system
AUTOMATIC MARINE AND RV TOILETS
 AUTOMATIC MARINE AND RV TOILETS 1 THE INVENTOR, DESIGNER AND MANUFACTURER SINCE 1958, SFA SANIFLO IS THE WORLD S LEADER OF MACERATING TOILETS FOR THE MARINE AND RECREATIONAL VEHICLE INDUSTRIES Speciay
Simply perfect. Perfectly simple.
 Simpy perfect. Perfecty simpe. Introducing i-dos: the automatic, inteigent dosing system, and the range of Bosch aundry appiances. 3rd Edition 2014 www.bosch-home.com.au 2 Bosch Laundry Appiances more
NO-FROST REFRIGERATOR-FREEZER ED22ZR
 Freezer Refrigerator Exterior moisture Mode and seria number Removabe Door sheves Leveing roers (not shown) Base grie NO-FROST REFRIGERATOR-FREEZER ED22ZR Contents Page Important Safety Instructions.....
Operating Instructions OPTISWITCH 3100 C with transistor output
 Operating Instructions OPTISWITCH 3100 C with transistor output Contents Contents 1 About this document 1.1 Function... 4 1.2 Target group... 4 1.3 Symboism used... 4 2 For your safety 2.1 Authorised personne...
INSTALLATION INSTRUCTION
 INSTALLATION INSTRUCTION TWO-STAGE ULTRA MID-EFFICIENCY GAS-FIRED VARIABLE SPEED FURNACES Upfow / Horizonta Modes: P*DU - V / G8V Up To 130 MBH Output CONTENTS GENERAL INFORMATION... 3 UNIT INSTALLATION...
Operating Instructions OPTISWITCH 3100 C with contactless electronic switch
 Operating Instructions OPTISWITCH 3100 C with contactess eectronic switch Contents Contents 1 About this document 1.1 Function... 4 1.2 Target group... 4 1.3 Symboism used... 4 2 For your safety 2.1 Authorised
WASHING MACHINE. User Manual W1044CF1W. Service Helpline:
 EN User Manual WASHING MACHINE User Manual W1044CF1W Service Helpline: 0333 577 7238 CONTENTS 4 CHAPTER-1: BEFORE USING THE APPLIANCE Correct Usage 6-7 General warnings 8-9-10-11 Safety warnings 12-13-14-15-16-17
contents: laundry Washing Machines Technical information Page 03 Product Features Page 16 Washing Machine Range Page 32 specifications Page 52
 contents: aundry Washing Machines Technica information Page 03 Product Features Page 16 Washing Machine Range Page 32 specifications Page 52 WasheR DRyeR Technica information Page 35 Product Features Page
WASHING MACHINE. User Manual CLA1016W
 WASHING MACHINE User Manual CLA1016W CONTENTS 4 CHAPTER-1: BEFORE USING THE APPLIANCE Correct Usage 6-7 General warnings 8-9-10-11 Safety warnings 12-13-14-15-16-17 Packaging and Environment 18 Savings
Installation and Operating Instructions MODEL: MSE46W
 Installation and Operating Instructions MODEL: MSE46W MSE50W MODEL: Free Standing Electric ElectricOven Oven Free Standing Please read these instructions carefully before attempting to install or use this